hp-concentra-wrapper-portlet
![]()
Actions
Issue
A ‘Carriage Jam. The print carriage cannot move. Open the ink cartridge access door, clear any paper jam or obstruction, and select OK‘ message displays on the printer control panel.
One of the following error codes might display with the message:
-
0x61000008
-
0x6100000B
-
0x6100001D
The carriage, which holds the cartridges, stalls in the printer. A paper jam might have occurred previously.
You might also experience the following symptoms:
-
The printer does not print.
-
The print job stops unexpectedly.
Solution one: Restart the printer
Follow these steps to restart the printer, and then try to print a test page.
Step one: Restart the printer
-
Press the Power button to turn off the printer.
-
Wait 60 seconds.
-
Press the Power button to turn on the printer.
note:
The printer might go through a warm-up period which can last several minutes. Wait until the printer is idle and silent before continuing.
Step two: Print a Printer Status Report
Video on printing a test page
The following video demonstrates how to print a printer status report.
note:
This video shows the HP Officejet 4620 e-All-in-One Printer series, but the steps are the same for your printer.

Print a test page to make sure that the hardware functions correctly.
-
Load plain white U.S. letter or A4 size paper in the tray.
-
On the product control panel, press the Setup button (
 ).
). -
Press the button (
 ) next to the Down Arrow (
 ) until Reports displays next to OK, and then press the button next to OK.
 -
Press the button next to the Down Arrow (
 ) until Printer Status Report displays next to OK, and then press the button next to OK again. The test page prints.
-
If these steps resolved the issue, and the test page prints, there is no need to continue troubleshooting.
-
If the issue persists, continue with the next solution.
-
If the test page does not print, continue with the next solution.
Solution two: Clear the jam from inside the printer
Follow these steps to clear the jam from the cartridge access area, the cleanout area, and from underneath the printer.
note:
Use a flashlight to complete these steps.
Video on clearing a carriage jam
The following video demonstrates how to clear a carriage jam.
note:
This video shows the HP Officejet 4620 e-All-in-One Printer series, but the steps are the same for your printer.

Step one: Clear the jam from the cartridge access area
Follow these steps to remove jammed paper from inside the cartridge access area.
-
Press the Power button to turn on the printer, if it is not already turned on.
-
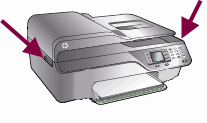
Locate the slots on the sides of the printer.
Figure : Locate the slots on the sides of the printer
-
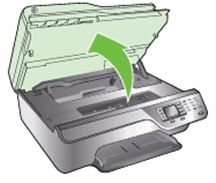
Place your fingers in the two slots on the sides of the printer, and then lift the cartridge access door. The carriage moves into the cartridge access area.
Figure : Open the cartridge access door
-
Disconnect the power cord from the rear of the printer.
warning:Do not reach into the cartridge access
area when the printer is plugged into an electrical outlet.
-
Disconnect the USB cable from the rear of the printer if you have a USB connection to the computer.
-
Gently remove any jammed paper from the cartridge access area. To avoid tearing any whole sheets of paper, pull the paper with both hands.
-
Use a flashlight to thoroughly check for torn pieces of paper that might remain in the cartridge access area. If any torn pieces of paper remain inside the printer, more jams are likely to occur.
Use a flashlight
Paper jammed in carriage path


-
Slide the carriage to the right side of the cartridge access area, and then inspect the left side of the cartridge access area for torn pieces of paper that might remain inside the printer.
-
Remove any torn pieces of paper you find.
-
Slide the carriage to the left side of the cartridge access area, and then inspect the right side of the cartridge access area for torn pieces of paper that might remain inside the printer.
-
Remove any torn pieces of paper you find.
Step two: Clear the jam from inside the cleanout door
Follow these steps to remove any jammed paper from the cleanout door.
-
Make sure that the power is off and that the power cord is disconnected from the rear of the printer.
warning:Do not reach into the cartridge access
area when the printer is plugged into an electrical outlet.
-
Make sure the USB cable is disconnected from the rear of the printer, if you have a USB connection to the computer.
-
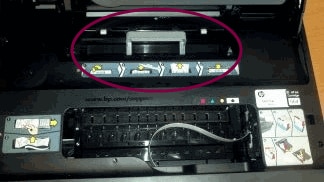
With the cartridge access door open, locate the cleanout door. The door is behind the cartridge access area towards the rear of the printer.
Figure : The cleanout door
-
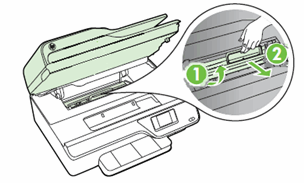
Pull the cleanout door up and then out to remove it from the printer.
Figure : Remove the cleanout door
-
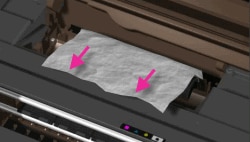
Gently remove any jammed paper. To avoid tearing any whole sheets of paper, pull the paper with both hands.
Figure : Remove any jammed paper
-
Use a flashlight to thoroughly check for torn pieces of paper that might remain in the cleanout area. If any torn pieces of paper remain inside the printer, more jams are likely to occur.
Figure : Use a flashlight

-
Remove any torn pieces of paper you find.
-
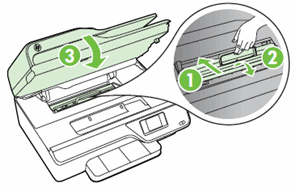
Gently reinsert the cleanout door into the cleanout area, and then press down on the handle until the door snaps into place.
-
Close the cartridge access door.
-
Insert the cleanout door into the cleanout area
-
Push down on the door handle until the door snaps into place
-
Close the cartridge access door
Figure : Reinsert the cleanout door and close the cartridge access door
-
Step three: Clear the jam from underneath the Printer
If you are unable to remove jammed paper from the cartridge access area or from inside the cleanout door, follow these steps to clear the jam from underneath the printer.
-
Press the Power button to turn off the printer, if it is not off already.
-
Disconnect the power cord from the rear of the printer, if it is not disconnected already.
-
Turn the printer onto its right side so that you can access its underside.
caution:Before turning the printer, use your hand to secure the scanner lid.
-
Slide the paper tray out until it stops.
-
Gently remove any jammed paper and bits of torn paper from the input tray area and from underneath the printer. To avoid tearing any whole sheets of paper, pull the paper with both hands.
Figure : Remove paper from underneath the printer

-
Use a flashlight to thoroughly check for torn pieces of paper that might remain inside the printer. If any torn pieces of paper remain inside the printer, more jams are likely to occur.
Figure : Use a flashlight

-
Remove any torn pieces of paper you find.
-
Slide the paper tray back in until it stops.
-
Return the printer to its normal position.
-
Open the cartridge access door, and then look inside the printer for any loose objects that might have shifted when you turned the printer over. Remove any loose objects you find.
-
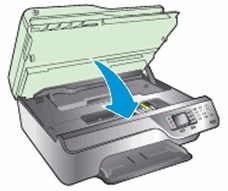
Close the cartridge access door.
Figure : Close the cartridge access door
-
Reconnect the power cord to the rear of the printer.
-
Press the Power button to turn on the printer.
Step four: Print a Printer Status Report
Print a test page to make sure that the hardware functions correctly.
How to print a test page
Follow these steps to print a test page.
-
Load plain white U.S. letter or A4 size paper in the tray.
-
On the product control panel, press the Setup button (
 ).
). -
Press the button (
 ) next to the Down Arrow (
 ) until Reports displays next to OK, and then press the button next to OK.
 -
Press the button next to the Down Arrow (
 ) until Printer Status Report displays next to OK, and then press the button next to OK again. The test page prints.
-
If these steps resolved the issue, and the test page prints, there is no need to continue troubleshooting.
-
If the issue persists, continue with the next solution.
-
If the test page does not print, continue with the next solution.
Solution three: Remove and reinsert the cartridges
Improper placement or installation of the cartridges can cause the printer to indicate a carriage jam error. Follow these steps to remove and then reinsert the cartridges.
Step one: Remove and reinsert the cartridges
Follow these steps to remove and then reinsert the cartridges.
-
Press the Power button to turn on the printer, if it is not already on.
-
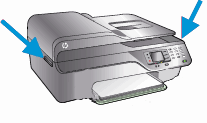
Locate the two slots on the sides of the printer.
Figure : Slots on the sides of the printer
-
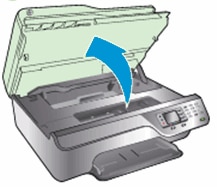
Place your fingers in the slots on the right and left sides of the printer, and then lift to open the cartridge access door. The carriage moves into the carriage access area.
Figure : Open the cartridge access door
-
Wait until the carriage is idle and silent before proceeding.
-
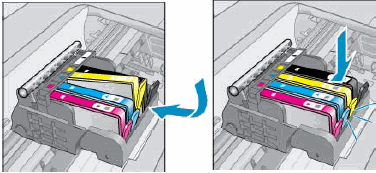
Press in the tab on the front of a cartridge to release it, and then pull up on the cartridge to remove it from the slot.
Figure : Remove the cartridge from its slot

-
Repeat these steps to remove the other cartridges.
-
To reinsert a cartridge, hold the cartridge so that the cartridge contacts are facing toward the printer.
-
Match the colored dot on the cartridge with the dot of the same color on the carriage.
-
Slide the cartridge into its slot, and then gently press the cartridge down until it clicks into place.
note:
Make sure that the colored dot on the cartridge label matches the colored dot on the slot.
Figure : Install the cartridge
-
Repeat these steps to reinsert the other cartridges.
-
Close the cartridge access door.
Figure : Close the cartridge access door

Step two: Print a Printer Status Report
Print a test page to make sure that the hardware functions correctly.
How to print a test page
Follow these steps to print a test page.
-
Load plain white U.S. letter or A4 size paper in the tray.
-
On the product control panel, press the Setup button (
 ).
). -
Press the button (
 ) next to the Down Arrow (
 ) until Reports displays next to OK, and then press the button next to OK.
 -
Press the button next to the Down Arrow (
 ) until Printer Status Report displays next to OK, and then press the button next to OK again. The test page prints.
-
If these steps resolved the issue, and the test page prints, there is no need to continue troubleshooting.
-
If the issue persists, continue with the next solution.
-
If the test page does not print, continue with the next solution.
Solution four: Make sure that the posts in the cartridge parking area are not blocking the carriage
The carriage might move freely to the left and right even though the error displays on the control panel. Follow these steps to check if the posts are blocking the carriage.
Step one: Make sure that the posts in the cartridge parking area are not blocking the carriage
note:
Consider using gloves to perform these steps.
-
Unplug the power cord from the power source or electrical outlet.
-
Open the cartridge access door.
Figure : Open the cartridge access door

-
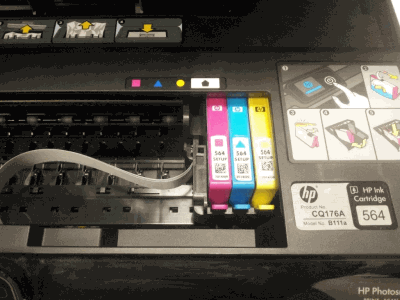
Reach into the cartridge access area, and then manually move the carriage to the left of the printer and then the right. The carriage should move completely underneath the cover on the right side of the printer.
-
If you cannot move the carriage completely underneath the cover on the right side of the printer, continue with these steps.
Figure : Example of the carriage partially under the cover on the right side of the printer
-
Figure : Example of the carriage resting underneath the cover on the right side of the printer

-
-
Move the carriage to the left side of the printer, and then use a flashlight to look inside the printer under the right cover.
Figure : Example showing where to look under the printer cover

-
Make sure that the posts are not blocking the carriage from moving all the way to the right.
Figure : Example of posts that might be blocking the carriage

-
If you see posts that could be blocking the carriage, continue with these steps.
-
-
Use a long, slim object (such as the eraser-end of a pencil) to gently push in the post.
Figure : Example of pushing in the post with a pencil

-
Reach into the cartridge access area, and then manually move the carriage to the right of the printer. The carriage should move under the printer cover.
warning:Do not lift up on the carriage.
Figure : Push the carriage to the right
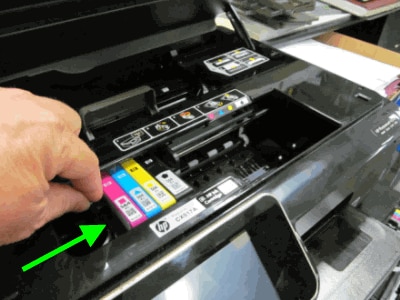
Figure : Example of the carriage resting under the cover

-
Close the cartridge access door.
Figure : Close the cartridge access door

-
Reconnect the power cord to the rear of the printer.
-
Plug the power cord back into the power source or electrical outlet.
-
If the printer does not turn on automatically, press the Power button to turn it on.
Step two: Print a Printer Status Report
Print a test page to make sure that the hardware functions correctly.
How to print a test page
Follow these steps to print a test page.
-
Load plain white U.S. letter or A4 size paper in the tray.
-
On the product control panel, press the Setup button (
 ).
). -
Press the button (
 ) next to the Down Arrow (
 ) until Reports displays next to OK, and then press the button next to OK.
 -
Press the button next to the Down Arrow (
 ) until Printer Status Report displays next to OK, and then press the button next to OK again. The test page prints.
-
If these steps resolved the issue, and the test page prints, there is no need to continue troubleshooting.
-
If the issue persists, continue with the next solution.
-
If the test page does not print, continue with the next solution.
Solution five: Plug the printer directly into a wall outlet
Follow these steps to plug the printer directly into a wall outlet, and then print a test page.
Step one: Plug the printer directly into a wall outlet
Plug the printer directly into an electrical outlet to make sure that the power source functions correctly.
-
Disconnect the power cord from the rear of the printer.
-
Unplug the power cord from any power strip or surge suppressor.
-
Plug the power cord directly into an electrical outlet.
-
Reconnect the power cord to the rear of the printer.
-
Press the Power button to turn on the printer.
Step two: Print a Printer Status Report
Print a test page to make sure that the hardware functions correctly.
How to print a test page
Follow these steps to print a test page.
-
Load plain white U.S. letter or A4 size paper in the tray.
-
On the product control panel, press the Setup button (
 ).
). -
Press the button (
 ) next to the Down Arrow (
 ) until Reports displays next to OK, and then press the button next to OK.
 -
Press the button next to the Down Arrow (
 ) until Printer Status Report displays next to OK, and then press the button next to OK again. The test page prints.
-
If these steps resolved the issue, and the test page prints, there is no need to continue troubleshooting.
-
If the issue persists, continue with the next solution.
-
If the test page does not print, continue with the next solution.
Solution six: Reset the printer
Follow these steps to reset the printer.
Step one: Perform a power reset
-
With the printer turned on, disconnect the power cord from the rear of the printer.
-
Unplug the power cord from the wall outlet.
-
Wait at least 15 seconds.
-
Plug the power cord back into the wall outlet.
-
Reconnect the power cord to the printer.
-
Turn the printer on.
Step two: Print a test page
Print a test page to make sure that the hardware functions correctly.
How to print a test page
Follow these steps to print a test page.
-
Load plain white U.S. letter or A4 size paper in the tray.
-
On the product control panel, press the Setup button (
 ).
). -
Press the button (
 ) next to the Down Arrow (
 ) until Reports displays next to OK, and then press the button next to OK.
 -
Press the button next to the Down Arrow (
 ) until Printer Status Report displays next to OK, and then press the button next to OK again. The test page prints.
-
If these steps resolved the issue, and the test page prints, there is no need to continue troubleshooting. Reconnect the USB cable, and then try to print again.
-
If the test page prints successfully, but you continue to experience an issue with your printer, then the issue is not related to the hardware.
-
Experiencing another issue?
If your printer prints a test page and there is still an issue with your printer, go to HP Customer Support, type your printer model, and then browse for the appropriate support document to troubleshoot the issue.
-
-
If the printer does not print a test page, there is an issue with the printer hardware. Continue to the next step or solution.
Solution seven: Service the printer
Service or replace your HP product if the issue persists after completing all the preceding steps.
Go to Contact HP Customer Support to schedule a product repair or replacement. If you are in Asia Pacific, you will be directed to a local service center in your area.
To confirm your warranty status, go to HP Product Warranty Check. Repair fees might apply for out-of-warranty products.
ViRTuE
Мыслитель
(6623)
7 лет назад
Вытащи ленту, помой ее с жидким мылом в теплой воде, протри тряпочкой и вставь обратно. Загрязнилась она у тебя
_____________________________
Если что, то пиши в моей группе https://vk.com/skpekb (Скорая компьютерня помощь). Смогу помочь и дать более развернутый ответ
максим ларионовУченик (214)
7 лет назад
а что за лента?
ViRTuE
Мыслитель
(6623)
энкодерная лента. ну или хотя бы сделайте как на этом видео https://www.youtube.com/watch?v=IKzsM4L9ntw
ну и вы не написали модель вашего устройства
 У многих принтеров HP Photosmart, DeskJet и OfficeJet случаются серьезные ошибки сбой системы чернил, ошибка системы чернил, а также неисправность системы чернил в зависимости от перевода. Разбираем причины и решение проблемы.
Ошибки системы чернил типа 0xc19a — это аппаратные ошибки принтера. Поэтому устраняются они ремонтом принтера. Самые тяжелые ошибки связаны с неисправностью печатающей головки, которые рассмотрим ниже.
Ошибки системы чернил типа 0xc18a — это проблемы, связанные с чернилами. Самое важное — эти проблемы решаемые.
Ошибка HP 0xc19a0013
Ошибка 0xc19a0013 наиболее часто встречается в струйных принтерах HP с сообщением «Сбой системы чернил 0xc19a0013» или «Ошибка системы чернил». Наиболее вероятно, что ошибка 0xc19a0013 — это перегрев головки. Она не страшная, обычно ее можно устранить. В случае ошибки 0xc19a0013 головку нужно хорошо почистить от чернил, промыть, а если не помогло, головку нужно менять.
Конкретный случай. Принесли в ремонт принтер HP Photosmart C6283 с полным отсутствием черного цвета. Чистка головки силами принтера ничего не давала. Чернила были оригинальными и не просроченными, проблема качества чернил не стояла.
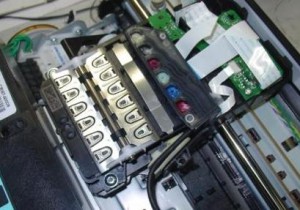 Сняв печатающую головку, я увидел, что ее плата залита чернилами. Вытер, но черный цвет не появился. После промывки головки при печати что-то появилось, но сразу после копии выскочила ошибка 0xc19a0013 Сбой системы чернил. Ошибка появлялась при печати с любым качеством (ч/б или цветной).
Удалось убрать эту ошибку, войдя в сервисное меню, выполнив сброс и сделав прочистку несколько раз. После этого ошибка исчезла, но качество печати было отвратительным, чернила проходили очень слабо, только в отдельных местах. Еще три прочистки. Получилось хорошее качество в половине дюз. Только снятие головки, отмачивание в растворе и длительная чистка помогли. Сначала качество было неважным, но через 4-5 прочисток все дюзы заработали. Т.о. ошибка была вызвана тем, что черные чернила не поступали в головку.
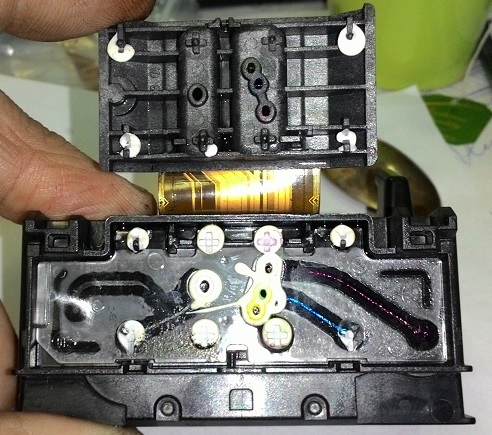
Вот фото разобранной головки HP B210B. На фото видно, что каналы чернил к дюзам имеют разную длину и форму. Цвета с длинным каналом чистить труднее и дольше. Белые кружки — это герметик вокруг выходов каналов. При его нарушении чернила разных цветов смешиваются. Вывод — нельзя прикладывать большое давление при чистке головки.
Очень неприятная ошибка 0xc18a0001 (несоответствие чернил в картридже оригинальным от HP), которая после сброса появляется вновь. Как убрать ее описано тут.
Коды ошибок системы чернил HP
Ошибки чернил и головки HP 0xc18a
В помощь страдающим от сбоя системы чернил на принтерах HP Photosmart, Deskjet и Officejet привожу коды ошибок.
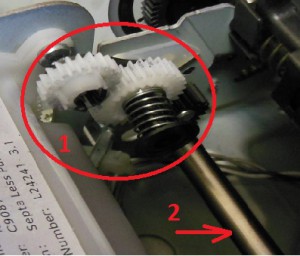
0xc05d0281 — ошибка когда не работает механизм управления клапанами при прокачке дюз головки. Связано с поломкой :
- шестеренок перекидного редуктора 1 (открывает, закрывает клапана );
- шестерней, расположенных далее на оси 2 глубоко внутри принтера;
- головки, сломан рычаг клапанов (клапаны не поднимаются);
- неправильной установкой головки
0xc05d1281 — ошибка, связанная с теми же клапанами головки HP Photosmart C7283, C5183 и подобных МФУ, когда сломана шестерня вала, приводящая перекидной редуктор.
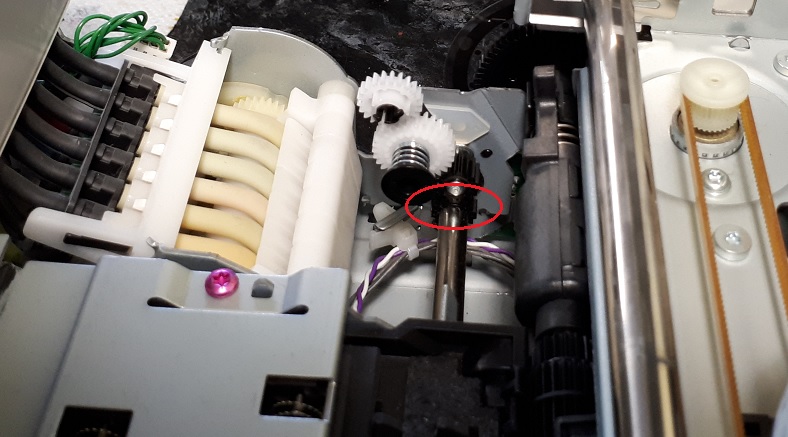
0xc18a — Ошибки системы подачи чернил. Кстати, ошибки 0xc18a можно сбросить.
0xc18a0106 — отключен датчик проводимости чернил, отключена помпа; на принтере HP Photosmart С8256, например, сбрасывается снятием шлейфа головки, ближайшего к кардридеру.
Ошибки 0xc18a0007, 0xc18a0107, 0xc18a0207, 0xc18a0307, 0xc18a0407, 0xc18a0507 — проводимость чернил одного из 6 цветов вне диапазона. Датчики проводимости чернил находятся прямо в чернильном насосе.

Можно, в принципе, изменить показания датчиков путем подпайки дополнительных сопротивлений резисторам на плате. Таким образом можно добиться снятия ошибки. Но проще подобрать чернила.
0xc18a0206 — отключен насос, засохла головка. Обычно возникает при засохших дюзах печатающей головки. Для устранения нужно снять печатающую головку, тщательно прочистить ее до открытия всех дюз, проверить работу насоса, выполнить сброс принтера.
0xc18a0501 — возникла после использования совместимых чернил
Ошибки головки 0xc19a
0xc19a0002 — нет головки, например, отключен шлейф, сломана головка, плохие контакты в шлейфе
0xc19a0003 — критическая ошибка головки: неисправна или грязные контакты, часто после снятия ошибки сменяется ошибкой «нет печатающей головки»
0xc19a0005 — критическая ошибка головки или главной платы управления
0xc19a0013 — возможны ошибка картриджей, чернил, головки (например, из-за забитых дюз и перегрева головки). 0xc19a0013 не страшная ошибка, во многих случаях проблему можно решить
0xc19a0020, 0xc19a0023,0xc19a0024, 0xc19a0027 — ошибка, связанная с головкой, главной платой; ошибки 0xc19a0023 и 0xc19a0027 могут чередоваться, чаще всего после таких ошибок приходится менять головку, ошибка фатальная
0xc19a0034, 0xc19a0036 — критическая ошибка головки, скорее всего, поврежден шлейф или контакты, не вставлен шлейф головки
0xc19a0028, 0xc19a0035 — в головке неправильные чернила (отличаются по проводимости), залит датчик ширины бумаги справа снизу каретки — нужно промыть и высушить;
0xc19a0028 кто-то написал, что в головке вода вместо чернил — полная чушь. Датчики чернил находятся в насосе, а не в головке, к тому же, они измеряют только проводимость, причем в насосе. Более того, состав чернил датчики не определяют. Чернила в головке и в насосе могут отличаться, поскольку в головке 6 демпферных камер весьма существенного объема.
0xc19a0041 — грязная или неисправная головка
Обычно ошибки 0xc19a0002, 0xc19a0003, 0xc19a0020, 0xc19a0023,0xc19a0024, 0xc19a0027, 0xc19a0042 связаны с неисправностью печатающей головки. А также шлейфа.
Другие ошибки системы чернил струйных принтеров HP
0xc05d0281- неисправность рычага шестерни печатающей головки, отказ клапана, плохой маятник, неправильная регулировка высоты вала головки. Например, ошибка 0xc05d0281 возникает в HP С5183, С6183, С6283 и других 6-цветных принтерах с картриджами 177, когда не поднимается коромысло клапанов головки.
0x61011beb, 0x61011bed — общая ошибка принтера, связанная с узлом парковки, замятием каретки, бумаги, а также поломкой маятникового редуктора. Аналогичная ошибка 0x61011be5 связана с узлом обслуживания purge unit.
0x6100000b — ошибка принтера, связанная с невозможностью определить начальное положение каретки. Связана ошибка может с лентой энкодера, датчиком энкодера, двигателем. Для начала нужно почистить ленту.
Сброс ошибок 0xc19 и 0xc18
Варианты сброса ошибок.
Выдернуть шлейф головки, включить принтер и выключить после обнаружения новой ошибки 0xc19a0002 — нет головки. Эта ошибка сотрет предыдущую критическую ошибку. Затем вставить шлейф головки и включить принтер.
1. Общий сброс в HP Photosmart C5183.
Вынуть штекер питания. Нажать одновременно влево и справку, или ОК и справку, вставить питание, держать кнопки вплоть до выключения принтера.
Держать крест и стрелку вниз, включить принтер.
2. Рекалибровка — держать сразу 4 кнопки Cancel, OK, Black, Color и выключить принтер, вынуть питание, подождать минуту, включить принтер.
3. Вынуть батарейку, которая обычно располагается на или рядом с форматером. Подождать 15 минут. Включить принтер.
Некоторые ошибки можно сбросить через сервисное меню.
Вход в сервисное меню HP
1. нажать кнопку вкл. и держать 10 секунд
затем
лев. вверх
лев. вниз
2 раза лев. вверх
2. Нажать и отпустить кнопки кнопки «Печать фото» (“Print Photos”) и «Устранение красных глаз» (“Red Eye Removal”).
Появится экран с надписью Enter Special Key Combo. Нажать и отпустить «Устранение красных глаз», «Печать фото», «Устранение красных глаз»
В сервисном меню выбрать Resets, затем Semi/Full Reset.
Либо нажать и отпустить кнопки кнопки Настройка (ключ) и Стрелка влево, появится Enter Special Key Combo, затем ОК. System Configuration Menu.
3. Для Officejet 6500A для входа в сервисное меню использовать: выключить МФУ кнопкой, нажать вкл. и удерживать несколько секунд пока не загорится светодиод карты, затем нажать Q, отмена, 2 раза Q (home- back-home-home). Далее пользоваться навигацией по краям экрана.
4. Для Officejet Pro 8600 Plus нажать вкл. и удерживать несколько секунд, пока не потухнет экран, затем нажать слева вверху (home), отмена (X), 2 раза home. Далее использовать навигацию по краям экрана.
5. При включении держать # и 3, либо # и 6.
6. Для HP Photosmart 5520. Слева внизу (back, возврат), слева-вверху (home), Слева-внизу (back, возврат), справа-снизу (отмена, cross), Слева внизу (back, возврат).
7. Для Officejet Pro 8500A — в основном меню перейти вправо, появится подсветка стрелки «Возврат», 4 раза нажать на кнопку возврат, появится инженерное меню, в нем можно выбрать reset, partial reset и др.
8. Для HP Photosmart D7363 одновременно Вкл и Х, затем -, кнопка улучшения изображения с человечком и снова — .
Возврат к заводским установкам
В некоторых принтерах HP, например, в Photosmart C7283 ошибки чернил типа 0xc18a можно сбросить через возврат к начальному состоянию. Для сброса нужно зажать Справку и Ок, вставить шнур питания и держать до сброса.
Читать про ремонт струйных принтеров.
Задать вопрос, сделать заказ можно в чате. Мы ответим в любом случае.
Посетители также читают по этой теме:
Ремонт струйных принтеров
- Принтер не печатает
- Ремонт принтеров, МФУ
- Устройство печатающих головок HP
- Чистка печатающей головки
- Чистка головки Brother
- Ремонт принтеров Epson
Модераторы: KOT, Женька 116


 Всем доброго времени суток! Немного предыстории для полноты информации:
Принтер не печатает черным после летних 3 месяцев простоя.
Было решено чистить голову, благо в интернете есть даже целых несколько видеороликов по этой модели сборка/разборка, чистка головки .
Промочил все сопла шприцом смесью воды со стеклоочистителем 9к1. Зашибись, сопла впитывают/льют как надо. Сушу сутки голову на подоконике.
Собираю принтер, включаю и вроде бы вот должно заработать, но не тут то было! Каретка неистово начинает еб****ть (бить) по корпусу и бегать как ужаленная, после чего останавливается, на дисплее выходит предупреждение “во избежание поломки нажмите кнопку выкл”, после выходит табличка “застряла каретка” хотя там внутри нет никаких препятствий, нажимаю, ок после чего выбивает ошибку “0x6100000a” мол неправильное выключение.
Недолгими гуглениями этой ошибки нахожу эту тему, Чищу линейку(линейный энкодер), с первого раза “под краном воды и мылом” мне увы не помогло(голова так же бегает быстро и бьется об стенки принтера), беру стеклоочиститель, чищу/вытираю, собираю и вуаля голова начинает нормально двигаться, но счастье было не долгим так как вылезла ошибка 0x6100000b, в этот раз гугел не помог и все советы сводились снова к чистке линейки, а линейку чистить увы не видел смысла, она блестела как у кота яйки и лишнее телодвижение с ней могло бы привести снова к “0x6100000a”(проверено) 
Решил зайти в инженерное меню мфушки как в этом видео и сделать full reset, но это не помогло.
После упорного осмотра заметил, что механизм отсоса или как он там называется “по моему мнению” не ушел в свое “спящее положение” и каретка не могла до конца дойти до правой стороны упиравшись в него. Немного подвигав этот механизм отсоса каретка таки смогла дойти до конца вправо.
Этот вывод я сделал потому, что сфоткал это место до моего вмешательства и этот механизм не должен быть виден в выключенном состоянии, а должно быть как на фото(надеюсь вы меня поняли)
Собираю, включаю, теперь каретка радостно ходит туда сюда с нормальной скоростью, я уже в предвкушении счастья, так как потратил на это целый день..
После full reset’a на каждом включении идет 3 минутный цикл подготовки, который нельзя отменить
ии опяяять.. 

нажимаю ок, но уже что-то новенькое и это “0x6100000d”
На официальном англоязычном форуме HP есть тема с этой ошибкой, но другой моделью и там пишут, что 0x6100000d определяется как ошибка firmware т.е. ошибка ПО. Но мне кажется проблема в другом, так как до этого все работало.
На этом остановился, просто уже не знаю что делать:(, собирал крайне аккуратно, даже линейку пальцами особо не трогал и не гнул(держу по краям где нет разметки, чтобы не залапать) Мне как студенту принтер ой как нужен, а толковых мастерских в моем мелком городе нет, нужно ехать за 90км и тащить эту бандуру.
Может кто сталкивался с этой проблемой? И возможно ли его перепрошить и где достать прошивку? В инженерном меню такой пункт есть REFLASH.
Последний раз редактировалось anoncheg Ср окт 26, 2016 1:37 pm, всего редактировалось 7 раз(а).
-

anoncheg
- Осматривается
-

- Персональный альбом
![]()
Вернуться в Принтеры струйные
Кто сейчас на форуме
Сейчас этот форум просматривают: aresson и гости: 9
