In cmd when I try to do the command:
adb shell
it shows device not found error. Can someone help me please. It’ll be appreciated.
asked May 22, 2012 at 15:24
![]()
12
Don’t forget to go to your device and enable Settings->Developer Options->USB debugging.
answered May 1, 2013 at 22:58
![]()
rmtheisrmtheis
5,89612 gold badges60 silver badges78 bronze badges
5
Try any of the following solutions. I get errors with adb every now and then.
And one of the following always works.
Solution 1
Open command prompt as administrator and enter
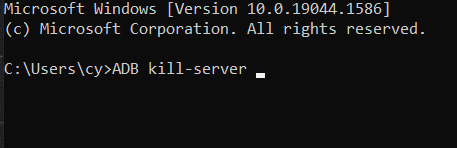
adb kill-serveradb start-server
Solution 2
Install drivers for your phone if you’re not testing on emulator.
Solution 3
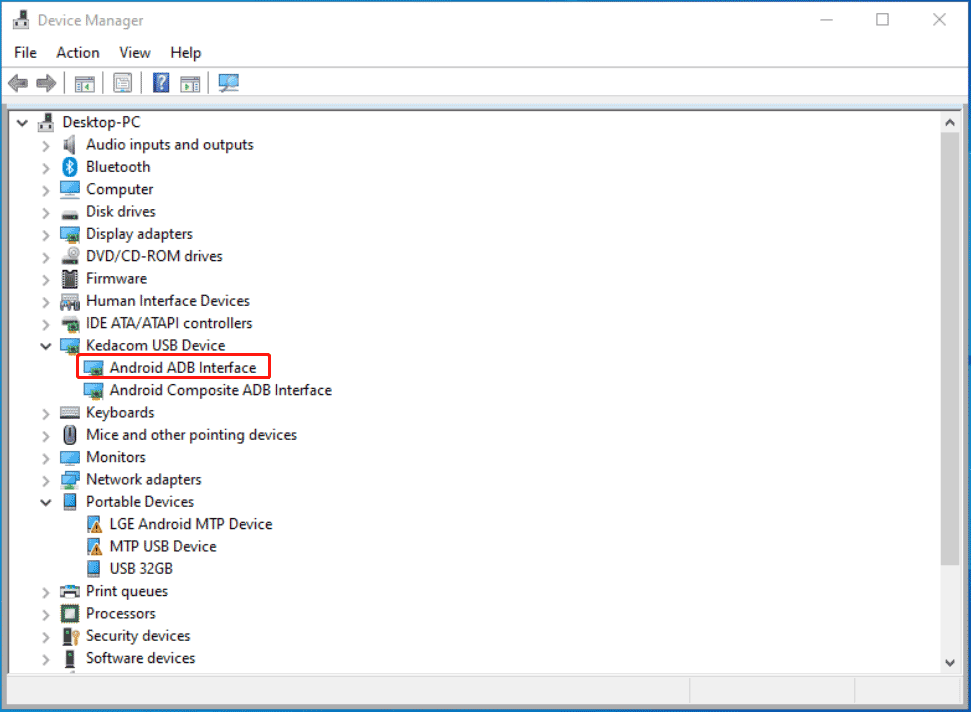
Open android sdk manager and install “Google USB Driver” from extras folder. (attached screenshot)
Android SDK Google USB Driver missing
Solution 4
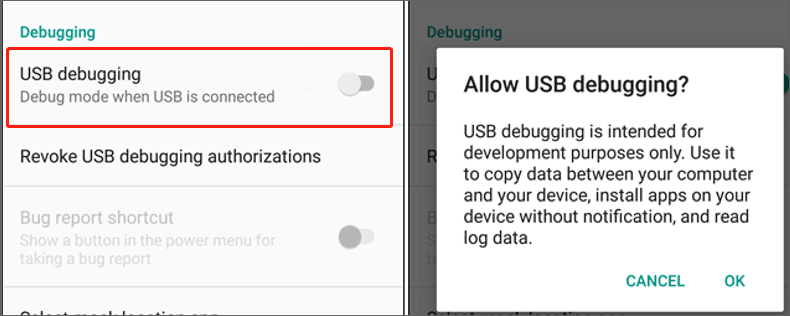
Go to settings > Developer Options > Enable USB Debugging.
(If you don’t see Developer Options, Go to Settings > About Phone > Keep tapping “Build number” until it says “You’re a developer!”
Enable USB Debugging
answered Jun 15, 2016 at 23:10
![]()
ChiragMSChiragMS
4855 silver badges12 bronze badges
2
It depends on windows system but usually:
- you go to system properties
- look at hardware devices
- Right click on the yellow (has to be yellow if it’s driver problem) icon representing your mobile device
- select property
- Then go on the driver tab
- select update driver
- choose the bottom selection find on local computer
- then choose manually
- From the windows opened look for driver disk the bottom right button
- Choose the driver from the folder
<sdk>extrasgoogleusb_driveri386(or amd64 for and). - Remember to uncheck the show only compatible hardware.
- Then choose the driver
- When windows warn your about possible incompatibility go on.
For my mobile it works, but depend on your mobile if it work or not.
Hope this help, bye.
![]()
alepuzio
1,3802 gold badges28 silver badges38 bronze badges
answered May 22, 2012 at 18:19
![]()
Guaido79Guaido79
1,26111 silver badges18 bronze badges
10
If you installed Eclipse have Android SDK, go to DDMS. If the list device display “?????????”
you do adb kill-server and then adb start-server.
Please make sure you install USB driver and enable debug mode.
answered May 22, 2012 at 15:48
![]()
Tai TranTai Tran
1,4063 gold badges15 silver badges27 bronze badges
3
Another issue here is that you likely need to turn off “connect as media device” to be able to connect with adb.
answered Sep 22, 2013 at 21:45
![]()
liamvictorliamvictor
3,2411 gold badge22 silver badges25 bronze badges
5
For me, I have to Revoke USB debugging authorizations in Developer Options. Here is the steps:
- Turn off
USB Debugging, - Revoke USB debugging authorizations,
- Plug the cable back in,
- Turn on
USB Debugging
answered Jul 16, 2018 at 2:20
![]()
chozchoz
17.1k4 gold badges52 silver badges73 bronze badges
2
I solved:
Just turn off USB debugging and re-enable debugging it immediately
answered Dec 4, 2017 at 11:36
![]()
Mzhda SaeedMzhda Saeed
2132 silver badges4 bronze badges
1
On my G2 I had to select PTP instead of MTP mode to get the connection to work.
answered Jul 15, 2016 at 0:28
![]()
1
I had this problem suddenly crop up in Windows 7 with my Nexus One – somehow the USB drivers had been uninstalled. I ran android-sdk/SDK Manager.exe, checked Extras/Google USB Driver and installed it. Then I unplugged the phone and plugged it back in, and ran “adb devices” to confirm the phone was attached.
This doesn’t work for all phones, just the ones listed here:
http://developer.android.com/sdk/win-usb.html
answered Oct 12, 2012 at 17:28
![]()
Sarah NorthwaySarah Northway
1,0091 gold badge14 silver badges23 bronze badges
Developer options
- USB Debug
if you can not see developer option, go to about. build version and click build version until developer options in unlock.
answered Jan 29, 2014 at 14:28
![]()
CorreoCorreo
211 silver badge3 bronze badges
1
Try changing USB port.
Try restarting adb server.
answered Dec 4, 2020 at 9:03
![]()
I have a Droid 3 (Verizon). I went to Motorola here and found the driver for the device ‘Motorola ADB Interface’ which was showing in device manager. It’s kind of a big download for just the driver, but during installation it found it and installed correctly.
answered Apr 7, 2013 at 6:50
![]()
Simon_WeaverSimon_Weaver
138k81 gold badges637 silver badges680 bronze badges
I switched to a different USB port and it suddenly got recognized…
answered Sep 1, 2020 at 7:48
![]()
chenopchenop
4,6554 gold badges41 silver badges62 bronze badges
How about:
Settings -> System -> Developer options -> Debugging -> turn on toggle for Wireless ADB debugging
or:
Revoke USB debugging authorizations
and try from the scratch.
answered Jan 28, 2021 at 9:20
![]()
On my Sony Xperia XZ1 Compact on Oreo I had to switch USB mode to MIDI to get it working. Only after this my Windows recognised Android ADB, however it couldn’t autoinstall driver. I opened Device Manager and installed the Google USB Driver for the ADB.
answered Sep 4, 2021 at 11:31
![]()
Just wanted to provide a simple answer here. I am just messing with an old Android device for the first time doing these root and unlock procedures. I received an error like this one when an adb push "..." "/sdcard/" command failed, and the key was that my device was in the bootloader screen. Booting to recovery then allowed me copy over the file(s), and I presume the normal OS would as well.
answered Apr 23, 2016 at 17:28
![]()
PysisPysis
1,4022 gold badges17 silver badges30 bronze badges
This worked for me, my AVG anti virus was deleting my adb.exe file. If you have AVG try:
1) opening the program
2) go to options
3) go to the virus vault and click on it
4) find your adb program, click on it, and press RESTORE at the bottom
This will move the file back to its original place.
However, unless you turn off the AVG it will delete the file again.
After this android studio located the file. Good luck.
answered Jul 21, 2016 at 4:50
![]()
I found my solution from this similar thread by enabling USB tethering on my LG G6 (requires data saver to be turned off)
Go to: Settings -> Tethering & networks -> switch on USB tethering
answered Aug 13, 2018 at 20:56
![]()
For completeness, I’ve just had a case here I had to change my USB cable. Guess the one I had was for charging only, accursed thing.
answered Mar 7, 2021 at 23:12
![]()
IanIan
1,4672 gold badges21 silver badges36 bronze badges
To solve this problem,
Add adb folder to your windows path (system veriable)
This solves the problem
answered Nov 19, 2021 at 11:06
![]()
In my case I needed to swap the ends of the cable connecting my device to the computer…
answered Feb 18, 2022 at 23:28
![]()
-
MiniTool
-
MiniTool News Center
- How to Fix ADB Device Not Found Error in Windows 10? (4 Ways)
By Vera | Follow |
Last Updated March 30, 2022
![]()
ADB device not found is a common issue that may happen on your Windows 10 PC when trying to use ADB, Android Debug Bridge to communicate with a device. If you get the error, how can you fix it? Don’t worry and you can find many useful solutions from this post given by MiniTool Solution.
ADB Error Device Not Found Windows 10
ADB, short for Android Debug Bridge, is a command-line utility that allows you to communicate with a device. To be specific, you can control your device over USB from a computer, install and uninstall apps, run shell commands, etc. with ADB. ADB is included with Google’s Android SDK.
However, when you use it, you may get an annoying thing. On the computer screen, you may see a message saying “error: device not found”. Sometimes, you get the error “ADB no devices/emulators found”.
The ADB error can be triggered by various reasons, for example, the ADB driver is not updated, USB debugging is disabled, the connection mode is incorrect, etc. The good news is you can easily fix the issue of ADB no devices emulators found on your Windows 10 PC. Just try the in-depth solutions below.
How to Fix ADB Device Not Found
Enable USB Debugging
To make sure ADB works perfectly, you should enable USB debugging on your Android device. Or else, the ADB error device not found appears.
Step 1: On your Android phone, go to Settings > About.
Step 2: Tap on Build number seven times to activate Developer options.
Step 3: Enable USB debugging.
Tip: If you want to know much information about USB debugging, refer to our previous post – What Is USB Debugging & How to Enable/Disable It.
Change Connection Mode
MTP (Media Transfer Protocol) is required for ADB. If your Android phone doesn’t use this connection mode, the issue of ADB device not found may appear on your Windows 10 PC. Just change the connection mode as shown below.
Step 1: Connect your phone to your computer.
Step 2: Swipe down to open the notification panel and select USB connection notification.
Step 3: Choose Media device (MTP).
Update ADB Interface Driver
An outdated ADB interface driver can result in the error – device not found or ADB no devices/emulators found in Windows 11/10. To help you out, it is necessary to install a new version for that driver. Here is what you should try:
Step 1: You need to get a Google USB driver first – directly download that driver or get it via Android SDK Manager. Android gives you a simple guide on Get the Google USB Driver.
Step 2: Run Device Manager in Windows 10 via the Win + X menu.
Step 3: Expand Other devices, USB Device, Android Device, etc., right-click on Android ADB Interface or Android Phone and choose Update driver.
Step 4: Click Browse my computer for drivers > Let me pick from a list of available drivers on my computer.
Step 5: Click Have Disk and tap on Browse to the directory which includes the Google USB driver you have downloaded before. Usually, the location is C:Program FilesAndroidandroid-sdkextrasgoogleusb_driver.
Step 6: Double-click on Android ADB Interface to install the driver on your PC.
Tip: Sometimes you can fix ADB device not found via installing Universal ADB Windows Driver. You can search for one in Google, then download and install it on your computer.
Reset the ADB Process
If none of the above ways to fix ADB device not found emulator, you can choose to reset the ADB process to fix the issue in Windows 10.
Step 1: Launch Command Prompt on your PC.
Step 2: Type in the following commands and press Enter after each one:
ADB kill-server
ADB start-server
Final Words
These are all the useful solutions to fix ADB device not found or ADB no devices/emulators found in Windows 10. If you find some other useful ways to fix the ADB error, share your ideas with us in the comment below. Thanks.
About The Author

Position: Columnist
Vera is an editor of the MiniTool Team since 2016 who has more than 5 years’ writing experiences in the field of technical articles. Her articles mainly focus on disk & partition management, PC data recovery, video conversion, as well as PC backup & restore, helping users to solve some errors and issues when using their computers. In her spare times, she likes shopping, playing games and reading some articles.
ADB, or Android Debug Bridge, is a command-line program that allows users to control devices through USB from their computer. The Google Android SDK includes the utility. Several customers complained about receiving the “device not found” message. Alternatively, some users also experienced a sudden lack of ADB and no emulator.
Luckily, the post will help fix the ADB with no device/emulator problem. To troubleshoot the issue, you must first check for updates for ADB drivers. Updated drivers help smooth communication with Windows. You can update drivers manually or use Advanced Driver Updater to update them seamlessly. We recommend the automatic way as it’s safe, quick, and requires minimal technical knowledge.
To get the tool, click the download button below:

Reasons for error: device not found.
- Disabled USB Debugging
- Incorrect Connection Mode
- Obsolete Driver
How To Fix ADB Device Not Found Error?
To fix no device emulator found, just follow the steps given below:
Solution1: Enable USB Debugging
To operate the ADB device from the computer, ensure the USB debugging option on your Android device is enabled.
1. On your Android phone, go to Settings > About.
2. In the About section, press “Build number” seven times in succession.

3. This will enable the Developer Options.
4. Now access Developer Options > select USB Debugging.

Now try reconnecting the device with the PC and check if this solves the problem. If this, too, doesn’t work, move to the next step.
Read Also : Download and Update PCI Device Drivers for Windows 11,10
Solution 2: Change ADB Device Connection Mode
Ensure the Android phone’s connection mode is set correctly to identify the ADB device. You must pick the Media Transfer Protocol connection option here (MTP). Otherwise, the “ADB no emulators or devices detected” error will display.
1. Connect the Android phone to the PC.
2. Tap the notification window for more USB choices.
3. Tap USB Debugging connected option
4. Set the connection mode to the Media device (MTP).

Now, check the “ADB error: device not found” warning should be gone. If it does, select PTP (Picture Transfer Protocol). It will help get rid of the ADB device not recognized error.
Read This: Download Apple Mobile Device USB Driver for Windows 11,10,8,7
Solution 3: Update Android ADB Interface
- Manually install the right driver for your ADB device using Device Manager.
1) Select your SDK manager from the Start menu > Run as administrator.

2) When the SDK manager launches, navigate and expand the Extras folder > select Google USB Driver> click Install 1 package.

3) After installing the driver, connect your Android smartphone.
4) Hit the Windows logo + R keys.
5) In the box, type devmgmt.msc and click Enter to launch Device Manager.

6) Look for your Android smartphone. It will be in the Other devices area > right-click it and select Update Driver Software.

7) Select Browse my computer for drivers.

8) Move forward and click Let me pick from a list of device drivers on my computer.

9) Select the Have Disk option.

10) Click Browse to choose the Google USB Driver you downloaded earlier. Alternatively, you may type the following address into the field.
C:Program Files (x86)Androidandroid-sdkextrasgoogleusb_driver
Then press the OK button.

11) Select Android ADB Interface and double-click it.

12) Follow the simple on-screen directions to finish installing the driver.
After that, restart the computer to allow the updated driver to take effect.
- Automatically install the right driver for your ADB device using Advanced Driver Updater.
If you prefer to keep things simple, use Advanced Driver Updater. To use the application and update drivers use the steps below:
1. Install it Advanced Driver Updater.
2. Go to Advanced Driver Updater > Scan Now > and wait for the scan results.

3. Verify that the drivers are up to date by checking the scan results.

4. Click Update driver next to the driver you want to update (If using the application’s FREE version). If you’re a registered user, you may update all of your outdated drivers with the Update All option.

5. After the driver has been updated, restart the computer.
Solution 4: Reset the ADB
If the ADB device is not recognized using any of the ways described above, you can reset the ADB process. Enter the following commands into the ADB tool to reset it.
ADB kill-server
ADB start-server
After rebooting the ADB process, try re-using this command line & check whether it works properly and allows you to control the Android phone from the computer or not.
Conclusion:-
In this blog, we have seen how to fix ADB Device Not Found Error on Windows using several methods discussed. Updating drivers is one of the methods to resolve this issue, and updating them automatically by using Advanced Driver Updater is the best way. Use these methods in fixing ADB Device Not Found Error on Windows, and let us know about your views in the comment section below.
Related: Download USB Mass Storage Device Driver on Windows 11
В этом руководстве мы покажем вам, как исправить ошибку «Устройство ADB не найдено». В некоторых случаях окно Command или PowerShell также может быть пустым под списком подключенных устройств. В том же духе есть несколько других распространенных ошибок ADB, которые уже были рассмотрены ранее. К ним относятся: Исправление adb не распознается Ошибка и Исправление несанкционированного устройства с помощью команд ADB [3 methods]. На данный момент мы сосредоточимся на исправлении ошибки «Устройство ADB не найдено», которая показывает пустой результат в разделе «Список подключенных устройств». Следуйте инструкциям.
Устройства Android благодаря своей экосистеме с открытым исходным кодом позволяют выполнять множество настроек. Теперь эти настройки охватывают два разных домена. Первый — это обычные пользователи, которые настраивают свое устройство с помощью многочисленных тем, пакетов значков, средств запуска и т. д. Затем идут технические энтузиасты, которые делают эти настройки на шаг впереди. Они разблокируют загрузчик устройства, прошивают пользовательские ПЗУ и пользовательские восстановления или даже рутируют свои устройства через Magisk.
Но независимо от того, к какому домену вы принадлежите, есть одна общая черта: использование команд ADB и Fastboot. Обычные пользователи могут использовать эти команды для загрузки своего устройства в режим Fastboot/Bootloader или Recovery Mode, применения обновлений через ADB Sideload, установки/удаления приложений и других задач. Затем гики могут использовать эти команды, чтобы разблокировать загрузчик (разблокировка fastboot oem), загрузить свое устройство в TWRP (fastboot boot twrp.img), прошить ZIP-файлы и файлы IMG (fastboot flash boot magisk_patched.img) и список продолжается.
Однако иногда эти команды просто не выполняются. Это может принять форму довольно большого количества ошибок (как уже обсуждалось во вступительном абзаце). Среди них наиболее распространенным является устройство ADB, не найденное, и раздел «Список подключенных устройств» будет пустым. В этом руководстве мы сообщим вам обо всех возможных причинах этой ошибки и, что более важно, о том, как ее исправить. Следуйте вместе.
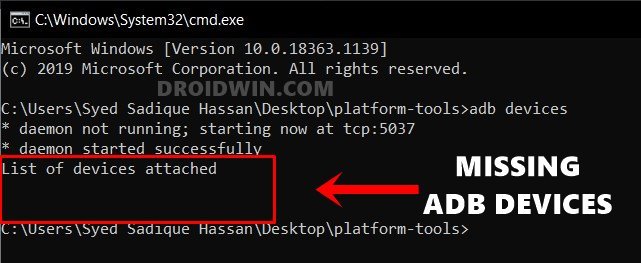
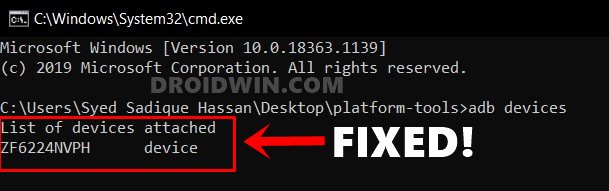
Итак, когда и почему возникает эта ошибка? Отвечая сначала на часть «когда», ну, это происходит, когда вы выполняете adb устройства команду в окне CMD или PowerShell. После ввода этой команды, как правило, вы получите идентификатор вашего устройства, за которым следует ключевое слово устройства. Однако, когда вы сталкиваетесь с этой проблемой, окно CMD/PowerShell не приводит к каким-либо значениям. Скорее они начнут с новой строки. Если немного повнимательнее, вы можете получить сообщение , что опять же не приносит никакой пользы конечному пользователю.
С учетом сказанного, в этом руководстве будут перечислены все возможные способы исправления не найденного устройства ADB. [List of Devices Attached is blank]. Имейте в виду, что универсального решения этой ошибки не существует. Вам придется попробовать все нижеперечисленные методы один за другим, пока вы не добьетесь успеха. Кроме того, мы начнем с самых простых настроек, а затем добавим немного продвинутых. Итак, без лишних слов, давайте продолжим это руководство.
Исправление 1: повторная проверка установки ADB
Прежде всего, убедитесь, что у вас установлены правильные двоичные файлы ADB и Fastboot. Вам не нужно ничего делать — просто установите инструменты платформы Android SDK, предоставленные Google. [Windows | Linux | macOS]. Если вы установили какие-либо другие инструменты ADB и Fastboot, удалите их и используйте только тот, который предоставлен Google. Причина?
Предоставлено: Форум разработчиков Android.
Что ж, все эти инструменты оказались одними из самых облегченных, в конечном итоге отсутствуют несколько важных файлов, особенно тех, которые относятся к разделу хранилища устройства. Следовательно, установите Android SDK Platform Tools на свой ПК и посмотрите, исправит ли он не найденное устройство ADB. [List of Devices Attached is blank] ошибка или нет.
Исправление 2: Запустите командную строку, где установлен ADB
Это один факт, который многие пользователи упускают из виду. Вы должны запускать окно командной строки только в папке, где присутствуют двоичные файлы ADB и Fastboot. Поскольку мы рекомендовали установить Android SDK Platform Tools, вам следует запускать окно CMD только внутри инструментов платформы. Теперь есть два разных способа сделать это:
Прямой подход:
Как видно из названия, этот метод предлагает вам напрямую открыть окно CMD внутри папок ADB. Вот как это можно сделать:
- Перейдите в папку platform-tools на вашем ПК.
- Затем введите CMD в адресную строку папки и нажмите Enter.
- Это запустит командную строку внутри самой папки инструментов платформы.
Косвенный подход
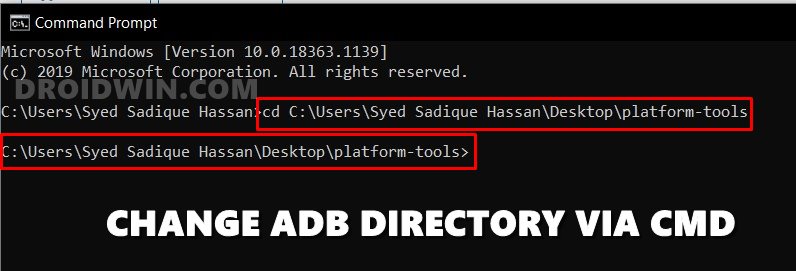
В этом методе вы можете запустить CMD в обычном режиме из меню «Пуск», а затем изменить его каталог на папку, в которой установлен ADB. Вот инструкции для того же:
- Перейдите в меню «Пуск» и найдите CMD.
- Запустите окно командной строки от имени администратора.
- Теперь введите cd, а затем каталог установки ADB.
- Например, я установил инструменты платформы Android SDK на свой рабочий стол, поэтому команда в моем случае будет C:UsersusernameDesktopplatform-tools
После того, как вы изменили каталог на место установки ADB, проверьте, исправляет ли он ошибку «Устройство ADB не найдено». [List of Devices Attached is blank] ошибка или нет.
Исправление 3: убедитесь, что отладка по USB включена
Хотя в основном это происходит по очевидным направлениям, но обычно это одна из главных причин этой проблемы. Отладка по USB должна быть включена, чтобы ваш компьютер распознал ваше устройство в режиме ADB. Поэтому вам следует еще раз убедиться, что отладка по USB действительно включена. Вот необходимые инструкции для того же:
- Перейдите в Настройки на вашем устройстве. Затем перейдите в «О телефоне» и нажмите «Номер сборки» 7 раз. Пользователи Xiaomi должны нажать на номер MIUI 7 раз.
- Затем вы получите всплывающее сообщение о том, что параметры разработчика включены.
- Итак, теперь вернитесь в «Настройки», а затем «Система».
- Теперь перейдите в «Параметры разработчика» (на некоторых устройствах он может находиться в разделе «Дополнительно») и включите переключатель «Отладка по USB».
После этого подключите свое устройство к ПК через USB-кабель и посмотрите, сможет ли оно исправить ADB Device not found. [List of Devices Attached is blank] ошибка. [Don’t Miss: How to Enable USB Debugging on a Broken Android Device’s Screen?]
Исправление 4: USB-соединение должно быть авторизовано
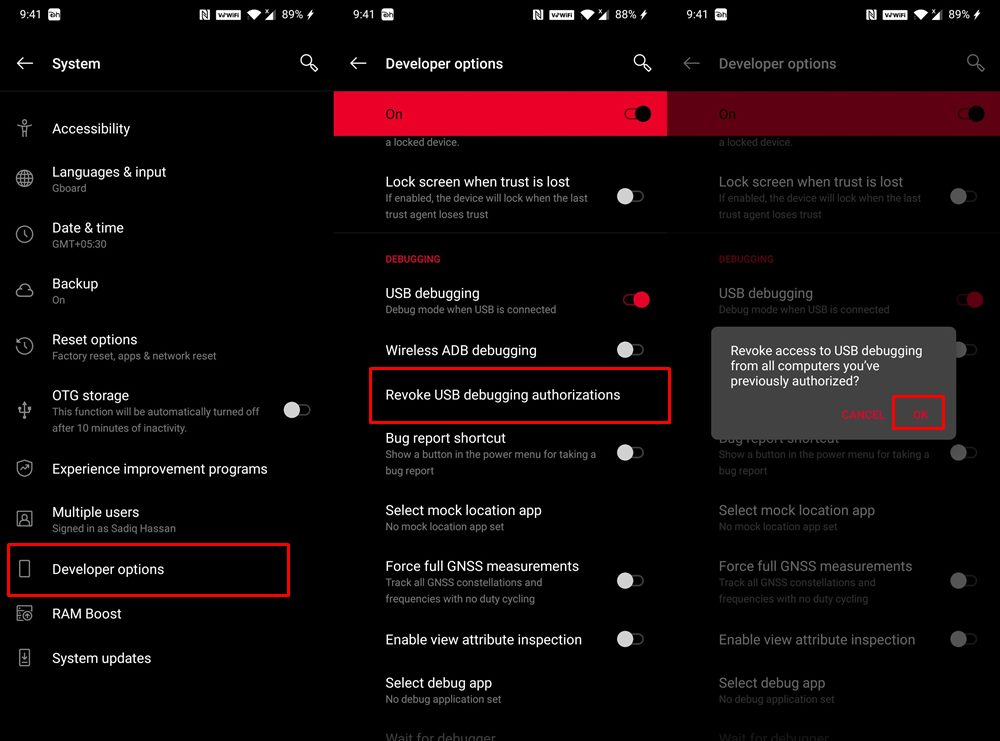
Включение отладки по USB — это только полдела. При первом подключении устройства к ПК в режиме ADB вам необходимо будет проверить отпечаток пальца устройства на ПК. В этом случае лучше всего отозвать разрешение USB-отладки вашего устройства, а затем повторно проверить его. Вот как это можно сделать:
- Прежде всего, перейдите к параметрам разработчика на вашем устройстве. Если вы еще не включили его, перейдите в «Настройки»> «О телефоне»> «Семь раз нажмите на номер сборки»> «Вернитесь в «Настройки»> «Система»> «Дополнительно»> «Параметры разработчика».
- Когда вы дойдете до параметров разработчика, прокрутите до раздела «Отладка» и нажмите «Отменить авторизацию отладки по USB». Нажмите OK в появившемся диалоговом окне подтверждения.
- Теперь запустите окно CMD в папке инструментов платформы (как указано в исправлении 2).
- Затем введите приведенную ниже команду в окне CMD: устройства adb.
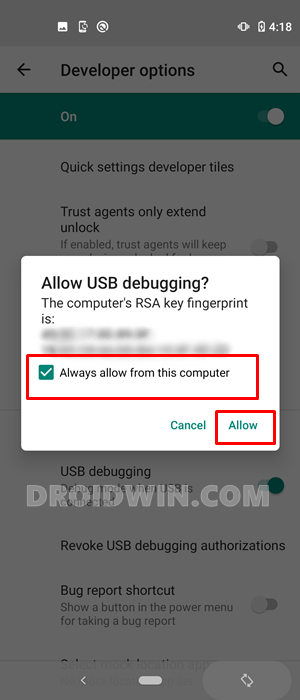
- Теперь вы получите «Разрешить отладку по USB» на своем устройстве, нажмите «Разрешить».
- Кроме того, если это ваш собственный доверенный компьютер, вы также можете отметить параметр «Всегда разрешать с этого компьютера». Это избавит вас от необходимости разрешать отладку по USB каждый раз, когда вы подключаете устройство к компьютеру.
- Как только это будет сделано, посмотрите, исправит ли это устройство ADB, не найденное [List of Devices Attached is blank] ошибка.
Исправление 5: изменить режим USB-подключения
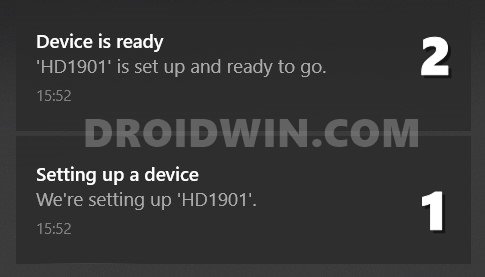
Некоторые пользователи сообщают об успешном изменении режима USB-подключения на MTP из режима USB-накопителя (или режима передачи файлов). Поэтому, как только вы подключите свое устройство к ПК через USB-кабель, вы должны увидеть текущий режим USB-подключения. Выберите MTP из списка (если его нет, то вы также можете переключиться в режим PTP). Как только вы это сделаете, вы можете увидеть уведомление об установке на вашем ПК, как показано ниже:
Однако, если вы не видите возможность изменить режим USB-подключения, вы также можете выполнить этот шаг вручную. Для этого перейдите в «Настройки» > «Система» > «Параметры разработчика» > «Конфигурации USB по умолчанию» (см. изображение ниже). Затем выберите MTP (или PTP) из вариантов. Теперь проверьте, исправляет ли это устройство ADB, не найденное [List of Devices Attached is blank] ошибка или нет.
Исправление 6: установка драйверов вручную
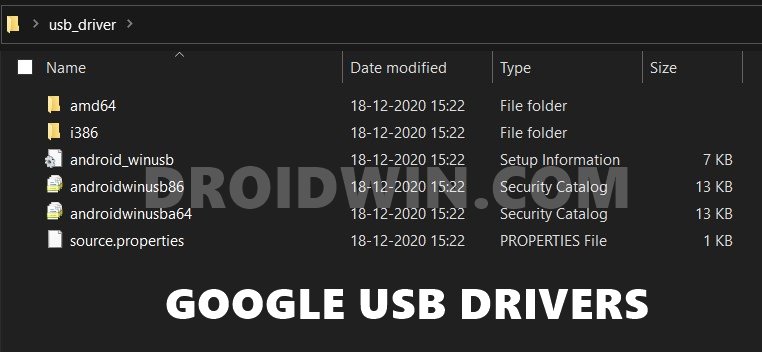
Большинство Android-устройств поставляются со своими собственными USB-драйверами. В результате, как только вы подключите свое устройство к компьютеру через USB-кабель, драйверы будут автоматически установлены на ваш компьютер. Но если этого не произойдет, вы также можете установить их вручную. Google предоставляет необходимые android_winusb на веб-сайте разработчиков Android.
Вам просто нужно загрузить и добавить его через Диспетчер устройств вашего ПК. И в отличие от того, что вы, возможно, читали до сих пор, этот файл драйвера USB универсально принимается всеми устройствами Android. Даже если вы увидите сайты, на которых размещены USB-драйвера для отдельных телефонов, это просто для увеличения кликов, результирующий файл будет таким же (android_winusb). Поэтому загрузите этот файл и выполните следующие шаги.
- Для начала извлеките конкурс из скачанного файла драйвера и у вас должны получиться следующие файлы:
- Щелкните правой кнопкой мыши значок Windows и выберите в меню Диспетчер устройств.
- В нем перейдите в раздел «Другие устройства», и вы должны увидеть свое устройство Android в списке. В некоторых случаях он может находиться в разделе «Порты» или в разделе «Переносное устройство».
- Найдя устройство, щелкните его правой кнопкой мыши и выберите «Обновить драйверы».
- В следующем появившемся всплывающем окне выберите Поиск драйверов на моем компьютере.
- Теперь нажмите кнопку «Обзор», перейдите к извлеченной папке драйвера и выберите папку usb_driver. Да, вам не нужно выбирать отдельный файл драйвера, просто выберите папку с драйвером, а ваш ПК позаботится обо всем остальном.
- Выбрав папку с USB-драйвером, нажмите «Далее» и следуйте инструкциям на экране, чтобы установить его.
- После завершения установки отключите и снова подключите устройство к ПК через USB-кабель. Посмотрите, исправляет ли это устройство ADB, не найденное [List of Devices Attached is blank] ошибка.
Исправление 7: добавьте путь к системной переменной ADB
В некоторых случаях система не может решить, какие драйверы ADB ей нужно использовать. Обычно это происходит, если на вашем ПК установлено более одной копии драйверов ADB/Fastboot. Обычно это может конфликтовать с системной переменной среды, связанной с Android SDK. Исправление для этого состоит в том, чтобы вручную добавить каталог установки ADB, т. е. расположение папки инструментов платформы в переменные системной среды. вот необходимые инструкции для того же:
- Перейдите в меню «Пуск» и найдите «Просмотр дополнительных параметров системы».
- Перейдите на вкладку «Дополнительно» и нажмите кнопку «Переменные среды».
- Теперь вы должны увидеть два раздела: пользовательские переменные и системные переменные. Что касается этого руководства, мы будем иметь дело с последним.
- Поэтому выберите «Путь» в системных переменных и нажмите «Изменить».
- Появится параметр «Изменить переменную среды», нажмите «Обзор» с правой стороны.
- Теперь перейдите в место, где вы установили двоичные файлы ADB и Fastboot, выберите папку с инструментами платформы и нажмите «ОК».
- Теперь вы должны увидеть, что этот каталог успешно добавлен в переменные среды. Нажмите OK, чтобы закрыть диалоговое окно.
- Точно так же путь также будет виден в системных переменных в разделе «Переменные среды», как показано на изображении ниже. Нажмите OK, чтобы закрыть и это диалоговое окно. Вот и все. Теперь ваша ошибка исправлена.
- После добавления пути подключите устройство через USB-кабель к компьютеру, и проблема уже будет решена.
Итак, на этом мы завершаем руководство о том, как исправить не найденное устройство ADB. [List of Devices Attached is blank] ошибка. Мы поделились семью различными исправлениями для одного и того же, любое из которых должно сработать в вашу пользу. Дайте нам знать в комментариях, если у вас есть какие-либо вопросы относительно вышеупомянутых шагов. Мы вернемся к вам с решением в ближайшее время.
In this guide, we will show you the steps to fix the ADB Device not found error. In some instances, the Command or PowerShell window might also show blank under the list of devices attached. Along the same lines, there are a few other common ADB Errors that few have already covered before. These include: Fix adb is not recognized Error and Fix Unauthorized Device with ADB Commands [3 methods]. As of now, our focus will be on fixing the ADB device not found error that shows a blank result under the List of Devices Attached section. Follow along for the detailed instructions.
Android devices, thanks to their open-source ecosystem allows you to carry out a plethora of tweaks. Now, these tweaks encompass two different domains. The first one is the everyday users who customize their device using numerous themes, icon packs, launchers, etc. Then comes the tech enthusiasts, who take these customizations one step ahead. They unlock the device’s bootloader, flash custom ROMs and custom recoveries, or even root their devices via Magisk.
But no matter to which domain you belong, one thing stands in common: the use of ADB and Fastboot Commands. The general users might use these commands to boot their device to Fastboot/Bootloader or Recovery Mode, Apply Update via ADB Sideload, installing/uninstalling apps, among other tasks. Then the geeks could make use of these commands to unlock the bootloader (fastboot oem unlock), boot their device to TWRP (fastboot boot twrp.img), flash ZIPs, and IMG files (fastboot flash boot magisk_patched.img), and the list goes on.
However, sometimes these commands just fail to execute. It could take the shape of quite a few errors (as already discussed in the introductory paragraph). Among them, the most common one seems to be the ADB Device not found and the List of Devices Attached section would be blank. In this guide, we will make you aware of all the plausible reasons for this error, and more importantly how to fix it. Follow along.
- Fix Magisk Module Bootloop without TWRP Recovery
- How to Fix TWRP Error 20 GApps after flashing LineageOS
- Fix Mi Account Authorization | Unbrick Xiaomi | EDL Mode
- How to Fix Error: Cannot load recovery.img
So when and why this error happens? Answering the ‘when’ part first, well it happens when you execute the adb devices command in CMD or PowerShell window. Upon typing in this command, in general cases, you would have got your device ID followed by the device keyword. However, when you are facing this issue, the CMD/PowerShell window wouldn’t result in any value. Rather they would start off with a new line. If it is a little bit more caring, then you might get the <waiting for device> message, which again doesn’t do any good to the end-user.
With that said, this guide will list out all the possible methods to fix the ADB Device not found [List of Devices Attached is blank]. Do keep in mind that there isn’t any universal fix for this error. You will have to try all the below-mentioned methods one by one until you achieve success. Furthermore, we will start off with the most basic tweak first followed by the slightly advanced ones. So without further ado, let’s get on with this guide.
Fix 1: Reverify ADB Installation
First and foremost, make sure that you have the proper ADB and Fastboot binaries installed. There’s nothing much that you need to do- just install the Android SDK Platform Tools provided by Google [Windows | Linux | macOS]. If you have installed any other ADB and Fastboot tools, then please uninstall them and only use the one provided by Google. The reason?
Well, all these tools are proving to be among the most lite-weights end up missing a few important files, especially those related to the device storage partition. Hence, install the Android SDK Platform Tools on your PC and see if it fixes the ADB Device not found [List of Devices Attached is blank] error or not.
- How to Boot into Recovery (TWRP/Stock) from Fastboot Mode
- Fix TWRP Error 7 (While Flashing Custom ROM via TWRP)
- How to Fix FAILED (remote: unknown command) Error
- Mi Unlock Tool Errors and their Fixes
Fix 2: Launch Command Prompt where ADB is installed
This is one fact that many users end up missing. You should only launch the Command Prompt window inside the folder where ADB and Fastboot binaries are present. Since we have recommended the installation of Android SDK Platform Tools, hence you should launch the CMD window inside the platform-tools only. Now there are two different ways of doing so:
The Direct Approach:
As is evident from the name, this method tells you to directly open the CMD window inside the ADB folders. Here’s how it could be done:

- Head over to the platform-tools folder on your PC.
- Then type in CMD in the folder’s address bar and hit Enter.
- This will launch the Command Prompt inside the platform-tools folder itself.
The Indirect Approach
In this method, you could launch CMD normally from the Start menu and then change its directory to the folder where ADB is installed. Here are the instructions for the same:
- Head over to the Start menu and search for CMD.
- Launch the Command Prompt window as an administrator.
- Now type in cd followed by the ADB installation directory.
- For example, I have installed Android SDK platform Tools on my desktop, hence the command in my case would be
cd C:UsersusernameDesktopplatform-tools
Once you have changed the directory to the ADB installation location, check if it fixes the ADB Device not found [List of Devices Attached is blank] error or not.
Fix 3: Make sure USB Debugging is Enabled
While it is mostly along the obvious lines, but this is usually among the biggest culprits for this issue. USB Debugging is needed to be enabled so that your PC recognized your device in the ADB Mode. So you should reverify that the USB Debugging is indeed enabled. Here are the required instructions for the same:
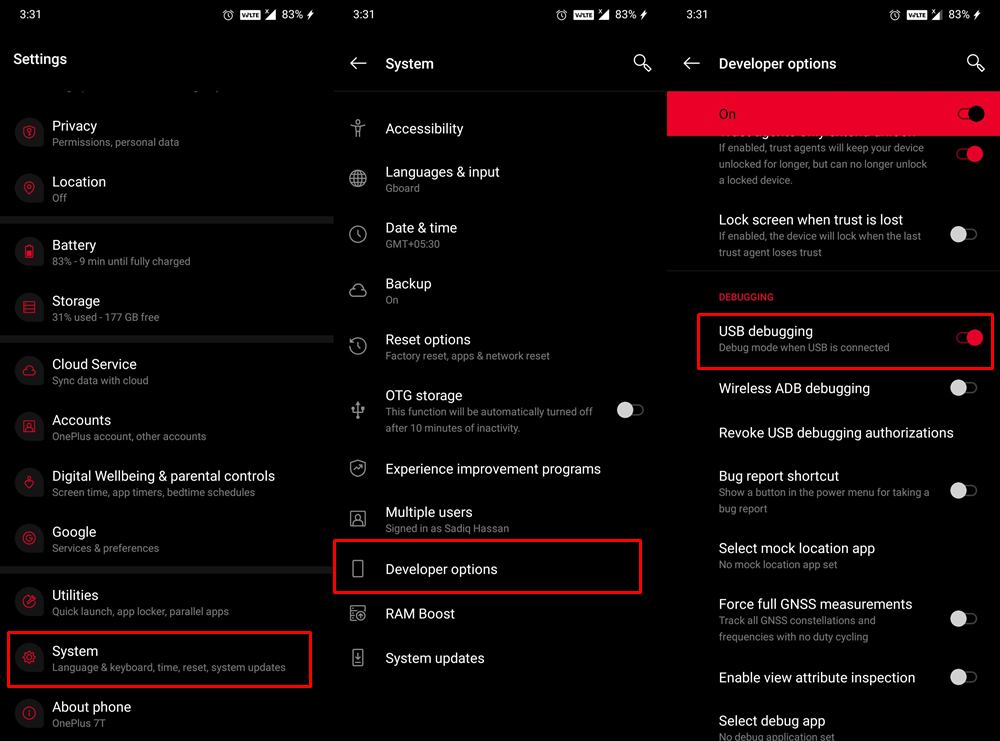
- Head over to Settings on your device. Then go to About Phone and tap on Build Number 7 times. Xiaomi users should tap on MIUI Number 7 times.
- You will then get a toast message that Developer Options is enabled.
- So now go back to Settings followed by System.
- Now go to Developer Options (in some devices it might be under the Advanced section) and enable the USB Debugging toggle.
Once done, connect your device to PC via USB cable and see if it is able to fix ADB Device not found [List of Devices Attached is blank] error. [Don’t Miss: How to Enable USB Debugging on a Broken Android Device’s Screen?]
- How to Install OTA Updates in Rooted Android Device
- How to Install Substratum Themes on any Android (Oreo 8.0 and above)
- Permanently Install TWRP without TWRP ZIP File (only using TWRP.img file)
- Root Android Devices Without TWRP Recovery
Fix 4: USB Connection should be Authorized
Enabling the USB Debugging is just half the done work. The first time you connect your device to the PC in ADB Mode you will have to verify the device’s fingerprint with your PC. The best bet, in this case, is to revoke the USB Debugging permission of your device and then re-verify it. Here is how it could be done:
- First off, head over to the Developer Options on your device. If you haven’t enabled it yet, then go to Settings > About Phone > Tap on Build Number 7 times > Go back to Settings > System > Advanced > Developer Options.
- Once you reach Developer Options, scroll to the Debugging section and tap on Revoke USB Debugging Authorizations. Tap on OK in the confirmation dialog box that appears.

- Now launch the CMD window inside the platform-tools folder (as mentioned in Fix 2).
- Then type in the below command in the CMD window:
adb devices
- You will now get an Allow USB Debugging on your device, tap on Allow.

- Furthermore, if this is your own trusted PC, then you could also tick-mark the Always allow from this computer option. Doing so will save you from allowing the USB Debugging every time you connect the device to your PC.
- Once that is done, see if it fixes the ADB Device not found [List of Devices Attached is blank] error.
Fix 5: Change USB Connection Mode
Some users have reported success after changing the USB Connection Mode to MTP from USB storage mode (or File Transfer mode). So as soon as you connect your device to the PC via USB cable, you should see the current USB connection mode. Select MTP from the list (if it is not there, then you may also switch to PTP mode). Once you do so, you may see the setup notification on your PC, as shown below:
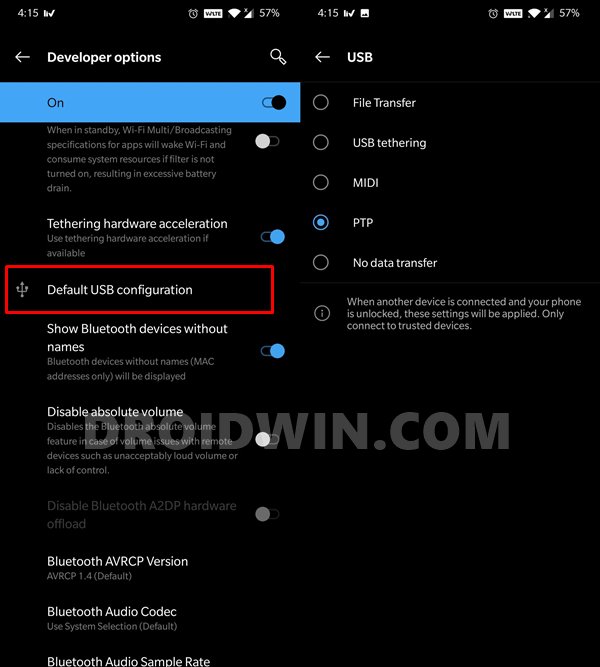
However, if you don’t see the option to change the USB Connection Mode, then you could manually carry out this step as well. For that, go to Settings > System > Developer Options > Default USB Configurations (see below image). Then select MTP (or PTP) from the options. Now check whether it fixes the ADB Device not found [List of Devices Attached is blank] error or not.
- How to Pass Magisk SafetyNet on Rooted Android 11
- Root Android 11 via Magisk Patched boot.img (without TWRP)
- Fix Android stuck in Recovery Mode: No Command screen
- Fix Magisk patched boot.img issue while Rooting Android 11
Fix 6: Manually Install Drivers
Most Android devices come baked in with their own USB Drivers. As a result, as soon as you connect your device to your PC via USB cable, the drivers would automatically be installed on your PC. But if that doesn’t happen you may manually install them as well. Google provides the required android_winusb file on its Android Developers website.
You just need to download and add it via your PC’s Device Manager. And as opposed to what you might have read till now, this USB driver file is universally accepted by all Android devices. Even if you see sites hosting USB drivers for individual phones, it’s just to increase clicks, the resulting file will be the same (android_winusb). So download this file and proceed with the below steps.
- To begin with, extract the contest of the downloaded driver file and you should get the following files:
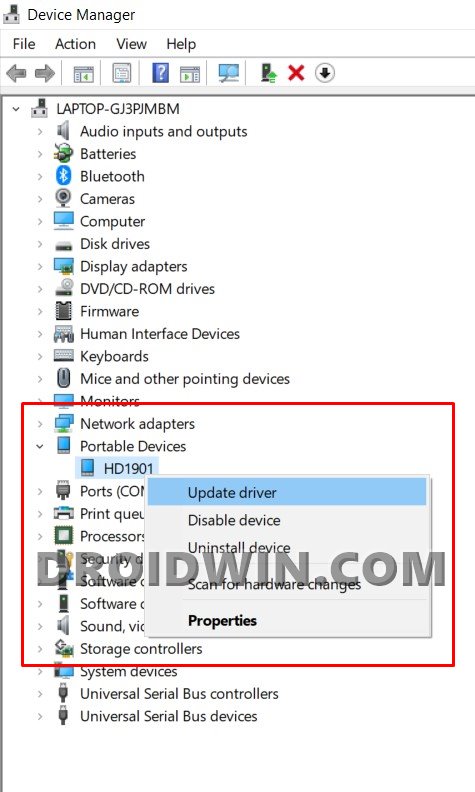
- Right-click on the Windows icon and select Device Manager from the menu.
- Within that, go to the Other devices section and you should see your Android device listed there. In some cases, it might be under the Ports section or the Portable Device section as well.
- Once you find the device, right-click on it, and select Update Drivers.

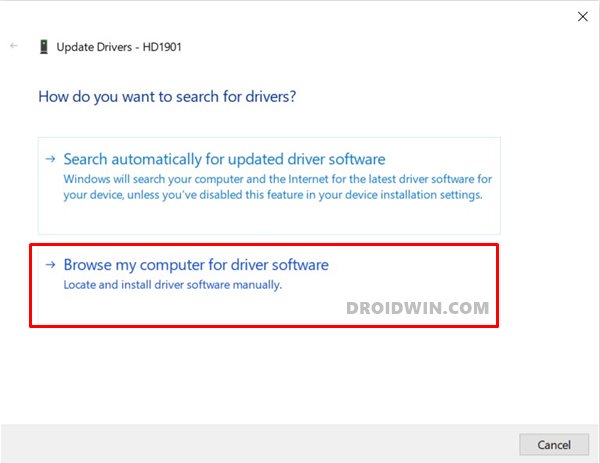
- In the next popup that appears, select Browse my computer for driver software.

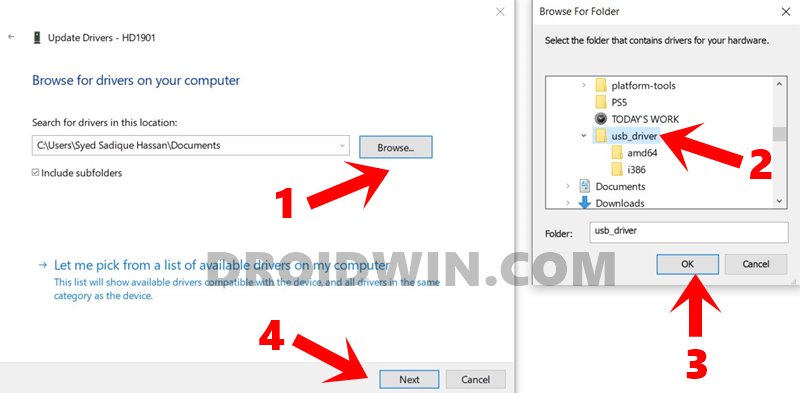
- Now click on the Browse button, navigate to the extracted driver folder, and select the usb_driver folder. Yes, you don’t need to select the individual driver file, just select the driver folder and your PC will take care of the rest.
- Once you have selected the USB Driver folder, hit Next and proceed with the on-screen instructions to install it.

- After the installation is complete, unplug and then replug your device to the PC via USB Cable. See if it fixes the ADB Device not found [List of Devices Attached is blank] error.
Fix 7: Add ADB System Variable Path
In some cases, the system isn’t able to decide which ADB Drivers do it needs to use. This usually happens if you have more than one copy of ADB/Fastboot Drivers installed on your PC. This usually might conflict with the environmental system variable related to the Android SDK. The fix for that is to manually add the ADB installation directory, i.e, the platform-tools folder’s location to the System Environment Variables. here are the required instructions for the same:
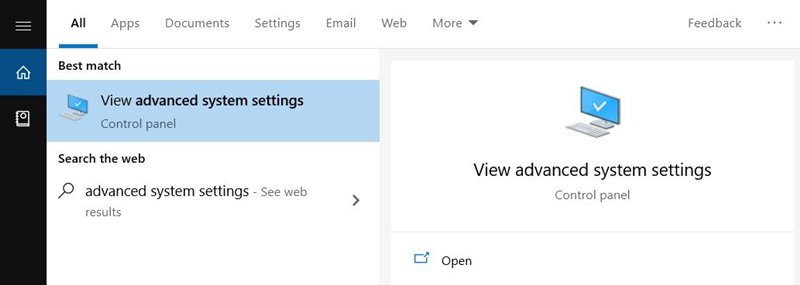
- Head over to the Start menu and search for View Advanced System Settings.

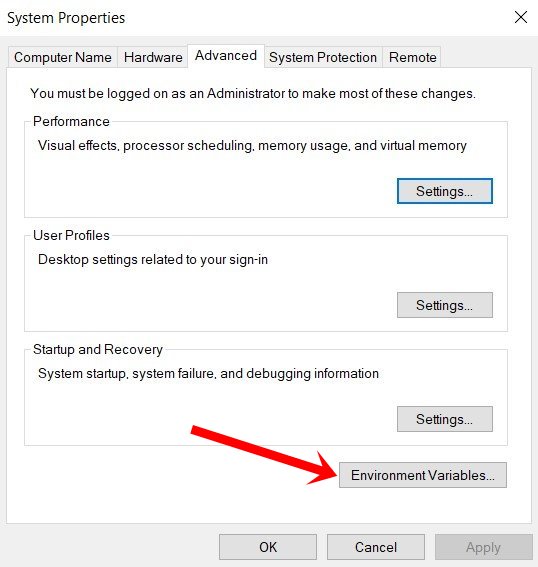
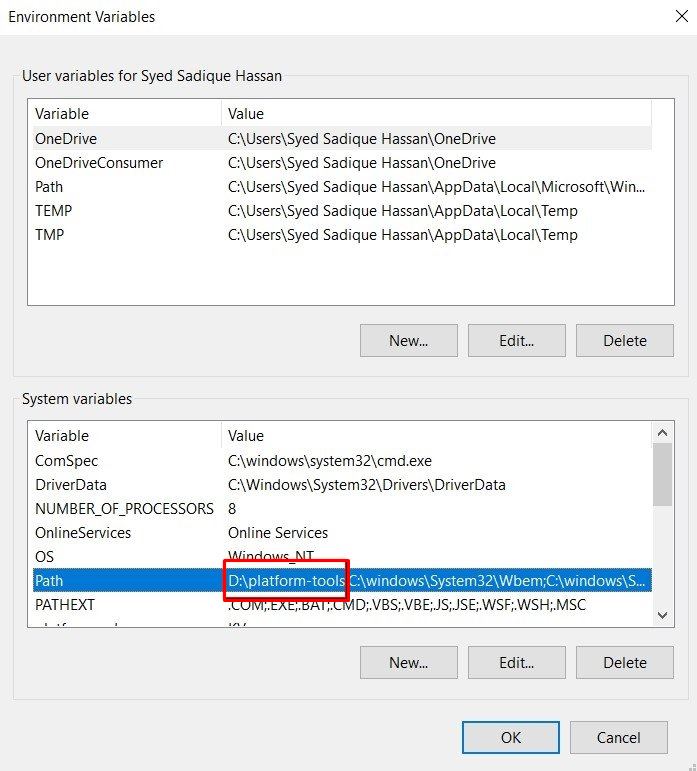
- Go to the Advanced tab and click on the Environmental Variables button.

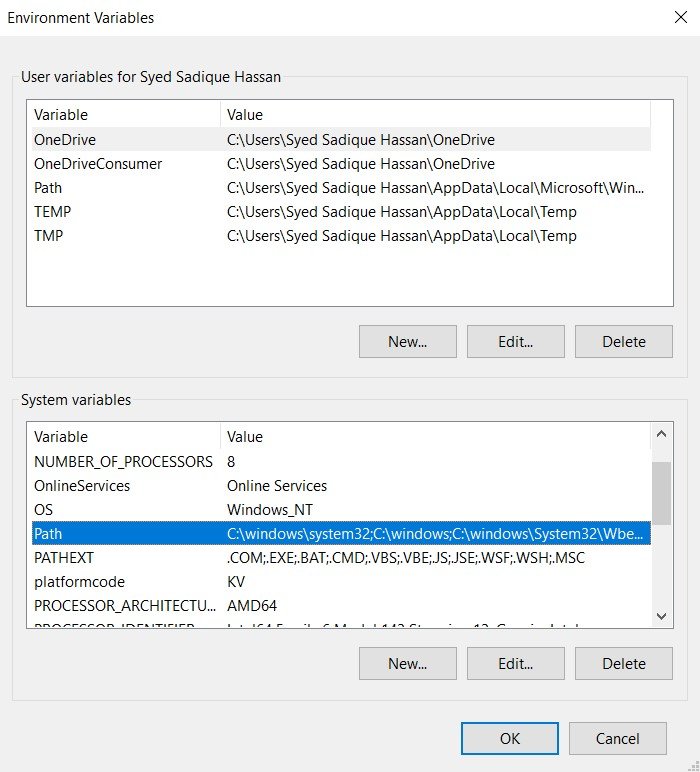
- You should now see two sections: User Variables and System variables. As for this guide, we would be dealing with the latter.
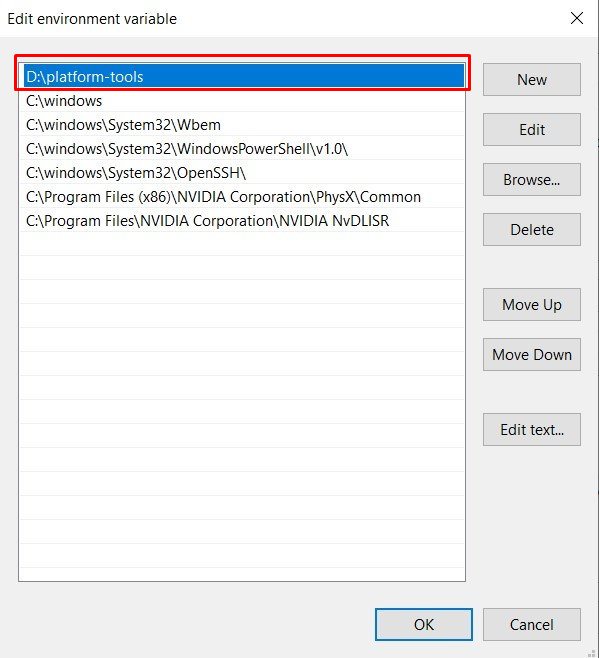
- So select Path from the System Variables and click on Edit.

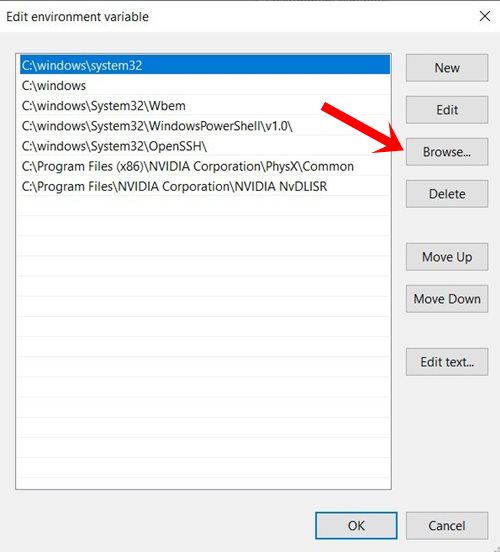
- It will bring up the Edit environment variable option, click Browse from the right-hand side.

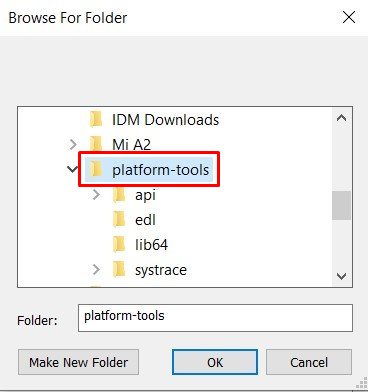
- Now navigate to the location where you have installed the ADB and Fastboot binaries and select the platform-tools folder and click OK.

- You should now see this directory successfully added to the environment variables. Click OK to close the dialog box.

- Likewise, the path will also be visible in System variables under Environment Variables, as shown in the below image. Click OK to close this dialog box as well. That’s it. Your error now stands rectified.

- Once the path has been added, plug in your device via USB cable to your PC, and the issue would have been fixed by now.
So with this, we conclude the guide on how to fix the ADB Device not found [List of Devices Attached is blank] error. We have shared seven different fixes for the same, any one of which should work out in your favor. Do let us know in the comments if you have any queries concerning the aforementioned steps. We will get back to you with a solution at the earliest.
- [GUIDE] Flash ROMs/Magisk/TWRP/Kernels on A/B Partition Devices
- Everything About Magisk- Manager, Modules and More
- Best Magisk Modules of 2020 [PART-1]
- [3 METHODS] Unroot any Android Device-Uninstall Magisk
About Chief Editor

Sadique Hassan
administrator
A technical geek by birth, he always has a keen interest in the Android platform right since the birth of the HTC Dream. The open-source environment always seems to intrigue him with the plethora of options available at his fingertips. “MBA by profession, blogger by choice!”
