В этом уроке мы покажем вам, как исправить проблему с программным кирпичом или загрузочной петлей после установки TWRP Recovery. Переход к индивидуальной разработке похож на две стороны одной медали. С одной стороны, вам гарантировано множество настроек, модов и настроек. Но с другой стороны, есть и некоторые риски. Говоря о плюсах, вам просто нужно разблокировать загрузчик. После этого вы можете прошивать пользовательские ПЗУ, двоичные файлы или даже рутировать свое устройство через Magisk.
В том же духе вы также можете установить собственное восстановление, такое как TWRP. Есть множество причин, по которым вам может понадобиться это восстановление. Начнем с того, что вы можете легко прошивать файлы ZIP и IMG, создавать и восстанавливать резервные копии Nandroid или удалять различные разделы устройства. Точно так же вы также можете монтировать внешние устройства или использовать расширенные функции, такие как файловый менеджер TWRP или даже его удобный интерфейс командной строки. . Однако существуют некоторые риски, если вы не прошиваете это восстановление должным образом.
Чаще всего вы можете оказаться в загрузочной петле или устройстве с программным кирпичом сразу после прошивки TWRP Recovery. И это было и всегда было одной из самых повторяющихся проблем для различных устройств Android. если вас это тоже беспокоит, то вы попали в нужное место. В этом руководстве мы объясним вам причины, а также шаги по устранению проблемы с программным кирпичом или загрузочной петлей после установки TWRP Recovery. Следуйте вместе.
С момента появления устройств с разделами A / B количество проблем, связанных с перепрошивкой TWRP, резко возросло. Поскольку устройства A/B больше не имеют выделенного раздела восстановления, вам необходимо загрузить его в загрузочный раздел, а затем прошить. Принимая во внимание, что, с другой стороны, устройства только для A по-прежнему имеют раздел восстановления, и, следовательно, TWRP можно прошить напрямую.
Однако, похоже, не многие пользователи знают, является ли их устройство разделом A/B или только A. В результате они в конечном итоге используют неправильную команду для прошивки восстановления, что приводит к повреждению загрузочного раздела. [Read: TWRP: fastboot flash vs fastboot boot: Which command to use].
Другая причина заключается в неспособности TWRP расшифровать раздел данных и, следовательно, получить доступ к данным, хранящимся на вашем устройстве. Эта проблема в основном связана с неофициальными сборками TWRP, но было несколько случаев, когда пользователи сталкивались с ошибкой и с официальными сборками. [Read: How to Fix TWRP 0MB Internal Memory Issue].
В том же духе, прошивка неправильной сборки также является одной из наиболее распространенных причин. В настоящее время большинство устройств имеют версии Pro, Super, Max, Ultra и множество других вариантов. Так что некорректная прошивка TWRP была замечена не раз. [Read: How to Fix TWRP Error 7 (While Flashing Custom ROM via TWRP)].
Кроме того, в некоторых случаях DM Verity Encryption также может вызывать некоторые проблемы. С учетом сказанного ниже приведены различные способы устранения всех этих проблем. Это, в свою очередь, поможет вам решить проблему с программным кирпичом или загрузочной петлей после установки TWRP Recovery. [Read: Disable DM-Verity or Android Verified Boot without TWRP].
Как исправить Soft Brick/Bootloop после установки TWRP Recovery
Универсального решения как такового нет. Вам придется попробовать каждое из перечисленных ниже исправлений, пока вы не сможете добиться успеха. Кроме того, если вы можете загрузиться в TWRP, сделайте резервную копию Nandroid, а затем перенесите ее в более безопасное место (SD-карта, USB OTG, ПК и т. д.).
С учетом сказанного давайте теперь приступим к руководству по устранению проблемы с программным кирпичом или загрузочной петлей после установки TWRP Recovery. Droidwin и его участники не будут нести ответственность в случае термоядерной войны, если ваш будильник не разбудит вас, или если что-то случится с вашим устройством или данными, выполнив следующие шаги.
Исправление 1: повторно проверьте загруженный файл TWRP
Одна из основных причин, по-видимому, связана с тем, что пользователи могли непреднамеренно загрузить неправильное восстановление TWRP. Теперь, когда каждое отдельное устройство выпускается в трех-четырех вариантах (Max, Pro, Ultra и т. д.), проблема становится еще более заметной. Поэтому лучшее решение в этом случае — проверить кодовое имя устройства.
Каждое устройство имеет уникальное имя. К счастью, TWRP загружает все файлы восстановления, соответствующие кодовому имени устройства, поэтому проблем с этим быть не должно. Просто повторно подтвердите кодовое имя вашего устройства, загрузите и установите соответствующий файл TWRP. Посмотрите, сможет ли он исправить проблему с программным кирпичом или загрузочной петлей после установки TWRP Recovery.
Исправление 2: Flash No-Verity-Opt-Encrypt
На вашем устройстве Android раздел данных зашифрован по умолчанию. Это делается для предотвращения несанкционированного доступа к данным, хранящимся на вашем устройстве. Хотя все это хорошо, реальная проблема возникает при доступе к данным через собственный двоичный файл, такой как TWRP. И есть только несколько TWRP Recovery, которые могут расшифровать раздел данных на ходу.
Для других вам придется выбрать альтернативные маршруты. Это предполагает два разных подхода. Первый из них менее радикальный, и мы поделились им здесь. Второй делает более экстремальный шаг, и поэтому мы поделились им после нескольких исправлений. С учетом сказанного, если мы сосредоточимся на этом исправлении, то оно потребует от вас прошивки no-verity-opt-encrypt (некоторые также называют его Disable_DM-Verity_ForceEncrypt). Шаги для прошивки этого файла следующие:
- Для начала скачайте файл: Скачать: no-verity-opt-encrypt-6.1.zip.
- Теперь загрузите свое устройство в TWRP Recovery.
- Затем перенесите файл No-Verity-Opt-Encrypt.zip на свое устройство через TWRP. Поскольку ваше устройство находится в бутлупе. Перенос через TWRP — единственный выход.
- Затем перейдите в «Установить» > «Выберите файл No-Verity-Opt-Encrypt.zip» > «Проведите пальцем вправо», чтобы прошить его.
- После этого перейдите в «Перезагрузка» и выберите «Восстановление». Теперь ваше устройство перезагрузится в TWRP.
- Теперь проверьте, устраняет ли он проблему с программным кирпичом или загрузочной петлей после установки TWRP Recovery.
Исправление 3: ZIP-файл установщика Flash Magisk
Хотя основной задачей Magisk по-прежнему является возможность рутирования вашего устройства, но это не единственная его задача. Он также содержит множество других полезных функций. Два из них — прохождение теста на подстраховку и расшифровка раздела данных. Хотя я действительно не тестировал последний, но было много пользователей, которые смогли исправить проблему TWRP Bootloop с помощью flash Magisk.
Однако, прежде чем сделать это, убедитесь, что вы полностью понимаете риск рутирования. Такие приложения, как Google Pay и подобные, могут работать не так, как ожидалось. [FIX: How to Pass Magisk SafetyNet on Rooted Android 11] Кроме того, вы можете больше не получать обновления OTA. [Fix: How to Install OTA Updates in Rooted Android Device. If that is all well and good, then here are the required steps to flash Magisk Installer ZIP via TWRP.
- To begin with, download the latest Magisk ZIP File: Magisk 21 ZIP File.
- Then boot your device to TWRP Recovery.
- Now, transfer the file to your device via TWRP. As mentioned before, since your device is in a bootloop. transferring via the TWRP is the only way out.
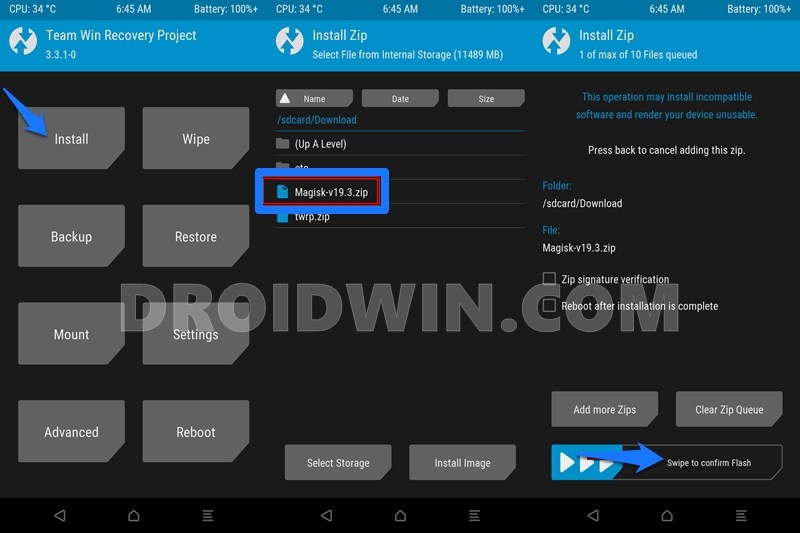
- After this head over to Install > Select the Magisk Installer ZIP file > Perform a right swipe to flash it.
- Once that is done, go to Reboot and select Recovery. Your device will now reboot to TWRP recovery.
- See if it fixes the soft brick or bootloop issue after installing the TWRP Recovery or not.
Fix 4: Format Data via TWRP
Well, we have already shared two different methods to decrypt the data partition. The first one was via flashing the no-verity-opt-encrypt.zip while the second one requires flashing of Magisk ZIP. However, in some instances, both these methods might not be able to give out desirable results. If that happens, then the only method forward is to format the data partition via TWRP. This will remove all the data from your device and at the same time, remove the encryption as well. Follow along for the instructions:
- First off, boot your device to TWRP Recovery.
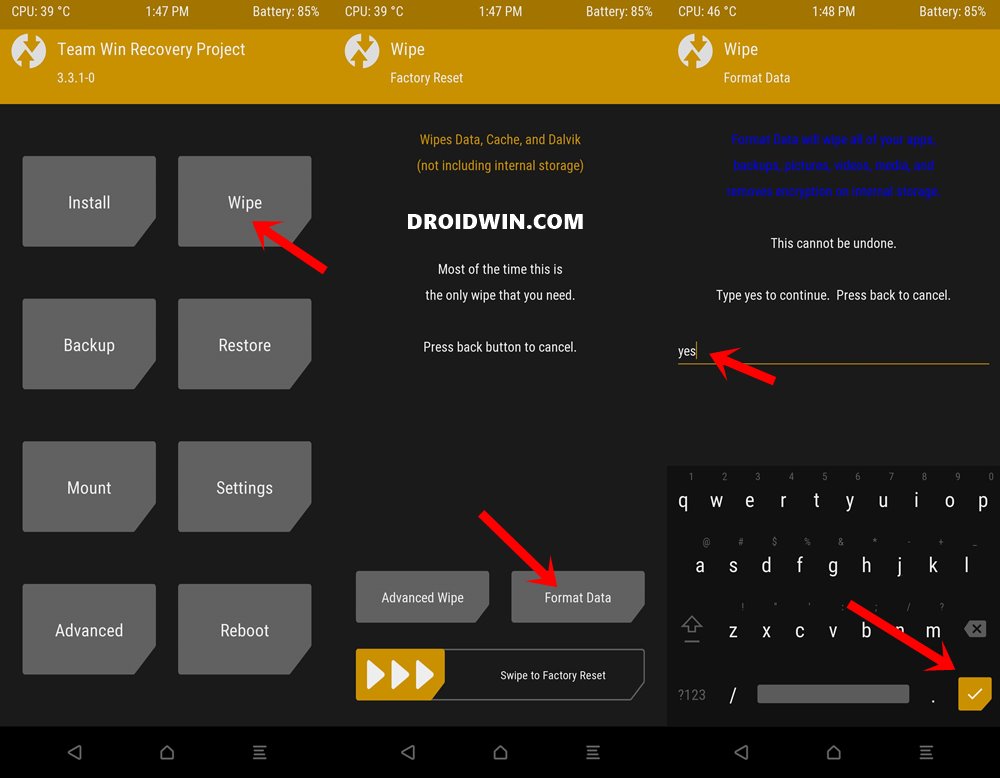
- Now go to Wipe and tap on Format Data.
- Type in YES in the space provided and tap on the tick mark situated at the bottom right.
- All the data from your deivce will no be deleted and the encryption will be removed as well.
- Once done, go to Reboot and tap on Recovery.
- Your device will now boot to TWRP. Check if it is able to fix the soft brick or bootloop issue after installing the TWRP Recovery or not.
- If the issue is still there, then transfer the No-Verity-Opt-Encrypt.zip file to your device via TWRP.
- Then go to Install, select that file, and perform a right swipe to flash it.
- Once the file has been flashed, go to Reboot and tap on Recovery. Once booted to TWRP, see if the issue stands rectified or not.
Fix 4: Flash Stock Boot.img via TWRP Recovery
If none of the aforementioned methods managed to spell out success in your case, then you might have to switch back to stock. It might be the case that the TWRP Recovery might have a few bugs that the developers are trying their best to fix. Or the boot partition on your device has been corrupted as a result of flashing an incorrect binary. So the best bet is to revert to stock and wait for a few days before flashing the TWRP, In the meantime, at least the bootloop will be fixed and your device will be up and running.
With that said, this method is only for A/B partition devices. This is because only these sets of devices use the boot partition to flash the recovery file. [The A-only devices still have the recovery partition to flash the TWRP]. Итак, во-первых, проверьте, является ли ваше устройство разделом A / B или нет, используя это руководство: . Если это действительно A/B, выполните шаги по прошивке стокового boot.img. Однако, если это окажется только для A, то обратитесь к шагам по прошивке стокового файла recovery.img.
Прошить стоковый Boot.img через TWRP [For A/B Devices]
Загрузите стоковый boot.img для своего устройства. Имейте в виду, что вы должны загружать только boot.img, соответствующий вашему текущему установленному ПЗУ, а также текущую версию прошивки. [Build Number]. Если вы используете стандартную прошивку, вам могут помочь следующие руководства:
Получив стандартный файл boot.img, выполните следующие шаги, чтобы установить его на свое устройство:
- Начните с загрузки вашего устройства в TWRP (если это еще не так).
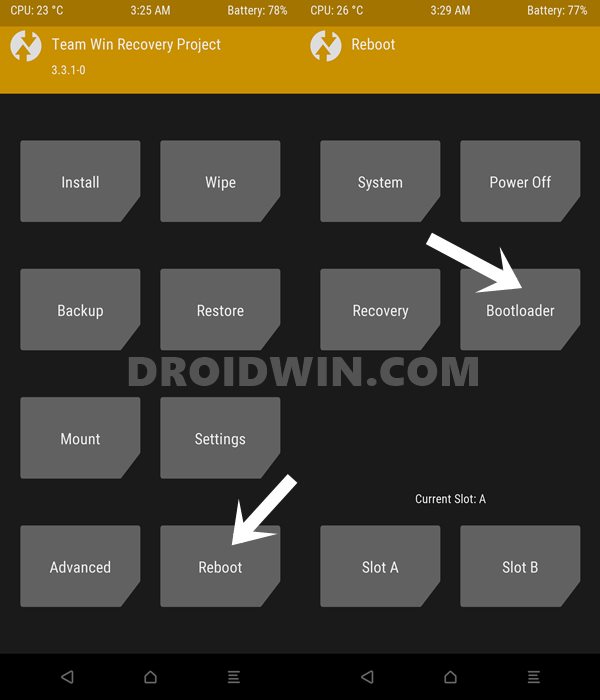
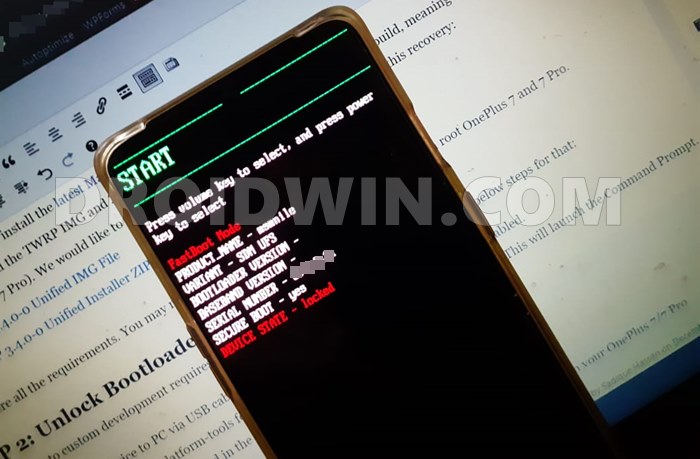
- После этого перейдите к «Перезагрузить» и нажмите «Загрузчик». Теперь ваше устройство загрузится в режиме быстрой загрузки.
- Затем загрузите и установите Android SDK Platform Tools на свой компьютер.
- Теперь перенесите стандартный файл boot.img в эту папку с инструментами платформы.
- Внутри той же папки введите CMD в адресной строке и нажмите Enter. Это запустит окно командной строки.
- Теперь введите следующую команду, чтобы прошить стандартный файл boot.img: fastboot flash boot boot.img
- Как только это будет сделано, используйте следующую команду для загрузки с перезагрузкой OSfastboot.
- Посмотрите, устраняет ли это проблему с программным кирпичом или загрузочной петлей после установки TWRP Recovery.
Прошить Stock Recovery.img через TWRP [For A-only Device]
Прежде всего, получите стандартный файл восстановления с помощью любого из следующих руководств, приведенных ниже (в то время как данные руководства сосредоточены на стандартном boot.img, но вы также получите другие файлы разделов, включая recovery.img):
Получив стандартный файл recovery.img, обязательно переименуйте его, выполнив следующие шаги, чтобы прошить его на свое устройство:
- Начните с загрузки вашего устройства в TWRP (если это еще не так).
- После этого перейдите к «Перезагрузить» и нажмите «Загрузчик». Теперь ваше устройство загрузится в режиме быстрой загрузки.
- Затем загрузите и установите Android SDK Platform Tools на свой компьютер.
- Теперь перенесите стоковый файл recovery.img в эту папку platform-tools.
- Внутри той же папки введите CMD в адресной строке и нажмите Enter. Это запустит окно командной строки:
- Теперь введите следующую команду, чтобы прошить стоковый файл recovery.img: fastboot flash recovery recovery.img
- Как только это будет сделано, используйте следующую команду для загрузки с перезагрузкой OSfastboot.
- Посмотрите, устраняет ли он проблему с программным кирпичом или загрузочной петлей после установки TWRP Recovery.
Исправление 6: перепрошить стоковую прошивку
Если прошивка только стандартного boot.img или recovery.img не помогла решить эту проблему, вам, вероятно, придется полностью перепрошить пользовательское ПЗУ или стандартное ПЗУ. Другими словами, переустановите ОС, которую вы сейчас используете. В случае пользовательских ПЗУ вам следует придерживаться инструкций по перепрошивке, предоставленных разработчиками. Пока вы можете продолжить с грязной флэш-памятью, но рекомендуется выполнить чистую установку (то есть также отформатировать данные).
С другой стороны, если вы используете стандартную прошивку, начните с отключения вашего устройства{ [3 METHODS] Отключите любое устройство Android — удалите Magisk}. Точно так же обязательно удалите все моды или пользовательские двоичные файлы, которые вы установили. Как только это будет сделано, обратитесь к нашему подробному руководству «Как прошить стоковую прошивку с помощью команд Fastboot». Сделайте это, и проблема должна быть исправлена.
На этом мы завершаем руководство о том, как исправить проблему с программным кирпичом или загрузочной петлей после установки TWRP Recovery. Мы поделились шестью различными методами для одного и того же. Дайте нам знать в комментариях, какой из них сработал в вашу пользу. Точно так же, если у вас есть какие-либо вопросы относительно вышеупомянутых шагов, сообщите нам об этом в комментариях.
In this tutorial, we will show you how to fix the soft brick or bootloop issue after installing the TWRP Recovery. Stepping into custom development is like the two faces of a coin. On one side you are guaranteed tons of tweaks, mods, and customizations. But on the other, there are a few risks as well. Talking about the positives first, well you just need to unlock the bootloader. After which, you could flash custom ROMs, binaries, or even root your deivce via Magisk.
Along the same lines, you could also install a custom recovery like TWRP. There are a plethora of reasons why you would need this recovery. To begin with, you could easily flash ZIP and IMG files, create and restore Nandroid backups or delete various device partitions, Likewise, you could also mount external devices or use advanced functions such as the TWRP file manager or even its handy command-line interface. However, there do exist some risks if you don’t flash this recovery in the right manner.
More often than not, you might end up in a bootloop or a soft brick device right after flashing the TWRP Recovery. And this was and has always been among the most recurring issues for various Android devices. if you are also getting bugged with this, then you have come to the right place. In this guide, we will explain to you the reasons as well as the steps to fix the soft brick or bootloop issue after installing the TWRP Recovery. Follow along.
- Fix Magisk Module Bootloop without TWRP Recovery
- Fix Magisk patched boot.img issue while Rooting Android 11
- How to Pass Magisk SafetyNet on Rooted Android 11
- How to Fix Android Device stuck in Fastboot Mode
Right since the inception of A/B partition devices, issues related to the flashing of TWRP has skyrocketed. Since A/B devices no longer have a dedicated recovery partition, hence you need to boot it to the boot partition and then flash it. Whereas on the other hand, A-only devices still have the recovery partition and hence TWRP could directly be flashed.
However, not many users seem to be aware of whether their deivce is an A/B partition or is A-only. As a result, they end up using the incorrect command to flash the recovery which results in the corrupt boot partition. [Read: TWRP: fastboot flash vs fastboot boot: Which command to use].
The other reason is the inability of TWRP to decrypt the data partition and hence access the data stored on your device. This issue is mostly linked with unofficial TWRP builds but there have been a few instances of users facing the error with official builds as well. [Read: How to Fix TWRP 0MB Internal Memory Issue].
Along the same lines, flashing the incorrect build is among the most common cause as well. Nowadays, most devices have a Pro, Super, Max, Ultra, and tons of other variants. So incorrect flashing of TWRP has been noticed quite a few times. [Read: How to Fix TWRP Error 7 (While Flashing Custom ROM via TWRP)].
Furthermore, in some cases, the DM Verity Encryption could also cause a few issues. With that said, given below are the various methods to rectify all these issues. This in turn will help you fix the soft brick or bootloop issue after installing the TWRP Recovery. [Read: Disable DM-Verity or Android Verified Boot without TWRP].
How to Fix Soft brick/Bootloop after installing TWRP Recovery
There is no universal fix as such. You will have to try out each of the below-mentioned fixes until you are able to achieve success. Furthermore, if you are able to boot to TWRP, then take a Nandroid backup and then transfer it to a safer place (SD Card, USB OTG, PC, etc).
With that said, let’s now get on with the guide to fix the soft brick or bootloop issue after installing the TWRP Recovery. Droidwin and its members wouldn’t be held responsible in case of a thermonuclear war, your alarm doesn’t wake you up, or if anything happens to your device or data by performing the below steps.
Fix 1: Reverify the Downloaded TWRP File
One of the most command reasons seems to stem out from the fact that users might have unintentionally downloaded the incorrect TWRP Recovery. Now that every single device comes in three-four variants (Max, Pro, Ultra, etc), the issue becomes all the more prominent. So the best fix, in this case, is to verify the device codename.
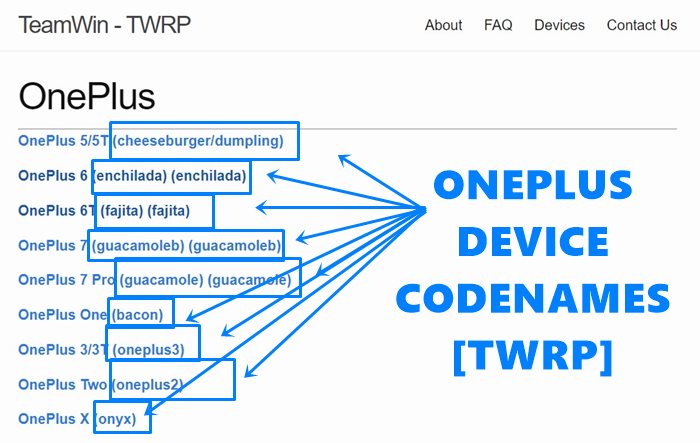
Each device comes with a unique name. Fortunately, TWRP uploads all the recovery files corresponding to the device code-name, so there shouldn’t be an issue on that end. Just reverify your device code name and download and flash the TWRP file accordingly. See if it is able to fix the soft brick or bootloop issue after installing the TWRP Recovery.
Fix 2: Flash No-Verity-Opt-Encrypt
Your Android deivce has the data partition encrypted by default. This is done to prevent unauthorized access to the data stored on your device. While this is all well and good, the real issue arises in accessing the data via a custom binary file such as TWRP. And there is only a handful of TWRP Recoveries that are able to decrypt the data partition on the go.
For others, you will have to take alternate routes. This involves two different approaches. The first one is the less drastic one and we have shared it here. The second one takes a more extreme step and hence we have shared that after a few fixes. With that said, if we focus on this fix, then it requires you to flash the no-verity-opt-encrypt (some also calls it by the name Disable_DM-Verity_ForceEncrypt). The steps to flash this file is as follows:

- To begin with, download the file: Download: no-verity-opt-encrypt-6.1.zip.
- Now, boot your device to TWRP Recovery.
- Next up, transfer the No-Verity-Opt-Encrypt.zip file to your device via TWRP. Since your device is in a bootloop. transferring via the TWRP is the only way out.
- Then go to Install > Select the No-Verity-Opt-Encrypt.zip file > Perform a right swipe to flash it.
- Once done, go to Reboot and select Recovery. Your device will now reboot to TWRP.
- Now check if it fixes the soft brick or bootloop issue after installing the TWRP Recovery.
Fix 3: Flash Magisk Installer ZIP
While Magisk’s primary focus still stands the ability to root your device, but that isn’t its only focus. It also holds a plethora of other useful functionalities. Two of them are the passing of the safety net test and decryption of data partition. While I haven’t really tested the latter one, but there are have been many users who were able to fix the TWRP Bootloop issue by flash Magisk.
However, before you do so, make sure you completely understand the risk of rooting. Apps like Google Pay and the likes might not function as expected [FIX: How to Pass Magisk SafetyNet on Rooted Android 11] Likewise, you might no longer receive OTA updates [Fix: How to Install OTA Updates in Rooted Android Device. If that is all well and good, then here are the required steps to flash Magisk Installer ZIP via TWRP.
- To begin with, download the latest Magisk ZIP File: Magisk 21 ZIP File.
- Then boot your device to TWRP Recovery.
- Now, transfer the file to your device via TWRP. As mentioned before, since your device is in a bootloop. transferring via the TWRP is the only way out.
- After this head over to Install > Select the Magisk Installer ZIP file > Perform a right swipe to flash it.
- Once that is done, go to Reboot and select Recovery. Your device will now reboot to TWRP recovery.
- See if it fixes the soft brick or bootloop issue after installing the TWRP Recovery or not.
Fix 4: Format Data via TWRP
Well, we have already shared two different methods to decrypt the data partition. The first one was via flashing the no-verity-opt-encrypt.zip while the second one requires flashing of Magisk ZIP. However, in some instances, both these methods might not be able to give out desirable results. If that happens, then the only method forward is to format the data partition via TWRP. This will remove all the data from your device and at the same time, remove the encryption as well. Follow along for the instructions:
- First off, boot your device to TWRP Recovery.
- Now go to Wipe and tap on Format Data.
- Type in YES in the space provided and tap on the tick mark situated at the bottom right.
- All the data from your deivce will no be deleted and the encryption will be removed as well.
- Once done, go to Reboot and tap on Recovery.
- Your device will now boot to TWRP. Check if it is able to fix the soft brick or bootloop issue after installing the TWRP Recovery or not.
- If the issue is still there, then transfer the No-Verity-Opt-Encrypt.zip file to your device via TWRP.
- Then go to Install, select that file, and perform a right swipe to flash it.
- Once the file has been flashed, go to Reboot and tap on Recovery. Once booted to TWRP, see if the issue stands rectified or not.
- Unbrick Motorola and Fix Start Up Failed without using Lenovo Motorola Smart Assistant
- Restore Pixel 3/3 XL/3a/3a XL to Stock Firmware via Fastboot | Unbrick it
- How to Boot any (Bricked/Unbricked) Android Device to EDL Mode
- Boot Realme Devices to EDL Mode (3 Methods) | Unbrick It
- How to Root Android Devices Without TWRP Recovery
Fix 4: Flash Stock Boot.img via TWRP Recovery
If none of the aforementioned methods managed to spell out success in your case, then you might have to switch back to stock. It might be the case that the TWRP Recovery might have a few bugs that the developers are trying their best to fix. Or the boot partition on your device has been corrupted as a result of flashing an incorrect binary. So the best bet is to revert to stock and wait for a few days before flashing the TWRP, In the meantime, at least the bootloop will be fixed and your device will be up and running.
![]()
With that said, this method is only for A/B partition devices. This is because only these sets of devices use the boot partition to flash the recovery file. [The A-only devices still have the recovery partition to flash the TWRP]. So first off, verify if your device is A/B Partition or not using this guide: . If it is indeed A/B, then proceeded with the steps to flash the stock boot.img. However, if it turns out to be A-only, then refer to the steps to flash the stock recovery.img file.
Flash Stock Boot.img via TWRP [For A/B Devices]
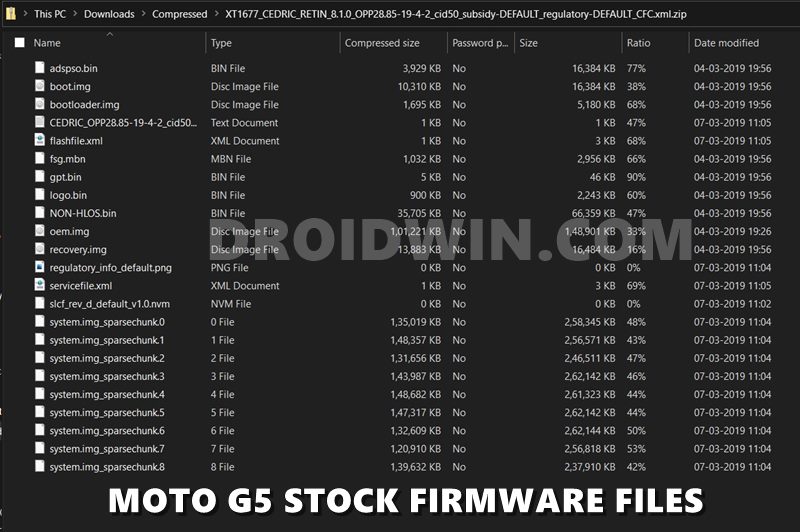
Download the stock boot.img for your device. Do keep in mind that you should only download the boot.img corresponding to your currently installed ROM as well as the current firmware version [Build Number]. If you are on a stock ROM, then the following guides might help you out:
- How to Extract payload.bin and get the stock boot image file
- Extract Stock Boot.img from OnePlus OxygenOS Stock ROM
- How to Extract OZIP Realme Stock ROM (Firmware)
Once you have got the stock boot.img file, proceed with the below steps to install it onto your device:
- Start off by booting your device to TWRP (if that isn’t the case already).
- Once done, go to go to Reboot and tap on Bootloader. Your device will now boot to Fastboot Mode.

- Next up, download and install the Android SDK Platform Tools on your PC.
- Now transfer the stock boot.img file to this platform-tools folder.
- Inside the same folder, type in CMD in its address bar and hit Enter. This will launch the Command Prompt window.

- Now type the following command to flash the stock boot.img file:
fastboot flash boot boot.img
- Once that is done, use the following command to boot to the OS
fastboot reboot
- See if it fixes the soft brick or bootloop issue after installing the TWRP Recovery

Flash Stock Recovery.img via TWRP [For A-only Device]
Tio begin with, get hold of the stock recovery file via any of the following guides given below (while the given guides focus on stock boot.img, but you will also get other partition files, including the recovery.img):
- How to Extract payload.bin and get the stock boot image file
- Extract Stock Boot.img from OnePlus OxygenOS Stock ROM
- How to Extract OZIP Realme Stock ROM (Firmware)
Once you get the stock recovery.img file, make sure to rename proceed with the below steps to flash it onto your device:
- Start off by booting your device to TWRP (if that isn’t the case already).
- Once done, go to go to Reboot and tap on Bootloader. Your device will now boot to Fastboot Mode.

- Next up, download and install the Android SDK Platform Tools on your PC.
- Now transfer the stock recovery.img file to this platform-tools folder.
- Inside the same folder, type in CMD in its address bar and hit Enter. This will launch the Command Prompt window:
- Now type the following command to flash the stock recovery.img file:
fastboot flash recovery recovery.img
- Once that is done, use the following command to boot to the OS
fastboot reboot
- See if it fixes the soft brick or bootloop issue after installing the TWRP Recovery.
Fix 6: Reflash the Stock Firmware
If flashing just the stock boot.img or the recovery.img doesn’t managed to fix this issue, then you would probably have to completely reflash the custom ROM or stock ROM. In other words, reinstall the OS that you are currently using. In case of custom ROMs, well you should stick with the flashing instructions that the developers have provided. While you may proceed with the dirty flash, but it is recommended that you go ahead with a clean install (i.e formatting the data as well).
On the other hand, if you are on a stock ROM, then start off by unrooting your device{ [3 METHODS] Unroot any Android Device-Uninstall Magisk}. Likewise, also make sure to remove any mods or custom binaires that you have installed. Once that is done, refer to our detailed guide to How to Flash Stock Firmware via Fastboot Commands. Do so and the issue should be fixed.
With this, we conclude the guide on how to fix the soft brick or bootloop issue after installing the TWRP Recovery. We have shared six different methods for the same. Do let us knwo in the comments which one managed to work out in your favor. Likewise, if you have any queries concerning the aforementioned steps, do let us knwo in the comments as well.
- How to fix ADB Device not found [List of Devices Attached is blank]
- Detailed Steps to Fix adb is not recognized Error
- Fix Unauthorized Device with ADB Commands [3 methods]
- How to Fix FAILED (remote: Command not allowed)
- How to Fix TWRP 0MB Internal Memory Issue
About Chief Editor

Sadique Hassan
administrator
A technical geek by birth, he always has a keen interest in the Android platform right since the birth of the HTC Dream. The open-source environment always seems to intrigue him with the plethora of options available at his fingertips. “MBA by profession, blogger by choice!”
The term boot loop is often used to describe a situation in which an Android device will not fully load the operating system and instead loops continuously between the startup screen and a partially-loaded home screen. This can happen for many reasons, but it’s typically caused by either corrupt data on your phone’s internal storage or problems with the firmware. Thankfully, there are ways you can fix this problem without having to send your phone away for repair! In this article, we have discussed how to fix bootloop with twrp so that you can get back your phone working again.

Summary: If your phone is stuck in a bootloop, there are a few things you can do to fix it. First, make sure you have the latest version of Android software installed on your phone. Next, download and install the TWRP recovery tool. Once you have TWRP installed, use it to flash the latest firmware update for your phone onto your device. If that doesn’t work, you can try resetting your phone back to its factory settings.
Required Things
- Your Android device
- A computer with Windows installed or a Mac
- MiniTool Partition Wizard
- USB cable to connect your Phone and Computer
Instructions: How to Fix Bootloop With Twrp
Step One:
The first thing you need to do to fix a boot loop issue on your Android device is to download the Twrp recovery image for your device. Once you have downloaded the image, extract it and save it to your computer’s desktop folder.
Step Two:
Connect your phone to your computer with a USB cable to access your phone’s data on your computer.
Step Three:
Open Command Prompt and type in ADB devices, then press enter. If you see your device pop up there, then it’s ready to go for the next step. If not, check that you’ve got the correct USB cables and that your drivers are installed. If you’ve got the drivers correctly installed, then try checking the box that says “Allow USB debugging” in your phone’s developer options. If it still isn’t working after that, try restarting your computer and making sure your phone is set to MTP mode (File Transfer mode).
Step Four:
You need to type in ADB reboot bootloader to get into fast boot mode. To do this, press enter on the keyboard.
Step Five:
Type in fast boot flash recovery TWRP-filename at this point for whatever folder you saved it in (e.g., fast boot flash recovery android_one_twrp”). Press Enter again after typing that command so that it executes properly. Finally, type exit to go back out of Command Prompt or CMD window when done.
Step Six:
Once you’ve followed these steps, turn off your phone and wait about a minute before turning it back on to see if the problem has been fixed! If not, you’ll need to do some more troubleshooting. Delete the Text App Data If simply restarting your phone hasn’t fixed the problem, the next thing you should try is deleting the text app data. This will force the app to rebuild the cache and shouldn’t delete any of your actual messages.
Step Seven:
If you’re still having problems, try the same process over again. Still, with a different recovery, file if available, or use a factory reset through the Android system (also known as wiping all your data).
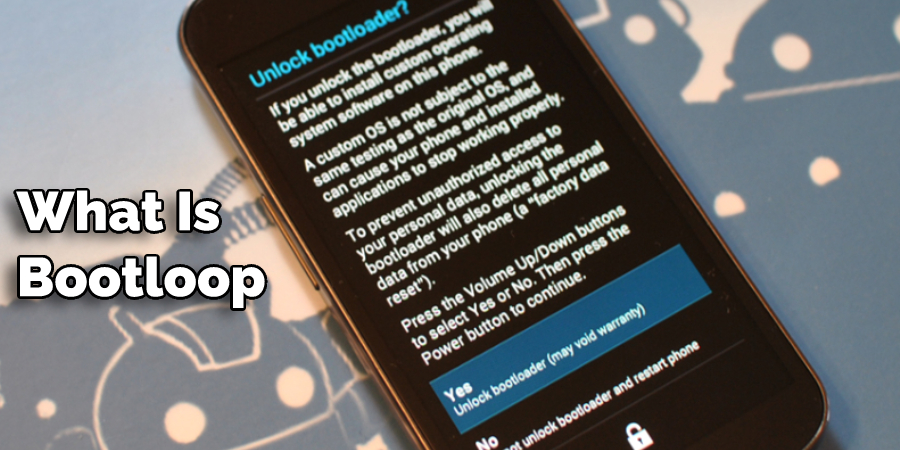
What is Bootloop?
Bootloop is a condition where the phone automatically restarts on its own with no warning. This can happen for many reasons, including low battery, insufficient storage space available to install an operating system update, or corruption of the software. There are two main solutions that we would recommend as follows:
Solution One – You boot into recovery mode and then wipe data/factory reset, which deletes your personal information like photos, contact lists, etc.
Solution Two – You use ADB commands to delete specific files to resolve some software issue causing Bootloop.
Reason Why Bootloop Happens?
If you are too impatient and excited when using your phone, the boot loop will likely happen. Usually, a boot loop happens after an update or root because it can’t get past something in the system due to corrupted data or files. Not only does this make rebooting impossible, but also makes any factory reset not work either. That means if there’s a good chance of fixing with twrp, then we should do so before anything else! We will also be discussing the method on how to fix bootloop with twrp in these blog posts. So don’t forget to check it out.
What is TWRP?
TWRP stands for Team Win Recovery Project. It is a custom recovery software that helps you to install and use Android operating systems on your phone or tablet. TWRP can be used when the device doesn’t boot up properly, as it will allow you to access all of the information stored in its memory and make changes, such as installing new firmware updates (buttons).
TWRP also offers several advanced features unavailable in stock recovery, including backing up and restoring your phone’s software. To install TWRP, you have to download an installer for it from Android File Host and use the ADB command to boot into the installation.
Benefits of Using TWRP
- It lets you install custom OS and kernels
- It gives the user a way to backup data, restore your phone from backups, or create an android.
- It offers a console that can be used for various functions, like viewing logs and flashing zip files.
- TWRP allows you to modify the system partition without needing root access, which means that if there is a boot loop and your device can’t get past the Android logo because of damage or corruption in this section of the firmware, then someone with little technical knowledge can fix it.
- You can flash an image of the same Android version or a newer one, which is useful for updating the latest security patches.
- You can wipe your data and Flashify backups (backups zipped into .zip files) with TWRP without needing root access, which means you don’t need to connect through ADB anymore.
How To Install Twrp?
Just follow the installation steps one by one carefully for the successful installation of this custom recovery on your device.
1) Download the latest TWRP file (you can get it from here)
2) Transfer downloaded file into internal storage or SD card of your Android device
3) Power off your phone
4) Reboot in bootloader mode
Note: If you are using a Samsung phone, make sure that you have enabled the “OEM unlocking” option under Developer Options before proceeding with the following instructions below. Once done, please proceed right away with the next set of instructions as per the given order until you finish installing TWRP on your phone successfully.
5) Press and hold “Volume Up,” “Home” and the power button of your device until you enter into bootloader mode, then release only the power key. You should see the TWRP logo on-screen now (please note that this may differ depending on what version of Android OS is running on your device)
6) After the TWRP logo shows up on the screen, please release the “Volume Up” and “Power Button,” then you should see a list of options in front of you
7) The first option is to Wipe data/factory reset followed by wipe cache partition that will allow your phone to fix the boot loop issue as well.
8) Next, select the “Recovery Mode” option using Volume buttons to scroll up/down between options and Power button to select.
Note: Please make sure before choosing anything else from this menu, just scroll down at least one line after selecting these two options so you can find the Reboot system now or leave it blank for a regular reboot. You need to press the volume keys again while holding the power key till the device reboots successfully into normal mode with no issues.
9) Now go back to Home Screen, clear all recent apps using three fingers swipe gesture, and then go back to Settings >> Apps and select Show system apps.
10) Find the App called “Package Installer” or “APK installer” on the System Application page
11) You’ll see a list of options with it such as Open, Uninstall, etc. Tap on the Open option that will allow you to install APPs from this app without any hassle, just like how you do in Play Store.
12) Select the APK file you just downloaded on your computer and wait for it to install.
13) Once installation is complete, tap the “Open” button again. This time there will be a message saying “Package Installation Successful.” It means that now when you reboot the device, Android OS will start up without any issues.
Precautions To Take
- Android system needs to be rooted.
- You need a recovery tool like TWRP.
- Ensure that the device is charged up to 80% or more. If not, use a wall charger and connect it to an AC outlet.
- Back up important data such as photos, videos, music files, etc., if anything goes wrong while installing TWRP recovery on your Android phone.
- Make sure to enable USB debugging and OEM unlocking on your device.
- Enable OTG storage on your Android phone’s setting. Again, how to do this varies from model to model, so refer to the manual for your device or check online tutorials.
Tips and Advice To Avoid Bootloop in the Future
The boot loop is a frustrating problem that can often make your device unusable. We have already given some instructions on how to fix bootloop with twrp. But here we give some tips and advice that should be taken to avoid them again in the future!
Tip 1: Check the operating system for updates or bugs. If there is a bug that you are running into, it may be beneficial to update your operating system to avoid this problem in future boot loops.
Tip 2: Be careful with what kind of programs and apps you download onto your device! The more codes on your phone, the higher chance of something going wrong when updating or installing new programs, which could cause a boot loop.
Tip 3: Don’t use third-party software such as rooting tools because they can make an already delicate process even worse by altering your phone’s firmware settings, causing errors that cannot always be fixed without wiping data completely off the device (which would erase all content).
Tip 4: If you’re having issues that you can’t figure out with your phone, you should backup your phone’s data and do a factory reset. The best way to go about this is by selecting the “Wipe” option within TWRP, which will wipe your device clean of all personal information without damaging any system files or programs that could be causing problems.
Tip 5: With a factory reset, you’ll be able to start fresh with your new phone. It also ensures that all of the programs and software on your current device are up-to-date by installing updates from Google Play Store.
Frequently Asked Questions
How Do You Know if Your Device Has an Issue?
Android is a complicated operating system that can be very difficult to fix. If it’s restarting the loop after being turned on, then there’s likely some sort of software or hardware problem with the phone. The best thing for you to do in this case would be to take out the battery and put it back in before powering up again.
This will often bypass any faulty connections by jumping straight into Android OS without going through the boot animation process. If this doesn’t work, you should consider taking more drastic measures like “wiping” or reformatting your data from within TWRP recovery mode, which we’ve discussed in the following blog post!
What Can Cause a Bootloop Issue?
A boot loop is a continuous loop in the system, and several factors can cause it. For instance, some applications may cause an issue with one or more dependencies required to fully load correctly onto your device’s operating system during startup.
How Do I Fix Boot Loop Error?
To fix the boot loop error, you need to find out the root cause of the issue and take appropriate measures. You can try many things to fix the error on your device running Android OS or other operating systems like Windows XP. One option is using TWRP recovery mode, which will allow you to perform various tasks such as formatting partition data, for example.
But this may not always work if there are errors deep within your system’s file structure that have been caused by faulty applications, drivers, third-party software, hardware problems, etc. For most people who suffer from boot loops due to malware infections, it’s often enough just delete all their personal data and apps and then reset the phone to factory settings.
Conclusion
A boot loop occurs when the phone’s software crashes and loops back on itself, causing an infinite restart cycle of the device. The most common cause of this error is a faulty update. You can now fix boot loop issues with your Android device.
If you are experiencing the common problem of a phone that won’t power on, it might be time to try using TWRP recovery mode and factory reset to get things back up and running again. We’ve outlined the steps in our article on how to fix bootloop with twrp.
The steps for doing this are simple enough that anyone should follow along, so don’t hesitate! If this isn’t working for you, we also listed a few other solutions that may be helpful. We’re also happy to help out if you need any more info too. Good luck!
You may read aslo:
- How To Fix Black Spot On IPhone Screen
- How to Fix a Hard Bricked Phone
I am trying to recover the data from a default/factory encrypted
Samsung Galaxy S7 Edge stuck in a bootloop (i.e.: restarting endlessly when
booting the system). It is using the stock rom. Only the recovery (twrp) and
download mode are working. I need to either fix the bootloop or decrypt at
least the data partition in twrp (I know the lock pattern). Note: I
know that the bootloop might be fixed by a factory reset, but that would result
in data loss.
General info:
Model: SM-G935F
Codename: hero2lte
Android version: Stock 7.1.x (almost sure)
TWRP: 3.2.3-0
Install
I followed the adb guide and the install guide (only up to and
including the twrp install; LineageOS was not installed).
After installing adb and heimdall on the pc, this is what was done on
the phone:
- Enter download mode
heimdall flash --RECOVERY twrp-3.2.3-0-hero2lte.img- Reboot into recovery
It kept saying it could not mount /system nor /data, but it never
asked (and still doesn’t) for the encryption password or anything. When
trying to do a nandroid backup, Internal storage showed as 0 MB and it errored
out.
Booting into the system worked without any issues.
Then, I tried installing (LineageOS’) su, to be able to backup things
properly using something like oandbackup or TitaniumBackup:
- Boot into recovery
adb push addonsu-15.1-arm64-signed.zip- Install -> addonsu-15.1-arm64-signed.zip
I thought one of the following was going to happen:
- The write would work, and su would be available
- The write would work, and the stock rom would ignore it
- The write would fail, nothing would happen
It showed some errors about the partitions again (up to this point, I thought
only the data partition was encrypted, not the system one).
I tried Reboot -> System, and what happened was:
- The device was (and still is) stuck in a bootloop
So I tried using LineageOS’ su-removal:
- Boot into recovery
adb push addonsu-remove-15.1-arm64-signed.zip- Install -> addonsu-remove-15.1-arm64-signed.zip
Yet, nothing seems to have changed. TWRP onscreen log:
Could not mount /data and unable to find crypto footer.
Failed to mount '/data' (Invalid argument)
Updating partition details...
Failed to mount /data (Invaild argument)
...done
Unable to mount storage
Failed to mount /data (Invaild argument)
Full SELinux support is present.
Unable to mount /data/media/TWRP/.twrps
MTP Enabled
Looking at /cache/recovery/log, it does not show /system as empty:
/system | /dev/block/sda14 | Size: 4132MB Used: 3987MB Free: 145MB Backup Size: 3987MB
   Flags: Can_Be_Mounted Can_Be_Wiped Can_Be_Backed_Up Wipe_Available_in_GUI IsPresent Mount_Read_Only
   Primary_Block_Device: /dev/block/sda14
   Display_Name: System
   Storage_Name: System
   Backup_Path: /system
   Backup_Name: system
   Backup_Display_Name: System
   Storage_Path: /system
   Current_File_System: ext4
   Fstab_File_System: ext4
   Backup_Method: files

/data | /dev/block/sda18 | Size: 0MB Used: 0MB Free: 0MB Backup Size: 0MB
   Flags: Can_Be_Mounted Can_Be_Wiped Can_Be_Backed_Up Wipe_During_Factory_Reset Wipe_Available_in_GUI IsPresent Can_Be_Encrypted Has_Data_Media Can_Encrypt_Backup Use_Userdata_Encryption Is_Storage Is_Settings_Storage
   Symlink_Path: /data/media
   Symlink_Mount_Point: /sdcard
   Primary_Block_Device: /dev/block/sda18
   Length: -20480
   Display_Name: Data
   Storage_Name: Internal Storage
   Backup_Path: /data
   Backup_Name: data
   Backup_Display_Name: Data
   Storage_Path: /data/media
   Current_File_System: ext4
   Fstab_File_System: ext4
   Backup_Method: files
   MTP_Storage_ID: 65537
But it shows nothing when trying to access it:
~ # ls -lah /system
__bionic_open_tzdata: couldn't find any tzdata when looking for localtime!
__bionic_open_tzdata: couldn't find any tzdata when looking for GMT!
__bionic_open_tzdata: couldn't find any tzdata when looking for posixrules!
drwxr-xr-x    2 root     root          40 Jan  1  1970 .
drwxrwxrwt   24 root     root         840 Sep 10 02:15 ..
Also in /cache/recovery/log:
I:Done processing fstab files
I:Setting up '/data' as data/media emulated storage.
I:Created '/sdcard' folder.
I:Can't probe device /dev/block/sda18
I:Unable to mount '/data'
I:Actual block device: '/dev/block/sda18', current file system: 'ext4'
I:Can't probe device /dev/block/sda18
I:Unable to mount '/data'
I:Actual block device: '/dev/block/sda18', current file system: 'ext4'
get_crypt_ftr_info crypto key location: 'footer'
Bad magic for real block device /dev/block/sda18
Could not mount /data and unable to find crypto footer.
I:Setting up '/data' as data/media emulated storage.
I:Can't probe device /dev/block/sda18
I:Unable to mount '/data'
# ...
Questions:
-
If it could not even mount the parition, how did it become soft bricked?
-
Does “Install” write anything anywhere else (excluding log entries, etc)?
-
Can it actually overwrite/damage the partition (or the block device directly)
even when it cannot mount it? -
Is there a way to debug the bootloop
-
How could the bootloop be fixed?
Decrypt
So I tried decrypting the data partitions to see if I at least could access it
from twrp, using these steps.
This is the pattern:
[_   1   6]
[2   7   5]
[3   4   _]
Which means the code twrp uses (from 1 to 9) should be this: 2478635. So I
tried:
~ # twrp decrypt 2478635
Attempting to decrypt data partition via command line.
Failed to decrypt data.
I also tried using the “native” code (from 0 to 8), to no avail:
~ # twrp decrypt 1367524
Attempting to decrypt data partition via command line.
Failed to decrypt data.
Looking at the partitions:
~ # ls -l /dev/block/platform/155a0000.ufs/by-name/
__bionic_open_tzdata: couldn't find any tzdata when looking for localtime!
__bionic_open_tzdata: couldn't find any tzdata when looking for GMT!
__bionic_open_tzdata: couldn't find any tzdata when looking for posixrules!
lrwxrwxrwx    1 root     root            15 Sep 10 02:15 BOOT -> /dev/block/sda5
lrwxrwxrwx    1 root     root            15 Sep 10 02:15 BOTA0 -> /dev/block/sda1
lrwxrwxrwx    1 root     root            15 Sep 10 02:15 BOTA1 -> /dev/block/sda2
lrwxrwxrwx    1 root     root            16 Sep 10 02:15 CACHE -> /dev/block/sda15
lrwxrwxrwx    1 root     root            15 Sep 10 02:15 CPEFS -> /dev/block/sdd1
lrwxrwxrwx    1 root     root            16 Sep 10 02:15 CP_DEBUG -> /dev/block/sda17
lrwxrwxrwx    1 root     root            16 Sep 10 02:15 DNT -> /dev/block/sda10
lrwxrwxrwx    1 root     root            15 Sep 10 02:15 EFS -> /dev/block/sda3
lrwxrwxrwx    1 root     root            16 Sep 10 02:15 HIDDEN -> /dev/block/sda16
lrwxrwxrwx    1 root     root            15 Sep 10 02:15 OTA -> /dev/block/sda7
lrwxrwxrwx    1 root     root            15 Sep 10 02:15 PARAM -> /dev/block/sda4
lrwxrwxrwx    1 root     root            16 Sep 10 02:15 PERSDATA -> /dev/block/sda13
lrwxrwxrwx    1 root     root            16 Sep 10 02:15 PERSISTENT -> /dev/block/sda11
lrwxrwxrwx    1 root     root            15 Sep 10 02:15 RADIO -> /dev/block/sda8
lrwxrwxrwx    1 root     root            15 Sep 10 02:15 RECOVERY -> /dev/block/sda6
lrwxrwxrwx    1 root     root            16 Sep 10 02:15 STEADY -> /dev/block/sda12
lrwxrwxrwx    1 root     root            16 Sep 10 02:15 SYSTEM -> /dev/block/sda14
lrwxrwxrwx    1 root     root            15 Sep 10 02:15 TOMBSTONES -> /dev/block/sda9
lrwxrwxrwx    1 root     root            16 Sep 10 02:15 USERDATA -> /dev/block/sda18
Shows that sda14 is the system partition and that sda18 is the data
partition. So I managed to pull /dev/block/sda14 and /dev/block/sda18:
adb pull /dev/block/sda14 sda14.img
# ...

adb pull /dev/block/sda18 sda18.img
/dev/block/sda18: 1 file pulled. 3.7 MB/s (26843545600 bytes in 6961.803s)
I verified that the SHA-1 hashes of the block device and the .img match, but
I’m at a loss about how to decrypt them on the pc.
Question:
How could I decrypt them on Android/Linux/Windows?
Note: If this is too specific for this site, please comment where the
appropriate forum would be. I know of the phone-specific xda, but that seems
to be too generic. Any help is appreciated.
Что такое бутлуп
Бутлуп – это бесконечная циклическая загрузка смартфона. Телефон не может запустить Android и поэтому постоянно перезагружается после показа логотипа. Слово bootloop образовано от двух английских слов «boot» (загрузка) и «loop» (петля).
Суть проблемы состоит в том, что загрузчик Xiaomi (bootloader) по какой-то причине не может стартовать. В итоге получается циклический ребут. Для исправления ситуации есть несколько способов.
Сначала нужно определить причину возникновения неполадки. С ходу назвать причину практически невозможно, поэтому приходится перебирать все возможные варианты решения проблемы и надеяться, что хоть какой-нибудь из них сработает.
Наиболее часто встречается вариант, когда смартфон Сяоми самопроизвольно отключается и переходит в режим перезагрузки. После включения устройства оно работает около 30 секунд, и затем мобильный аппарат опять уходит в бутлуп. В таких случаях у пользователя нет даже возможности зайти в настройки и проверить работоспособность системы.

Реже встречается случай, когда девайс функционирует в стандартном режиме, но периодически самостоятельно перезагружается. Периодичность такого поведения может быть различной – от 1 дня до 2-3 недель. Однако решение проблемы не стоит откладывать, ведь такое поведение смартфона указывает на наличие неисправности.
Причины цикличной перезагрузки
Бесконечная перезагрузка устройства возникает не просто так. Для этого всегда имеются предпосылки. Проблема в том, что понять, какое действие пользователя вызвало проблему не так просто.
Рассмотрим основные причины возникновения bootloop на Xiaomi:
- Критическое повреждение файлов Android. Чаще всего возникает в результате деятельности вирусов и другого вредоносного ПО. Также бывает, если пользователь установил рут и решил немного изменить системные файлы.
- Неправильно установленная прошивка. Такое бывает в том случае, если прошивка устройства была проведена с ошибками. Или же пользователь пытался установить сборку, которая не подходит для его телефона.
- Сбой во время разблокировки загрузчика. Если вы решили разблокировать загрузчик Xiaomi и что-то пошло не так, то появления бутлупа – вполне ожидаемый результат. Для этой проблемы есть собственное решение.
- Сбой во время установки Root. Если вы решили установить права суперпользователя, используя для этого рекавери TWRP, то даже малейшая ошибка в процессе установки может привести к таким последствиям.
- Повреждение чипа памяти. Самый неприятный вариант. Если в результате падения или попадания в смартфон воды был повреждён чип памяти с загрузочной записью, телефон всё время будет перезагружаться. Выход только один: идти в сервисный центр.
В любом случае проблема связана с загрузчиком — система не может стартовать из-за него. Обычно помогают самые простые методы, но иногда приходится привлекать тяжёлую артиллерию в виде консоли и драйверов ADB.
Из-за чего происходит bootloop
Циклическая перезагрузка, в большинстве случаев, является следствием повреждения системного программного обеспечения Android. Чаще всего bootloop случается, если залить несовместимую версию ПО. Также он происходит, если процесс прошивки завершился некорректно (например, внезапно отключили электроэнергию). Еще одна из возможных причин – проблемы при обновлении ПО. Если батарея села в процессе обновления прошивки «по воздуху» – перезагрузка может длиться вечно, из-за повреждения файлов ОС Android.
Бутлуп также проявляется в случае изменения неопытным пользователем файлов системы, имея root-доступ. Неправильная правка build.prop, с целью тонкой настройки Android под себя, очень часто вызывает bootloop. Вредоносные программы очень редко способны ввести аппарат в состояние циклической перезагрузки, так как для этого им нужен root-доступ. Последняя причина появления bootloop – аппаратные неисправности чипсета, памяти (оперативной или постоянной), модулей связи.
Решение 1: сброс настроек телефона (Hard Reset)
Сброс телефона к заводским настройкам в большинстве случаев помогает решить проблему вечной загрузки Xiaomi.
Суть сброса заключается в том, что из смартфона удаляются все данные, а системные файлы приводятся к изначальному виду. Поэтому, если проблема вызвана повреждением файлов Android, этот вариант поможет.
Внимание! После сброса исчезнут все файлы пользователя, которые находятся на внутреннем накопителе: фото, видео, музыка, программы, документы. Поэтому не стоит пренебрегать синхронизацией с Mi Cloud. Эта опция позволит быстро восстановить утерянную информацию.
Hard Reset в стоковом рекавери
Для этого при включении Xiaomi нужно дополнительно нажать кнопку увеличения громкости. Стандартное рекавери (установленное по умолчанию) существенно отличается от кастомного, которое пользователи ставят самостоятельно.
Я уже подробно описывал сброс Xiaomi до заводских настроек через рекавери. Повторюсь:
- Выключите телефон.
- Зажмите кнопки питания и увеличения громкости.
- Выберите пункт Wipe Data (удалить данные).
- Тапните по Wipe All Data (удалить все данные).
- Подтвердите, выбрав Confirm.
- Начнётся процедура сброса, по завершении которой появится сообщение Data wiped successfully (данные удалены успешно).
- Вернитесь в главное меню, выберите Reboot → Reboot to System.
После сброса телефон самостоятельно перезагрузится и запустит MIUI. Первый запуск может занять до 15 минут, в зависимости от модели смартфона. Поэтому нужно запастись терпением.
После рестарта телефон Xiaomi придётся настраивать, как только что купленный.
Hard Reset в TWRP
Кастомное рекавери TWRP вовсе не похоже на стоковое. Процесс сброса к заводским настройкам там немного сложнее. Однако TWRP поддерживает русский язык, поэтому работать с ним не в пример проще.
Есть 2 варианта сброса: стандартный и полный. Рассмотрим оба.
Стандартный способ TWRP:
- Выключите телефон и войдите в рекавери при помощи кнопок зажатия питания и увеличения громкости.
- Перейдите в раздел «Очистка».
- Передвиньте ползунок вправо.
- По завершении процесса вернитесь в главное меню и выберите «Перезагрузка».
- Тапните кнопку «Система».

После рестарта вы получите полностью чистый смартфон без приложений и пользовательских файлов, с исправленным бутлуп. Настраивать нужно будет даже аккаунт Google.
ТОП-5 производительных смартфонов Xiaomi по рейтингу AnTuTu:
- 1 Black Shark 4 Pro
867578 баллов - 2
POCO F3 Pro821847 баллов
- 3
Mi 11 Ultra817225 баллов
- 4
Mi Mix Fold815000 баллов
- 5
Mi 11 Pro804210 баллов
Полный сброс TWRP:
- Выключите телефон, затем зажмите кнопки питания и увеличения громкости.
- В главном меню перейдите в раздел «Очистка».
- Тапните по кнопке «Выборочная очистка».
- Отметьте галочками все пункты, кроме Vendor, OTG и SD карта.
- Подтвердите действие передвижением ползунка вправо.
- По завершении процесса тапните по кнопке «Перезагрузка в ОС».

Полный вариант сброса к заводским настройкам, если после обычного сброса телефон всё равно бесконечно перезагружается и не включается. С помощью этой процедуры можно удалить вообще всё с внутреннего накопителя.
Как устранить постоянную перезагрузку на Сяоми?
Первый способ означает необходимость восстановить резервную копию MIUI. Обязательное условие – установка стороннего рекавери, например, TWRP. Рекомендуется заранее сделать резервную копию данных.
Для входа в формат Recovery требуется зажать клавишу увеличения громкости и кнопку питания одновременно. Появляется меню, одним из пунктов которого является Wipe. Выбираем его, что приводит к удалению текущей информации. Если форматирование будет осуществляться при отсутствии резервной копии, то все данные будут навсегда удалены из памяти телефона.
Когда операция завершится, надо вернуться в основное меню, где кликнуть по Restore. Остается указать путь, где хранятся сохраненные ранее данные, и дать подтверждение на проведение операции. Желательно наложить запрет на последующие обновления оболочки.
К содержанию
Решение 2: перепрошивка
Перепрошивка поможет в случае, если проблема бесконечного включения заключается в повреждённом загрузчике или в отсутствии некоторых файлов операционной системы.
Если после перепрошивки телефон постоянно перезагружается, по-другому вы его не почините. Можно установить стоковую прошивку или кастомную.
Установка официальной прошивки
Для этого потребуется актуальная прошивка под конкретный смартфон (обязательно версии Global), программа для установки прошивки MiFlash Pro последней версии, а также подходящие ADB драйверы для устройства.
Прошивка осуществляется в режиме Fastboot — по ссылке моя подробная инструкция как это сделать.
Такой вариант позволяет сохранить пользовательские файлы. Достаточно на определённом этапе выбрать вместо clean all and lock пункт save user data. В инструкции по ссылке об этом сказано.
Установка кастомной прошивки
В этом случае для лечения циклической перезагрузки Xiaomi используется рекавери TWRP. Потребуется сама прошивка в формате ZIP, Google Apps (если отсутствуют в прошивке), пакет Magisk (для установки Root), а также необходимые фиксы и исправления. Всё это нужно закинуть в корень карты памяти.
Я уже подробно рассказывал о процессе установки кастома при помощи TWRP. Первая загрузка после установки может занять до 15 минут, в зависимости от типа прошивки и её ключевых особенностей.
Внимание! Для установки кастома потребуется разблокированный загрузчик и рекавери TWRP. Если этого нет, то без работающего телефона разблокировать bootloader и накатить рекавери не получится. Поэтому лучше ограничиться установкой официальной прошивки MIUI.
Часть 1: Что может вызвать проблемы bootloop на Android?
Ошибка цикла Android загрузки может показаться странной и необъяснимой, но это происходит из-за некоторые конкретные причины.
Во-первых, обратите внимание, что это неправильно, что ошибка загрузки цикла происходит только в корневое устройство. Цикл загрузки Android ошибка может также произойти в наличии устройства с оригинальным программным обеспечением, ROM и встроенного программного обеспечения.
В корневом устройстве, изменения, такие, как перепрошивки ROM или настроенные прошивки, которые не совместимы с оборудованием устройства или существующего программным обеспечением, могут быть обвинены в задаче загрузки цикла.
Двигаясь дальше, когда программное обеспечение вашего устройства не в состоянии взаимодействовать с системными файлами в процессе запуска, может возникнуть проблема цикла Android загрузки. Такой глюк вызывается, если вы недавно обновили Android версии.
Кроме того, коррумпированный App обновление файлы также могут привести к bootloop Android вопроса. Приложения и программа, загруженная из неизвестных источников приносят определенный типа вируса, который мешает вам использовать устройство гладко.
Все-в-все, ошибка Android загрузки цикла является прямым результатом при попытке фальсифицировать с внутренними настройками вашего устройства.
Поэтому, если вы ищете способы, чтобы направлять вас о том, как исправить проблему загрузки цикла, вам придется обновить устройство внутри либо переустановить его или принимать метод восстановления.
Читайте дальше, чтобы узнать больше о том, как исправить ошибку bootloop без потери данных, когда устройство страдает от bootloop Android проблемы.
Решение 3: исправление при помощи ADB
Консоль и ADB – это мощные инструменты для исправления неполадок с загрузчиком в телефоне Xiaomi. Потребуется скачать пакет ADB под конкретный смартфон и установить его на компьютер вместе с подходящими драйверами.
Я уже говорил о процессе восстановления загрузчика при помощи ADB. Не забудьте, что после завершения всех действий потребуется перезагрузить телефон командой fastboot reboot.
Для работы с ADB требуется только оригинальный кабель USB от Xiaomi. Китайские аналоги не всегда обеспечивают стабильное соединение. А отключение телефона от ПК в самый ответственный момент может окончательно убить смартфон.
Что такое теневой бан в TikTok
Теневой бан – вид блокировки аккаунта, при котором не блокируется ни сам аккаунт, ни контент на нем. В отличии от классической блокировки аккаунта, TikTok не оповещает о теневом бане и просто начинает «резать» охваты старого и нового контента.
Процесс автоматизирован и выполняется алгоритмами TikTok. Это позволяет защитить соцсеть от некачественных аккаунтов, ворующих контент у популярных блогеров, защитить авторские права и свести к нулю число роликов с неподобающим контентом.
Решение 5: обращение в сервисный центр
Если программные способы не помогли вылечить зависший на перезагрузке телефон, скорее всего, проблема носит аппаратный характер и связана с чипом памяти. Произвести ремонт такого смартфона самостоятельно невозможно. Потребуется обращаться в официальный сервисный центр.
Для визита в сервисный центр понадобятся документы от телефона Xiaomi и, возможно, вас попросят подтвердить вашу личность с помощью паспорта.
От походов в неофициальные мастерские лучше воздержаться. Не факт, что попадётся хороший специалист. Многие неофициальные конторы нанимают непрофессионалов, а такой «мастер» может сделать только хуже. Особенно если нужно заменить чип памяти (работа тонкая и сложная).
Бутлуп – это весьма неприятная проблема, при которой телефон постоянно включается и выключается. В большинстве случаев постоянную перезагрузку Xiaomi можно исправить программными способами в домашних условиях. Но важно выполнять все действия в строгом соответствии с инструкцией. Иначе можно окончательно убить телефон.
Проблемы, связанные с перезагрузкой
Существует 2 распространенные поломки устройств Redmi. В первом случае, когда гаджет включается, на экране появляется логотип MI. После нескольких секунд ожидания он выключается, а потом снова загорается.

Вторая проблема – работа гаджета в привычном режиме, однако в самые неподходящие моменты он самостоятельно перезагружается. Такие выключения повторяются 2-3 раза в день. Также бывают ситуации, когда проблема появляется каждый час.
Зацикленная перезагрузка, обрывающаяся на логотипе MIUI
Прежде всего, необходимо рассмотреть именно данный вариант, так как его причины более значительны. Он может возникнуть в следующих случаях:
- Было установлено обновление операционной системы Android самостоятельно или автоматически, однако несмотря на исправления ошибок в прошлой версии, новая может содержать другие;
- На смартфон установили программное обеспечение посредством ПК или recovery TWRP;
- Перед последним перезапуском смартфона, было установлено новое приложение;
- В меньшем количество случаев причиной может быть разряженный аккумулятор или его поломка;
- Ряд стандартных ситуаций также следует учитывать, например, падения на твёрдую поверхность, попадание воды внутрь корпуса, а также случайные манипуляции с устройством, ребёнком или домашним животным.
Как исправить bootloop
Забегая наперед, предупредим: если слова «root», «recovery», «TWRP», «перепрошивка», «драйверы», «загрузчик» незнакомы вам или пугают, а времени/желания вникать нет – вылечить bootloop могут лишь в СЦ. Самостоятельное изучение с нуля может отнять много времени и нервов, а случайная ошибка – «добить» смартфон. Если все это не пугает – дальнейшая инструкция для вас.
Первое, что стоит сделать при устранении bootloop, вызванного не сбоем перепрошивки – выключить смартфон и попытаться зайти в меню recovery. Обычно оно запускается, если на выключенном аппарате зажать одновременно «звук +» и «питание», удержав до появления меню. Иногда также нужно параллельно зажать и кнопку «домой» (у некоторых Samsung) или «звук -» (Nexus). Но рекавери есть не у всех моделей: например, Xiaomi 2021 года имеют заблокированный загрузчик без меню recovery.
В меню нужно найти пункт заводского сброса Android («hard reset», «wipe data», «factory reset», или тому подобный). Перемещение обычно осуществляется с помощью качельки громкости, выбор – кнопкой питания. Если прошивка не повреждена – сброс избавит от вечной перезагрузки Android-смартфона.
Recovery Menu
Если причиной bootloop стал сбой при обновлении ОС Android или в процессе заливки новой прошивки – придется «плясать с бубном» за ПК. В первую очередь, следует скачать драйвера для своего смартфона, чтобы подключить его для перепрошивки. Следующий шаг – загрузка ПО, предназначенного для заливки Android на смартфон. Для Samsung это – Kies или Odin, для LG – LG FlashTool, для Sony — Sony Update Service Prо. Lenovo шьются через FlashTool и другие утилиты (зависит от чипсета), Xiaomi – через XiaomiFlash. Программу для прошивки конкретной модели стоит уточнить на официальном сайте или профильном форуме, там же можно найти и инструкцию.
Третий шаг – загрузка прошивки, после чего телефон (следуя инструкции) нужно подключить к ПК, выбрать файл прошивки, установить параметры и приступить к перепрошивке. Предупреждаем: данный метод избавления от bootloop рекомендуется только опытным пользователям. Ошибки, допущенные при заливке ПО Android, могут сделать циклическую перезагрузку неизлечимой, превратив аппарат в «кирпич». Если вы не уверенны в своих силах – лучше обратиться в СЦ. То же самое каcается и аппаратных повреждений. Самостоятельная перепрошивка ОС Android избавиться от них не поможет.
Оперативная система Android является самой используемой. Но в ее работе есть свои нюансы и неполадки. Довольное актуальной является проблема с появлением Xiaomi Bootloop. Многие пользователи смартфонов Xiaomi сталкиваются с тем, что их смартфон постоянно перезагружается, показывая только логотип, а дальше не двигается. Из-за чего это происходит, что делать и как предотвратить – обсудим в этой статье.
