Желудь Великого Дуба
Желудь Великого Дуба (англ. Grand Oak Acorn) — сюжетный предмет в игре “Dragon Age: Начало”.
Местонахождение
- Желудь можно получить, обменяв на него что-нибудь у безумного отшельника.
- Его также можно получить, обыскав пень в лагере безумного отшельника, что вынудит его напасть на группу.
Интересные факты
- Вы также можете получить желудь после разговора с Великим Дубом.
Материалы сообщества доступны в соответствии с условиями лицензии CC-BY-SA, если не указано иное.
![]()
Квест стартует после битвы под Остагаром. У нас есть в руках древние договоры Серых Стражей. Одним из потенциальных союзников являются кланы долийских эльфов. Найти один из кланов можно в лесу Брессилиан. На подходах к лагерю нас встретит дозор под предводительством эльфийки Митры(Стража-долийца встретят теплее, чем остальных). После разговора она отведет нас к Хранителю Затриану – лидеру клана. Как выясняется, эльфы уже знают о наступлении Мора, но помочь не могут, так как у них слишком мало людей. Всех или почти всех охотников гложет проклятье оборотней, которые также живут в этом лесу. Затриан предлагает помощь в обмен на исцеление его клана.
Идем в лес. Перебив нескольких волков и агрессивных оборотней, встречаем группу разумных, которые посоветуют нам убираться. Их можно убедить или запугать(при достаточном навыке влияния либо силе), либо сразиться с ними. В любом случае оборотни ретируются, сказав, что лес сам разберется с нарушителями. В одном из ответвлений нас ждет интересный персонаж – Великий Дуб, оживший сильван, говорящий стихами, причем не “белыми”(как, например Морриган). Дерево скажет, что недавно у него украли желудь, и попросит его принести. Найти его можно в смежной части леса. За деревом находится полянка с палатками. После обследования вся команда кроме магов или персонажей с развитой силой воли засыпает. Оказывается, это иллюзия, созданная демоном. После победы обыщите сундук – там лежит отличный подарок для Зеврана(если он остался в команде).
Пройдя глубже в лес, видим за одним из поворотов плотный туман. Он мешает пройти к руинам. За противоположным поворотом находится пенек. При попытке его обыскать появится еще один забавный персонаж – безумный отшельник, любящий играть в загадки. Желудь для Великого Дуба находится у него. Получить его можно двумя способами:
- Выменять. В качестве эквивалента пойдет шарф Даниелы(квест “Во власти проклятья”) или книга(награда за квест по поиску железной коры).
- Убить отшельника и забрать желудь.
Возвращаем желудь дубу и получаем посох “Ветвь дуба”. Он поможет нам пройти через туман. Есть и другой способ его получить – убить Дуб и взять с него посох.
Пройдя сквозь туман, снова встречаем разумных оборотней. Они раздосадованы тем, что лес позволил нам пройти. После разговора они нападут. Когда у вожака останется примерно половина здоровья, бой прервет белый волк с корнеобразными наростами на лапах. Он свалит Стража, позволив оборотням ретироваться.
Путь к логову оборотня лежит через руины. Когда мы войдем, оборотни закроют прямой путь к логову. Придется пробиваться через два уровня, кишащие нежитью и прочими противниками. После того, как отряд спустится в логово оборотней, придется сразиться с хозяевами. Возле последней двери нас встретит еще один разумный оборотень. Он скажет, что хозяйка ждет Стража для разговора. Зайдя в зал встречаем уже знакомого нам Бегуна(вожак первой встреченной группы) и странного вида нимфу, которая является духом леса. Она скажет, что Затриан сам призвал ее, а также сам создал проклятье, и попросит привести его. Найти Хранителя можно в верхнем уровне руин, куда ведет прямой путь из логова. Тот самый, что заблокировали оборотни.
Эльф скажет, дух – источник проклятья и лекарство для охотников. Можно согласиться и пойти убить всех оборотней и Хозяйку Леса, а можно привести Затриана к Хозяйке. В последнем случае у нас будет выбор из трех вариантов:
- Все таки перебить оборотней, получив лекарство и заключив союз с эльфами.
- Снять проклятье, заключив союз эльфами
- Перебить эльфов, заключив союз с оборотнями.
В любом случае, это найдет отражение в эпилоге.
Лес Бресилиан умело скрывает от чужаков многие тайны, с одной из которых придется столкнуться во время решения проблемы с оборотнями. В задании «Природа зверя» произойдет встреча с говорящим Великим Дубом и отшельником из Западного и Восточного Бресилиана. Между «чудиками» возникнет разногласие: отшельник украл у Великого Дуба желудь, главную святыню. Без него уникальному дереву грозят увядание и скорая погибель. При встрече Великий Дуб обратится за помощью и попросит вернуть украденную вещь, обещая взамен убрать лесной барьер, ведущий к древним эльфийским руинам, где скрывается Бешеный Клык, виновник проклятия долийских эльфов. Отшельник откажется добровольно расставаться с желудем, однако предложит обменять его на что-нибудь полезное или просто убить своего неугомонного деревянного соседа.
К полезным вещам, в его понимании, относятся книги и шарфы. Помимо желудя у него припасены книга и шлем, с которыми от также согласится расстаться. Шлем является частью комплекта древних эльфийских доспехов (можно начать собирать в руинах), а книга открывает 35 страницу кодекса под названием «Архонты Империи» с описанием уникальных предметов. Обмен автоматически прекращается после падения барьера. Убрать лесной барьер можно двумя способами — воспользоваться помощью отшельника или Великого Дуба. Когда поручение будет выполнено, отшельник заколдует шкуру оборотня, что послужит пропуском через барьер, а Великий Дуб выдаст посох «Ветвь Дуба» (урон: 5,20; +1 к магии, +2 к телосложению, +10% к урону от сил природы).
Предметы для обмена с отшельником из Восточного Бресилиана в Dragon Age: Origins:
- Сага об Илорене (The Tales of Ilmoren) — Каммен, лагерь долийских эльфов. Помочь Каммену и Гейне соединить свои сердца. Убедить Гейне поможет развитый навык «Влияние», или добытая шкура волка. Если переспать с Камменом или Гейне, книгу получить не удастся.
- Песенник (Lanaya’s Songbook) — сундук рядом с Ланайей и Затрианом в лагере долийских эльфов в лесу Бресилиан. Ланайя в итоге обидится на совершенный поступок и перестанет разговаривать, обида пройдет после завершения задания с оборотнями.
- Шарф (The Scarf) — Даниэлла, оборотень у северного выхода в Восточном Бресилиане. Задание Атраса можно выполнить и без шарфа, рассказав правду о проклятии.
- Кулон Атраса (Athras’s Pendant) — в обмен на шарф Даниэллы и выполнение задания.
- Ботинки Дейгана (Deygan’s Boots) — своровать вещи при осмотре Дейгана, раненного эльфа из Западного Бресилиана (за телом убитого храмовника справа от водопада через мост), и доставить его в лагерь долийцев.
- Рог галлы (Halla Horn) — убить галлу Элоры, взять рог и отдать его Вараторну.
- Наручи из железного дерева (Ironbark Bracer) — делает Вараторн после доставки коры.
Уникальные предметы из заметки «Архонты Империи» (35 страница Кодекса):
- Кольцо Заката (+3 к хитрости, -1 к силе) — сундук под елью после битвы с крупной тенью в лагере за Великим Дубом в Западном Бресилиане.
- Кольцо Восхода (+4 к силе; -1 к хитрости) — Шианни в захваченном порождениями тьмы эльфинаже Денерима во время финального прорыва к архидемону.
- Надев оба кольца, персонаж получает бонус к броне.
Если возникнет желание убить отшельника и Великий Дуб, то никак ценных вещей с их тел взять не удастся — пустая трата времени.
«А Дейн стоял и ждал, когда
К нему клыкастый зверь подступит.
Горели яростью глаза
Того, кто был когда-то волком.
Он поднял острый свой клинок,
Моля о смерти милосердной.
Создатель внял его мольбе.»
Из ферелденской легенды «Дейн и оборотень»,
приблизительно Чёрный век 4:50
При первом посещении Бресилианского Леса вы столкнетесь с патрулем долийских эльфов, которые после краткого разговора отведут вас к Хранителю Затриану. Страж-долиец будет принят куда теплее, чем Страж с иной предысторией, когда Затриану в любом случае не понравятся Зевран и мабари, если они будут в группе. Хранитель признает, что мог бы оказать помощь Серым Стражам согласно договору, но бесконечные стычки с местными оборотнями истощили клан, и многие уже заразились. Впрочем, Затриан тут же подскажет решение – нужно всего-то разыскать в Бресилианских чащах волка по кличке Бешеный Клык, который послужил источником заразы, и принести в лагерь его сердце.
Прохождение: Бресилиан
 Прохождение: Бресилиан
В Бресилиане вы скоро наткнетесь на оборотней (юго-центр карты, у водопада) и в ходе короткого разговора выясните, что Хранитель рассказал вам отнюдь не все, однако надо будет двигаться дальше, чтобы узнать побольше подробностей.
Прохождение: Бресилиан
 Прохождение: Бресилиан
С оборотнями можно разойтись относительно мирно (использовав Убеждение или Угрозу), или свести все к потасовке, которую изрядно потрепанный предводитель по имени Бегун быстро прервет, а потом поспешно удалится.
Прохождение: Бресилиан
 Прохождение: Бресилиан
Вход в логово оборотней расположен на юге Восточного Бресилиана (следующая часть карты), однако единственный проход к ним защищен магическим туманом, который не позволит пройти дальше.
Существует два способа развеять туман:
1. Поговорить с Великим Дубом в Западном Бресилиане и вернуть ему украденный желудь (осторожно, рядом стоит пять Диких Сильванов).
Прохождение: Бресилиан
 Прохождение: Бресилиан
Вор – Сумасшедший отшельник – обитает в Восточном лесу, и является сильным магом. Можно:
– убить его и добыть желудь (ваш противник будет вызывать демонов себе в помощь);
– обменять желудь на амулет Атриана, книгу Каммена или шарф Даниеллы, так же старика могут заинтересовать простые серебряные кольца;
– если в группе есть Зевран, он предложит собственноручно обшарить пень-жилище и достанет все имущество мага.
Прохождение: Бресилиан
 Прохождение: Бресилиан
2. Поговорить с отшельником и выполнить его просьбу – убить Великий Дуб. Если вы убьете одного из антагонистов, повторить номер со вторым не выйдет.
Великий Дуб отдаст вам свою ветку (неплохой посох), а отшельник – зачарует шкуру оборотня (вы ее и так получите в ходе лесных драк). Так или иначе, у вас появится средство миновать туманные врата.
Прохождение: Бресилиан
 Прохождение: Бресилиан
У входа в развалины вы столкнетесь с новой группой оборотней под предводительством Бегуна, но добить последнего опять не удастся – в последний момент вас атакует белый волк, и оставшиеся оборотни спасутся бегством. Вам останется только следовать за ними в многоярусные развалины.
Прохождение: Бресилиан
 Прохождение: Бресилиан
Основной вход в логово – это лестница справа от входа, но дверь к ней закрыта, и вам придется искать иной путь. Ярус невелик и заселен в основном пауками. Проход на следующий ярус расположен в юго-восточной части карты в конце просторного зала и охраняется драконом. Имеет смысл отправить вперед разбойника под Скрытностью, так как на полу скрыто несколько ловушек. Дракон атакует вас, когда вы подойдете к середине зала. Он может последовать за вами обратно в коридор, поэтому лучше постоянно держать его в заморозках и параличах различного характера. В дальнем конце зала валяются драконьи сокровища с неплохой добычей, в том числе – и с отличным луком.
Прохождение: Бресилиан
 Прохождение: Бресилиан
Рекомендуется поглядывать на карту – к северу и югу от входа в нижний ярус руин имеется пара потайных комнат, которые обнаруживаются, только если подойти вплотную.
На втором ярусе обитает многочисленная нежить, имеющая нехорошую привычку появляться ниоткуда и нападать сзади, поэтому будьте начеку. В первом зале вы столкнетесь с призраком эльфийского мальчика. Разговор с ним не заладится и призрак убежит, а вы окажетесь в компании впечатляющего отряда скелетов. Если будет трудно, можно отступить к входу на ярус и за вами последует только часть орды, а остальных можно будет позже выманить луками.
Прохождение: Бресилиан
 Прохождение: Бресилиан
По пути вам потребуется миновать большой зал, охраняемый скелетами-лучниками и оснащенный множеством ловушек. Лучше отправить вперед разбойника, чтобы тот обезвредил все «сюрпризы».
Прохождение: Бресилиан
 Прохождение: Бресилиан
В большом зале на юго-западе яруса вы столкнетесь сначала с несколькими скелетами на лестнице, а потом – с Тайным ужасом. Он телепортируется по залу в хаотичном порядке и призывает в помощь новых скелетов. Проще всего расстрелять его с лестницы, не вступая в зал – в этом случае ваш противник останется на месте и не будет перемещаться. Так же будут очень полезны Стрелы Андрасте, прерывающие вражеские заклинания.
Прохождение: Бресилиан
 Прохождение: Бресилиан
Вход на следующий ярус (Логово) находится к северу от зала Тайного Ужаса. Там на вас начнут нападать новые отряды оборотней, причем практически со всех сторон, и появляться ниоткуда как заправские разбойники. Путь дальше представляет собой узкий коридор с парой капканов на полу. Дальше вы встретитесь с Привратником, и тот сам начнет переговоры. Вы можете согласиться с их предложением, или нет. Если вы выбрали бой, то существует небольшая хитрость, которая поможет в стычке – нужно отступить обратно в коридор, туда оборотни будут заходить по одному. Кроме того, две небольшие группы прячутся в боковых комнатах.
Прохождение: Бресилиан
 Прохождение: Бресилиан
В первом случае вас проводят к Хозяйке Леса (во втором вы и так до нее дойдете), которая представит вашему вниманию свою версию возникновения проклятия и озвучит небольшую просьбу – привести в Логово Затриана. Если вы не согласитесь, то вас ожидает бой с оборотнями во главе с Бешеным Клыком. Победив, возьмите сердце и выходите на поверхность – рядом есть короткий путь к входу в Руины. По пути вы наткнетесь на Затриана, и сможете решить его судьбу. Если же вы поддержите идею Хозяйки о переговорах, то найдете его там же, на первом ярусе развалин неподалеку от входа. Уговорить Хранителя сложности не представит.
Прохождение: Бресилиан
 Прохождение: Бресилиан
Разговор не заладится с самого начала и вам придется встать на чью-то сторону (если это будут оборотни, то вы поднимете Влияние на Алистера, если эльфы – то на Лелиану). На стороне Хозяйки леса будут сражаться оборотни, а на стороне Затриана – дикие сильваны и вызванные Призраки.
Прохождение: Бресилиан
 Прохождение: Бресилиан
Возможные варианты:
– встать на сторону Затриана и убить Бешеного Клыка (Затриан с радостью пообещает вам поддержку своего клана в битве с Порождениями Тьмы);
– то же самое, только после битвы вам представится возможность убить Хранителя собственноручно (видимо, чтобы неповадно было). В этом случае в клане решат, что Затриан погиб в битве с оборотнями и подтвердят Договор, а раненых эльфов поднимет на ноги Ланайя;
– встать на сторону Хозяйки, привести в Логово и победить Затриана, после чего убедить его снять проклятие ценой собственной жизни (выполнение Договоров вам пообещает Ланайя, а Лелиана в группе одобрит этот выбор);
– сделать то же самое, только в итоге просто перебить бывших оборотней;
– вместо того чтобы привести на встречу Затриана, убедите Хозяйку отомстить – убить всех эльфов клана (перед входом в логово лучше завершить побочные квесты в долийском лагере, иначе потом вам это будет недоступно). Для этого необходимо иметь третий уровень Убеждения. Кстати, Морриган это решение одобрит.
Прохождение: Бресилиан
 Прохождение: Бресилиан
Во власти проклятия
Квест выдаст Атрас в лагере долийцев (нужно Убеждение), рассказав, что его жена Даниелла погибла в стычке с оборотнями. Так ему сказал Затриан, но Артас подозревает, что это не так, и попросит выяснить правду.
Прохождение: Бресилиан
 Прохождение: Бресилиан
Даниелла находится в Восточном Бресилиане неподалеку от северного входа. Эльфийка успела превратиться в оборотня и очень страдает от этого, моля о смерти. Помочь ей невозможно – у вас есть вариант избавить женщину от страданий (можно перед этим немного расспросить ее о Бешеном Клыке), либо она сама нападет на вас. По возвращении к Атрасу расскажите ему правду либо солгите (Лелиана одобрит это решение). При этом можно отдать ему шарф эльфийки, и в любом случае вы получите амулет с увеличением сопротивления магии +4%.
Так же можно солгать, что Даниелла по-прежнему бегает в лесу, и Атрас кинется на ее поиски.
Железная Кора
Оружейник Вараторн расскажет, что очень нуждается в Железной коре, которую можно было бы найти в лесу, если бы Хранитель не запретил ходить туда. Можно пообещать найти эту кору, раз уж вам все равно нужно идти на поиски Бешеного Клыка.
Кора находится в Западном Бресилиане неподалеку от северного хода к Восточной части леса на упавшем дереве и охраняется диким сильваном.
Прохождение: Бресилиан
 Прохождение: Бресилиан
Когда вы отдадите кору Вараторну, он предложит сделать вам либо длинный лук с бонусом против диких животных и нежити, либо среднюю броню +25 к выносливости. Можно выбрать что-то одно, Убедить Вараторна сделать и то и другое или вообще отказаться от награды и получить в дар амулет с прибавкой к устойчивости к силам Природы.
Прохождение: Бресилиан
 Прохождение: Бресилиан
Сожаления Каммена
Молодой эльф по имени Каммен расскажет вам о своих личных затруднениях (Долийцу надо всего лишь быть вежливым, а Стражу с иной предысторией придется использовать Убеждение или Угрозу).
Все проблемы Камена в том, что девушка по имени Гейна отвергла его ухаживания, так как он еще не подтвердил, что является охотником, принеся из леса волчью шкуру, потому что Затриан не позволяет эльфам ходить на охоту, чтобы те не стали жертвой оборотней.
Прохождение: Бресилиан
 Прохождение: Бресилиан
Здесь доступны следующие решения:
– убедить Гейну продолжать отношения, ведь Каммен с радостью сдаст «экзамен», как только доступ в лес будет открыт. Ланайя обязательно обсудит с вами то, что вышло в итоге, но в целом будет довольна;
– убедить Каммена представить шкуру волка, которую добыли вы (снимите шкуру с бресилианского волка или сохраните одну из Лотеринга);
– соблазнить Гейну (доступно только Стражу-мужчине) и рассказать об этом Камену – эльф при этом убежит прочь, а Лелиана и Винн снизят одобрение, зато Зевран повысит;
– соблазнить Каммена (доступно только Стражу-женщине) и заставить отказаться от Гейны (изменение одобрения аналогично);
Прохождение: Бресилиан
 Прохождение: Бресилиан
– рассказать эльфам, что возлюбленный их ненавидит, и тогда они перестанут разговаривать;
– солгать Гейне, будто Каммен всем рассказывает о своем намерении поскорее затащить ее в постель. В этом случае последует весьма эмоциональная сцена, которая так же приведет к разрыву;
– поговорить с Гейной и убедить Каммена оставить все как есть до лучших времен.
Если вы не разрушили отношения парочки, Каммен отдаст вам книгу «Сказания Илорена», дающую новую запись в Кодекс.
Галла Элоры
Эльфийка Элора, следящая за галлами расскажет, что одна из ее питомиц явно нездорова и может быть ранена оборотнями. Вам будет предложено осмотреть благородное животное. Чтобы от осмотра был толк, вашему Стражу необходимо иметь хотя бы второй уровень навыка Выживания и выбрать опцию «успокоить галлу».
Прохождение: Бресилиан
 Прохождение: Бресилиан
Если вам это удастся, Элора сумеет определить проблему и квест завершится. Так же можно солгать эльфийке, что галла обречена и лучше добить ее из милосердия. Если Элора поверит вашим словам, она отдаст вам рога галлы, из которых Вараторн сделает амулет с бонусом к ментальной защите.
Если вам недостанет убедительности, Элора перестанет с вами разговаривать.
Раненый в лесу
В центре Западного Бресилиана рядом с надгробием вы найдете раненого эльфа по имени Дейган. Его можно отнести в лагерь, вылечить и отправить к сородичам, ограбить и/или задушить (а после этого доставить в лагерь). Если вы доставили Дейгана в лагерь, то при разговоре он поблагодарит вас за спасение и подарит сапфир в знак благодарности. Если вы его ограбили, то эльф расскажет, что потерял одну ценную вещицу – деревянную статуэтку лучника – и попросит ее найти. Возвращать статуэтку или нет, особой разницы не имеет.
Прохождение: Бресилиан
 Прохождение: Бресилиан
Незавершенная переписка
К северу от Вараторна есть запертый сундук, в котором находится одно Любовное Письмо, а в южной потайной комнате на первом ярусе руин второе.
Знак безопасности
Дается в Денеримском трактире «Покусанный дворянин» по цепочке «Услуги заинтересованным лицам». В центре западного Бресилиана требуется пустить стрелу. При этом ваш Страж должен быть вооружен луком.
Прохождение: Бресилиан
 Прохождение: Бресилиан
Место Силы
Активируется рядом с надгробием в центре Западного Бресилиана по заданию Гильдии Магов.
Сокровища Мага
На севере и на востоке Восточной части Бресилиана находятся две могилы. Потревожив их, вы поднимете по отряду скелетов во главе с Восставшими из мертвых, с которых после убийства снимается часть тяжелого доспеха Джаггернаута, что активирует данный квест.
Прохождение: Бресилиан
 Прохождение: Бресилиан
Третья часть расположена в центре Западного Бресилиана, рядом с местом Силы по предыдущему квесту (доступна только после получения квеста). Четвертая часть находится на нижнем ярусе руин, в последнем саркофаге в зале, доступном по квесту «Эльфийский ритуал». Собрав все четыре части, вы завершите квест.
Прохождение: Бресилиан
 Прохождение: Бресилиан
Восставшие из мертвых достаточно сильны и на раннем этапе представляют собой серьезных противников. Имеет смысл набрасывать на них что-нибудь типа Силового поля и сначала беспрепятственно разобраться со свитой.
Эльфийский Ритуал
На втором ярусе развалин к югу от первого зала вы обнаружите свиток с описанием древнего ритуала и глиняную табличку, что активирует данный квест. Дальше на перекрестке идите на север и выйдете в зале, где надлежит исполнить ритуал. Изучив свои находки, выполните следующие действия:
Прохождение: Бресилиан
 Прохождение: Бресилиан
1. Взять с алтаря кувшин;
2. Набрать воды из источника в центре зала;
3. Поставить кувшин на алтарь;
4. Помолиться;
5. Отпить воды из кувшина;
6. Вылить оставшуюся воду обратно в бассейн.
Прохождение: Бресилиан
 Прохождение: Бресилиан
Если ритуал выполнен правильно, запертая раньше дверь в северной стене зала откроется. Внутри вы столкнетесь с несколькими скелетами и призраком эльфийки, которая после краткого и непродуктивного разговора вступит в бой, призвав на помощь еще пару элитных Призраков. В саркофаге, охранявшемся Призраками, лежит доспех Джаггернаута по квесту «Сокровища мага». Его окончание завершит квест «Сокровища мага».
Сожаление Винн
Квест выдается Винн в лагере, а Энерин найдется к северу от Сумасшедшего отшельника, в Восточном Бресилиане.
Убийца братьев твоих
Квест выдается Гильдией магов. Малефикары находятся на севере Восточного Бресилиана, неподалеку от надгробия Восставшего из Мертвых (квест Сокровища мага). На эту группу вы наткнетесь только если получили квест, и лишь при втором посещении локации.
Прохождение: Бресилиан
 Прохождение: Бресилиан
Боевой маг
На втором ярусе развалин к югу от второго перекрестка в комнате вы обнаружите алтарь и филактерию, в которой, как вы поймете, уже много веков заключен дух эльфийского мага. Дух пообещает научить специализации Боевого мага в обмен на свободу – для этого требуется положить филактерию на алтарь.
Прохождение: Бресилиан
 Прохождение: Бресилиан
Духа можно освободить просто так (+2 к одобрению Алистером), получить специализацию и освободить духа, оставить себе в виде подвески или предварительно обмануть его, получив при этом специализацию и не сдержав обещание.
Освобожденный
Часть заметок для получения квеста «Освобожденный» (Денерим) вы возьмете с трупа Искателя приключений вместе с его журналом в центрально-южном зале второго яруса Развалин, в зале со скелетами-лучниками и ловушками.
Прохождение: Бресилиан
 Прохождение: Бресилиан
Свитки Банастора
В юго-восточной комнате в Логове Оборотней вы обнаружите один из пяти свитков, необходимых вам по квесту магов.
Лучше отправляться в лес с максимально свободным рюкзаком и обязательно иметь в пати разбойника, способного эффективно вскрывать замки – лута будет много, и возможно, что перед Логовом вам потребуется вернуться к долийцам и продать ненужный хлам.
Сердце Бешеного Клыка – прекрасный амулет, который будет полезен любому из соратников. Понятно, что получите вы его, только если Хозяйка умрет.
Прохождение: Бресилиан
 Прохождение: Бресилиан
Вторично проходя через Лес, вы будете натыкаться на Порождений Тьмы – в том числе и на Огра-вожака (оранжевый мини-босс).
Новые записи в Кодексе об эльфийской истории можно получить у Ланайи и Сарела (если в группе есть Стен, вы услышите дополнительный диалог), так же имеет смысл внимательно обойти лагерь. Сундук рядом с арравелем Хранителя содержит еще одну интересную книгу.
Прохождение: Бресилиан
 Прохождение: Бресилиан
Можно попытаться взять ее Разбойником под невидимостью, но если ваш навык Скрытности недостаточен, Ланайя вас уличит и отчитает. К книге можно подобраться после возвращения из эльфийских руин, когда Ланайя отойдет в сторону. Если вы примете решение перебить клан, книга станет недоступна.
У Вараторна можно купить бесконечное количество ядовитого экстракта, эльфийского и мертвого корней, а так же множество рецептов ядов и зелий, чертежей ловушек и Учебник Оборотня. После прохождения трех сюжетных квестов его товары обновляются – появляется лук Темная Луна, дающий запись в кодекс, рюкзак и книги прокачки.
Прохождение: Бресилиан
 Прохождение: Бресилиан
Ориентиры для мабари расположены в следующих местах: в лагере аравель Затриана, в Западном Бресилиане – Большое дерево за Говорящим Дубом, в Восточном – палатка Безумного Отшельника.
Если вернуться в лагерь до того, как вы войдете в Логово, можно попытаться выяснить у Затриана некоторые подробности о местных диковинках и возникновении проклятия.
К югу от Великого Дуба в Западном Бресилиане расположен заброшенный лагерь. При попытке его обследовать почти вся ваша группа упадет замертво (потом у «уснувших» соратников обнаружится травма), а один (обычно маг) останется, чтобы сражаться с Тенью.
Прохождение: Бресилиан
 Прохождение: Бресилиан
Если выбрать опцию «Следует быстрее уходить отсюда», не обследуя лагерь, тень не появится совсем. С Тенью можно будет сразиться вчетвером, если обследовать только одну вещь, а потом попытаться уйти прочь. После победы на месте лагеря появятся несколько скелетов и сундук, в которых найдутся долийские перчатки – специальный подарок для Зеврана. С Тени снимается неплохое кольцо.
В центре Западного Бресилиана вам придется выстоять схватку с Порождениями Тьмы, в отряде которых обнаружится элитный огр.
Сумасшедший отшельник может согласиться так же обменять Древний Эльфийский шлем (часть хорошего сета) и книгу, добавляющую запись в Кодексе, на те же вещи, что и желудь.
Древний Эльфийский доспех добавляет запись в Кодексе и собирается следующим образом:
– шлем выменивается у Сумасшедшего отшельника;
– доспех берется на нижнем уровне Эльфийских руин, в саркофаге у южно-западной комнаты;
Прохождение: Бресилиан
 Прохождение: Бресилиан
– перчатки находятся в северно-центральной комнате Разрушенного Храма, в деревне Убежище (квест «Урна Священного Праха»), дают +2 к броне и +4% отразить враждебную магию;
– ботинки находятся в часовне Лотеринга, в шкафу, ключ от которого может дать Сэр Брайант. Так же можно попросить принести их Мабари, находясь в Редклиффе.
Если вы поймали баг и ботинок не нашли, а Лотеринг уже уничтожен, то нужно скачать фикс здесь, установить с помощью daupdater.exe и зайти в игру. В инвентаре появится свиток, активировав который вы и получите эти ботинки.
Сет можно собрать и на ранних уровнях, а потом улучшить. Для этого подайте вещи любому торговцу, сохраните игру, загрузите ее снова и выкупите доспех у этого торговца обратно.
В юго-западной комнате Логова Оборотней и южной комнате Нижнего яруса вы найдете черные филактерии, которые при попытке их взять расколются, что вызовет Восставших из Мертвых.
Прохождение: Бресилиан
 Прохождение: Бресилиан
Если вы способствовали уничтожению долийцев, то после боя в лазарете вы найдете раненого эльфа, и сможете либо добить его из жалости, либо уложить поудобнее.
После завершения сюжетного квеста можно потребовать дополнительную награду: если Проклятие снято или клан уничтожен, Бегун даст щит; если оборотней вы перебили, Затриан подарит красивый двуручный топор «Клюв грифона», который имеет два слота под руны и бонус +4 к урону против Порождений Тьмы.
Прохождение: Бресилиан
 Прохождение: Бресилиан
После завершения квеста при возвращении в Бресилиан (например, при выполнении побочных квестов) вам встретится эльфийский патруль. Если вы сняли проклятие с оборотней, то его предводительница попытается вам угрожать. Можно убить и ее и сопровождающих, а можно убедить, что Затриан сам во всем виноват – в этом случае, а так же если вы поддержали Затриана и убили Хозяйку, эльфийка подарит вам неплохое кольцо. Если вы помогли оборотням отомстить, эльфийка нападет без разговоров.
Если вы встанете на сторону эльфов, то разблокируете ачивмент «Браконьер», а если на сторону оборотней – «убийца».
Прохождение: Бресилиан
 Прохождение: Бресилиан
Если вы станете обворовывать всех эльфов подряд, при переходе между локациями Бресилиана вы столкнетесь с эльфийкой Мелорой, оранжевым мини-боссом, решившей вас проучить с помощью острого железа.
После прохождения квеста в вашем лагере к вам обратится Лелиана и споет красивую песню.
In Uthenera
|
Haharen na melana sahlin Emma ir abelas Souver’inan isala hamin Uhenan him dor’felas In uthenera na revas Vir sulahn’nehn Vir dirthera Vir samahl la numin Vir lath sa’vunin |
Старейшина, подошел твой срок; Душа моя скорбью полна. Отдых нужен усталым глазам, Сердце увядшее бьется все реже; Свобода – во сне наяву. Мы поем, веселясь Мы рассказываем истории Мы смеемся и плачем Мы любим – еще один день. |
Для древних эльфов, живущих во времена Арлатана, утенера была обрядом почитания. В то время эльфы не старели. Они не были бессмертными, но и не страдали от старения тела или разума. Ослабевал у них только дух.
Это происходило нечасто, но говорили, что старейшины в какой-то момент уставали от жизни. Воспоминания становились для них непосильной ношей, и, не зная покоя, они “отступали в сторону”, отдавая роль старейшин рода своим преемникам. Слово “утенера” означает “долгий сон”, для которого старейшие удалялись в склеп, бывший и ложем и могилой. После пышной церемонии, на которую собирался весь клан, старейшие впадали в дремоту, длившуюся столетиями. Часто они и вовсе больше не просыпались. Со временем тело такого эльфа ослабевало, и он тихо умирал во сне. Родные регулярно приходили в склеп, чтобы воздать почтение принесшему столь великую жертву.
С появлением людей и последовавшим ускорением жизни эльфов обряд утенеры начал забываться, а после падения Арлатана был окончательно забыт.
Из книги «Что ушло», написанной Гассандриэлем,
правителем Гамаширала, Славный век 2:7.
Подарки в локации
Прохождение: Бресилиан
 Прохождение: Бресилиан
– Долийские перчатки (Западный Бресилиан, заброшенный лагерь к югу от Великого Дуба, после битвы с Тенью) – Зевран, особый подарок;
– Ониксовая статуэтка демона (Восточный Бресилиан, груда костей у восточного надгробия) – Алистер;
– Серебряная брошь (Вараторн, долийский лагерь) – Морриган;
– Серебряный медальон (первый ярус эльфийских руин, в драконьих сокровищах) – Морриган;
– Милость Андрасте (Западный Бресилиан, неподалеку от водопада) – Лелиана;
– Изящные свитки (Нижний уровень эльфийских руин, саркофаг по квесту «Эльфийский ритуал») – Винн;
– Белый срез (Нижний уровень эльфийских руин, саркофаг в юго-западной комнате)– Огрен;
– Воловья кость (Западный Бресилиан, неподалеку от надгробия, под камнями) – мабари.
– Раскрашенная звездная сфера (Западный Бресилиан, неподалеку от надгробия, под камнями) – Винн.
Влияние выбора в «Начале» на Dragon age 2
– Если в «Начале» вы сняли проклятие с оборотней, на Рваном берегу вы столкнетесь с эльфийкой, назвавшейся дочерью Даниеллы;
– Если вы не снимали проклятия, на Расколотой горе вы повстречаетесь с оборотнем, который выдаст вам дополнительный квест, направленный на поиски Хозяйки Леса.
“The only thing that could help them must come from the source of the curse itself, and that… that would be no trivial task to retrieve.” ―Zathrian
Nature of the Beast is one of the four main quest lines in Dragon Age: Origins that must be completed before calling the Landsmeet.
Background[]
The Dalish elves are being destroyed by a virulent disease which is turning them all into werewolves. The clan keeper, Zathrian, asks for your assistance in ridding them of the curse. He requests that you find the first werewolf, Witherfang, and return with his heart to end the curse destroying his people. The quest takes you through the Brecilian Forest to track down the lead werewolf.
Note: Dalish Elf Wardens will have some significant changes in dialogue during this quest. Also, if Dog is present in your active party, it will growl at Zathrian at the beginning of the dialogue, and Zathrian will express his distaste for canines.
Walkthrough[]
The Dalish Camp[]
When the Warden travels to the Brecilian Outskirts, they will be greeted by Mithra, a Dalish elf leading a patrol. After a brief exchange (nothing to be gained by withholding the truth in this dialogue; let her know you have business with her leader, and that you are a Grey Warden), she will lead the Warden to Keeper Zathrian in the Dalish Camp. He explains that the Dalish elves currently cannot honor the ancient treaties because many of their hunters have been afflicted after they were ambushed by werewolves since they entered this part of the forest.
Zathrian will explain that the lycanthropy spreads like a disease but is linked to its original source: a wolf known as Witherfang and that, with the beast’s heart, he may be able to find a cure, which will enable them to join the Warden in the fight against the Blight. The Warden can also ask for a reward in exchange for their help; if the Warden sides with the elves and doesn’t cure the werewolves Zathrian will give them Griffon’s Beak. Zathrian will also share a few parting tips, for example: Watch for the white wolves, and promptly directs you to his apprentice Lanaya and the clan storyteller Sarel. If pressed about equipment, he will have Varathorn set aside some supplies for you (if you do not ask Zathrian this you can still loot the chest behind Varathorn’s wagon and get the same supplies). As you progress through the quest, you can consult Zathrian concerning any new developments.
Note: If Dog is in the party when you first arrive at the Dalish Camp then when the conversation is over Mabari Dominance is active even though you have not examined the Landmark Tent behind Zathrian yet.
The Warden should explore the camp before moving on, to grab the side quests, codex entries, and some spare loot. One locked chest, right next to Zathrian, will trigger angry reactions from the elves if you ignore Lanaya’s warnings. The other locked chests can be freely opened however.
- If fighting werewolves later, have Shale or Dog in the party. Against a party full of people the werewolves will use Overwhelm and kill everyone very quickly. Dog and Shale are immune to this ability. For this reason, along with many others, Shale or Dog make great additions to the party.
- Varathorn is notable because of his infinite supply of herbs, and the Manual: Shapeshifter he sells.
- If one kills Zathrian using cone of cold spells etc. then you may not be able to side with the werewolves or Zathrian at the end, meaning you must kill him during later dialogue in the quest. This means Lanaya will become the Keeper. (Xbox confirmed).
West Brecilian Forest[]
Note: As the Warden progresses through the main quest, some wandering groups in this area will be repopulated. Keep your eyes open when backtracking.
After checking out the Dalish Camp, the Warden can use the exit in the eastern side of the area. This will lead the party to a new unlocked area: West Brecilian Forest. The path through the forest is patrolled by groups of wolves, blighted wolves, and werewolves. Along the northwest path from the entrance, the Warden will find a great bear guarding a corpse with some loot and one Andraste’s Grace nearby.
In the northern central portion of the map, next to the waterfalls, there is a small island with 3 bridges. All of the paths west of the waterfalls lead here. As the party approaches, three werewolves confront the party. One of them is named Swiftrunner, and will tell the Warden to give up and go back to the Dalish. It is possible to use the Warden’s Coercion skill to Intimidate or Persuade Swiftrunner to avoid a confrontation; otherwise they will attack, though they retreat once one has lost 50% health. The dialogue hints that the werewolves have grievances against the Dalish elves, and you will encounter Swiftrunner again multiple times during this quest.
After dealing with Swiftrunner, the Warden can cross the bridge heading eastward across a creek, and fight another group of werewolves. Crossing the next bridge will lead the party to a group composed of darkspawn, some hurlocks, plus an ogre (which drops Silver Cord).
- Deygan, a Dalish elf, lies seriously wounded just past the encounter with Swiftrunner. See the Wounded in the Forest side quest for details.
- Just south of the path, where the darkspawn were camped, the Warden can inspect a Mystical Site of Power for the Places of Power quest. There is also a Gravestone that “gives you an uneasy feeling”, but for the time being the only option given is to “Leave the tombstone alone”. This Gravestone belongs to The Mage’s Treasure quest, and cannot be inspected/ activated until another Gravestone is activated – see also the Northern ancient tombstone section below for details.
- A Pile of Rubble around the same area has an Ox Bone and a Painted Skyball.
- To the north of this area, the Warden can retrieve a piece of Ironbark from a Fallen Tree, for the Rare Ironbark quest.
The Grand Oak[]
The path splits into a northern branch leading to the North Exit to East Forest (guarded by a wild sylvan), and a southern branch. The latter leads to the South Exit to East Forest (guarded by another group of werewolves, some of the rabid variety), but also to a clearing further South, marked on the map as Grand Oak Clearing. This branch of the path is guarded by a number of wild sylvans, but leads to a friendly sylvan known as The Grand Oak. Amidst the rhymes, the Oak will offer a new quest: recover the stolen acorn from the Mad Hermit (more on this later, see § The Magical Barrier below).
- The Warden can attack The Grand Oak during this encounter, or later in the questline. The Grand Oak entry has further details.
- Just south of the Grand Oak, a small bridge gives access to a seemingly abandoned campsite. See West Brecilian Forest for details.
- A Landmark Tree lies just east of the campsite, up a short ramp. If Dog is in your party, you may use this to activate Mabari Dominance for this area.
- Meeting the Grand Oak is one of the events in the questline that triggers the spawning of fresh groups of enemies (werewolves and blighted wolves) throughout the Forest.
- If you kill the Grand Oak, it’s place will later be occupied by a group of darkspawn.
East Brecilian Forest[]
Note: As the Warden progresses through the main quest, some of the wandering groups in this area will be repopulated. Keep your eyes open when backtracking.
As mentioned, the Warden can enter the East Brecilian Forest from the West Brecilian Forest via either of two passages. The Northern passage is guarded by a group of werewolves, while the Southern passage is guarded by one wild sylvan (best killed using ranged attacks as companions can get caught in traps surrounding it).
Note: Athras’ wife, Danyla is found in the northern passage, just past the werewolves. See Lost to the Curse side quest.
The two Western paths converge at a central crossing, where you’ll encounter three wild sylvans. From here, three paths leave in easterly directions:
- North-East path: leads to the Northern Ancient Tombstone;
- East path: leads to the Mad Hermit Clearing
- South-East path: leads to the Magical Barrier
The northeast and east paths are also connected after the respective landmarks. See below for more details on each section.
The Magical Barrier[]
The southeast passage leads to a misty magical barrier: when the party tries to pass through, a cutscene shows them magically turned around, walking out of the mist in the same location where they entered it. The main quest line (Nature of the Beast) will be updated to reflect that the Warden needs to find a way to cross this barrier (placate the forest or trick it).
There are two main options to achieve this:
- Side with the Mad Hermit found in the Eastern Forest: He will ask the Warden to kill The Grand Oak, and offers passage through the barrier in exchange.
- Side with The Grand Oak found in the Western Forest: You will need to retrieve the Grand Oak Acorn from the Mad Hermit and the Oak will give the Warden an Oak Branch that allows passage through the barrier.
If you kill the Grand Oak first and don’t have the wood, talk to the hermit, and he will offer to make you ‘invisible’ by enchanting a Werewolf Pelt, which you probably have since you picked it when killing them along the way. You also cannot kill the hermit (even with forced attack during dialogue with him) and will not find anything in the tree stump, i.e. cannot agitate him to attack you. As he ‘teleports’ away from your knife attack, Morrigan or Wynne will mention his use of illusions.
- It is possible to kill both the hermit and the oak tree, by attacking the hermit and running away into the magical barrier and then going to the oak tree and killing the oak, then going back to the hermit who will still be hostile and killing him, but doing this will make it impossible to get past the magical barrier, also making the quest “Nature of the Beast” impossible to complete. You can also side with the Grand Oak by trading for the acorn, return the acorn to the Oak, and then come back to the Hermit and mess with his stump. This will cause the Hermit to attack.
- For those playing on PC: With the latest patch for PC it is no longer possible to kill both the Mad Hermit and the Grand Oak using the method described above, because you can’t leave the area while in Combat Mode, and you will stay in Combat Mode until the Hermit and his Allies are dead. Also, if you run to an Exit after having initiated Combat, the Hermit and his Allies will follow you, you cannot out-run them.
- If you save before buying the acorn from the Mad Hermit, then buying it, go ahead and reload the save, then go to the Grand Oak. If you talk to the Oak, you will have the choice to give the Oak the acorn, though technically you haven’t got it yet, and you can still keep the scarf for side quest.}}
- If you have completed the Lost to the Curse side quest, you will no longer have the scarf, the hermit will trade for a shiny silver ring, when selecting from the found in the forest option.
Note: Once you pass through the barrier with either the Oak Branch or Magical Werewolf Pelt, the barrier disappears. Selling the staff and any leftover Werewolf Pelts does not impact venturing to the next area.
Northern ancient tombstone[]
The northeast path has several bears. Past them, the clearing in front of the ruins in this area is guarded by two ogres.
- This is referred to as the Northern Ancient Tombstone since there are two landmarks in this section of the Forest marked as Ancient Tombstone on the map. The second one is found past the magical barrier, further south, and is referred to as the Southern Ancient Tombstone.
- Among the piles of rubble and corpses in this clearing, there is a Gravestone, similar to the one found in the Western Brecilian Forest. Inspecting it, the Warden will find that “the air seems unnaturally cold around this ancient tombstone. Runes of warding are carved into the surface”. If the Warden chooses to “Disturb the Wards”, then The Mage’s Treasure quest is added to the journal (if you didn’t already start it), the Codex entry: Legend of the Juggernaut is unlocked, and the party will be attacked by a Revenant and his undead minions.
- Once the Mage’s Treasure quest is obtained, if the Warden has received the Thy Brother’s Killer quest, and leaves the Eastern Brecilian Forest, a group of maleficar will spawn in the Northern Ancient Tombstone Clearing (towards the eastern-most path that leads to the Mad Hermit clearing).
- On the path between the Northern Ancient Tombstone Clearing and the Mad Hermit Clearing, the Warden can find Aneirin, for the Wynne’s Regret quest.
- You can find a Steel Spiked Collar for Dog on one of the corpses.
The Mad Hermit[]
When the Warden approaches the Mad Hermit’s clearing, he will teleport in the middle of the camp, swinging fists to the empty air, dancing and overall being faithful to his name. Engage him in dialogue, and he’ll offer to help you reach the center of the Forest if you kill the Grand Oak in the Western Brecilian Forest and provide him with a Werewolf Pelt. The Warden has now various options, as described in the Mad Hermit entry, to receive the help they require to cross the magical barrier in the forest. They all involve a trip back to the Grand Oak so, keep your eyes open for newly spawned patrols in the forest.
- If you kill the Mad Hermit, his camp will later be occupied by bandits, and a group of darkspawn will appear by the southern Ancient Tombstone.
- There is a Landmark Tent where Dog can activate Mabari Dominance, as well as a nearby locked chest.
- The Hermit may become hostile if you stick your hand in the tree stump. It is possible to retrieve a Golden Ring (+1 constitution) from here.
Note: Once you passed through the Magical Barrier (using either the Magical Werewolf Pelt or the Oak Branch) to reach the center of the forest and the ruins, you can no longer trade with the Hermit, nor can you agitate him into attacking you by rummaging through the tree stump.
Southern ancient tombstone[]
On the other side of the Magic Barrier, the Warden will encounter Swiftrunner once again. The dialogue may lead to more unanswered questions about the conflict between the Dalish elves and the werewolves, but will also lead to an unavoidable fight with Swiftrunner and 3 rabid werewolves. When Swiftrunner’s health gets too low, Witherfang will make an appearance, and bring the fighting to an abrupt end, allowing Swiftrunner to flee. Just ahead lies the Southern Ancient Tombstone.
Past the Southern Ancient Tombstone the Warden will have a brief encounter with another named werewolf, the Gatekeeper, and a couple of his aides. They will run away before the Warden can do anything, but drop a hint about a “Lady” to be protected. Beyond this point lies the entrance to the Brecilian Ruins.
Note: This may be a good time to clear out your inventory; players have reported requiring over 100 empty inventory slots to pick up every item. If you backtrack to the Dalish Camp, watch out for enemies that may have spawned since you cleared the area.
Brecilian Ruins[]
The ruins in the Brecilian Forest include two levels leading to the werewolves’ lair.
Note: Leaving the area or entering the ruins will trigger the spawning of new enemies in the forest behind you; the first time you return or leave the ruins the Warden will face a large group of darkspawn (hurlocks and genlock alphas).
Ruins Upper Level[]
Map of the Ruins Upper Level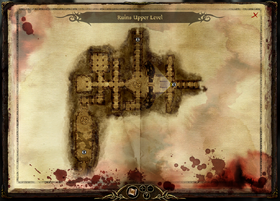
The Warden enters this level from the eastern corridor, in a large room where a couple of werewolves give the party their own brand of welcome. The stairs leading down and north-ward from this room lead to the Lair of the Werewolves, the Warden’s objective. Unfortunately, the door is barred and to reach the lair the Warden will have to travel the long way through both the upper and lower level of the ruins to find a second entrance (your quest log will update, telling you that you need to find an alternative path).
Note: * The Upper Ruins have 3 secret doors. They look like bricked-up arches, but once the controlled party member gets close enough, they are recognized for what they are. Loot and enemies are found behind the doors, and sometimes multiple doors are connected so that opening one will open a second door (behind the party).
-
- The doors are located just prior to reaching the downward staircase and tree roots.
- The two secret doors are found on either side immediately upon entering the Upper Ruins. A locked chest is located through the left-side secret door, looting it yields a letter needed for the Correspondence Interruptus side quest.
- The third secret door is on the left side of the large room just after the stairwell and tree roots.
- There are multiple traps located throughout the ruins, it is recommended to have a rogue up front in order to detect them.
The only way is beyond the door facing west, where the Warden will meet giant spiders and Web Traps. Straight ahead, and to the north the Warden will find a couple of small rooms with columns, some Piles of Rubble and Cocoons. The party should follow the south branch, which leads downstairs. As you descend, you’ll hear the sound of a large creature in the distance, along with an auto-save, as well as nervous comments by your companions. At the bottom you’ll enter a larger room with a few corpses lying around and a round mosaic in the center. There are a number of traps surrounding the mosaic. When you cross the mosaic, a Dragon will swoop down and attack. If the party includes a character that can disable traps, some of them can be disarmed before starting the fight with the Dragon.
Note: * There are four (4x) invisible square pressure plates on the mosaic and two (2x) more around it, and when stepped upon, these traps will unleash fireballs.
- If you avoid the mosaic and cross the room up against the north or south wall then the Dragon will not appear. You can still raid the Dragon Hoard.
The Dragon may drop a generic armor chest piece. The corpses, chests, and the
Dragon Hoard in the room will make up for it. The Hoard will yield Falon’Din’s Reach (unlocking Codex entry: Falon’Din: Friend of the Dead, the Guide) and a Silver Medallion, along with a large selection of gems, potions, and gold. At the end lies the stairs to the Lower Ruins.
Lower Ruins[]
Map of the Lower Ruins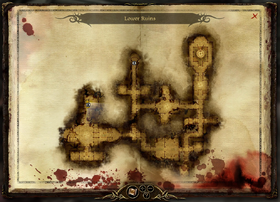
The Warden enters this level from the northern path in the middle of the map. The first thing the companions are likely to notice is a ghostly elf just ahead of the group. The spirit will move away as the party approaches, but a group of undead (skeletons and corpses) will raise up and attack. The two side rooms just ahead hold more skeletons, and the passage beyond that (just before the collapsed portion) contains web traps and more spiders.
The collapsed corridor will force the Warden to a detour eastward, leading to a larger room with a round mosaic in the center. After encountering a ghostly boy, a large group of skeletons will ambush the companions here. Check the south side room for a sarcophagus that yields a Fancy Scroll and a Carved Elven Tablet.
Note: As the party enters the larger room, the spirit of a young elvish boy will be walking around the mosaic, apparently looking for his mother. This spirit is linked to The Mage’s Treasure quest; the Tablet found in the sarcophagus nearby is also linked to a sub-quest, The Elven Ritual, which will be added to the quest journal when picked up.
The group should continue east, and turn southward at the end of the corridor (or northward to complete The Elven Ritual and subsequently The Mage’s Treasure quests). A group of skeletons will be waiting at the bottom of a flight of stairs. Once the group is defeated, a larger group of skeletons will spawn around the party.
At the next crossing, the party will meet 2 groups of undead (one from the side room to the east, the other from the corridor up ahead), while a third group waits behind the closed door to the West. The main path lies beyond that door.
Approach this door with care, since the large room behind holds many enemies (mostly skeletons), and a very large amount of traps (5 Pressure Plates surround you as soon as you step through the door, just to get you started). Keep the group from entering the door, and pull the skeletons to you (they have archers so you may have to run behind a corner to force them closer, or close the door after getting their attention). If the party can disarm traps, do so between pulling groups; otherwise walk carefully each party member past the door and hugging the wall. A stealth rogue with Combat Stealth can scout ahead and disable all the plates. A mage with area of effect or missile defense spells would be effective here. The skeleton groups and traps don’t stop right past the door, so keep an eye on the movement of your companions.
Once the room is disarmed and skeletons are eliminated, the party can move through the door on the west side, into the corridor that was beyond the collapsed section at the beginning of the level. A Metal Door (and an Auto-Save) lies ahead, leading to the largest room of the Lower Ruins. Skeletons of all kinds will greet the Warden past this point. Once the initial groups are dealt with, the party can descend the first flight of stairs into this enormous room. Don’t let the statues and paraphernalia distract you, because an arcane horror will spawn as soon as the Warden gets close enough.
The arcane horror will teleport from one corner of the room to another at regular intervals if someone tries to attack it at melee, making the fight difficult. At the same time, a large number of skeletons from the surrounding balconies and ancillary passages will pour into the room and attack the party.
- It’s often safest to attack the arcane horror with ranged weapons from atop the stairs. It will only counter with Spirit Blast against ranged attackers; or not at all if you have a long enough range weapon (e.g., range 50+ staff), stand on the stairs, and leave the arcane horror in the corner where it first appears.
- The skeletons will eventually wander into the large room after a time if you remain atop the stairs.
- You can remove its ability to teleport by having a party member stand on each of the 4 pads at the same time.
The arcane horror will drop a pair of Ashen Gloves among other things. More loot can be found down the flight of stairs facing south from this room (a sarcophagus holds Ancient Elven Armor unlocking Codex entry: Ancient Elven Armor and a Legacy White Shear). One of the chests has a lock difficulty of Very Hard (60 XP)—it can be opened if you have a character with Device Mastery technique and at least 24 points of cunning—it doesn’t contain important loot though, thus it isn’t a big loss if you can’t open it.
A few more skeletons await the Warden on the path heading north from this room, but the entrance to the Werewolf Lair is just past them.
Lair of the Werewolves[]
Map of the Lair of the Werewolves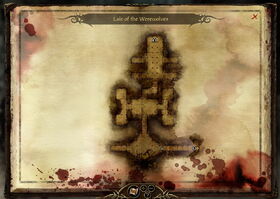
The Warden enters the Werewolf Lair through a passage in the Lower Ruins, arriving into the northern-most room of the level, a small safe area separated from the main room ahead by a door (the corpses can be looted for Corpse Gall). Beyond the door, a large group of werewolves, including shadow werewolves, stand guard and will attack as soon as the Warden opens the door.
Shadow werewolves use stealth and will try to Overwhelm your companions. Once this group is defeated, the party can explore the large room ahead: be careful of traps and more werewolves (including hidden shadow werewolves) just ahead. The companions can use the barricades for cover and to lure the werewolves closer when the party is ready. The flights of stairs to the sides may yield some loot, but lead nowhere. The only option is to move forward and down the stairs headed south.
Past the door at the bottom of these stairs, the party will meet the Gatekeeper accompanied by three other werewolves. He has been sent by The Lady to offer an opportunity to parley. If the party agrees to parley, he will take them to the Lady of the Forest. The alternative, of course, is to attack the werewolves. If you fight the Gatekeeper, more werewolves will join him from adjacent rooms (total of 7 ordinary, 4 rabid, and 2 shadow), resulting in a very tough battle. Against 13 enemies who can chain knockback and Overwhelm your party, it is best that you have a lot of AoE damage at your disposal, so that you can take them out quickly. Other than that, a good tactic is to retreat back to the stairs outside the entrance door.
There is a glitch at the door threshold that prevents the AI from pathing through it. On PC, you cannot order your party to move to the other side of the door by clicking in the area; you have to take control of each party member and manually move them with the keyboard, one by one. This glitch prevents the werewolves from simply rushing after the party, allowing you to deal with one or a few of them at a time.
If Shale is in the party and you agree to parley she wonders what the point is of speaking with the werewolves.
If Wynne is in the party and you refuse to parley she objects.
At this point, the Warden has choices about how the quest line will be completed.
Note: If the Warden decides to parley, the Gatekeeper will let the party through to the next room via a cut scene. Be sure to return to this room (and, explore its side rooms) after the next set of interactions or conclusion of the main quest, in order to pick up a Scroll of Banastor and a revenant phylactery, part of The Black Vials quest.
───────
The Warden’s choices[]
There are three possible outcomes that can be achieved from this point forward, based on choices made in the remaining encounters. Each outcome can be achieved with varying degrees of finesse and approval changes.
- Side with the elves and Zathrian, and attack the werewolves. The elves are cured and will honour the treaties and help battle the Blight.
- Side with the werewolves and attack Zathrian. The werewolves will help battle the Blight. The elves are not cured.
- Side with the elves and the werewolves. The curse is lifted and the werewolves become human. The elves are cured, will honour the treaties, and will help battle the Blight.
Note: Siding with the elves or with the werewolves is easy to achieve. Siding with both requires specific conditions described below, and can be easy to overlook. Saving the game before encountering the Lady of the Forest and separate save before later meeting Zathrian is recommended.
The conversation with The Lady of the Forest will explain the origin of the conflict between the werewolves and the Dalish elves: Zathrian cursed (into werewolf form) a group of human settlers who had murdered his son and raped his daughter. The werewolves currently in the forest are not the original criminals, but unfortunates who wandered into the forest since. The Lady asks the Warden to bring Zathrian to the chamber so they may talk.
───────
Refuse to bring Zathrian[]
On initial parley with the Lady, refuse to bring Zathrian to her and decide to find Witherfang ‘the hard way’.
The Lady transforms into Witherfang, who attacks along with Swiftrunner and 8 werewolves. Witherfang’s howl ability can knock you down so avoid her until you kill Swiftrunner and the werewolves. If the Gatekeeper is left alive, he will attack with 3 werewolves after Witherfang’s group is dealt with.
Obtained from Witherfang’s corpse:
 Heart of the Forest (automatically added to inventory)
- Heart of Witherfang
- Expert Cold Iron Rune
Search this area before taking the exit to the east. Go south up the stairs; Zathrian is waiting in the next room. He thanks you for getting Witherfang’s heart and apologizes for lying to you. No matter what you say he says he should get back to the Dalish Camp and invites you to come with him (if you say you’ll find your own way back, he says he is not letting the heart out of his sight, and you are automatically taken to the Dalish Camp with him and not given the opportunity to kill Zathrian and deal with Lanaya instead).
Note: In this plot line (vs. siding with him and killing the werewolves, see below), Zathrian states that he is the only one who can use the wolf’s heart to cure the hunters. Thus, you cannot kill him, since he mentions that there will be no Dalish support for the Blight.
At the Dalish Camp Zathrian tells you that the heart has cured the hunters. He pledges the elves’ support to fight the Blight.
Even if you didn’t ask for a reward, Zathrian gives you one. You receive:
- Griffon’s Beak
───────
Agree to bring Zathrian[]
She shows you an exit to the surface to the east (you can first search this room). When you are ready to see Zathrian take the door to the east. Find Zathrian; he explains that the Lady is actually Witherfang and shows no remorse for creating the curse. He says he will only go to see the Lady if you safeguard him from harm.
- Offer Zathrian your protection, or say you don’t think it will come to that. He agrees to speak with the Lady.
- Refuse Zathrian your protection. You have to agree to kill the werewolves.
Return to the Lady of the Forest with Zathrian. During their conversation, the Lady reveals that Zathrian used his own blood to create the curse. Because of this, as long as the curse remains, Zathrian also remains alive. His death will not end the curse, however.
Side with Witherfang[]
Curse Lifted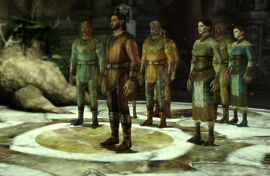
When Zathrian meets the Lady of the Forest, he will eventually say “See? They turn on you as quickly. Do what you have come here to do, Grey Warden, or get out of my way.”
“You’ll end that curse if I have to force you myself!”
Zathrian attacks and summons 2 greater shades and 3 wild sylvans. During this fight Witherfang, Swiftrunner and the werewolves are paralyzed. A dispel magic effect (e.g., from Cleanse Area or Dispel Magic) can dispel the paralysis, allowing Witherfang and the werewolves to attack Zathrian (this may crash the game [confirmation needed] ). Mana Clash is particularly effective against Zathrian.
Zathrian’s available spells include:
- Misdirection Hex
- Vulnerability Hex
- Winter’s Grasp
- Cone of Cold
- Blizzard
- Shock
- Chain Lightning
- Blood Magic
- Blood Wound
Aside from dispelling the paralysis on Witherfang and the werewolves, the most effective strategy here is to focus fire on Zathrian, ignoring all other enemies, since the fight is ended when his health reaches 0. Glyph of Neutralization may be used to interrupt his casting briefly, but will result in him using Blood Magic (as with most enemy mages encountered in the game), which simply adds Blood Wound, an extremely dangerous spell, to his toolbox. Alternatively, another good strategy is to have the entire party quickly run into one of the side hallways to the left and right of the map. Zathrian always casts Blizzard into the middle of the room, and this will prevent him from chasing after the party. The wild sylvans will also take heavy damage from the blizzard because of their low movement speed. This should give you time to take out the two shades, then the wild sylvans if they are still alive. During this time, Zathrian will simply attack the paralyzed werewolves in the room.
After the fight, Zathrian will agree to lift the curse, sacrificing himself and the Lady of the Forest (Zathrian’s body disappears). The werewolves transform back to humans and leave the forest.
- If Wynne is in the party
 Wynne approves (+7) (this does not happen until after the curse is lifted).
Obtained by asking Swiftrunner for a reward:
- Swiftrunner’s Shield
You may also decide to double-cross the ex-werewolves and attack them, even after getting a reward.
Return to the Dalish Camp. Lanaya, the new Keeper, tells you that “the curse is over, and no one else will be subjected to it.” She pledges the elves’ support to fight the Blight.
Note: Even though the werewolf curse is lifted amiably, Lanaya will mention the use of ‘the wolf’s heart’ to cure the hunters, when talking to her at the Dalish camp; almost exact words from Zathrian.
───────
Side with Zathrian[]
The Lady transforms into Witherfang and attacks along with Swiftrunner and 8 werewolves. Attack Swiftrunner and the werewolves before attacking Witherfang; Zathrian can keep Witherfang busy for most of the fight, but he may use Cone of Cold and may accidentally freeze you.
You get (from Witherfang’s corpse):
- Heart of Witherfang
- Expert Cold Iron Rune
Zathrian takes Witherfang’s heart and thanks you. If you ask, he tells you that if he had died, Lanaya knows how to use the heart to cure the hunters. Zathrian says he should get back to the Dalish Camp and invites you to come with him.
- Stay and explore; he leaves saying that he will talk to you when you return to the Dalish Camp.
- Return to the Dalish Camp with Zathrian.
- Double-cross Zathrian and attack him. Zathrian attacks, and he summons 2 greater shades and 3 wild sylvans (Mana Clash is particularly effective against Zathrian).
- If Zevran is in the party Zevran approves (+4)
- You get (from Zathrian’s corpse):
- If Zevran is in the party
Return to the Dalish Camp. Zathrian or Lanaya (if you killed Zathrian) tells you that the heart has cured the hunters and pledges the elves’ support to fight the Blight.
If Zathrian is still alive then you get:
- Griffon’s Beak
───────
Kill Zathrian and the elves[]
If you can persuade, you may be able to convince the Lady to kill Zathrian and the elves (requires Expert Coercion).
Note: This is the only way to get a werewolf army instead of a Dalish elf army, but it also means you have to kill the Dalish elves, including Varathorn, the only merchant that sells unlimited Deathroot, Elfroot and Toxin Extracts.
- If Morrigan is in the party Morrigan approves (+4).
Note: If you let Wynne or Zevran change your mind then you still get Morrigan’s Approval change.
- If Wynne is in the party she thinks you are mad:
- If Zevran is in the party he asks if you’re truly going to do this.
- If you tell him that he’s going to help he says his mother was Dalish and begs you not to do this.
- Otherwise he says his mother was Dalish and begs you not to do this.
You appear at the Dalish Camp with the Lady, Swiftrunner, and the werewolves. Zathrian approaches to talk but no matter what you say he refuses to lift the curse. You have to fight Zathrian, Mithra, Lanaya, and all the elves in the camp.
Zathrian likes to use cold spells (Cone of Cold and Blizzard) so avoid him—let Witherfang fight him—and focus on the other elves first (Mana Clash is particularly effective against Zathrian).
You get (from elven corpses):
- Magister’s Staff
- Keeper’s Ring
- Dalish Longbow
- Varathorn’s Dar’Misu
- Elfrope
- 24
 80
80
The Lady of the Forest and the werewolves will pledge to fight the Blight.
Rewards[]
- 1250 XP – upon receiving either the Magical Werewolf Pelt or the Oak Branch
- 1500 XP – upon completion of this quest at the Dalish Camp by getting army support for the Blight, either from Zathrian/Lanaya and the Dalish elves or from The Lady of the Forest and the werewolves
Siding with the Dalish elves
- Griffon’s Beak – from Zathrian
After the curse is lifted
- Swiftrunner’s Shield – from Swiftrunner
Result[]
- If you sided with the elves, all the ailing Dalish hunters are cured once you return to camp. Zathrian (or Lanaya, if he died) will honor the Grey Warden treaties and pledge the Dalish army to help you battle the Blight. At this point, Emissary Caron will appear in your Party Camp and you can turn in crafting materials to the Dalish army. If Zathrian did not lift the curse (and wasn’t double-crossed), he will later appear in Redcliffe Castle prior to the Final Onslaught, and will fight alongside you against the Archdemon.
- If instead you convinced the werewolves to kill the elves, the werewolves will pledge themselves to help you battle the Blight. At this point, Emissary Bulfa will appear in your Party Camp and you can feed him a single nug (though no caged nugs are actually removed from your inventory). After Arl Eamon recovers, Cassian will also be located in the Redcliffe Castle as he and his group were sent ahead by the Lady of the Forest. The Lady herself will later appear in Redcliffe Castle prior to the Final Onslaught, and Swiftrunner will fight alongside you against the Archdemon.
Note: Of course, this will also mean you lose access to the only infinite source of elfroot, deathroot and toxin extracts in the game, Varathorn. So stock up in advance if you intend to follow this path, or download an appropriate mod that replaces Varathorn with a werewolf merchant that can accomplish the same thing.
- If you chose to side with both and convinced Zathrian to sacrifice himself and lift the curse, the humans will disperse and the elves will honor the treaties. All werewolves that have not been slain will also be removed from the Werewolf Lair and the Brecilian Forest, except from the East Brecilian Forest.
Regardless of how you completed this quest, you can now freely open the chest by the Keeper’s aravel to obtain the Song Book, which grants Codex entry: In Uthenera. ![]()
![]() It’s not possible to open this chest if you slaughter the elves (chest is no longer interactive), but Leliana will sing the song in camp anyway.
It’s not possible to open this chest if you slaughter the elves (chest is no longer interactive), but Leliana will sing the song in camp anyway.
The next time you enter the middle of the West Brecilian Forest (north from the entrance, then straight across the bridges by the waterfall), you will be confronted by Panowen (whose husband was slain by the werewolves) and several Dalish hunters. If you lifted the curse or sided with the werewolves, she will attack you unless you can persuade her that Zathrian was to blame (in which case she gives you the Silverleaf ring). If instead you killed the werewolves, she will thank you and bestow the ring as a reward.
And lastly, the next time you speak with Leliana at the party camp, she will sing “In Uthenera”.
Note: Remember to return to the Werewolf Lair after completing this quest to pick up the remaining loot. There are several locked chests that can give you XP, plus you can kill some “friendly” werewolves with AOE spells (if you sided with them) for even more XP.
Side quests[]
There are four side quests that can be taken in the Dalish Camp once Nature of the Beast has been started. Some of them cannot be completed after resolving the werewolf/elf conflict. Obviously, none of them can be completed if you side with the werewolves (as all the elves will be dead).
- Cammen’s Lament – ends upon return to camp with Cammen stating he will find his own pelt if you did not visit Cammen prior to ending the curse. This quest is easily completed with two ranks of coercion skill during your first encounter with Cammen prior to entering the Brecilian Forest.
- Elora’s Halla – can be completed at any time.
- Lost to the Curse – speak to Danyla’s husband before entering the Forest; completed by discussing her fate with him upon your return. If you have not yet met Danyla before convincing Zathrian to lift the curse, she will be removed from the Forest where she normally appears. You can then speak with Athras and he can be sent to search for her, thereby closing the quest.
- Rare Ironbark – begin this before you enter the Forest; it will remain open after completing the main quest.
Codex objects[]
(Note: any of the main entries may have been unlocked elsewhere before entering the Brecilian Forest.
- Colored inks for Dalish tattoos in Dalish Camp
- Totems & statues of elven pantheon in Dalish Camp
- Two of The Black Vials binding phrases
- One of the Correspondence Interruptus letters
- One of the Ancient Texts from Scrolls of Banaster
- One of the Unbound journal entries
- Chestpiece of Ancient Elven Armor
- Gravestone for Legend of the Juggernaut
- Red longbow of the Friend of the Dead
- Whitewood buckler of the Great Protector
- Mad Hermit’s old book about Imperium Archons
- A carved elven tablet about ancient elven ritual
- Elven Burial Chamber for the long sleep
- Song Book titled In Uthenera
Notes[]
- With regards to the difference in experience earned between the different ways to end this quest, the difference appears to be about 3200 experience with monsters between levels 15-17 using the zFCR creature rescale mod that modifies the ranks of many mobs in the game (it is unclear how much this affects experience earned). The option that gives the least experience is talking your way past the Gatekeeper, and ending the curse, killing only Zathrian during the battle that ensues. Slaying everything (including Zathrian) naturally ends with the most experience earned. The slaying everything approach also allows you to kill the Gatekeeper and his guards while talking your way past him initially (although the 3 Werewolves that he initially starts with may be bugged). The difference will be less at a lower level and with vanilla creature ranks. The difference in experience amounts to about 12% of the experience bar at level 22.
- Stealing from the Hermit’s tree stump will result in him turning hostile, forcing you to kill him. However, you can actually steal the acorn this way (if you didn’t trade for it), so the quest can be continued.
- When you find the Arcane Warrior phylactery, it will begin vibrating. If you say, Nah, you may have a use later, it will stop vibrating & the light will go away. However, you still get to choose the Specialization. On the Xbox, the Phylactery might remain clickable without being usable.
- When agreeing to find Zathrian, before you leave you may be able to kill the werewolves surrounding the Lady of The Forest with the exception of Swiftrunner, this can be accomplished by casting a 4th tier area of effect spell like Inferno, you’ll get extra experience and loot without actual battle (however doing so will also result in a lack of support in the battle against Zathrian as they are all dead. (tested on PC, patch 1.02)
- Some players prefer to side with the Elves because of their strong bow attack, which the werewolves lack. mages & templars (and even golems, from Branka) offer some ranged support, but none are as powerful as the Dalish army.
- If you choose to kill or free the werewolves from their curse you can return to the east woods to find an elf looking for the werewolves to avenge her husband’s death. This is Panowen, as mentioned above. She will be hostile towards you and will admit to wanting to continue hunting them down even if they were turned back to humans. You can talk her down with persuasion and in return she will give you an item (Silverleaf ring).
- Unsurprisingly, if you open Varathorn’s equipment chest before actually asking him about it, he comments on you looting through things before you know you can have them, but this has no known negative effects on your interactions with him or the rest of the Dalish.
- It seems that if you destroy all your Werewolf Pelts and killed the Grand Oak before you pass through the magical barrier, you are unable to continue this quest and since it is a main quest, you cannot complete the game as well. Aside from loading a previous save, other solutions would be to use the Console and jump to another area or use an unofficial mod and manually add a werewolf pelt in your inventory.
- If the Warden is of Dalish Origin, they will be granted by Zathrian the Griffon’s Beak even if they didn’t ask for a reward or slew the Werewolves without Zathrian’s assistance.
Bugs[]
- After movie of the curse lifting, you might not be able to exit; the doors somehow lose their activation icon. Save and reload game.
 Some players have reported a glitch where werewolf pelts disappear from inventory, preventing access to the ruins through the Hermit. Only matters if the player has already killed the Grand Oak.
- Talk to the Grand Oak before killing the hermit (or checking the stump, which will force his death). If he dies first, you can be stuck without a way to complete the quest; the Hermit will be dead, the stump useless, leaving you no way to cross the barrier. Likewise, if you trade with the Hermit for the acorn, leave the conversation, give the acorn to the Grand Oak, and then return to the Hermit to either continue trading or check his stump, you may acquire yet another acorn that you will keep for the duration of the game.
 When siding with the werewolves, it is possible to get blocked from completing the Nature of the Beast quest. Only Swiftrunner and Witherfang appear, standing near the forest entrance after the battle. This can happen when the battle ends prematurely if not all the elves in the Dalish camp are defeated. To ensure this does not happen, make sure you run into all the elves by checking around the area. A cutscene should play shortly after all the elves are defeated.
- Trading the hermit for the helmet then saving and reloading the game will glitch the game, it will allow you to talk to the Grand Oak with the option as if you had the acorn. Proceeding with the option will not cause you to lose the helmet, and it will proceed as if you traded for the acorn. However talking to the Hermit will still result in him saying he still has the book and the acorn. You can still advance normally without actually getting the acorn from the hermit.
- Even when using Cleanse Area and releasing some of the werewolves from being “paralyzed ” they do not engage Zathrian and continue standing where they were for the entire battle.
- When talking with the werewolves before entering the chamber with the Lady, there is an exploit to earn unlimited approval with Shale. When agreeing to parley with the Lady, Shale will object. A persuasion check will overcome Shale’s objections and give you +4 approval from Shale. After you can engage the werewolves in conversation again, agree to talk to the Lady and Shale will object again leading to the persuasion option again. You can do this an unlimited amount of times.
- After defeating Zathrian he may turn into an ally and the fight will end. Talking to him after this restarts the cut-scene from before the battle. If you once again chose to fight Zathrian he will start this second battle with no health.
Trivia[]
- David Gaider wrote the majority of the Nature of the Beast quest line. [1]
References[]
- ↑ The BioWare Forum, “Writers of Dragon Age”
