Все программы в момент установки их в Windows прописывают в реестр свои ассоциации к файлам, с которыми они работают. Иногда при неграмотных действиях пользователя некоторые ассоциации могут изменится. Если добавить ассоциацию к ярлыкам, имеющим расширение .lnk, то программы с рабочего стола перестанут открываться. Разберемся почему так получается и как устранить.
Когда пользователь пытается открыть файл, который не имеет ассоциации, Windows предложит указать программу, с помощью которой можно это сделать. Но пользователь уверен, что ему по почте прислали именно документ в формате Word и пытается открыть файл программой Word.

В результате все файлы имеющие такое же расширение ассоциируются с этой программой.
Если в Windows появилась ассоциация ярлыков, то все ярлыки станут неработоспособными и программы с рабочего стола открываться не будут.
Восстановить ассоциацию файлов lnk можно через реестр путем удаления соответствующей записи.
Открываем окно “Выполнить” сочетанием клавиш “Win+R” и вводим команду “regedit”

В реестре переходим по ветке:
HKEY_CURRENT_USERSoftwareMicrosoftWindowsCurrentVersionExplorerFileExts
И удаляем раздел .lnk

После этого достаточно выйти из учетной записи пользователя и зайти обратно. Windows добавит в реестр правильный раздел .lnk и ярлыки будут нормально функционировать.
Изменить ассоциацию файла, неправильно сопоставленного какой-либо программе, можно без вмешательства в реестр.
Изменение ассоциации файла программе настраивается через элемент Панели управления “Программы по-умолчанию”.
Для этого откроем панель управления “Пуск / Панель управления” и выберем элемент “Программы по умолчанию”

Выбираем пункт “Сопоставление типов файлов или протоколов конкретным программам”

Выбираем расширение файла, для которого необходимо изменить ассоциацию, и нажимаем кнопку “Изменить программу”

Указываем программу, при помощи которой необходимо открывать данный файл.

Создаешь батник с этим содержимым, запускаешь его, соглашаешься на внесение изменение, перезагружаешь комп. Все.
Содержимое батника:
Windows Registry Editor Version 5.00
;Восстановление ассоциирования файлов [.LNK] – Windows 7
[HKEY_CLASSES_ROOT.LNK]
@=”lnkfile”
[HKEY_CLASSES_ROOT.LNKShellEx{000214EE-0000-0000-C000-000000000046}]
@=”{00021401-0000-0000-C000-000000000046}”
[HKEY_CLASSES_ROOT.LNKShellEx{000214F9-0000-0000-C000-000000000046}]
@=”{00021401-0000-0000-C000-000000000046}”
[HKEY_CLASSES_ROOT.LNKShellEx{00021500-0000-0000-C000-000000000046}]
@=”{00021401-0000-0000-C000-000000000046}”
[HKEY_CLASSES_ROOT.LNKShellEx{BB2E617C-0920-11d1-9A0B-00C04FC2D6C1}]
@=”{00021401-0000-0000-C000-000000000046}”
[HKEY_CLASSES_ROOT.LNKShellNew]
“Handler”=”{ceefea1b-3e29-4ef1-b34c-fec79c4f70af}”
“IconPath”=hex(2):25,00,53,00,79,00,73,00,74,00,65,00,6d,00,52,00,6f,00,6f,00,
74,00,25,00,5c,00,73,00,79,00,73,00,74,00,65,00,6d,00,33,00,32,00,5c,00,73,
00,68,00,65,00,6c,00,6c,00,33,00,32,00,2e,00,64,00,6c,00,6c,00,2c,00,2d,00,
31,00,36,00,37,00,36,00,39,00,00,00
“ItemName”=”@shell32.dll,-30397”
“MenuText”=”@shell32.dll,-30318”
“NullFile”=””
[HKEY_CLASSES_ROOT.LNKShellNewConfig]
“DontRename”=””
[HKEY_CLASSES_ROOTlnkfile]
@=”Shortcut”
“EditFlags”=dword:00000001
“FriendlyTypeName”=”@shell32.dll,-4153”
“IsShortcut”=””
“NeverShowExt”=””
[HKEY_CLASSES_ROOTlnkfileCLSID]
@=”{00021401-0000-0000-C000-000000000046}”
[HKEY_CLASSES_ROOTlnkfileshellexContextMenuHandlersCompatibility]
@=”{1d27f844-3a1f-4410-85ac-14651078412d}”
[HKEY_CLASSES_ROOTlnkfileshellexContextMenuHandlersOpenContainingFolderMenu]
@=”{37ea3a21-7493-4208-a011-7f9ea79ce9f5}”
[HKEY_CLASSES_ROOTlnkfileshellexContextMenuHandlers{00021401-0000-0000-C000-000000000046}]
@=””
[HKEY_CLASSES_ROOTlnkfileshellexDropHandler]
@=”{00021401-0000-0000-C000-000000000046}”
[HKEY_CLASSES_ROOTlnkfileshellexIconHandler]
@=”{00021401-0000-0000-C000-000000000046}”
[HKEY_CLASSES_ROOTlnkfileshellexPropertySheetHandlersShimLayer Property Page]
@=”{513D916F-2A8E-4F51-AEAB-0CBC76FB1AF8}”
[-HKEY_CURRENT_USERSoftwareMicrosoftWindowsCurrentVersionExplorerFileExts.LNKUserChoice]
[HKEY_CURRENT_USERSoftwareMicrosoftWindowsCurrentVersionExplorerFileExts.LNKOpenWithProgids]
“lnkfile”=hex(0):
Download Article
Download Article
If all of your files suddenly have the .lnk extension, you can’t open apps by clicking their shortcuts, or you’re seeing non-stop errors about .lnk files, the issue might stem from a malware infection or Windows Update gone awry. LNK is the file extension used for Windows shortcuts—the icons and menu items you click to open files, folders, and documents. Broken LNK files may cause headaches, but fortunately, there’s usually an easy fix! This wikiHow article will teach you 6 easy ways to fix problems with LNK files on your Windows PC.
Things You Should Know
- If your icons and shortcuts have changed to LNK files, it may be due to corrupt system files.
- If your LNK errors are due to a virus or malware infection, you can usually fix the issue by running an anti-malware scan in Safe Mode.
- There are several freeware tools available that can easily fix broken LNK files.
-

1
Start your PC in Safe Mode with Networking support. In many cases, a .lnk file extension problem can be caused by a virus or malware.[1]
To properly scan and remove threats from your PC, you’ll want to boot up into Safe Mode with Networking. If you know for sure you don’t have a malware infection, you can skip this method.- If you can access your Windows Settings, you can boot into Safe mode by clicking the Start menu and going to Settings > Update & Security > Recovery > Restart Now. When your PC restarts, go to Troubleshoot > Advanced options > Startup Settings > Restart. When prompted after reboot, press 5 or F5 to start Safe Mode with Networking.[2]
- If you can’t access Settings, reboot your PC to the sign-in screen. Once you’re prompted to log in, hold down Shift as you click Power > Restart. When the PC restarts, go to Troubleshoot > Advanced options > Startup Settings > Restart. When prompted after reboot, press 5 or F5 to start Safe Mode with Networking.
- If you can access your Windows Settings, you can boot into Safe mode by clicking the Start menu and going to Settings > Update & Security > Recovery > Restart Now. When your PC restarts, go to Troubleshoot > Advanced options > Startup Settings > Restart. When prompted after reboot, press 5 or F5 to start Safe Mode with Networking.[2]
-

2
Download Malwarebytes from https://www.malwarebytes.com. Once you’re in Safe Mode, you should be able to open any web browser (such as Edge or Chrome). Malwarebytes has a free malware scanning and removal app that can easily identify these viruses and remove them from Windows. Click Start Free Download to download the installer to your PC.
Advertisement
-

3
Install Malwarebytes. Double-click the MBSetup file you downloaded (it will be in your Downloads folder), then follow the on-screen instructions to install Malwarebytes on your PC. If prompted to install BrowserGuard, choose Skip this for Now.
- Click Done when you’re finished installing. Malwarebytes will then launch automatically.
-

4
Click Scan. You’ll see this below “Scanner” on the welcome screen. Malwarebytes will now check for updates and then scan Windows for viruses and malware. This process can a few minutes or longer, depending on the size of your hard drive and whether updates need to be installed.
-

5
Click View Scan Results. Once the scan is finished, a pop-up will appear at the bottom-right corner of your screen. You’ll see the View Scan Results button on this pop-up.
-

6
Remove the infections. If any threats were detected, Malwarebytes will help you quarantine them. Check all the boxes to select detected threats, then click Quarantine to remove them.
-

7
Restart your PC in Normal mode. Once the scan is done and the threats are quarantined, reboot your PC normally. If your PC was infected with malware or a virus and Malwarebytes was able to fix the problem, this may have solved the issue.
- It’s possible that you’ll still experience .LNK errors even after the threats were removed. If so, try using a broken shortcut fixer or running a registry fix.
Advertisement
-

1
Download the Registry fix for Windows. Usually, .lnk extensions fail to work properly due to a failed Windows Update, missing files or files corrupted by malware. You can download and run .lnk file association fixer to solve this problem. You can download the file for all versions of Windows from https://www.thewindowsclub.com/downloads/lnk-fix-twc.zip.
-

2
Unzip the file. To unzip, right-click the downloaded file, select Extract All, choose a location (such as your desktop), and then click Extract. The new folder will open instantly.
-

3
Right-click “LNK_Fix_TWC.reg” and select Merge. If you’re using Windows 11, you’ll need to select Show more options first. You’ll be asked if you want to continue.
-

4
Click Yes. This applies the registry fix. Once the process is complete, you can restart your PC. This should resolve most .LNK link error problems.
Advertisement
-

1
Open the Control Panel. You may be able to resolve the .LNK errors with a quick System Restore. To open the Control Panel without encountering .LNK errors, follow these steps:
- Press Windows key + R to open the Run dialog.
- Type Control Panel.
- Click OK.
-

2
Open the Recovery panel. If you see it in the window, click Recovery. If not, type recovery into the search bar at the top of the window and click Recovery when it appears.
-

3
Click Open System Restore. It’s the second option.
-

4
Click Next on the System Restore wizard. This displays a list of restore points.
- If you see an error that says you don’t have System Restore configured, you won’t be able to use this method. But don’t worry—you can continue with any of the other methods.
-

5
Select a restore point and click Next. Choose a restore point from a date on which your computer was working well.
- If you click Scan for affected programs with a restore point selected, you’ll see which programs you’ve installed since Windows created that restore point. All of these programs will be removed from your PC if you complete the restore, but your personal files and other programs will be safe.
- If you don’t see a good candidate, check the box next to “Show more restore points” at the bottom.[3]
-

6
Click Next to confirm. A summary will appear.
-

7
Click Finish to start the System Restore. Once the process is complete, your computer will be restored to the selected date.
- If this doesn’t solve the .LNK problem, you can continue to another method.
Advertisement
-

1
Install Glary Utilities 5 from Glarysoft. This freeware tool will scan for broken shortcuts (LNK) files and repair them automatically. To download the program, go to https://www.glarysoft.com/glary-utilities and click the green Download Now button.
-

2
Install the program. Click the downloaded file and follow the on-screen instructions to install.
- Click Finish after installing and the app will launch instantly.
-

3
Click the Advanced Tools tab. It’s at the top of the window.
-

4
Click Shortcuts Fixer. The tool will now scan your computer for any broken .LNK shortcuts. All broken shortcuts will appear in the window.
-

5
Select all broken shortcuts. If not all of the boxes are checked by default, select them now.
-

6
Click the down-arrow next to “Fix Shortcut.” It’s to the right of the “Fix Shortcut” button at the top of the tool.
-

7
Select Fix All Checked. This repairs the links for all of the broken shortcuts.
- If a shortcut cannot be fixed, you’ll see the word “Error” to the right of its name. Also, a checkbox will remain next to the file to indicate that it’s still selected, while the fixed files will no longer have shortcuts.
- You can repair any of the “Error” shortcuts manually by reassociating those .lnk files with the apps or files they are supposed to point to. To do this, click one of the error files, then click Fix Shortcut. Choose the correct file, folder, or app, then click Open to select it.
Advertisement
-

1
Open a Command Prompt as an administrator. You can use your PC’s System File Checker (SFC) to repair problems with corrupted system files. Fixing these system files will often resolve .LNK errors. To avoid potential .LNK errors when opening Command Prompt, follow these steps to open it:
- Press Windows key + R.
- Type cmd but don’t press Enter.
- Press Control + Shift + Enter at the same time.
- Click Yes to open the command prompt.
-

2
Type sfc /scannow and press Enter. This scans your entire PC for corrupt system files. The process can take several minutes or more, depending on the size of your hard drive.
-

3
Follow the on-screen instructions to resolve any issues. If the System
Advertisement
-

1
Open the Registry Editor. To do so without any .LNK errors, follow these steps:
- Press Windows key + R.
- Type regedit and press Enter.
- Click Yes.
-

2
Go to the LNK registry subkey. Here’s an easy way to do this:
- Click the View menu and make sure “Address Bar” is selected. When this feature is on, you’ll see an address bar at the top or bottom of the Registry Editor that says “Computer.”
- Type or paste this key into the address bar: HKEY_CURRENT_USERSoftwareMicrosoftWindowsCurrentVersionExplorerFileExts.lnk
- If that doesn’t work, you can navigate there manually—in the left panel, click HKEY_CURRENT_USER, click Software, click Microsoft, click Windows, click CurrentVersion, click Explorer, click FileExts, then click .lnk.
-

3
Delete the UserChoice subkey. If you see a key with this name beneath “.lnk” in the left panel, right-click it and select Delete.[4]
After that, reboot your PC—the problem should be resolved.
Advertisement
Ask a Question
200 characters left
Include your email address to get a message when this question is answered.
Submit
Advertisement
-
If you still experience .lnk errors after trying these fixes, it’s best to reset your computer. You’ll have the opportunity to keep your personal files or start from scratch.
Thanks for submitting a tip for review!
Advertisement
About This Article
Thanks to all authors for creating a page that has been read 96,676 times.
Is this article up to date?
Всем привет! В этом посте поговорим об одной очень жизненной ситуации, с которой на рабочем компьютере столкнулась сестра автора блога. Суть ее в том, что все ярлыки открываются одной программой.
То есть смотрите, например, значок интернет-браузера Opera стал открываться через Word. К тому же в результате этого сбоя, перестал работать установленный на ПК сервер рабочей программы. А это уже, согласитесь, конкретный косяк.
Содержание статьи:
Почему ярлыки открываются одной программой
Как вернуть ассоциации ярлыков к программам
Так вот, друзья, давайте разбираться, почему так все-таки произошло и что нужно сделать, чтобы исправить подобную ситуацию. А все дело в том, что неосознанными действиями пользователя, были заданы неверные ассоциации ярлыков с родными программами.
Как это могло получиться? Да очень просто. При открытии ярлыка была использована команда “Открыть с помощью”, в результате чего всем файлам с расширением “.lnk” была присвоена неправильная программа для открытия.
Но большого страха в этом нет, все можно вернуть на свои места без большой крови. Для этого автором блога в Сети был найден простой и легкий способ того, как можно вернуть ассоциации ярлыков с родными программами:
Сразу скажем о том, что все манипуляции будем делать на примере Windows 10, хотя на других версиях данной ОС все будет аналогично. Итак, первым делом открываем с правами администратора редактор реестра.
Для этого жмем по кнопке “Пуск” и вводим команду “regedit”:
После его открытия помним, что здесь работать нужно очень осторожно, не делая никаких ошибочных манипуляций. На этом шаге нам нужно проследовать по пути:
HKEY_CURRENT_USERSoftwareMicrosoftWindowsCurrentVersionExplorerFileExts.lnk
Найти там подраздел “UserChoice” и обязательно удалить его. Делается это нажатием по нему правой кнопки мыши:
Вот, в принципе, и всего делов-то. После перезагрузки компьютера все ассоциации ярлыков вернутся к родным программам. Как видите, ничего сложного в этом нет. Кстати, сестра автора блога сумела исправить данную проблему даже по телефону.
Но если кто-то из вас совершенно не дружит с редактором реестра либо боится там что-нибудь не то удалить, то есть еще один вариант. Он заключается в запуске на компьютере маленькой программки под названием Unassociate File Types.
Стоит сказать, что она даже не требует установки. Поэтому берем ее по ссылке с официального сайта, затем распаковываем и запускаем. Но на этом шаге автора ждал облом, потому как на Windows 10 данная утилита не работает:
Но если у кого-то установлена Vista или Windows 7, то бояться не стоит, программа запустится без проблем. Затем в графе “File types” находим нужное нам расширение “.lnk” и жмем кнопку “Remove file association”:
На этом месте будем завершать статью, поскольку вопрос о том, почему все ярлыки открываются одной программой или как вернуть ассоциацию ярлыков с родными приложениями исчерпан полностью.
Если у вас остались вопросы, спешите задать их в комментариях. Будем вместо решать ваши проблемы и неувязки.
С уважением, Комаровский Виталик
Доброго времени суток уважаемые посетители сайта. Недавно, будучи у друга в гостях, столкнулся с некоторой проблемой на его ноутбуке с операционной системой Windows 7. Проблема эта заключалась в том, что у него на рабочем столе все ярлыки поменяли расширение на .lnk. К тому же ни один ярлык не работал. Он сказал, что случилось это, когда он, выделив ярлык от видео файла, сделал «открыть с помощью», далее нажал «Выбрать программу» и в открывшемся окне случайно забыл убрать галочку с опции «Использовать выбранную программу для всех файлов такого типа». И после этого все ярлыки на рабочем столе, стали открываться выбранной тогда программой KMPleer.
И как вы понимаете эта программа не сможет открывать все программы на компьютере  При указании другой нужной программы опять таки же, эта другая программа сопоставляется со всеми файлами, т.е. она открывает (пытается открывать:)) и видео файлы, и фотографии и .exe файлы.

Так что же случилось спросите вы? А случилось то, что слетели ассоциации на типы файлов. Вам конечно же не интересно как и почему это случилось, а просто хочется побыстрее исправить такую ситуацию. Поверьте и мне с моим другом тоже было интересно и хотелось решить эту головоломку.
Ведь иначе, чтобы запустить ту или иную программу или игру, приходится на каждом ярлыке нажимать левую кнопку и выбирать там свойства. Потом на вкладке «Ярлык» жмакать кнопку «Расположение файла» и уже из папки исходника запускать программу. Согласитесь — это архи неудобно. Поэтому давайте ка лучше перейдем к решению данной проблемы.
Поехали…
Ярлыки не работают и расширение поменялось на .lnk. Что делать? [Решение]
Решить данную проблему оказалось делом не легким, в силу того, что я с системным реестром на «вы» (категорически не советую и Вам лезть в реестр, если у Вас нет твердых знаний в этой области). Но, как оказалась, если есть под рукой необходимое программное обеспечение, то решить проблему с нерабочими ярлыками сущий пустяк. Речь пойдет о маленькой программе или даже можно сказать утилите под названием Unassociate File Types. Натолкнулся я на данную программу на сайте http://www.winhelponline.com. Скачать оную программу можно перейдя по ссылке для скачивания. Данная программа бесплатная и к тому же не требует установки.
Программа Unassociate File Types
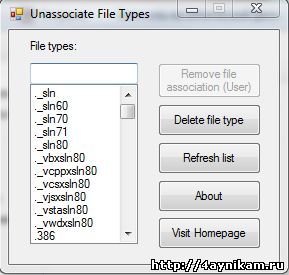
Запустив программу перед вами появится вот такое окошечко.

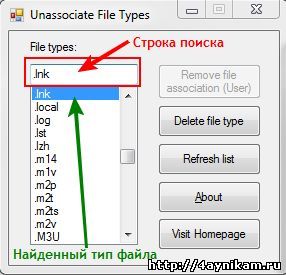
В этом окне слева вы видите список типов файлов, расширений. Нам нужно найти тип файла .lnk. Чтобы не прокручивать список вниз и не искать глазами такое расширение, в программе слева над списком есть строка поиска. Вот там и вводим название необходимого нам расширения .lnk.

Найдя расширение выделяем его и и жмем кнопку Remove File Association. Данная кнопка удаляет ассоциацию файлов с этим расширением. И если вы все сделали правильно то все ярлыки на вашем рабочем столе должны придти в норму и нормально работать. Точно также можно исправить ассоциации и на другие типы файлов (это если вдруг расширение ваших ярлыков поменялось на что то другое)
В программе есть ещё одна кнопка — Delete File Type. Она удаляет выбранный тип файла из реестра.
P.S. Для тех у кого не получается разархивировать сжатый файл (из-за того, что не открывается архиватор и т.д.) выкладываю ссылку на не сжатый (не за архивированный) файл — ССЫЛКА.
Послесловие.
Вот и все. Исправить ассоциации типов файлов можно и через системный реестр, но это уже совсем другая история. Надеюсь данная статейка поможет Вам уважаемые пользователи и сделает вашу работу с компьютером комфортней. Оставайтесь с нами и узнаете ещё много интересного.
Обновление (16.03.2015):
Добавлю способ удаления ассоциации через системный реестр, так как у многих возникают трудности с выше описанными методами.
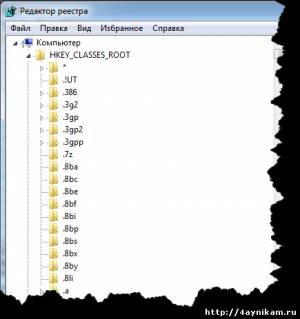
Запускаем Редактор системного реестра путем введения команды «regedit» в «Пуск — выполнить» (моно открыть путем нажатия сочетания клавиш Win+R) и нажатия Enter. Откроется редактор. В нем открываем раздел HKEY_CLASSES_ROOT и уже здесь ищем нужную ветку с вашим расширением.

Нашли? Тогда удаляйте к чертям. Вот и все.
![]() Загрузка…
Загрузка…
