Ваш Mac не включается? Без паники! Не спешите бросать всё и нести любимый компьютер в ближайший сервис. Вполне возможно, что для «реанимации» хватит и встроенных средств macOS, воспользоваться которыми может каждый желающий.

♥ ПО ТЕМЕ: Терминал на Mac (macOS): что это, команды, синтаксис – понятный гид для начинающих.
Загрузка в Безопасном режиме (Safe Mode) на Mac
При активации Safe Mode macOS просканирует жесткий диск и исправит все ошибки, которые найдет.
«Безопасная» загрузка запускает только жизненно необходимые компоненты (т.е. только то, что необходимо для запуска компьютера). В результате не будут запущены сторонние расширения, элементы входа в систему (логины-пароли), а также будет очищен кэш в определенных разделах.
Чтобы запустить Mac в режиме Safe Mode, выключите его, затем включите и одновременно со стартовым звуком зажмите на клавиатуре клавишу ⇧Shift. Если ваш Mac завис при включении, сначала выключите его (для этого удерживайте физическую кнопку питания на корпусе или клавиатуре в течение 10 секунд).

Если Mac загрузил систему, перезагрузите его и включайте уже как обычно. Если же компьютер вновь завис, переведите его в Verbose Mode — для этого необходимо выключить Mac, включить его и после стартового сигнала одновременно нажать и удерживать ⌘Cmd + V. Так вы сможете узнать, какой именно системный компонент приводит к проблеме. Когда источник будет выявлен, можно перезагрузиться в Safe Mode (с зажатой клавишей ⇧Shift) и удалить проблемное расширение, после чего попробовать уже обычную перезагрузку.
♥ ПО ТЕМЕ: Как вывести свои контакты на дисплей пропавшего Mac.
Если безопасный режим не решил вашу проблему, переходим к следующей опции под названием Режим восстановления (Recovery Mode). Он “живёт” в отдельной части загрузочного диска и позволяет восстанавливать систему, получать доступ к Терминалу и возможность переустановить операционную систему вашего Mac — macOS.
Для перехода в Режим восстановления:
1. Выключите компьютер;
2. Включите его;
3. Сразу же после стартового сигнала нажмите и удерживайте сочетание клавиш ⌘Cmd + R.

Если перейти в Recovery Mode не удается (при проблемах с диском такое бывает), можно запустить режим восстановления через интернет. Сочетание клавиш будет уже несколько другим — ⌘Cmd + ⌥Option (Alt) + R. Этот способ требует интернет-подключения и займет гораздо больше времени, т.к. macOS будет загружать из Сети образ системы весом в несколько гигабайт.
Если загрузка в Режим восстановления прошла успешно, вы увидите несколько вариантов действий. Запустите Дисковую утилиту и найдите загрузочный диск, который является источником проблем — скорее всего, он называется Macintosh HD. Выберите его в окне слева, а затем нажмите Первая помощь → Запустить.

♥ ПО ТЕМЕ: Как удалить дубликаты файлов (фото и тд) и освободить место на Mac: лучшие бесплатные приложения.
Проверка fsck
File system consistency check (fsck, «проверка целостности файловой системы») — старый добрый Unix-инструмент для проверки и решения проблем с дисками.
В зависимости от объема жесткого диска, его типа и серьезности проблемы fsck-проверка может занять довольно много времени. Просто наберитесь терпения.
Для запуска fsck необходим переход в однопользовательский режим (Single User Mode). Он позволяет вносить изменения в общие пользовательские ресурсы на компьютере. Single User Mode не запускает macOS; он просто дает доступ к командной строке Unix.
Для перехода в Single User Mode:
1. Выключите Mac;
2. Включите его;
3. Сразу после стартового сигнала нажмите и удерживайте сочетание клавиш ⌘Cmd + S.

Вскоре вы увидите командную строку. Наберите в ней fsck -fy для запуска процедуры fsck.
Примечание: если ваш диск зашифрован, выберите подходящий пользовательский аккаунт и введите пароль для дешифровки. Если у вас установлен пароль на прошивку Mac, запустить Single User Mode не получится.
Важно дождаться окончания fsck-проверки — если процесс будет прерван, возможна потеря данных. После окончания проверки вы увидите одно из следующих сообщений:
** The volume Macintosh HD could not be repaired.

*****The volume was modified *****
Система сообщает, что восстановить жесткий диск не удалось. Ничего страшного — просто запустите fsck еще раз. Команда та же: fsck -fy
** The volume Macintosh HD was repaired successfully.

*****The volume was modified *****
Уже намного лучше… но расслабляться рано. Опять-таки, запустите проверку еще раз.
** The volume Macintosh HD appears to be OK.
А вот это — то, что нам нужно. fsck проверила весь диск и не нашла ничего, что требовало бы исправлений.

Теперь из Single User Mode можно выходить. Команда для выхода: exit.
♥ ПО ТЕМЕ: Как узнать, откуда был скачан файл на Mac.
Apple Diagnostics
Если описанные выше способы вам не помогли, то проблема почти наверняка очень серьезная. А это значит, что пришло время воспользоваться Apple Diagnostics!
Это специальный тест для компьютеров Mac от компании-производителя. По его итогам вы получите код ошибки и сможете понять, что именно не так с вашим Mac.
Для запуска теста Apple Diagnostics:
1. Выключите ваш Mac;
2. Отключите от него все подключенные устройства, за исключение клавиатуры, мышки, монитора, Ethernet-кабеля (если есть) и кабеля питания. Иными словами, отключите флешки, внешние жесткие диски, принтеры, сканеры и т.п.
3. Включите Mac;
4. Сразу же после стартового сигнала нажмите и удерживайте на клавиатуре D.
5. Выберите свой язык
Как уже упоминалось выше, после прохождения теста вы получите в свое распоряжение код ошибки. Расшифровка кодов:
- ADP001: Ошибок не найдено.
- NDD001: Проблема с USB-устройствами. Убедитесь, что вся ненужная USB-техника отключена;
- NNN001: Не найден серийный номер. Вы пользуетесь Hackintosh? За вами уже выехали! (шутка);
- PFR001: Проблема с программным обеспечением;
- PPM001-015: Проблема с памятью компьютера;
- PPR001: Проблема с процессором;
- PPT001: Аккумулятор не найден;
- VFD006: Проблема с видеокартой;
- VFF001: Проблема со звуковой картой.
Как видим, проблемы делятся на две категории — те, которые легко устранит и рядовой пользователь (например, ошибки, связанные с USB), и те, с которыми надо сразу идти в сервис (к примеру, неполадки с видео- и аудиокартами, процессором, памятью и т.д.).
♥ ПО ТЕМЕ: Как правильно настроить режим «Не беспокоить» на iPhone, iPad и Mac.
Восстановление файлов с поврежденного диска
Повреждение жесткого диска среди прочего означает и возможную потерю данных (или их части). Для того, чтобы избежать этого, попробуйте создать образ «сломавшегося» диска. Для этого потребуется внешний жесткий диск как минимум того же объема.
1. Подключите его к Mac, перезагрузите компьютер,
2. Войдите в Recovery Mode (⌘Cmd + R),
3. Запустите Дисковую утилиту,
4. В строке меню вверху выберите Файл → Новый образ → Образ «Macintosh HD» и запустите процесс. На создание образа уйдет какое-то время, но в конце вы получите копию старого диска в формате DMG и сможете его смонтировать уже в новой системе.

Если же создание образа по каким-то причинам не получится, файлы можно скопировать и вручную. Для этого вернитесь в режим восстановления (⌘Cmd + R) и запустите приложение Терминал. Для запуска копирования ваших файлов на внешний носитель используйте команду cp -r. Пример:
cp -r /Volumes/Macintosh HD/Users/[username]/Documents/Volumes/Backup/
Не забудьте сменить [username] на свое имя пользователя в системе.
Давайте разберем команду: cp — это команда на копирование, –r означает, что эта команда выполняется рекурсивно, т.е. сначала копируются директории внутри указанной вами директории, а затем директории, которые входят в их состав, и так далее.
Первый путь — это указание на местонахождение файлов, которые вы хотите скопировать. Второй путь указывает местоположение внешнего накопителя, он всегда будет в /Volumes/, какое бы название вы ему ни дали.
Единственная сложность этого способа — вы должны вспомнить, где именно находились ваши файлы, и соответствующим образом прописать путь. Также вам остается только надеяться на то, что файлы не находятся на поврежденной части диска.
Когда копирование данных будет завершено, вы можете с чистой совестью отдать Mac в ремонт или переустановить macOS.
… Именно в такие моменты люди начинают понимать важность резервного копирования данных. И действительно — при настроенном копировании Time Machine проблемы с потерей данных не страшны. Настройте копирование данных прямо сейчас — и сэкономьте себе много времени, нервов и денег в будущем!
Смотрите также:
- Стопки в macOS, или как упорядочить файлы на рабочем столе в аккуратные группы.
- Автозагрузка на Mac, или как добавить (удалить) программы для автоматического запуска при загрузке macOS.
- Самые сложные пароли: как правильно придумывать и не забывать их — 2 совета от хакера.
Hard drive failure or corruption is the biggest nightmare for every Mac or Windows user. You can lose your entire data in fluke due to a corrupted hard drive.
Therefore, you should make it your habit to backup your hard drive regularly so you can restore your data easily. Also, to fix corrupted Mac hard drive on-time ensure to recognize the early disk failure signs, such as:
- When you start to receive errors in Disk Utility like ‘Error: This disk needs to be repaired’
- Somehow any files, folders, or partitions becomes inaccessible or mysteriously disappeared
- If some programs or applications run abnormally on your Mac
- Mac operating system becomes unstable
- Mac fails to recognize the hard drive while booting
- Some grinding or whining noises coming from the hard drive
- Your MacBook gets hotter when you run it for a long time
- In the worst case, you smell a burning plastic odor coming from your Mac
If you are experiencing any of these hard drive corruption symptoms, you better hurry up and learn how to fix a corrupted hard drive on Mac. Luckily, this post will help you find the perfect method to fix your corrupted hard drive in no time. So, let’s fix your Mac hard drive now!
How to Fix Corrupted Hard Drive on Mac with Disk Utility?
Disk Utility is a built-in Mac repair tool. It can scan the hard drive and fix most drive errors related to the formatting and directory structure. This program can also fix particular disk errors like when multiple apps quit unexpectedly, external devices fail to work, or your Mac won’t boot up.
Disk Utility can scan and repair all the problems that your disk may encounter. Further, it is pretty simple to fix a corrupted hard drive with Disk Utility as follows:
Step 1. Launch Disk Utility
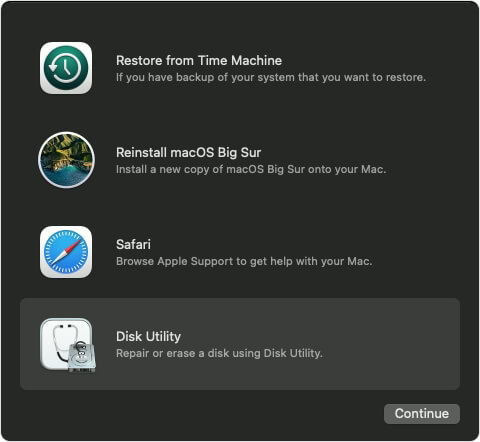
Launch Disk Utility from the Utilities folder under your Application folder. However, if your Mac won’t boot up, you can access Disk Utility from macOS Recovery.
To do so, first determine whether you are using a Mac with Apple silicon or Intel processor. Here are the appropriate steps in both cases:
- Apple silicone users need to turn on the Mac and keep on holding the power button until they see the start options window. Next, click on the Options button and then click Continue.
- Intel processor users have to press Command and R keys immediately after turning on the Mac.
You have to select a user account you know the password for and then select the Disk Utility from the Utilities window in macOS.
Step 2. Choose your hard drive
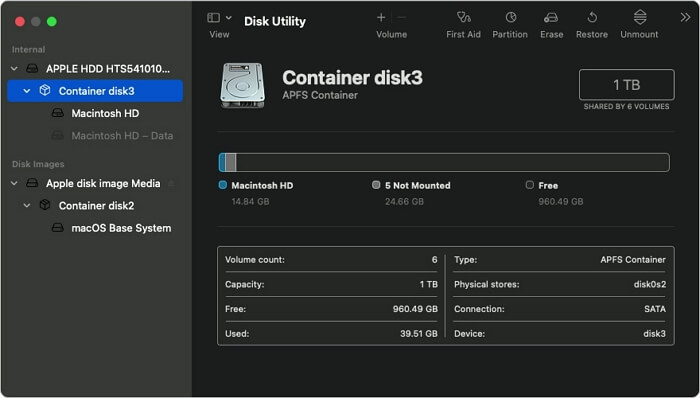
Go to Choose View > Show All Devices. This Disk Utility sidebar will show all disks or storage devices available on your Mac. Here beneath every disk, you can see containers and volumes of that disk.
Step 3. Repair volumes, containers, and disks
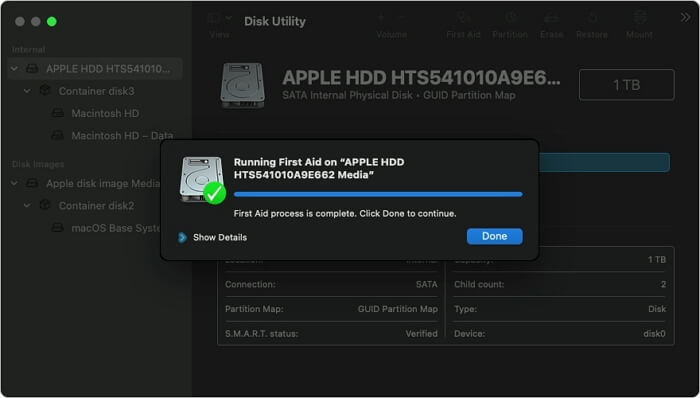
For the disk, you want to fix, select its last volume on that disk and click on the First Aid button.
Click on the Run to check the volume for errors. Once Disk Utility is done checking the volume, check each volume on the disk and then each container on the disk. And finally, check the entire disk.
What To Do when Disk Utility Failed to Repair Hard Drive
Disk Utility is one of the fastest and simplest ways to repair your damaged hard drive. But sometimes Disk Utility can’t fix your drive, or the First Aid process might fail. In that case, Apple advises to first backup the corrupted hard drive and then format it before recovering data from the backup files.
However, you have to make a Time Machine backup before the hard drive is corrupted. That’s because you can’t back up the hard drive using the Time Machine after it has been corrupted.
So, if you haven’t backed up your Mac hard drive before, you still have a way to restore your data. Yes, using the third-party data recovery software, you can fix and restore your corrupted hard drive without Time Machine backup.
Here EaseUS Data Recovery Wizard for Mac is the perfect data recovery software. As long as your hard drive can mount onto macOS X, this tool can even recover data from the physically damaged drive.
Moreover, it can recover the damaged Time Machine hard drives and USB flash drives or SD cards. Also, the tool offers:
- Fast scan speed to find lost data
- Export and import scan results
- Recover lost data from emptied Trash
- Recover unsaved Word document
- An intuitive user interface makes the recovery process easy, etc.
Using EaseUS Data Recovery Wizard for Mac, you can recover your hard drive on Mac as follows:
Step 1. Select the location to scan
Launch EaseUS Data Recovery Wizard for Mac and choose the hard drive, SSD, SD card, USB flash drive, or TF card where you lost data. Click “Search for lost files” to start scanning.

Step 2. Filter lost Mac data
The software will automatically scan for lost data on MacBook/iMac. When the scan completes, filter wanted data through the “Type” and “Path” buttons.

Step 3. Recover lost data or files
Double-click a file to preview it. Then, click the “Recover” button to restore the lost data to another place.

Bonus Tip: How to Protect Mac Files and Data
No matter how careful or alert Mac users you are being, your disk could fail anytime, and you can lose your entire data. Therefore, the best practice to protect your Mac data is to back it up.
If you backup your Mac files and data in real-time, you never have to worry about disk corruption or failure. Fortunately, Mac allows users to back up their data in various ways, such as:
Time Machine
Time Machine is a free Mac solution to backup your photos, videos, or documents on your Mac. Once you set up the Time Machine, it can frequently back up your Mac data. You can set up Time Machine as:
Step 1. Plugin your hard drive or SSD.
Step 2. You will get a message on your screen asking if you want to use the drive with Time Machine.
Step 3. Click on the Use as Backup Disk option.
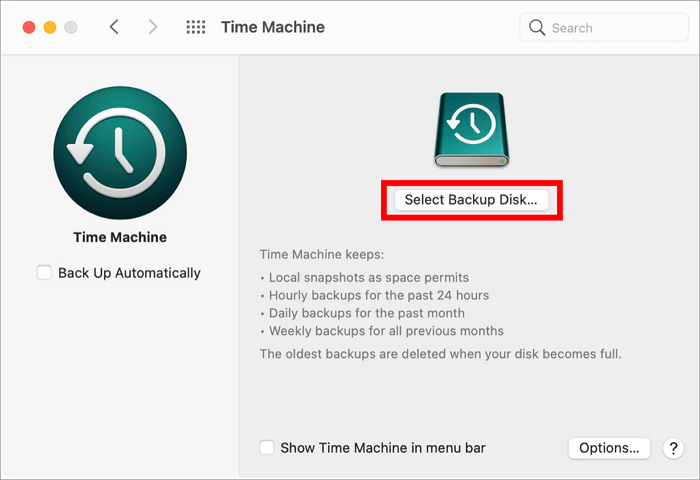
Step 4. If the message won’t pop up on your screen, ensure that the drive is formatted correctly.
Step 5. If the message doesn’t automatically appear, go to System Preferences > Time Machine > Select the Backup Disk.
Step 6. Select the storage device and then click on the Use Disk.
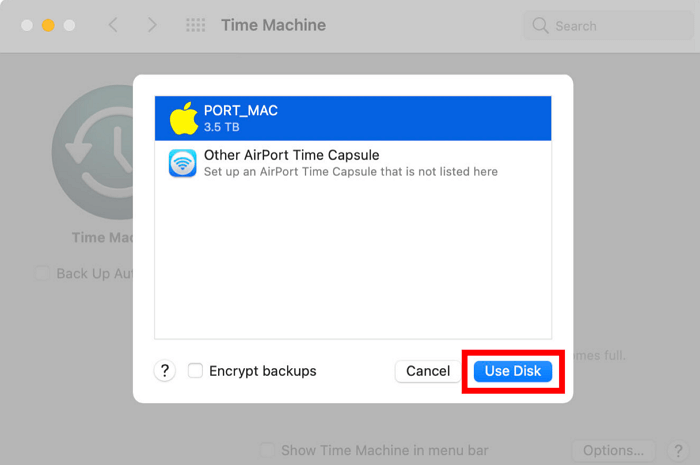
Step 7. Just check the box next to Back Up Automatically to resume Mac backup immediately.
iCloud Drive
Apple users can also use iCloud Drive to safely backup their data. Here you can configure settings to automatically store Mac files and folders on iCloud.
Up to 5GB, you can backup your data for free on iCloud. After that, you can get paid iCloud membership for $0.99 per month up to 50GB, 200GB for $2.99, and so on.
To backup up Mac data with iCloud, just follow these steps:
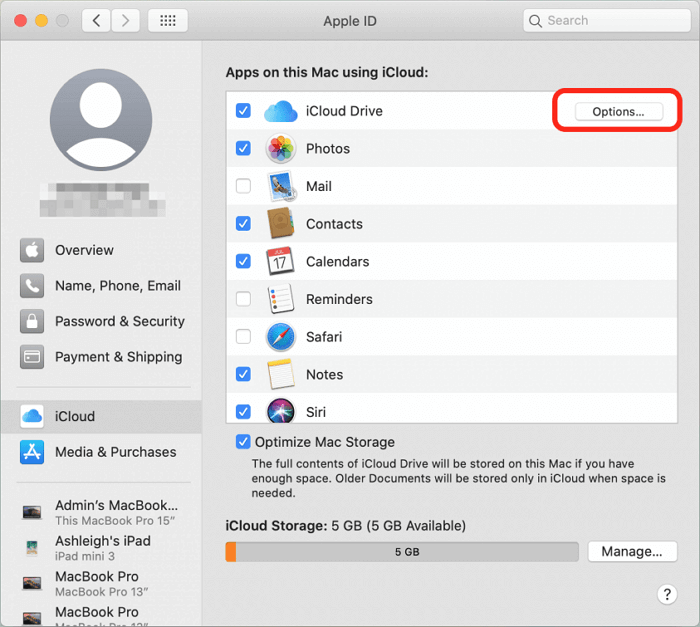
Step 1. Launch System Preferences > iCloud.
Step 2. Sign in to your iCloud account and tick the box beside iCloud.
Step 3. Click on the Options box and check all the boxes beside every time that you want to backup in iCloud.
Step 4. Open the Finder > click on the iCloud Drive folder and move any folder that’s not already in iCloud.
Third-party cloud storage
If you don’t want to use iCloud to backup files, many other alternatives are available, such as Dropbox, Google Drive, etc. Here you simply have to create an account on your selected cloud storage and upload all your data.
Other disks
If you have two hard disks on your Mac device, you can backup files from one disk to another. Before moving the files, don’t forget to compress them to save space. For this, just choose File > Compress.
External storage devices
You can also backup all your Mac files on external storage devices for extra safety like a USB flash drive, hard disk, CD, DVD, etc.
Conclusion
When your hard drive corrupts, it’s alright to feel stressed as all your data will get lost with it. But if you have already backed up your data, you won’t feel that much stress.
Here Disk Utility offers a great solution to Mac users to fix corrupted hard drives. Unfortunately, sometimes when Disk Utility itself starts showing errors, it will be impossible to fix or restore data using the program.
Therefore, in that case, it is a good idea to use third-party data recovery software like EaseUS Data Recovery Wizard for Mac. The software can even help you recover the damaged Time Machine drives and USB flash drives.
So, peeps, the best solution to fix a corrupted hard drive on Mac is timely backing up your data. This way, you can easily restore all your vital data despite hard disk failure. We have already shared all the methods to protect and backup data on Mac. So, you just have to pick the right method and secure your data now.
- Pandora
- Top 10 Best Disk Repair Software for Mac
96%
User approval rate
Last update: March 8, 2023
-

-
Yevgeniy T. Approver
Each year, data storage provider Backblaze publishes hard drive reliability statistics, and the results are always the same: the lifetime annualized failure rate for modern hard drives is around 2 percent. In other words, you can expect 2 out of every 100 hard drives to fail during a full year of use.
Since it’s only a matter of time before you become yet another victim of these gloomy statistics, you should familiarize yourself with the best Mac disk repair software tools right now so that you know what to do when the worst happens and you lose important data.
Jump to:
Results
Our complete ranking
Brief selection
![]()
Disk Drill
Platform: macOS Windows
Distributed as: Freemium
![]()
Techtool Pro
Platform: macOS
Distributed as: Paid
![]()
What to Look for in Mac Disk Repair Software?
There are certain things we always look for when selecting Mac disk repair software. Let’s take a closer look at some of them so that you better understand what separates outstanding disk repair software applications from those that are merely good.
-
Compatibility with Mac file systems
Mac computers rely on different file systems than Windows and Linux machines. The default file system of newer Macs is called Apple File System (APFS), while older Macs use Hierarchical File System (HFS+ or HFS Plus). For disk repair software to be useful, it must support all Mac file systems, and, ideally, also Windows and Linux file systems.
-
S.M.A.R.T. monitoring capabilities
Prevention is worth a pound of cure, and S.M.A.R.T. monitoring can help you detect emerging hard drive issues a long time before they become a problem, giving you enough time to back up your data to a safe location and determine the best solution.
-
HDD management functionality
When repairing a hard drive, it’s often necessary to move large quantities of files around, delete corrupted partitions, and perform other HDD management tasks, so selecting Mac disk repair software that supports them is always a good idea.
-
The ability to repair bad sectors
Bad sectors can lead to stability issues and cause read/write operations to fail. Fortunately, there are many Mac disk repair software tool that can not only detect them but also repair them, and we describe several of them in this article.
-
Hard drive corruption repair
Hard drive corruption often goes hand-in-hand with the presence of bad sectors, but it can also be caused by malware, buggy software, and various hardware issues. When addressed in a timely manner, hard drive corruption doesn’t necessarily have to cause data loss, especially when the best hard drive repair software is used.
-
Data backup & recovery
To avoid data loss, it’s paramount to regularly back up all important data. To do that, you may not even need to install dedicated backup software because many disk repair software applications come with built-in data backup and recovery capabilities. Of course, it never hurts to have more than one copy of your files, so don’t hesitate to combine local backups with cloud backups.
-
Easy-to-use user interface
It goes without saying that you don’t want to waste your time on a disk repair application that’s pain to use when there are so many excellent options available. The application of your choice should have a modern user interface that’s easy to understand and doesn’t require you to read a manual just to understand available options.
-
Availability of a free trial version
The fact is that the best disk repair software solutions are not free—at least not entirely. We say that because many disk repair software solutions offer a free trial version that let’s you play with all key features without spending a single dollar, allowing you to decide whether the software is really worth it or not.
-
Positive online reviews
The web is an excellent source of information, and we highly recommend you use it to read online reviews of disk repair software to learn which applications real users like and dislike. When hundreds of users from around the world praise certain software, there’s a very good chance that the software is worth downloading.
10 Best Disk Repair Software for macOS
#
![]()
1. Disk Drill
4.79 • Best choice for Mac users – Disk Drill for Mac combines ease of use with excellent data recovery capabilities and many extra features that greatly increase its overall value.
Read full Disk Drill review
Distributed as
Freemium Some features are provided free of charge, but money is required to unlock the rest
Selecting the best disk repair software for Mac would be much more difficult if it wasn’t for Disk Drill for Mac. This popular data recovery and disk repair software has been around since 2010, offering a simplified approach to data recovery. Since the release of the first version, Disk Drill for Mac has received several major updates, and its latest version looks and feels modern and polished.
The average Mac user can simply launch Disk Drill for Mac, select the problematic hard drive and click the Recover button. Disk Drill for Mac will automatically run diagnostics on the hard drive to determine its condition. It will then select the optimal data recovery method and proceed to recover deleted and lost files. Once it’s finished, the user can browse through a list of recoverable files and mark individual files and even entire folders for recovery.
Disk Drill for Mac supports all major file systems (HFS & HFS+, FAT/FAT32/exFAT, NTFS, EXT3/EXT4), and it works with internal and external storage devices alike. Included with it are multiple Mac HDD repair tools, including a disk monitoring tool that can alert you when your hard drive starts to show signs of failure.
![]()
macOS • Disk Drill
1 of 18
Disk Drill for macOS – Gallery
Top Disk Drill Pros
-
Two for one
-
Abundance of extra utilities
-
Structured scan results
-
Mount results as a virtual disk
-
RAID recovery capabilities
Top Disk Drill Cons
-
Phone support
-
No disk cloning
-
Bootable drives
-
Recovery over a network
-
Video and photo repair
Overall experience
Disk Drill for Mac is easily the best data repair software for Mac because it comes with several easy-to-use Mac HDD repair tools capable of diagnosing just about any hard drive issues you may run into.
![]()
2. Techtool Pro
• Suitable for basic data recovery tasks – We’re still testing this software. Wait until we’re done for our final verdict!
Distributed as
Paid Commercial software can be used only with a valid license.
Price range
$159.99…$289.99
While not nearly as popular as it used to be some 10 years ago, TechTool Protogo, now part of the TechTool Pro product line, still remains one of the best disk repair software Mac users should know about. Unlike many other disk repair tools for Mac computers, TechTool Protogo can bypass the operating system and run directly from a bootable diagnostic device, which is essentially a convenient disk repair toolbox with the right tool for just about any disk repair job.
Because many hard drive issues are caused by external factors, such as overheating or a faulty power supply, it’s great to see TechTool Protogo include one of the most comprehensive hardware testing tools in the industry. With it, it’s extremely straightforward to spot temperature sensors that have exceeded the normal range and pinpoint the exact cause of your hard drive issues.
Another useful tool included in TechTool Protogo is the Volume Rebuild tool. As its name suggests, the Volume Rebuild tool can repair volumes that have suffered logical damage (caused by non-mechanical issues). Best of all, it can handle not just native Mac drive formats but also MS-DOS (FAT32) and ExFAT volumes.
![]()
macOS • TechTool Pro
1 of 5
TechTool Pro – Gallery
Top TechTool Pro Pros
-
Can recover deleted APFS files
-
Offers many features beyond that of data recovery
-
SMART drive check to alert you of potential drive failures
-
Stand-alone hard disk repair tool Mac users can run from a bootable device
-
Offers comprehensive hardware diagnostics
Top TechTool Pro Cons
-
Required to purchase additional licenses for application upgrades
-
Can be difficult to control startup parameters
-
Some reports of issues with the eDrive creation feature
Overall experience
TechTool Protogo is a Swiss Army knife-type repair disk utility that has been around since the days of Macintosh. Its latest version may not be as popular as some of the older versions, but its disk repair capabilities are still impressive.
![]()
3. DiskWarrior
2.26 • This warrior is ready for retirement – DiskWarrior claims to be the world’s most advanced repair and data recovery tool, but the results it delivers tell a different story.
Read full DiskWarrior review
Distributed as
Paid Commercial software can be used only with a valid license
Price range
$119.95…$59.95
DiskWarrior specializes in eliminating directory errors on Mac computers. Its signature approach to disk repair prevents data loss by creating an error-free version of the damaged data and comparing it with the original data to verify its integrity. This approach has earned DiskWarrior multiple awards over the years, and users who have been able to avoid a disastrous loss of data with this Mac drive repair software swear by it.
The latest version of DiskWarrior runs on Mac OS X 10.5 Leopard, Mac OS X 10.6 Snow Leopard, Mac OS X 10.7 Lion, Mac OS X 10.8 Mountain Lion, Mac OS X 10.9 Mavericks, Mac OS X 10.10 Yosemite, Mac OS X 10.11 El Capitan, macOS 10.12 Sierra, macOS 10.13 High Sierra, macOS 10.14 Mojave, and macOS 10.15 Catalina.
Even if you don’t repair directory errors caused crashes, power loss, and other unexpected interruptions, you should still consider using DiskWarrior because it can greatly improve the performance of your system. How? By optimizing the directory structure for maximum performance. According to the developers of DiskWarrior, such optimization can result in up to a 60 percent decrease in the time it takes programs to scan the directory.
![]()
macOS • DiskWarrior
1 of 6
DiskWarrior for macOS – Gallery
Top DiskWarrior Pros
-
Repair capabilities
-
Bootable recovery
-
Disk optimization
-
Error detection
-
Disk monitoring
Top DiskWarrior Cons
-
Strange behavior
-
File system support
-
Development
-
M1 support
-
Trial version
Overall experience
There are many disk repair tools for Mac that make lofty promises even though they can’t do much more than the Disk Utility app, but DiskWarrior isn’t one of them. This disk repair tool for Mac has pioneered its own approach to disk repair, helping its customers solve challenging directory issues without risking data loss.
![]()
4. OnyX
• Suitable for basic data recovery tasks – We’re still testing this software. Wait until we’re done for our final verdict!
Distributed as
Freeware All features are provided free of charge without any limitations.
Apple’s main goal is to make Mac computers accessible to as many users as possible. To make this happen, Apple sometimes hides more advanced features that might otherwise confuse less tech-savvy users. However, many of these hidden features are exactly what you need to diagnose and repair disk problems. OnyX is a versatile disk repair tool Mac users can use to access a large number of hidden features with ease.
The main window of OnyX is split into several tabs:
- The Maintenance tab lets you access common system maintenance tasks and script, allowing you to rebuild cache files, repair file permissions, and more.
- Next to it is the Cleaning tab, which is where you need to go it you want to delete system cache files or large logs.
- The Automation tab is home to multiple routine tasks that you can automate with a single click to keep your Mac in the best possible condition without any manual work.
- The Utilities tab is home to lesser-known Mac apps that most regular users don’t even know exist.
- Worth mentioning is also the Parameters tab, which gives you a great degree of control over the look and feel of the operating system and individual apps.
Since OnyX is completely free, there’s absolutely no reason to not give it a try and see what it has to offer. Just make sure to download the right version for your Mac because there’s a specific version of OnyX for each major version of the operating system. The correct version for macOS 10.15 Catalina is OnyX 3.7.2, while the users of macOS 10.14 Mojave should download OnyX 3.6.8.
![]()
macOS • OnyX
1 of 5
OnyX for macOS – Gallery
Top OnyX Pros
-
Completely free and supported by donations
-
Provides easy access to advanced Mac features and apps
-
Let’s you configure hidden macOS settings and parameters
Top OnyX Cons
-
No data recovery option
Overall experience
If you consider yourself to be an advanced Mac user, you need to have OnyX installed on your system because you would be hard-pressed to find a more convenient way how to access hidden features, especially one that’s free.

5. Data Rescue
3.26 • Oldie but not goodie – Data Rescue for Mac is among the oldest applications of its kind, but its age is starting to show in multiple not-so-favorable ways.
Read full Data Rescue review
Distributed as
Freemium Some features are provided free of charge, but money is required to unlock the rest
Price range
$19…$399.96
Data Rescue 6 for Mac has a lot in common with our favorite Mac disk repair software, Disk Drill for Mac. Both software applications are comprehensive data recovery solutions intended to recover permanently deleted files from a variety of storage devices. Just like Disk Drill for Mac, Data Rescue 6 offers two distinct data recovery methods: Quick Scan and Deep Scan. Last but not least, both data recovery solutions have been around for a long time and received many positive reviews from professional reviewers and customers alike.
Data Rescue 6 for Mac has a fairly barebones user interface, and it’s clear that its developers haven’t put much effort into making this hard drive repair software inviting for Mac users. The good news is that you won’t spend too much time interacting with Data Rescue 6 because all you need to do to start the recovery process is click the Start Recovering Files button and select a drive to scan. The Quick Scan data recovery mode takes just a short while to complete, but Deep Scan often requires multiple hours to finish. Unfortunately, it’s impossible to pause the scan, which is why it’s best to start it before going to bed.
With a single Data Rescue 6 license, you can perform an unlimited number of recoveries from up to 5 drives. Because you can often find Data Rescue 6 on sale, we recommend you wait a while before you pay the full price.

macOS • Data Rescue
1 of 18
Data Rescue for macOS – Gallery
Top Data Rescue Pros
-
Mail alerts
-
Hex editor
-
Virtual RAID
-
Specify the starting point for scanning
-
Passwordless launch
Top Data Rescue Cons
-
Inability to scan system disks
-
Unreliable bootable recovery
-
Needs the internet at all times
-
Scanning duration
-
Limited number of saved sessions
Overall experience
Data Rescue 6 for Mac is a compelling alternative to Disk Drill for Mac with a few major shortcomings that prevent it from ranking higher on this list.
![]()
6. AppCleaner
• Suitable for basic data recovery tasks – We’re still testing this software. Wait until we’re done for our final verdict!
Distributed as
Freeware All features are provided free of charge without any limitations.
Leftover application files eat up valuable storage space, and their presence on the hard drive can cause problems with newer versions of the applications that originally created them. To keep your hard drive clean and organized, you should uninstall applications with AppCleaner, one of the most useful free Mac utilities in the world.
When you drop an application into AppCleaner, the utility automatically finds all files that belong to it and safely deletes them. AppCleaner works on all versions of macOS from High Sierra up to Catalina, but you won’t find it in the App Store because its developer, FreeMacSoft, distributes it only on its website.
![]()
macOS • AppCleaner
1 of 5
AppCleaner for Mac – Gallery
Top AppCleaner Pros
-
Thoroughly uninstalls unwanted apps
-
Is available for free
Top AppCleaner Cons
-
Supports only macOS up to Monterey
Overall experience
Apple should make AppCleaner the default uninstall method on macOS instead of allowing applications to leave behind files that do nothing but eat up valuable storage space and cause problems with other applications.
![]()
7. Drive Genius
• Suitable for basic data recovery tasks – We’re still testing this software. Wait until we’re done for our final verdict!
Distributed as
Freemium Some features are provided free of charge, but money is required to unlock the rest.
Limitations
Limited functionality
Many hard drive issues can be prevented with proper maintenance, and Drive Genius has all the maintenance features you need to keep your hard drive in top condition. The features are split into three categories:
- Protect: Consistency Check, Repair, Rebuild, Malware Scan, BootWell, Instant DrivePulse, Repair, Active Files.
- Clean Up: Repartition, Find Duplicates, Find Large Files, Clone, Secure Erase, Initialize, IconGenius, Information.
- Speed Up: Defragment, Speed.
That’s 18 features in total. Arguably the most interesting feature of them all is Instant DrivePulse, Repair. Its purpose is to check your hard drive for hardware-related problems, such as those that may result from a damaged drive, bad cable, or bad connection. Unfortunately, Drive Genius isn’t compatible with all recent versions of macOS, but there’s a demo version available that you can use to test if this hard disk repair tool runs on your Mac.
![]()
macOS • Drive Genius
1 of 5
Drive Genius for macOS – Gallery
Top Drive Genius Pros
-
Comes with 18 useful disk repair features
-
Free demo version available
-
Professional version available for a one-time payment
Top Drive Genius Cons
-
Limited functionality for macOS 10.13 or later
Overall experience
For the average Mac user who doesn’t troubleshoot multiple disk issues on a daily basis, the Drive Genius is probably an overkill, but professionals can easily justify the steep price considering that they can get access to 18 useful disk repair features.
![]()
8. Carbon Copy Cloner
• Suitable for basic data recovery tasks – We’re still testing this software. Wait until we’re done for our final verdict!
Distributed as
Freemium Some features are provided free of charge, but money is required to unlock the rest.
Price range
$39.99…$100
Carbon Copy Cloner is the right Mac disk repair software to use when all other disk repair software applications fail. Its main feature is the ability to create bootable backups that can be stored anywhere and used in a minute. When a disaster strikes, you can simply boot from a Carbon Copy Cloner backup and repair the malfunctioning disk later.
Just like Time Machine in macOS, Carbon Copy Cloner can constantly back up your files, allowing you to go back in time and retrieve an older version of any file that was stored on your Mac. You can schedule backups to run as often as you want, and Carbon Copy Cloner can keep you informed about their progress via the Notification Center or email.
![]()
macOS • Carbon Copy Cloner
1 of 5
Carbon Copy Cloner for macOS – Gallery
Top Carbon Copy Cloner Pros
-
Ability to create bootable backups
-
Can seamlessly back up your files as you work on your Mac
-
Complex backup scheduling features
Top Carbon Copy Cloner Cons
-
Cannot monitor disk S.M.A.R.T attributes
Overall experience
After Apple’s Time Machine, Carbon Copy Cloner may just be the most popular backup application for macOS, and it’s easy to see why. Its ability to recover from bootable backups can save you when all other hard drive repair software fails.
![]()
9. AppleJack
• Suitable for basic data recovery tasks – We’re still testing this software. Wait until we’re done for our final verdict!
Distributed as
Freeware All features are provided free of charge without any limitations.
Aimed at advanced Mac users, AppleJack is a command-line utility that runs in Single User Mode. You can use it to repair your hard drive, repair permissions, get rid of possibly corrupted cache files, and validate the system’s preference files. To boot into Single User Mode, all you need to do is boot up your Mac and hold down Command + S keys together as soon as the boot process begins. From there, you enter the admin password to log in and typing applejack, or applejack auto, or applejack auto restart.
Despite being aimed at advanced Mac users, AppleJack is fairly easy to use because it presents all available options on the screen in the form of a text-based menu. You simply enter your choice, press Enter on the keyboard, and let AppleJack do the hard work.
![]()
macOS • AppleJack
1 of 5
AppleJack for macOS – Gallery
Top AppleJack Pros
-
Command-line utility with a menu-based interface
-
Works even when your Mac can’t boot into macOS
Top AppleJack Cons
-
Project abandoned
Overall experience
AppleJack is an easy choice for advanced Mac users who are not afraid of the Single User Mode and command-line interfaces.
![]()
10. MemTest86
• Suitable for basic data recovery tasks – We’re still testing this software. Wait until we’re done for our final verdict!
Platforms
macOS Windows Linux
Distributed as
Freemium Some features are provided free of charge, but money is required to unlock the rest.
Limitations
Limited functionality
There’s a good reason why Memtest OX X occupies the last place on this list: it’s actually not a Mac HDD repair tool. Instead, it’s a memory testing software application capable of booting from a USB flash drive and testing the RAM in your Mac for faults.
We decided to include it on this list because many Mac issues that seem to be caused by a faulty hard drive can just as easily be caused by a faulty memory module. With Memtest OS X, you can confirm or rule out your suspicion and avoid fixing an imaginary problem.
The latest version of Memtest OS X has an easy-to-use graphical user interface with mouse support, and it offers 13 different RAM testing algorithms. Regular Mac users can stick with the free version of Memtest OS X, but professionals should also consider the Pro Edition.
![]()
macOS • MemTest86
1 of 5
MemTest86 for Mac – Gallery
Top MemTest86 Pros
-
Industry-standard RAM testing software application
-
Graphical interface with mouse support
-
13 different RAM testing algorithms
Top MemTest86 Cons
-
Expensive pricing
Overall experience
When it comes to RAM testing, there’s no reason to look any further than Memtest OS X, and the free version is enough for confirming that you’re dealing with a disk-related issue.
Top Causes of Mac Hard Drive Damage
Even the most reliable hard drive in the world can fail or become corrupted for a number of reasons:
Software bugs
When privileged software applications misbehave, they can cause filesystem corruption or make it impossible to boot into the operating system. That’s why you should never give admin permissions to applications you don’t fully trust.
Human error
It’s natural for us to make mistakes, especially when we attempt something for the first time, such as partitioning a hard drive. Unfortunately, human errors can have disastrous consequences and lead to permanent loss of data, so be extra careful and never follow any online instructions without cross-referencing them first.
Hardware failure
Hard drive reliability statistics don’t lie: there isn’t a single manufacturer that produces hard drives with 100 percent reliability. To avoid data loss caused by a sudden hardware failure, use a disk health monitoring tool and replace the hard drive before its condition deteriorates too much.
Firmware issues
There have been several causes of faulty hard drive firmware leading to hard drive damage and data loss in the past. While hard drive manufacturers are usually quick to release an updated version of the firmware, it’s up to end-users to update their hard drives.
External factors
Hard drive damage can also be caused by external factors such as natural disasters, power surges, and various unforeseen mishaps. Having a reliable backup plan in place is the only way how you can always be prepared for the worst.
Benefits of Hard Disk Repair Software Solutions
When something goes wrong with your hard drive, you have several options on how to proceed. You can take the hard drive to a professional hard drive repair shop and ask them to fix the issue for you. You can also use hard disk repair software and attempt to fix the problem by yourself. Here are some reasons why the do-it-yourself approach is better:
- Speed:
Depending on which hard drive repair shop you choose, it can take as much as several weeks for your hard drive to return back to you. If that’s the only hard drive you have, you’re out of luck. With a hard disk repair software solution, you can repair your hard disk in just a few minutes.
- Convenience:
Modern hard disk repair software solutions like Disk Drill for Mac are extremely convenient to use. They walk you through the entire process, allowing you to fix your hard drive from the comfort of your home, allowing you to experience the satisfaction of repairing your own Mac.
- Price:
Professional hard disk repair services tend to cost a lot of money, and there’s no guarantee that the repair shop you choose won’t use the same software tool you could easily download from the internet, perhaps even for free. Before you give your hard-earned money to someone else, use the disk repair software for Mac listed in this article to fix the problem by yourself.
Did You Know?
Each year, data storage provider Backblaze gathers data about over 100,000 spinning hard drives used in its cloud storage ecosystem, summarizing the gathered data in comprehensive reports published on its website. On average, approximately 2 percent of hard drives used by Backblaze fail each year, which means that 2 out of every 100 hard drives go to Silicon Heaven.
Conclusion
After testing countless Mac disk repair software applications, we were able to narrow them down to just 10. Disk Drill for Mac earned the top spot thanks to its ease of use, excellent data recovery performance, and useful disk repair tools. Overall, Mac users can choose from a wide variety of disk repair tools, many of which are free or offer a trial version.
Help Us Improve This Article
Was the provided information useful? Your vote is important to use!
Frequently Asked Questions
If you can’t boot in macOS to perform hard disk repair using any of the 10 tools listed above, you need to restart your computer in macOS Recovery and repair the hard disk using Disk Utility:
- Turn on your Mac and press and hold Command-R.
- Select Disk Utility from the utilities window and click Continue.
- Choose View and select Show All Devices.
- Select your hard disk in the side bar and click the First Air button.
- Click Run and Continue to repair the hard disk with Disk Utility.
You can run whole disk repair on a Mac by launching the diskutil application in Terminal:
- Launch Terminal from the Utilities folder.
- Type or paste in the following command: diskutil list
- Remember the name of your disk.
- Issue the following command to repair it: diskutil repairvolume [disk name]
Disk Utility can fail for many different reasons. The disk may have suffered mechanical damage, the file system may be corrupted, or there may be malware present on the system that’s blocking Disk Utility and preventing it from finishing the repair process.
![]()
![]()
Yevgeniy Tolkunov
Approver
-
Frisco, Texas, United States
-
LinkedIn
Yevgeniy Tolkunov is Hardware Engineer at ACE Data Recovery. Yevgeniy has a Master’s Degree in Physics, Information Technology; 15+ years of experience.
MacOS от Apple через UNIX предоставляет множество инструментов для поддержания работоспособности ваших дисков, одним из которых является команда терминала fsck. Вот как это использовать.
fsck, или «проверка согласованности файловой системы», — это инструмент UNIX, который существует уже давно. Он проверяет диски на наличие ошибок и пытается исправить любые проблемы. Он также запускается при запуске macOS за кулисами, если ваш Mac был выключен неправильно или принудительно выключен путем удерживания нажатой кнопки питания.
На Mac fsck находится в корне вашего загрузочного диска по адресу: /sbin/fsck
Вы можете запустить fsck в автоматическом или интерактивном режиме.
Считается, что современные форматы томов macOS, использующие ведение журнала, не нуждаются в fsck, поскольку функция ведения журнала позволяет операционной системе время от времени автоматически проверять и поддерживать согласованность дисковых томов, работающих правильно.
Но вы все же можете время от времени запускать fsck на журналируемых томах, и для fsck есть флаг, чтобы принудительно проверять журналируемые тома.
По умолчанию fsck диагностирует внутренний загрузочный диск вашего Mac, если вы не укажете иначе.
Начните с diskutil
Чтобы начать, откройте приложение «Терминал» в /Applications/Utilities/Terminal и введите: diskutil list и нажмите клавишу «Return».
Если к вашему Mac подключено много дисков, это может занять несколько минут.
Когда это будет сделано, diskutil выведет список всех устройств хранения, подключенных к вашему Mac:
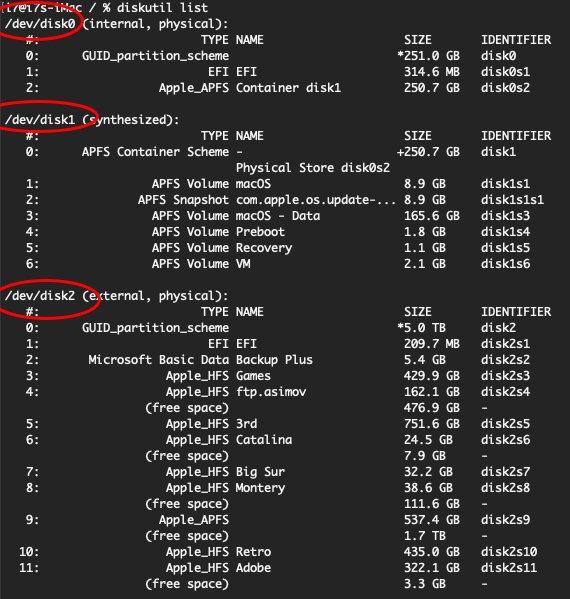
«dev/» означает «устройство» и является каталогом точки монтирования по умолчанию для устройств в FreeBSD (на котором основана macOS).
Каждое физическое устройство имеет имя, такое как «disk0», «disk1» и т. д. Таким образом, загрузочный диск вашего Mac обычно называется «/dev/disk0», а следующее подключенное устройство — «/dev/disk1» и так далее.
Каждый том или раздел на каждом устройстве указан следующим с отступом по порядковому номеру, а информация о типе тома, имени, размере и полном имени удостоверения отображается справа. Так, например, первый том на вашем загрузочном диске помечен как «disk0s1», второй помечен как «disk0s2», и каждый том следует с аналогичным именем и номером тома, добавленным в конце.
В большинстве команд UNIX вы можете указать все устройство (например, «/dev/disk0») или конкретный том на устройстве (например, «/dev/disk0s1» или «/dev/disk0s2») и т. д.
Два наиболее полезных флага для использования с командой fsck — это флаг «-f» (принудительно) и флаг «-y» (автоматический ответ «да» на любые отображаемые подсказки). Вы можете объединить флаги в один вместе с командой fsck в Терминале, чтобы сообщить ему, как работать.
Например, чтобы принудительно проверить внутренний диск без взаимодействия, в Терминале введите: /sbin/fsck -fy и нажмите клавишу Return.
Вы можете просмотреть все параметры для fsck и дополнительную информацию о команде в Терминале, набрав: man fsck и нажав клавишу «Return».
Если вы не работаете в качестве пользователя-администратора на своем Mac, вам может потребоваться предварить команду fsck sudo ‘ («superuser do»), а затем ввести пароль администратора после нажатия клавиши «Ввод».
Запуск fsck
Используя приведенную выше информацию о списке устройств, возвращенную diskutil, вы можете указать fsck проверять только определенный том. Например: sudo fsck -fy /dev/disk4s2 указывает fsck проверить и попытаться восстановить второй том на устройстве 4, подключенном к вашему Mac.
Обратите внимание, что каждый проверяемый том должен быть сначала размонтирован, прежде чем fsck сможет запустить на нем. Вы можете использовать приложение Apple Disk Utility в /Applications/Utilities/Disk Utility, чтобы вручную размонтировать тома, выбрав их из списка слева в главном окне Disk Utility, а затем нажав кнопку Unmount в верхней части окна:

Это приведет к удалению значка тома с рабочего стола в Finder. Когда вы закончите, вы можете аналогичным образом перемонтировать том в Finder, нажав кнопку «Подключить» в Дисковой утилите (при условии, конечно, что том не был поврежден и все еще может быть подключен).
результаты fsck
Как только fsck запустится, он проверит указанный диск или том, и если вы указали параметр -y, он попытается восстановить каждый том без запроса. Если вы не указали параметр -y, вам будет предложено, что делать на каждом этапе процесса проверки. Каждое имя тома и его тип будут указаны как запуски fsck.
Если по какой-то причине fsck не может восстановить или прочитать диск или том, он напечатает сообщение в Терминале, сообщающее вам об этом. Например, распространенная и неопределенная ошибка: «Не удалось полностью проверить том Untitled HD».
Если fsck обнаружит какие-либо проблемы с диском/томом или любой из его структур данных, она напечатает сообщение и попытается устранить любые проблемы.
После завершения fsck рекомендуется перезагрузить Mac — либо из меню Apple -> Команда «Перезагрузить», либо в Терминале, набрав: reboot now и нажав «Return».
Обратите внимание, что перезапуск в Терминале может привести к закрытию любых других запущенных приложений без предупреждения.
Поддержание работоспособности и правильной работы дисков вашего Mac имеет решающее значение для вашего рабочего процесса и в целом является хорошей идеей. fsck поможет вам сделать это.
Многие клиенты сталкивались с проблемой “Подключенный Вами диск нельзя прочитать на этом компьютере“. Это происходит, когда вы пытаетесь подключить внешний жесткий диск, SD-карту, USB-накопитель streak к вашему MacBook. Компьютеры Mac с версиями macOS Big Sur, Catalina, Mojave или High Sierra обычно получают эту ошибку. Вставленный вами диск не был прочитан с помощью этого компьютера Проблема с принтером имеет кнопку извлечения, игнорирования и инициализации. Проблема чаще возникает в macOS, но она также возникает в Mac OS X с альтернативным сообщением “Подключенный Вами диск нельзя прочитать на этом компьютере MacBook”. Здесь мы посмотрим, почему возникает эта проблема, и представим некоторые возможные исправления для нее.
Есть несколько подлинных причин, которые могут вызвать это конкретное сообщение об ошибке:
- Сбой диска: Возможно, поврежден либо сам диск, либо его USB-интерфейс.
- Неформатированный диск: Неформатированный диск с неподдерживаемой файловой системой может привести к тому, что вставленный вами диск не был прочитан из-за проблемы с USB на этом компьютере.
- Проблема с программой WD: Проблема с нечитаемым диском может возникнуть с жесткими дисками WD из-за состояния гонки на шине 1394. Это искажает оглавление VCD с помощью другого сброса шины.
- Противоречие формату: Если диск не отформатирован для поддержки MAC OS X, вы можете столкнуться с этой проблемой.
Часть 2: Как исправить Подключенный Вами диск нельзя прочитать на этом компьютере на Mac?
Исправление 1: Предварительная проверка
Есть несколько фундаментальных проверок, которые вы можете выполнить, чтобы определить, в чем проблема:
- Проверьте, зашифрован ли ваш внешний диск: Если вы получаете сообщение об ошибке после установки зашифрованного диска, вам необходимо открыть этот диск с помощью программного обеспечения encrypter.
- Посмотрите на файловую систему диска, поддерживается ли она MacOS.
- Если это новый жесткий диск, инициализируйте его, чтобы он заработал.
- Установите этот диск на другой компьютер (Windows или Mac), чтобы проверить, чист ли он.
- Иногда USB-кабель или порт работают неправильно. В этой ситуации измените USB-соединение или порт и повторите попытку.
- Сбросьте SMC, если вы уверены, что проблема с USB-портом.
- Вы можете попытаться повторно подключить жесткий диск к компьютеру Mac после отключения%
Исправление 2: Проверить файловую систему и переформатировать в Fat32
Проверьте, отформатирована ли файловая система вашего внешнего жесткого диска, SD-карты, USB-накопителя streak или других устройств в файловой системе FAT32. Если ваше устройство отформатировано в NTFS, этот формат вызывает проблему “USB не читается Mac”. Чтобы решить эту проблему, если вас это не затруднит, преобразуйте формат NTFS вашего жесткого диска в FAT32.
Исправление 3: Обновить драйверы на Mac
Проблема с нечитаемым диском также может быть вызвана устаревшим драйвером на вашем Mac. Было бы полезно, если бы вы проверили драйверы на своем MacBook и обновили их с помощью следующих усовершенствований:
В меню Apple перейдите и выберите опцию “Системные настройки”.
Откройте “Обновление программного обеспечения”, чтобы найти последние обновления.
Посмотрите, есть ли какие-либо доступные обновления для вашего Mac и программного обеспечения. Если это так, убедитесь, что ваша система постоянно обновляется.
Исправление 4: Восстановить с помощью Дисковой утилиты
В меню “Перейти” перейдите в раздел “Утилиты” и дважды коснитесь “Дисковая утилита”.
Выберите том на левом листе, для которого вам нужно установить разрешения.
Перейдите на вкладку “Первая помощь”.
Установите приложение Adobe на выбранный вами том, а затем нажмите “Восстановить диск” Разрешения.
Исправление 5: Инициализировать диск
Если проблема продолжится, у вас нет другого выхода, кроме как инициализировать диск. Общий процесс заключается в следующем:
Нажмите кнопку “Инициализировать”. Это откроет дисковую утилиту.
В меню “Вид” выберите “Показать все устройства”. Здесь вы найдете диск, у которого возникла проблема. Выберите поврежденный диск и нажмите на опцию “Первая помощь”.
Нажмите и подождите, пока “Восстановить диск” выполнит свою работу.
Изучите опцию “Стереть”. Нажмите кнопку “Формат файла” после указания имени диска, а затем нажмите “Стереть”.
Устранение 6: Восстановить данные с нечитаемого диска и подумать о замене
Из-за вышеуказанных причин macOS пренебрегает чтением диска, и вы не можете получить доступ к его данным. Если у вас нет резервной копии ваших данных, вам нужна экспертная программа восстановления Mac, такая как Tenorshare 4DDiG восстановление данных Mac.
Tenorshare 4DDiG восстанавливает данные с внешних жестких дисков, потерянные из-за случайного удаления, вирусов и практически по любой причине. Вы можете выполнить приведенные ниже действия, чтобы вернуть потерянные данные:
- Восстановить более 1 000 типов файлов с легкостью
- Восстановить фотографии, видео, аудио и другие файлы без потери качества
- Восстановить потерянные документы без перезаписи других файлов, что в конечном итоге защищает другие файлы от простого перезаписывания
- Восстановить файлы с внешних устройств, таких как внешние жесткие диски, SD-карты, камеры и USB-накопители
- Поддержка версий macOS Monterey, macOS Big Sur, macOS 10.15 (Catalina) и ниже
- Восстановить данные можно всего тремя щелчками мыши. Нет необходимости в технических знаниях
-
Шаг 1:Подключите и выберите поврежденный внешний жесткий диск
После установки Tenorshare 4DDiG на ваш компьютер Mac/Windows запустите программу и подключите внешний жесткий диск к компьютеру. В интерфейсе выберите внешний жесткий диск для запуска.
Шаг 2:Сканирование и предварительный просмотр
Как только будет получен результат сканирования, вы можете нажать на каждый тип файла, чтобы просмотреть более подробную информацию внутри него.
Шаг 3: Восстановите потерянные данные с диска
Выберите файл и нажмите кнопку “Восстановить“, чтобы выбрать местоположение для обнаруженных файлов. Сохранение файлов обратно в раздел, где вы их потеряли, может привести к их необратимой потере.
Устранение 7: Обратиться за помощью к специалисту
Возможно, клиенты могут подчеркнуть, что их непрофессиональные методы могут еще больше повредить их жесткие диски. В этой ситуации идеально передать вашу систему ближайшему специалисту. Они могли бы дать вам несколько правильных идей по утилизации вставленного вами диска с ошибкой “не читается”.
Часть 3: Как избежать ошибки “Диск не читается”?
- Извлеките внешний диск надлежащим образом: Жесткие диски могут серьезно пострадать, если вы извлекаете их ненадлежащим образом. Удаление их с компьютера во время использования может привести к его повреждению.
- Резервное копирование ваших данных: Резервное копирование данных – это идеальный способ предотвратить потерю данных. Time Machine – это программа для macOS, которая может создавать резервные копии ваших документов.
- Сохраняйте расширенные форматы файловой системы: Если есть выбор, используйте NTFS (APFS, HAS+) вместо файловой системы FAT32/exFAT. Платформа записи NTFS обеспечивает большую адаптивность, контроль безопасности и восстановление данных.
Часть 4: Часто задаваемые вопросы о том, что диск не читается
1. Как сделать диск читаемым на Mac?
Чтобы сделать диск читаемым на Mac, восстановите его с помощью функции disk utility, упомянутой в приведенных выше исправлениях. Дисковая утилита проверит и восстановит нечитаемый диск на вашем Mac.
2. Как вы исправляете поврежденный диск на Mac?
Если вы можете обнаружить признаки неисправности жесткого диска Mac на ранней стадии, как правило, проблему можно устранить. Для фиксации вы можете выбрать один из следующих методов:
- Исправлено с помощью дисковой утилиты.
- Запустите команду FSCK.
3. Как мне исправить поврежденный и нечитаемый внешний жесткий диск Mac?
Шаг 1: Перейдите к дисковой утилите из Finder и приложений.
Шаг 2: Выберите поврежденный жесткий диск с левой стороны.
Шаг 3: Щелкните и запустите опцию “Первая помощь” или щелкните правой кнопкой мыши жесткий диск и выберите “Первая помощь” из выпадающего меню.
4. Что означает, что подключенный вами диск не был прочитан этим компьютером?
Когда Mac выдает вам сообщение о том, что вставленный вами диск не читается с помощью SD-карты этого компьютера, это означает, что на USB-накопителе или внешнем жестком диске выявлены проблемы. Когда вы вставляете внешний диск, а системный диск или документы повреждены, вы получаете сообщения, которые мешают вам получить доступ к вашим данным.
Заключение:
Несмотря на то, что существуют различные способы устранения проблемы с подключенным диском, который не читался с помощью этого компьютера Big Sur, это может повредить ваши документы. В этой ситуации вы будете в надежных руках, используя Tenorshare 4DDiG восстановление данных Mac. Эта программа жизнеспособна, и существует приличная вероятность того, что вы сможете сохранить все ваши поврежденные или подорванные файлы.
-
Home>>
- Проблемы с Mac >>
- Исправление Подключенный Вами диск нельзя прочитать на этом компьютере на Mac

