21.07.2019
Просмотров: 1691
BSOD или синий экран смерти MBR CHECKSUM MISMATCH с цифровым стоп-кодом 0x0000008B чаще всего возникает на компьютерах с Windows 7. Однако не исключается вероятность появления ошибки и на более ранних сборках. Указывает такой BSOD на вирус. Однако не стоит исключать факт повреждение жесткого диска или загрузочного сектора.
Читайте также: Способы решения ошибки 0x00000101 – CLOCK WATCHDOG TIMEOUT
Причины ошибки 0x0000008B: MBR CHECKSUM MISMATCH
На официальном сайте, а также на форуме Microsoft указано, что ошибка 0x0000008B чаще всего появляется из-за вирусов. Однако некоторые пользователи делились комментариями, в которых указано, что синий экран смерти MBR_CHECKSUM_MISMATCH на их ПК появился вследствие повреждения загрузочного сектора, а в некоторых случаях – жесткого диска.
Казалось бы, что сложного в решении данной ситуации? Однако существует много видов вирусов и не все могут быть обнаружены. Как правило, для сканирования ПК нужно использовать антивирусы с обновленными вирусными базами, а еще лучше, использовать антивирусный сканер Dr. Web Curelt, записанный на флешку с пометкой «Только чтение» (без записи). Иногда вирусы повреждают файлы защитника еще до того, как он будет запущен. Поэтому активация режима «Только чтение» может помочь решить проблему.
Также при поисках решения проблемы нужно проверить загрузчик MBR, а также просканировать жесткий диск на наличие или отсутствие поврежденных секторов.
Методы решения ошибки 0x0000008B: MBR CHECKSUM MISMATCH
Чтобы решить проблему с синим экраном смерти 0x0000008B: MBR CHECKSUM MISMATCH, стоит создать проверочный защищенный носитель. Для этого стоит воспользоваться следующими рекомендациями:
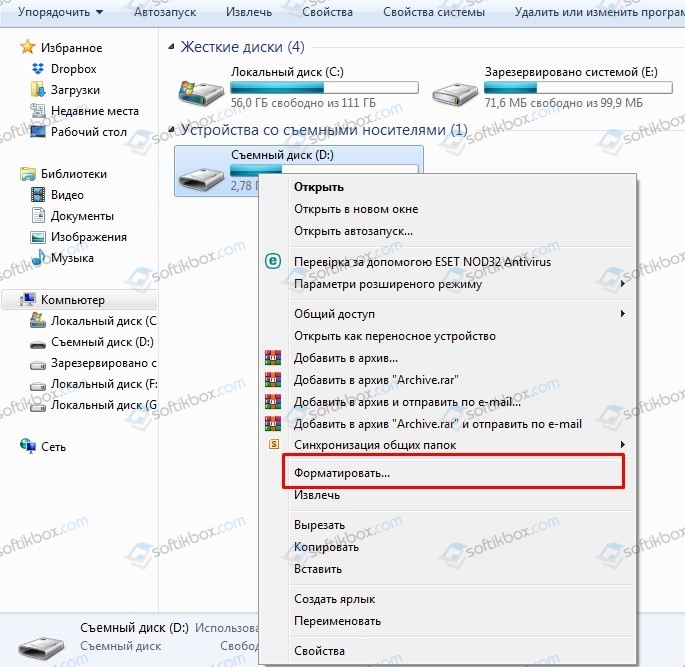
- Подключаем к ПК флешку. Заходим в Проводник и нажимаем на съемном носителе правой кнопкой мыши. Выбираем «Форматировать».
- Выбираем файловую систему NTFS и кликаем «Начать».
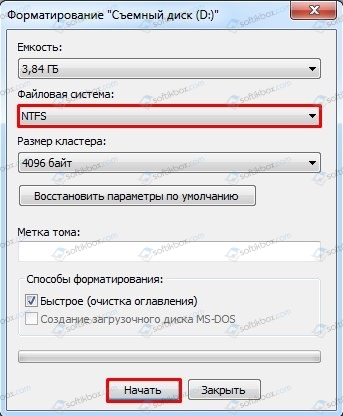
- Подтверждаем выполнение действий.
После форматирования флешки выполняем новые действия.
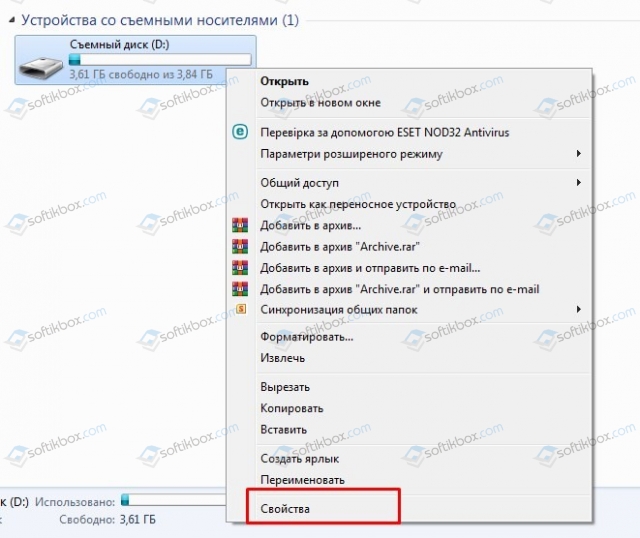
- Создаем на флешке новую папку и помещаем туда файл антивирусного сканера. Мы будем использовать Dr. Web.
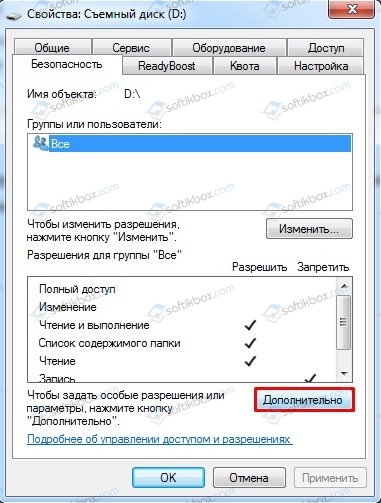
- После того, как вы скопировали на флешку файл, нажимаем на самом диске правой кнопкой мыши и выбираем «Свойства».
- Откроется небольшое окно. Переходим во вкладку «Безопасность» и нажимаем на кнопку «Изменить».

- Появится еще одно окно. Ставим отметки «Разрешить» в пунктах «Чтение и выполнение», «Список содержимого в папках», «Чтение», а также отметку «Запретить» в пункте «Запись».
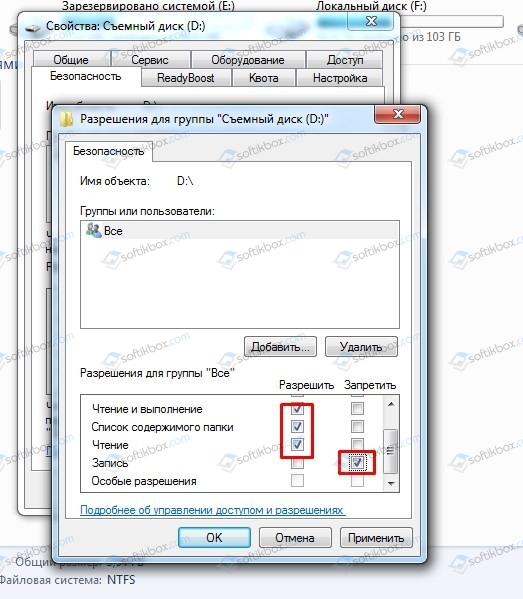
- Подтверждаем выполнение операции.
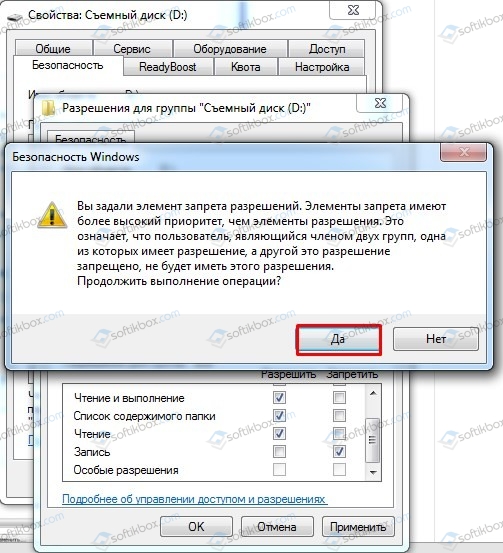
ВАЖНО! В случае, если появится окно «Ошибка применения безопасности», то нажимаем «Отмена», «Отмена», «ОК».
- Далее возвращаемся ко вкладке «Безопасность». Нажимаем на кнопку «Дополнительно».
- Откроется небольшое окно. Нажимаем «Изменить разрешение…».
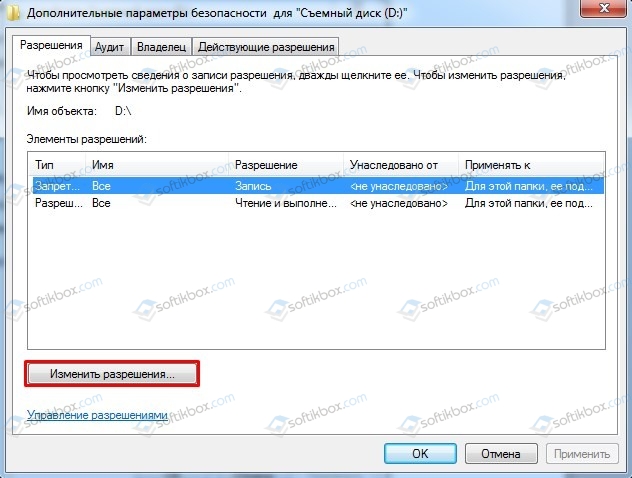
- Двойным кликом открываем пункт «Запись», которому назначен параметр «Запретить».
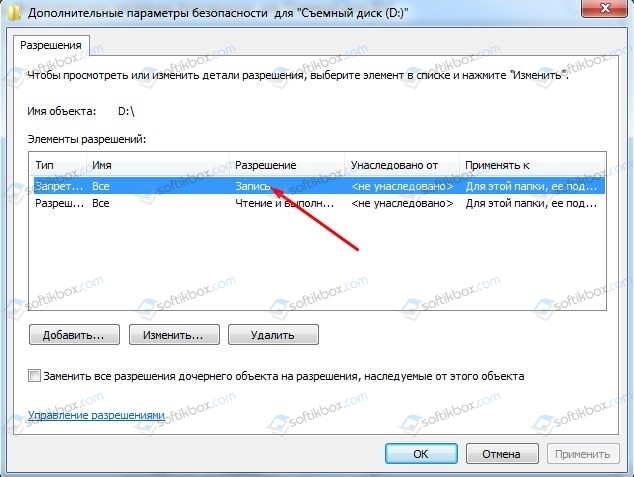
- Появится окно элемента разрешения. В разделе «Запретить» выставляем все отметки, кроме «Полный доступ», «Траверс папок», «Содержание папки», «Чтение разрешении».
- Теперь переходим к папке с антивирусным сканером. Нажимаем на ней правой кнопкой мыши и выбираем «Свойства».
- Откроется небольшое окно. Переходим во вкладку «Безопасность» и нажимаем на кнопке «Дополнительно». Далее «Изменить разрешение» и в следующем окне нужно убрать галочку «Добавить разрешения, наследуемые от родительских объектов». А в запросе ответить «Удалить».
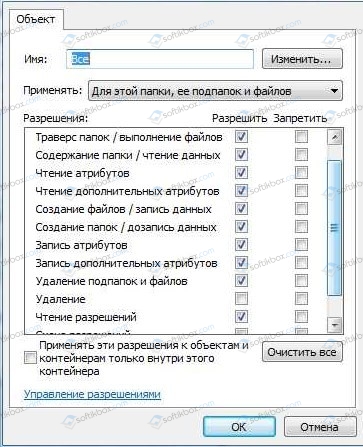
- Далее нажимаем «Добавить», «Дополнительно», выбираем «Поиск» и двойным кликом нажимаем на параметре «Все». Жмем «ОК».
- В окне «Элемент разрешения для …название вашей папки с антивирусом». Ставим отметки «Удаление», «Смена разрешения», «Смена владельца». Этим параметрам задаем значение «Запрещено».
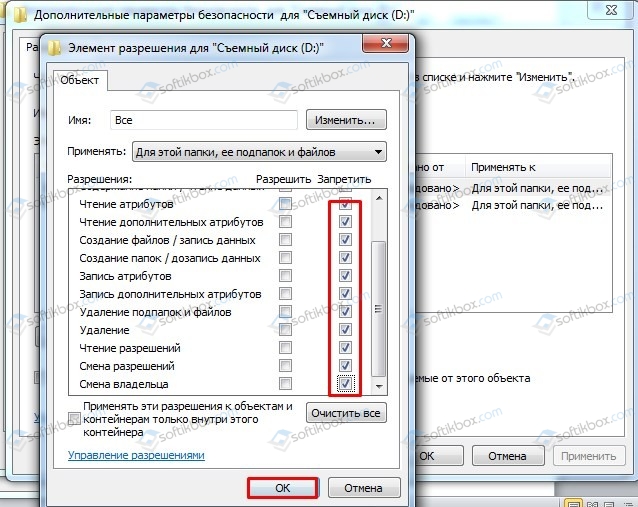
- Далее вновь нажимаем «Добавить», «Дополнительно…», «Поиск». Двойной клик по кнопке «Все» в результатах поиска. Жмем «ОК», а в окне «Элемент разрешения для …название папки с антивирусом» ставим десять галочек, как на рисунке. Жмем «ОК».
- В окне «Дополнительные параметры безопасности для …название папки с антивирусом» нажимаем «ОК».
ВАЖНО! Если появится окно «Ошибка применения безопасности», то кликаем «Отмена», «Отмена», «ОК».
Флешка создана. Можно запустить проверку системы на вирусы. Рекомендуем выполнить несколько проходов, в том числе и в безопасном режиме.
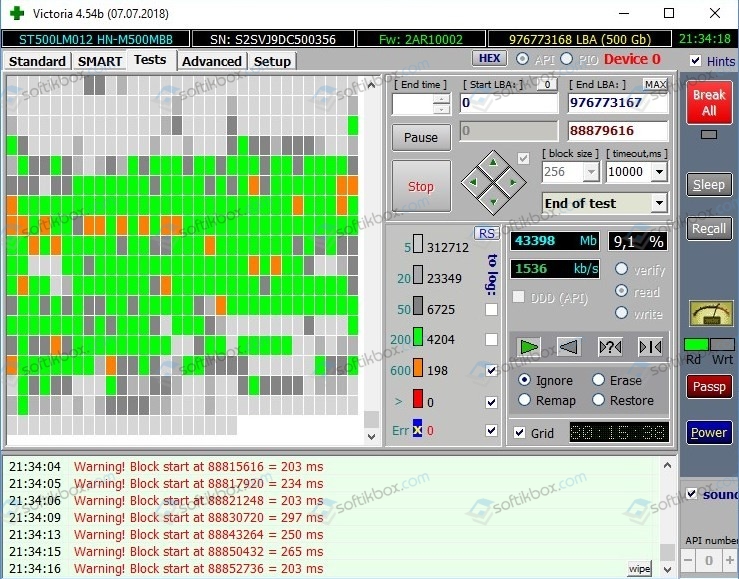
В случае, если антивирус все же не обнаружил каких-либо вирусов, стоит просканировать жесткий диск на наличие или отсутствие поврежденных секторов. Для этого рекомендуем использовать программы Victoria HDD, MHDD или HDD Scan. Они проанализируют состояние диска. Первая программа позволит заменить бытые сектора здоровыми.
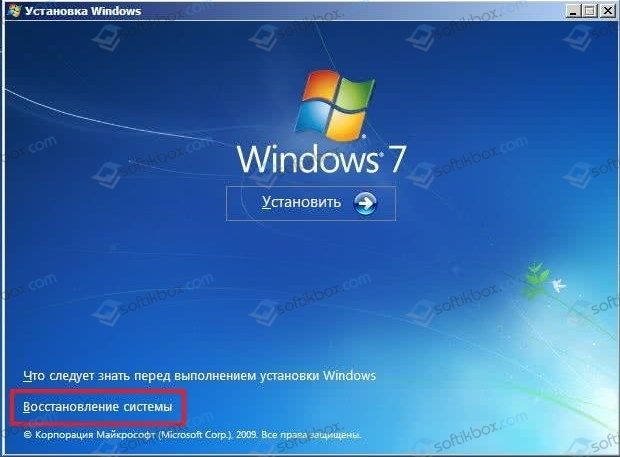
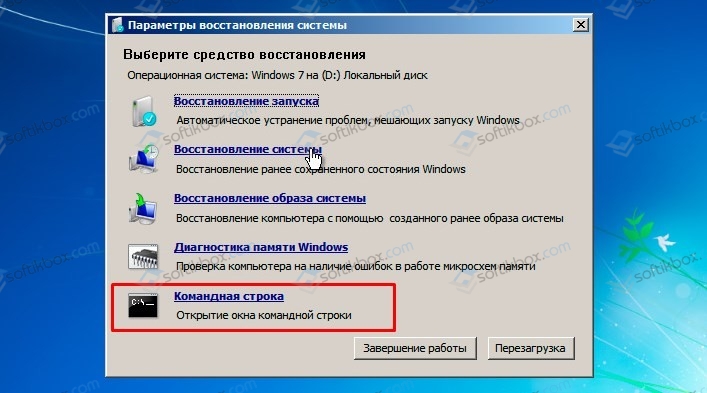
Если софт не обнаружит нарушение целостности секторов, то стоит попробовать восстановить загрузчик MBR. Для этого нужно подключить к ПК установочный диск или флешку с той же версией и разрядностью Windows. В BIOSе выставляем приоритетность загрузки с носителя. Далее, как только появится окно установщика, выбираем «Восстановление системы».
Далее выбираем «Командную строку».
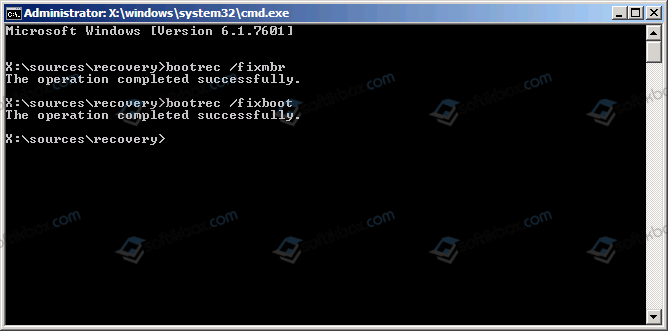
В консоли вводим bootrec /fixmbr. Эта команда перезаписывает MBR Windows 7 на системном разделе жесткого диска. Однако, этого не всегда работает (например, в случае с вирусами в MBR), а потому следом за этой командой обычно используют еще одну, которая записывает новый загрузочный сектор Windows 7 на системный раздел: bootrec /fixboot.
В случае, если исправить неполадку вышеуказанными способами не удалось, стоит выполнить переустановку Windows с форматированием разделов.
Не уверены, если это нужное исправление? Этой проблемы мы добавили в наш Диагностический дамп памяти которой можно подтвердить.
Симптомы
На компьютере, на котором выполняется Пакет обновления 1 (SP1) для Windows Vista, Пакет обновления 2 (SP2) для Windows Vista, Windows Server 2008, Пакет обновления 2 (SP2) для Windows Server 2008, Windows Server 2008 R2 или Windows 7 появляется сообщение об ошибке, подобное приведенному ниже:
STOP: 0x000000B8 (параметр1, параметр2, параметр3, параметр4)
ATTEMPTED_SWITCH_FROM_DPC
Примечание
-
Параметры в этом сообщении о STOP-ошибке зависят от конфигурации компьютера.
-
Не все STOP-ошибки “0x000000B8” вызываются этой проблемой.
Такое поведение наблюдается в следующих случаях:
-
Компьютер находится в случае большой нагрузки.
-
Компьютер подключен к сети, которая имеет некоторые проблемы с подключением к.
Причина
Эта проблема возникает, поскольку драйвер перенаправлен Подсистема буферизации драйвера (Rdbss.sys) неверно выполняет операции ввода-вывода запроса пакетов (IRP) отмены на уровне вызовов отложенных процедур, так и на уровне подготовки к отправке.
Операции отмены запроса ввода-ВЫВОДА выполняет операцию ожидания, включающей контекстное переключение для потока. Контекстное переключение для потока не допускается на уровне вызовов отложенных процедур, так и на уровне подготовки к отправке. Таким образом появляется сообщение об ошибке, описанное в разделе «Проблема».
Решение
Сведения об исправлении
Существует исправление от корпорации Майкрософт. Однако данное исправление предназначено для устранения только проблемы, описанной в этой статье. Применяйте это исправление только в тех случаях, когда наблюдается проблема, описанная в данной статье. Это исправление может проходить дополнительное тестирование. Таким образом если вы не подвержены серьезно этой проблеме, рекомендуется дождаться следующего пакета обновления, содержащего это исправление.
Если исправление доступно для скачивания, имеется раздел “Пакет исправлений доступен для скачивания” в верхней части этой статьи базы знаний. Если этот раздел не отображается, обратитесь в службу поддержки для получения исправления.
Примечание. Если наблюдаются другие проблемы или необходимо устранить неполадки, вам может понадобиться создать отдельный запрос на обслуживание. Стандартная оплата за поддержку будет взиматься только за дополнительные вопросы и проблемы, которые не соответствуют требованиям конкретного исправления. Чтобы получить полный список телефонов поддержки и обслуживания клиентов корпорации Майкрософт или создать отдельный запрос на обслуживание, посетите следующий веб-сайт корпорации Майкрософт:
http://support.microsoft.com/contactus/?ws=supportПримечание. В форме “Пакет исправлений доступен для скачивания” отображаются языки, для которых доступно исправление. Если нужный язык не отображается, значит исправление для данного языка отсутствует.
Предварительные условия
Чтобы применить это исправление, необходимо использовать одну из следующих операционных систем:
-
Пакет обновления 1 для Windows Vista
-
Windows Vista с пакетом обновления 2
-
Windows Server 2008
-
Windows Server 2008 с пакетом обновления 2
-
Windows 7
-
Windows Server 2008 R2
Чтобы получить дополнительные сведения о получении пакета обновления для Windows Vista, щелкните следующий номер статьи базы знаний Майкрософт:
935791 Как получить последний пакет обновления для Windows Vista
Дополнительные сведения о том, как получить пакет обновления для Windows Server 2008, щелкните следующий номер статьи базы знаний Майкрософт:
968849 Как получить последний пакет обновления для Windows Server 2008
Необходимость перезагрузки
Может потребоваться перезагрузить компьютер после установки данного исправления.
Сведения о замене исправлений
Это исправление не заменяет ранее выпущенные исправления.
Сведения о файлах
Глобальная версия этого исправления устанавливает файлы с атрибутами, указанными в приведенных ниже таблицах. Дата и время для файлов указаны в формате UTC. Дата и время для файлов на локальном компьютере отображаются в местном времени с вашим текущим смещением летнего времени (DST). Кроме того, при выполнении определенных операций с файлами, даты и время могут изменяться.
Примечания к сведениям о файле Windows Vista и Windows Server 2008
Важно. Исправления для Windows Server 2008 и Windows Vista исправления включены в те же пакеты. Однако только «Windows Vista» отображается на странице запрос исправления. Для получения пакета исправлений, который применяется к одной или обеих операционных систем, установите исправления, перечисленные в разделе «Windows Vista» на странице. Всегда смотрите раздел “Информация в данной статье относится к следующим продуктам” статьи для определения фактических операционных систем, к которым применяется каждое исправление. Глобальная версия этого исправления устанавливает файлы с атрибутами, указанными в приведенных ниже таблицах. Дата и время для файлов указаны в формате UTC. Дата и время для файлов на локальном компьютере отображаются в местном времени с вашим текущим смещением летнего времени (DST). Кроме того, при выполнении определенных операций с файлами, даты и время могут изменяться.
-
Файлы, относящиеся к определенному продукту, этапу разработки (RTM, SPn) и направлению поддержки (LDR, GDR) можно определить путем проверки номера версий файлов, как показано в следующей таблице.
Версия
Продукт
SR_Level
Направление поддержки
6.0.600
1.
22 xxxWindows Vista и Windows Server 2008
SP1
LDR
6.0.600
2.
22 xxxWindows Vista и Windows Server 2008
SP2
LDR
-
1 Пакет обновления интегрируется в окончательной версии Windows Server 2008. Таким образом файлов выпуска RTM относятся только к системе Windows Vista. Файлов выпуска RTM выглядят следующим образом: 6.0.0000. номер версии XXXXXX .
-
Файлы MANIFEST (.manifest) и MUM (.mum), устанавливаемые для каждой среды, указаны отдельно в разделе “Сведения о дополнительных файлах для системы Windows Vista и Windows Server 2008”. MUM файлы и файлы МАНИФЕСТА и связанные файлы каталога безопасности (.cat), очень важны для поддержания состояния обновляемого компонента. Файлы каталога безопасности, для которых не перечислены атрибуты, подписаны цифровой подписью корпорации Майкрософт.
Для всех поддерживаемых 32-разрядных версий Windows Server 2008 и Windows Vista
|
Имя файла |
Версия файла |
Размер файла |
Дата |
Время |
Платформа |
|---|---|---|---|---|---|
|
Rdbss.sys |
6.0.6001.22657 |
225,792 |
18-Mar-2010 |
15:59 |
x86 |
|
Rdbss.sys |
6.0.6002.22367 |
225,280 |
18-Mar-2010 |
16:24 |
x86 |
Для всех поддерживаемых 64-разрядных версий Windows Server 2008 и Windows Vista
|
Имя файла |
Версия файла |
Размер файла |
Дата |
Время |
Платформа |
|---|---|---|---|---|---|
|
Rdbss.sys |
6.0.6001.22657 |
289,280 |
18-Mar-2010 |
16:25 |
x64 |
|
Rdbss.sys |
6.0.6002.22367 |
225,280 |
18-Mar-2010 |
16:25 |
x64 |
Для всех поддерживаемых IA-64-разрядных версий Windows Server 2008
|
Имя файла |
Версия файла |
Размер файла |
Дата |
Время |
Платформа |
|---|---|---|---|---|---|
|
Rdbss.sys |
6.0.6001.22657 |
678,912 |
18-Mar-2010 |
16:00 |
IA-64 |
|
Rdbss.sys |
6.0.6002.22367 |
679,936 |
18-Mar-2010 |
16:21 |
IA-64 |
Примечания к сведениям о файлах Windows 7 и Windows Server 2008 R2
Важно. Исправления для Windows Server 2008 R2 и Windows 7 включены в одни и те же пакеты. Однако исправления на странице запроса исправлений перечислены под обеими операционными системами. Чтобы запросить пакет исправления, который применяется к одной или обеим ОС, установите исправление, описанное в разделе “Windows 7/Windows Server 2008 R2” страницы. Всегда смотрите раздел “Информация в данной статье относится к следующим продуктам” статьи для определения фактических операционных систем, к которым применяется каждое исправление.
-
Файлы MANIFEST (.manifest) и MUM (.mum), устанавливаемые для каждой среды, указаны отдельно в разделе “Сведения о дополнительных файлах для Windows Server 2008 R2 и Windows 7”. MUM и файлы МАНИФЕСТА и связанные файлы каталога безопасности (.cat), очень важны для поддержания состояния обновляемого компонента. Файлы каталога безопасности, для которых не перечислены атрибуты, подписаны цифровой подписью корпорации Майкрософт.
Для всех поддерживаемых 86-разрядных версий Windows 7
|
Имя файла |
Версия файла |
Размер файла |
Дата |
Время |
Платформа |
|---|---|---|---|---|---|
|
Rdbss.sys |
6.1.7600.20671 |
241,664 |
18-Mar-2010 |
05:55 |
x86 |
Для всех поддерживаемых 64-разрядных версий Windows 7 и Windows Server 2008 R2
|
Имя файла |
Версия файла |
Размер файла |
Дата |
Время |
Платформа |
|---|---|---|---|---|---|
|
Rdbss.sys |
6.1.7600.20671 |
309,248 |
18-Mar-2010 |
06:03 |
x64 |
Для всех поддерживаемых версий Windows Server 2008 R2 для систем на базе процессоров IA-64
|
Имя файла |
Версия файла |
Размер файла |
Дата |
Время |
Платформа |
|---|---|---|---|---|---|
|
Rdbss.sys |
6.1.7600.20671 |
719,872 |
18-Mar-2010 |
05:35 |
IA-64 |
Статус
Корпорация Майкрософт подтверждает, что это проблема продуктов Майкрософт, перечисленных в разделе “Относится к”.
Дополнительные сведения
Дополнительные сведения о «0x000000B8» остановить код ошибки, посетите следующий веб-узел Microsoft Developer Network (MSDN):
Описание 824684 Стандартные термины, используемые при описании обновлений программных продуктов Майкрософт
Сведения о дополнительных файлах
Сведения о дополнительных файлах для системы Windows Vista и Windows Server 2008
Дополнительные файлы для всех поддерживаемых 32-разрядных версий (x86) операционных систем Windows Vista и Windows Server 2008
|
Имя файла |
X86_7bad763f0e1a22c0c272a47dde20b22d_31bf3856ad364e35_6.0.6002.22367_none_0bce0088067f3c48.manifest |
|
Версия файла |
Неприменимо |
|
Размер файла |
693 |
|
Дата |
19-Mar-10 |
|
Время |
9:59 |
|
Платформа |
Неприменимо |
|
Имя файла |
X86_9f40de32e052eff4f2e29be91c9a15c3_31bf3856ad364e35_6.0.6001.22657_none_f376d76b6e1ae9aa.manifest |
|
Версия файла |
Неприменимо |
|
Размер файла |
693 |
|
Дата |
19-Mar-10 |
|
Время |
9:59 |
|
Платформа |
Неприменимо |
|
Имя файла |
X86_microsoft-windows-rdbss_31bf3856ad364e35_6.0.6001.22657_none_5a2f707f7aa93e37.manifest |
|
Версия файла |
Неприменимо |
|
Размер файла |
6,856 |
|
Дата |
18-Mar-10 |
|
Время |
19:38 |
|
Платформа |
Неприменимо |
|
Имя файла |
X86_microsoft-windows-rdbss_31bf3856ad364e35_6.0.6002.22367_none_5c0b127b77d7af4c.manifest |
|
Версия файла |
Неприменимо |
|
Размер файла |
6,856 |
|
Дата |
19-Mar-10 |
|
Время |
5:01 |
|
Платформа |
Неприменимо |
Дополнительные файлы для всех поддерживаемых версий x64 под управлением операционной системы Windows Vista и Windows Server 2008
|
Имя файла |
Amd64_a6fa8e2026fd27084688420649c5c23e_31bf3856ad364e35_6.0.6001.22657_none_e8f536829b2eafb6.manifest |
|
Версия файла |
Неприменимо |
|
Размер файла |
697 |
|
Дата |
19-Mar-10 |
|
Время |
9:59 |
|
Платформа |
Неприменимо |
|
Имя файла |
Amd64_cc5d9b16d74a1c580a488a531f357039_31bf3856ad364e35_6.0.6002.22367_none_c22d150630098a5f.manifest |
|
Версия файла |
Неприменимо |
|
Размер файла |
697 |
|
Дата |
19-Mar-10 |
|
Время |
9:59 |
|
Платформа |
Неприменимо |
|
Имя файла |
Amd64_microsoft-windows-rdbss_31bf3856ad364e35_6.0.6001.22657_none_b64e0c033306af6d.manifest |
|
Версия файла |
Неприменимо |
|
Размер файла |
7,113 |
|
Дата |
18-Mar-10 |
|
Время |
20:08 |
|
Платформа |
Неприменимо |
|
Имя файла |
Amd64_microsoft-windows-rdbss_31bf3856ad364e35_6.0.6002.22367_none_b829adff30352082.manifest |
|
Версия файла |
Неприменимо |
|
Размер файла |
7,113 |
|
Дата |
19-Mar-10 |
|
Время |
7:41 |
|
Платформа |
Неприменимо |
Дополнительные файлы для всех поддерживаемых версий Windows Server 2008 на базе процессоров IA-64
|
Имя файла |
Ia64_ccb2d952c14a47bc5c3276bad9528614_31bf3856ad364e35_6.0.6002.22367_none_9e96774e9ebac37a.manifest |
|
Версия файла |
Неприменимо |
|
Размер файла |
695 |
|
Дата |
19-Mar-10 |
|
Время |
9:59 |
|
Платформа |
Неприменимо |
|
Имя файла |
Ia64_df61aa80466f51b249671ee7048ca165_31bf3856ad364e35_6.0.6001.22657_none_e9266bdae4093667.manifest |
|
Версия файла |
Неприменимо |
|
Размер файла |
695 |
|
Дата |
19-Mar-10 |
|
Время |
9:59 |
|
Платформа |
Неприменимо |
|
Имя файла |
Ia64_microsoft-windows-rdbss_31bf3856ad364e35_6.0.6001.22657_none_5a3114757aa74733.manifest |
|
Версия файла |
Неприменимо |
|
Размер файла |
7,107 |
|
Дата |
18-Mar-10 |
|
Время |
19:20 |
|
Платформа |
Неприменимо |
|
Имя файла |
Ia64_microsoft-windows-rdbss_31bf3856ad364e35_6.0.6002.22367_none_5c0cb67177d5b848.manifest |
|
Версия файла |
Неприменимо |
|
Размер файла |
7,107 |
|
Дата |
18-Mar-10 |
|
Время |
20:15 |
|
Платформа |
Неприменимо |
Сведения о дополнительных файлах для Windows 7 и Windows Server 2008 R2
Дополнительные файлы для всех поддерживаемых 86-разрядных версий Windows 7
|
Имя файла |
Update.mum |
|
Версия файла |
Неприменимо |
|
Размер файла |
1,674 |
|
Дата (UTC) |
18-Mar-2010 |
|
Время (UTC) |
23:02 |
|
Платформа |
Неприменимо |
|
Имя файла |
X86_454e73ecd5612e36bb21fafb3b063a54_31bf3856ad364e35_6.1.7600.20671_none_400029ae5025fb29.manifest |
|
Версия файла |
Неприменимо |
|
Размер файла |
693 |
|
Дата (UTC) |
18-Mar-2010 |
|
Время (UTC) |
23:02 |
|
Платформа |
Неприменимо |
|
Имя файла |
X86_microsoft-windows-rdbss_31bf3856ad364e35_6.1.7600.20671_none_5a3b9d4adbd61dd0.manifest |
|
Версия файла |
Неприменимо |
|
Размер файла |
21,803 |
|
Дата (UTC) |
18-Mar-2010 |
|
Время (UTC) |
19:26 |
|
Платформа |
Неприменимо |
Дополнительные файлы для всех поддерживаемых 64-разрядных версий Windows 7 и Windows Server 2008 R2
|
Имя файла |
Amd64_36577c9efd06da6d800c88ee22ce067c_31bf3856ad364e35_6.1.7600.20671_none_28884e1865e30f54.manifest |
|
Версия файла |
Неприменимо |
|
Размер файла |
697 |
|
Дата (UTC) |
18-Mar-2010 |
|
Время (UTC) |
23:02 |
|
Платформа |
Неприменимо |
|
Имя файла |
Amd64_microsoft-windows-rdbss_31bf3856ad364e35_6.1.7600.20671_none_b65a38ce94338f06.manifest |
|
Версия файла |
Неприменимо |
|
Размер файла |
21,809 |
|
Дата (UTC) |
18-Mar-2010 |
|
Время (UTC) |
20:19 |
|
Платформа |
Неприменимо |
|
Имя файла |
Update.mum |
|
Версия файла |
Неприменимо |
|
Размер файла |
1,906 |
|
Дата (UTC) |
18-Mar-2010 |
|
Время (UTC) |
23:02 |
|
Платформа |
Неприменимо |
Дополнительные файлы для всех поддерживаемых версий Windows Server 2008 R2 с архитектурой IA-64
|
Имя файла |
Ia64_67a744d724788b5b95a88569b7a7d02c_31bf3856ad364e35_6.1.7600.20671_none_fcba5c1fc0f6cff2.manifest |
|
Версия файла |
Неприменимо |
|
Размер файла |
695 |
|
Дата (UTC) |
18-Mar-2010 |
|
Время (UTC) |
23:02 |
|
Платформа |
Неприменимо |
|
Имя файла |
Ia64_microsoft-windows-rdbss_31bf3856ad364e35_6.1.7600.20671_none_5a3d4140dbd426cc.manifest |
|
Версия файла |
Неприменимо |
|
Размер файла |
21,806 |
|
Дата (UTC) |
18-Mar-2010 |
|
Время (UTC) |
20:18 |
|
Платформа |
Неприменимо |
|
Имя файла |
Update.mum |
|
Версия файла |
Неприменимо |
|
Размер файла |
1,684 |
|
Дата (UTC) |
18-Mar-2010 |
|
Время (UTC) |
23:02 |
|
Платформа |
Неприменимо |
Синий экран 0x0000008B указывает на несоответствие контрольной суммы MBR.
Параметры MBR_CHECKSUM_MISMATCH:
- Сигнатура диска MBR;
- Контрольная сумма MBR, определенная загрузчиком ОС;
- Контрольная сумма MBR, определенная системой;
- Зарезервированный параметр.
Причина
Данная ошибка происходит во время загрузки операционной системы, когда контрольная сумма MBR, которую вычисляет операционная система Microsoft Windows, не соответствует контрольной сумме загрузчика системы.
Данный BSoD указывает на наличие вирусов.
Решение
Необходимо просканировать операционную систему на наличие вирусов актуальной антивирусной программой.
Reader Interactions
In this blog post, we find out the different reasons that show the Error 0x000000B8 along with its probable solutions. It may also show ATTEMPTED_SWITCH_FROM_DPC which usually occurs when a program that is incompatible with the system is used. This error may also be abbreviated as STOP 0xB8 but the full STOP code will always be what’s displayed on the blue screen message.
Most of the time, the ATTEMPTED_SWITCH_FROM_DPC error is caused by viruses or issues with antivirus software. Nonetheless, like almost every STOP code, there’s always a possibility that the source reason is hardware-related or has something to do with a device driver. In this state, your PC may stop working some basic and vital functions with automatic Restarting of Windows which causes the unsaved work or data will be immediately lost. However, if Windows is able to start after the BSOD error 0x000000B8, you may be prompted with:
Windows has recovered from an unexpected shutdown message that shows:
Problem Event Name: BlueScreen
BCCode: B8

Note – The most simple and basic way to resolve STOP code 0x000000B8 is to perform the manual update procedure which is to revert to the last successful boot. In order to do this, you must restart the device and wait for it to reach the BIOS messages. Generally, you will receive this error while starting a new program or installing updates.
List of Contents
- Activate Default Windows BSOD Tool- Blue Screen Troubleshooter
- Fix up all the memory issues in Windows Memory Diagnostic
- Boot Windows 10 into Safe Mode
- Halt the auto-restart of your PC
- Remove Third-Party Antivirus from the System
- Reset the corrupt Windows System components & recover DLL files
- Install recent patches via Windows Update Settings
- Dismiss the existing Malware in Windows Security
- Update the corrupt Drivers with a Yellow exclamation mark
- Delete all the junk files from Disk Storage using Disk Cleanup Tool
- Uninstall similar Applications to reduce the risk of their conflict
- Execute the DISM command to repair corrupt Windows files
- Use System Restore to reach an earlier version
- Delete leftovers of an incomplete Windows Update
- Run Disk Checking Utility via Command Prompt
- Perform Windows Automatic Repair
- Rebuild Boot Configuration Data (BCD)
- Fresh install Windows 10
- Corrupt HDD
We provide 19 solutions to fix the error 0x000000B8 depending on the above reason analysis. It’s suggested to try the following methods one by one until the BSOD ATTEMPTED_SWITCH_FROM_DPC is fixed successfully.
1] Activate Default Windows BSOD Tool- Blue Screen Troubleshooter
In recent times, Microsoft introduced Windows Blue Screen Troubleshooter that can analyze and fix the STOP Code ATTEMPTED_SWITCH_FROM_DPC. This is an in-built Troubleshooter application that finds the root cause of the Blue screen errors and helps you to resolve them. This section is by default turned off and therefore follow the following guidelines to enable it –
- First, click on the Start button and then select the Settings Gear Icon.
- From the appearing Settings app, choose Update & Security option.
- Click on Troubleshoot from the left column.
- Switch to the right side and locate the Blue Screen option.
- Once you locate it, select it and hit Run the troubleshooter.
- You are done.

If the BSOD Error 0x000000B8 is still persisting on the system then jump to the next workaround given below.
2] Fix up all the memory issues in Windows Memory Diagnostic
Faulty RAM sections and incorrect allocation of memory are the two major reasons that can cause this issue. Windows Memory Diagnostic is a great free memory test utility that can definitely fix the BSOD Stop code 0x000000B8. Here are some easy instructions to launch the application-
- Click on the Start icon and type memory.
- Select Windows Memory Diagnostic from the result.
- Choose “Restart now and check for problems (recommended)”.

- As a consequence, Windows will reboot immediately afterward.
- You will see a blue-colored page detecting memory issues in the system.
- When the growth rate becomes 100%, the device will reboot again automatically.
- Consequently, when your device starts up, check the results of this diagnosis. This will be available in the “System tray – Notification area”.
3] Boot Windows 10 into Safe Mode to fix 0x000000B8
This issue is really difficult to apply any fixes, even though you may not be able to access the Display Screen. In this case, first of all, start your device into the Safe Mode and then move towards the resolution. Being in Safe Mode, the OS loads a minimal user interface, with only the basic important services required for it to perform. This mode makes it accessible to troubleshoot the BSOD Error 0x000000B8 because it does not load things that can make a Windows crash. Read and apply the following series of steps to enter into the Safe Mode-
Step-1: Right-click on the Start button and select the Run option.
Step-2: Type MSConfig and hit the Enter key.
Step-3: Switch to the Boot tab and under Boot options, tick the box before Safe Boot.
Step-4: You will see that the Minimal radio button gets auto-selected, though, if it doesn’t happen, tick them manually.
Step-5: Click on Apply and then OK to save the changes.
Step-6: Now, close the current window and Restart your device.
Step-7: When Windows is booting, keep pressing the F8 key. The function varies from the system model, therefore, get them first.
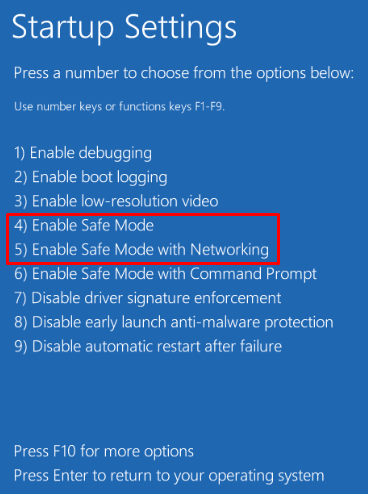
Step-8: A new wizard with Safe Boot in Advanced Boot Options prompts on the screen. Select this to enter Safe Mode.
4] Pause the auto-restart of your PC to fix 0x000000B8
Out of several bugs that appear because of 0x000000B8 BSOD, auto PC reboot disturbs the most and it’s also quite a bad user experience. In an attempt to reduce this issue, disable the auto-restart feature that may provide you adequate time to think and fix the error. Here’s how to proceed –
- First of all, open the Desktop Screen by pressing the Win + D hotkey.
- Now, press Win + E to open File Explorer.
- Right-click on This PC (available on the left pane) and select Properties.
- Doing so will redirect you to Control Panel > System.
- Select Advanced system settings from the left navigation and then select Settings under Startup and Recovery.

- Click on the Settings button.
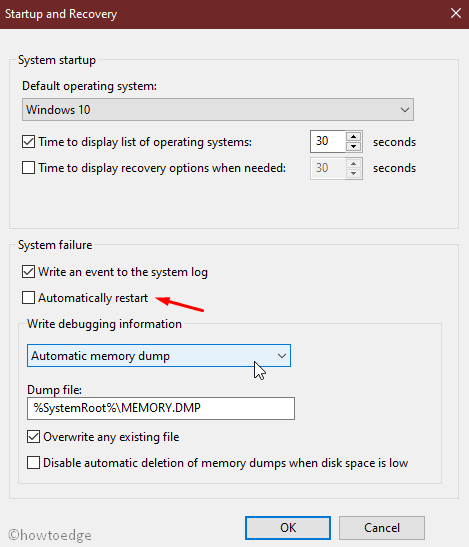
- Next, go to the System failure section.
- Untick the checkbox against Automatically restart.
- Click OK to save the changes made so far.
Performing the above steps will simply stop the auto-restarting of your OS.
5] Remove Third-Party Antivirus from the System to fix 0x000000B8
Generally, users install a third-party free anti-malware program so as to remove viruses and Trojan files. However, they are not such valuable as their features are already included in the Windows Defender app. Therefore, it would be more beneficial to make the Windows Security application the default one.
Removing external anti-malware programs will have greater possibilities to fix the 0x000000B8 BSOD error in the system. Here’s the complete procedure-
- Press Win+I to start the Windows Settings.
- On the new window, select the Apps option.
- Click on Apps & Features from the left panel.
- Switch to the adjacent right side and you will see the list of entire installed applications.
- Click on the third-party antivirus and select the Uninstall button to remove this app completely.
- If UAC prompts, tap Yes to approve your consent.
- Follow the online instructions to complete the uninstallation process.
We expect the above procedure will resolve the 0x000000B8 BSOD error in Windows 10, if not, try the next one-
6] Reset the corrupt Windows System components & recover DLL files
If you are working on the latest OS Windows 10, chances are more of encountering a dialogue box error. This issue notifies you of a missing DLL file which instantly becomes a problematic job. It also affects the system performance and in other cases, reduces the application trying to run. In addition, Windows system components slip into corruption for various reasons like malware infection which results in 0x000000B8 BSOD.
Supporting this action can be critical to the system. Fortunately, the System File Checker is developed by Microsoft which can execute the BSOD ATTEMPTED_SWITCH_FROM_DPC efficiently. Here are the following steps to recover the missing DLL files –
- Right-click on the Taskbar and select Task Manager.
- Click on the File option located at the top left end and select the “Run new task” option.
- Type cmd in the text field available here.
- Check the box before “Create this task with administrative privileges”
- Hit the OK button and this will launch the Elevated Command Prompt.
- Now, type the following command and hit Enter key –
sfc /scannow.

- This will start checking the faulty elements and will fix any other flaws that it finds.
- At last, restart your PC when the process ends completely.
7] Install recent patches via Windows Update Settings
Microsoft regularly releases cumulative updates so that you can avail yourself of the new features with various fixes and improvements. With the former, fixing existing bugs is available in the patches. Moreover, the outdated Operating System is highly prone to get influenced by BSOD 0x000000B8. In this case, we need to update the OS moving ahead with Windows Settings app. Here is the method in brief –
- Open Windows Settings by pressing the Windows + I hotkey.
- Select the Update & Security option available there.
- On the next page, select Windows Update located at the left pane.
- Switch to the right side and click on Check for updates.

- When you see all the updates, click on the Download button under each of them.
- Downloading will start shortly and installation will follow once the process is finished.
- At last, wait for a while and then restart the PC when the Windows prompt.
Note – You can open this article if the check for updates is not working.
8] Remove Malware From Your Windows PC
You might experience slow performance and sometimes face the weird behavior of your PC which actually occurs when your device is affected by malware or trojans. Besides, some other invasive software program comes from a malicious website or a site that attempts to install malware onto your device. They usually need some effort from your side by asking you to install software that your computer appears to require.
Once they enter your PCs, they simply wipe out the most crucial and important data required for starting Windows. This causes the occurrence of BSOD Error 0x000000B8 pretty common. In order to fix this issue, you must try out the Windows Defender tool and check if there are indeed some bad files on your computer. However, we are able to detect and remove the threats by using. To perform this task, use the following instructions –
- Press Windows + S keys and let Taskbar search come up.
- Type Security and press Enter.
- When the app interface opens, choose Virus & threat protection.
- Locate the Scan options link and then click on the same.
- Select the radio button ahead of the Full scan option.
- Click on the Scan Now button and wait while the scanning/repairing process starts.
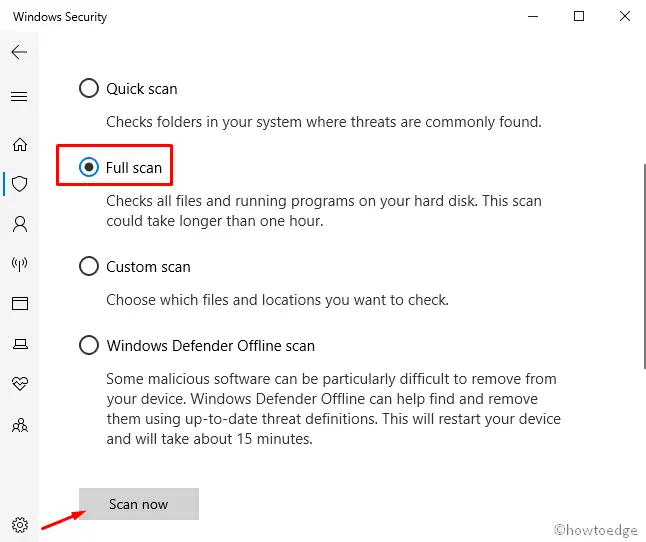
- It might take a while as the application will start searching for viruses in every file in the system. Thereafter, the result will appear on the screen.
- During this, if any malware is detected, click on Clean Threats to remove them.
- From the available three options, select Remove first and then hit Start actions to wipe out all the virus components.
9] Update the corrupt Drivers with a Yellow exclamation mark
In general, the incompatible or obsolescent device drivers become the main culprit that causes 0x000000B8 BSOD Error on your device. Therefore, it would be crucial to update your device regularly using the Device Manager. To explore such drivers, just open the Device Manager and look for the yellow exclamation mark ahead of the driver. This implies that the device is conflicting with other hardware or might they are not installed accurately. If indeed there is one, just update that particular driver. Let’s follow the proper steps to do so-
- Right-click on the Start button and select the Run option.
- When it prompts, type “
devmgmt.msc” and press Enter. - On the new page, look for any yellow exclamation marks beside the available device drivers.
- Once you find, expand, and then right-click on the same
- From the options list, choose the Update driver option.

- A new window prompts providing two options to choose from.
- Select “Search automatically for updated driver software” and be assured as the System will take care of the rest.
- Follow the same instructions for other corrupt drivers as well.
On updating all of the outdated device drivers, try to update the Windows OS again and then you won’t experience the 0x000000B8 BSOD error while doing so.
Find and Fix Driver Issues automatically via the PC Repair Tool – ‘DriverFix’.
10] Delete junk files from Disk Storage using Disk Cleanup Tool
Junk files are useless stuff for the device that piles up over a period of time and becomes unimportant once the task at hand is completed. These Files occupy a large space of the HDD which leads to low storage and thus causes 0x000000B8 BSOD error. While the availability of these files will not really impact the performance of your operating system. Although, how frequently you should do, depends on the utilization of your computer. But in our viewpoint, it would be more useful to remove such unnecessary files once a month at least using Disk Cleanup Tool. So, follow the below instructions to clean it –
- Press the Windows key and type
cleanmgrin the search field. - From the appeared results, select the Disk Cleanup application.
- There appears a pop-up asking to choose the particular drive. Here, select the C: drive and hit the OK button.
- This cleanup tool will start searching for the spaces that it can free up.
- Select the “Clean up system file” button.
- Re-select the C: drive as performed earlier and hit the OK button.
- This time, it does the calculation of how much storage can be retrieved by deleting the system files.
- On the next window, select all the check-boxes except Downloads and press the OK button.

- The cleaning of junk files will start immediately after.
Note – Check the boxes once before deletion as there may be the existence of some important files.
11] Uninstall similar Applications to reduce the risk of their conflict
To reduce any further complexity, you must remove the applications that perform similar tasks. If two or more apps work the same functions, there is a possibility of using each other resources and therefore it’s quite essential to uninstall them. Here are the essential steps-
- First of all, press Win & R hotkey to call the Run menu.
- In the search box, type
appwiz.cpland hit the OK button. The “Program and features” page will appear. - Now, find out the program (similar ones) which is responsible to cause STOP code 0x000000B8.
- Once you find it, select it and click on the Uninstall button.
- At last, restart your system and wait for a while.
If the error is still persisting, move to the next workaround given below.
12] Execute the DISM command to repair corrupt Windows files
The System File Checker (SFC) is a command-line application and also a most beneficial tool that scans your system files for repairing corrupted files or any other changes. If a file has been edited or changed, it will replace that file with the accurate version. Sometimes, corruption in the Windows files may arise some critical issues on your System, and in this case, execute the DISM tool to resolve the 0x000000B8 BSOD error. Let’s take a look at how to use them –
- Press Window + Q hotkey to open the Taskbar search.
- Type the Command Prompt in the text box.
- Right-click on the result and choose Run as administrator from the context menu.
- If UAC prompts, hit the Yes button to give your consent.
- Type the given parameter followed by the Enter key.
DISM.exe /Online /Cleanup-image /Restorehealth
- This will start to detect the issue that may lead to such an error. Once found, it will repair them.
- When you run the command successfully, restart your computer normally and this will resolve the BSOD error 0x000000B8.
13] Use System Restore to reach an earlier version
Sometimes, when you install new apps or remove the existing ones, this results in problems inside Registry and causes 0x000000B8 BSOD on your screen. In this case, you must revert to the existing OS to an earlier version where everything was functioning properly. Here’s how to reach the previous point on your PC –
- Press Win + R hotkey to launch the Run dialog.
- Type
rstruiin the search field and press the OK button. - In the System Restore window, hit the Next button.
- Mark the Show more restore points checkbox. This will let you access the entire page with a specific Date and Time.
- Select the latest restore point and press the Next button.
- At last, press the Finish option so as to initiate the restoring process.

Note – This process is applicable only if you have created a restore point at some earlier time. In case, you don’t have any, just skip this method and proceed to the next workaround.
14] Delete leftovers of an incomplete Windows Update
Windows Update brings you quality updates (or cumulative updates) as soon as they’re available for your machine. However, there might occur some issues midway through this process which can cause such 0x000000B8 BSOD errors. In such a case, you need to wipe out these files from the system. Here are the steps to follow-
- Press Win and I hotkey together to launch the Settings app.
- From the list of categories, select Update & Security icon.
- On the following page, select Windows Update.
- Move to the corresponding right pane of the same page and choose the View update history link.
- Next, click on the Uninstall updates option and wait till this completes.
- It will reveal the list of entire installed cumulative updates on your device.
- Hit the Uninstall button available at the top of the page.
- Now, follow the on-screen instructions until the file is completely removed.
15] Run Disk Checking Utility via Command Prompt
The usage of any device for a long time may create trouble in its different sectors. By virtue of having such a bad region, you may undergo the 0x000000B8 BSOD Error on your PC. In these circumstances, the Disk Checking application is a quite helpful tool that can certainly remove such errors. Here is the detailed procedure-
- Press the Window button and type cmd.exe in the search field.
- From the list, right-click on Command Prompt and choose the Run as administrator option.
- UAC will prompt asking your permission, tap Yes to continue.
- Succeeding this type the following command line on elevated Command Prompt-
chkdsk C: /f /r /x
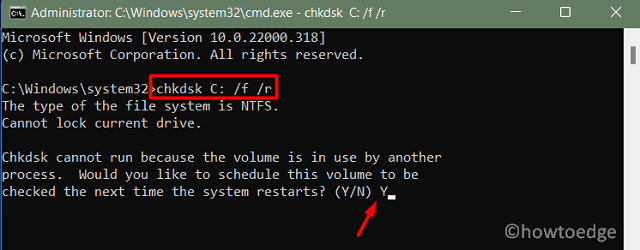
Note – CHKDSK stands for Disk Status upon activation. However, the other letters have their specific meanings.
-
- C- represents the Disk where the OS is installed. You can change this to “D:“, “E:” or any depending upon your usage.
- f- implies settling the scanned bugs.
- r- implies detecting the existing problems in the Disk.
- x- means to partition the disk volume and let help the detection process.
- On pressing the Enter key, Disk Checking Utility will start scanning the underlying causes. As this is a time-consuming process, wait until this gets over.
- Eventually, reboot the PC so that the changes made come into effect.
16] Perform Windows Automatic Repair to fix 0x000000B8
Performing the Windows Automatic Repair tool may rectify the reasons that affect your system performance. This might solve the BSOD error 0x000000B8 once it finds the exact reason. Just follow the below guidelines-
- To enter the BIOS Mode, plug in the Windows installation media at the corresponding port and reboot your PC.
- While loading the OS, press the function key (F12, Esc, or Delete).
- When the Windows Setup page opens, select the preferred language.
- Click on the Next button to go ahead.
- On the left bottom corner of the page, hit Install Now and then Repair your computer.
- Now, expand the Advanced Options, available on the Startup repair window.
- Select the Troubleshoot option.
- Finally, reboot your system normally and see if the BSOD Error 0x000000B8 has been resolved or not.
17] Rebuild Boot Configuration Data (BCD)
One of the most common reasons behind BSOD Error 0x000000B8 is the presence of corrupt Boot Configuration Data. Repairing these BCD files may help you to solve the Blue Screen Of Death issue. Here are the essential steps-
- Firstly, plug in the USB device containing the Windows Installation Media and Reboot your PC.
- So long as the BIOS loads, press any of the supported function keys (F2, F4, F9, Esc, Del, or more) to launch Boot Menu.
- Select the Troubleshoot option and then expand the Advanced options.
- Now, choose Command Prompt.
- When the elevated prompt appears, execute the following codes one by one-
bootrec /scanos
bootrec /fixmbr
bootrec /fixboot
bootrec /rebuildbcd
- After running all these codes successfully, restart your system normally.
Performing the above steps will allow access to your desktop screen without causing BSOD Error 0x000000B8. In case the problem is still available, try the last workaround.
18] Fresh install Windows 10
If all methods fail and still the BSOD Error 0x000000B8 still persists, you should clean install Windows 10. This task is a little bit complex and takes a huge time to perform, so it would be better to do this in your free time.
- Plugin the USB flash device to the respective port and Restart your computer.
- While loading, press the function key (Esc, F12, Delete).
- Select any of the languages whichever is preferable and hit the Next button.
- Now, press the Install Now followed by entering the genuine product key.
- Mark the box I accept the license terms and select the Next option.
- Subsequently, go for Custom: Install Windows only (advanced).
- Here, delete all the earlier partitions available on the disk drive and reallocate them again.
Now, go through the Onscreen instructions until Windows 10 installs effectively. Hope this method helps you to diagnose the BSOD error 0x000000B8.
19] Replace the hard disk
If none of the above workarounds help to resolve the error code 0x000000B8 on your PC, this must be happening because of bad sectors on your hard disk. We recommend changing your hard drive and checking if this Stop Error code resolves afterward.
Conclusion
I hope this guide helps you to find and resolve the issues causing a blue screen error 0x000000B8 on your Windows PC. As stated above, you may try even performing a clean installation of Windows and checking if this error code resolves afterward. Let’s know in the comment section if either of the above fixes works in your case.
Tip: If you are facing update, activation, or driver issues on your Windows PC, try RESTORO PC Repair Tool. This software will scan your device for potential issues and resolve them automatically.
Возникло неравенство контрольной суммы MBR
Причины появления
Период возникновения сбоя – загрузка ОС. При подсчете контрольной суммы MBR выясняется, что она не равняется контрольной сумме загрузчика всей ОС. Как правило, причиной подобного сбоя является вирус.
Параметры
Появляется синий экран с соответствующей надписью:
STOP: 0x0000008B (parameter1, parameter2, parameter3, parameter4)
Предусматривается следующий порядок расшифровки:
parameter1
Сигнатура диска MBR
parameter2
Значение контрольной суммы MBR, установленной загрузчиком ОС
parameter3
Значение контрольной суммы MBR, установленной непосредственно ОС
parameter4
Является зарезервированным
Способ восстановления
Требуется выполнить проверку компьютера на присутствие вредоносного ПО. Для этого можно использовать любые антивирусы.
