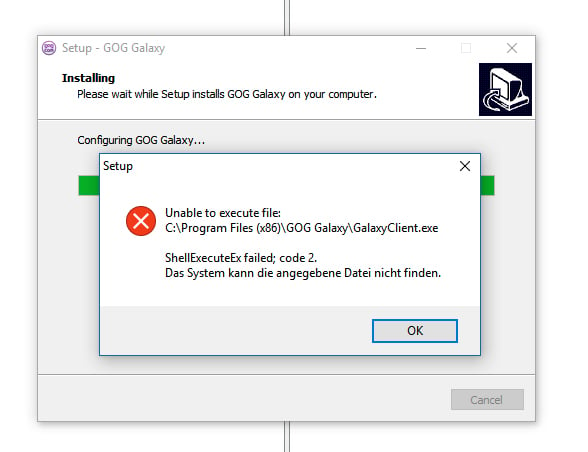
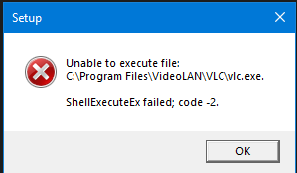
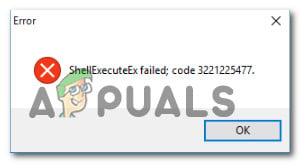
Ошибка «Shellexecuteex Failed» возникает перед пользователями Windows всякий раз, когда те пытаются совершить действие, требующее подключения к Интернету, либо установить какое-то приложение в систему. Пользователи утверждают, что данное сообщение могут сопровождать самые разные коды.
Содержание
- Причины за «Shellexecuteex Failed»
- Методы решения «Shellexecuteex Failed»
- Метод №1 Запуск приложения от имени Администратора (если применимо)
- Метод №2 Сканирование системных файлов
- Метод №3 Сброс настроек системных звуков
- Метод №4 Выполнение чистой загрузки
- Метод №5 Редактирование групповой политики
Причины за «Shellexecuteex Failed»
- У приложения нет прав администратора.
- Повреждение системных файлов Windows.
- Системные звуки, заданный пользователем, заставляют приложение вылетать.
- Конфликт между двумя или несколькими приложениями.
- Чрезвычайно строгие групповые политики системы Windows.
Методы решения «Shellexecuteex Failed»
Метод №1 Запуск приложения от имени Администратора (если применимо)
Самый простой метод в подобной ситуации — это запуск необходимого приложения от имени Администратора. Разумеется, этот метод подойдет далеко не для всех пользователей. Чтобы запустить приложение от имени Администратора, вам нужно сделать следующее:
- нажмите правой кнопкой мыши на исполнительный файл (.exe) нужного вам приложения;
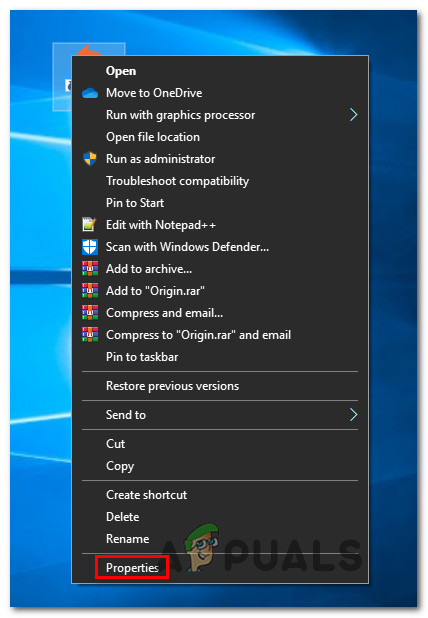
- выберите в контекстном меню пункт «Свойства»;
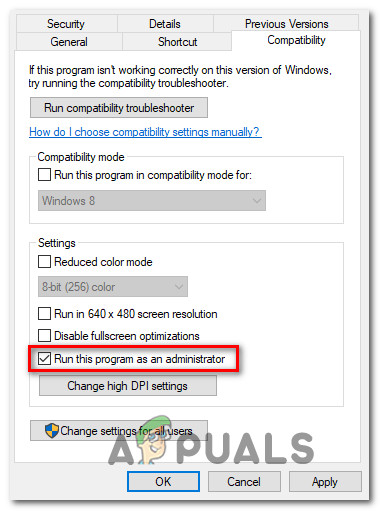
- перейдите во вкладку «Совместимость»;
- поставьте галочку возле пункта «Запускать эту программу от имени администратора»;
- нажмите кнопки «Применить» и «OK».
Попробуйте запустить приложение и посмотрите, проявится ли ошибка «Shellexecuteex Failed» или нет.
Метод №2 Сканирование системных файлов
Возможно, причиной за появлением данного сообщения стоят поврежденные системные файлы. В таком случае вам необходимо воспользоваться утилитами SFC и DISM. Они просканируют вашу Windows на наличие поврежденных файлов и восстановят их, если это будет возможно.
Попробуйте сделать следующее:
- нажмите Windows+R;
- копируйте в пустую строчку «cmd» и нажмите Ctrl+Shift+Enter;
- впишите команду «sfc /scannow» и нажмите Enter;
- подождите окончания работы утилиты SFC и перезагрузите компьютер;
- снова откройте командную строку;
- выполните следующие команды:
- Dism.exe /online /cleanup-image /scanhealth;
- Dism.exe /online /cleanup-image /restorehealth;
- перезагрузите компьютер.
Если эти утилиты нашли на вашем компьютере повреждения и исправили их (это станет понятно из информации в командной строке), то сообщение «Shellexecuteex Failed» должно исчезнуть.
Метод №3 Сброс настроек системных звуков
Как бы странно это не звучало, но рассматриваемая сегодня ошибка может возникать… из-за системных звуков Windows. Возможно, не так давно вы меняли настройки своих системных звуков. Если это так, то попробуйте сделать следующее:
- нажмите Windows+R;
- пропишите в пустой строчке «mmsys.cpl» и нажмите Enter;
- перейдите во вкладку «Звуки»;
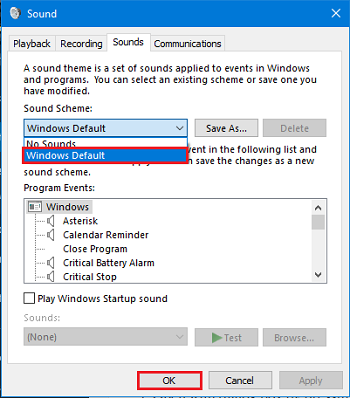
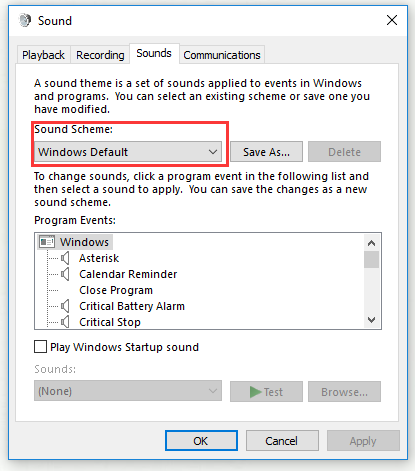
- выберите в ниспадающем меню звуковых схем значение «По умолчанию»;
- нажмите кнопки «Применить» и «OK»;
- перезагрузите компьютер.
Проверьте, исчезла ли ошибка «Shellexecuteex Failed» или нет.
Метод №4 Выполнение чистой загрузки
Конфликт между какими-то программами в системе может вызвать ошибку «Shellexecuteex Failed». Но как понять, что дело действительно заключается в конфликте между программным обеспечением? Ответ — чистая загрузка. Чтобы осуществить чистую загрузку, сделайте следующее:
- нажмите Windows+R;
- копируйте в пустую строчку «msconfig» и нажмите Enter;
- перейдите во вкладку «Службы»;
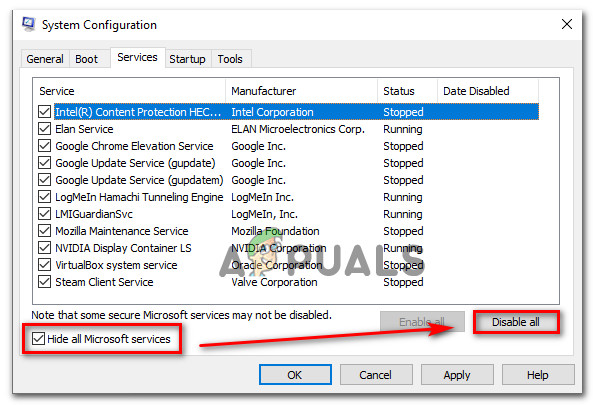
- поставьте галочку возле опции «Не отображать службы Майкрософт» и нажмите кнопку «Отключить все»;
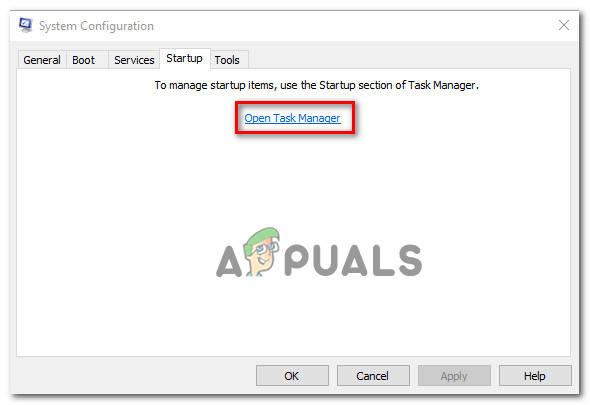
- теперь перейдите во вкладку «Автозагрузка» и нажмите на строчку «Открыть диспетчер задач»;
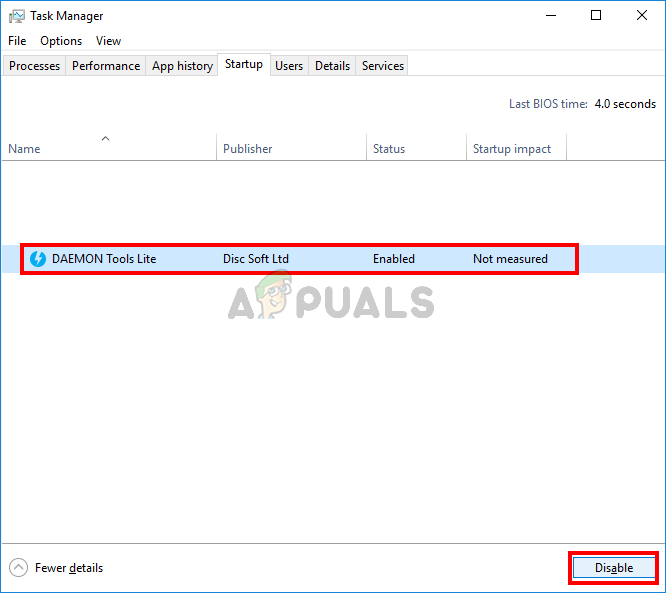
- отключите все программы из предоставленного списка;
- перезагрузите компьютер.
Протестируйте теперь свою систему. Если ошибка «Shellexecuteex Failed» исчезла, то какая-то отключенная служба или программа действительно была «виновницей». Вам нужно поочередно включать отключенные программы/службы и тестировать систему, чтобы понять, что конкретно вызывает ошибку.
Метод №5 Редактирование групповой политики
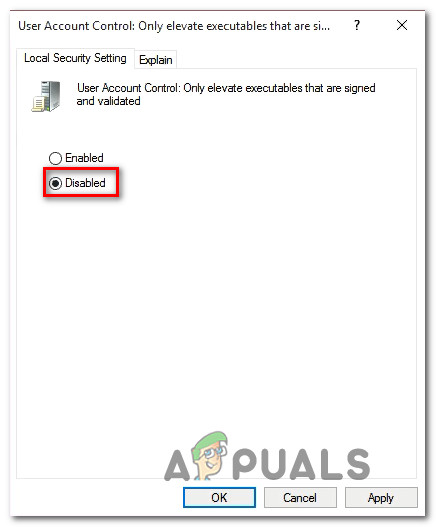
Если ничего из вышеуказанного не сработало, то можно попробовать воспользоваться этим методом. Некоторые пользователи утверждают, что им удалось избавиться от ошибки «Shellexecuteex Failed», отредактировав групповую политику «Контроль учетных записей пользователей: повышение прав только для подписанных и проверенных исполняемых файлов».
Чтобы сделать это на своем компьютере, вам нужно выполнить следующее:
- нажмите Windows+R;
- пропишите «gpedit.msc» и нажмите Ctrl+Shift+Enter;
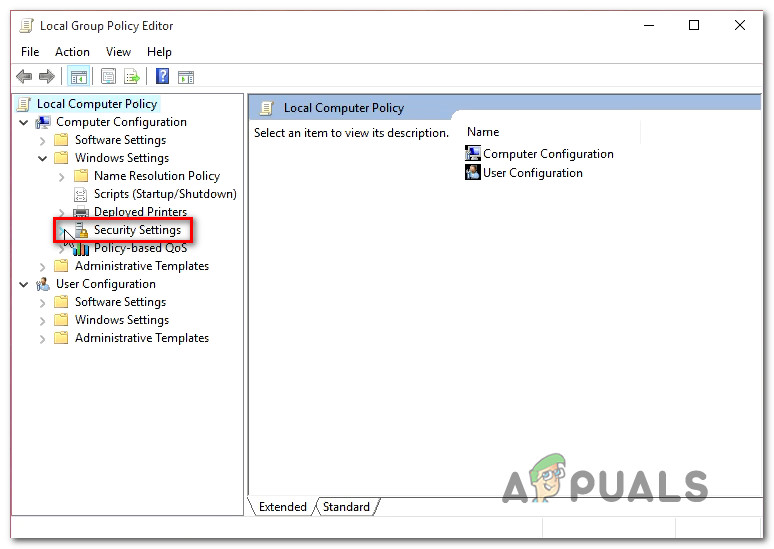
- пройдите следующим путем: Политика “Локальный компьютер”→Конфигурация компьютера→Конфигурация Windows→Параметры безопасности;
- открыв меню параметров безопасности, нажмите дважды левой кнопкой мыши на «Контроль учетных записей пользователей: повышение прав только для подписанных и проверенных исполняемых файлов»;
- поставьте галочку возле пункта «Отключить»;
- сохраните изменения в настройках групповой политики системы и перезагрузите компьютер.
Мы надеемся, что наш материал был полезен в решении ошибки «Shellexecuteex Failed».
При попытке установить программу на вашем компьютере с Windows, Если вы видите “ShellExecuteEx failed” в сопровождении различных кодов, то этот пост поможет вам.
Сопутствующие коды ошибок могут быть: 2, 5, 67, 255, 1155, 1460, 8235, 2147221003, и т.д. Эта ошибка обычно возникает, если установщик требует прав администратора, файл установки был поврежден или существует конфликт приложений.
ShellExecuteEx — это функция ОС, которая выполняет операцию над указанным файлом. Если операция завершится неудачно, вы получите эту ошибку.
- Запустите исполняемый файл от имени администратора
- Повторно загрузите или переустановите программу
- Запустить Средство Проверки Системных Файлов
- Сброс звуков по умолчанию.
Давайте подробно рассмотрим эти методы.
Попробуйте запустить приложение от имени администратора
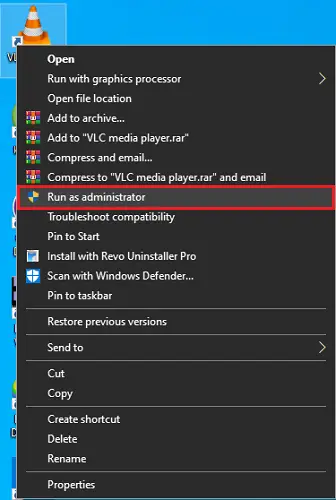
Запуск приложений с правами администратора. Даже если приложение не удается запустить, попробуйте переустановить приложение с правами администратора. Просто щелкните правой кнопкой мыши на файле установщика и нажмите кнопку Запуск от имени администратора.

Загрузите установщик еще раз, а затем установите повторно
Иногда, когда вы загружаете любое приложение для установки, вы возможно столкнулись с ситуацией, когда программа установки не будет работать и приложение не будет установлено. Это может произойти из-за поврежденного или файла установщика.
Попробуйте загрузить то же самое с официального сайта приложения или любого доверенного источника. Также можно отключить антивирус на время установки и далее добавить приложение в исключения антивируса ( Внимание!!, вы должны быть уверены, что в этом файле нет вирусов или он из надежного источника)
Здесь вы можете приобрести ключ лицензии Windows 10 Pro 2020. Вы сразу же получаете ваш собственный уникальный ключ активации. После ввода лицензионного ключа вы начинаете использовать лицензионную операционную систему без ограничений, а также получать последующие пакеты обновлений, выпускаемые Microsoft.
Запустите сканирование SFC
Запуск сканирования SFC делается для замены потенциально поврежденных системных файлов. Таким образом, если ошибка возникает из-за поврежденного системного файла, то следующие шаги должны помочь вам исправить ошибку.
SFC scan не только находит проблемный системный файл, но и исправляет его.
Нажмите Клавишу Win + X . Откроется меню быстрого доступа.
Нажмите на Windows PowerShell (администратор) . Если вместо PowerShell отображается Командная строка, выберите пункт Командная строка (администратор) .

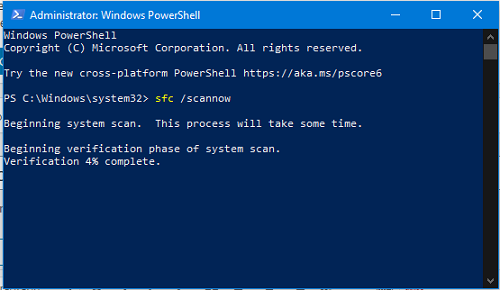
Выполните команду: sfc /scannow
Подождите несколько секунд, так как требуется время для завершения сканирования.
Если проблема в этом, то ошибка должна быть решена.

Но если есть действительно большая проблема, то вы можете столкнуться с сообщением, говорящим: «Windows Resource Protection нашел поврежденные файлы, но не смог исправить».
Вам просто нужно перезагрузить машину в безопасном режиме и снова запустить вышеуказанную команду.
Сброс системных звуков по умолчанию
Вы можете подумать, что как сброс системного звука по умолчанию может решить системную ошибку, такую как “ShellExecuteEx”? Но некоторые пользователи сообщили, как этот шаг решил их проблему.
Откройте диалоговое окно Выполнить, нажав клавишу Win + R.
И введите mmsys.cpl нажмите Enter.
Нажмите на вкладку Звуки. Выберите «По умолчанию» в звуковой схеме.
Нажмите на кнопку Применить, а затем на кнопку ОК.

Download PC Repair Tool to quickly find & fix Windows errors automatically
When you try to install a program on your Windows computer if you see a “ShellExecuteEx failed” accompanied by different codes, then this post will help you. The accompanying error codes could be 2, 5, 67, 255, 1155, 1460, 8235, 2147221003, etc. . This error usually occurs, if the installer requires administrator privileges, the setup file has become corrupted, or there is application conflict. ShellExecuteEx is an OS function that performs an operation on a specified file. If the operation fails, you get this error.
In this article, we will show you how to deal with ShellExecuteEx failed errors in Windows 11/10. You have the following options:
- Run the Exe file as administrator
- Re-download or reinstall the program
- Run System File Checker
- Reset Sounds to default
- Install or run the program in Clean Boot State.
Let us take a look at these methods in detail.
1] Try running the application as an administrator
Running applications with admin rights make applications run with more power. Even if the application fails to open up, try re-installing the application with admin rights. Just right click on the installer file and click on Run as administrator.
2] Download the installer again and then install
Sometimes when you download any application to install, you may have faced a situation where the setup won’t run and the app won’t install. This may happen due to a corrupt or defective installer file. Try downloading the same from the application’s official website or any trusted source.
3] Run SFC scan
You may know that running an SFC scan is done for replacing potentially corrupted system files. So, if the error is occurring due to a corrupted system file then the following steps should help you. SFC scan not only finds a problematic system file but also fixes it.
- Press Win Key + X. A Quick Access Menu will open up.
- Click on Windows PowerShell (Admin). If it shows Command Prompt instead of PowerShell then select Command Prompt (Admin).
- Run the command: sfc /scannow
- Wait for some moments as it takes time to complete the scan.
If everything goes right, the error should get resolved. But, if there is a really big problem then you may encounter a message saying: ‘Windows Resource Protection found corrupt files but was unable to fix’. You just need to restart your machine in Safe Mode and run the above command again.
4] Reset System Sounds to default
You may think that how resetting system sound to default can solve a system error like “ShellExecuteEx”? But some of the users have reported how this step solved their problem and it is worth mentioning, it may solve your problem too.
Open Run dialog box by pressing Win Key + R.
Type mmsys.cpl and press Enter.
Click on Sounds Tab. Select Windows Default in Sound Scheme.
Click on Apply and then on OK.
The problem should have gone by now.
5] Install or run the program in Clean Boot State
To avoid program conflicts, you may install or run the program in Clean Boot State and see if that helps you.
These are some of the methods you can try to resolve the error. Let us know if this helped.
Shubham is a PHP Developer, who is skilled in PHP, DOM, Angular, JavaScript, and C#. He loves talking about Microsoft technologies.
Several Windows users have been reaching us with questions after encountering the “Shellexecuteex Failed” error message whenever they try to perform an action that involves connecting to the Internet or when installing an application. Affected users are reported various codes that are displayed along with the error message. As it turns out, the issue is not exclusive to a certain WIndows version as we managed to find occurrences of it on Windows 7, Windows 8.1 and Windows 10.
What’s causing the “Shellexecuteex Failed” error on Windows?
We investigated this particular issue by looking at various user reports and at the repair strategies that are commonly used in this particular scenario. Based on our analysis, there are several different culprits that are often identified for causing the issue. Here are several scenarios that you might be encountering:
- The application doesn’t have admin privileges – As it turns out, this problem is quite common in instances where there’s an unexpected app shut down due to insufficient permissions. If this scenario is applicable, you should be able to resolve the issue in most cases by ensuring that the app opens with administrative access.
- System File Corruption – Another potential culprit is system file corruption that affects a dependency used by the application that’s showing the error. Several users that were also encountering this problem have reported that the issue was resolved after they repaired every logical error and corrupted item with the two built-in utilities (DISM and SFC). In most severe cases, the only viable fix that will work in this scenario is to reset every Windows component by performing a clean install or repair install.
- Custom System sounds are crashing the app – It’s also possible that you’re encountering this issue due to some custom Windows theme sounds that are not being handled properties by the application trying to use them. In this case, you should be able to resolve the issue by reverting back to the default Windows sounds.
- Application conflict – Under certain circumstances, it’s also possible that a different application conflicts with the process of the app that you’re trying to launch, which ends up triggering the error. Since there’s no definitive of the apps that conflict, the best way of discovering the culprit is to start your computer in clean boot mode and see if the symptoms stop.
- Overprotective Local policy – If one particular Local policy is enabled (Only elevate executables that are signed and validated) every executable that is not properly signed and validated will be prevented from running with this particular error. In this case, you fix the problem by accessing the Group Policy editor and disabling the policy causing the problem.
Method 1: Running the application as Administrator (if applicable)
If you’re encountering the “Shellexecuteex Failed” error while trying to open or install an application, it’s very likely that the issue occurs due to an unexpected application shutdown (or installation executable) because it doesn’t have admin access.
This type of issue is typically restricted to open source apps and apps with small teams of developers – we haven’t identified any occurrences with triple-A teams.
If you think this scenario might be applicable to your current situation, you will be able to resolve the issue simply by forcing the application to start with admin access. Here’s a quick guide on how to run the application as administrator:
- Right-click on the application that is is triggering the error and choose Properties from the newly appeared menu.
Accessing the Properties screen of the application encountering the issue - Once you’re inside the Properties screen, select the Compatibility tab and go to the Settings section. Next, check the box associated with Run this program as administrator, then click on Apply to set this as the new default behavior.
Ensuring that the app starts with admin privileges - Start the application again and see if the issue is now resolved.
If the same “Shellexecuteex Failed” error is still occurring, move down to the next method below.
Method 2: Running DISM and SFC scans
As it turns out, in some cases, the “Shellexecuteex Failed” error is occurring due to some kind of system file corruption that is preventing the installation from completing. If this scenario is applicable, the only viable fix is to try to resolve the corruption that’s causing the issue while limiting the damage.
And the best way of doing this is to rely on built-in utilities like DISM (Deployment Image Servicing and Management) and SFC (System File Checker). both are equipped to deal with corrupted system files, but they operate differently.
While SFC relies on a locally stored cache to replace the corrupted items with healthy copies, DISM uses WU (Windows Update) to download the healthy files needed for the replacement. But since the utilities are geared towards fixing different components (SFC is more efficient with logical errors), the best approach is to deploy both scans to improve your chances of success.
Here’s what you need to do:
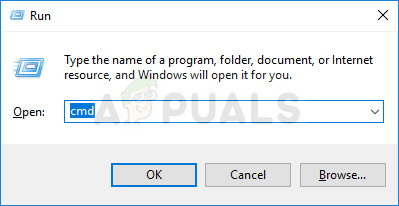
- Press Windows key + R to open up a Run dialog box. Next, inside the Run text box, type ‘cmd’ and press Ctrl + Shift + Enter to open up a Command Prompt with admin access. When you’re prompted by the UAC (User Account Control), click Yes to open the elevated Command Prompt.
Running Command Prompt - Inside the elevated Command prompt, type the following command and press Enter to initiate an SFC scan:
sfc /scannow
Note: Do not interfere with the window until the process is complete. Interrupting the operation will likely create even more logical errors that will be harder to fix.
- Once the scan is complete, restart your computer and wait for the next startup to complete. Once your OS is fully loaded, follow step 1 again to open another elevated Command Prompt. Once back into the CMD window, type the following commands and press Enter after each one to initiate a DISM scan:
Dism.exe /online /cleanup-image /scanhealth
Dism.exe /online /cleanup-image /restorehealth
Note: Make sure your internet connection is stable before you initiate this process. The first command will start the scan while the second will start the scanning process.
- Once the DISM scan is complete, restart your computer and see if the issue is resolved at the next system startup.
If the “Shellexecuteex Failed” error is still appearing when you repeat the same action, move down to the next method below.
Method 3: Reverting the System Sounds to the Default
As several different users have reported, this particular issue can also be caused by some System Sounds defined by some themes that are not being handled properly by the module that is trying to use them. If this scenario is applicable, the app using the sounds will crash whenever it tries to play them,
In this case, you will be able to resolve the issue by resetting all Windows sounds to the default. After doing so and restarting the machine, most affected users have reported that the issue was resolved.
Here’s a quick guide on reverting the system sounds back to the default values:
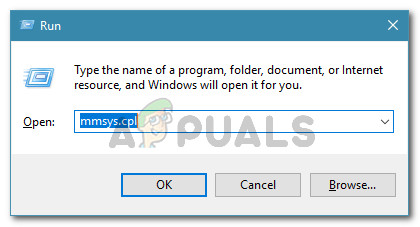
- Press Windows key + R to open up a Run dialog box. Inside the run box, type “mmsys.cpl” inside the text box and press Enter to open the Sound screen.
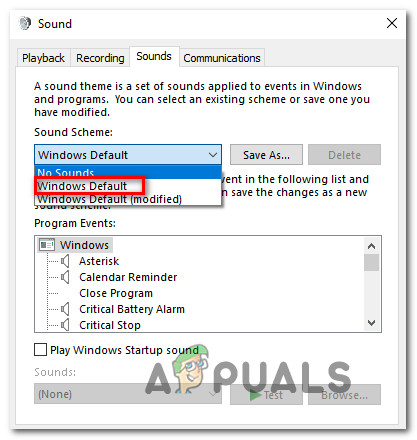
Running dialog: mmsys.cpl - Once you’re inside the Sound window, select the Sounds tab from the horizontal menu. Next, change the Sound Scheme to Windows Default.
Changing the Sound Scheme to Windows Default Note: If your current Sound Scheme is set to Windows Default (modified) chance it to Windows Default since you might have some invalid sounds.
- Once the active Sound Scheme has been successfully changed, restart your computer and see if the issue is resolved at the next system startup.
Repeat the action that was previously triggering the “Shellexecuteex Failed” error and in case the issue is still appearing, move down to the next method below.
Method 4: Performing a clean boot
If you’ve come this far with no palpable results, you may be encountering the issue due to some kind of 3rd party conflict that is triggering the “Shellexecuteex Failed” error. Since there are a lot of potential applications that might conflict with the application that’s displaying the error, the best way of taking care of the issue is to configure your computer to start in clean boot.
Follow the instructions below to achieve a clean boot state and identify the application that is causing the conflict. Here’s what you need to do:
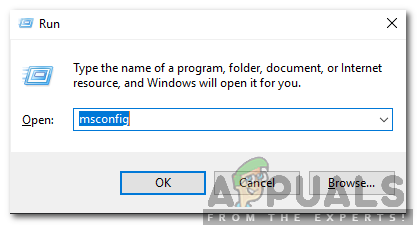
- Press Windows key + R to open up a Run dialog box. Next, type “mscofig” and press Enter to open up the System Configuration menu. When you see the UAC (User Account Control) menu, click Yes to grant administrative privileges.
Typing in msconfig and pressing enter - Once you’re inside the System Configuration window, click on the Services tab from the top of the menu, then check the box associated with “Hide all Microsoft Services”. After you’ve done this, all Windows services will be removed from that list, so you don’t run the risk of disabling a Windows component.
Disabling all non-Microsoft startup items - After you manage to exclude all essential services from the list, click on the Disable all button to effectively prevent any 3rd party service from being started at the next machine startup.
- Next, select the Startup tab from the horizontal menu and click on Open Task Manager.
Opening the Startup items window via Task Manager - After you’re inside the Startup tab of Task Manager, systematically select each startup service and then click on the Disable button in the bottom section of the screen. This procedure will ensure that no startup service gets called at the next system startup.
Disabling Apps from Startup - Now that you’ve got to this step, you have effectively disabled every service or process that might interfere with the application showing the “Shellexecuteex Failed” error. Take advantage of the clean boot state you’ve just configured by restarting your computer.
- At the next system startup, see if the error is still occurring once you try to launch the application. If the error is not occurring anymore, complete the installation, then reverse engineer the steps above and re-enable the services that you previously disabled.
If this method didn’t allow you to resolve the “Shellexecuteex Failed” error, move down to the next method below.
Method 5: Adjusting the “Only elevate executables” Policy
As it turns out, this particular issue can also be avoided by adjusting one Group policy named Only elevate executables that are signed and validated. But keep in mind that this method will only be effective in situations where the issue is being caused by an executable that isn’t signed properly.
Several affected users have reported that the issue stopped occurring and the installation was successful after the Only elevate executables that are signed and validated was effectively disabled.
Note: Certain Windows versions don’t include the Group Editor. In this case, this method won’t be applicable, so move directly to the final method below.
Here’s a quick guide on disabling the policy that is triggering the “Shellexecuteex Failed” error:
- Press Windows key + R to open up a Run dialog box. Next, type “gpedit.msc” inside the text box and press Ctrl + Shift + Enter to open up the Local Group Policy Editor with admin privileges. When you see the UAC (User Account Control) prompt, click on Yes to grant admin access.
Running the Local Policy Group Editor - Once you’re inside the Local Group Policy Editor, move to the left-hand panel and select Computer Configuration > Windows Settings > Security Settings.
Accessing the Security Settings menu from the Local Group Policy Editor - With the Security Options menu selected, move over to the right-hand side and double-click on the User Account Control: Only elevate executables that are signed and validated policy.
- Once you’re inside the policy menu, select the Local Security Setting tab and then ensure that the policy is set to Disabled.
Disabling the Policy - Click Apply to save the changes, then restart your computer and see if the issue is resolved at the next system startup.
If the “Shellexecuteex Failed” error is still occurring move down to the next method below.
Method 6: Performing a clean install
If none of the methods above have allowed you to resolve the issue, chances are you’re dealing with an underlying corruption issue that cannot be resolved conventionally. If this scenario is applicable in your current situation, you can only resolve the issue by resetting every Windows component.
The quickest way of doing this is by performing a clean install (here), but keep in mind that this procedure will make you lose any personal data including installed applications, games, media, user preferences and more.
A most efficient approach that takes a little longer is to go for a repair install (in place install). This procedure will allow you to keep all your personal effects including games, applications, user preferences and any type of media. If you decide to perform a repair install, follow the instructions (here).
If you want to find a solution to the “Shellexecuteex Failed” error, this post is what you need. It will show you some possible causes of the “Shellexecuteex Failed” error. In addition, it will also introduce you to several workable methods for this error. Now get these methods from MiniTool.
What Causes the “Shellexecuteex Failed” error on Windows?
Here are a few situations you might encounter:
- The application doesn’t have admin privileges
- System File Corruption
- Custom System sounds are crashing the app
- Application conflict
- Overprotective Local policy
If you want to find the methods for the “Shellexecuteex Failed” error, keep reading.
Method 1: Run the Application as Administrator
If you meet a “Shellexecuteex Failed” error when you open or install an application, it is likely to cause problems due to an unexpected application shutdown or installation of an executable because it does not have administrator access.
The following part will show you how to run an application as an administrator.
Step 1: Right-click on the application that is triggering the error, and select Properties.
Step 2: Select the Compatibility tab and check Run this program as administrator under the Settings section. Click Apply.
Step 3: Run the application again and see if the “Shellexecuteex Failed” error is fixed.
Method 2: Run DISM and SFC Scans
In some cases, the “Shellexecuteex Failure” error occurs because the installation could not be completed due to some type of system file corruption.
Follow the steps below to fix this error.
Step 1: Press Windows + R keys to open the Run dialog box. Type cmd and press Ctrl + Shift + Enter to run Command Prompt as an administrator.
Step 2: Type sfc /scannow and press Enter to perform an SFC scan.
Tip: Do not interfere with the window until this process is complete. Interrupting this operation may result in more logical errors that are more difficult to fix.
Step 3: After the scan is complete, restart the computer and wait for the next boot to complete. When the operating system is fully loaded, follow Step 1 to open Command Prompt again.
Step 4: Execute the commands: Dism.exe /online /cleanup-image /scanhealth and Dism.exe /online /cleanup-image /restorehealth to perform a DISM scan.
Tip: Before starting this process, make sure your Internet connection is stable.
Step 5: After the DISM scan is complete, restart the computer to see if the “Shellexecuteex Failed” error is fixed.
Method 3: Revert the System Sounds to the Default
In this case, you also fix the issue by resetting all Windows sounds to the default.
Step 1: Press Windows + R keys to open the Run dialog box. Type mmsys.cpl and click OK to open the Sound screen.
Step 2: Select the Sounds tab and then change the Sound Scheme to Windows Default. Click Apply and then click OK.
Step 3: Restart your computer to see if the “Shellexecuteex Failed” error disappears.
Method 4: Perform a Clean Boot
If the errors haven’t been fully resolved so far, you may be experiencing a “Shellexecuteex failure” error due to some kind of third-party conflict. Many potential applications could conflict with the ones that the application that is displaying the error, so your best approach to the problem is to configure your computer to start with a clean boot.
Step 1: Press Windows + R keys to open the Run dialog box. Type mscofig and click OK to open the System Configuration menu.
Step 2: Click the Services tab and then check Hide all Microsoft Services.
Step 3: Click Disable all to prevent all third party services from being started the next time your computer starts.
Step 4: Select the Startup tab and click Open Task Manager.
Step 5: Select each startup service systematically and then click Disable. This step ensures that no startup services are invoked the next time the system starts.
Step 6: Restart the computer to see if the error is still existing. If the error no longer occurs, complete the installation, then reverse engineer the steps above and re-enable the previously disabled services.
Method 5: Adjust the “Only elevate executables” Policy
In cases where the problem is caused by an improperly signed executable, in order to avoid this particular problem, you can adjust one Group policy named Only elevate executables that are signed and validated.
Step 1: Press Windows + R keys to open the Run dialog box. Type gpedit.msc and press Ctrl + Shift + Enter to open Local Group Policy Editor with admin privileges.
Step 2: Navigate to Computer Configuration > Windows Settings > Security Settings > Local Policies > Security Options. Double-click User Account Control: Only elevate executables that are signed and validated.
Step 3: Select the Local Security Setting tab and then ensure the policy is set to Disabled. Click Apply and then click OK.
Step 4: Restart the computer to see if the issue is fixed.
Method 6: Perform a Clean Install
If none of the above methods can solve this problem, you’re probably dealing with an underlying corruption problem that cannot be fixed by conventional means. You can only solve this problem by resetting each Windows component.
The quickest way is to perform a clean install. This process will cause you to lose any personal data.
The most effective way to take longer is to install the fix – in place install. During this process, you can retain all personal effects.
Bottom Line
In conclusion, this post has shown you some possible reasons for the “Shellexecuteex Failed” error. Meanwhile, it also shows you some useful methods to fix this problem. If you encounter this issue, you can try these methods.
