Отправляемся на Цитадель. Нас будет ждать новая локация. Здесь нас ждет диалог с доктором Брайансом. Далее допрашиваем Хэдли и пытаемся выяснить что же здесь произошло. Далее осматриваемся в комнате, ищет всякие подсказки от доктора Байансона, который оставил нам в лаборатории.
Продолжаем изучать все вокруг, разговариваем с СУЗИ, как только что-то найдем, также вокруг вы сможете найти различные улучшения и не только.

Исследуем все, затем возвращаемся к галактической карте и на ней расставляем фильтры. Используйте карту, чтобы уменьшить количество систем, которые нам придется изучить. В результате, нам надо будет обыскать всего одну систему.
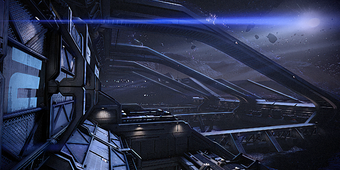
Далее возвращаемся на корабль и с помощью галактической карты отправляемся в Туманность Конская Голова, далее отправляемся в галактику Айзур. В галактике ничего не будет, ниже от Солнца вам надо будет сканировать, пока вы не найдете Магавид – местная станция. Приземляемся. Оказавшись на станции, спускаемся на платформе вниз, где нас ждут налетчики и тварь. Нам надо найти Гарно.
Далее встретим людей, которые, видно, под витаминами. Ну, вы понимаете. Далее осматриваемся вокруг. Далее по лестнице поднимаемся и идем налево, ремонтируем подъемник. Появится дрон, которого мы сопроводим. Дрон откроет доступ завтра, после поднимаемся на подъемнике и идем дальше. Добираемся до непонятной лаборатории. Изучаем ее. Далее проникаем в минеральную лабораторию, где найдем толпу фанатиков. Затем открываем дверь за ними и находим блок данных с новостями.

Далее надо найти путь системы безопасности, иначе мы не сможем пройти за дверь. Далее возвращаемся назад, к большому терминалу на стене. Используем его. Далее найдется Гарно. Общаемся с ним. Далее пускаемся за ним в погоню. На пути нам начнут попадаться хаски – убиваем их. Далее с самими налетчиками сражаться придется. Позже появятся баньши и опустошители.
Далее встретим дрона, которого нам придется провожать, скорей всего. Так что снова сражаемся с армадой жнецов.

Далее найдем Гарно, но окажется, что он и являлся Левиафаном и он уже мертв – взорвет себя. Далее возвращаемся в лабораторию доктора Брайнсона. Изучаем его личный терминал, там есть новые сообщения. На первом этаже вы сможете также найти ключ в столе и открыть шкафчик в дальнем углу комнаты, где можно изучить много важных объектов.
Далее снова идем к карте и используем два фильтра, после чего получаем координаты Энн Брайнсон. Отправляемся в туманность Пилоса. Затем отправляемся в систему Заерин, сканируем ее и рядом с Солнцем найдем планету Намакли, которая не отображается на карте. Выходим на ее орбиту и сканируем ее, чтобы найти следы доктора Энн Брайнсон, после чего садимся на планету.
Приземление будет не из приятных. После того, как сядем – отправляемся вперед, стараемся бежать быстро, а то обстреливают нас. Далее придется карабкаться и прыгать по различным зданиям, вокруг многое будет разрушено. Позже сражаемся с каннибалами.

В конце пути добегаем до лифта, поднимаемся наверх и нас ждет ролик. Найдем Энн Брайнсон. Эвакуируемся вместе с ней. Возвращаемся в лабораторию доктора. Возвращаемся и смотрим ролик. Общаемся с Энн в ее лаборатории. Далее используем Энн в качестве приманки, чтобы выяснить местонахождение Левиафана.
Далее отправляемся в указанную систему, чтобы найти Левиафана. В системе опять сканируем пространство, затем находим планет, а затем опять сканируем планету, чтобы определить более точно его местонахождение, после чего приземляемся.
Далее к нам прилетит масса жнецов и придется защищать челнок.

Далее короткий ролик и общаемся с Кортезом. Он даст нам антенну, которую надо зарядить с помощью силового разъема. Заряжаем батарею и возвращаем на челнок, пока не наберет 100 процентов, после чего сможем засесть в тритона и начать всех хорошенько крошить. Далее погружаемся под воду. Далее бредем вперед, разгребая толщи воды. Через некоторое время перед нами выплывет Левиафан.

Собственно, вот и все. В целом, DLC можно считать одним из лучших.
Alex Garneau is missing on Mahavid, which is under Reaper attack. Find Garneau and learn more about Leviathan.
Acquisition[]
The mission’s journal entry is automatically acquired upon landing on Mahavid.
Preparation[]
Regardless of your progression through the main game, you’ll be facing the entire Reaper ground force roster here. Put light emphasis on stripping shields, medium emphasis on crowd control, and heavy emphasis on stripping armor and causing fire and biotic explosions.
There are also several points in this mission where you may find yourself fighting enemies from multiple directions at once. If you train your Shepard with Energy Drain or Defense Matrix, you will be able to restore a downed shield quickly.
Walkthrough[]
On the way down to the asteroid in the shuttle, Shepard, Cortez, and your squad will discuss the mission and the evidence you’ve found while you were searching Dr. Bryson’s lab. After the short mission briefing, Shepard and the squad will land on the asteroid mining facility.
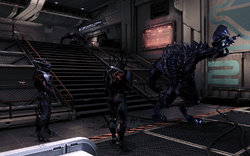
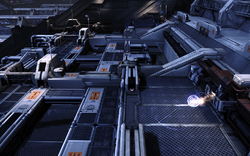
After exiting the shuttle, take the nearby lift down to the main floor. While moving off the lift, your squad will notice a small Reaper scouting party ahead, near the door to the inside of the facility. The Reapers here consist of two Marauders and a Brute. A second brute is upstairs and will not come down if you do not advance too far from the lift. There’s plenty of cover nearby, and if you act quickly you should be able to take them out easily. There is an ammo pile on the right wall. Tip: If you hit one of the Marauders with a Stasis bubble before they notice you, it will catch the other Marauder as well, with the added useful effect of blocking the Brute from approaching you until you shoot the Marauders.
Head up the stairs where the Reaper enemies were located to find a Med Kit and a second ammo pile, if needed. Bypass the only accessible door to the right, and head on through to the next room. Here you’ll find yourself in a reception room with T-GES Mineral Works employees hanging out, oblivious to the Reaper party that you and your team just cleaned out. Shepard and team will talk to the personnel at the reception desk, and after asking about Dr. Garneau, you’ll find that the elevator is inoperable. You’ll have to find a way to repair it so you can move on.
Find Dr. Garneau[]
After regaining control of Shepard, you’ll be able to look around, eavesdrop on some of the other personnel talking with each other, and find that you now have to repair the elevator. There is a datapad near the group in front of the customs personnel you can interact with to get some more information and 1250 credits. There is another datapad behind the reception desk that also yields credits, 2500. The men behind the reception desk will make threats while you’re behind the desk, but they are not hostile.
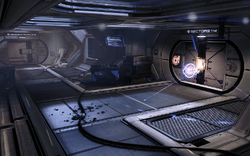
At the far side of the room away from the door you took to get into this room, you’ll find a Repair Drone Terminal you can use to activate a drone to fix the elevator. Stay near it to guide it to the elevator. This section, familiar for those who play multiplayer, also foreshadows the more difficult drone escort later in the mission. After fixing the elevator, take it up to the next floor.
Inside this hallway, you can find a datapad behind a crate of rocks to the left worth 1250 credits. Then move through either door, as both lead to different parts of connected rooms. Staff members ominously close themselves off behind partitions as you approach, and there are various objects you can interact with that show that T-GES Mineral Works is not what it seems. In the room with the potted plants are a terminal and a datapad, each with 1250 credits. The door to personnel quarters is locked for now but you won’t be able to get in until you find a “personnel ID” further on.
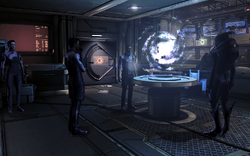
Check out the security terminal with the floor map: you need a password for further clearance. Now head to the next room with more creepy workers in conference; behind the 3D display console there’s a datapad (worth 1250 credits) on the table and a door to bypass. Inside the room is an SMG High-Velocity Barrel and a datapad (worth 2500 credits) with an undelivered message by Dr. Garneau to Dr. Bryson—which contains a working password for the security terminal.
But before you return to the security terminal, press on towards the medical bay. It’s locked for now but your present objective is the security station next to it—a datapad with a working personnel ID can be found there (worth 1250 credits).
Now head all the way back to the personnel quarters, with a valid personnel ID you can now enter. There is an Pistol Ultralight Materials mod and two datapads with information date-stamped almost ten years before.
Return to the security terminal and access it. It will play a security footage of Dr. Garneau’s arrival to this facility earlier; but more importantly it gives you a patient number for accessing the medical bay. Now head back to the med bay and use the patient number to get inside.
Follow Garneau[]
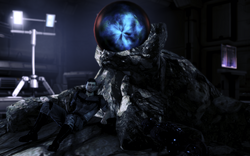
Once inside, there’s a Med Kit available for pickup next to a windowed room with a corpse on a table. Interact with the window to meet Dr. Garneau. After a conversation it turns out this person is being controlled by the Leviathan and it makes the thrall run away. Give chase but after the second door the only way is through the access ladder going outside.
Once outside, follow the linear path towards the objective, and you’ll soon notice that the Husks are doing something rare—instead of rushing towards you as usual, they chase after Dr. Garneau. Deal with the stragglers in your way and move on to the next clearing. Grab the SMG Recoil System mod along the way.
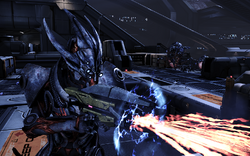
Now this is the main battleground for the remainder of the mission, terrain-wise there’s cover everywhere to use and the closest elevation has a Reaper Blackstar for special occasions. It’s better to leave the Blackstar there for now and bear with using conventional weapons first. Your objective is at the far end, but this time the Reapers are determined to stop you. Marauders, Ravagers and conventional Husks will drop from above to block you. A pair of Banshees will join in the fight after you’ve dealt with the initial wave—arguably the toughest fight of the whole level since there are lots of culs-de-sac it’s easy for Banshees to trap you in, and it isn’t always obvious in the heat of combat which pieces of cover can be jumped over and which can’t. The Banshees present a good opportunity to use the Blackstar, though if you think you’re good at ducking while under fire you can simply rush to the other side early on and preempt their appearance entirely. Taking one of the Banshees out as quickly as possible will also simplify the situation dramatically.
Warning: If this is your first time facing Banshees, it’s a good idea to look over their page for guidance on how to deal with them. In short, STAY AWAY as they have a lethal grab attack at close range. Their ranged attacks are slow-moving but important to dodge as they deal damage over time that delays your normal shield recharge.
Whatever you choose, there’s still a Ravager and a couple of Husks guarding the door that need to be dealt with, if they haven’t joined the battle at the open area. Once they’re dead inspect the area just next to the door and in front of it for a Med Kit and a Pistol Cranial Trauma System.
Guide the Drone[]
As you access the door, power goes offline and now you have to escort a vulnerable repair drone to repair two power units, located in the two separate elevated positions from the area you just came through. There’s an element of time pressure in this section, since the drone “shields” bar gradually depletes even when it’s not being shot. Stay close to the drone to guide it, but here comes the second half of the fight: Marauders and Ravagers will crash the party. Once the first repair is complete it’s time to escort it to the second unit. Choose your path wisely: the drone is slow to navigate obstacles and will not move without you nearby. As you get close to the second power unit you’ll hear the Banshee scream; the good news is that it’s the last enemy on this level, the bad news is it comes from behind. If you’re low on ammo or have yet to use the Blackstar, it’s as good a time as any to unleash it. Once the repair is complete you’re clear to proceed.
The Darkness Must Not Be Breached[]
Open the door and into the mine, you’ll see Dr. Garneau with his back towards the artifact and surrounded by Husks. Instead of giving you a clear shot at the Husks, he detonates the artifact, killing him along with the rest of the Husks.
Examining the area your squadmate will discover the real Dr. Garneau’s body. It turns out the man you were chasing was an impostor after all. Some of the facility’s personnel, apparently themselves again, approach. Not only have they no recollection of who Dr. Garneau is, they actually have no recollection of anything other than being somewhere dark and cold. When Cortez announces that the Reapers attacking the base have suddenly pulled back, the workers don’t appear to know what a “Reaper” is. Finally, Shepard asks them what year it is. An asari miner answers 2176—apparently the Leviathan has held the facility’s personnel as thralls for ten years.
Enemies[]
- Banshee
- Brute
- Cannibal
- Husk
- Marauder
- Ravager
- Swarmer
Datapads[]
Dr. Triffon,
Your appeal is denied. Your resources are cut off, and you’ve been reassigned.
Clean out your office, and report to Dr. Lann. There will be no further discussion on this matter.
The tests reportedly pushed the subject past his emotional breaking point. The subject is currently in a catatonic state and being treated in-hospital. All further tests planned for this subject have been canceled.
Moving forward, a new screening process will be put in place to prevent similar delays.
After comparing the stomach contents of varren from eight different regions, we must reevaluate our current understanding of their feeding practices.
TO WHOEVER IS MOVING MY STUFF:
Some of the data I’ve been compiling on how historical weather events affect hanar government have gone missing.
If you moved it, please return it! It is the culmination of years of research. If you need me to help you find space for your project, just ask. I’d be happy to help.
Tanis
NOTE TO STAFF: The new crossbreed appears harmless and would be inconspicuous in an office environment. However, it is exceedingly dangerous.
Use extreme caution when working with all third-generation plants.
Due to an increase in electrical storm activity, communications with the beta site research team have been delayed. We ask all those awaiting data to please be patient.
Current forecasts indicate that the storms will dissipate by the end of the week. Regular communications will resume at this time.
T-GES Personnel Review
Brown, Jeremie — Personnel ID # 231-95
Sector E Maintenance
Since applying recent feedback, your work has shown a vast improvement. Your work with the corrupted skin samples we acquired was impressive. You are being given a promotion and a raise in security access level. Thank you for your hard work.
This review is confidential. Employees are encouraged not to leave reviews in view of others.
The quality of the ore samples from Sector 4 are tapering off. As of 01/15/2175, that area will begin decommissioning procedures.
Head of Mining Operations,
Del Closmire
December 23, 2178
Andrea,
I miss you. Why won’t you return my emails?
Your mother is very ill and needs to see you.
I love you. Come home soon.
Dad
| ← Previous Mission | Mission Index | Next Mission → |
|---|---|---|
| Leviathan: Find Garneau | Missions | Citadel: Leviathan II |

Mass Effect 2 (2010)
Mass Effect 3 • «Левиафан» • (DLC) • 1 • [Найти Гарно] •
“• Mass Effect 3 • «Левиафан» • (DLC) • 1 • [Найти Гарно] •
▬▬▬▬▬▬▬▬▬▬▬▬▬▬▬▬▬▬▬▬▬▬▬▬
• “Левиафан” — второе сюжетное дополнение.
▬▬▬▬▬▬▬▬▬▬▬▬▬▬▬▬▬▬▬▬▬▬▬▬
• Кто-то скрывается в неизведанных уголках галактики, кто-то, у кого хватает сил уничтожить “Жнеца”. Шепард делает попытку раскрыть самую сокровенную тайну галактики, пока “Жнецы” не уничтожили ее навсегда.
▬▬▬▬▬▬▬▬▬▬▬▬▬▬▬▬▬▬▬▬▬▬▬▬
• В дополнение к новому сюжету, дополнение «Mass Effect 3: Левиафан» также включает в себя два новых вида оружия – Дробовик AT-12 «Грабитель» и штурмовую винтовку M-55 «Аргус». Обе новинки очень пригодятся в путешествии по самым мрачным уголкам галактики в поисках ускользающей истины.
▬▬▬▬▬▬▬▬▬▬▬▬▬▬▬▬▬▬▬▬▬▬▬▬
• 10 Заданий Цитадель:
доктор Брайсон
Цитадель: Левиафан I
Левиафан: найти Гарно
Магавид: Левиафан
Цитадель: Левиафан II
Левиафан: найти Энн Брайсон
Намакли: Левиафан
Цитадель: Левиафан III
Левиафан: Сканирование планет
Деспойна: Левиафан
• 2 Вида оружия
АТ-12 “Грабитель”
М-55 “Аргус”
• 5 Модификаций
Лезвие инструметрона для штурмовой винтовки
Сверхлегкие материалы для крупнокалиберного пистолета
Система поражения мозга для крупнокалиберного пистолета
Амортизатор отдачи для пистолета-пулемёта
Ствол с высокой начальной скоростью для пистолета-пулемёта
• 1 Дополнительное умение
Господство
• Новый элемент интерьера каюты капитана
Эксперимент Брайсона с Головой Хаска
• 10 элементов Военных Ресурсов
Ликвидные средства — 40 очков
Рабочий отряд ворка — 15 очков
Крыло истребителей “Воркадьяволы” — 30 очков
Радиаторы из искусственных алмазов — 25 очков
Юпитерианская диссертация — 5 очков
Управляющий Гротан Пазнесс — 20 очков
Доктор Энн Брайсон — 20 очков
Противорадиационное экранирование — 25 очков
Декстро-питание — 10 очков
Схема нервной системы хасков — 30 очков
Порабощение Левиафаном — 400 очков
• 4 Новых достижения
Иголка в стоге сена
Дела семейные
Под давлением
Разоблачитель
••• ▬▬▬▬▬▬ ஜ۩۞۩ஜ ▬▬▬▬▬▬ •••
✿ Video editing done by me …Vita ✿ܓ
✿ Happy viewing ツ”
