Locating the elements based on the provided locator values.
One of the most fundamental aspects of using Selenium is obtaining element references to work with.
Selenium offers a number of built-in locator strategies to uniquely identify an element.
There are many ways to use the locators in very advanced scenarios. For the purposes of this documentation,
let’s consider this HTML snippet:
<ol id="vegetables">
 <li class="potatoes">…
 <li class="onions">…
 <li class="tomatoes"><span>Tomato is a Vegetable</span>…
</ol>
<ul id="fruits">
  <li class="bananas">…
  <li class="apples">…
  <li class="tomatoes"><span>Tomato is a Fruit</span>…
</ul>
First matching element
Many locators will match multiple elements on the page. The singular find element method will return a reference to the
first element found within a given context.
Evaluating entire DOM
When the find element method is called on the driver instance, it
returns a reference to the first element in the DOM that matches with the provided locator.
This value can be stored and used for future element actions. In our example HTML above, there are
two elements that have a class name of “tomatoes” so this method will return the element in the “vegetables” list.
- Java
- Python
- CSharp
- Ruby
- JavaScript
- Kotlin
WebElement vegetable = driver.findElement(By.className("tomatoes"));
vegetable = driver.find_element(By.CLASS_NAME, "tomatoes")
var vegetable = driver.FindElement(By.ClassName("tomatoes"));
vegetable = driver.find_element(class: 'tomatoes')
const vegetable = await driver.findElement(By.className('tomatoes'));
val vegetable: WebElement = driver.findElement(By.className("tomatoes"))
Evaluating a subset of the DOM
Rather than finding a unique locator in the entire DOM, it is often useful to narrow the search to the scope
of another located element. In the above example there are two elements with a class name of “tomatoes” and
it is a little more challenging to get the reference for the second one.
One solution is to locate an element with a unique attribute that is an ancestor of the desired element and not an
ancestor of the undesired element, then call find element on that object:
- Java
- Python
- CSharp
- Ruby
- JavaScript
- Kotlin
WebElement fruits = driver.findElement(By.id("fruits"));
WebElement fruit = fruits.findElement(By.className("tomatoes"));
fruits = driver.find_element(By.ID, "fruits")
fruit = fruits.find_element(By.CLASS_NAME,"tomatoes")
IWebElement fruits = driver.FindElement(By.Id("fruits"));
IWebElement fruit = fruits.FindElement(By.ClassName("tomatoes"));
fruits = driver.find_element(id: 'fruits')
fruit = fruits.find_element(class: 'tomatoes')
const fruits = await driver.findElement(By.id('fruits'));
const fruit = fruits.findElement(By.className('tomatoes'));
val fruits = driver.findElement(By.id("fruits"))
val fruit = fruits.findElement(By.className("tomatoes"))
Java and C#WebDriver, WebElement and ShadowRoot classes all implement a SearchContext interface, which is
considered a role-based interface. Role-based interfaces allow you to determine whether a particular
driver implementation supports a given feature. These interfaces are clearly defined and try
to adhere to having only a single role of responsibility.
Optimized locator
A nested lookup might not be the most effective location strategy since it requires two
separate commands to be issued to the browser.
To improve the performance slightly, we can use either CSS or XPath to find this element in a single command.
See the Locator strategy suggestions in our
Encouraged test practices section.
For this example, we’ll use a CSS Selector:
- Java
- Python
- CSharp
- Ruby
- JavaScript
- Kotlin
WebElement fruit = driver.findElement(By.cssSelector("#fruits .tomatoes"));
fruit = driver.find_element(By.CSS_SELECTOR,"#fruits .tomatoes")
var fruit = driver.FindElement(By.CssSelector("#fruits .tomatoes"));
fruit = driver.find_element(css: '#fruits .tomatoes')
const fruit = await driver.findElement(By.css('#fruits .tomatoes'));
val fruit = driver.findElement(By.cssSelector("#fruits .tomatoes"))
All matching elements
There are several use cases for needing to get references to all elements that match a locator, rather
than just the first one. The plural find elements methods return a collection of element references.
If there are no matches, an empty list is returned. In this case,
references to all fruits and vegetable list items will be returned in a collection.
- Java
- Python
- CSharp
- Ruby
- JavaScript
- Kotlin
List<WebElement> plants = driver.findElements(By.tagName("li"));
plants = driver.find_elements(By.TAG_NAME, "li")
IReadOnlyList<IWebElement> plants = driver.FindElements(By.TagName("li"));
plants = driver.find_elements(tag_name: 'li')
const plants = await driver.findElements(By.tagName('li'));
val plants: List<WebElement> = driver.findElements(By.tagName("li"))
Get element
Often you get a collection of elements but want to work with a specific element, which means you
need to iterate over the collection and identify the one you want.
- Java
- Python
- CSharp
- Ruby
- JavaScript
- Kotlin
List<WebElement> elements = driver.findElements(By.tagName("li"));

for (WebElement element : elements) {
    System.out.println("Paragraph text:" + element.getText());
}
from selenium import webdriver
from selenium.webdriver.common.by import By

driver = webdriver.Firefox()

    # Navigate to Url
driver.get("https://www.example.com")

    # Get all the elements available with tag name 'p'
elements = driver.find_elements(By.TAG_NAME, 'p')

for e in elements:
    print(e.text)
using OpenQA.Selenium;
using OpenQA.Selenium.Firefox;
using System.Collections.Generic;

namespace FindElementsExample {
 class FindElementsExample {
  public static void Main(string[] args) {
   IWebDriver driver = new FirefoxDriver();
   try {
    // Navigate to Url
    driver.Navigate().GoToUrl("https://example.com");

    // Get all the elements available with tag name 'p'
    IList < IWebElement > elements = driver.FindElements(By.TagName("p"));
    foreach(IWebElement e in elements) {
     System.Console.WriteLine(e.Text);
    }

   } finally {
    driver.Quit();
   }
  }
 }
}
require 'selenium-webdriver'
driver = Selenium::WebDriver.for :firefox
begin
     # Navigate to URL
  driver.get 'https://www.example.com'

     # Get all the elements available with tag name 'p'
  elements = driver.find_elements(:tag_name,'p')

  elements.each { |e|
    puts e.text
  }
ensure
  driver.quit
end
const {Builder, By} = require('selenium-webdriver');
(async function example() {
    let driver = await new Builder().forBrowser('firefox').build();
    try {
        // Navigate to Url
        await driver.get('https://www.example.com');

        // Get all the elements available with tag 'p'
        let elements = await driver.findElements(By.css('p'));
        for(let e of elements) {
            console.log(await e.getText());
        }
    }
    finally {
        await driver.quit();
    }
})();
import org.openqa.selenium.By
import org.openqa.selenium.firefox.FirefoxDriver

fun main() {
    val driver = FirefoxDriver()
    try {
        driver.get("https://example.com")
        // Get all the elements available with tag name 'p'
        val elements = driver.findElements(By.tagName("p"))
        for (element in elements) {
            println("Paragraph text:" + element.text)
        }
    } finally {
        driver.quit()
    }
}
Find Elements From Element
It is used to find the list of matching child WebElements within the context of parent element.
To achieve this, the parent WebElement is chained with ‘findElements’ to access child elements
- Java
- Python
- CSharp
- Ruby
- JavaScript
- Kotlin
  import org.openqa.selenium.By;
  import org.openqa.selenium.WebDriver;
  import org.openqa.selenium.WebElement;
  import org.openqa.selenium.chrome.ChromeDriver;
  import java.util.List;

  public class findElementsFromElement {
      public static void main(String[] args) {
          WebDriver driver = new ChromeDriver();
          try {
              driver.get("https://example.com");

              // Get element with tag name 'div'
              WebElement element = driver.findElement(By.tagName("div"));

              // Get all the elements available with tag name 'p'
              List<WebElement> elements = element.findElements(By.tagName("p"));
              for (WebElement e : elements) {
                  System.out.println(e.getText());
              }
          } finally {
              driver.quit();
          }
      }
  }
from selenium import webdriver
from selenium.webdriver.common.by import By

driver = webdriver.Chrome()
driver.get("https://www.example.com")

    # Get element with tag name 'div'
element = driver.find_element(By.TAG_NAME, 'div')

    # Get all the elements available with tag name 'p'
elements = element.find_elements(By.TAG_NAME, 'p')
for e in elements:
    print(e.text)
using OpenQA.Selenium;
using OpenQA.Selenium.Chrome;
using System.Collections.Generic;

namespace FindElementsFromElement {
 class FindElementsFromElement {
  public static void Main(string[] args) {
   IWebDriver driver = new ChromeDriver();
   try {
    driver.Navigate().GoToUrl("https://example.com");

    // Get element with tag name 'div'
    IWebElement element = driver.FindElement(By.TagName("div"));

    // Get all the elements available with tag name 'p'
    IList < IWebElement > elements = element.FindElements(By.TagName("p"));
    foreach(IWebElement e in elements) {
     System.Console.WriteLine(e.Text);
    }
   } finally {
    driver.Quit();
   }
  }
 }
}
  require 'selenium-webdriver'
  driver = Selenium::WebDriver.for :chrome
  begin
    # Navigate to URL
    driver.get 'https://www.example.com'

    # Get element with tag name 'div'
    element = driver.find_element(:tag_name,'div')

    # Get all the elements available with tag name 'p'
    elements = element.find_elements(:tag_name,'p')

    elements.each { |e|
      puts e.text
    }
  ensure
    driver.quit
  end
  const {Builder, By} = require('selenium-webdriver');

  (async function example() {
      let driver = new Builder()
          .forBrowser('chrome')
          .build();

      await driver.get('https://www.example.com');

      // Get element with tag name 'div'
      let element = driver.findElement(By.css("div"));

      // Get all the elements available with tag name 'p'
      let elements = await element.findElements(By.css("p"));
      for(let e of elements) {
          console.log(await e.getText());
      }
  })();
  import org.openqa.selenium.By
  import org.openqa.selenium.chrome.ChromeDriver

  fun main() {
      val driver = ChromeDriver()
      try {
          driver.get("https://example.com")

          // Get element with tag name 'div'
          val element = driver.findElement(By.tagName("div"))

          // Get all the elements available with tag name 'p'
          val elements = element.findElements(By.tagName("p"))
          for (e in elements) {
              println(e.text)
          }
      } finally {
          driver.quit()
      }
  }
Get Active Element
It is used to track (or) find DOM element which has the focus in the current browsing context.
- Java
- Python
- CSharp
- Ruby
- JavaScript
- Kotlin
  import org.openqa.selenium.*;
  import org.openqa.selenium.chrome.ChromeDriver;

  public class activeElementTest {
    public static void main(String[] args) {
      WebDriver driver = new ChromeDriver();
      try {
        driver.get("http://www.google.com");
        driver.findElement(By.cssSelector("[name='q']")).sendKeys("webElement");

        // Get attribute of current active element
        String attr = driver.switchTo().activeElement().getAttribute("title");
        System.out.println(attr);
      } finally {
        driver.quit();
      }
    }
  }
  from selenium import webdriver
  from selenium.webdriver.common.by import By

  driver = webdriver.Chrome()
  driver.get("https://www.google.com")
  driver.find_element(By.CSS_SELECTOR, '[name="q"]').send_keys("webElement")

    # Get attribute of current active element
  attr = driver.switch_to.active_element.get_attribute("title")
  print(attr)
    using OpenQA.Selenium;
    using OpenQA.Selenium.Chrome;

    namespace ActiveElement {
     class ActiveElement {
      public static void Main(string[] args) {
       IWebDriver driver = new ChromeDriver();
       try {
        // Navigate to Url
        driver.Navigate().GoToUrl("https://www.google.com");
        driver.FindElement(By.CssSelector("[name='q']")).SendKeys("webElement");

        // Get attribute of current active element
        string attr = driver.SwitchTo().ActiveElement().GetAttribute("title");
        System.Console.WriteLine(attr);
       } finally {
        driver.Quit();
       }
      }
     }
    }
  require 'selenium-webdriver'
  driver = Selenium::WebDriver.for :chrome
  begin
    driver.get 'https://www.google.com'
    driver.find_element(css: '[name="q"]').send_keys('webElement')

    # Get attribute of current active element
    attr = driver.switch_to.active_element.attribute('title')
    puts attr
  ensure
    driver.quit
  end
  const {Builder, By} = require('selenium-webdriver');

  (async function example() {
      let driver = await new Builder().forBrowser('chrome').build();
      await driver.get('https://www.google.com');
      await  driver.findElement(By.css('[name="q"]')).sendKeys("webElement");

      // Get attribute of current active element
      let attr = await driver.switchTo().activeElement().getAttribute("title");
      console.log(`${attr}`)
  })();
  import org.openqa.selenium.By
  import org.openqa.selenium.chrome.ChromeDriver

  fun main() {
      val driver = ChromeDriver()
      try {
          driver.get("https://www.google.com")
          driver.findElement(By.cssSelector("[name='q']")).sendKeys("webElement")

          // Get attribute of current active element
          val attr = driver.switchTo().activeElement().getAttribute("title")
          print(attr)
      } finally {
          driver.quit()
      }
  }
Support the Selenium Project
Want to support the Selenium project? Learn more or view the full list of sponsors.
Find element by Text in Selenium is used to locate a web element using its text attribute. The text value is used mostly when the basic element identification properties such as ID or Class are dynamic in nature, making it hard to locate the web element.
Sometimes, developers tend to group similar web elements with the same ID or the same Class together. For example, if you have an element with the tag as Button which has a dynamic ID and Class name, where ID is getting changed from ‘ID-3465-text1’ to ‘ID-4434-textE2,’ and the Class name gets changed from “ID-Class-text45” to “ID-Class-text73” on every new session.
In such cases, it becomes very difficult to locate the web elements using ID or Class attribute, and this is when the Text attribute comes to the rescue while performing Selenium automation testing.
The text value can be fully matched or partially matched to locate the element. In this article on how to find element by text in Selenium WebDriver, you will read about how to use the Text attribute in order to find any element.
Let’s get started!
TABLE OF CONTENTS
- What is Find Element In Selenium?
- What is Find Element By Text In Selenium?
- Find Element By Text In Selenium for complete Text match
- Find Element By Text In Selenium for partial Text match
What is Find Element In Selenium?
When you start writing your Selenium automation script, interaction with web elements becomes your first and a very vital step because it’s the WebElements that you play around with within your test script. Now, interaction with these web elements can only happen if you identify them using the right approach.
Find Element method in Selenium is a command which helps you identify a web element. There are multiple ways that Find Element provides to uniquely identify a web element within the web page using Web locators in Selenium like ID, Name, Class Name, etc. Here is the syntax of Find Element In Selenium.
The syntax of Find Element is
|
WebElement elementName= driver.findElement(By.<LocatorStrategy>(“LocatorValue”)); |
As shown in the above syntax, this command accepts the “By” object as the argument and returns a WebElement object. The “By” is a locator or query object and accepts the locator strategy. The Locator Strategy can assume the below values:
- ID
- Name
- Class Name
- Tag Name
- Link Text
- Partial Link Text
- XPath
- CSS Selector
Also read – FindElement And FindElements In Selenium [Differences]
What is Find Element By Text in Selenium?
We saw in the previous section about find element in Selenium and its syntax. Now, you must be wondering how to find element by text in Selenium WebDriver.
You can also watch this video to learn how to find elements by Text in Selenium WebDriver using Java.
The answer is by making use of XPath in Selenium!!
Wondering how? Let’s look at the sections below.
In order to use Text, you will need to make use of XPath as your Locator Strategy and the text attribute of the element in the Locator Value.
The basic format of XPath in Selenium is as below.
|
XPath = //tagname[@Attribute=’Value’] |
However, before we get started, it’s important to understand two built-in methods of Selenium, which will ultimately be used in findElement.
- text() – This is a built-in method in Selenium that is used with XPath in order to locate an element based on its exact text value. The syntax of using text() with findElement is:
- contains() – Similar to the text() method, contains() is another built-in method which is used with XPath. However, this is used when we want to write the locator based on a partial text match. The syntax of using text() & contains() with findElement is:
|
WebElement ele = driver.findElement(By.xpath(“//<tagName>[text()=’text value’]”)) |
|
WebElement ele=driver.findElement(By.xpath(“//<tagName>[contains(text(),’textvalue’)]”)) |
Let us now read about these in detail.

Find Element by Text in Selenium for Complete Text match
Now that you saw the syntax for using text() in case of complete text match. In this section on how to find element by text in Selenium, let us see it using an example.
We will use Selenium Playground offered by LambdaTest for understanding the same. LambdaTest is a cloud-based cross browser testing platform that supports Selenium Grid, providing a solution to every obstacle you face while performing automation testing using your local machine. Test Automation Platforms like LambdaTest offer a Selenium Grid consisting of 3000+ online browsers for you to perform Selenium automation testing effortlessly.
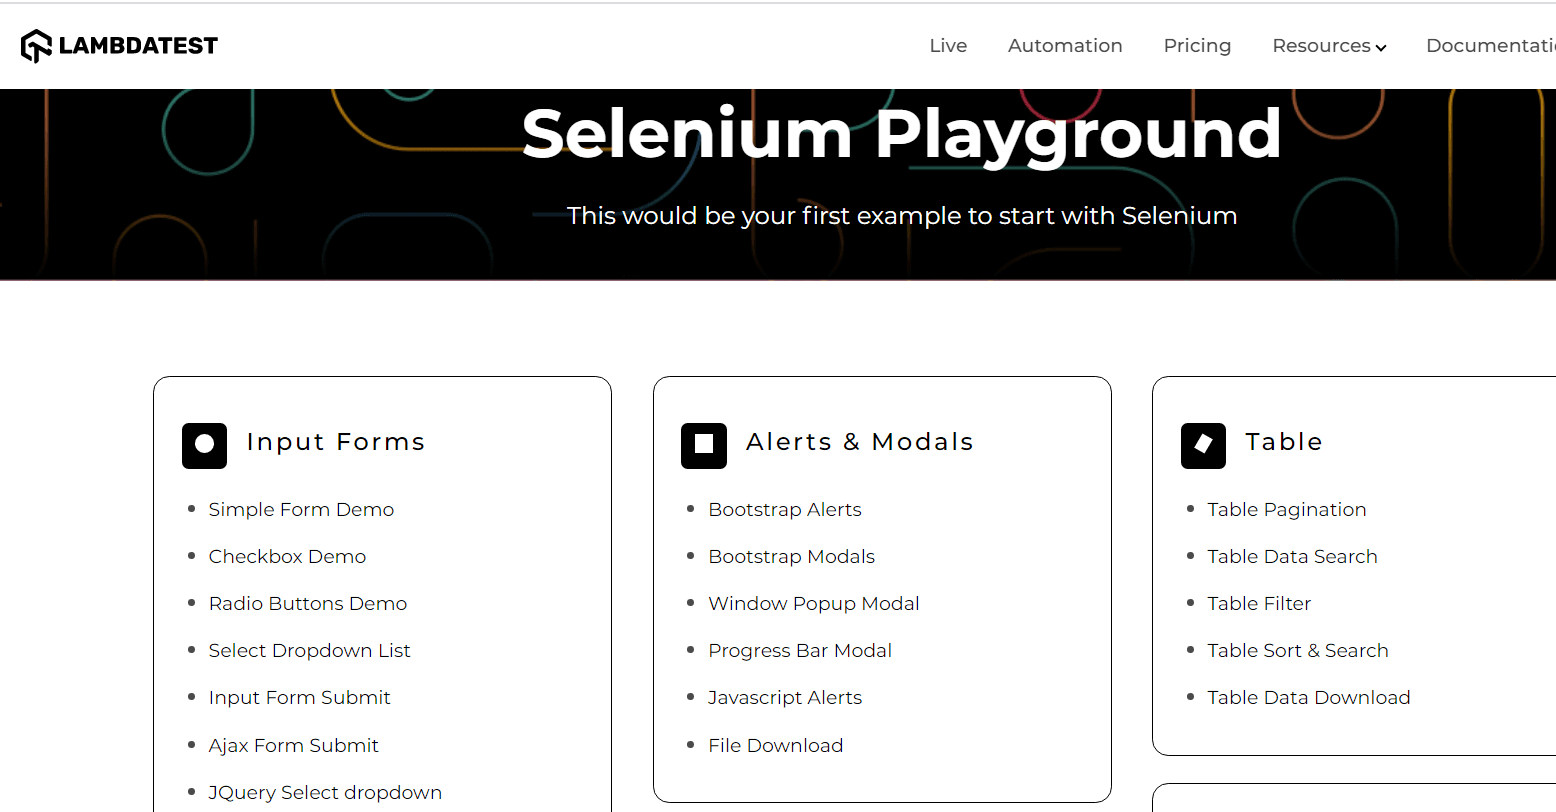
Use Case
- Log in to Selenium Playground.
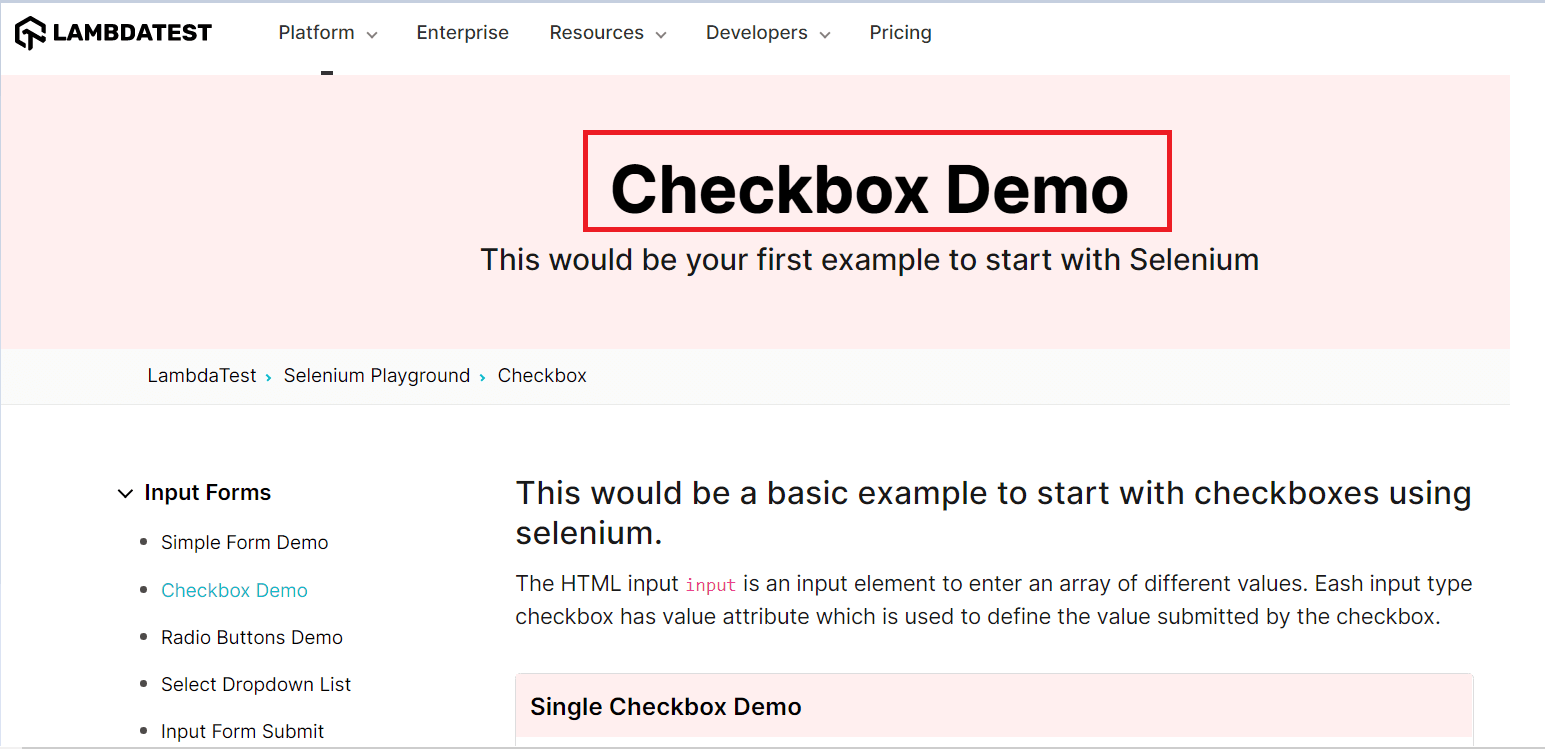
- Identify the Web Element for the Checkbox Demo link on the above web page using the text() method.
- Click on it and print the page header.
Implementation
We will implement the case using Selenium with Java and use the cloud Selenium Grid offered by LambdaTest for executing our test case.
Selenium Grid refers to a software testing setup that enables QAs to perform parallel testing across multiple browsers and devices with unique operating systems. When the entire setup of Selenium Grid is accessible using cloud-based servers, it is called Selenium Grid Cloud. An online Selenium Grid helps you focus on writing better Selenium test scripts rather than worrying about infrastructure maintenance.
Let us now inspect the locator for the Checkbox Demo page. In order to inspect, you can simply right-click on the Web Element and click on Inspect. On the Elements tab, you can start writing your locator.
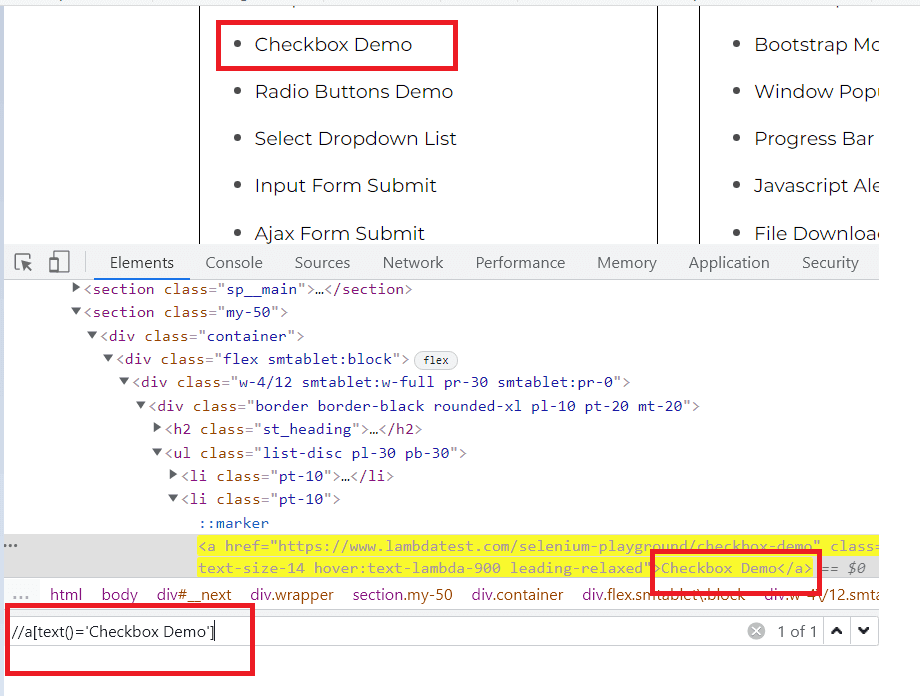
As shown in the above picture, we use the Checkbox Demo text with its tag a for a complete match, and hence, the correct implementation here would be:
|
WebElement checkbox= driver.findElement(By.xpath(“//a[text()=’Checkbox Demo’]”)) |
Let us now use the same and write our test case.
You can refer to the below testcase.
|
1 2 3 4 5 6 7 8 9 10 11 12 13 14 15 16 17 18 19 20 21 22 23 24 25 26 27 28 29 30 31 32 33 34 35 36 37 38 39 40 41 42 43 44 45 46 47 48 49 50 51 52 53 54 55 56 57 58 59 60 61 62 63 64 65 66 67 68 69 70 |
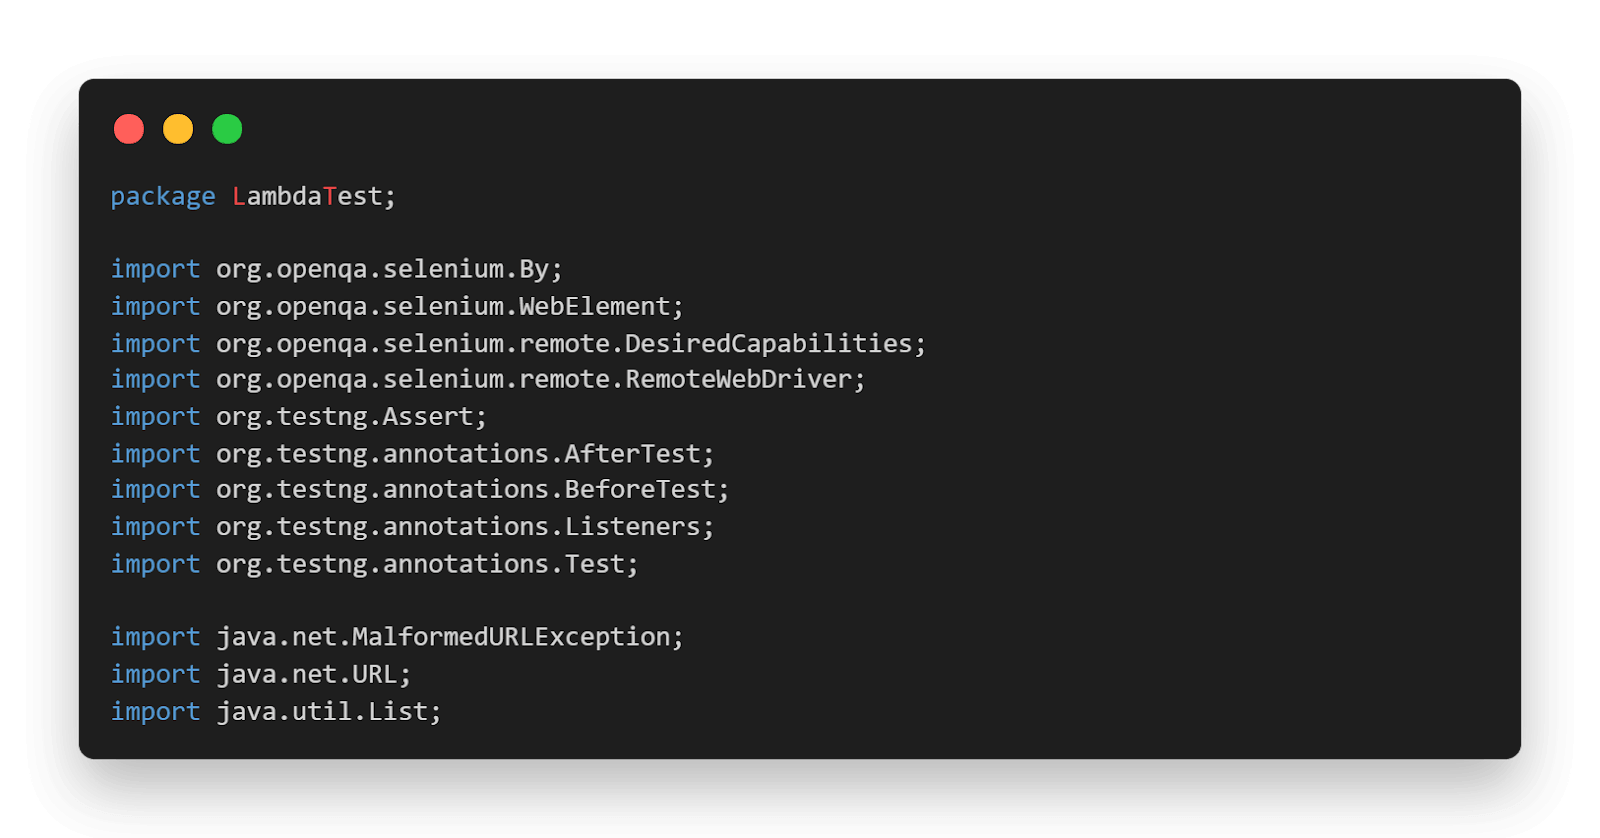
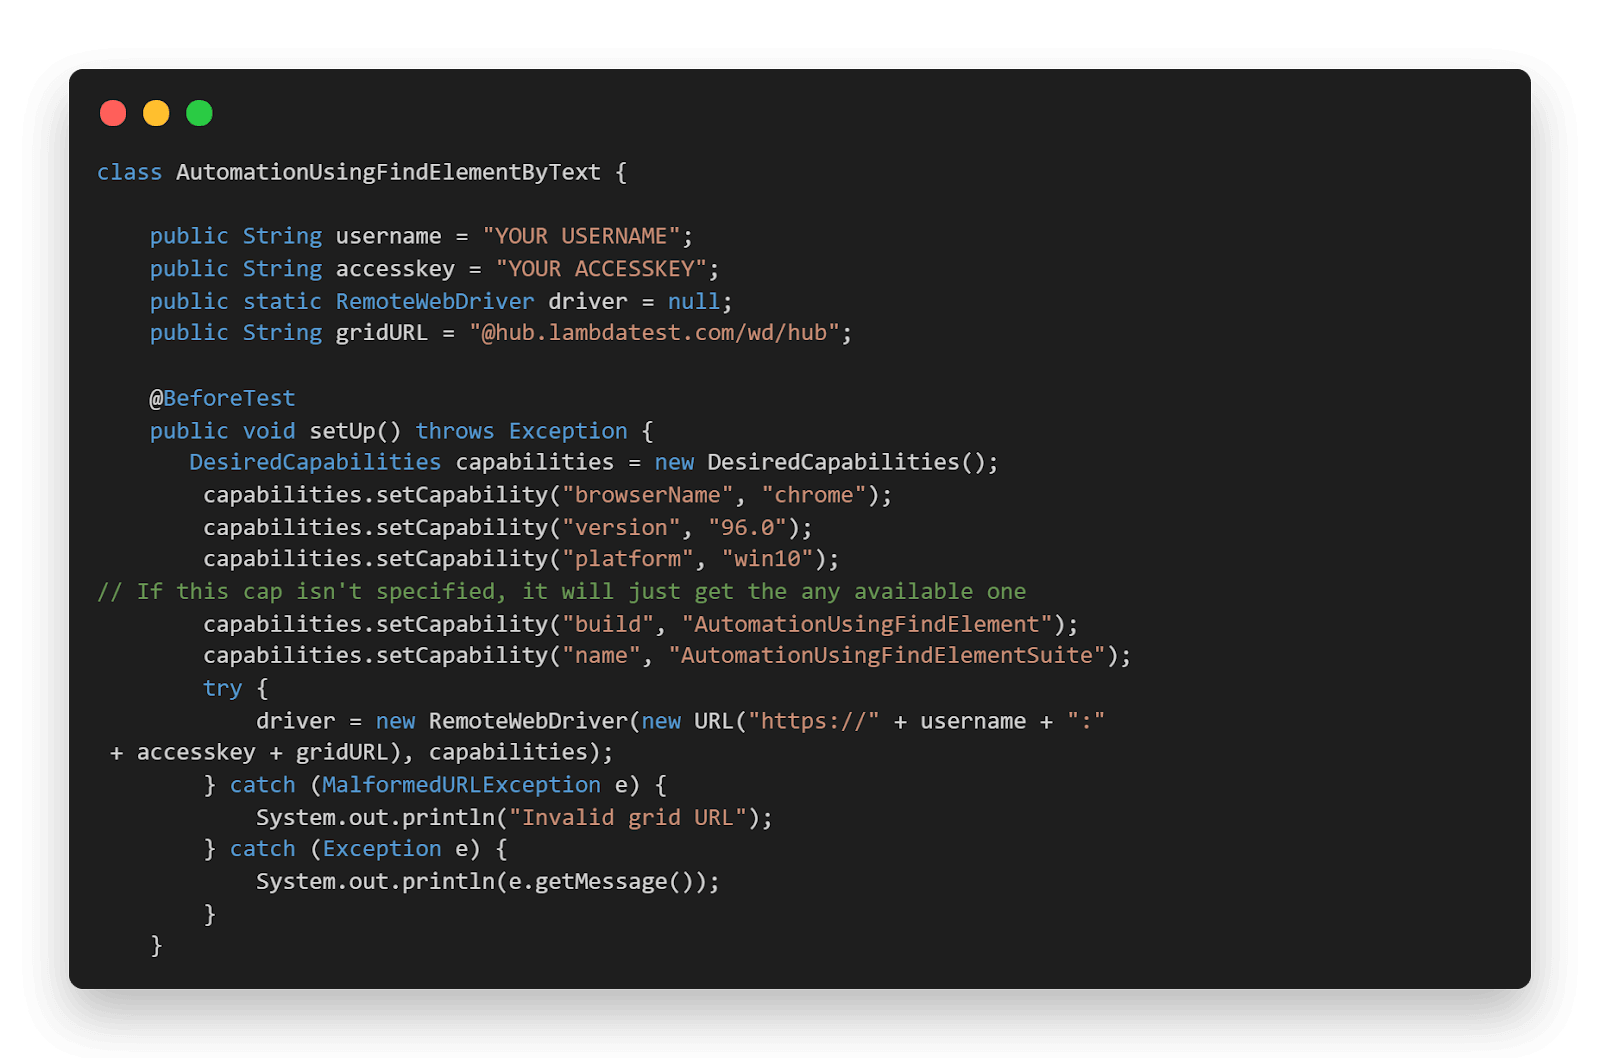
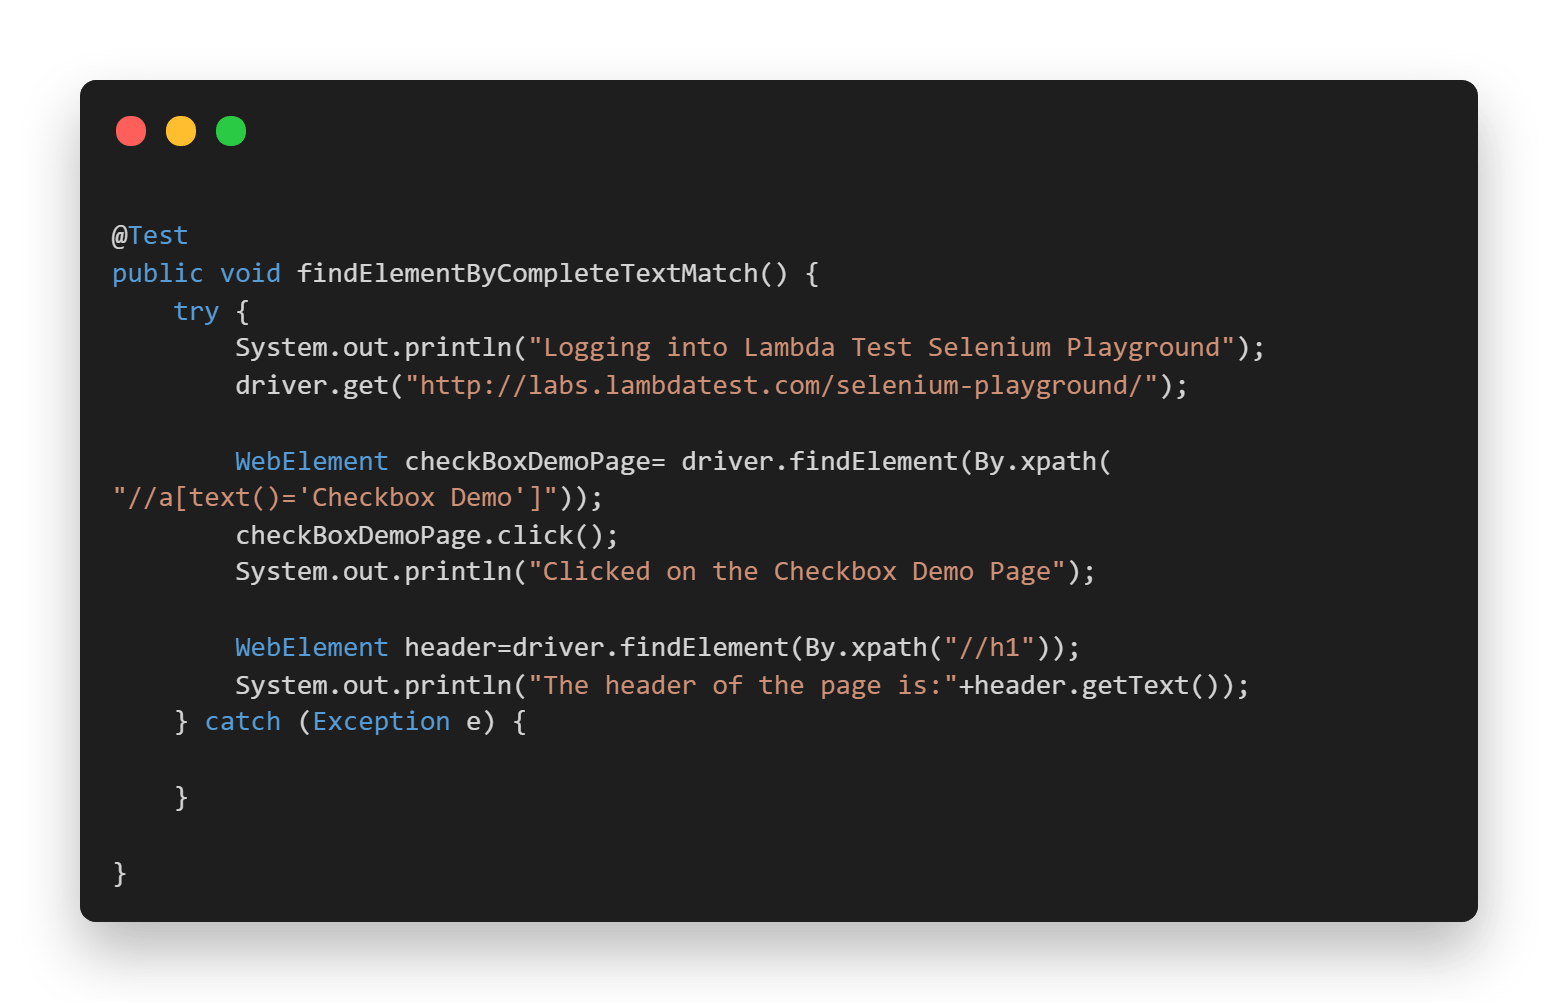
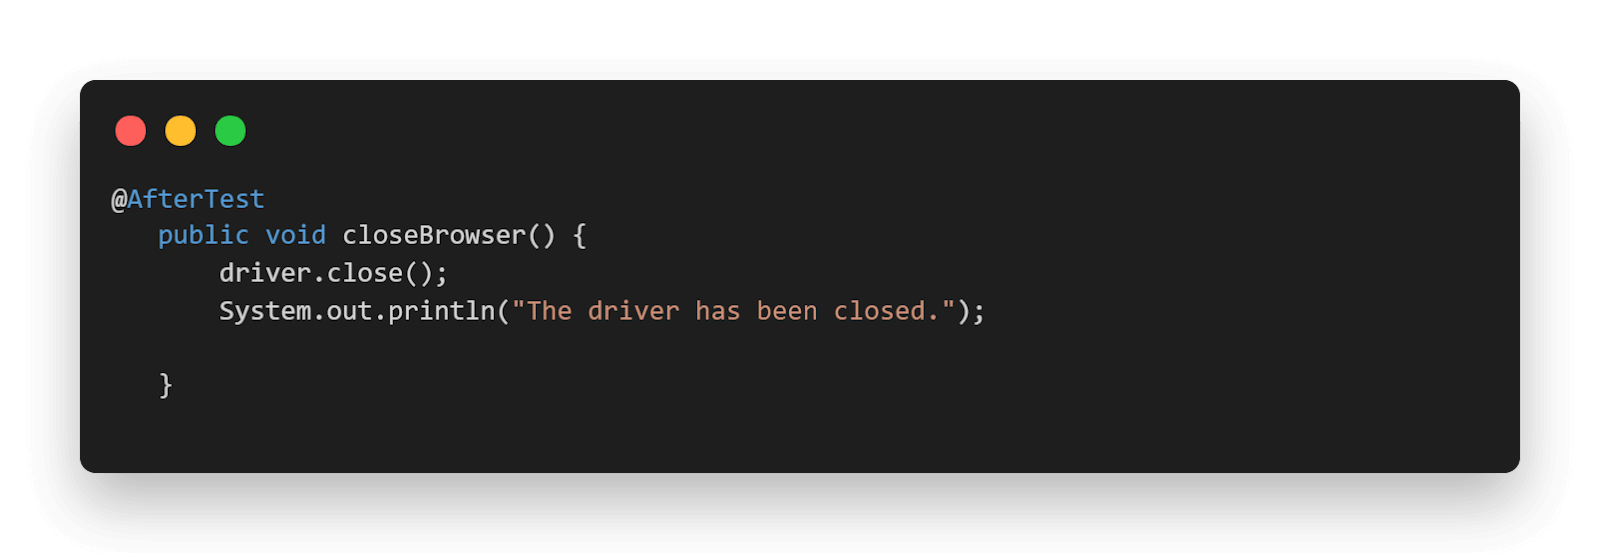
package LambdaTest; import org.openqa.Selenium.By; import org.openqa.Selenium.WebElement; import org.openqa.Selenium.remote.DesiredCapabilities; import org.openqa.Selenium.remote.RemoteWebDriver; import org.testng.Assert; import org.testng.annotations.AfterTest; import org.testng.annotations.BeforeTest; import org.testng.annotations.Listeners; import org.testng.annotations.Test; import java.net.MalformedURLException; import java.net.URL; import java.util.List; @Listeners({util.Listener.class}) class AutomationUsingFindElementByText { public String username = “YOUR USERNAME”; public String accesskey = “YOUR ACCESSKEY”; public static RemoteWebDriver driver = null; public String gridURL = “@hub.lambdatest.com/wd/hub”; @BeforeTest public void setUp() throws Exception { DesiredCapabilities capabilities = new DesiredCapabilities(); capabilities.setCapability(“browserName”, “chrome”); capabilities.setCapability(“version”, “96.0”); capabilities.setCapability(“platform”, “win10”); // If this cap isn’t specified, it will just get the any available one capabilities.setCapability(“build”, “AutomationUsingFindElement”); capabilities.setCapability(“name”, “AutomationUsingFindElementSuite”); try { driver = new RemoteWebDriver(new URL(“https://” + username + “:” + accesskey + gridURL), capabilities); } catch (MalformedURLException e) { System.out.println(“Invalid grid URL”); } catch (Exception e) { System.out.println(e.getMessage()); } } @Test public void findElementByCompleteTextMatch() { try { System.out.println(“Logging into Lambda Test Selenium Playground”); driver.get(“http://labs.lambdatest.com/Selenium-playground/”); WebElement checkBoxDemoPage= driver.findElement(By.xpath(“//a[text()=’Checkbox Demo’]”)); checkBoxDemoPage.click(); System.out.println(“Clicked on the Checkbox Demo Page”); WebElement header=driver.findElement(By.xpath(“//h1”)); System.out.println(“The header of the page is:”+header.getText()); } catch (Exception e) { } } @AfterTest public void closeBrowser() { driver.close(); System.out.println(“The driver has been closed.”); } } |
You can use the below testng.xml file for running the above testcase.
|
<?xml version=“1.0” encoding=“UTF-8”?> <!DOCTYPE suite SYSTEM “http://testng.org/testng-1.0.dtd”> <suite name=“AutomationUsingFindElementSuite”> <test name=“AutomationUsingFindElementTest” > <classes> <class name=“LambdaTest.AutomationUsingFindElementByText” > </class> </classes> </test> </suite> |
And the below pom.xml file for installing all the necessary dependencies.
|
1 2 3 4 5 6 7 8 9 10 11 12 13 14 15 16 17 18 19 20 21 22 23 24 25 26 27 28 29 30 31 32 33 34 35 36 37 38 39 40 41 42 43 |
<?xml version=“1.0” encoding=“UTF-8”?> <project xmlns=“http://maven.apache.org/POM/4.0.0” xmlns:xsi=“http://www.w3.org/2001/XMLSchema-instance” xsi:schemaLocation=“http://maven.apache.org/POM/4.0.0 http://maven.apache.org/xsd/maven-4.0.0.xsd”> <modelVersion>4.0.0</modelVersion> <groupId>org.example</groupId> <artifactId>LambdaTest</artifactId> <version>1.0–SNAPSHOT</version> <dependencies> <dependency> <groupId>org.Seleniumhq.Selenium</groupId> <artifactId>Selenium–api</artifactId> <version>4.0.0–alpha–7</version> </dependency> <dependency> <groupId>org.Seleniumhq.Selenium</groupId> <artifactId>Selenium–remote–driver</artifactId> <version>4.0.0–alpha–7</version> </dependency> <dependency> <groupId>org.Seleniumhq.Selenium</groupId> <artifactId>Selenium–chrome–driver</artifactId> <version>4.0.0–alpha–7</version> </dependency> <dependency> <groupId>org.testng</groupId> <artifactId>testng</artifactId> <version>6.14.3</version> </dependency> <dependency> <groupId>io.github.bonigarcia</groupId> <artifactId>webdrivermanager</artifactId> <version>4.4.3</version> </dependency> </dependencies> <properties> <maven.compiler.source>8</maven.compiler.source> <maven.compiler.target>8</maven.compiler.target> </properties> </project> |
Github
Code Walkthrough
In this section on how to find element by text in Selenium, let’s look at the different areas of code in detail.
- Imported Dependencies: Here, we have imported all the necessary classes of Selenium WebDriver, WebDriverWait, Desired Capabilities, and RemoteWebDriver to set the respective browser capabilities and run the test cases on the grid.
- Global Variables: As we have used a Selenium Grid Cloud like LambdaTest to perform our test execution, we are using the below-shown variables.
Here, you can populate the values for your corresponding username and access key, which can be collected by logging into your LambdaTest Profile Section. You can copy the Username and the Access Token to be used in the code. However, the grid URL will remain the same, as shown below.
- @BeforeTest(Setup Method): Here, we have used the LambdaTest Desired Capabilities Generator and have set the necessary capabilities of browser name, version, platform, etc., for our Selenium Remote WebDriver. After that, we are opening the website in the launched browser.
- @Test(findElementByCompleteTextMatch): In this case, we are first logging into the Selenium Playground web page. After that, we locate the Checkbox Demo button using a complete text match and click on the same. In the end, we are printing the header of the web page.
- @AfterTest(closeBrowser): Here, we are just closing the launched browser.

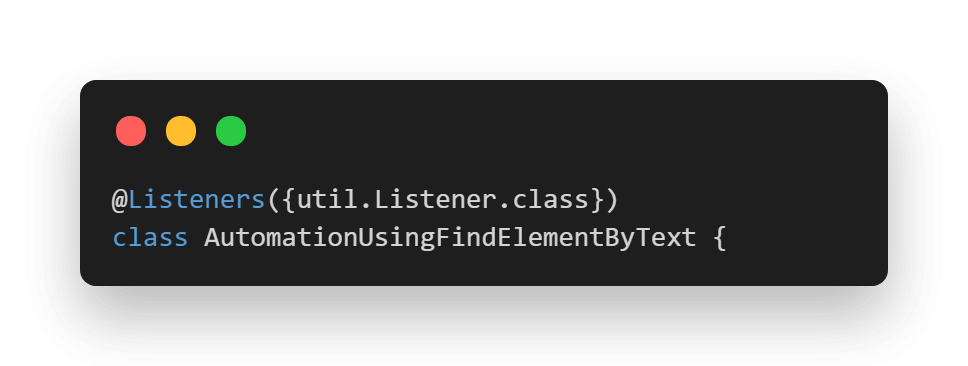
We have also used the Listener class here in order to customize the TestNG Report. TestNG provides us with a lot of Listeners (e.g., IAnnotationTransformer, IReporter, etc.). These interfaces are used while performing Selenium automation testing mainly to generate logs and customize the TestNG reports.
If you want to know more about Event Listeners In Selenium WebDriver watch this video to learn how the Listeners “listen” to the event defined in the Selenium script and behave accordingly.
Also read: How To Use TestNG Reporter Log In Selenium
To implement the Listener class, you can simply add an annotation in your test class just above your class name.
Syntax:
|
@Listeners(PackageName.ClassName.class) |
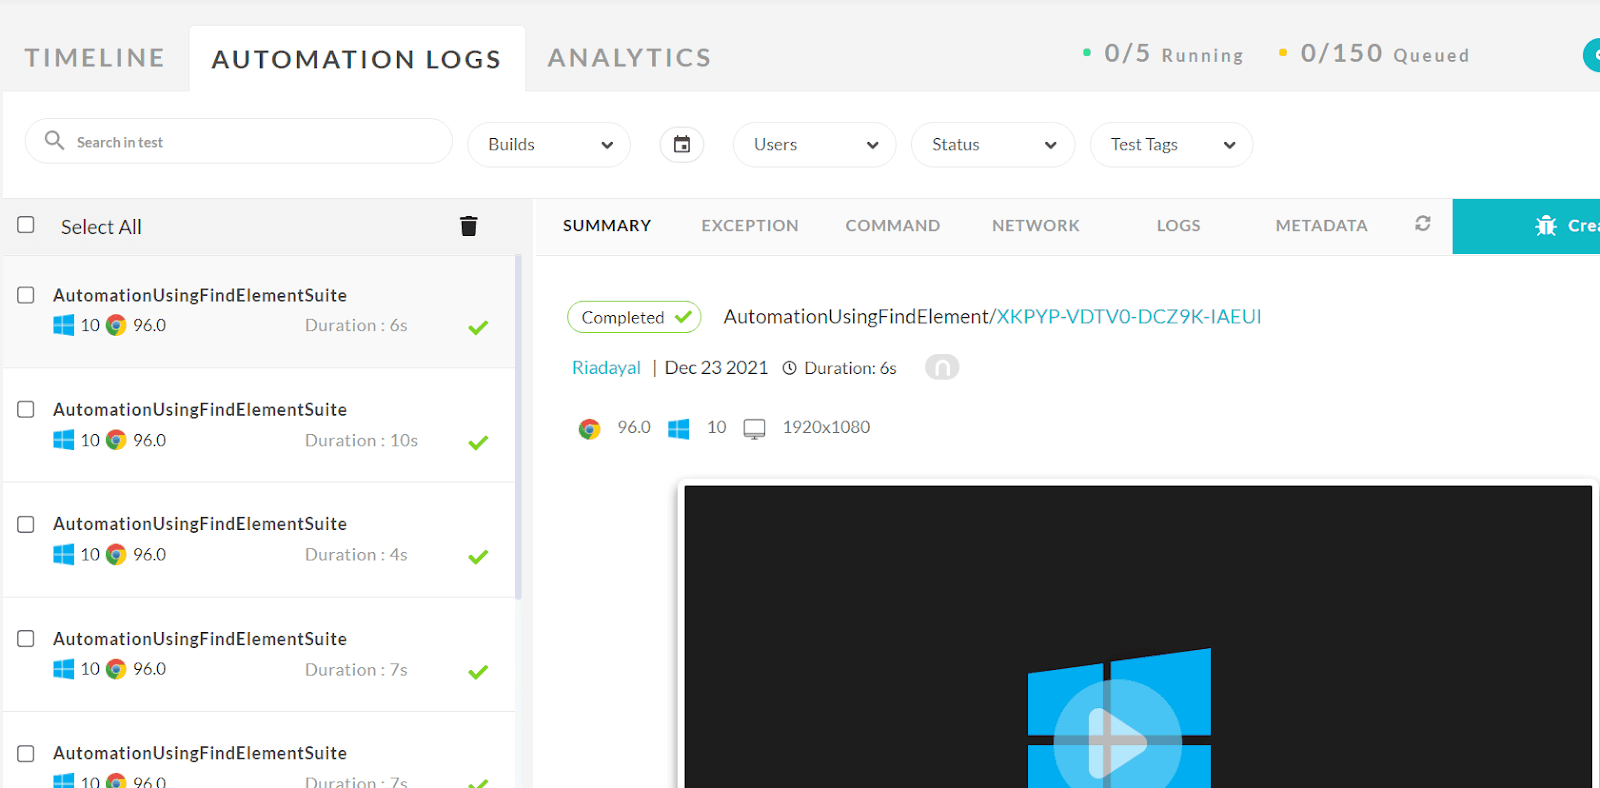
Once the tests are completed, you can also view your test results, logs, and the test recording as well in your LambdaTest Automation Dashboard.
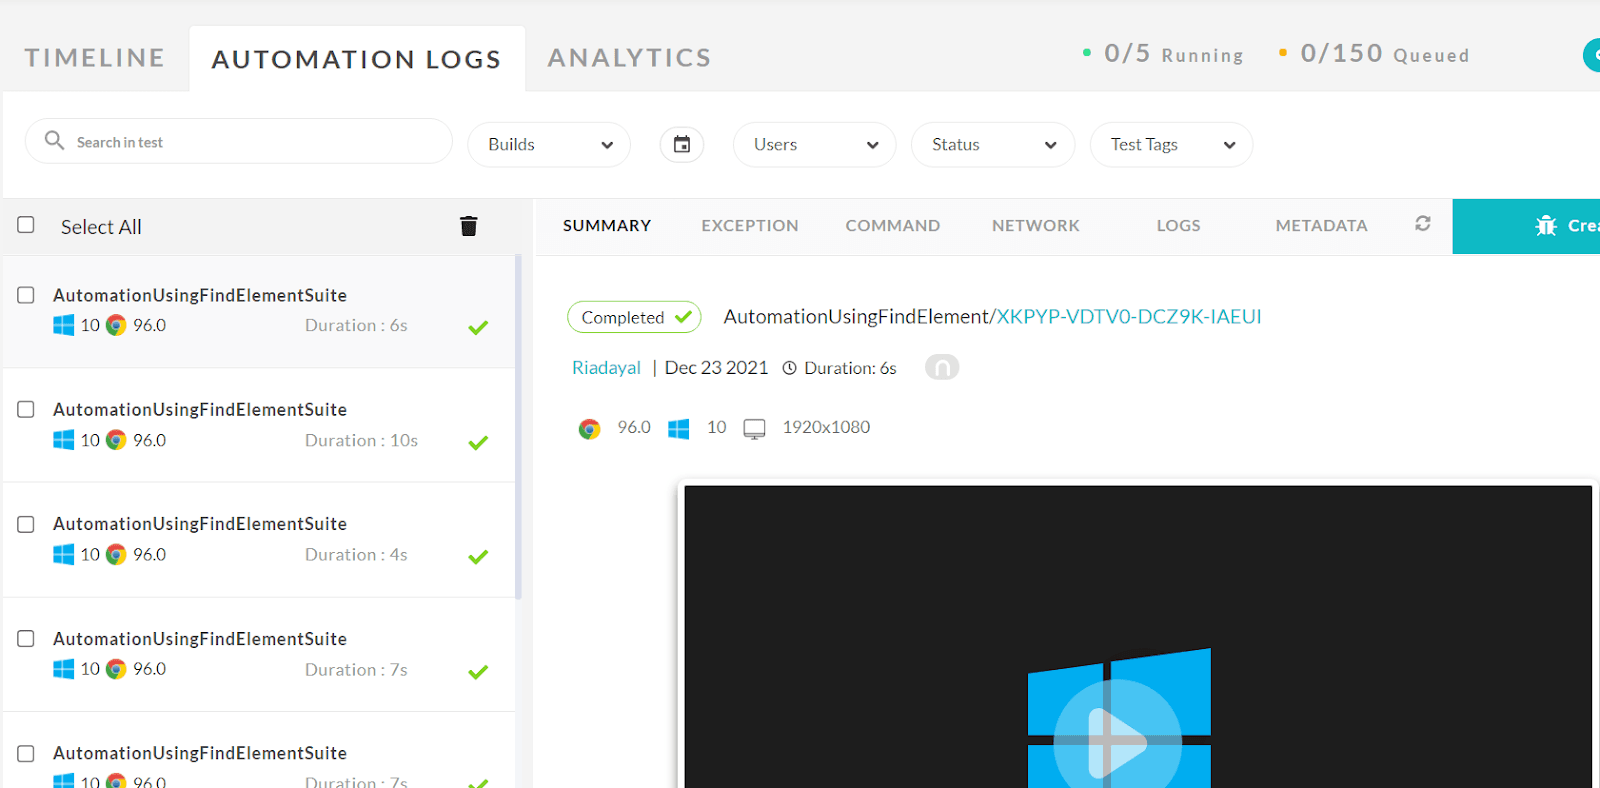
Console Output
Once you run the test case, the console output will look something like the below:
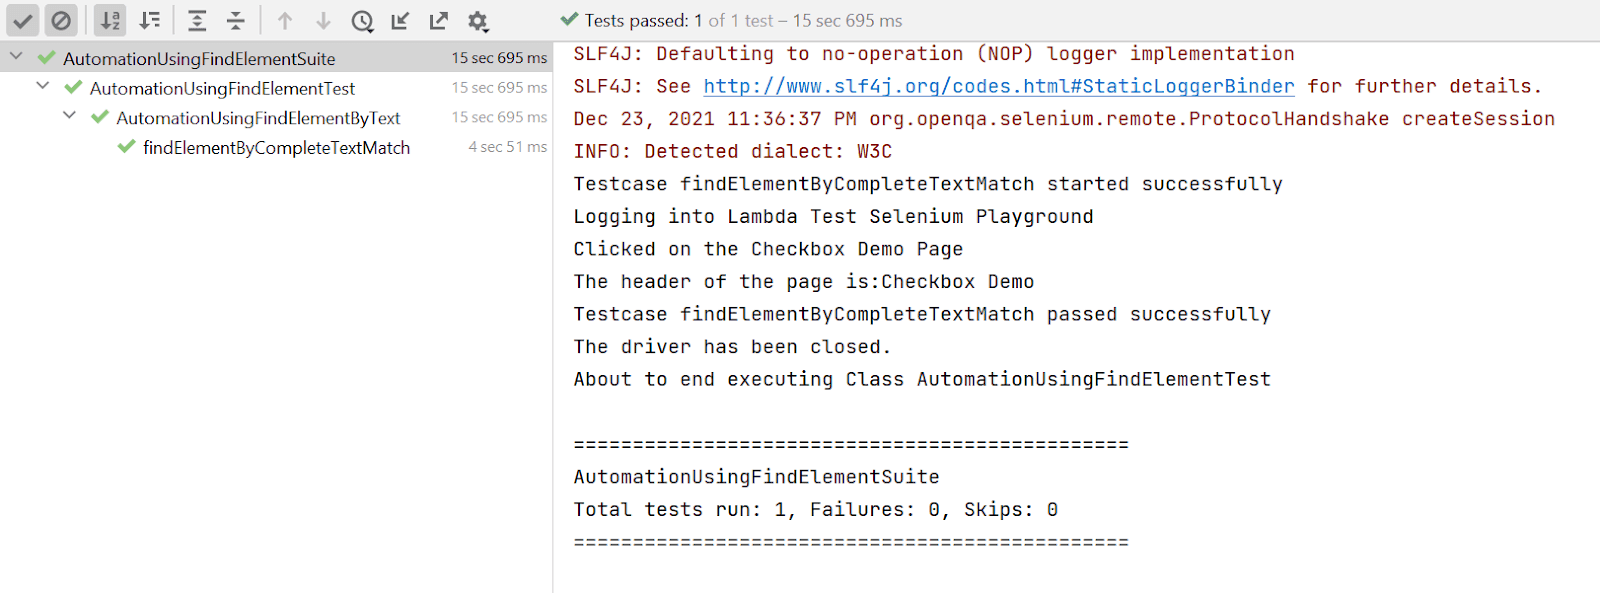
The below video will help you write your first test script in Selenium using Java by interacting with different web elements.
You can also Subscribe to the LambdaTest YouTube Channel and stay updated with the latest tutorials around Selenium testing, Cypress E2E testing, CI/CD, and more.
Find Element by Text in Selenium for Partial Text match
In the previous example of this article on how to find element by text in Selenium WebDriver, you saw how you could use findElement by Text for a complete text match. In this section, we will understand how we can use partial Text match in order to locate web elements.
Also read – Find Elements With Link Text & Partial Link Text In Selenium
Use Case
- Log in to Selenium Playground.
- Identify all the Web Elements which have a table in their names.
- Print the text of all such Web Elements.

Let us see the locator for the above test case.
Implementation
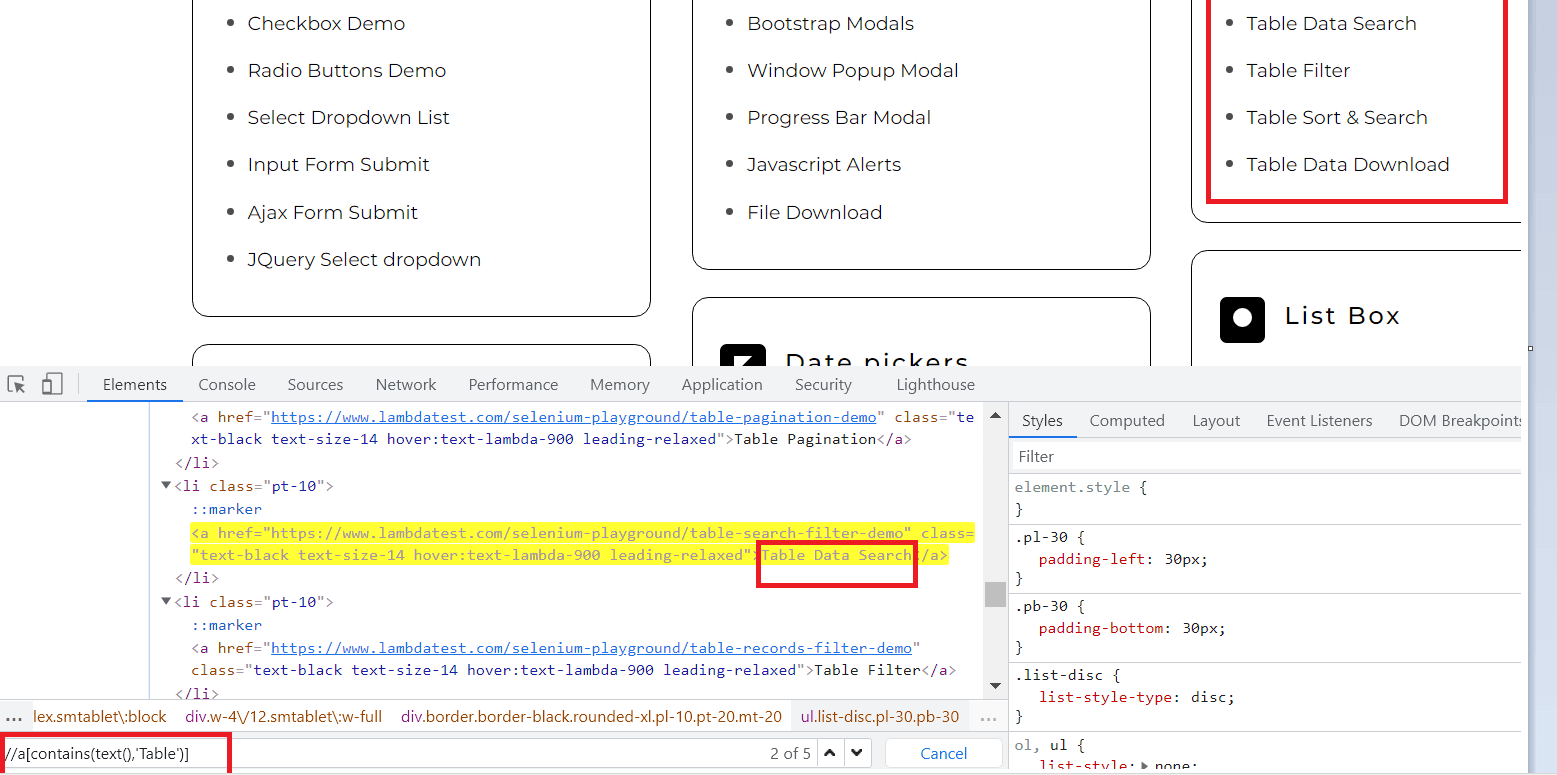
As shown in the above picture, we use the Table text with its tag a for a partial match, and as a result, we get a total of 5 Web Elements using the above locator. Since there are more than 1 Web Element, in this case, we will use FindElements.
FindElements in Selenium returns you the list of web elements that match the locator value, unlike FindElement which returns only a single web element. In case, there are no matching elements within the web page, FindElements returns an empty list.
The syntax of FindElements in Selenium is:
|
List<WebElement> listName= driver.findElements(By.<LocatorStrategy>(“LocatorValue”)) |
Hence, the correct implementation using FindElements with partial text match here would be:
|
List<WebElement> tableOptions=driver.findElements(By.xpath(“//a[contains(text(),’Table’)”) |
Let us now use the same and write our test case.
You can refer to the below testcase.
|
1 2 3 4 5 6 7 8 9 10 11 12 13 14 15 16 17 18 19 20 21 22 23 24 25 26 27 28 29 30 31 32 33 34 35 36 37 38 39 40 41 42 43 44 45 46 47 48 49 50 51 52 53 54 55 56 57 58 59 60 61 62 63 64 65 |
package LambdaTest; import org.openqa.Selenium.By; import org.openqa.Selenium.WebElement; import org.openqa.Selenium.remote.DesiredCapabilities; import org.openqa.Selenium.remote.RemoteWebDriver; import org.testng.Assert; import org.testng.annotations.AfterTest; import org.testng.annotations.BeforeTest; import org.testng.annotations.Listeners; import org.testng.annotations.Test; import java.net.MalformedURLException; import java.net.URL; import java.util.List; @Listeners({util.Listener.class}) class AutomationUsingFindElementByText { public String username = “YOUR USERNAME”; public String accesskey = “YOUR ACCESSKEY”; public static RemoteWebDriver driver = null; public String gridURL = “@hub.lambdatest.com/wd/hub”; @BeforeTest public void setUp() throws Exception { DesiredCapabilities capabilities = new DesiredCapabilities(); capabilities.setCapability(“browserName”, “chrome”); capabilities.setCapability(“version”, “96.0”); capabilities.setCapability(“platform”, “win10”); // If this cap isn’t specified, it will just get the any available one capabilities.setCapability(“build”, “AutomationUsingFindElement”); capabilities.setCapability(“name”, “AutomationUsingFindElementSuite”); try { driver = new RemoteWebDriver(new URL(“https://” + username + “:” + accesskey + gridURL), capabilities); } catch (MalformedURLException e) { System.out.println(“Invalid grid URL”); } catch (Exception e) { System.out.println(e.getMessage()); } } @Test public void findElementByPartialTextMatch() { try { System.out.println(“Logging into Lambda Test Selenium Playground”); driver.get(“http://labs.lambdatest.com/Selenium-playground/”); List<WebElement> tableOptions= driver.findElements(By.xpath(“//a[contains(text(),’Table’)]”)); for(WebElement e: tableOptions){ System.out.println(“The different options with table in name are:”+e.getText()); } } catch (Exception e) { } } @AfterTest public void closeBrowser() { driver.close(); System.out.println(“The driver has been closed.”); } } |
You can use the below testng.xml file for running the above testcase.
|
<?xml version=“1.0” encoding=“UTF-8”?> <!DOCTYPE suite SYSTEM “http://testng.org/testng-1.0.dtd”> <suite name=“AutomationUsingFindElementSuite”> <test name=“AutomationUsingFindElementTest” > <classes> <class name=“LambdaTest.AutomationUsingFindElementByText” > </class> </classes> </test> </suite> |
And the below pom.xml file for installing all the necessary dependencies.
|
1 2 3 4 5 6 7 8 9 10 11 12 13 14 15 16 17 18 19 20 21 22 23 24 25 26 27 28 29 30 31 32 33 34 35 36 37 38 39 40 41 42 43 |
<?xml version=“1.0” encoding=“UTF-8”?> <project xmlns=“http://maven.apache.org/POM/4.0.0” xmlns:xsi=“http://www.w3.org/2001/XMLSchema-instance” xsi:schemaLocation=“http://maven.apache.org/POM/4.0.0 http://maven.apache.org/xsd/maven-4.0.0.xsd”> <modelVersion>4.0.0</modelVersion> <groupId>org.example</groupId> <artifactId>LambdaTest</artifactId> <version>1.0–SNAPSHOT</version> <dependencies> <dependency> <groupId>org.Seleniumhq.Selenium</groupId> <artifactId>Selenium–api</artifactId> <version>4.0.0–alpha–7</version> </dependency> <dependency> <groupId>org.Seleniumhq.Selenium</groupId> <artifactId>Selenium–remote–driver</artifactId> <version>4.0.0–alpha–7</version> </dependency> <dependency> <groupId>org.Seleniumhq.Selenium</groupId> <artifactId>Selenium–chrome–driver</artifactId> <version>4.0.0–alpha–7</version> </dependency> <dependency> <groupId>org.testng</groupId> <artifactId>testng</artifactId> <version>6.14.3</version> </dependency> <dependency> <groupId>io.github.bonigarcia</groupId> <artifactId>webdrivermanager</artifactId> <version>4.4.3</version> </dependency> </dependencies> <properties> <maven.compiler.source>8</maven.compiler.source> <maven.compiler.target>8</maven.compiler.target> </properties> </project> |
GitHub
Also, read – How To Get Text Of An Element In Selenium?
Code Walkthrough
In this section on how to find element by text in Selenium, let us now check the test case walkthrough in detail. The BeforeTest and import statements remain the same as we saw in our previous example.
@Test(findElementByPartialTextMatch): In this case, we are first logging into the Selenium Playground web page. After that, we locate all the Web Elements which have Table in their text and store them in a list. Later, we iterate over the list and print their text.
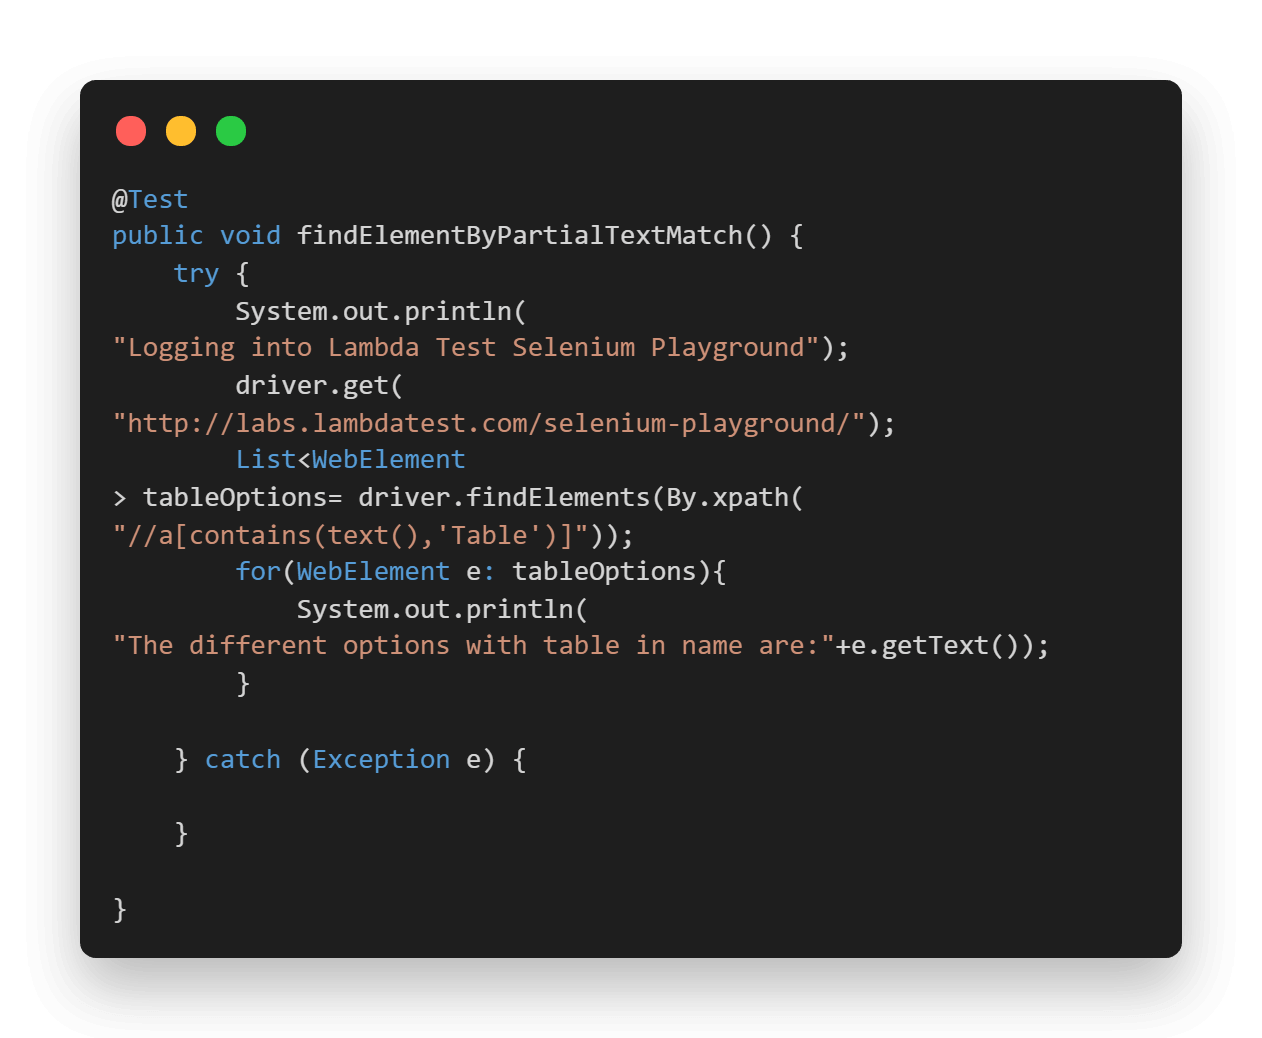
Once the tests are completed, you can also view your test results, logs, and the test recording as well in your LambdaTest Automation Dashboard.
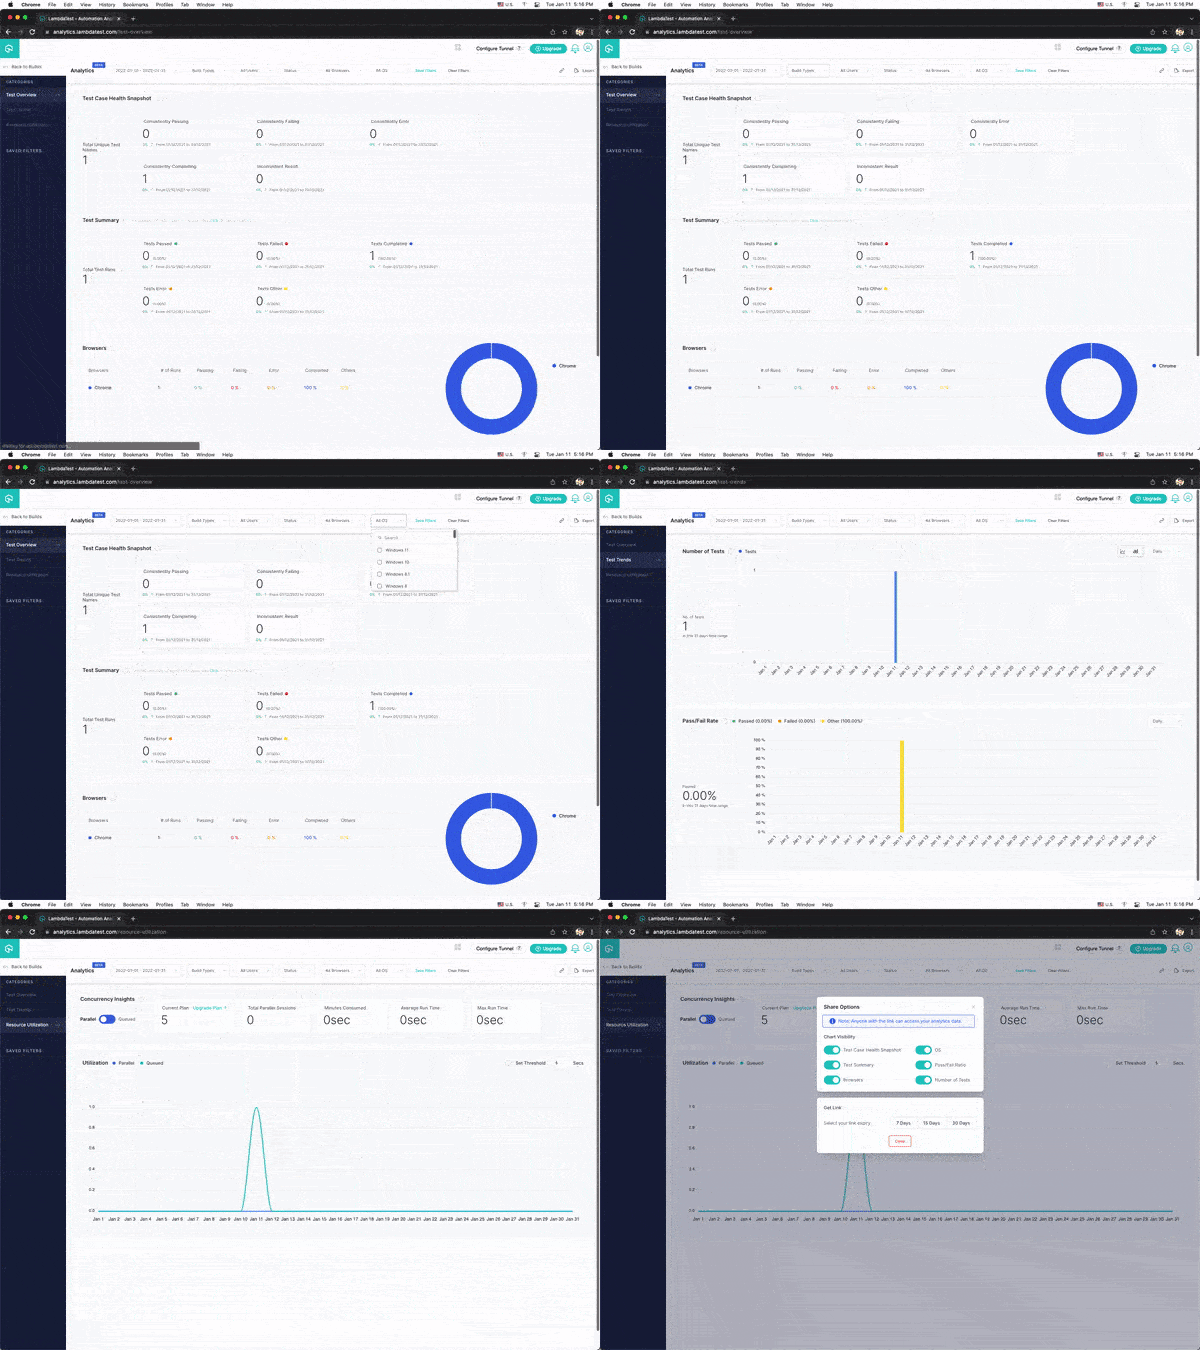
You can also see the test results on the LambdaTest Analytics Dashboard. The dashboard shows all the details and metrics related to your tests.
Navigate to the LambdaTest Analytics Dashboard to view the metrics of your tests. You can quickly assess test performance and overall health from Test Overview. The Test Summary will show how many passed and failed tests your team has run and the overall efficiency of these tests.
Console Output
Once you run the test case, the console output will look something like the below:
If you’re a developer or a tester and want to take your skills to the next level, this Selenium 101 certification from LambdaTest can help you reach that goal.
Here’s a short glimpse of the Selenium 101 certification from LambdaTest:
Conclusion
In this Selenium Java tutorial on how to find element by text in Selenium WebDriver, we explored finding an element using text in Selenium. We saw how we could use the text() method in case of both complete and partial text matches. We also saw how we could use it in the case of FindElements and get a list of Web Elements through text match. In the end, we also implemented the cases using Selenium with Java on a cloud Selenium Grid.
Honestly, using text() is one of my personal favorite methods in Selenium when it comes to locating Web Elements, as it’s very easy to implement and can be tweaked in any way to match our use case.
I hope you enjoyed reading this article on how to find element by text in Selenium, learned some more about FindElement By Text, and I believe this method will become your personal favorite too. 🙂
Happy Testing!!
Frequently Asked Questions (FAQs)
How do you search text in Selenium?
The ‘findElement’ method returns a WebElement object. This object has a ‘getText’ method, which returns the visible text on that element. To find a particular element, use the ‘findElement’ method with appropriate locators.
What is text () in XPath?
In XPath, text() is a node test that matches a text node. A text node is the kind of node that contains the text between the start and end tags when elements are written in HTML source code or in XML source code.
How do I find an element in Selenium?
You can use the following methods:
- ID.
- Name.
- ClassName.
- TagName.
- Link Text/Partial Link Text.
- CSS Selector.
- XPATH Selector.
Ria Dayal
A Senior Quality Engineer By Profession, an automation enthusiast and loves to anchor. Her expertise revolves around Selenium, Java, Rest Assured, and Jenkins. Shell scripting too interests her a lot.
Ria enjoys reading novels and writing is her comfort zone.
Время на прочтение
4 мин
Количество просмотров 98K
В этой статье будет рассмотрена возможность использования аннотации @FindBy для поиска элементов на странице, а так же создание своих классов для работы с элементами и контейнерами вроде форм, таблиц и т.д.
Введение в @FindBy
Для начала посмотрим на тест, который просто ищет какую-то фразу на ya.ru
public class SearchTest {
    @Test(dataProvider = "pageObjects")
    public void testSearch(final SearchPage searchPage) {
        searchPage.init(driver);
        driver.get("http://ya.ru");
        searchPage.search("Bolek i Lolek");
    }

    @DataProvider
    private Object[][] pageObjects() {
        return new Object[][]{
                {new SimpleSearchPage()},
                {new AnnotatedSearchPage()},
                {new ExtendedSearchPage()},
                {new SearchPageWithSearchForm()}
        };
    }

    private WebDriver driver;

    @BeforeClass
    public void beforeClass() {
        driver = new FirefoxDriver();
    }

    @AfterClass
    public void afterClass() {
        driver.quit();
    }
}
Как видите, тест очень простой и ничего собственно не тестирует, а просто запускается 4 раза с разными page-объектами, рассматривая эволюцию которых, мы и будем изучать @FindBy.
Изначально page-класс для страницы поиска выглядел так:
public class SimpleSearchPage implements SearchPage {
    private WebDriver driver;

    @Override
    public void search(final String query) {
        driver.findElement(By.id("text")).sendKeys(query);
        driver.findElement(By.cssSelector("input[type="submit"]")).click();
    }

    @Override
    public void init(final WebDriver driver) {
        this.driver = driver;
    }
}
Здесь мы видим довольно-таки стандартный подход к использованию веб-драйвера для поиска элементов, т.е. driver.findElement(By.something()).
Лёгким движением рук можно преобразовать этот класс, используя аннотации
public class AnnotatedSearchPage implements SearchPage {
    @FindBy(id = "text")
    private WebElement searchField;

    @FindBy(css = "input[type="submit"]")
    @CacheLookup
    private WebElement searchButton;

    @Override
    public void search(final String query) {
        searchField.sendKeys(query);
        searchButton.click();
    }

    @Override
    public void init(final WebDriver driver) {
        PageFactory.initElements(driver, this);
    }
}
Как это работает?! В методе init() мы вызываем PageFactory.initElements(driver, this);. Драйвер не начинает искать элементы на странице сразу же, а ищет их как только мы обращаемся к полю класса. Например строка searchButton.click(); «превращается» в driver.findElement(By.cssSelector("input[type="submit"]")).click();
Плюсов от такого подхода вроде бы пока маловато, но они есть:
- не нужно писать driver.findElements(…) и копипастить этот поиск по всему классу;
- можно использовать аннотацию @CacheLookup: найдя элемент в первый раз, driver кэширует его и в будущем уже использует кэшированный объект, что даёт небольшой прирост в скорости тестов;
- можно уйти от использования интерфейса WebElement и создать свои классы для элементов страницы типа Button, TextField и т.д.
Создание своих классов для элементов страницы
Я уже многократно напарывался на тот факт, что интерфейс WebElement не очень-то удобен:
- он предоставляет излишний функционал, например, .getCssValue(), который абсолютно ненужен в selenium тестах;
- его невозможно расширить, т.е. нельзя добавить пару своих ну очень удобных методов на каждый день, ну и, соответственно, из него нельзя удалить ненужные методы (например, для любой ссылки метод .isEnabled() просто не имеет смысла);
- для того, чтобы работать с более сложными элементами (например, с выпадающими списками) приходится явно вызывать конструктор класса Select, что больше похоже на какой-то хак.
Давайте посмотрим, как можно модифицировать page-класс, используя свои интерфейсы для элементов на странице.
public class ExtendedSearchPage implements SearchPage {
    @FindBy(id = "text")
    private TextField searchField;

    @FindBy(css = "input[type="submit"]")
    private Button searchButton;

    @Override
    public void search(final String query) {
        searchField.clearAndType(query);
        searchButton.click();
    }

    @Override
    public void init(final WebDriver driver) {
        PageFactory.initElements(new ExtendedFieldDecorator(driver), this);
    }
}
Итак, здесь мы уже используем TextField и Button вместо WebElement. Ключевым моментом здесь является использование самописного FieldDecorator в методе init(). Теперь именно он инициализирует поля класса ExtendedSearchPage. Плюсы от использования такого подхода:
- повышается читаемость тестов: глядя на тип поля, сразу же становится понятно, что это кнопка, а не просто какой-то абстрактный элемент на странице, хотя на самом деле это может быть и не кнопка, но это уже зависит от реализации класса Button;
- возможность добавлять свои методы, например, clearAndType() для полей ввода;
- более изящный способ создания классов-контейнеров (таблиц, форм и т.д.);
Есть конечно же и минус: для каждого найденного элемента создаётся ещё один объект в памяти, который просто делегирует все вызовы объекту WebElement.
Создание классов-контейнеров
Как обычно, для начала немного кода
public class SearchPageWithSearchForm implements SearchPage {
    @FindBy(tagName = "form")
    private SearchForm searchForm;

    @Override
    public void search(final String query) {
        searchForm.search(query);
    }

    @Override
    public void init(final WebDriver driver) {
        PageFactory.initElements(new ExtendedFieldDecorator(driver), this);
    }
}

public class SearchForm extends AbstractContainer {
    @FindBy(id = "text")
    private TextField searchField;

    @FindBy(css = "input[type="submit"]")
    private Button searchButton;

    public void search(final String query) {
        searchField.clearAndType(query);
        searchButton.click();
    }
}
Здесь мы уже видим полноценный класс для формы поиска, который можно спокойно переиспользовать на разных страницах (конечно, если на всех страницах сайта форма поиска реализована одинаково). Дополнительно, можно реализовать процесс иницализации объектов-контейнеров таким образом, что поиск элементов будет происходить только внутри контейнера, а не по всей странице, таким образом, получается, что контейнер ничего не знает об окружающем мире, что в конечном итоге и даёт нам возможность использовать его для тестирования других страниц.
Исходники
Исходники примеров можно скачать отсюда.
In this post, we will dive into the Selenium Webdriver Find Element API. Webdriver has two levels of interrogation which as we can refer to as finding something on the browser page, these are WebDriver and DOM level interrogations. I will explain and show examples of both levels of finding anything on the browser.
WebDriver Level Find in Selenium (Selenium Versions: 2, 3, 4)
Webdriver level find consists of below functions:
. getTitle() – returns page title as String
.getCurrentUrl() – returns current URL as String
.getPageSource() – returns page source as String (Note: Webdriver returns some page source differences depends on a driver of browsers. But if you check a text, this will not be a problem. All drivers of browsers return the content of the page correctly.)
Webdriver Level Find Examples
import static org.hamcrest.CoreMatchers.is;
import static org.hamcrest.MatcherAssert.assertThat;

import org.junit.jupiter.api.AfterAll;
import org.junit.jupiter.api.Assertions;
import org.junit.jupiter.api.BeforeAll;
import org.junit.jupiter.api.BeforeEach;
import org.junit.jupiter.api.Test;
import org.junit.jupiter.api.TestInstance;
import org.openqa.selenium.WebDriver;
import org.openqa.selenium.chrome.ChromeDriver;

@TestInstance(TestInstance.Lifecycle.PER_CLASS)
public class DriverLevelFind {
    private       WebDriver driver;
    final private String    URL = "https://www.swtestacademy.com";

    @BeforeAll
    public void setupTest() {
        driver = new ChromeDriver();
    }

    @BeforeEach
    public void navigateToSwTestAcademy() {
        //Go to www.swtestacademy.com
        driver.navigate().to(URL);
    }

    //.getTitle Example
    @Test
    public void T01_getTitle() {
        //Check title
        assertThat(driver.getTitle(), is("Software Test Academy"));
    }

    //.getCurrentURL Example
    @Test
    public void T02_getCurrentURL() {
        //Check Current URL
        assertThat(driver.getCurrentUrl(), is("https://www.swtestacademy.com/"));
    }

    //.getPageSource Example
    @Test
    public void T03_getPageSource() {
        //Get PageSource and save it into a String
        String pageSource = driver.getPageSource();

        //Check page source contains ""
        Assertions.assertTrue((pageSource.contains("swtestacademy")));
    }

    @AfterAll
    public void quitDriver() {
        driver.quit();
    }
}
Find Elements with Relative Locators in Selenium 4
In selenium 4, a new locator approach has been announced as Relative Locators. For this, I wrote a comprehensive article and you can find it here.
Find Elements in Selenium (Versions: 2, 3, 4)
First of all, we have to start with what is DOM. DOM expansion is Document Object Model. The Document Object Model is a programming API for HTML and XML documents. It defines the logical structure of HTML and the way a page is accessed and manipulated.
DOM Example:
<TABLE>
<ROWS>
<TR>
<TD>Jack</TD>
<TD>Mike</TD>
</TR>
<TR>
<TD>Jason</TD>
<TD>Celine</TD>
</TR>
</ROWS>
</TABLE>
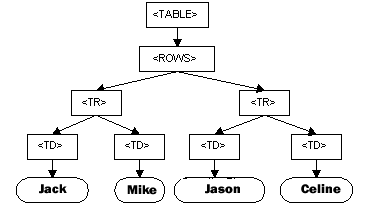
* For more information you can visit http://www.w3.org/TR/WD-DOM/introduction.html
Everything in a web page such as text box, button, paragraph, etc. is a web element in webdriver. We can interrogate web elements via WebDriver’s interrogation methods such as .getText(), isSelected(), .getSize(), .getLocation(), etc. Finding elements can be done in two steps. First, we have to find the element which we want to interrogate, and then we can interrogate it with WebDriver’s interrogation methods. For example, if we want to get the text of Google’s “Gmail” link:

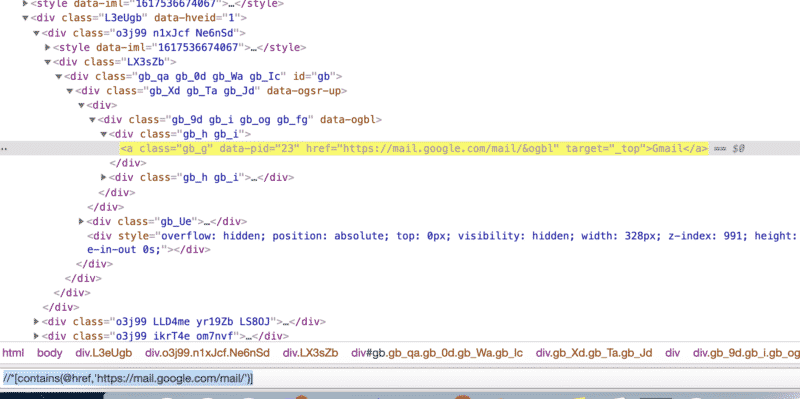
1) We have to find the element via id, CSS, or XPath selectors. In this example I used Xpath.
(Note: Selectors will be described later posts so now just see their usage. You can find elements also with some extensions like Ranorex Selocity, SelectorsHub, ChroPath, etc.)
WebElement gmailLink = driver.findElement(By.xpath("//*[contains(@href,'https://mail.google.com/mail/')]"));
For this kind of smart Xpath locator tactics, you can read my article on XPath locators.
2) Get Gmail link’s text via .getText() method.
assertThat(gmailLink.getText(), is("Gmail"));
Finding Elements with By Methods
Webdriver’s find methods with “By” are listed below.
| Method | Syntax | Description |
| By.id | driver.findElement(By.id(<element ID>)) | Locates an element using the ID attribute. |
| By.name | driver.findElement(By.name(<element name>)) | Locates an element using the Name attribute |
| By.LinkText | driver.findElement(By.linkText(<linktext>)) | Locates a link using link text |
| By.partialLinkText | driver.findElement(By.partialLinkText(<linktext>)) | Locates a link using the link’s partial text |
| By.className | driver.findElement(By.className(<element class>)) | Locates an element using the Class attribute |
| By.tagName | driver.findElement(By.tagName(<htmltagname>)) | Locates an element using the HTML tag |
Selenium Find By Id
http://the-internet.herokuapp.com/ is our test site
Navigate to http://the-internet.herokuapp.com/login
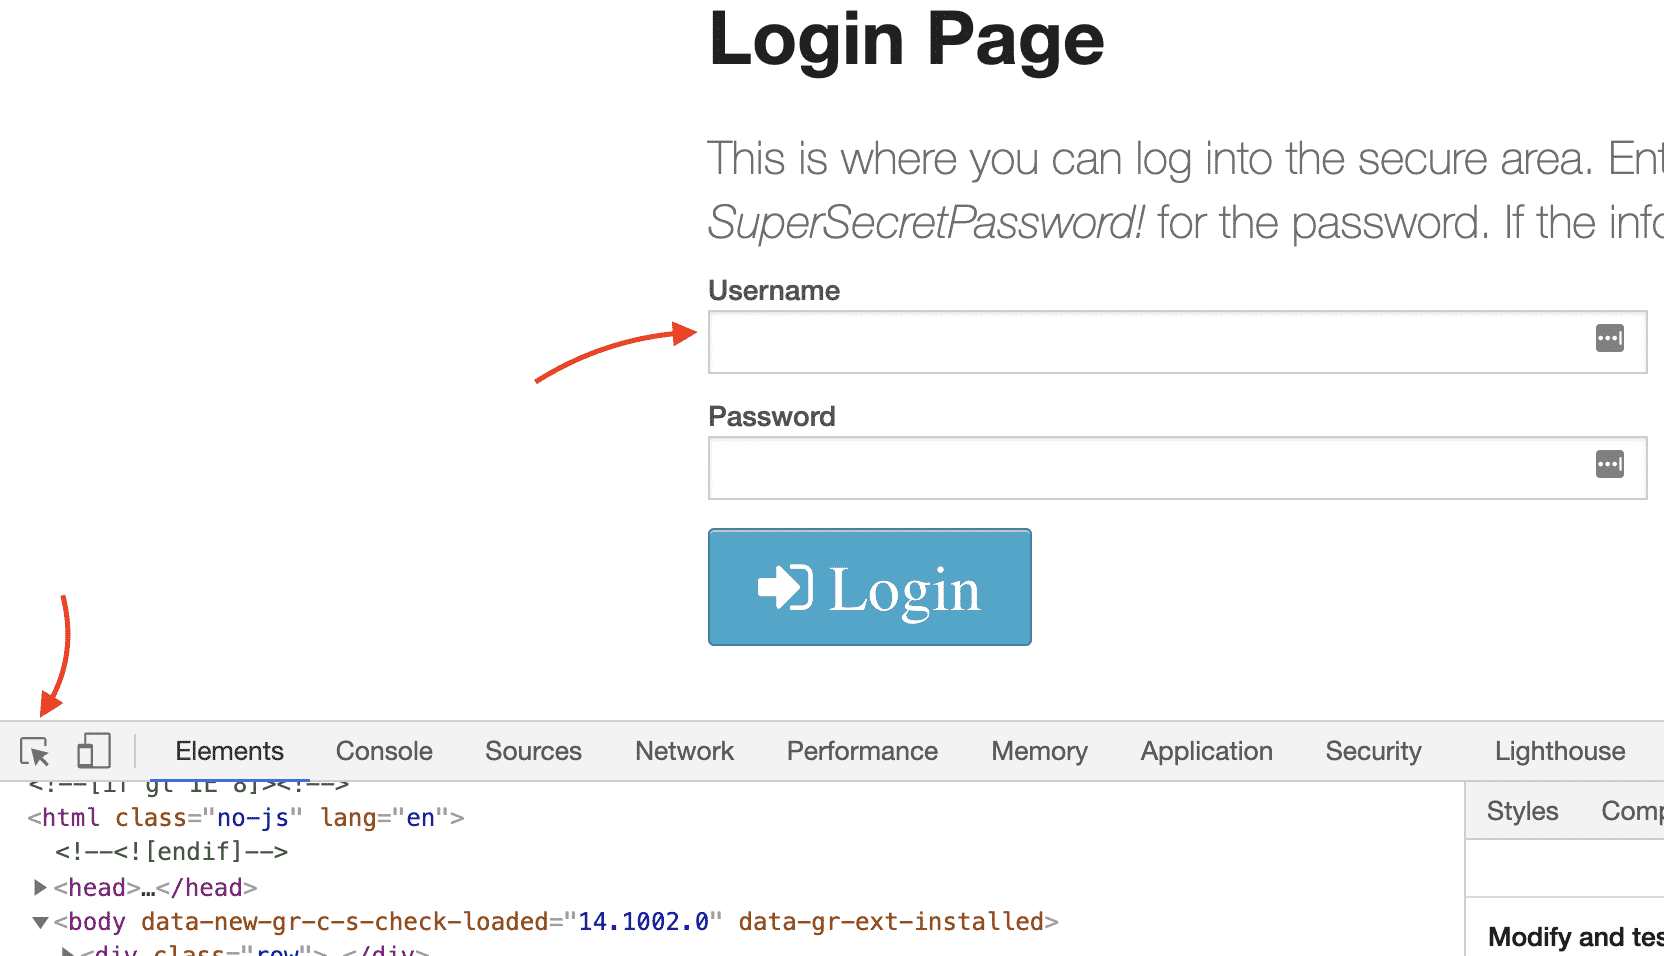
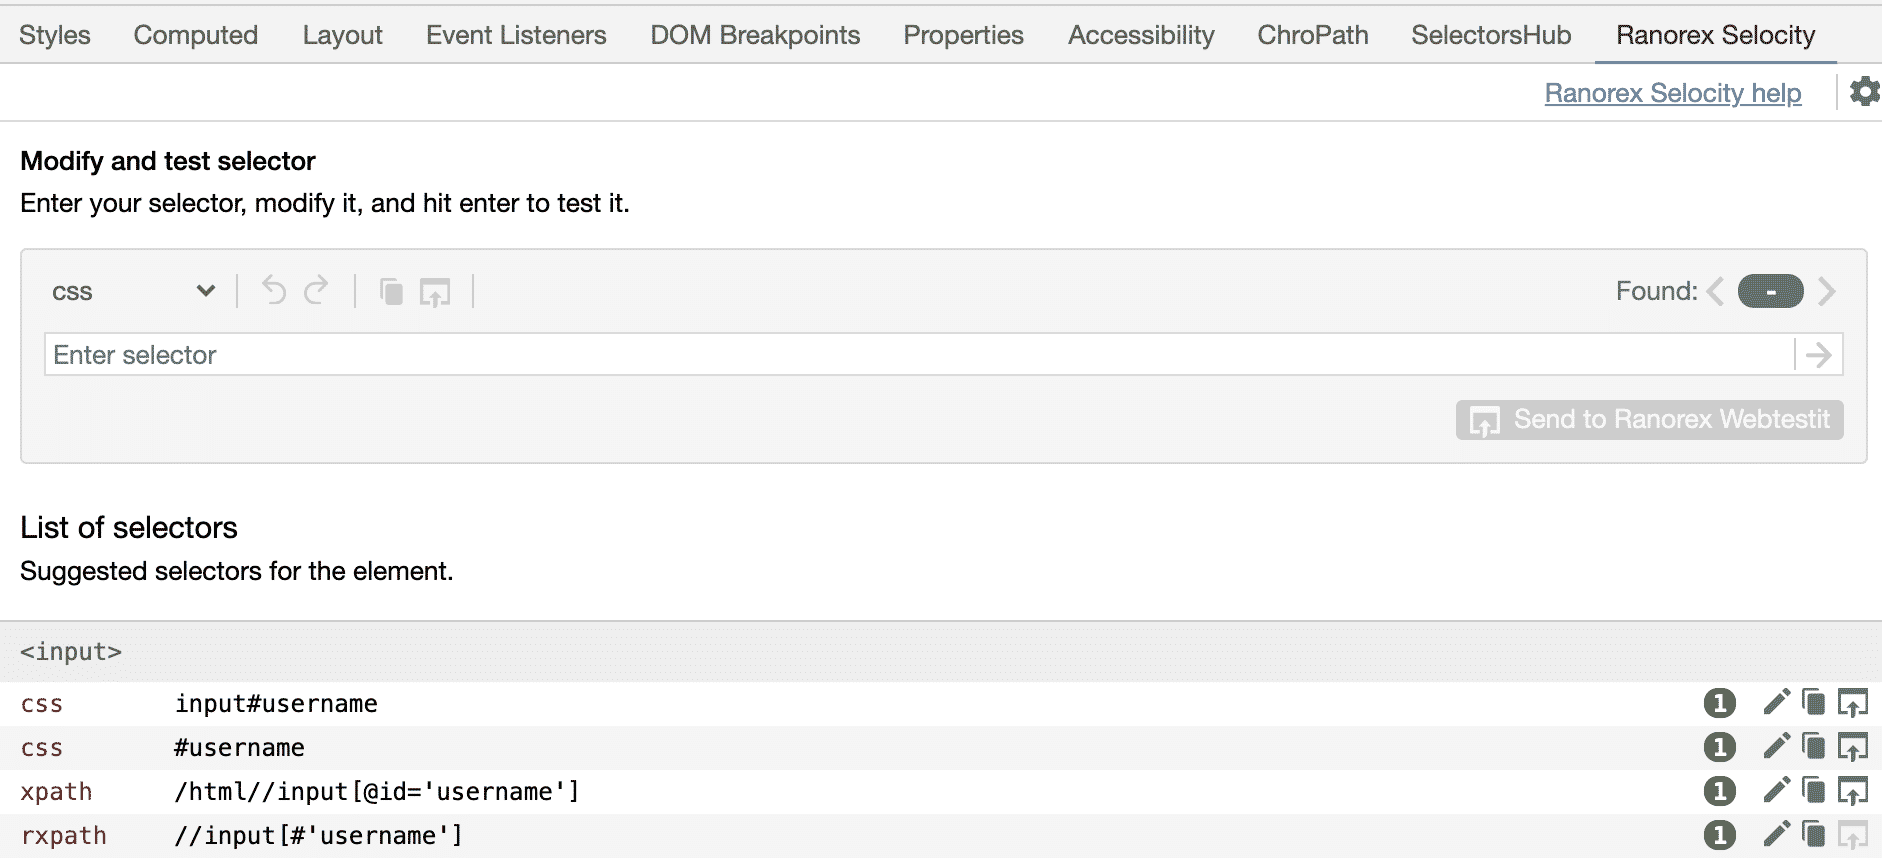
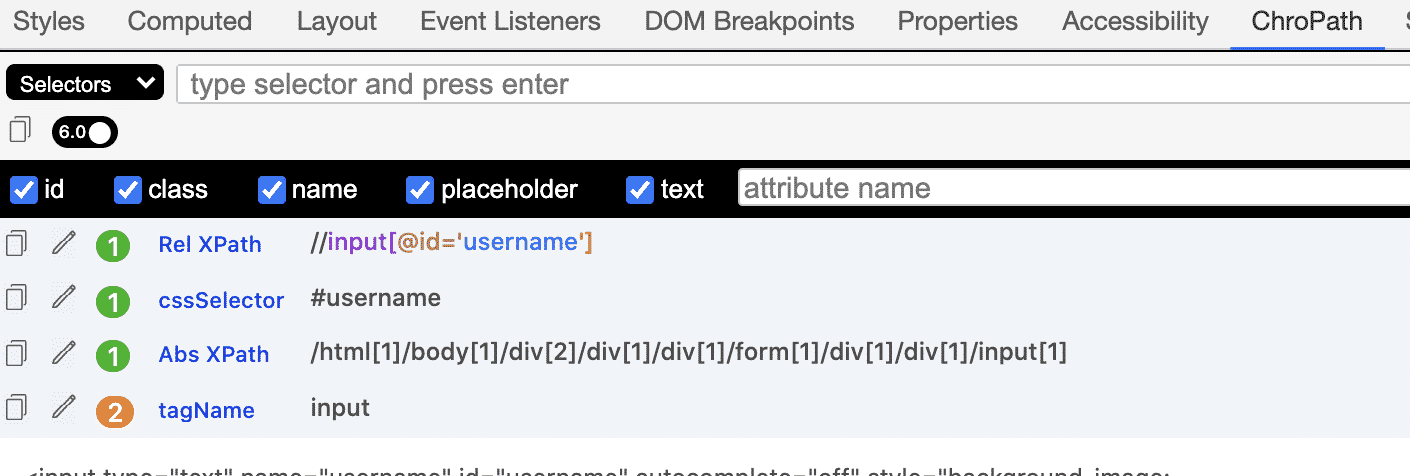
Then we will right-click inspect on chrome to see the HTML source. Here I suggest some chrome extensions like Ranorex Selocity, ChroPath, and SelectorsHub. By using these extensions, you can get the CSS and XPath locators easier. I will show these three, extensions now. 🙂
On the login page, I clicked the username field and now let’s see what these tools can give us one by one.
Ranorex Selocity
ChroPath
SelectorsHub

You can use any of them as your decision but whichever your will use know the best practices in CSS and XPath locators.
Let’s continue 🙂 In the below picture, the attribute of the username field is “username”.
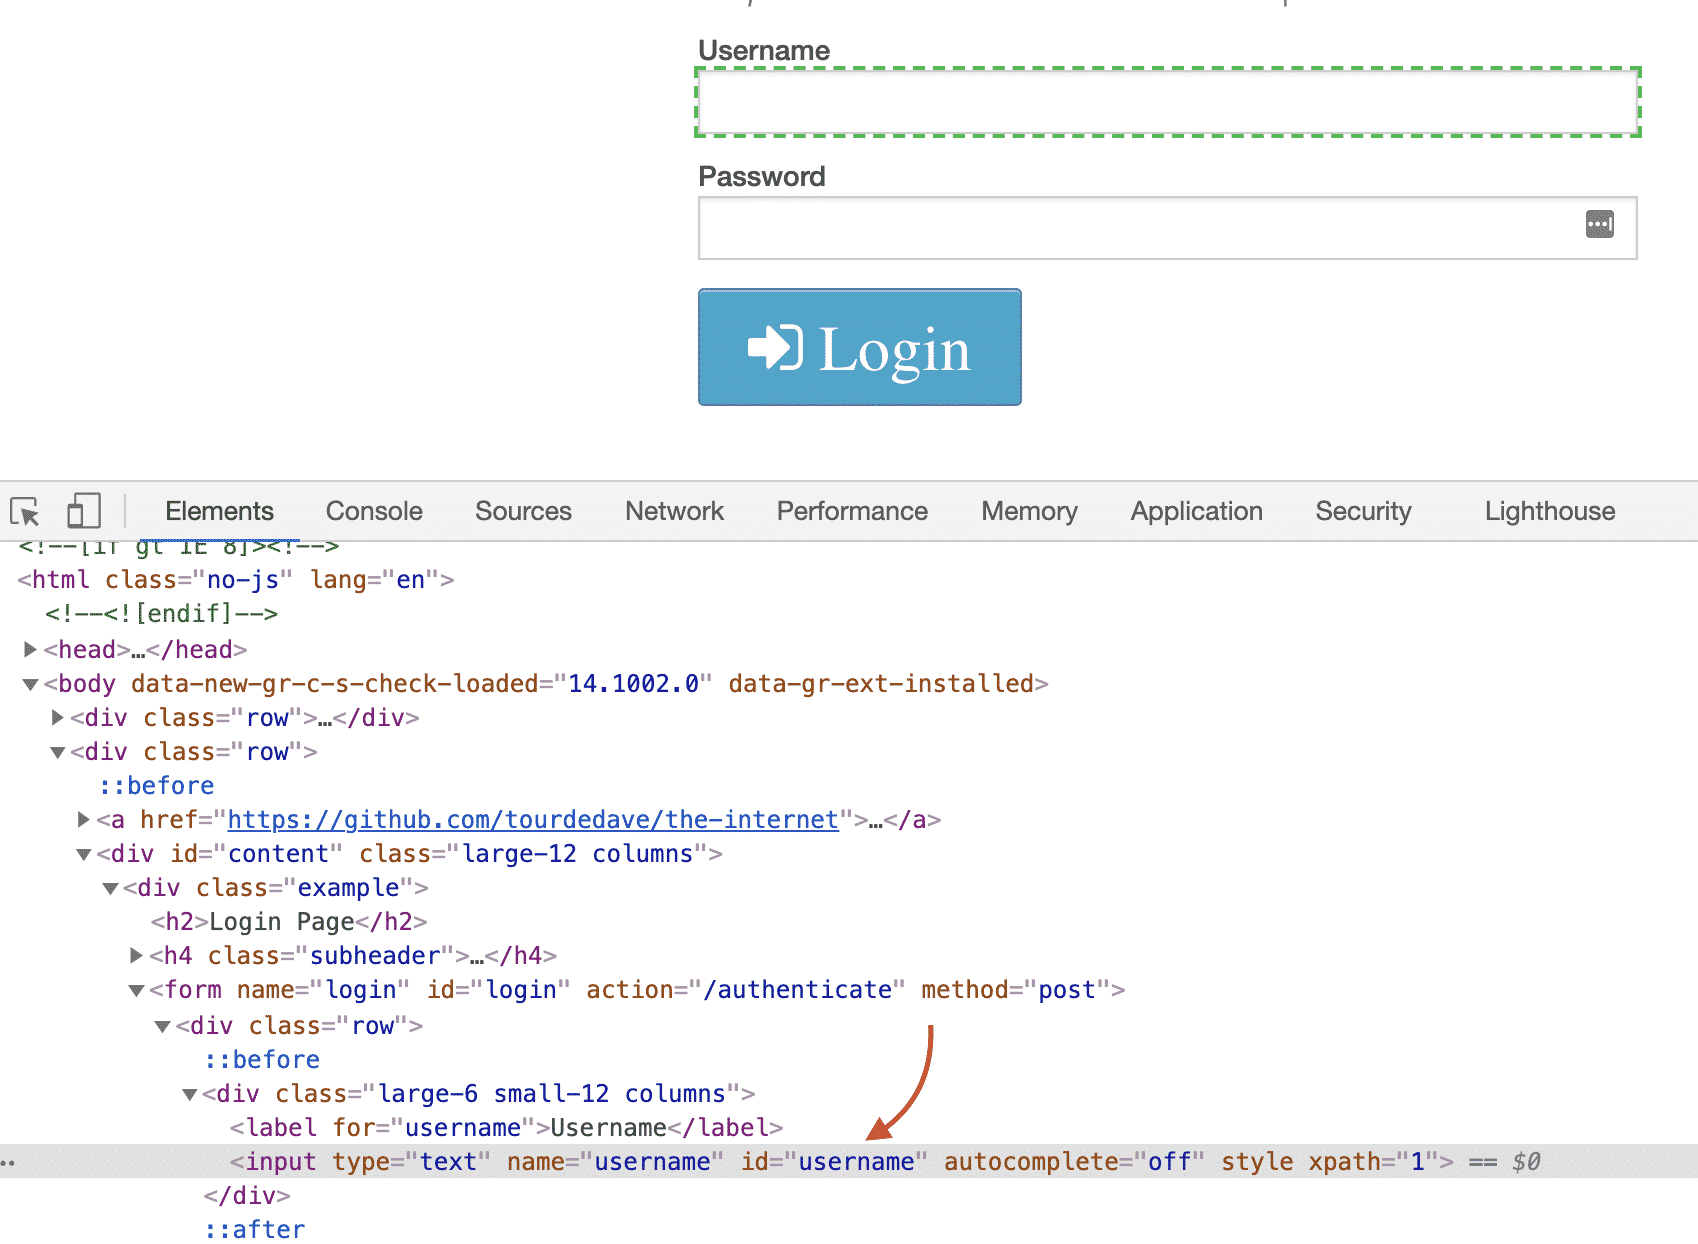
Test code is shown below:
@Test
public void T01_findById() {
    //Find user name text box by By.id method
    WebElement userName = driver.findElement(By.id("username"));
    //Assert that text box is empty
    Assertions.assertEquals("", userName.getText());
}
Selenium Find By Name
This time we can find the username by using its name attribute.
Test code is shown below:
@Test
public void T02_findByName() {
    //Find user name text box by By.Name method
    WebElement userName = driver.findElement(By.name("username"));
    //Assert that text box is empty
    Assertions.assertEquals("", userName.getText());
}
Selenium Find By LinkText
This time we can find the Elemental Selenium text by using linkText method.
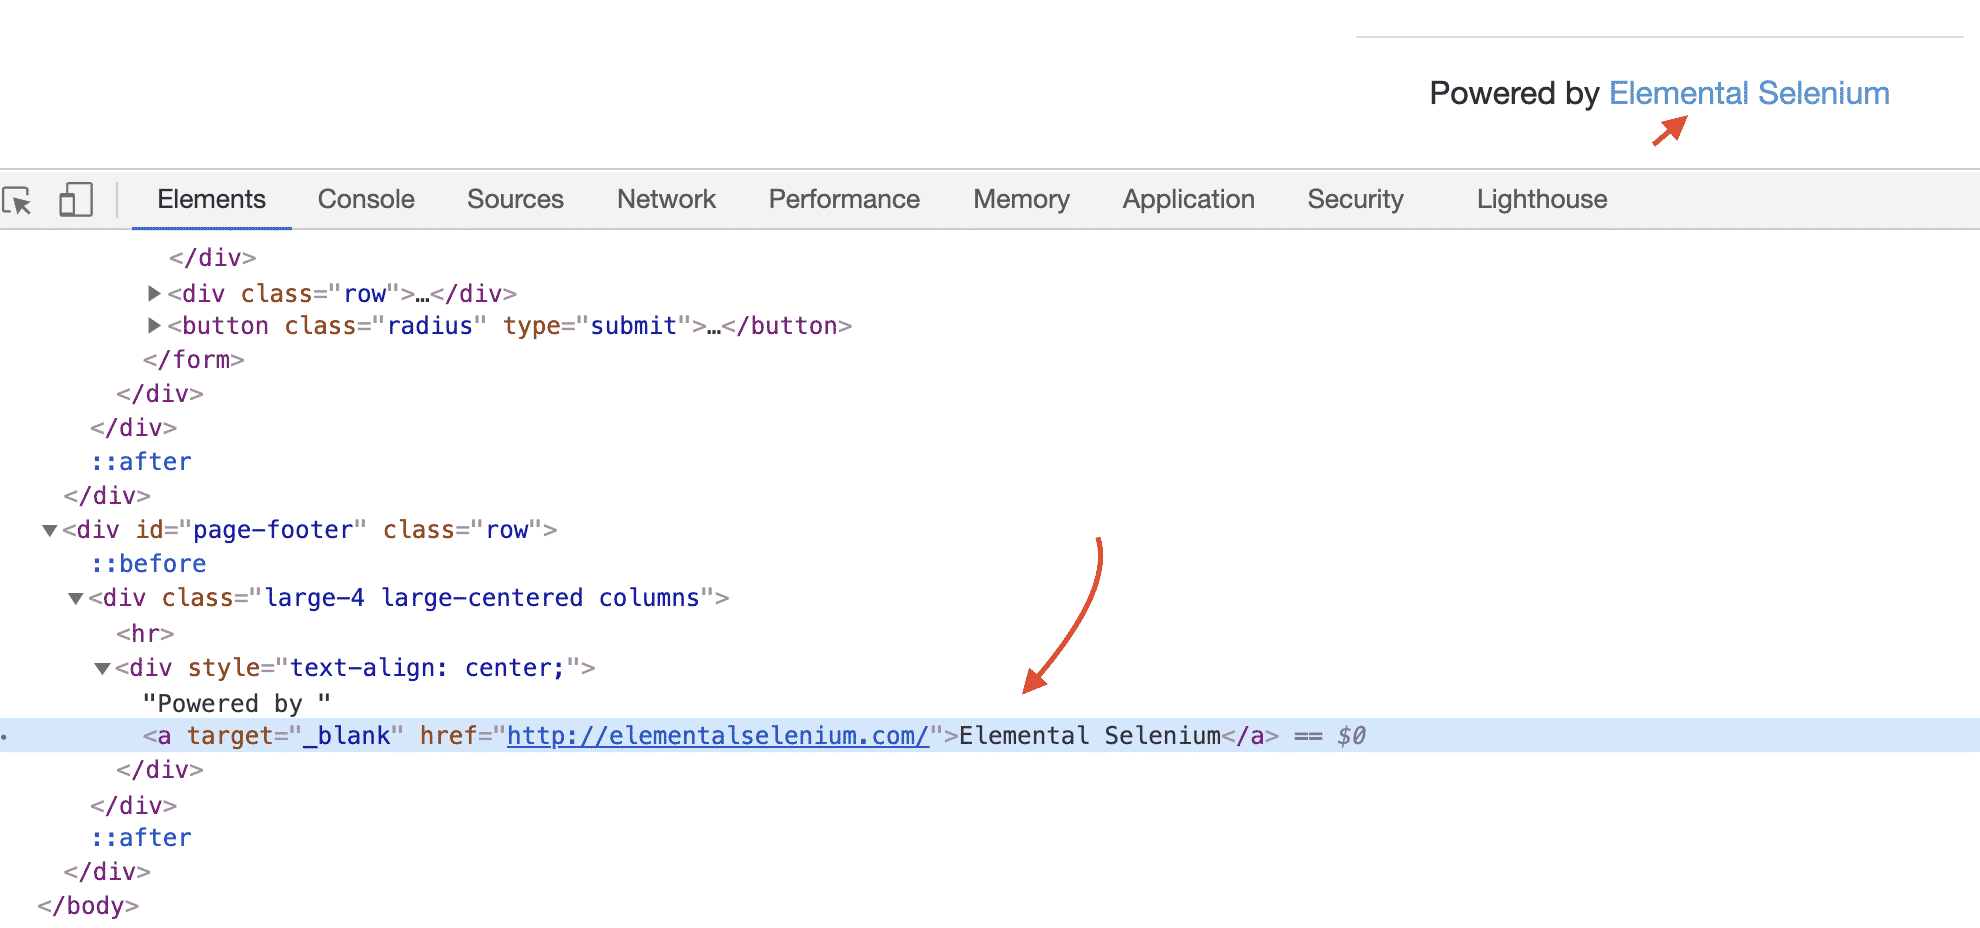
@Test
public void T03_findLinkText() {
    driver.navigate().to(baseURL + "/login");
    //Find text by By.LinkText method
    WebElement link = driver.findElement(By.linkText("Elemental Selenium"));
    //Assert that text box is empty
    Assertions.assertEquals("Elemental Selenium", link.getText());
}
Selenium Find By PartialLinkText
With this method, we can locate the link with its partial text.
@Test
public void T04_findPartialLinkText() {
    //Find text by By.partialLinkText method
    WebElement link = driver.findElement(By.partialLinkText("Elemental Sel"));
    //Assert that text box is empty
    Assertions.assertEquals("Elemental Selenium", link.getText());
}
Selenium Find By ClassName
We can access any object with its class name. In the below example, we will find the subheader by using the By.className method, and then we will verify it via contains assertion.
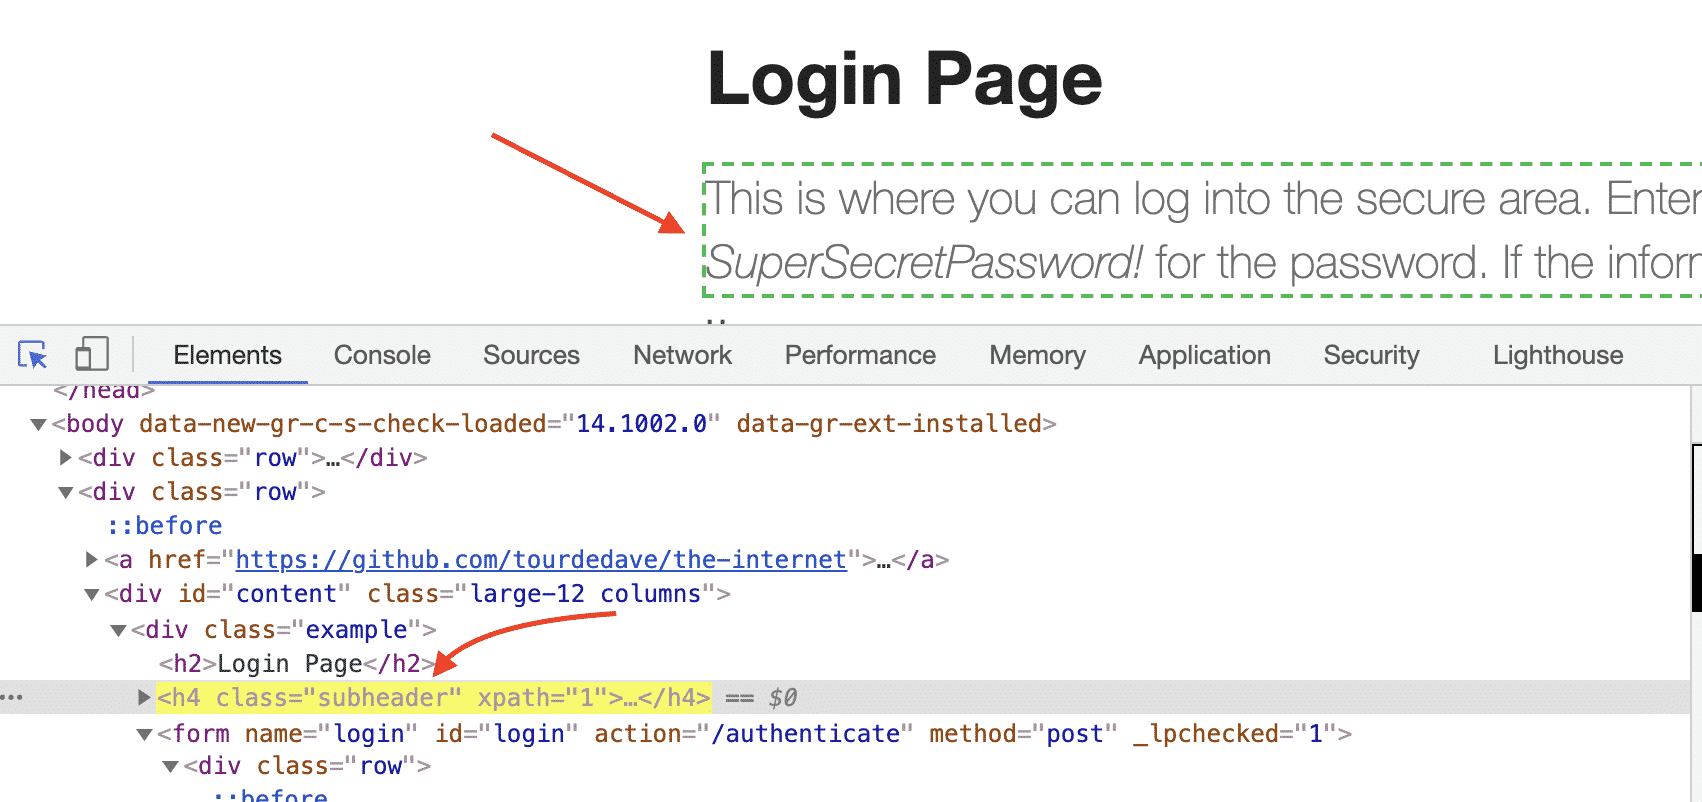
@Test
public void T05_findClassName() {
    //Find subheader by using By.className
    WebElement subHeader = driver.findElement(By.className("subheader"));
    //Assert that subheader contains SuperSecretPassword
    Assertions.assertTrue(subHeader.getText().contains("SuperSecretPassword"));
}
Selenium Find By TagName
In our sample page, we have two input fields these are username and password. Let’s find them all with their tag name “input” and verify that we have two input fields.

@Test
public void T06_findTagName() {
    //Find input fields by By.tagName method
    List<WebElement> inputTags = driver.findElements(By.tagName("input"));
    //Assert that text box is empty
    Assertions.assertEquals(2, inputTags.size());
}
Chaining with findElements Methods and ByChained Support Class
The below example is created by using the old Linkedin Homepage but now it has been changed but the main idea of this method is the same and you can apply it on any page.
In any web page, there is more than one web element that has got the same id, name, class, etc. We can interrogate any web element by chaining its id, name, tag name, etc. and we can do that in two ways:
- Chaining with findElement by methods
- Chaining with ByChained support class
You can find these two ways in the below examples.
Again our test site is linkedin.com main page 🙂
As you can see in the picture there are several links on the main page under “div class=link” and our aim to locate “About” link.
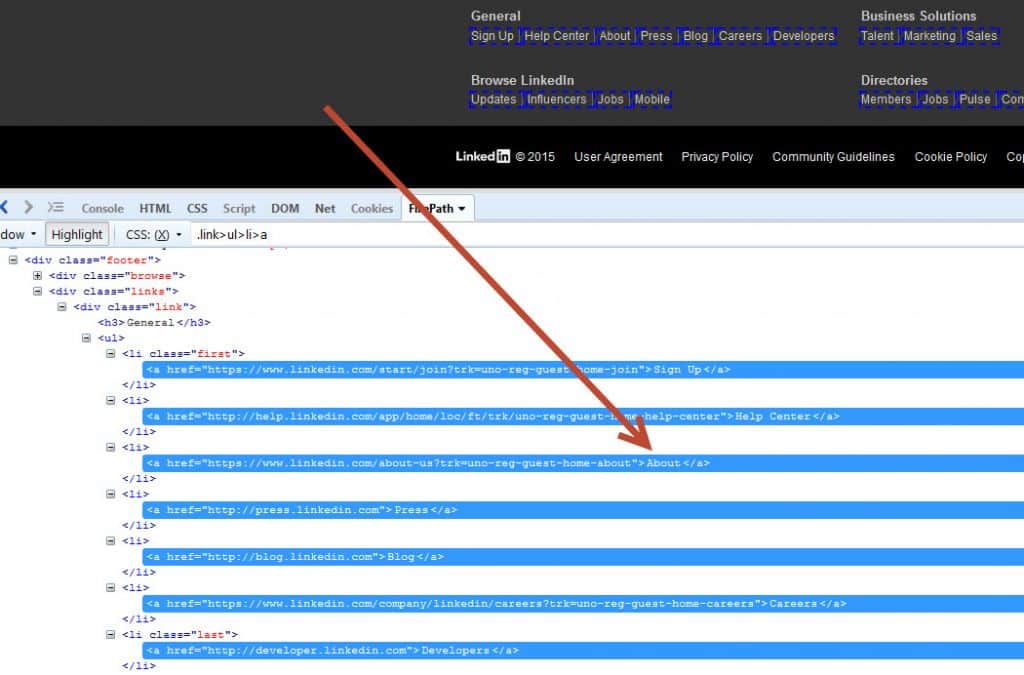
To locate the “About” link, first, we will chain findElement methods which are shown in the below example.
@Test
public void T07_chainingWithFindElementMethods(){
    //Navigate to Linkedin.com
    driver.navigate().to("https://www.linkedin.com/");

    WebElement element = driver.findElement(By.className("link")).
                                findElement(By.linkText("About"));

    assertThat(element.getAttribute("href"), is("https://www.linkedin.com/about-us?trk=uno-reg-guest-home-about"));
}
and the second way is using ByChained support class.
@Test
public void T08_chainingWithByChained(){
    //Navigate to Linkedin.com
    driver.navigate().to("https://www.linkedin.com/");

    WebElement element;
    element = driver.findElement(
            new ByChained(
                    By.className("link"),
                    By.linkText("About")));

    assertThat(element.getAttribute("href"), is("https://www.linkedin.com/about-us?trk=uno-reg-guest-home-about"));
}
Finding Elements by CSS Selectors
First of all CSS selectors are faster. Yes, it is faster and more flexible than XPath selectors. Thus, it should be your default way to interrogate the web elements.
You can learn how to write effective CSS locators in this article.
We can find an element’s CSS path very easily with the Ranorex Selocity addon. Its installation is described in RanorexSelocity post. (Also, you can use ChroPath, and SelectorsHub).
Below the CSS of the subheader is so easy. We can find its class name and in CSS we are locating class names by using (.) operator so the CSS locator of the subheader will be “.subheader”.

This test’s code is shown below:
@Test
public void T07_findCSS() {
    //Find subheader by using By.className
    WebElement subHeader = driver.findElement(By.cssSelector(".subheader"));
    //Assert that subheader contains SuperSecretPassword
    Assertions.assertTrue(subHeader.getText().contains("SuperSecretPassword"));
}
Finding Elements by XPath Selectors
XPath is generally slower than CSS. It is better to use CSS rather than XPath but if you really get in trouble by interrogation with CSS then at that time you can use XPath. I do not want to go into detail about all XPath here but you can find all tactics of XPath selectors here.
In our codes, we use “By.xpath” syntax to interrogate XPath selectors. Lets, find the subheader this time by using XPath locators.
This is the test code:
@Test
public void T07_findXPath() {
    //Find subheader by using By.className
    WebElement subHeader = driver.findElement(By.xpath("//h4[@class='subheader']"));
    //Assert that subheader contains SuperSecretPassword
    Assertions.assertTrue(subHeader.getText().contains("SuperSecretPassword"));
}
GitHub Project
https://github.com/swtestacademy/selenium-examples/tree/main/src/test/java/findelement
CSS & XPath Reference:
In the below reference all the properties and functions of XPath, CSS, DOM are written side by side. I highly recommend this reference and also you can download this reference as a PDF from the below link.
https://www.simple-talk.com/dotnet/.net-framework/xpath,-css,-dom-and-selenium-the-rosetta-stone/
Thanks,
Onur Baskirt

Onur Baskirt is a Software Quality Leader with international experience in world-class companies. Now, he is a Lead Technical Consultant at Emirates Airlines in Dubai.
We are aware that a webpage consists of numerous WebElements such as text boxes, buttons, lists, etc. We can perform a variety of actions on these WebElements using Selenium commands like search elements, associate events with web elements, etc. To perform these actions we first need to interact with a web page so that we can use WebElement Commands/actions. In this topic, we will discuss the different methods used to find an element on the webpage using Selenium so that we can perform actions on these elements. We will cover the following topics in this article.
- Find elements using Selenium WebDriver?
- Why do we need to find a web element in Selenium?
- How to find elements in Selenium?
- What is By class in Selenium?
- Difference between find Element and find Elements in Selenium.
Find elements using Selenium WebDriver?
As mentioned above to interact with WebElements, we first have to find or locate these elements on the webpage. We can find elements on a web page by specifying the attributes such as Id of the element or class name of the element and such other parameters. These alternatives using which we can find elements on a webpage are called locator strategies.
The following are the locator strategies we can use while locating the elements.
| Locator | Description |
|---|---|
| id | finds elements by ID attribute. The search value given should match the ID attribute. |
| name | Finds or Locates elements based on the NAME attribute. The name attribute is used to match the search value. |
| class name | Finds elements that match the class name specified. Note that compound classes are not allowed as strategy names. |
| tag name | Finds or Locates elements having tag names that match the search value. |
| CSS selector | Matches CSS selector to find the element. |
| XPath | Matches XPath expression to the search value and based on that the element is located. |
| link text | Here the visible text whose anchor elements are to be found is matched with the search value. |
| partial link text | Here also we match the visible text with the search value and find the anchor value. If we are matching multiple elements, only the first entry will be selected. |
Now before moving to how we can use these various types of locators to locate the elements, let’s first understand why exactly there is a need to find the elements in Selenium?
Why do we need to find an element in Selenium?
We know that we use Selenium mostly for UI testing of a web-based application. Since we need to perform automatic feature interaction with the web page, we need to locate web elements so that we can trigger some JavaScript events on web elements like click, select, enter, etc. or add/ update values in the text fields. To perform these activities it is important to first locate the element on the web page and then perform all these actions.
For example, suppose given a web page “demoqa.com” as shown below.

Now, let us say we need to perform some actions on the “JOIN NOW “ button. So before implementing the code for the say click event on this button, we will have to first find this element on the web page. So, how we are going to find the element so that we can carry on with our actions?
We will use two methods ‘findElement’ and ‘findElements’ provided by Selenium WebDriver for this purpose. Now let us go ahead and understand the details of these methods.
How to find elements in Selenium?
As discussed, Selenium WebDriver provides two methods using which we can find an element or list of elements on a web page. These are:
findElement(): This method uniquely finds a web element on the web page.
findElements(): This method finds a list of web elements on the web page.
Let’s understand the usage and details of these methods in the following sections:
findElement() in Selenium
The findElement() method of the Selenium WebDriver finds a unique web element within the webpage.
It’s syntax looks like below:
WebElement elementName = driver.findElement
                  (By.LocatorStrategy("LocatorValue"));
As shown in the above syntax, this command accepts the “By “ object as the argument and returns a WebElement object.
The “By” is a locator or query object and accepts the locator specifier or strategies we discussed above. So if we write the line “driver.findElement( By.)” then the Eclipse IntelliSense will give the following locator strategies that we can associate with By object.
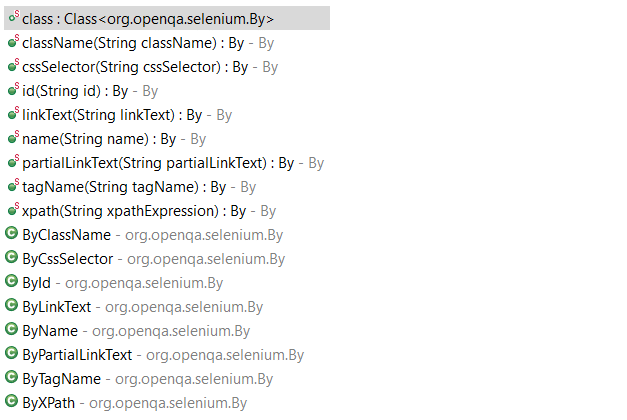
The above screenshot shows all the options that we get when we write ‘By’. We will explain each of these strategies in the later sections of this chapter.
Note: In case there is no matching element found, the findElement command throws NoSuchElementException.
But what happens if there are multiple elements matching the criteria provided in the findElement() method? When such a case occurs, the findElement() method returns the first most element within the web page.
findElements() in Selenium
The command findElements() returns a list of web elements that match the specified criteria, unlike findElement() which returned a unique element. If there are no matching elements then an empty list returns.
The general syntax of findElements() command in Selenium WebDriver is as below:
List<WebElement> elementName = driver.findElements(By.LocatorStrategy("LocatorValue"));
Like the findElement() command, this method also accepts the “By “ object as the parameter and returns a WebElement list.
Let us consider an example wherein we need to find the number of elements having tag name as “input “ on the DemoQA text box page. The inspect panel for this is as below.
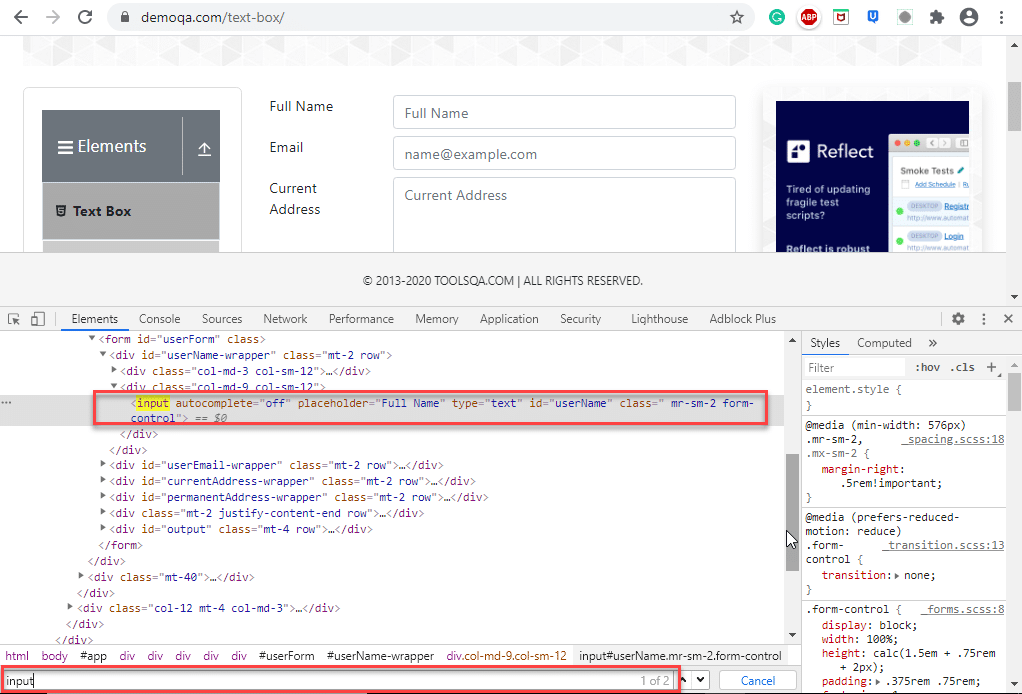
In the above screenshot, when we search for the tag name ‘input’ two entries return (shown by the red rectangle around the search tool which says 1/2).
The following program shows the example of the findElements() method in which we provide the By object with tagName.
import java.util.List;

import org.openqa.selenium.By;
import org.openqa.selenium.WebDriver;
import org.openqa.selenium.WebElement;
import org.openqa.selenium.chrome.ChromeDriver;

public class FindElementByTagName {
   public static void main(String[] args) {
	   System.setProperty("webdriver.chrome.driver", "C:/testSelenium/chromedriver.exe");

	   WebDriver driver = new ChromeDriver();

	   driver.get("https://demoqa.com/text-box/");

	   // Find elements using tag name
	   List<WebElement> allInputElements = driver.findElements(By.tagName("input"));

	   if(allInputElements.size() != 0)
	   {
		   System.out.println(allInputElements.size() + " Elements found by TagName as input n");

		   for(WebElement inputElement : allInputElements)
		   {
			   System.out.println(inputElement.getAttribute("placeholder"));
		   }
	   }
   }
}
Following is the program output.

Next, let us understand how to use different locator strategies with findElement() and findElements() commands.
What is By class in Selenium?
In this section, we will understand how to use Selenium WebDriver’s findElement() and findElements() with different strategies using the By class. The ‘By’ class accepts various locator strategies explained above to find an element or elements on a web page. Let us discuss all the By class locator strategies.
How to find an element using the attribute “id” in Selenium?
Using “id “ to find an element is by far the most common strategy used to find an element. Suppose if the webpage uses dynamically generated ids, then this strategy returns the first web element that matches the id.
This strategy is preferred as most web pages are designed by associating ids with the elements. This is because using IDs is the easiest and quickest way to locate elements because of its simplicity while coding a web page. The value of the id attribute is a String type parameter.
The general syntax of findElement() command using By id strategy is :
WebElement elm = driver.findElement(By.id("Element_Id"));
As an example consider the following element in the DemoQA text box page:
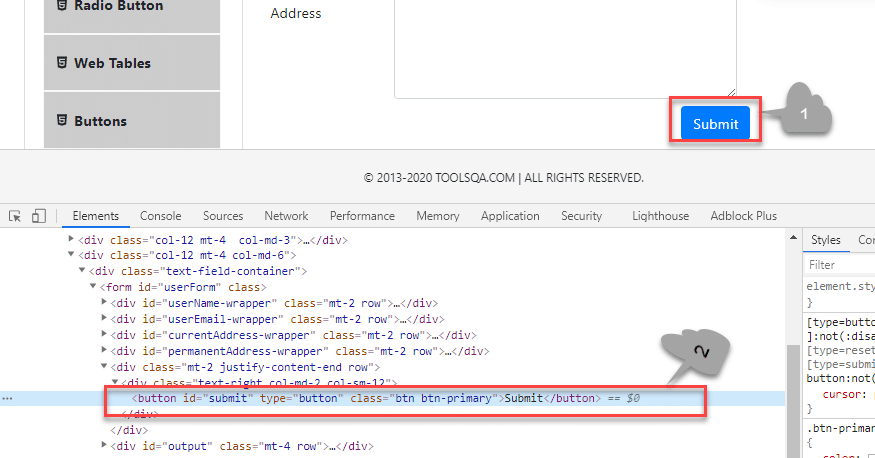
Here we have selected the “submit “ button (marked 1). The element code for this is marked 2 in the above screenshot.
The findElement() command corresponding to the above element:
WebElement element = driver.findElement(By.id("submit"));
// Action can be performed on Button element
element.submit();
Note: If none of the web elements within the web page matches the id attribute then a “NoSuchElementException” is raised.
Note: UI developers have to ensure that the ids on the page are unique. Auto-generated or dynamically generated ids are usually non-unique.
The complete program to find an element using the “By.id “ object is as seen below:
import org.openqa.selenium.By;
import org.openqa.selenium.WebDriver;
import org.openqa.selenium.WebElement;
import org.openqa.selenium.chrome.ChromeDriver;

public class FindElementById {

     public static void main(String[] args) {

	System.setProperty("webdriver.chrome.driver", "C:/testSelenium/chromedriver.exe");

	WebDriver driver = new ChromeDriver();

	driver.get("https://demoqa.com/text-box/");
        WebElement element = driver.findElement(By.id("submit"));


	if(element != null) {
	    System.out.println("Element found by ID");
	}
   }
}
This program gives the following output.

The above program is a program to find an element using the id (By.Id) of that element. We provide an appropriate URL from which we need to search an element and then call “findElement() “ with the argument By.id(“elementID”). This call returns the given element with the specified id.
How to find an element using the attribute “name” in Selenium?
This strategy is the same as id except that the locator locates an element using the “name” instead of “id “.
The value of the NAME attribute accepted is of type String. The general syntax of the findElement() method with By Name strategy is as below.
WebElement elm = driver.findElement(By.name("Element_NAME"));
For example, consider the following element on the page DemoQAAutomationPracticeForm :
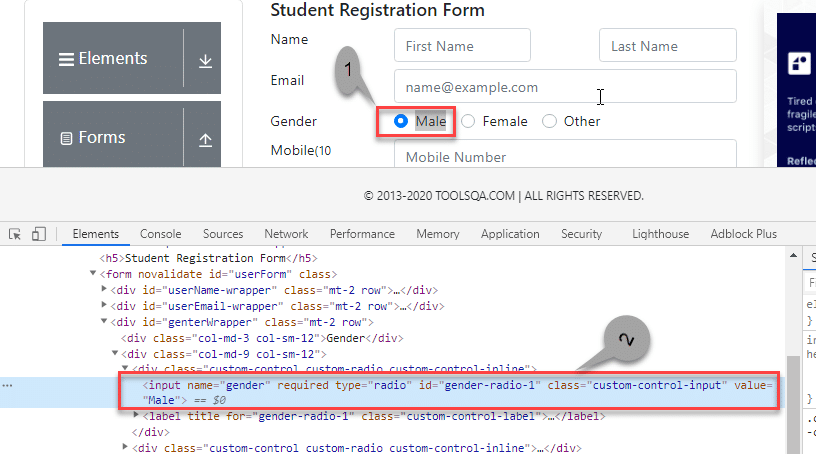
In the above screenshot, we select the first gender value (marked 1). Its corresponding element in the DOM is highlighted (marked 2).
The corresponding findElement() method call for the above element is:
WebElement element = driver.findElement(By.name("gender"));
// Action can be performed on Input Text element
element.sendKeys("ToolsQA");
As a result of this method call, the first element matching the given name attribute value returns. If we can not find the match, NoSuchElementException raises.
Providing name as a strategy is also an efficient way to find an element but again if the names are not unique then the method suffers.
For example, consider the following element:
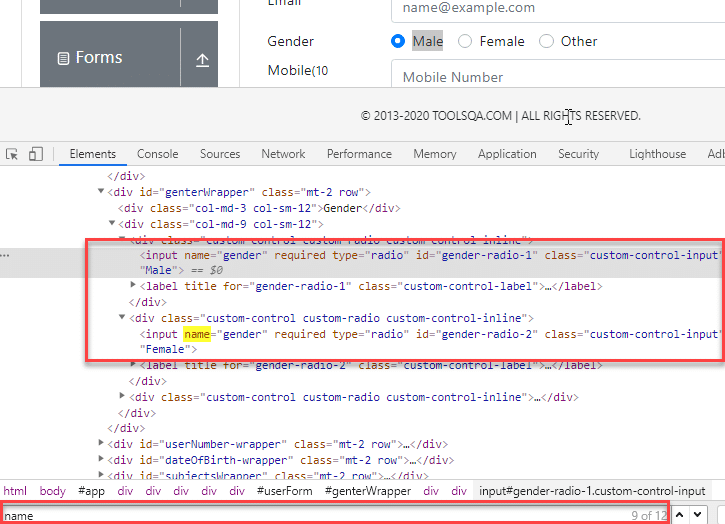
In the above screenshot, there are two elements with the same name = gender. In this case, the findElement() method returns the first element.
Following code shows the program to find an element using Name (By.name):
import org.openqa.selenium.By;
import org.openqa.selenium.WebDriver;
import org.openqa.selenium.WebElement;
import org.openqa.selenium.chrome.ChromeDriver;

public class FindElementByName {
     public static void main(String[] args) {
	   System.setProperty("webdriver.chrome.driver", "C:/testSelenium/chromedriver.exe");
      	   WebDriver driver = new ChromeDriver();

	   driver.get("https://demoqa.com/automation-practice-form");

	   WebElement element = driver.findElement (By.name("gender"));
	   if(element != null) {
	 	System.out.println("Element found by Name");
	   }
	}
}
The program gives the following output.

The above program finds an element in Selenium using the name. We provide the name of the element that we can have to search as an argument to the By object in the ‘findElement()’ call.
How to find an element using the attribute “class name” in Selenium?
Here the value of the “class” attribute is passed as the locator. This strategy is mostly used to find multiple elements that use similar CSS classes.
The locator strategy ‘By Class Name’ finds the elements on the web page based on the CLASS attribute value. The strategy accepts a parameter of type String. The general syntax with the Class name strategy is given by:
List<WebElement> webList = driver.findElements(By.className(<Element_CLASSNAME>)) ;
or
WebElement elm = driver.findElement(By.className(<Element_CLASSNAME>)) ;
The first syntax is to obtain a list of matching elements based on Class Name while the second syntax is to get only one matching element.
In case the element has many classes, then this strategy will match each of the classes.
Consider the following element (submit button) on DemoQAAutomationPracticeForm :
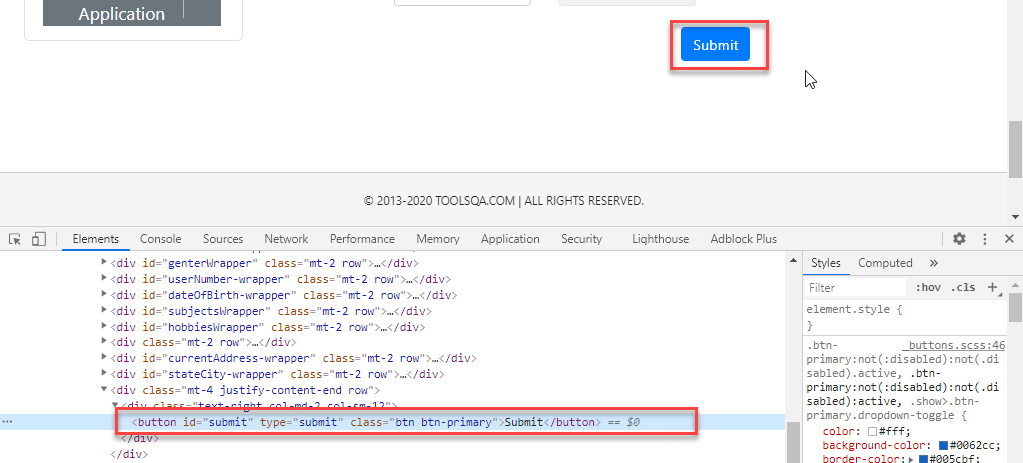
The corresponding command for finding the element marked above is:
WebElement parentElement = driver.findElement(By.className("button"));
parentElement.submit();
Note: Finding elements using class name strategy is helpful when we end up with non-unique IDs and names. That time we just go for the Class Name strategy and try to find the elements. When we use the Class Name strategy, once Selenium finds the particular class, it then looks for ID in the specified class.
The program to find an element using By.className is as below:
import org.openqa.selenium.By;
import org.openqa.selenium.WebDriver;
import org.openqa.selenium.WebElement;
import org.openqa.selenium.chrome.ChromeDriver;

public class FindElementByClassName {
	public static void main(String[] args) {
		System.setProperty("webdriver.chrome.driver", "C:/testSelenium/chromedriver.exe");

		WebDriver driver = new ChromeDriver();

		driver.get("https://demoqa.com/automation-practice-form");

		WebElement parentElement = driver.findElement (By.className("button"));

		if(parentElement != null) {
			System.out.println("Element found by ClassName");
		}

	}
}
This program gives the following output.

In this program, we have provided a class name “button” as a By object argument in the ‘findElement()’ call. It scans the page and returns an element with className = “button”.
How to find an element using the attribute “HTML tag name” in Selenium?
The Tag Name strategy uses an HTML tag name to locate the element. We use this approach rarely and we use it only when we are not able to find elements using any other strategies.
The value of the TAG attribute is a String type parameter. The syntax of the findElement() method using this strategy is as below.
WebElement elem = driver.findElement(By.tagName(“Element_TAGNAME”));
As already mentioned, note that this strategy is not very popular and we use it only when there is no other alternative to locate the element.
As an example consider the following element on DemoQAAutomationPracticeForm :
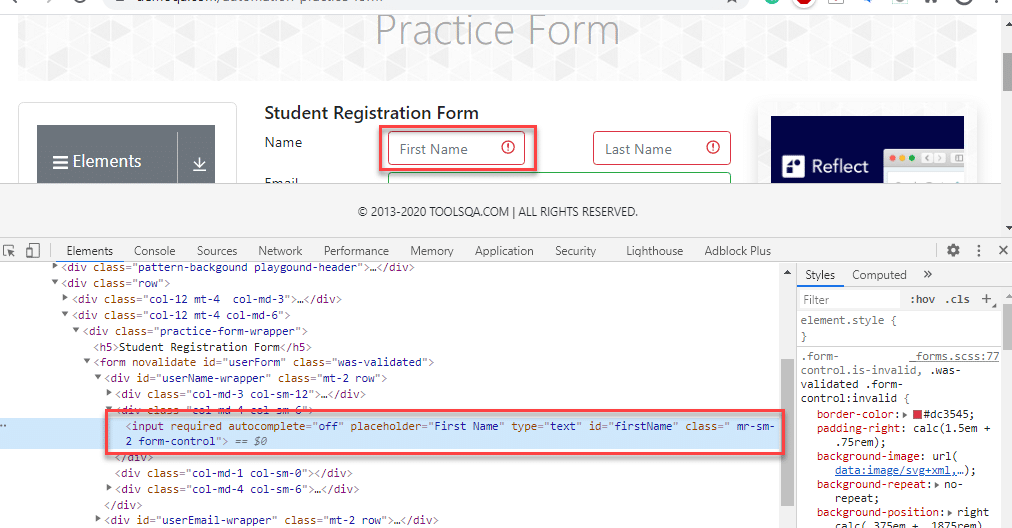
The corresponding command for the above element (input tag) is as below:
WebElement element = driver.findElement(By.tagName("input"));
Following is the program to find elements using By.tagName object.
import java.util.List;

import org.openqa.selenium.By;
import org.openqa.selenium.WebDriver;
import org.openqa.selenium.WebElement;
import org.openqa.selenium.chrome.ChromeDriver;

public class FindElementByTagName {

     public static void main(String[] args) {
	  System.setProperty("webdriver.chrome.driver", "C:/testSelenium/chromedriver.exe");

	  WebDriver driver = new ChromeDriver();
          driver.get("https://demoqa.com/automation-practice-form");
	  WebElement element = driver.findElement (By.tagName("input"));
	  if(element != null) {
	       System.out.println("Element found by tagName");
	  }
     }
}
The output of this program is as seen below.

Above program uses By.tagName object in ‘findElement()’ call to find an element based on tagName = “input”.
How to find an element using the “CSS Selector” in Selenium?
We can also use the CSS Selector strategy as an argument to By object when finding the element. Since CSS Selector has native browser support, sometimes the CSS Selector strategy is faster than the XPath strategy.
Again we will choose an element from the page DemoQAAutomationPracticeForm :
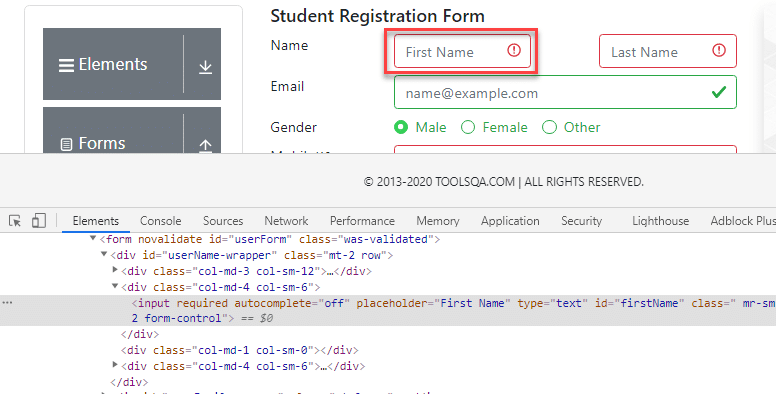
The CSS Selector for the above input field is #firstName. So the corresponding command to find element by CSS Selector is:
WebElement inputElem = driver.findElement(By.cssSelector("input[id = 'firstName']"));
inputElem.SendKeys("demoQA");
The following program shows how to find elements using the By.cssSelector construct.
import org.openqa.selenium.By;
import org.openqa.selenium.WebDriver;
import org.openqa.selenium.WebElement;
import org.openqa.selenium.chrome.ChromeDriver;

public class FindElementByCssSelector {
	public static void main(String[] args) {
	     System.setProperty("webdriver.chrome.driver", "C:/testSelenium/chromedriver.exe");
    	     WebDriver driver = new ChromeDriver();
             driver.get("https://demoqa.com/automation-practice-form");
	     WebElement inputElem = driver.findElement (By.cssSelector("input[id = 'firstName']"));
	     if(inputElem != null) {
		 System.out.println("Element found by cssSelector");
	     }
	}
}
The program gives the following output.

The above program finds an element using CSS Selector for the field ‘firstNam’ by using the By.cssSelector locator strategy. The program returns an element having the specified CSS selector.
How to find an element using the “XPath” in Selenium?
This strategy is the most popular one for finding elements. Using this strategy we navigate through the structure of the HTML or XML documents.
This strategy accepts a String type parameter, XPath Expression. The general syntax of using this strategy is as given below:
WebElement elem = driver.findElement(By.xpath(“ElementXPathExpression”));
Using XPath we can locate a single element using various ways. It provides many different and easy ways to locate elements.
As an example let us take the following element in the page DemoQAAutomationPracticeForm :
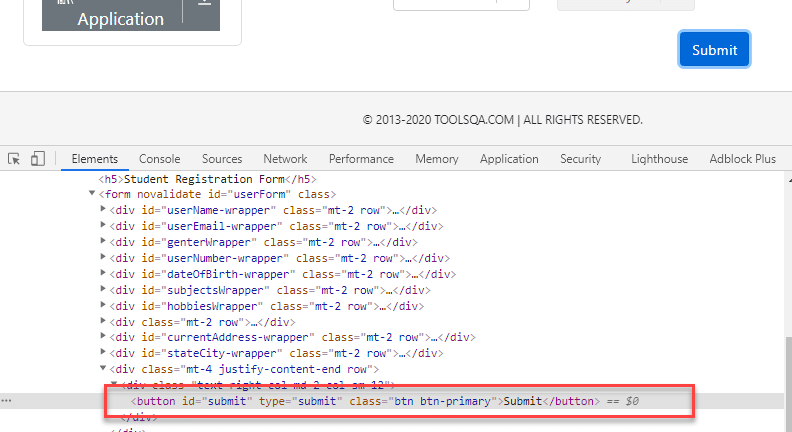
The XPath for the above button element is [@id=”submit”]. Please refer How To Inspect Elements using Web Inspector for more information. So we use it in the findElement() command as below:
WebElement buttonLogin = driver.findElement(By.xpath("//button[@id = 'submit']"));
A program to find elements using By.XPath is as follows:
import org.openqa.selenium.By;
import org.openqa.selenium.WebDriver;
import org.openqa.selenium.WebElement;
import org.openqa.selenium.chrome.ChromeDriver;

public class FindElementByXpath {
      public static void main(String[] args) {
	   System.setProperty("webdriver.chrome.driver", "C:/testSelenium/chromedriver.exe");
           WebDriver driver = new Chrome
Driver();
   	   driver.get("https://demoqa.com/automation-practice-form");
	   WebElement buttonSubmit = driver.findElement( By.xpath("//button[@id = 'submit']"));
	   if(buttonSubmit != null) {
		System.out.println("Element found by xpath");
	   }
	}
}
This program displays the following output.

Here we have provided the XPath of the “submit “ button as an argument to the By.xpath locator. The program returns the element that matches the specified XPath.
How to find an element using the “Link Text/Partial Link Text” in Selenium?
This strategy finds links within the webpage. It specially finds elements having links. This means we can use this strategy to find elements of “a “ (links) tags that have matching link names or partial link names.
The strategy accepts the value of the LINKTEXT attribute as a String type parameter.
The syntax of findElement using this strategy is as seen below.
WebElement elem = driver.findElement(By.linkText(“Element LinkText”));
The above syntax is for finding elements using full link text. This is used when we know the link text that is used within the anchor (a) tag.
We can also use the partial link and find elements. Following is the syntax:
WebElement elem = driver.findElement(By.partialLinkText(“ElementLinkText”));
Here we can provide partial link names.
As an example, we can take the following element (DemoQAHomeLink ). We have highlighted the element as shown below:
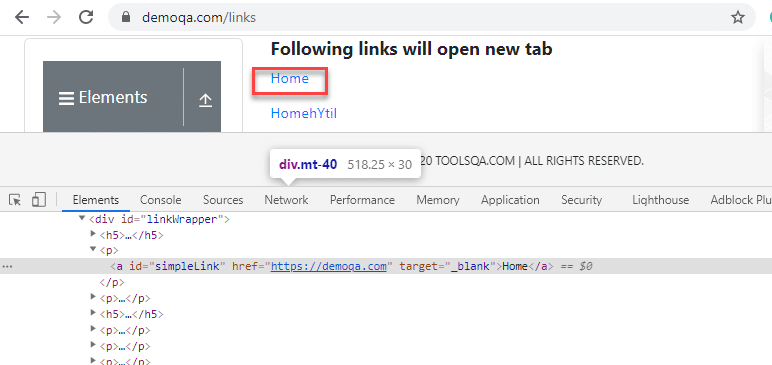
We can use a link strategy if the targetted text is link text. So for the above link element, the findElement() command for the link and partial link strategy is as follows:
WebElement element = driver.findElement(By.linkText("Home"));

//Or can be identified as
WebElement element = driver.findElement(By.partialLinkText("HomehY");
In the first example, we use By.linkText strategy and provide the entire ‘linkname’. This will look for a link with the “Home” word. In the second example, we use By.partialLinkText and only provide a part of ‘linkname’ (‘HomehY’). Since this is a partial link, it will look for links starting with ‘HomehY’. As shown above, there is a link ‘HomehYtil’ on the page. So By.partialLinkText will find this link.
Let us implement a code to find element using By.linkText/By.partialLinkText.
import org.openqa.selenium.By;
import org.openqa.selenium.WebDriver;
import org.openqa.selenium.WebElement;
import org.openqa.selenium.chrome.ChromeDriver;

public class FindElementByLinkTextAndPartialLinkText {
	public static void main(String[] args) {
		System.setProperty("webdriver.chrome.driver", "C:/testSelenium/chromedriver.exe");
		WebDriver driver = new ChromeDriver();
		driver.get("https://demoqa.com/links");
		WebElement element = driver.findElement (By.linkText("Home"));

		if(element != null) {
			System.out.println("Element found by LinkText");
		}

		element= driver.findElement (By.partialLinkText("HomehY");

		if(element!= null) {
			System.out.println("Element found by PartialLinkText");
		}
	}
}
The Output:

This program finds an element using By.linkText and By.partialLinkText locator. When By.linkText is specified, the ‘findElement’ matches the entire linkText specified. It matches the partial text when By.partialLinkText is specified.
Difference between find Element and find Elements in Selenium
Let us discuss some differences between findElement() and findElements() methods provided by Selenium WebDriver.
| FindElement() | FindElements() |
|---|---|
| Returns the first web element out of all the elements found by the same locator. | Finds and returns a list of web elements. |
| This method finds only one element. | This method returns the collection of elements matching the locator. |
| If no element matches the locator, an exception “NoSuchElementException” is thrown. | No exception is thrown if no matching elements are found. Simply returns an empty list. |
| NNo indexing required since only one element is returned. | Each web element is indexed starting from 0. |
Key TakeAways
We need to find or locate web elements within the webpage so that we can perform actions on these elements.
Additionally, we have two methods find Element and find Elements methods in Selenium WebDriver using which we can locate elements.
Also, the method findElement() in Selenium returns a unique web element from the webpage.
The method findElements() in Selenium returns a list of web elements
Lastly, to locate or find the elements each method uses a locator strategy which is provided via an argument to the “By” object. These strategies are by Id, by Name, by Class Name, by XPath, by link, etc.
