Get-ChildItem cmdlet in PowerShell is used to get items in one or more specified locations. Using Get-ChildItem, you can find files. You can easily find files by name, and location, search file for string, or find file locations using a match pattern.
Very often, we store files anywhere on the drive where they shouldn’t be put, and later after a few months, we have so many files copied at different locations and remain an unorganized way.
If we try to find a file stored anywhere on the drive, using a manual search or windows provided search filter with wild card characters takes a lot of time and more frustration.
In this article, I will explain different and best possible ways to find files that match a pattern or find files by extension in PowerShell
Using PowerShell Get-ChildItem cmdlet to show a list of files or directories in one or more locations.
The Get-ChildItem cmdlet provides more flexibility for simple or advanced wildcards to find files by a search pattern.
Using Recurse parameter to get items recursively from all the child containers. You can limit the Depth parameter to limit the number of levels to recurse.
Cmdlet: Get-ChildItem
Syntax:
Get-ChildItem
   [[-Filter] <string>]
   -LiteralPath <string[]>
   [-Include <string[]>]
   [-Exclude <string[]>]
   [-Recurse]
   [-Depth <uint32>]
   [-Force]
   [-Name]
   [-Attributes <FlagsExpression[FileAttributes]>]
   [-FollowSymlink]
   [-Directory]
   [-File]
   [-Hidden]
   [-ReadOnly]
   [-System]
   [<CommonParameters>]
Let’s understand using PowerShell to find files by name, by extension, or find files recursively with different examples as given below.
Do you know: Using IIS to get a list of websites in PowerShell!
PowerShell Find files by extension in the current directory
To find all files by extension in the current directory that matches wildcard pattern *.txt
PS C:Temp> Get-ChildItem *.txt
Above command, find files in the current directory that matches extension .txt
PowerShell Find all files on the root of drive D:
To find and list all files stored on drive D: location, using Get-ChildItem is given below
PS C:> Get-ChildItem -Path D:
Above Get-ChildItem cmdlet takes D: as path and lists all the directory and files stored on location. It displays results items with Mode, LastWriteTime, and Length Name columns.
PowerShell Find File Recursively using Recurse parameter
To find and list all files stored on drive D: location, using PowerShell Get-ChildItem with Recurse parameter in PowerShell.
PS C:> Get-ChildItem -Path D: -Recurse
Using recurse parameter will list all files that the user has access to, however, doing recurse operation, if the user doesn’t have access to any of the resource items, it will throw an error.
To continue with Recurse operation even in the case of error, using ErrorAction parameter with silentlyContinue continue its operation.
PS C:> Get-ChildItem -Path D: -Recurse -ErrorAction SilentlyContinue
PowerShell Tip: How to add a newline to string or variable?
Search for files that do not match using exclude parameter
To find all files in current and subdirectory that do not match PowerShell wildcard *.exe, we can do it using exclude parameter
PS D:Temp> Get-ChildItem -Exclude *.exe -Recurse
Above command, get a list of all files exclude *.exe files in subdirectories using recurse parameter in PowerShell.
PowerShell Tip: How to search string in files using PowerShell Grep!
Get a list of all files in directory that matches a pattern
To get a list of all files in directory and subdirectory that matches PowerShell wildcard pattern *.doc,*.docx
PS D:Temp> Get-ChildItem -Include *.doc,*.docx -File -Recurse -ErrorAction SilentlyContinue
In the above example, Get-ChildItem uses the Include parameter to find *.doc or *.docx files from the directory or its subdirectories using Recurse parameter.
Use ErrorAction silentlyContinue to continue with finding files even without having errors.
Above command, search for files and get a list of all files in a directory in PowerShell.
Find file all items in subdirectories match specific filter
Using -Filter parameter to get list of all files from subdirectories that match filter *.txt
PS D:Temp> Get-ChildItem -Filter *.txt -Recurse
Above Get-ChildItem command using Recurse parameter to recursively iterate in folder and subfolders and filter parameter with *.txt to get only *.txt file extension files only.
Above PowerShell script find files recursively with extension.
Cool Tip: Replace text in string using PowerShell!
PowerShell Find Filename containing string
To find all files containing a string in a given directory or subdirectories, use the below command
PS D:Temp> Get-ChildItem -Recurse | Where {$_.Name -match 'Replace'} | Select Fullname

FullName
--------
D:TempReplace-Method.txt
In the above example, Get-ChildItem uses Recurse parameter to recursively find all files.
Using Where-Object cmdlet to compare name property that matches with ‘Replace’ and returns FullName of the file.
In the above script, search file for string and get file name that matches the string.
We can also use Get-ChildItem alias gci to query and file name containing a string as below
PS D:Temp> gci -Recurse | Where {$_.Name -match 'Replace'} | Select Fullname

FullName
--------
D:TempReplace-Method.txt
PowerShell Find Files in Directory containing string
To find all files in the directory containing string, use the below command
PS D:Temp> Get-ChildItem -Recurse | Where {$_.DirectoryName -match 'Debug'} | Select Fullname
In the above example, Get-ChildItem use Recurse parameter to recursively find all files in the Directory
Using Where-Object cmdlet to compare DirectoryName property that matches with ‘Debug’ and returns FullName of the files in that directory.
We can also use PowerShell Get-ChildItem alias gci to query and list all files within directory name containing a string as below
PS D:Temp> gci -Recurse | Where {$_.DirectoryName -match 'Debug'} | Select Fullname
PowerShell Tip: How to get MD5 checksum or SHA checksum for file in PowerShell!
PowerShell Find File by WildCard
To find all the files in directory or subdirectories that match PowerShell wildcard
PS D:Temp> Get-ChildItem | Where-Object { $_.Name -match '[a-z].txt$' }


    Directory: D:Temp


Mode                LastWriteTime         Length Name
----                -------------         ------ ----
-a----       10-07-2021     11:11            196 Replace-Method.txt
In the above example, it finds files using PowerShell wildcard as [a-z].txt$ and gets a list of all files.
Cool Tip: ErrorAction and ErrorVariable parameters in PowerShell!
PowerShell Find Files Older than Specific Days
To find files older than specific days, use PowerShell Get-ChildItem to get file objects and compare file creation date with current date – 15 days.
Get-ChildItem -File | Where-Object {$_.CreationTime -lt (Get-Date).AddDays(-15)} | Select Name, CreationTime | sort CreationTime -Descending
In the above PowerShell script, the first command gets the file object and passes the output to the second command.
Second command, Where-Object compare file creation date with current date – 15 days using Get-Date cmdlet and passes the output to the third command.
The third command selects file name and file creation date time format and passes the output to the fourth command.
In the last command, sort file creation date-time descending and gets a list of files older than 15 days before.
Conclusion
I hope you find the above article on using the PowerShell Get-ChildItem cmdlet to find files that match search patterns or find files by extension, or name helpful.
I tried to explain different ways to search for files by wildcard, file by name, file by location or directory, or get folders only in the file system.
You can find more topics about PowerShell Active Directory commands and PowerShell basics on the ShellGeek home page.
June 27th, 2016
Summary: Use Get-Childitem to search the files system with PowerShell.
 I saved a file somewhere on my computer and can’t find it. Is there a way to use Windows PowerShell to find it?
 Honorary Scripting Guy, Sean Kearney, is here today to show you a cool trick I use all the time. I use PowerShell to search for things constantly!
Why PowerShell? Well, to be honest, I have a bad, bad, bad habit of putting data where it shouldn’t be. Sometimes I’d use locations that the Indexer in Windows isn’t watching. In these situations, even Cortana can’t help me.
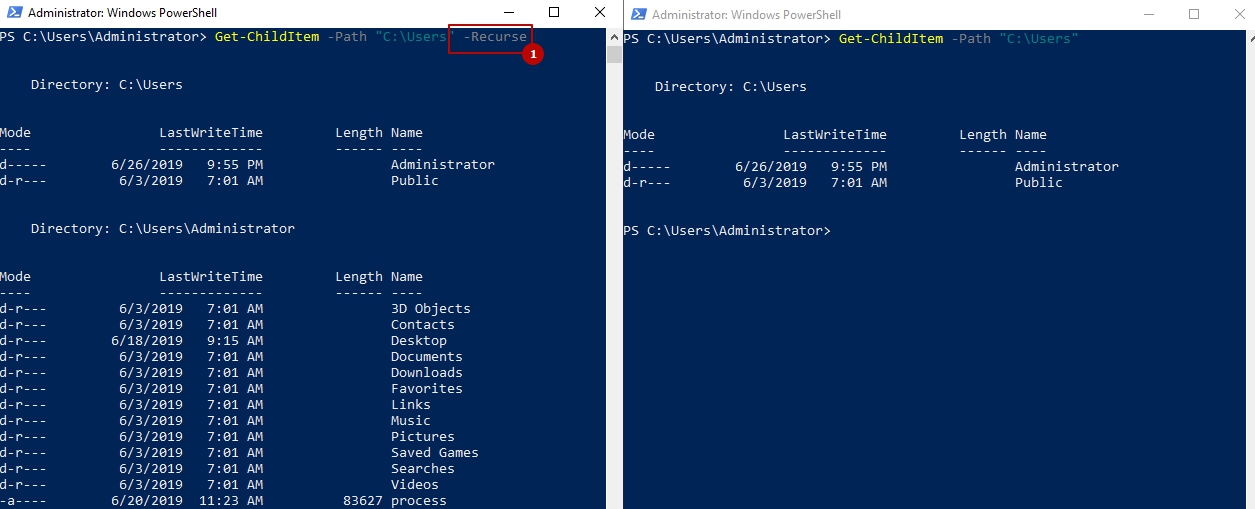
We can use Get-Childitem to show a list of files and/or directories quite easily. The following example lists all files on the root of Drive C:
Get-Childitem –Path C:
If we add a –Recurse parameter, we can show everything that we have access to.
Get-Childitem –Path C: -Recurse
So far, this is no different from running the following command in the CMD prompt.
Dir C:*.* /s
So, why PowerShell?
For searching, PowerShell offers us all the things that we don’t see under the hood. In that folder structure, there are bound to be many files that I cannot access. Those will throw an error (red by default) and makes it very hard to read.
So, we tell PowerShell, “Don’t bother showing me those minor errors, just continue.”
Get-Childitem –Path C: -Recurse -ErrorAction SilentlyContinue
But, how do we use this as a search tool? Get-Childitem includes two additional parameters, -include and –exclude . Their functions are pretty simple.
The -include parameter says, “Show me only these files in the search,” and -exclude says, “Keep that stuff out of my way.”
As the person on TV used to say, “But wait! There’s more!”. Sometimes the reason you can’t find a file is because it was stored in the Temporary Outlook folder.
That used to drive me bananas! Because Temporary is a hidden folder, you often will miss that, and so will Get-Childitem. To bypass those issues, add the –force parameter to let it examine those folders as well.
Get-Childitem –Path C: -Recurse –force -ErrorAction SilentlyContinue
We could now use this same command to show only the Word documents that I can access or maybe even all the files that I put the letters, HSG, in. Yes, odds are that I was watching too much Babylon 5 and stored a file in my Pictures folder.
Get-Childitem –Path C: -Include *HSG* -Recurse -ErrorAction SilentlyContinue
Unfortunately, it pulls up everything, and I mean everything. with the letters, HSG, in it, including folder titles. We can tell it to show only files by using PowerShell. This was introduced in version 3 of PowerShell.
Get-Childitem –Path C: -Include *HSG* -File -Recurse -ErrorAction SilentlyContinue
We can also use the the -Exclude parameter to say, “Don’t show me any TMP, MP3, or JPG files.:
Get-Childitem –Path C: -Include *HSG* -Exclude *.JPG,*.MP3,*.TMP -File -Recurse -ErrorAction SilentlyContinue
Here is where things really get powerful. Let’s get right down to the nitty gritty. Imagine that it was a really long weekend.
You did the work on Friday. You even forgot the file name! Just how do you sort that out?
In PowerShell, we can filter out files based upon date and time quite easily.
Right now, let’s get the date for June 24, 2016. I’m not planning on this being a long weekend but, hey, I could be sick on Monday so, it’s possible 😉
There are fancier ways of doing this, but I’m going to use Get-Date because it works internationally. First, supply the year, month, and day.
$FindDate=Get-Date -Year 2016 -Month 06 -Day 24
With this information, I can first off target two things. First, show me all my Word documents, files only, on the entire C: drive, and keep the error messages to yourself, PowerShell.
Get-ChildItem -Path C: -Include *.doc,*.docx -File -Recurse -ErrorAction SilentlyContinue
Now I can use Where-Object to show only files that were created since the day that I stored in $FindDate. This will include everything since 12:00 AM the morning of that day. We will compare the list against the LastWriteTime property, which is the “Last Time the File was Written to.”
Get-ChildItem -Path C: -Include *.doc,*.docx -File -Recurse -ErrorAction SilentlyContinue | Where-Object { $_.LastWriteTime -ge $FindDate }
Hey, wait. I did some work on the weekend. I only want Friday! Well, we can filter on that, too, by using the AddDays() method to our date and give it a range of 24 hours!
Get-ChildItem -Path C: -Include *.doc,*.docx -File -Recurse -ErrorAction SilentlyContinue | Where-Object { $_.LastWriteTime -ge $FindDate -and $_.LastWriteTime -le $Finddate.adddays(1) }
Of course, most people might want to search only a few spots. Get-Childitem can even be told to “Search only this list of folders.” In the following example, I am going to search the C:Users folder, an HSG folder on my USB key (Drive L: ), and a folder named “WhoopsNotThisOne” on Drive X:
Get-Childitem -Path C:Users, L:HSG, X:WhoopsNotThisOne -Include HSG*.doc? -Recurse
I hope this helped you along today and empowered you a little further in your daily tasks.
I invite you to follow the Scripting Guys on Twitter and Facebook. If you have any questions, send email to them at scripter@microsoft.com, or post your questions on the Official Scripting Guys Forum. See you tomorrow.
Until then always remember that with Great PowerShell comes Great Responsibility.
Sean Kearney
Honorary Scripting Guy
Cloud and Datacenter Management MVP
У данного командлета присутствуют несколько псевдонимов (aliases) – ls, dir, gci.

Разберем аргументы командлета позволяющие выполнить поиск файлов.
Поиск По Маске
Аргументы командлета Get-ChildItem позволяют выполнить поиск файлов. Доступные параметры, маска имени файла (-Filter), стартовая директория поиска (-Path), и возможность рекурсивного поиска в поддиректориях (-Recurse).
Поиск по маске, для примера осуществим вывод всех файлов с расширением ZIP.
# Вывод файлов с раширением *.zip
Get-ChildItem *.zip
Файловые маски не могут содержать регулярных выражений, только стандартные “*” (любое количество символов) и “?” (один любой символ).
# Вывод файлов с раширением *.zip и именем состоящим из трех символов
Get-ChildItem ???.zip
Как можно заметить, указывать параметр -Filter не обязательно, командлет сам понимает что ему была передана фильтрующая маска. Порядок следования параметров без их конкретного указания можно посмотреть во встроенной справке.
# Вывод справки
Get-ChildItem -?
Параметр -Path позволяет задать путь начала поиска. Так же он допускает использовать символы файловых масок. Можно совмещать комбинацию фильтров в параметре -Path и -Filter.
Выведем содержимое диска C:.
# Вывод содержимого указанной директории
Get-ChildItem C:

# То же самое что и выше, но с прямым указанием параметра
Get-ChildItem -Path C:
По умолчанию, выводится только содержимое текущей директории, но для полноценного поиска файлов необходимо выполнить обход всех файлов во всех поддиректориях. Осуществить такой обход позволяет параметр -Recurse.
Попробуем найти все файлы с расширением *.msc на диске C:.
# Вывод всех файлов *.msc на диске C:
Get-ChildItem -Path C: -Filter *.msc -Recurse -ErrorAction SilentlyContinue
Как вы могли заметить, при выводе содержимого диска C: отсутствовали скрытые файлы. Отображение скрытых и системных файлов задается атрибутами, о которых поговорим далее.
Поиск По Атрибутам
По умолчанию, скрытые файлы не попадают выходной список командлета Get-ChildItem. Вывод файлов с различными атрибутами, такими как скрытый, системный и прочее, можно задать с помощью параметра -Attributes.
Возможные значения для данного параметра можно посмотреть во встроенной справке по командлету (Get-ChildItem -?).
Важные, или популярные, атрибуты вынесены в отдельные параметры, а именно -Directory, -File, -System, -Hidden.

Попробуем посмотреть файлы скрытые файлы на диске C:.
# Вывод файлов диска C:
Get-ChildItem C:

# Вывод файлов диска C: включая скрытые
Get-ChildItem C: -Hidden
При указании параметра -Hidden выводятся только скрытые файлы и папки.
С параметром -Attributes все иначе. Он позволяет комбинировать файловые атрибуты. Доступны три операции:
! – NOT, исключает файлы с данным атрибутом (!Directory)
+ – AND, включает файлы со всеми указанными атрибутами (System+Hidden)
, – OR, включает файлы с хотя бы с одним указанным атрибутом (System, Hidden, Directory)
Модификаторы можно комбинировать.
# Вывод файлов диска C: с атрибутами - скрытый, системный, директории
Get-ChildItem C: -Attributes H,S,D
Сами названия атрибутов можно сокращать, что собственно и было продемонстрировано выше.
Поиск По Дате
Список файлов полученный с помощью вышеописанных способов можно отфильтровать по дате. Делается это с помощью передачи результатов выполнения командлета Get-ChildItem командлету Where-Object.
Пример фильтрации вывода команды по дате, с применением псевдонимов.
# Вывод файлов дата которых больше или равна дате 28.10.2019 20:00
ls | ? LastAccessTime -GE (Get-Date "28.10.2019 20:00")
Для командлета Where-Object можно задать так же другие условия, или даже несколько условий. Подробнее об этом можно узнать в справке по данному командлету.
Поиск По Содержимому
Поиск по содержимому, предполагает обход всех файлов с целью найти в них искомый текст. Выполнить данную операцию можно с помощью передачи всех файлов по конвейеру командлету Select-String.
Для примера я создал три текстовых файла с текстом:
1.txt (first)
2.txt (second)
3.txt (first second third)

Структура расположения файлов следующая.

Теперь примеры поиска текста в данных файлах с помощью PowerShell.
# Поиск всех файлов с текстом "first"
Get-ChildItem -Recurse | Select-String "first"
Вывод данной команды немного скудный, нет информации о файлах. Это легко поправить, выполнив передачу полученных данных снова командлету Get-ChildItem. На этот раз воспользуемся псевдонимами для сокращения ввода команд.
# Поиск всех файлов с текстом "first" с подробным выводом информации о файлах
ls -r | Select-String "first" | ls
Использование Найденных Файлов
Полученные списки файлов, всеми вышеописанными способами, можно передавать по конвейеру таким командлетам как Remove-Item, Move-Item, Copy-Item и прочим подобным. Тем самым упрощая работу с полученными файлами.
Итог
В статье было рассмотрено: Как выполнить поиск файлов в командной оболочке PowerShell?
Для поиска файлов через Powershell есть командлет ChildItem. С помощью него мы можем фильтровать данные. Например так мы выведем все файлы и папки, которые лежат на диске C.
Get-ChildItem -Path "C:" -RecurseГде:
- Path – где искать. Если его не указать, то powershell будет искать там файлы, откуда он и запущен. Через запятую можно указать несколько директорий.
- Recurse – рекурсивный поиск. Когда этот ключ не установлен, показываются файлы только текущей папки. Когда этот установлен, показываются, в том числе, папки и файлы внутри других папок.
Если у нас ожидаются папки, к которым у нас нет доступа, то мы можем добавить ключ -ErrorAction, что бы процесс поиска не останавливался с ошибкой:
Get-ChildItem -Path "C:Windows" -Recurse -ErrorAction SilentlyContinueДля поиска нужных элементов у нас есть два ключа: для включения параметра и исключения. Например я знаю точно, что у программы “Калькулятор” файл имеет в названии calc, а расширение exe. При этом не уверен находится ли он в папке Windows или Program Files и включу оба пути. Так же я хочу исключить файлы с расширением msi и словом win:
Get-ChildItem -Path C:Windows,C:Program Files -Include "*calc*.exe" -Exclude "*.msi","win*" -Recurse -Force -ErrorAction SilentlyContinueГде:
- Include нужен для поиска вхождения. Знак * говорит, что я не знаю с чего начинается имя файла, но в нем есть calc, я не знаю что идет после, но заканчивается на .exe . Например под эти результаты подходят 1111calc1111.exe или AbcAlc2.exe.
- Exclude говорит, что мне не нужно, т.е. исключит из выдачи. Это файлы заканчивающиеся на .msi и начинающиеся на win.
- Force этот ключ позволяет искать в скрытых файлах и папках
Если мы используем Include и не используем Recurse, то знак * обязателен в Path иначе результат будет пустой.
Теперь попробуем найти файлы, которые были созданы за последнюю неделю. Для этого, сначала, объявим переменную с датой:
$date = Get-Date -Year 2019 -Month 6 -Day 22 -Hour 1 -Minute 00Не обязательно все заполнять, но в таком случае значения будут приняты по умолчанию (от текущего дня).

Затем передадим эти значения в наш поиск:
Get-ChildItem -Path "C:" -Include "*.txt" -Exclude "*.rar" -Recurse | Where-Object {$_.LastWriteTime -ge $date}Где:
- | это конвейер или Pipline, он говорит о том, что к каждому объекту слева нужно применить действия справа
- Where-Object {$_.LastWriteTime – говорит о том, что нужно применять только к тем объектам, где есть значение LastWriteTime (последнее время изменения).
- -ge $date – значит, что объект должен быть больше или равен (Greater than or equal) нашей переменной с датой. Если бы мы хотели узнать до определенной даты, мы должны были бы указать -le $date, -eq если бы дата была бы ровна. Называется “Операторы сравнения”
Поиск по содержимому файлов через Powershell
Мы можем искать внутри файлов, т.е. вхождение строк:
Get-ChildItem -Path C:Folder1 -Include "*.txt" -Recurse | Select-String -SimpleMatch "fixmypc"Где:
- SimpleMatch – строка, которую мы хотим найти внутри файла
В случае выше, для всего что слева от pipeline | , будет идти поиск внутри файлов на упоминание строки fixmypc.
Командлет Select-String может использоваться для поиска файлов:
Select-String -Path C:Folder1* -SimpleMatch "fixmypc" -Include "*.txt" -Exclude "*.rar"Разница в том, что он будет искать только в текущей папке, а не во вложенных. Он так же будет искать вхождение в каждом файле, что при большом объеме существенно увеличит время работы. Т.е. эта команда предназначена уже для отфильтрованных значений, например после Get-ChildItem.
Но в Select-String есть дополнительные ключи, которые могут быть полезны. Вот часть из них:
- CaseSensitive – в обычных командлетах и сравнениях Powershell “а” и “А” одинаковые буквы. Если поставить этот ключ, то они станут разными
- Pattern – если с ключом SimpleMatch мы можем найти конкретную строку (нельзя использовать * звездочку), то с этим ключом мы можем использовать регулярные выражения.
…
Теги:
#powershell
I wanted to write a small script that searched for an exact file name, not a string within a file name.
For instance if I search for ‘hosts’ using Explorer, I get multiple results by default. With the script I want ONLY the name I specify. I’m assuming that it’s possible?
I had only really started the script and it’s only for my personal use so it’s not important, it’s just bugging me. I have several drives so I started with 2 inputs, one to query drive letter and another to specify file name. I can search by extension, file size etc but can’t seem to pin the search down to an exact name.
Any help would be appreciated!
EDIT : Thanks to all responses. Just to update. I added one of the answers to my tiny script and it works well. All three responses worked but I could only use one ultimately, no offence to the other two. Cheers. Just to clarify, ‘npp’ is an alias for Notepad++ to open the file once found.
$drv = read-host "Choose drive"
$fname = read-host "File name"
$req = dir -Path $drv -r | Where-Object { !$PsIsContainer -and  [System.IO.Path]::GetFileNameWithoutExtension($_.Name) -eq $fname }
set-location $req.directory
npp $req
