I think, you are referring to the binary program name included in the package. I use this technique to find this:
simply type dpkg -L <package-name> in a terminal, it will display all files installed by that package, then you can recognize the binary program names by looking at their location. Usually programs are installed in /usr/bin directory or /sbin directory.
Let’s see an example:
anwar@edubuntu-lenovo:~$ dpkg -L gnome-screenshot
/.
/usr
/usr/bin
/usr/bin/gnome-screenshot
/usr/share
/usr/share/GConf
/usr/share/GConf/gsettings
/usr/share/GConf/gsettings/gnome-screenshot.convert
/usr/share/applications
/usr/share/applications/gnome-screenshot.desktop
/usr/share/man
/usr/share/man/man1
/usr/share/man/man1/gnome-screenshot.1.gz
/usr/share/gnome-screenshot
/usr/share/gnome-screenshot/gnome-screenshot.ui
/usr/share/glib-2.0
/usr/share/glib-2.0/schemas
/usr/share/glib-2.0/schemas/org.gnome.gnome-screenshot.gschema.xml
/usr/share/doc
/usr/share/doc/gnome-screenshot
/usr/share/doc/gnome-screenshot/copyright
/usr/share/doc/gnome-screenshot/NEWS.gz
/usr/share/doc/gnome-screenshot/changelog.Debian.gz
Note that, the program name of gnome-screenshot package is gnome-screenshot.
You asked
Is there any standard way to know the
<packageName>for the desired program?
Sometimes the terminal can tell your the package name required to be installed to have a desired program. It happens when the program is in Standard repository and you have enabled those repository.
For example, If I type gnome-documents when no such package is installed, the terminal will tell be this:
anwar@edubuntu-lenovo:~$ gnome-documents
The program 'gnome-documents' is currently not installed.  You can install it by typing:
sudo apt-get install gnome-documents
But, in this case, I should at least know the program name
Contents
-
Package management with APT
- Introduction
-
Commands
-
Installation commands
- auto-apt
- Maintenance commands
- Removal commands
- Search commands
-
Installation commands
- Typical usage example
-
Setting up apt-get to use a http-proxy
- Temporary proxy session
- APT configuration file method
- BASH rc method
- How to login a proxy user
- Useful additional packages
- Additional links
- Troubleshooting
![]() This article applies to all supported versions of Ubuntu
This article applies to all supported versions of Ubuntu
Package management with APT
 Package management via apt-get runs hand-in-hand with the /etc/apt/sources.list file. For information on editing or updating your sources list see SourcesList.
Introduction
This page describes how to handle the packages on your system using apt-get and related commands. For example, you can install a new package, remove an installed package, or update all installed packages to the latest versions.
Commands
 All these commands except the search commands must be run as root or with superuser privileges, see sudo for more information.
-
 Example:
 sudo apt-get install ubuntu-desktop
 Example:
 Installation commands
-
apt-get install <package_name>
This command installs a new package.
-
apt-get build-dep <package_name>
This command searches the repositories and installs the build dependencies for <package_name>. If the package is not in the repositories it will return an error.
-
aptitude install <package_name>
Aptitude is an Ncurses viewer of packages installed or available. Aptitude can be used from the command line in a similar way to apt-get. Enter man aptitude for more information.
- APT and aptitude will accept multiple package names as a space delimited list. For example:
apt-get install <package1_name> <package2_name> <package3_name>
Use the -s flag to simulate an action. For example: “apt-get -s install <package_name>” will simulate installing the package, showing you what packages will be installed and configured.
 Use the -s flag to simulate an action. For example: “apt-get -s install <package_name>” will simulate installing the package, showing you what packages will be installed and configured.
 auto-apt
-
auto-apt run <command_string>
This command runs <command_string> under the control of auto-apt. If a program tries to access a file known to belong in an uninstalled package, auto-apt will install that package using apt-get. This feature requires apt and sudo to work.
- Auto-apt keeps databases which need to be kept up-to-date in order for it to be effective. This is achieved by calling the commands auto-apt update, auto-apt updatedb and auto-apt update-local.
- Usage example
-
You’re compiling a program and, all of a sudden, there’s an error because it needs a file you don’t have. The program auto-apt asks you to install packages if they’re needed, stopping the relevant process and continuing once the package is installed.
# auto-apt run ./configure
It will then ask to install the needed packages and call apt-get automatically. If you’re running X, a graphical interface will replace the default text interface.
-
Maintenance commands
-
apt-get update
Run this command after changing /etc/apt/sources.list or /etc/apt/preferences . For information regarding /etc/apt/preferences, see PinningHowto. Run this command periodically to make sure your source list is up-to-date. This is the equivalent of “Reload” in Synaptic or “Fetch updates” in Adept.
-
apt-get upgrade
This command upgrades all installed packages. This is the equivalent of “Mark all upgrades” in Synaptic.
-
apt-get dist-upgrade
The same as the above, except add the “smart upgrade” checkbox. It tells APT to use “smart” conflict resolution system, and it will attempt to upgrade the most important packages at the expense of less important ones if necessary.
-
apt-get check
This command is a diagnostic tool. It does an update of the package lists and checks for broken dependencies.
-
apt-get -f install
This command does the same thing as Edit->Fix Broken Packages in Synaptic. Do this if you get complaints about packages with “unmet dependencies”.
-
apt-get autoclean
This command removes .deb files for packages that are no longer installed on your system. Depending on your installation habits, removing these files from /var/cache/apt/archives may regain a significant amount of diskspace.
-
apt-get clean
The same as above, except it removes all packages from the package cache. This may not be desirable if you have a slow Internet connection, since it will cause you to redownload any packages you need to install a program.
-
The package cache is in /var/cache/apt/archives . The command
du -sh /var/cache/apt/archives
will tell you how much space cached packages are consuming.
-
-
dpkg-reconfigure <package_name>
Reconfigure the named package. With many packages, you’ll be prompted with some configuration questions you may not have known were there.
-
For example:
dpkg-reconfigure fontconfig-config
will present you with a “wizard” on configuring fonts in Ubuntu.
-
-
echo "<package_name> hold" | dpkg --set-selections
This command places the desired package on hold.
-
This command may have the unintended side effect of preventing upgrades to packages that depend on updated versions of the pinned package. apt-get dist-upgrade will override this, but will warn you first. If you want to use this command with sudo, you need to use echo “<package_name> hold” | sudo dpkg –set-selections not sudo echo “<package_name> hold” | dpkg –set-selections.
-
-
echo "<package_name> install" | dpkg --set-selections
This command removes the “hold” or “locked package” state set by the above command. The note above about sudo usage applies to this command.
Removal commands
-
apt-get remove <package_name>
This command removes an installed package, leaving configuration files intact.
-
apt-get purge <package_name>
This command completely removes a package and the associated configuration files. Configuration files residing in ~ are not usually affected by this command.
- + operator
-
If you want to remove package1 and install package2 in one step:
apt-get remove <package1> <package2>+
.
-
- + operator
-
apt-get autoremove
This command removes packages that were installed by other packages and are no longer needed.
-
apt-get autoremove <package_name>
This command removes an installed package and dependencies.
-
-
While there is no built in way to remove all of your configuration information from your removed packages you can remove all configuration data from every removed package with the following command.
dpkg -l | grep '^rc' | awk '{print $2}' | xargs dpkg --purge
Search commands
-
apt-cache search <search_term>
Each package has a name and a description. This command lists packages whose name or description contains <search_term>.
-
dpkg -l *<search_term>*
This will find packages whose names contain <search_term>. Similar to apt-cache search, but also shows whether a package is installed on your system by marking it with ii (installed) and un (not installed).
-
apt-cache show <package_name>
This command shows the description of package <package_name> and other relevant information including version, size, dependencies and conflicts.
-
dpkg --print-avail <package_name>
This command is similar to “apt-cache show”.
-
dpkg -L <package_name>
This command will list files in package <package_name>.
-
dpkg -c foo.deb
This command lists files in the package “foo.deb”. Note that foo.deb is a pathname. Use this command on .deb packages that you have manually downloaded.
-
dlocate <package_name>
This command determines which installed package owns <package_name>. It shows files from installed packages that match <package_name>, with the name of the package they came from. Consider this to be a “reverse lookup” utility.
In order to use this command, the package dlocate must be installed on your system. -
dpkg -S <filename_search_pattern>
This command does the same as dlocate, but does not require the installation of any additional packages. It is slower than dlocate but has the advantage of being installed by default on all Debian and Ubuntu systems.
-
apt-file search <filename_search_pattern>
This command acts like dlocate and dpkg -S, but searches all available packages. It answers the question, “what package provides this file?”.
-
apt-file needs to be updated regularly like apt-get. Use the command:
apt-file update
In order to use this command, the package apt-file must be installed on your system. -
-
apt-cache pkgnames
This command provides a listing of every package in the system
-
A general note on searching: If searching generates a list that is too long, you can filter your results by piping them through the command grep. Examples:
-
apt-cache search <filename> | grep -w <filename>
will show only the files that contain <filename> as a whole word
-
dpkg -L package | grep /usr/bin
will list files located in the directory /usr/bin, useful if you’re looking for a particular executable.
-
For more information on apt-get, apt-cache and dpkg consult their manual pages by using the man command. These manuals will provide a wider scope of information in addition to all of the options that you can use with each program.
-
Example:
man apt-get
.
Typical usage example
I want to feel the wind in my hair, I want the adrenaline of speed. So let’s install a racing game. But what racing games are available?
apt-cache search racing game
It gives me a lot of answers. I see a game named “torcs”. Let’s get some more information on this game.
apt-cache show torcs
Hmmm… it seems interesting. But is this game not already installed on my computer? And what is the available version? Which repository is it from (Universe or Main)?
apt-cache policy torcs
Ok, so now, let’s install it!
apt-get install torcs
What is the command I must type in the console to launch this game? In this example, it’s straightforward (“torcs”), but that’s not always the case. One way of finding the name of the binary is to look at what files the package has installed in “/usr/bin”. For games, the binary will be in “/usr/games”. For administrative programs, it’s in “/usr/sbin”.
dpkg -L torcs | grep /usr/games/
The first part of the command display all files installed by the package “torcs” (try it). With the second part, we ask to only display lines containing “/usr/games/”.
Hmmm, that game is cool. Maybe there are some extra tracks?
apt-cache search torcs
But I’m running out of space. I will delete the apt cache!
apt-get clean
Oh no, my mother asked me to remove all games from this computer. But I want to keep the configuration files so I can simply re-install it later.
apt-get remove torcs
If I want to also remove config files :
apt-get purge torcs
Setting up apt-get to use a http-proxy
These are three methods of using apt-get with a http-proxy.
Temporary proxy session
This is a temporary method that you can manually use each time you want to use apt-get through a http-proxy. This method is useful if you only want to temporarily use a http-proxy.
Enter this line in the terminal prior to using apt-get (substitute your details for yourproxyaddress and proxyport).
export http_proxy=http://yourproxyaddress:proxyport
If you normally use sudo to run apt-get you will need to login as root first for this to work unless you also add some explicit environment settings to /etc/sudoers, e.g.
Defaults env_keep = "http_proxy https_proxy ftp_proxy"
APT configuration file method
This method uses the apt.conf file which is found in your /etc/apt/ directory. This method is useful if you only want apt-get (and not other applications) to use a http-proxy permanently.
On some installations there will be no apt-conf file set up. This procedure will either edit an existing apt-conf file or create a new apt-conf file.
gksudo gedit /etc/apt/apt.conf
Add this line to your /etc/apt/apt.conf file (substitute your details for yourproxyaddress and proxyport).
Acquire::http::Proxy "http://yourproxyaddress:proxyport";
Save the apt.conf file.
BASH rc method
This method adds a two lines to your .bashrc file in your $HOME directory. This method is useful if you would like apt-get and other applications for instance wget, to use a http-proxy.
gedit ~/.bashrc
Add these lines to the bottom of your ~/.bashrc file (substitute your details for yourproxyaddress and proxyport)
http_proxy=http://yourproxyaddress:proxyport
export http_proxy
Save the file. Close your terminal window and then open another terminal window or source the ~/.bashrc file:
source ~/.bashrc
Test your proxy with sudo apt-get update and whatever networking tool you desire. You can use firestarter or conky to see active connections.
If you make a mistake and go back to edit the file again, you can close the terminal and reopen it or you can source ~/.bashrc as shown above.
source ~/.bashrc
How to login a proxy user
If you need to login to the Proxy server this can be achieved in most cases by using the following layout in specifying the proxy address in http-proxy. (substitute your details for username, password, yourproxyaddress and proxyport)
http_proxy=http://username:password@yourproxyaddress:proxyport
Useful additional packages
-
Deborphan
-
Debfoster
Additional links
-
Repositories/CommandLine
-
PinningHowto
-
AutoDeb
-
Synaptic Package Manager
-
Ubuntu Community Forums: Installations and Upgrades
-
What is apt-fast and should I use it?
Troubleshooting
-
https://help.ubuntu.com/community/PackageManagerTroubleshootingProcedure
CategoryPackageManagement CategoryCommandLine
Одной из наиболее привлекательных особенностей работы системы Linux является мгновенный доступ к тысячам пакетов, которые можно установить из диспетчера пакетов дистрибутива Linux.
Установить пакеты очень просто.
То есть до тех пор, пока вы знаете название того, что пытаетесь установить.
Но вы всегда можете поискать нужные пакеты.
В дистрибутивах, которые используют менеджер пакетов apt, таких как Debian, Ubuntu и Linux Mint и т.д. это делается с помощью команды поиска apt.
В этом руководстве мы покажем вам, как использовать команду apt search на нескольких примерах.
Вы быстро научитесь справляться с задачей поиска пакетов для дальнейшей установки.
Как найти пакет с помощью менеджера пакетов apt
Используйте следующие команды для поиска пакета с apt.
Перед запуском вам следует обновить список репозиториев, чтобы все результаты были актуальными.
$ sudo apt update
Самый простой способ поиска пакета – использовать следующий синтаксис.
Данная команда будет искать любые пакеты, связанные с вашим поисковым запросом, а не только пакеты, которые содержат определенную фразу в своем имени.
$ apt search package-name
Если вы хотите найти только имена пакетов, вы можете использовать следующий синтаксис.
Вот пример, в котором мы ищем пакеты с apache2 в имени.
Система покажет список пакетов, которые начинаются с текста «apache2».
$ apt-cache pkgnames apache2
apache2-ssl-dev
apache2-suexec-pristine
apache2-data
apache2-bin
apache2-dev
apache2-doc
apache2-suexec-custom
apache2
apache2-utils
apt— это утилита командной строки для установки, обновления, удаления и иного управления пакетами deb в Ubuntu, Debian и связанных с ними дистрибутивах Linux. Он сочетает в себе наиболее часто используемые команды из инструментов apt-getи apt-cacheс разными значениями по умолчанию некоторых параметров.
aptпредназначен для интерактивного использования. Отдавайте предпочтение сценариям apt-getи apt-cacheв вашей оболочке, поскольку они обратно совместимы между различными версиями и имеют больше параметров и функций.
Большинство aptкоманд необходимо запускать от имени пользователя с sudo привилегиями.
В этом руководстве вы можете узнать все о aptкомандах в Linix системе.
Обновление индекса пакета ( apt update)
Индекс пакетов APT — это, по сути, база данных, в которой хранятся записи о доступных пакетах из репозиториев, включенных в вашей системе.
Чтобы обновить индекс пакета, выполните команду ниже. Это вытянет последние изменения из репозиториев APT:
sudo apt updateВсегда обновляйте индекс пакетов перед обновлением или установкой новых пакетов.
Обновление пакетов ( apt upgrade)
Регулярное обновление вашей системы Linux является одним из наиболее важных аспектов общей безопасности системы.
Чтобы обновить установленные пакеты до последних версий, запустите:
sudo apt upgradeКоманда не обновляет пакеты, требующие удаления установленных пакетов.
Если вы хотите обновить один пакет, передайте имя пакета:
sudo apt upgrade package_nameПолное обновление ( apt full-upgrade)
Разница между upgradeи full-upgradeзаключается в том, что последний удалит установленные пакеты, если это необходимо для обновления всей системы.
sudo apt full-upgradeБудьте особенно осторожны при использовании этой команды.
Установка пакетов ( apt install)
Установка пакетов так же проста, как запуск следующей команды:
sudo apt install package_nameЕсли вы хотите установить несколько пакетов одной командой, укажите их в виде списка, разделенного пробелами:
sudo apt install package1 package2Чтобы установить локальные файлы deb, укажите полный путь к файлу. В противном случае команда попытается получить и установить пакет из репозиториев APT.
sudo apt install /full/path/file.debУдаление пакетов ( apt remove)
Чтобы удалить установленный пакет, введите следующее:
sudo apt remove package_nameВы также можете указать несколько пакетов, разделенных пробелами:
sudo apt remove package1 package2Команда removeудалит указанные пакеты, но может оставить некоторые файлы конфигурации. Если вы хотите удалить пакет, включая все файлы конфигурации, используйте purgeвместо remove:
sudo apt purge package_nameУдалить неиспользуемые пакеты ( apt autoremove)
Всякий раз, когда в системе устанавливается новый пакет, который зависит от других пакетов, зависимости пакета также будут установлены. Когда пакет будет удален, зависимости останутся в системе. Эти оставшиеся пакеты больше ничем не используются и могут быть удалены.
sudo apt autoremoveСписок пакетов ( apt list)
Команда listпозволяет вам перечислить доступные, установленные и обновляемые пакеты.
Чтобы просмотреть все доступные пакеты, используйте следующую команду:
sudo apt listКоманда напечатает список всех пакетов, включая информацию о версиях и архитектуре пакета. Чтобы узнать, установлен ли конкретный пакет, вы можете отфильтровать вывод с помощью grep команды.
sudo apt list | grep package_nameЧтобы перечислить только установленные пакеты , введите:
sudo apt list --installedПолучение списка обновляемых пакетов может быть полезно перед фактическим обновлением пакетов:
sudo apt list --upgradeableПоиск пакетов ( apt search)
Эта команда позволяет вам искать данный пакет в списке доступных пакетов:
sudo apt search package_nameЕсли найдено, команда вернет пакеты, имя которых соответствует поисковому запросу.
Информация о пакете ( apt show)
Информация о зависимостях пакета, размере установки, источнике пакета и т. д. может быть полезна перед удалением или установкой нового пакета.
Чтобы получить информацию о данном пакете, используйте showкоманду:
sudo apt show package_name
В следующей статье мы рассмотрим, как мы можем поиск доступных пакетов из командной строки. Есть несколько способов поиска пакетов, доступных в Debian, Ubuntu или Linux Mint, из терминала. Эти пакеты могут быть поиск благодаря склонный, APT-кэша y способность. Эти инструменты помогут нам при поиске названий пакетов и их описаний. Они также могут быть очень полезны, если то, что мы ищем, является конкретным пакетом, но мы не знаем точного имени пакета или если нам нужен инструмент для конкретной цели или задачи. Таким образом, мы сможем узнать доступные варианты.
Основные различия между использованием apt, apt-cache и aptitude для поиска доступных пакетов: их выпуск и порядок, в котором эти пакеты классифицируются. Кроме того, aptitude может не быть установлен по умолчанию в вашем дистрибутиве Gnu / Linux на основе Debian. Если это ваш случай, вам придется его установить.
Из всех примеров, которые мы увидим, apt-cache имеет самый простой для чтения вывод поскольку обычно мне не нужна дополнительная информация. Чтобы увидеть установленные / доступные версии, вы можете использовать имя пакета политики apt-cache.
Еще одна вещь, которую нужно иметь в виду, это то, что apt и apt-cache ищут в кеше программных пакетов apt, поэтому они возвращают оба пакета, доступные в репозитории например, вручную установленные пакеты DEB (недоступны в репозиториях). В случае aptitude, он вернет только те пакеты, которые доступны в репозиториях.
Индекс
- 1 Поиск доступных пакетов из командной строки
- 1.1 Поиск доступных пакетов с помощью apt-cache
- 1.2 Поиск доступных пакетов с помощью aptitude
- 1.3 Поиск доступных пакетов с помощью apt
- 2 Сделайте результаты более удобными для чтения
Поиск доступных пакетов из командной строки
Поиск доступных пакетов с помощью apt-cache
Как я уже писал, мы можем использовать apt-cache для поиск доступных пакетов в репозиториях Debian, Ubuntu или Linux Mint, помимо установленных пакетов DEB, которых нет в репозиториях. Используемый формат будет следующим:
apt-cache search BÚSQUEDA
Практический пример поиск пакета “nodejs” это будет примерно так:
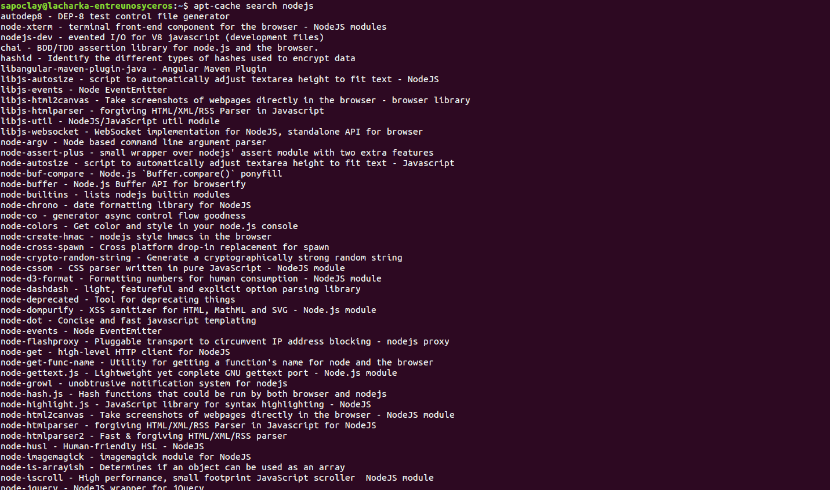
apt-cache search nodejs
Как вы можете видеть в предыдущем захвате, мне не удалось захватить весь вывод, потому что он может быть очень длинным.
Поиск доступных пакетов с помощью aptitude
В случае способности это Интерфейс на основе ncurses для apt. Этот инструмент обычно не устанавливается по умолчанию, но мы сможем установите его в Debian, Ubuntu, Linux Mint и другие дистрибутивы Gnu / Linux на основе Debian используя эту команду в терминале (Ctrl + Alt + T):
sudo apt install aptitude
После установки мы сможем использовать aptitude для поиска пакетов из командной строки. Используемый формат будет примерно таким:
aptitude search BÚSQUEDA
Практический пример поиска пакета “nodejs” будет следующим:

aptitude search nodejs
Мы также сможем использовать пользовательский интерфейс aptitude Ncurses. Нам больше не нужно будет писать способность чтобы запустить его:
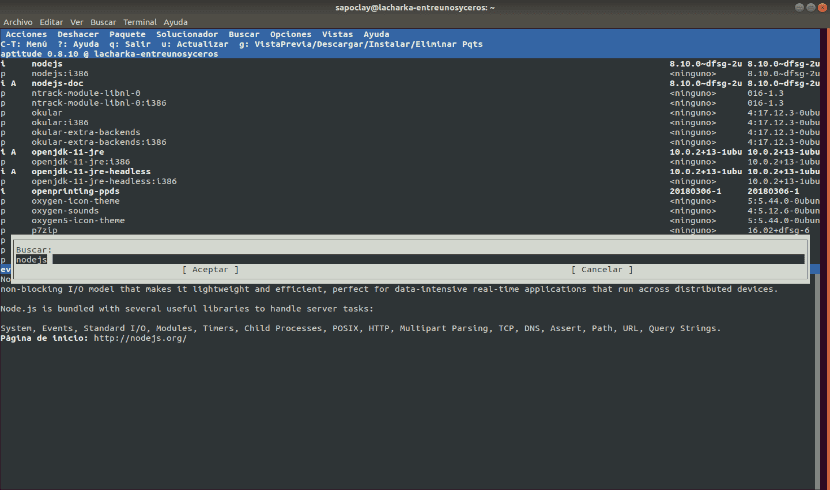
Здесь мы можем найдите пакеты, нажав / и затем введя ключевое слово для поиска.
Поиск доступных пакетов с помощью apt
Используя apt, мы можем искать доступные пакеты из командной строки следующим образом:
apt search BÚSQUEDA
Вы просто должны замените слово ПОИСК ключевым словом что мы заинтересованы в поиске. Мы можем добавить несколько ключевых слов в кавычки.
Это будет пример поиска ‘nodejs’ вместе с его выводом:
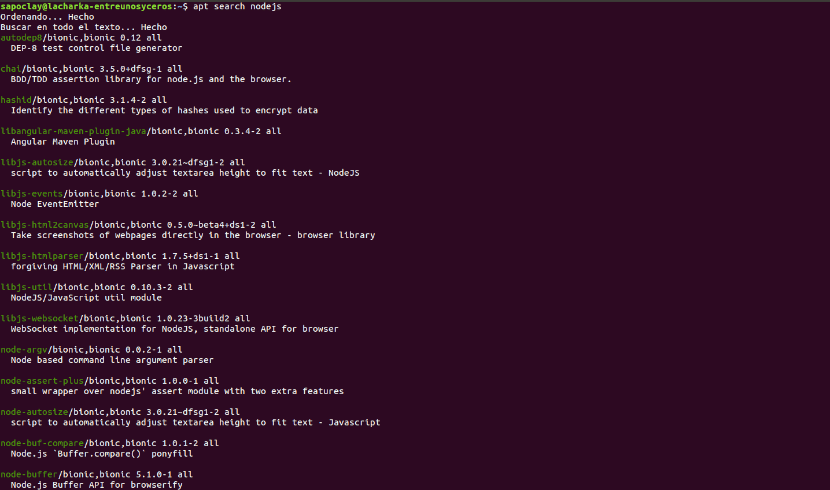
apt search nodejs
Опять же, результатов так много, что мне не удалось запечатлеть их все на предыдущем изображении.
Сделайте результаты более удобными для чтения
В трех только что рассмотренных случаях результаты поиска могут быть очень длинными. Когда это будет так, мы сможем запустить их, используя Подробнее рядом с командами. Этим мы упростим чтение, как показано ниже:
apt-cache search BÚSQUEDA | more
Мы также можем исключить результаты, которые не включают конкретное ключевое слово (SEARCH2 в этом примере), используя grep:

apt-cache search BÚSQUEDA | grep BÚSQUEDA2
Grep по умолчанию чувствителен к регистру. Если мы добавим параметр -i, мы можем игнорировать верхний и нижний регистр. Это было бы так: grep -i ПОИСК2.
Содержание статьи соответствует нашим принципам редакционная этика. Чтобы сообщить об ошибке, нажмите здесь.
