Supported distributions and versions
nginx packages are available for the following Linux distributions and
versions:
RHEL and derivatives
Version Supported Platforms 7.4+ x86_64, aarch64/arm64 8.x x86_64, aarch64/arm64, s390x 9.x x86_64, aarch64/arm64, s390x
Debian
Version Supported Platforms 11.x “bullseye” x86_64, aarch64/arm64
Ubuntu
Version Supported Platforms 18.04 “bionic” x86_64, aarch64/arm64 20.04 “focal” x86_64, aarch64/arm64, s390x 22.04 “jammy” x86_64, aarch64/arm64, s390x 22.10 “kinetic” x86_64, aarch64/arm64 23.04 “lunar” x86_64, aarch64/arm64
SLES
Version Supported Platforms 12 SP5+ x86_64 15 SP2+ x86_64
Alpine
Version Supported platforms 3.14 x86_64, aarch64/arm64 3.15 x86_64, aarch64/arm64 3.16 x86_64, aarch64/arm64 3.17 x86_64, aarch64/arm64
Amazon Linux
Version Supported platforms 2 (LTS) x86_64, aarch64/arm64 2023 x86_64, aarch64/arm64
Installation instructions
Before you install nginx for the first time on a new machine, you need to
set up the nginx packages repository.
Afterward, you can install and update nginx from the repository.
RHEL and derivatives
This section applies to Red Hat Enterprise Linux and its derivatives such as
CentOS, Oracle Linux, Rocky Linux, AlmaLinux.
Install the prerequisites:
sudo yum install yum-utils
To set up the yum repository, create the file named
/etc/yum.repos.d/nginx.repo
with the following contents:
[nginx-stable]
name=nginx stable repo
baseurl=http://nginx.org/packages/centos/$releasever/$basearch/
gpgcheck=1
enabled=1
gpgkey=https://nginx.org/keys/nginx_signing.key
module_hotfixes=true

[nginx-mainline]
name=nginx mainline repo
baseurl=http://nginx.org/packages/mainline/centos/$releasever/$basearch/
gpgcheck=1
enabled=0
gpgkey=https://nginx.org/keys/nginx_signing.key
module_hotfixes=true
By default, the repository for stable nginx packages is used.
If you would like to use mainline nginx packages,
run the following command:
sudo yum-config-manager --enable nginx-mainline
To install nginx, run the following command:
sudo yum install nginx
When prompted to accept the GPG key, verify that the fingerprint matches
573B FD6B 3D8F BC64 1079 A6AB ABF5 BD82 7BD9 BF62,
and if so, accept it.
Debian
Install the prerequisites:
sudo apt install curl gnupg2 ca-certificates lsb-release debian-archive-keyring
Import an official nginx signing key so apt could verify the packages
authenticity.
Fetch the key:
curl https://nginx.org/keys/nginx_signing.key | gpg --dearmor
    | sudo tee /usr/share/keyrings/nginx-archive-keyring.gpg >/dev/null
Verify that the downloaded file contains the proper key:
gpg --dry-run --quiet --no-keyring --import --import-options import-show /usr/share/keyrings/nginx-archive-keyring.gpg
The output should contain the full fingerprint
573BFD6B3D8FBC641079A6ABABF5BD827BD9BF62
as follows:
pub   rsa2048 2011-08-19 [SC] [expires: 2024-06-14]
      573BFD6B3D8FBC641079A6ABABF5BD827BD9BF62
uid                      nginx signing key <signing-key@nginx.com>
If the fingerprint is different, remove the file.
To set up the apt repository for stable nginx packages,
run the following command:
echo "deb [signed-by=/usr/share/keyrings/nginx-archive-keyring.gpg]
http://nginx.org/packages/debian `lsb_release -cs` nginx"
    | sudo tee /etc/apt/sources.list.d/nginx.list
If you would like to use mainline nginx packages,
run the following command instead:
echo "deb [signed-by=/usr/share/keyrings/nginx-archive-keyring.gpg]
http://nginx.org/packages/mainline/debian `lsb_release -cs` nginx"
    | sudo tee /etc/apt/sources.list.d/nginx.list
Set up repository pinning to prefer our packages over
distribution-provided ones:
echo -e "Package: *nPin: origin nginx.orgnPin: release o=nginxnPin-Priority: 900n"
    | sudo tee /etc/apt/preferences.d/99nginx
To install nginx, run the following commands:
sudo apt update
sudo apt install nginx
Ubuntu
Install the prerequisites:
sudo apt install curl gnupg2 ca-certificates lsb-release ubuntu-keyring
Import an official nginx signing key so apt could verify the packages
authenticity.
Fetch the key:
curl https://nginx.org/keys/nginx_signing.key | gpg --dearmor
    | sudo tee /usr/share/keyrings/nginx-archive-keyring.gpg >/dev/null
Verify that the downloaded file contains the proper key:
gpg --dry-run --quiet --no-keyring --import --import-options import-show /usr/share/keyrings/nginx-archive-keyring.gpg
The output should contain the full fingerprint
573BFD6B3D8FBC641079A6ABABF5BD827BD9BF62
as follows:
pub   rsa2048 2011-08-19 [SC] [expires: 2024-06-14]
      573BFD6B3D8FBC641079A6ABABF5BD827BD9BF62
uid                      nginx signing key <signing-key@nginx.com>
If the fingerprint is different, remove the file.
To set up the apt repository for stable nginx packages,
run the following command:
echo "deb [signed-by=/usr/share/keyrings/nginx-archive-keyring.gpg]
http://nginx.org/packages/ubuntu `lsb_release -cs` nginx"
    | sudo tee /etc/apt/sources.list.d/nginx.list
If you would like to use mainline nginx packages,
run the following command instead:
echo "deb [signed-by=/usr/share/keyrings/nginx-archive-keyring.gpg]
http://nginx.org/packages/mainline/ubuntu `lsb_release -cs` nginx"
    | sudo tee /etc/apt/sources.list.d/nginx.list
Set up repository pinning to prefer our packages over
distribution-provided ones:
echo -e "Package: *nPin: origin nginx.orgnPin: release o=nginxnPin-Priority: 900n"
    | sudo tee /etc/apt/preferences.d/99nginx
To install nginx, run the following commands:
sudo apt update
sudo apt install nginx
SLES
Install the prerequisites:
sudo zypper install curl ca-certificates gpg2
To set up the zypper repository for stable nginx packages,
run the following command:
sudo zypper addrepo --gpgcheck --type yum --refresh --check
    'http://nginx.org/packages/sles/$releasever_major' nginx-stable
If you would like to use mainline nginx packages,
run the following command instead:
sudo zypper addrepo --gpgcheck --type yum --refresh --check
    'http://nginx.org/packages/mainline/sles/$releasever_major' nginx-mainline
Next, import an official nginx signing key so zypper/rpm could verify
the packages authenticity.
Fetch the key:
curl -o /tmp/nginx_signing.key https://nginx.org/keys/nginx_signing.key
Verify that the downloaded file contains the proper key:
gpg --with-fingerprint /tmp/nginx_signing.key
The output should contain the full fingerprint
573B FD6B 3D8F BC64 1079 A6AB ABF5 BD82 7BD9 BF62
as follows:
pub  2048R/7BD9BF62 2011-08-19 [expires: 2024-06-14]
      Key fingerprint = 573B FD6B 3D8F BC64 1079  A6AB ABF5 BD82 7BD9 BF62
uid nginx signing key <signing-key@nginx.com>
Finally, import the key to the rpm database:
sudo rpmkeys --import /tmp/nginx_signing.key
To install nginx, run the following command:
sudo zypper install nginx
Alpine
Install the prerequisites:
sudo apk add openssl curl ca-certificates
To set up the apk repository for stable nginx packages,
run the following command:
printf "%s%s%s%sn"
    "@nginx "
    "http://nginx.org/packages/alpine/v"
    `egrep -o '^[0-9]+.[0-9]+' /etc/alpine-release`
    "/main"
    | sudo tee -a /etc/apk/repositories
If you would like to use mainline nginx packages,
run the following command instead:
printf "%s%s%s%sn"
    "@nginx "
    "http://nginx.org/packages/mainline/alpine/v"
    `egrep -o '^[0-9]+.[0-9]+' /etc/alpine-release`
    "/main"
    | sudo tee -a /etc/apk/repositories
Next, import an official nginx signing key so apk could verify
the packages authenticity.
Fetch the key:
curl -o /tmp/nginx_signing.rsa.pub https://nginx.org/keys/nginx_signing.rsa.pub
Verify that downloaded file contains the proper key:
openssl rsa -pubin -in /tmp/nginx_signing.rsa.pub -text -noout
The output should contain the following modulus:
Public-Key: (2048 bit)
Modulus:
    00:fe:14:f6:0a:1a:b8:86:19:fe:cd:ab:02:9f:58:
    2f:37:70:15:74:d6:06:9b:81:55:90:99:96:cc:70:
    5c:de:5b:e8:4c:b2:0c:47:5b:a8:a2:98:3d:11:b1:
    f6:7d:a0:46:df:24:23:c6:d0:24:52:67:ba:69:ab:
    9a:4a:6a:66:2c:db:e1:09:f1:0d:b2:b0:e1:47:1f:
    0a:46:ac:0d:82:f3:3c:8d:02:ce:08:43:19:d9:64:
    86:c4:4e:07:12:c0:5b:43:ba:7d:17:8a:a3:f0:3d:
    98:32:b9:75:66:f4:f0:1b:2d:94:5b:7c:1c:e6:f3:
    04:7f:dd:25:b2:82:a6:41:04:b7:50:93:94:c4:7c:
    34:7e:12:7c:bf:33:54:55:47:8c:42:94:40:8e:34:
    5f:54:04:1d:9e:8c:57:48:d4:b0:f8:e4:03:db:3f:
    68:6c:37:fa:62:14:1c:94:d6:de:f2:2b:68:29:17:
    24:6d:f7:b5:b3:18:79:fd:31:5e:7f:4c:be:c0:99:
    13:cc:e2:97:2b:dc:96:9c:9a:d0:a7:c5:77:82:67:
    c9:cb:a9:e7:68:4a:e1:c5:ba:1c:32:0e:79:40:6e:
    ef:08:d7:a3:b9:5d:1a:df:ce:1a:c7:44:91:4c:d4:
    99:c8:88:69:b3:66:2e:b3:06:f1:f4:22:d7:f2:5f:
    ab:6d
Exponent: 65537 (0x10001)
Finally, move the key to apk trusted keys storage:
sudo mv /tmp/nginx_signing.rsa.pub /etc/apk/keys/
To install nginx, run the following command:
sudo apk add nginx@nginx
The @nginx tag should also be specified when installing
packages with dynamic modules:
sudo apk add nginx-module-image-filter@nginx nginx-module-njs@nginx
Amazon Linux
Install the prerequisites:
sudo yum install yum-utils
To set up the yum repository for Amazon Linux 2, create the file named
/etc/yum.repos.d/nginx.repo
with the following contents:
[nginx-stable]
name=nginx stable repo
baseurl=http://nginx.org/packages/amzn2/$releasever/$basearch/
gpgcheck=1
enabled=1
gpgkey=https://nginx.org/keys/nginx_signing.key
module_hotfixes=true
priority=9

[nginx-mainline]
name=nginx mainline repo
baseurl=http://nginx.org/packages/mainline/amzn2/$releasever/$basearch/
gpgcheck=1
enabled=0
gpgkey=https://nginx.org/keys/nginx_signing.key
module_hotfixes=true
priority=9
To set up the yum repository for Amazon Linux 2023, create the file named
/etc/yum.repos.d/nginx.repo
with the following contents:
[nginx-stable]
name=nginx stable repo
baseurl=http://nginx.org/packages/amzn/2023/$basearch/
gpgcheck=1
enabled=1
gpgkey=https://nginx.org/keys/nginx_signing.key
module_hotfixes=true
priority=9

[nginx-mainline]
name=nginx mainline repo
baseurl=http://nginx.org/packages/mainline/amzn/2023/$basearch/
gpgcheck=1
enabled=0
gpgkey=https://nginx.org/keys/nginx_signing.key
module_hotfixes=true
priority=9
By default, the repository for stable nginx packages is used.
If you would like to use mainline nginx packages,
run the following command:
sudo yum-config-manager --enable nginx-mainline
To install nginx, run the following command:
sudo yum install nginx
When prompted to accept the GPG key, verify that the fingerprint matches
573B FD6B 3D8F BC64 1079 A6AB ABF5 BD82 7BD9 BF62,
and if so, accept it.
Source Packages
Packaging sources can be found in the
packaging sources repository.
The default branch holds packaging sources for the current
mainline version, while stable-* branches contain latest
sources for stable releases.
To build binary packages, run make in
debian/ directory on Debian/Ubuntu, or in
rpm/SPECS/ on RHEL and derivatives, SLES, and Amazon Linux, or in
alpine/ on Alpine.
Packaging sources are distributed under the same
2-clause BSD-like license
used by nginx.
Dynamic Modules
Main nginx package is built with all modules that do not require additional
libraries to avoid extra dependencies.
Since version 1.9.11, nginx supports
dynamic modules
and the following modules are built as dynamic and shipped as separate
packages:
nginx-module-geoip
nginx-module-image-filter
nginx-module-njs
nginx-module-perl
nginx-module-xslt
Signatures
Since our PGP keys
and packages are located on the same server,
they are equally trusted.
It is highly advised to additionally verify
the authenticity of the downloaded PGP key.
PGP has the “Web of Trust” concept,
when a key is signed by someone else’s key,
that in turn is signed by another key and so on.
It often makes possible to build a chain from an arbitrary key
to someone’s key who you know and trust personally,
thus verify the authenticity of the first key in a chain.
This concept is described in details in
GPG Mini Howto.
Our keys have enough signatures,
and their authenticity is relatively easy to check.
Binary Releases
Prebuilt Packages for Linux and BSD
Most Linux distributions and BSD variants have NGINX in the usual package repositories and they can be installed via whatever method is normally used to install software (apt on Debian, emerge on Gentoo, ports on FreeBSD, etc).
Be aware that these packages are often somewhat out-of-date.
If you want the latest features and bugfixes, it’s recommended to build from source or use packages directly from nginx.org.
Official Red Hat/CentOS packages
To add NGINX yum repository, create a file named /etc/yum.repos.d/nginx.repo and paste one of the configurations below:
CentOS:
[nginx]
name=nginx repo
baseurl=https://nginx.org/packages/centos/$releasever/$basearch/
gpgcheck=0
enabled=1
RHEL:
[nginx]
name=nginx repo
baseurl=https://nginx.org/packages/rhel/$releasever/$basearch/
gpgcheck=0
enabled=1
Due to differences between how CentOS, RHEL, and Scientific Linux populate the $releasever variable, it is necessary to manually replace $releasever with either 5 (for 5.x) or 6 (for 6.x), depending upon your OS version.
Official Debian/Ubuntu packages
Ubuntu:
The available NGINX Ubuntu release support is listed at this distribution page. For a mapping of Ubuntu versions to release names, please visit the Official Ubuntu Releases page.
Append the appropriate stanza to /etc/apt/sources.list. If there is concern about persistence of repository additions (i.e. DigitalOcean Droplets), the appropriate stanza may instead be added to a different list file under /etc/apt/sources.list.d/, such as /etc/apt/sources.list.d/nginx.list.
## Replace $release with your corresponding Ubuntu release.
deb https://nginx.org/packages/ubuntu/ $release nginx
deb-src https://nginx.org/packages/ubuntu/ $release nginx
e.g. Ubuntu 20.04 (Focal Fossa):
deb https://nginx.org/packages/ubuntu/ focal nginx
deb-src https://nginx.org/packages/ubuntu/ focal nginx
To install the packages, execute in your shell:
sudo apt update
sudo apt install nginx
If a W: GPG error: https://nginx.org/packages/ubuntu focal InRelease: The following signatures couldn't be verified because the public key is not available: NO_PUBKEY $key is encountered during the NGINX repository update, execute the following:
## Replace $key with the corresponding $key from your GPG error.
sudo apt-key adv --keyserver keyserver.ubuntu.com --recv-keys $key
sudo apt update
sudo apt install nginx
You have now nginx installed on your server but not ready to serve web pages. you have to start the nginx.
You can do this by using this command:
sudo systemctl start nginx
Debian 6:
Append the appropriate stanza to /etc/apt/sources.list.
deb https://nginx.org/packages/debian/ squeeze nginx
deb-src https://nginx.org/packages/debian/ squeeze nginx
Ubuntu PPA
This PPA is maintained by volunteers and is not distributed by nginx.org. It has some additional compiled-in modules and may be more fitting for your environment.
You can get the latest stable version of NGINX from the NGINX PPA on Launchpad:
You will need to have root privileges to perform the following commands.
For Ubuntu 20.04 and newer:
sudo -s
nginx=stable # use nginx=development for latest development version
add-apt-repository ppa:nginx/$nginx
apt update
apt install nginx
If you get an error about add-apt-repository not existing, you will want to install python-software-properties.
For other Debian/Ubuntu based distributions, you can try the lucid variant of the PPA which is the most likely to work on older package sets:
sudo -s
nginx=stable # use nginx=development for latest development version
echo "deb http://ppa.launchpad.net/nginx/$nginx/ubuntu lucid main" > /etc/apt/sources.list.d/nginx-$nginx-lucid.list
apt-key adv --keyserver keyserver.ubuntu.com --recv-keys C300EE8C
apt update
apt install nginx
Official Win32 Binaries
As of NGINX 0.8.50, NGINX is now available as an official Windows binary.
Installation:
cd c:
unzip nginx-1.2.3.zip
ren nginx-1.2.3 nginx
cd nginx
start nginx
Control:
nginx -s [ stop | quit | reopen | reload ]
For problems look in c:nginxlogserror.log or in EventLog.
In addition, Kevin Worthington maintains earlier Windows builds of the development branch.
Source Releases
There are currently two versions of NGINX available: stable (1.20.x), mainline (1.21.x).
The mainline branch gets new features and bugfixes sooner but might introduce new bugs as well.
Critical bugfixes are backported to the stable branch.
In general, the stable release is recommended, but the mainline release is typically quite stable as well.
See the :ref:`FAQ <faq.is_it_safe>`.
Stable
Mainline
Source code repository is at hg.nginx.org/nginx.
Older versions can be found here.
Building NGINX From Source
After extracting the source, run these commands from a terminal:
./configure
make
sudo make install
By default, NGINX will be installed in /usr/local/nginx. You may change this and other options with the :doc:`installoptions`.
You might also want to peruse the :doc:`3rd party modules <../../../modules/index>`, since these must be built at compile-time.
You can follow this guide for more detailed instruction for building nginx from source
Other Systems
- :doc:`solaris_10_u5`
- :doc:`solaris_11`
- :doc:`openbsd`
Warning
These pages are not thoroughly, if at all, reviewed for accuracy as they are on this page.
After Installing
There are many different example configurations that can be found in :doc:`../../index` section. Also the :doc:`config_pitfalls` page will help keep you from making mistakes that so many users before you did.
References
Original Documentation
Nginx – это один из популярнейших веб-серверов в мире, позволяющий размещать очень большие сайты с высоким трафиком. Он обычно расходует меньше ресурсов, чем другие веб-серверы, а еще может работать как обратный прокси-сервер.
Данный мануал поможет установить Nginx на сервер Ubuntu 20.04. также вы узнаете, как разблокировать трафик Nginx в брандмауэре, управлять этим сервисом и настроить блок server (аналог виртуального хоста).
Пакет Nginx можно найти в стандартном репозитории Ubuntu и установить с помощью пакетного менеджера apt.
Если это ваше первое взаимодействие с системой пакетирования apt в текущей сессии, вы должны обновить индекс пакетов. После этого можно установить Nginx.
$ sudo apt update
$ sudo apt install nginx
Чтобы подтвердить установку, нажмите Enter. После этого пакетный менеджер установит Nginx и его зависимости.
2: Настройка брандмауэра
Прежде чем протестировать Nginx, нужно разблокировать его трафик в брандмауэре ufw. Во время установки Nginx регистрирует в ufw профиль своего сервиса, потому открыть его трафик будет несложно.
Откройте список доступных профилей ufw:
$ sudo ufw app list

Available applications:
Nginx Full
Nginx HTTP
Nginx HTTPS
OpenSSH
В этом списке вы найдете три профиля Nginx:
- Nginx Full: открывает порт 80 (незашифрованный сетевой трафик) и 443 (зашифрованный трафик TLS/SSL).
- Nginx HTTP: открывает незашифрованный трафик HTTP на порт 80.
- Nginx HTTPS: для зашифрованного трафика TLS/SSL на порт 443.
Лучше использовать профиль, который поддерживает шифрование. Но поскольку на свежем сервере ещё не настроен SSL, мы можем открыть только порт 80.
Чтобы включить соответствующий профиль, введите:
$ sudo ufw allow 'Nginx HTTP'Убедитесь в том, что профиль включился:
$ sudo ufw statusКоманда должна показать, что трафик HTTP разблокирован:
Status: active
Status: active
To                         Action      From
--                         ------      ----
OpenSSH                    ALLOW       Anywhere
Nginx HTTP                 ALLOW       Anywhere
OpenSSH (v6)               ALLOW       Anywhere (v6)
Nginx HTTP (v6)            ALLOW       Anywhere (v6)
3: Тестирование веб-сервера
После установки Ubuntu 20.04 запустит Nginx автоматически. На данный момент веб-сервер должен работать.
Чтобы убедиться в том, что Nginx запустился, запросите его состояние в системе инициализации systemd.
$ systemctl status nginx

nginx.service - A high performance web server and a reverse proxy server
Loaded: loaded (/lib/systemd/system/nginx.service; enabled; vendor preset: enabled)
Active: active (running) since Fri 2020-04-20 16:08:19 UTC; 3 days ago
Docs: man:nginx(8)
Main PID: 2369 (nginx)
Tasks: 2 (limit: 1153)
Memory: 3.5M
CGroup: /system.slice/nginx.service
├─2369 nginx: master process /usr/sbin/nginx -g daemon on; master_process on;
└─2380 nginx: worker process
Как видите, сервис запущен успешно.
Также для проверки можно посетить стандартную посадочную страницу Nginx. Она доступна в браузере по домену или IP-адресу.
Если вы не знаете своего IP-адреса, вы можете узнать его с помощью командной строки. Введите:
$ curl -4 icanhazip.comУзнав свой IP-адрес, введите его в браузер, чтобы убедиться, что веб-сервер работает должным образом.
http://your_server_ipНа экране должна появиться стандартная страница Nginx:
Welcome to nginx!
If you see this page, the nginx web server is successfully installed and working. Further configuration is required.
4: Управление процессами Nginx
Теперь давайте рассмотрим несколько базовых команд для управления сервисом Nginx.
Чтобы остановить Nginx, введите:
$ sudo systemctl stop nginxЧтобы запустить его, введите:
$ sudo systemctl start nginxДля перезапуска веб-сервера используйте команду:
$ sudo systemctl restart nginxЧтобы обновить настройки Nginx, не сбрасывая соединения, введите команду:
$ sudo systemctl reload nginxПо умолчанию Nginx автоматически запускается во время загрузки сервера. Это поведение можно отключить:
$ sudo systemctl disable nginxЧтобы возобновить автозапуск сервиса, введите:
$ sudo systemctl enable nginx5: Настройка виртуального хоста
На веб-сервере Nginx можно использовать виртуальные хосты (в контексте Nginx они называются блоками server) для изоляции настроек и размещения нескольких доменов на одном сервере. Здесь мы используем условный домен your_domain.com, но вы должны заменить его собственным доменом.
В Ubuntu 20.04 Nginx по умолчанию предоставляет один включенный виртуальный хост, который обслуживает каталог /var/www/html. Этого хватит для работы одного сайта, но если вы хотите разместить несколько сайтов, вам нужно создать новые виртуальные хосты. Создайте структуру каталогов в /var/www для сайта your_domain.com, а /var/www/html оставьте как каталог по умолчанию, который будет обслуживаться, если запрос клиента не соответствует другим сайтам.
Создайте каталог your_domain.com, используйте опцию -p для создания всех необходимых родительских каталогов:
$ sudo mkdir -p /var/www/your_domain.com/htmlЗатем установите права на каталог с помощью переменной $USER:
$ sudo chown -R $USER:$USER /var/www/your_domain.com/htmlПрава должны быть установлены верно, если вы не поменяли unmask, но на всякий случай вы можете ввести такую команду:
$ sudo chmod -R 755 /var/www/your_domain.comЗатем создайте образец страницы index.html с помощью nano или другого редактора:
$ nano /var/www/your_domain.com/html/index.html

<html>
 <head>
    <title>Welcome to your_domain.com!</title>
 </head>
 <body>
    <h1>Success!  The your_domain.com server block is working!</h1>
 </body>
</html>
Сохраните и закройте файл.
Чтобы Nginx смог обслуживать этот контент, необходимо создать файл виртуального хоста с правильным набором директив. Вместо того чтобы напрямую изменять конфигурации по умолчанию, создайте новый файл /etc/nginx/sites-available/your_domain.com.
$ sudo nano /etc/nginx/sites-available/your_domain.comВставьте в файл следующие конфигурации. Они похожи на конфигурации по умолчанию, но содержат правильный домен и каталог:
server {
   listen 80;
   listen [::]:80;
   root /var/www/your_domain.com/html;
   index index.html index.htm index.nginx-debian.html;
   server_name your_domain.com www.your_domain.com;
   location / {
      try_files $uri $uri/ =404;
   }
}
Обратите внимание, что root содержит путь к новому каталогу, а server_name – новый домен.
Сохраните и закройте файл.
Включите файл, создав симлинк в каталоге sites-enabled:
$ sudo ln -s /etc/nginx/sites-available/your_domain.com /etc/nginx/sites-enabled/Теперь у вас есть два виртуальных хоста, которые будут обслуживать запросы клиентов на основе директив listen и server_name:
- your_domain будет обслуживать запросы для www.your_domain и your_domain.
- default будет отвечать на запросы по порту 80, если они не соответствуют остальным виртуальным хостам.
Чтобы избежать проблем с памятью, которые могут возникнуть в результате настройки дополнительных имен серверов, необходимо отредактировать одно значение в файле /etc/nginx/nginx.conf. Откройте файл:
$ sudo nano /etc/nginx/nginx.confНайдите строку server_names_hash_bucket_size и раскомментируйте ее, удалив символ #:
...
http {
...
server_names_hash_bucket_size 64;
...
}
...
Сохраните и закройте файл.
Проверьте ошибки в конфигурационном файле Nginx:
$ sudo nginx -tПерезапустите Nginx, чтобы новые параметры вступили в силу:
$ sudo systemctl restart nginxТеперь Nginx обслуживает домен вашего сайта. Чтобы убедиться в этом, откройте ссылку http://your_domain в браузере.
Success!
The your_domain.com server block is working!
6: Важные файлы и каталоги Nginx
Теперь вы знаете, как управлять сервисом. Пора познакомиться с важными файлами и каталогами веб-сервера Nginx.
Контент
- /var/www/htm: содержит текущий контент сайта. По умолчанию в нём находится только стандартная посадочная страница, которую вы уже видели. Этот каталог можно изменить в конфигурационном файле Nginx.
Настройки сервера
- /etc/nginx: каталог настроек nginx, в котором хранятся все конфигурационные файлы.
- /etc/nginx/nginx.conf: главный конфигурационный файл Nginx, содержащий глобальные настройки веб-сервера.
- /etc/nginx/sites-available/: каталог, в котором хранятся настроенные блоки server (виртуальные хосты) каждого отдельного сайта. Nginx не будет использовать эти блоки, пока ссылка на них не появится в каталоге sites-enabled (о нём речь пойдёт дальше). Как правило, этот каталог используется для настройки виртуальных хостов.
- /etc/nginx/sites-enabled/: каталог, в котором хранятся включенные блоки server. Чтобы включить блок, нужно создать символьную ссылку на файл, хранящийся в каталоге sites-available.
- /etc/nginx/snippets: этот каталог хранит сниппеты — фрагменты настроек, которые можно включить в конфигурацию Nginx. Как правило, в качестве фрагментов добавляют потенциально повторяемые сегменты конфигурации.
Логи
- /var/log/nginx/access.log: регистрирует все запросы, полученные веб-сервером Nginx (если не настроено другое поведение).
- /var/log/nginx/error.log: хранит все сообщения об ошибках Nginx.
Introduction
Nginx is a free, open-source Linux application for web servers. It works as a reverse proxy server by directing web traffic to specific servers.
Nginx is used for security and load-balancing, but can also function independently as a web server.
This guide will help you install Nginx on Ubuntu 20.04 Linux (Focal Fossa).

Prerequisites
- A system running Ubuntu 20.04 Linux
- A user account with sudo or root privileges
- Access to a terminal window / command line (click Activities > Search > type Terminal)
Step 1: Update Software Repositories
It is important to refresh the repository lists before installing new software. This helps make sure that the latest updates and patches are installed.
Open a terminal window and enter the following:
sudo apt-get update
Allow the process to finish.
Step 2: Install Nginx From Ubuntu Repositories
Nginx is included in the Ubuntu 20.04 default repositories. Install it by entering the following command:
sudo apt-get install nginx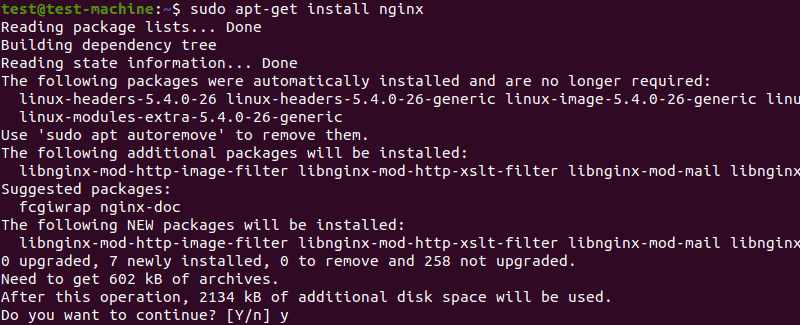
Step 3: Verify the Installation
Verify that Nginx installed correctly by checking the software version. Enter the following:
nginx -vThe system should display the software version of Nginx.

Step 4: Controlling the Nginx Service
The behavior of Nginx can be adjusted. Use this to start or stop Nginx, or to enable or disable Nginx at boot.
Start by checking the status of the Nginx service:
sudo systemctl status nginxIf the status displays active (running), Nginx has already been started. Press CTRL+z to exit the status display.
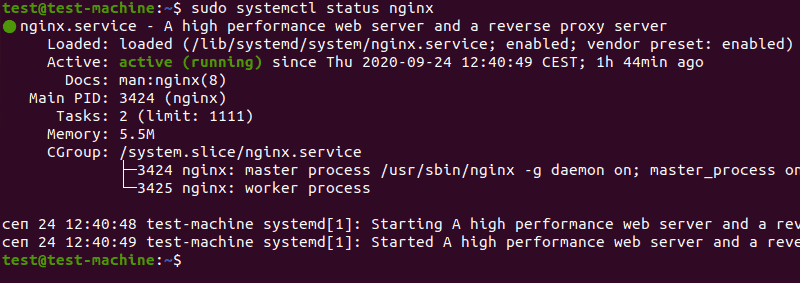
If Nginx is not running, use the following command to launch the Nginx service:
sudo systemctl start nginxTo set Nginx to load when the system starts, enter the following:
sudo systemctl enable nginx
To stop the Nginx service, enter the following:
sudo systemctl stop nginxTo prevent Nginx from loading when the system boots:
sudo systemctl disable nginx
To reload the Nginx service (used to apply configuration changes):
sudo systemctl reload nginxFor a hard restart of Nginx:
sudo systemctl restart nginxStep 5: Allow Nginx Traffic
Nginx needs access through the system’s firewall. To do this, Nginx installs a set of profiles for the Ubuntu default ufw (UnComplicated Firewall).
Start by displaying the available Nginx profiles:
sudo ufw app listThe system should display the following:

Note: Other applications may be listed. They can be ignored.
To grant Nginx access through the default Ubuntu firewall, enter the following:
sudo ufw allow 'nginx http'The system should display Rules updated.

Refresh the firewall settings by entering:
sudo ufw reload
For encrypted (https) traffic, enter:
sudo ufw allow 'nginx https'To allow both, enter:
sudo ufw allow 'nginx full'Note: It is recommended that you only allow the bare minimum required traffic through the firewall. For this process, only basic HTTP traffic is needed. Other configurations may require HTTPS (encrypted) or other traffic. If the system uses a different firewall, it should be configured to allow traffic on Port 80 (HTTP), Port 443 (HTTPS), or whatever ports are required by the network.
Step 6: Test Nginx
Make sure that the Nginx service is running, as in Step 4. Open a web browser, and navigate to the following web address:
http://127.0.0.1The system should display the Nginx welcome page.
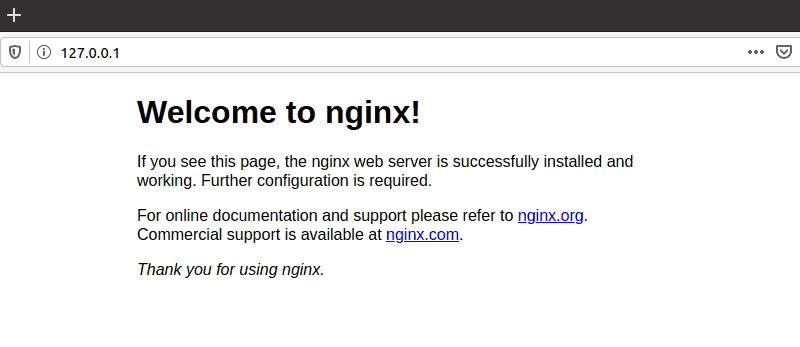
Note: If the system has a specific hostname or IP address, that may be used instead.
If the system does not have a graphical interface, the Nginx Welcome page can be loaded in the terminal using curl:
sudo apt-get install curl
curl –i 127.0.0.1
The system should display the HTML code for the Nginx Welcome page.
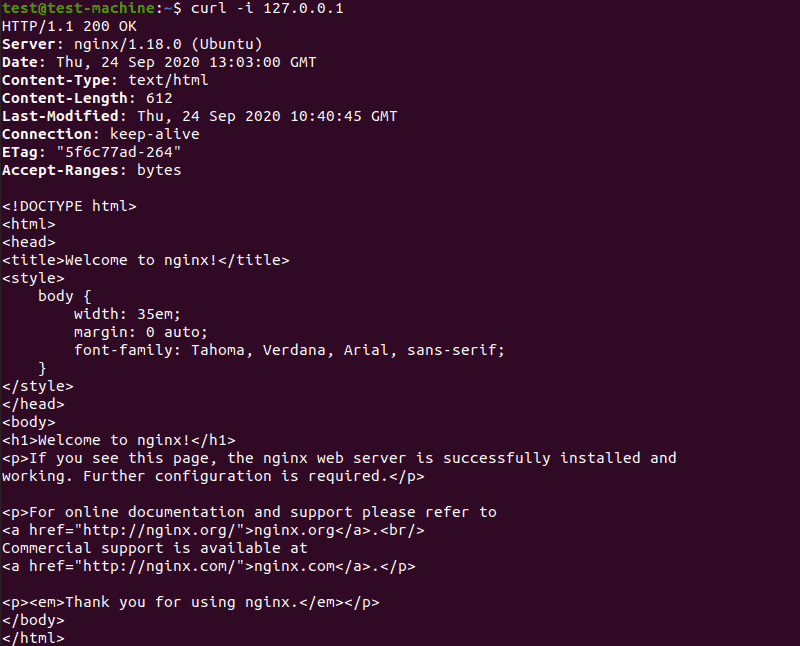
Step 7: Configure a Server Block (Optional)
In Nginx, a server block is a configuration that works as its own server. By default, Nginx has one server block preconfigured.
It is located at /var/www/html. However, it can be configured with multiple server blocks for different sites.
Note: This tutorial uses test_domain.com for the domain name. This may be replaced with your own domain name.
1. Create a Directory for the Test Domain
In a terminal window, create a new directory by entering the following:
sudo mkdir -p /var/www/test_domain.com/html2. Configure Ownership and Permissions
Use chmod to configure ownership and permission rules:
sudo chown –R $USER:$USER /var/www/test_domain.com
sudo chmod –R 755 /var/www/test_domain.com
3. Create an index.html File for the Server Block
Open index.html for editing in a text editor of your choice (we will use the Nano text editor):
sudo nano /var/www/test_domain.com/html/index.htmlIn the text editor, enter the following HTML code:
<html>
   <head>
      <title>Welcome to test_domain.com!</title>
   </head>
   <body>
      <h1>This message confirms that your Nginx server block is working. Great work!</h1>
   </body>
</html>
Press CTRL+o to write the changes, then CTRL+x to exit.
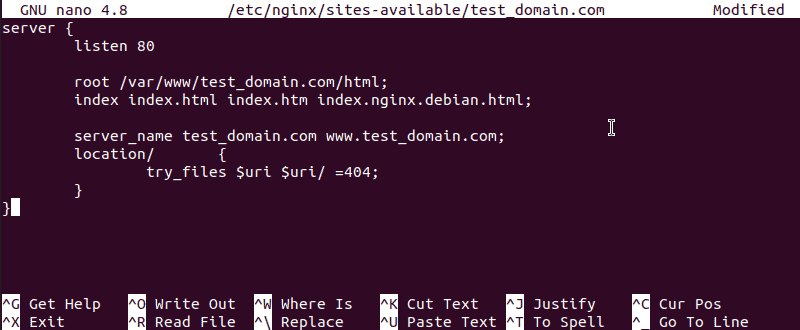
4. Create Nginx Server Block Configuration
Open the configuration file for editing:
sudo nano /etc/nginx/sites-available/test_domain.comEnter the following code:
server    {
listen 80;

root /var/www/test_domain.com/html;
index index.html index.htm index.nginx.debian.html;

server_name test_domain.com www.test_domain.com;
location /          {
try_files $uri $uri/ =404;
      }
}
5. Create Symbolic Link for Nginx to Read on Startup
Create a symbolic link between the server block and the startup directory by entering the following:
sudo ln –s /etc/nginx/sites-available/test_domain.com /etc/nginx/sites-enabled6. Restart the Nginx Service
Restart Nginx by running the following command:
sudo systemctl restart nginx7. Test the Configuration
sudo nginx –tThe system should report that the configuration file syntax is OK, and that the configuration file test is successful.

8. Modify the Hosts File (Optional)
If you’re using a test domain name that isn’t registered or public, the /etc/hosts file may need to be modified to display the test_domain.com page.
Display the system’s IP address with the following command:
hostname –iMake a note of the IP address displayed.

Next, open /etc/hosts for editing:
sudo nano /etc/hostsIn an empty space just below the localhost information, add the following line:
127.0.1.1 test_domain.com www.test_domain.com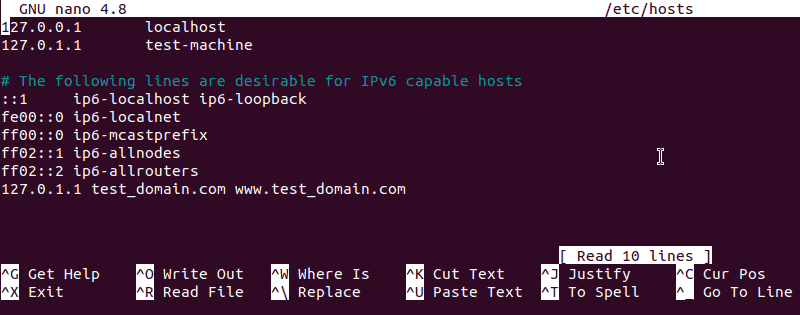
Replace 127.0.0.1 with the IP address displayed above. Press CTRL+o to save the changes, then CTRL+x to exit.
9. Check test_domain.com in a Web Browser
Open a browser window and navigate to test_domain.com (or the domain name you configured in Nginx).
You should see the message you entered in Part 3.

Important Nginx File Locations
By default, Nginx stores different configuration and log files in the following locations:
- /var/www/html – Website content as seen by visitors.
- /etc/nginx – Location of the main Nginx application files.
- /etc/nginx/nginx.conf – The main Nginx configuration file.
- /etc/nginx/sites-available – List of all websites configured through Nginx.
- /etc/nginx/sites-enabled – List of websites actively being served by Nginx.
- /var/log/nginx/access.log – Access logs tracking every request to your server.
- /var/log/ngins/error.log – A log of any errors generated in Nginx.
Conclusion
You should now have a working installation of Nginx on Ubuntu 20.04. As a bonus, you should now have an introduction to setting up an Nginx server block.
If you intend to use Nginx as a reverse proxy, see our article – How to Set Up Nginx as a Reverse Proxy.
-
Главная
-
Инструкции
-
Ubuntu
-
Как установить Nginx на Ubuntu: пошаговая инструкция
Nginx — это один из самых востребованных веб-серверов с открытым исходным кодом. Зачастую он используется как веб-сервер, обратный или почтовый прокси-сервер.
В данной статье мы подробно расскажем, как установить Nginx на Ubuntu и произвести его базовую настройку.
Для установки сервера Nginx понадобится локальная машина либо облачный сервер с установленной операционной системой Ubuntu. Программа доступна в официальных репозиториях Ubuntu по умолчанию. Установить её можно непосредственно из них, используя систему управления пакетами apt.
- Для начала нужно обновить списки пакетов из репозиториев:
sudo apt update- После окончания процесса обновления пакетов можно установить Nginx на машину:
sudo apt install nginx- Дождемся окончания установки, а после добавим программу в автозагрузку:
sudo systemctl enable nginx- Теперь нужно проверить, что веб-сервер успешно установлен и работает, а также добавлен в автозагрузку. Проверим статус работы веб-сервера:
sudo service nginx statusСтрока «Active: active (running)…» указывает на успешную работу сервера. Есть и другой способ проверить его работу. Нужно вставить IP-адрес сервера в адресную строку браузера. Если результат будет таким же, как на картинке ниже, то веб-сервер работает успешно.
- Теперь проверим его наличие в автозагрузке:
sudo systemctl is-enabled nginxЕсли в ответ на выполненную команду получаем «enabled», значит веб-сервер добавлен в автозагрузки.
Для работы с установленным веб-сервером пригодятся базовые команды управления. Они приведены в таблице ниже.
|
Функция |
Команда |
|
Запуск |
|
|
Отключение |
|
|
Перезапуск |
|
|
Перезагрузка |
|
|
Проверка состояния службы |
|
|
Тестирование конфигурации |
|
Настройка брандмауэра
Установка и настройка брандмауэра позволит закрыть все порты, кроме необходимых нам — 22 (SSH), 80 (HTTP), 443 (HTTPS). Первый протокол необходим для подключения к удаленному серверу. Второй и третий необходим для связи между клиентом и сайтом. Главное их отличие в том, что HTTPS — это зашифрованный HTTP. Шифрование данных происходит благодаря SSL-сертификату.
Установим утилиту UFW:
sudo apt install ufwПосле успешной установки добавим веб-сервер в список доступных приложений брандмауэра:
sudo nano /etc/ufw/applications.d/nginx.iniЗаполним файл следующим образом:
[Nginx HTTP]
title=Web Server
description=Enable NGINX HTTP traffic
ports=80/tcp[Nginx HTTPS]
title=Web Server (HTTPS)
description=Enable NGINX HTTPS traffic
ports=443/tcp
[Nginx Full]
title=Web Server (HTTP,HTTPS)
description=Enable NGINX HTTP and HTTPS traffic
ports=80,443/tcp
Проверим список доступных приложений:
sudo ufw app listЕсли среди них есть веб-сервер, значит всё сделано верно. Теперь нужно запустить брандмауэр и разрешить передачу трафика по вышеуказанным портам:
sudo ufw enable
sudo ufw allow 'Nginx Full'
sudo ufw allow 'OpenSSH'
Чтобы проверить изменения, вводим команду:
sudo ufw statusЕсли всё сделано правильно, то в статусе будут перечислены все порты, которые нам необходимы.
Настройка Nginx
Администрирование веб-сервера представляет из себя изменение и поддержку конфигурационных файлов. Среди них 1 файл конфигурации и 2 каталога. Это nginx.conf, sites-available и sites-enabled соответственно. Все они лежат в директории /etc/nginx.
Файл nginx.conf — это главный конфигурационный файл. Каталог sites-available содержит файлы конфигураций виртуальных хостов. Каждый отдельный файл хранит информацию об определенном сайте. Это его имя, IP-адрес и другие данные. Каталог sites-enabled, в свою очередь, состоит только из конфигураций активных сайтов. Только из директории sites-enabled читаются файлы конфигурации для виртуальных хостов. Также в ней хранятся ссылки на sites-available. Такая структура позволяет временно отключать сайты без потери их конфигураций.
Рассмотрим более детально главный файл конфигурации. Для этого откроем его для просмотра, используя редактор:
sudo nano /etc/nginx/nginx.confПосле выполнения команды откроется файл, разделенный на модули. По умолчанию он выглядит так, как показано на рисунке ниже:
Каждый отдельный модуль — это директива, которая отвечает за определенные настройки веб-сервера. Они бывают простыми и блочными. Блочные директивы, помимо имени и параметров, хранят набор дополнительных инструкций, размещенных внутри фигурных скобок.
Перечислим некоторую часть директив главного конфигурационного файла:
user— это пользователь, от которого осуществляются все рабочие процессы.worker_processes— число рабочих процессов сервера. Оно должно быть не больше, чем количество ядер процессора. Параметрautoустановит число автоматически.pid— файл с номером главного процесса.include— отвечает за подключение иных файлов конфигурации, удовлетворяющих заданной маске.events— контекст, состоящий из директив, влияющих на работу сетевого соединения.worker_connections— максимальное число одновременно работающих соединений одного рабочего процесса.multi_accept— флаг, который может быть как включен (on), так и выключен (off). Если он включен, то рабочий процесс будет принимать все новые соединения, иначе только одно.use— указывает метод обработки соединений. По умолчанию сервер выбирает наиболее подходящий и эффективный.http— контекст, состоящий из директив, отвечающих за работу HTTP-сервера.sendfile— включает (on) или отключает (off) метод отправки данных sendfile().tcp_nopush,tcp_nodelay— параметры, влияющие на производительность. Первый заставляет сервер отправлять заголовки HTTP-ответов одним пакетом, а второй позволяет не буферизировать данные и отправлять их короткими очередями.keepalive_timeout— параметр, отвечающий за время ожидания keep-alive соединения до его разрыва со стороны сервера.keepalive_requests— максимальное число запросов по одному keep-alive соединению.error_log— лог ошибок веб-сервера. Для сбора ошибок в определенной секции (http, server и т.д.) необходимо разместить директиву внутри нее.gzip— сжатие контента.
Настройка виртуальных хостов
На сервере может быть расположено множество сайтов. Все запросы приходят на его IP-адрес, а после веб-сервер определяет, какой дать ответ, в зависимости от домена. Виртуальные хосты предназначены для того, чтобы сервер понимал, что и к какому домену относится. В качестве примера создадим сайт testsite.dev.
Создадим папку для сайта:
sudo mkdir -p /var/www/testsite.dev/htmlПосле добавим индексный файл:
sudo nano /var/www/testsite.dev/html/index.htmlЗаполним его минимальными данными для отображения сайта:
<!DOCTYPE html>
<html lang="ru">
<head>
    <title>testsite.dev</title>
    <meta charset="utf-8">
</head>
<body>
    <h1>Hello, user</h1>
</body>
</html>
После создадим конфигурационный файл сайта в папке sites-available:
sudo nano /etc/nginx/sites-available/testsite.dev.confЗаполним его простейшей конфигурацией:
server {
    listen 80;
    listen [::]:80;    server_name testsite.dev www.testsite.dev;
    root /var/www/testsite.dev/html;
    index index.html index.xml;
}
Последнее, что осталось сделать, — это создать ссылку в директории sites-enabled на конфигурацию сайта testsite.dev, чтобы добавить его из доступных во включенные:
sudo ln -s /etc/nginx/sites-available/testsite.dev.conf /etc/nginx/sites-enabled/После создания виртуального хоста проведем тестирование конфигурации:
sudo nginx -tОтключим сайт по умолчанию, удалив запись о дефолтном виртуальном хосте:
sudo rm /etc/nginx/sites-enabled/default
Стоит уточнить, что после того, как мы отключим сайт по умолчанию, Nginx будет использовать первый встреченный серверный блок в качестве резервного сайта (то есть по IP-адресу сервера будет открываться самый первый сайт из конфигурации Nginx).
Перезагружаем веб-сервер:
sudo systemctl restart nginxПроверим, что всё было сделано верно и сайт работает. Для этого можно вставить IP-адрес сервера или домен, если он зарегистрирован, в адресную строку браузера:
Другой вариант — воспользоваться командой curl:
Заключение
В данной статье мы разобрали процесс установки Nginx на Linux, а именно на дистрибутив Ubuntu. С помощью этой инструкции можно провести базовую настройку веб-сервера и развернуть на нем свой первый сайт. Кроме этого, сервер подготовлен к переходу на зашифрованный протокол данных. Для этого нужно получить SSL-сертификат и настроить переадресацию с HTTP-протокола на HTTPS. Для настройки защищенного соединения вам будет необходимо сертификат SSL — заказать его можно в панели управления в разделе «SSL-сертификаты».
