Самым сложным вопросом при переходе с FL Studio в Ableton Live, стал вопрос: «Как установить плагины в Ableton Live 10?»
Дело в том что Anleton Live 10 работает только версиями плагинов x64. Но это далеко не все сюрпризы. Папки для сканирования можно добавить всего две:
- для плагинов VST2
- для плагинов VST3
Что делать? Я не могу установить плагины в Ableton Live 10
Устанавливать нужно по возможности новые версии плагинов x64. Устанавливать плагины можно в любое место на вашем компьютере. Не нужно специально устанавливать все плагины в одну папку. Сейчас я открою Вам один маленький секрет, который приведет вас в восторг и позволит добавить в Ableton Live уже установленные на компьютере плагины и установить без проблем новые.
Дело в том что исполнительный файл плагина для DAW, это файл с расширением .dll
Необходимо создать папку для плагинов, которую мы будем показывать Аблетону для сканирования плагинов. Затем просто ищем .dll файл нашего плагина, который обычно может находится по адресам:
- C:Program FilesVstplugins
- C:Program FilesSteinberg
- C:Program FilesНазвание плагина и др.
Не забудьте проверить C:Program Files (x86)
Бывает и такое, что плагины x64 попадают именно туда
Теперь тот самый маленький секрет! Нам просто нужно создать ярлык этого .dll файла. Я обычно делаю так: жму правой кнопкой мыши по .dll файлу плагина, выбираю пункт «отправить», выбираю из списка «рабочий стол, создать ярлык».
Далее мы работаем уже с ярлыком. Для корректного отображения в Ableton Live 10, советую переименовать ярлык плагина. Достаточно убрать «- ярлык» в конце наименования файла. Затем перемещаем этот ярлык в ранее подготовленную папку для сканирования.
Правильные настройки помогут установить плагины в Ableton Live 10
Для того чтобы установить плагины в Ableton Live 10, нам нужно настроить всего несколько параметров, а именно указать пути к нашим созданным папками с ярлыками для сканирования.
Для этого мы заходим в настройки Ableton Live (Options > Preferences). Нам нужна вкладка Плагины (Plug-Ins). В этой вкладке укажите две созданные ранее папки для плагинов VST2 и VST3.
После того как мы указали наши папки в Ableton Live 10, необходимо нажать кнопку Сканировать (Rescan). После сканирования все корректно добавленные ярлыки плагинов отобразятся как плагины в браузере Ableton Live 10, в категориях в разделе Плагины (Plug-Ins)
Если у вас не получается добавить плагины, то скорее всего плагин 32-битной версии, попробуйте поискать в системе версию на x64.
Если у вас версия плагина только x32, не спешите удалять ее. Читайте далее.
Как установить старые плагины в Ableton Live 10?
Для установки 32-битных версий плагинов нам поможет замечательная программа JBridge. Эта программа — VST адаптер. Ее основная функция это снятие ограничений с одного 32-битного процесса, т.е. каждый новый VST плагин ,будет запускаться в отдельном процессе. Таким образом можно запустить практически любой старый музыкальный софт много раз, лишь бы сам софт работал корректно.
Я не буду рассказывать, где взять плагины и саму программу, для этого у вас есть поисковые системы Яндекс и Гугл. Справитесь! Я в Вас верю)
Расскажу и покажу как пользоваться программой О, на примере бесплатного плагина s(M)exoscope.
Давайте откроем программу и настроим наши старые плагины на работу в Ableton Live 10. В открывшемся окне JBridge необходимо выбрать какую версию хоста мы будем использовать.
Далее выбираем первый пункт, остальные настройки оставляем по умолчанию.
Теперь нам нужно выбрать сам файл плагина, а именно s(M)exoscope.dll
После этого укажите директорию сохранения нового файла.
Не указывайте исходную директорию, при таком выборе вы получите ошибку сохранения.
Все, теперь выполняем операции, о которых я говорил в самом начале статьи. А именно переносим наши новые файлы плагина s(M)exoscope в папку сканирования Ableton Live 10 и нажимаем Rescan.
Таким простым способом можно установить плагины в Ableton Live 10, даже самые древние. Спросите зачем? Поверьте, среди них есть плагины с очень интересным функционалом, не встречающимся в более современных версиях.
Содержание
- – Как установить плагины в Ableton 9?
- – Как добавить плагины в Ableton 10 Live?
- – Как удалить плагины из Ableton Live 10?
- – Как открыть плагины в Аблетон?
- – Как установить плагины в фл студио?
- – Что такое плагин как его установить?
- – Какие плагины использовать для обработки вокала?
- – Где хранятся VST на Mac?
- – Как установить плагины на мак?
- – Куда ставить VST плагины?
Для этого мы заходим в настройки Ableton Live (Options > Preferences). Нам нужна вкладка Плагины (Plug-Ins). В этой вкладке укажите две созданные ранее папки для плагинов VST2 и VST3. Если у вас не получается добавить плагины, то скорее всего плагин 32-битной версии, попробуйте поискать в системе версию на x64.
Настраиваем Ableton Live 9 для работы с VST-плагинами
- Откройте Live’s Preferences меню. …
- Переключитесь во вкладку File/Folder;
- Под надписью “Plug-In Sources” выберите ту папку, где ваши VST плагины с DLL-файлами были инсталлированы (об этом было написано выше). …
- Кнопка “Use VST Plug-In Custom Folder” должна быть включена.
Как добавить плагины в Ableton 10 Live?
Для этого мы заходим в настройки Ableton Live (Options > Preferences). Нам нужна вкладка Плагины (Plug-Ins). В этой вкладке укажите две созданные ранее папки для плагинов VST2 и VST3. Если у вас не получается добавить плагины, то скорее всего плагин 32-битной версии, попробуйте поискать в системе версию на x64.
Как удалить плагины из Ableton Live 10?
Удерживание нажатой клавиши Alt (PC)/Alt (Mac) при нажатии кнопки Rescan полностью удаляет плагины из базы данных и запускает “чистую” проверку плагинов.
Как открыть плагины в Аблетон?
Для этого мы заходим в настройки Ableton Live (Options > Preferences). Нам нужна вкладка Плагины (Plug-Ins). В этой вкладке укажите две созданные ранее папки для плагинов VST2 и VST3. Если у вас не получается добавить плагины, то скорее всего плагин 32-битной версии, попробуйте поискать в системе версию на x64.
Как установить плагины в фл студио?
Для того, чтобы FL Studio нашёл его, просто поместите этот *. dll файл в папку с плагинами (E:VST PluginsVST x64 или E:VST PluginsVST x32). После установки плагинов вам надо обновить список плагинов FL Studio.
Что такое плагин как его установить?
Плаги́н (англ. plug-in, от plug in «подключать») — независимо компилируемый программный модуль, динамически подключаемый к основной программе и предназначенный для расширения и/или использования её возможностей. Плагины обычно выполняются в виде библиотек общего пользования.
Какие плагины использовать для обработки вокала?
Лучшие VST плагины для обработки вокала в 2018 году!
- Antares Auto-Tune Pro. Невозможно составить список, не выделяя Antares Auto-Tune — это, возможно, самый известный вокальный плагин в мире. …
- Celemony Melodyne 4. …
- iZotope VocalSynth 2. …
- Synchro Arts Revoice Pro 3. …
- FabFilter Pro-DS. …
- Reverb Foundry HD Cart. …
- Waves Vocal Bundle.
17 авг. 2018 г.
Где хранятся VST на Mac?
Для установки VST плагинов под Mac OS X, выполните следующие действия: Ваши VST плагины, как правило, устанавливаются в следующую папку в вашем доме и локальной директории: /Library/Audio/Plug-Ins/VST.
Как установить плагины на мак?
Поиск и установка расширения:
- Откройте браузер Safari и выберите Safari > «Расширения Safari» из меню.
- На странице «Расширения Safari» откроется App Store, как изображено выше. …
- Нажмите кнопку «Установить».
- После установки расширения нажмите кнопку «Открыть» и следуйте инструкциям расширения на экране.
2 апр. 2020 г.
Куда ставить VST плагины?
Для того чтобы загрузить VST плагины такого типа, данный файл необходимо скопировать в специальную папку C:Program FilesVstPlugins (она определяется по умолчанию). Если на своем компьютере вы такой папки не обнаружили, то ее надо предварительно создать.
Интересные материалы:
Можно ли оплатить административный штраф через Интернет?
Можно ли оспорить дарственную в Кыргызстане?
Можно ли остановить стиральную машинку?
Можно ли оставить наливной пол без покрытия?
Можно ли оставить воду в утюге?
Можно ли оставлять вареные овощи в воде?
Можно ли осуществлять доставку алкоголя?
Можно ли отбеливать вещи доместосом?
Можно ли отделать стены в ванной пластиковыми панелями?
Можно ли отказаться от повышения в должности?
Introduction: Adding Ableton Plugins
Hello! In this text I will be teaching you how to add plugins to a DAW (Digital Audio Workstation). There are many different types of DAWS one might use to create music but for this tutorial we will be using Ableton Live. Plugins are like add-ons that allow you to do more within Live. For instance, the plugin we will be using is called OB-Xd. This plugin is intended to proved a digital synth that will give us access to sounds not provided with the DAW. Furthermore, there are hundreds of plugins that can be used within a DAW.
Supplies
Ableton Live Program
Compatible plugin
Step 1: Opening Your DAW
To start this process you will want to open a new Live project and familiarize yourself with the preferences tab. In Live, command + ” , ” opens this up. Once here click the plugins tab. This is where your DAW will access the plugin saved on your computer. Make sure every field is turned on to prevent unintended errors.
Step 2: Downloading Your Plugin
A quick google search for free Ableton Live plugins will give you an endless supply of plugins to try but for this project we will be going to https://www.discodsp.com/obxd/ . Here we will find the OB-XD plugin and a link to download it. Click the word download to begin.
Step 3: Opening + Installing
Once the button is clicked, your computer should store your download in the download folder. Here, open the zip file and click the .pkg file to start and complete your download.
Step 4: Getting Plugin Into Ableton Live
Now that your plugin is downloaded to your computer, Live should be smart enough to find that file and add it to your DAW. This may not work if the required files are not saved in the proper location but this should not be a problem if you followed the download procedure correctly. In Live, go to your plugins page again and click “Rescan”. This should search through your computer and find all available plugins compatible with Ableton Live.
Step 5: Adding Plugin to Project
Your newly downloaded plugin should now be available underneath the plugin tab to the left of the program. Here the plugin should be available for use on any track. See a tutorial on how to use plugins and tracks within Live for further exploration.
In the previous tutorial on the differences between VST 2.0 vs VST 3.0 in Ableton, in this tutorial, we look at plugin installation but before we do that, I’d like to give you a primer on what a plugin actually is.
Plug-ins add features not native to your DAW, For Ableton, your plug-ins will come in the VST 2.0 or VST 3.0 format, on MacBook, they will come as Audio Units (AU) so that your plug-ins can be used in conjunction with your audio or video editing software.
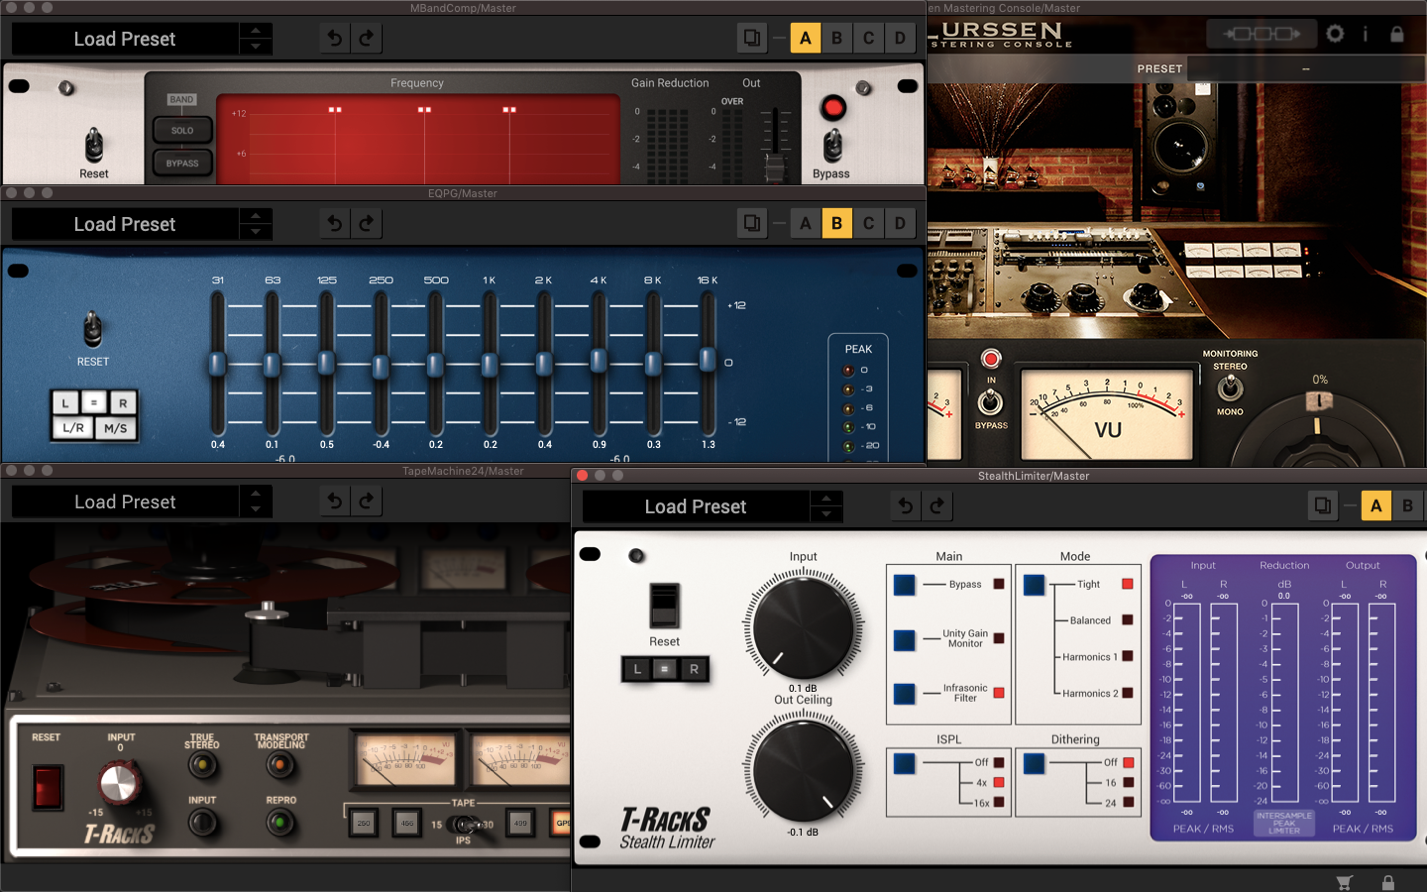
There are 3 main types of plug-ins:
- Audio Effects VST Plug-ins – these were the original VST plug-ins. They do not generate audio, but receive audio from your DAW, process the audio, and send the audio back to your DAW affected. These include EQs, compressors, distortion, saturators, reverbs, delays, etc.
- Virtual Instrument Plug-ins (VSTis) – these types of plug-ins behave like virtual instruments as they produce sound. Since the development of VST 2.0, VSTs have been able to receive MIDI inputs and leading the way to a flurry of virtual instruments and instrument emulations to be developed.
- MIDI Effects VSTs – these are the less common VST types that affect MIDI input. These may include, chord generators, LFO effects, and arpeggiators.
Installing Your Plug-in – What you need to know
Plug-in Acquisition
Plug-in manufacturers offer all sorts of plug-ins for either a subscription, purchase or for free (my favourite type):
- Purchase – these types of plug-ins are bought once off and require no additional charges
- Subscriptions – these plug-ins are purchased by licenses that can be ‘rented’ for some time and need a license renewal. With this format, you will always stay up-to-date the moment your plug-in is updated by the manufacturer
- Free Plug-ins – these plug-ins do not require a fee at check-out, and more often than not, just because they are free, does not mean that they are low quality.
Installation
When on either Windows or MacBook the installation files will come as .exe or .dmg files.

Upon installation, all VST 2.0 plug-ins will install with the .vst suffix on Mac and .dll on Windows. On both computer brands, all VST 3.0 plug-ins will install with the .vst3 suffix.
Note 1: the purchased plug-ins will often ask you to input your authorization code before, during, or after installation once you open the plug-in. in most cases, you will receive an installation guide to how you go about plug-in authorization

Note 2: some plug-ins act as hosts to other plug-ins. For example, Kontakt libraries will host other plug-ins mainly in the .nki format.

For this next segment, I shall be using the Lurssen Mastering Console by IK Multimedia plug-in as an example.

MacBook Installation
As mentioned, all your MacBook installation files come in the .dmg format. This will open the installation driver. This is how you go about installing plug-ins on MacBook
Step 1
Open your .dmg installation driver.
Most of your applications will simply ask you to drag and drop the application to your applications folder.
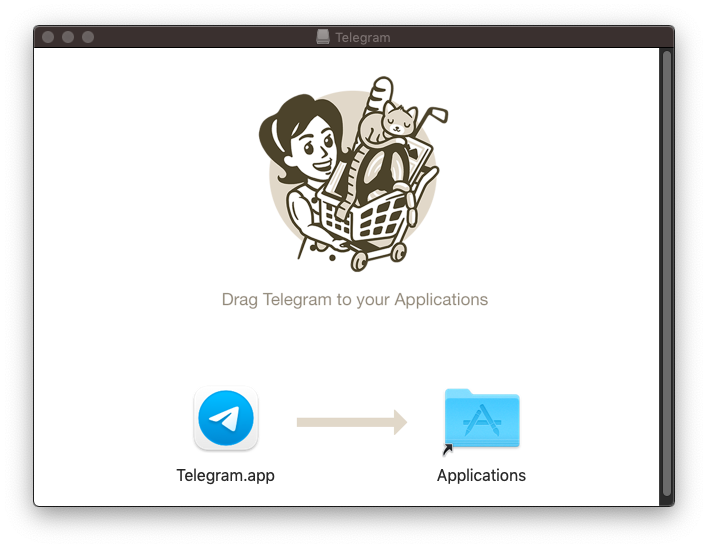
For your plug-ins, the installation file will be in the package format, I. E. .pkg

Step 2
Open the .pkg file and begin the installation process. The first page of the installer is generally an introduction to the installation process. If you have installed an application before this way, the installation process is similar.

Step 2
The next section is commonly the licensing section providing the licensing, distribution, and data-gathering clauses among others. I recommend you read this section carefully, and if you are comfortable with the terms of use, select agree and continue.

Step 3
Select your installation folder, this section is helpful with plug-in management

On MacBook, you are not able to choose the specific folder your plug-in will install in, only allowing you to select the drive in which you will install your plug-in. This is only limited to drives that have MacOS installed in them

Step 4
Now install, and depending on your security status, put in your password and accept

Step 5
Now finalize the installation process and finish. Depending on the type of plug-in you may be required to authorize the plug-in before or after installation, once you open the plug-in, whether by authorization code, or authorization file.
Windows Installation
The installation process for windows and MacBook does not differ too much, the steps are similar, with a few variations. Here is how you go about installing your plug-in on Windows
For this installation, I shall use the MODO Bass plug-in by IK Multimedia

Step 1
Open your plug-in .exe file. And begin the installation process. The process is similar in terms of the introduction section
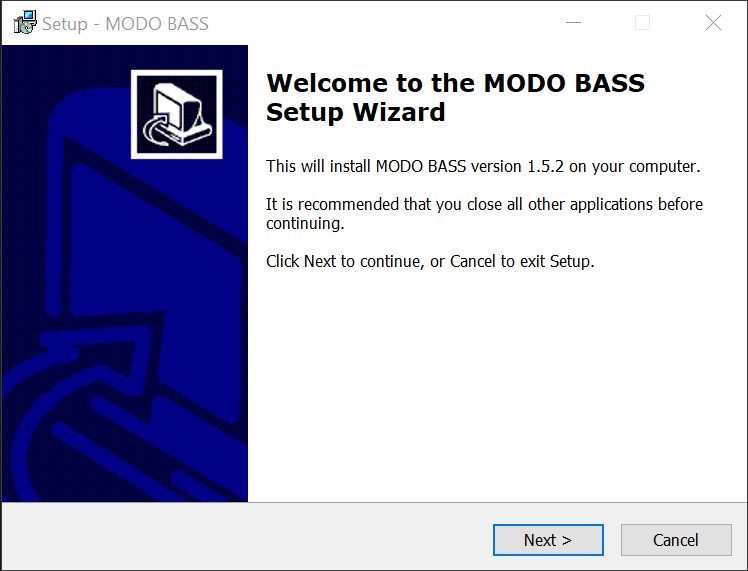
As well as the license agreement page

Step 2
Here is where Window holds the candle with the customization of your installation. You can choose which format you want to install your plug-in in. Depending you your installation preference (VST 2.0, 3.0, AAX, or RTAS), you can customize your plug-in here
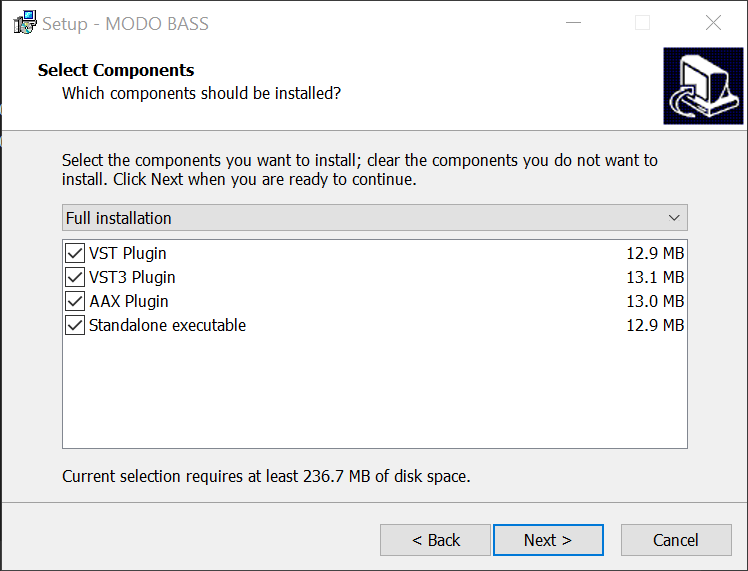
Step 3
Further on customization, you can select which folder you want to install your plug-in in, for plug-in management. Generally, your VST 2.0 and VST 3.0 will install in different folders.

Step 4
Now install and finalize this process.

Note
Depending on your plug-in you may need to authorize your plug-in before, after, or during installation via an authorization code or file.
Free Plug-in Installation
These plug-ins can be installed by simply copying and pasting your plug-in file. If you are using either Windows or MacBook, you should copy and paste your plug-in into these folders. For file management and missing plug-in solutions, stay posted for a tutorial on this subject.

Conclusion
Once you have installed your plug-in, you may need to restart your DAW to load these plug-ins into your Ableton browser. Once done, you will find your plug-ins in your browser plug-in folder on Ableton, categorized by either VST (VST 2.0) or VST 3 in separate folders. From here, you can now open your plug-in by dragging and dropping into the audio or MIDI track depending on the plug-in type, or by double-clicking on your plug-in to open it.

I suggest that, please try not to pirate your plug-ins. These are incredible tools made with care and thought, consider buying your plug-ins to support manufacturers so they can continue to create and update these amazing tools. Plug-ins are an invaluable resource, and care is made and effected to make them your own, and make your songs and beats iconic. Use them to your advantage. For the best plug-ins by instrument, stick around, I shall be going through the best plug-ins by instruments soon. For now, look at my recommendation for the best plug-ins for drums here. Have fun!
Plugins are used to broaden sound libraries, edit audio in unique ways and expand what is possible in music production. Enhance your Ableton experience and achieve any sound imaginable with an endless and accessible catalogue of downloadable plugins.
Hi, I’m Ben from Live Aspects and I’ll be showing you the two best ways to install VST plugins in Ableton.
- | How To Install VST Plugins
– Installation File Method
– Custom Install Method - | How To Run 32 Bit Plugins In Live 10
Without further ado, let’s get started!
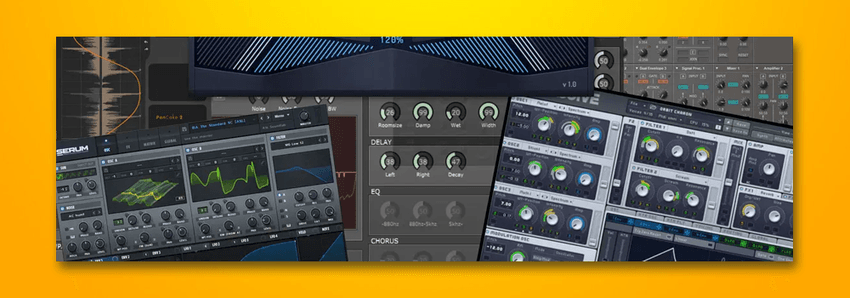
| How To Install VST Plugins
Start by downloading the plugin you wish the use in Ableton. If you are not sure which plugin/s to download, browse the internet to discover an endless amount of free and paid options. If you’re looking for a selection of FREE VST plug-ins for your DAW, visit here.
Below are the two best ways to install the different formats that plugins come in:
| Installation File Method (.pkg/.dmg/.exe)
This method is the quickest and most simple way to install VST plugins for use in Ableton. Plugin installation files typically have the extension .dmg or .pkg file on Mac or an .exe file on Windows. Follow these steps if the plugin you wish to install looks similar to the examples below:
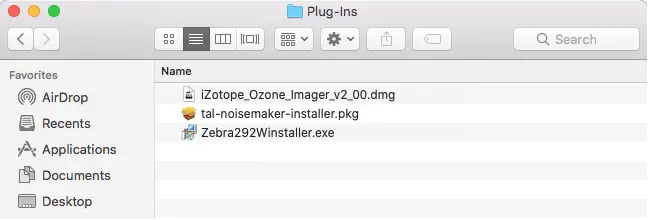
Step 1: Install Plugin
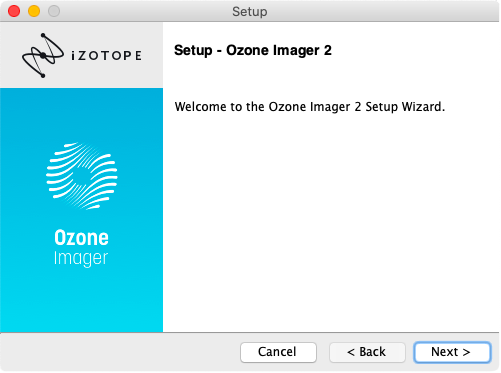
Double-click on your plugin installation file to begin the installation process. A new window will open up and take you through the steps to install the plugin. Exit this window once installation is complete. In this example, we are installing iZotope’s Ozone Imager, a free stereo imaging plugin.
Step 2: Access Live’s Preferences
Open Ableton and navigate to Live’s Preferences. Next, select the ‘File Folder’ tab. Ensure that ‘Use Audio Units’, ‘Use VST Plug-In System Folders’ and ‘Use VST Plug-In Custom Folder’ are all turned on.
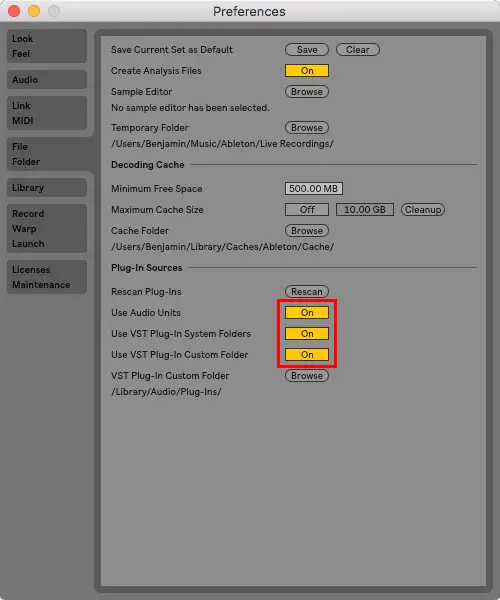
Step 3: Re-Scan Plugins
Firstly, ensure the VST Plug-In Custom Folder matches the location of your installed plugin. Below are the locations where plugins are installed by default on Mac and Windows devices:
Mac
/Library/Audio/Plug-Ins
Windows
C:/Program Files/VSTPlugins
If ‘Not Set’ is displayed under ‘VST Plug-In Custom Folder’, select ‘Browse’ and navigate to the default plugin folder for your device.
![]()
Finally, Select ‘Rescan Plug-Ins’.
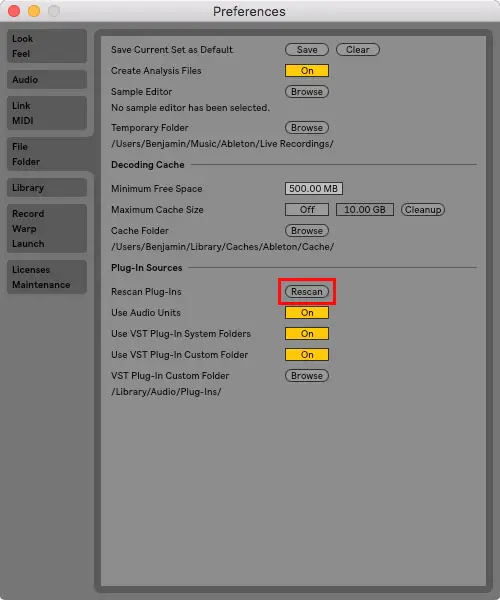
Step 4: Search Browser
Navigate to Live’s Browser, select the ‘Plug-ins’ tab, then expand the ‘Audio Units’ and ‘VST’ drop-down menus to access a list of plugins you have installed. Alternatively, use the Search Bar to search for the name of your plugin and be sure to select ‘All Results.’
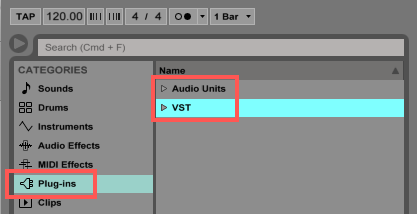
| Custom Install Method (VST & AU)
This method is the best way to install standalone VST and AU plugin files for use in Ableton. Plugins of this format typically have the extension .vst, .vst3 or .component and require manual installation. Follow these steps if the plugin you wish to install looks similar to the examples below:
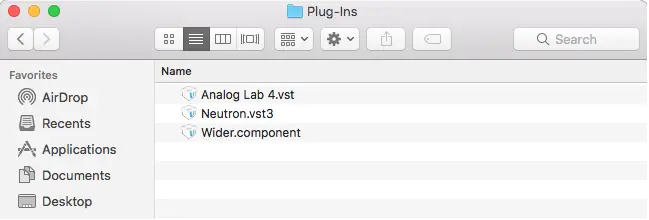
Step 1: Access Live’s Preferences
Open Ableton and navigate to Live’s Preferences. Next, select the ‘File Folder’ tab. Ensure that ‘Use Audio Units’, ‘Use VST Plug-In System Folders’ and ‘Use VST Plug-In Custom Folder’ are all turned on.

Step 2: Open VST Plug-In Custom Folder
If ‘Not Set’ is displayed under ‘VST Plug-In Custom Folder’, select ‘Browse’ and navigate to the default plugin folder for your device. Below are the locations where plugins are installed by default on Mac and Windows devices:
Mac
/Library/Audio/Plug-Ins
Windows
C:/Program Files/VSTPlugins
![]()
Next, open a new window in Finder (Mac) or Explorer (Windows) and navigate to the location of your VST Plug-In Custom Folder.

Step 3: Copy & Paste Plugin
Navigate to the location of your plugin and copy it by selecting it and pressing [COMMAND + C] on Mac or [CNTRL + C] on Windows. Next, head back to the location of your VST Plug-In Custom Folder and paste it by pressing [COMMAND + V] on Mac or [CNTRL + V] on Windows.

Step 4: Re-Scan Plugins
Head back into Ableton and open Live’s Preferences. Select the ‘File Folder’ tab and press ‘Rescan Plug-Ins’.

Step 5: Search Browser
Navigate to Live’s Browser, select the ‘Plug-ins’ tab, then expand the ‘Audio Units’ and ‘VST’ drop-down menus to access a list of plugins you have installed. Alternatively, use the Search Bar to search for the name of your plugin and be sure to select ‘All Results.’

| How To Run 32-bit Plugins In Live 10
Ableton Live no longer supports 32-bit plug-ins and as a result, many older plug-ins have become incompatible with Live 10. While plug-in creators often provide a 64-bit solution, there is a way to use 32-bit plug-ins in the latest versions of Live.
jBridge is an application designed for bridging VST plug-ins on Mac and Windows. It makes it possible to use outdated plug-ins in any DAW. You can download this amazing software for under $20 or try out the demo version for free.
jBridge for Mac
jBridge for Windows
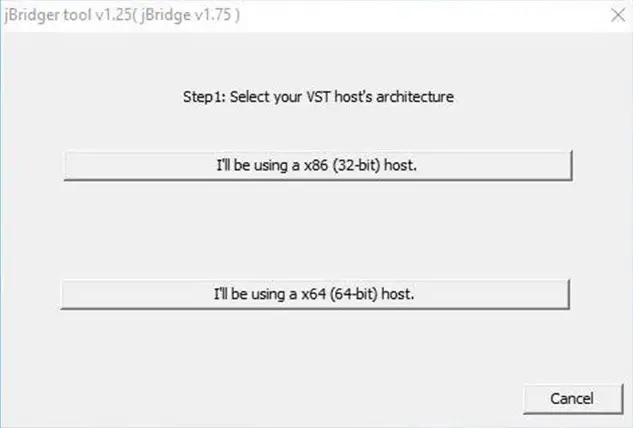
Want To Know More?
Here at Live Aspects, we have dozens of useful lessons and tutorials created to enhance your music production skills and help speed up the learning process. You can access our huge range of music theory lessons and production tips and tricks here.
Benjamin Jones
Hi, my name is Ben.
I live in Melbourne, Australia and I’m the founder of Live Aspects.
I’m a DJ and producer with a bachelor’s degree in Audio Production.
I’ve spent the last eleven or so years addicted to music production and discovering the extraordinary ways producers around the world create their music. My goal is to provide eager producers with the tools and information they need to make amazing music and experience the thrill of music production.
