Разобравшись с выделением контуров объектов на видео, перейдем к более сложной задаче — обнаружению прямоугольников и эллипсов. Более того, мы не только научимся находить их в кадре, но еще и сможем определять угол их наклона!
Хорошим примером использования подобных алгоритмов может стать ситуация, когда роботу нужно правильно ухватиться за предмет. Прямо как на картинке.

Если смотреть на цилиндр сверху, то он превратится в прямоугольник. Зная его координаты в кадре и угол наклона можно рассчитать поворот схвата манипулятора, чтобы правильно ухватиться за предмет.
Сегодня на уроке:
- Функция OpenCV для поиска прямоугольников minAreaRect
- Функция OpenCV для поиска эллипсов fitEllipse
- Отсечение лишних контуров по площади
- Вычисление угла поворота прямоугольника в OpenCV
- Определение угла поворота прямоугольника в видеопотоке
1. Функция OpenCV для поиска прямоугольников minAreaRect
В OpenCV имеется функция, которая пытается найти прямоугольник максимального размера, который может вписаться в заданный замкнутый контур. Надо заметить, что эта функция не определяет является ли контур прямоугольным, она пытается вписать в него прямоугольник оптимальным способом. Это важно!
minAreaRect( контур )
контур — это контур, в который мы собираемся вписать прямоугольник (тип аргумента — Nx2 массив NumPy).
Напишем программу, которая найдет на картинке все прямоугольники. За основу возьмем код из предыдущего урока про поиск контуров.
#!/usr/bin/env python

import sys
import numpy as np
import cv2 as cv

hsv_min = np.array((0, 54, 5), np.uint8)
hsv_max = np.array((187, 255, 253), np.uint8)

if __name__ == '__main__':
    fn = 'image2.jpg' # имя файла, который будем анализировать
    img = cv.imread(fn)

    hsv = cv.cvtColor( img, cv.COLOR_BGR2HSV ) # меняем цветовую модель с BGR на HSV
    thresh = cv.inRange( hsv, hsv_min, hsv_max ) # применяем цветовой фильтр
    _, contours0, hierarchy = cv.findContours( thresh.copy(), cv.RETR_TREE, cv.CHAIN_APPROX_SIMPLE)

    # перебираем все найденные контуры в цикле
    for cnt in contours0:
        rect = cv.minAreaRect(cnt) # пытаемся вписать прямоугольник
        box = cv.boxPoints(rect) # поиск четырех вершин прямоугольника
        box = np.int0(box) # округление координат
        cv.drawContours(img,[box],0,(255,0,0),2) # рисуем прямоугольник

    cv.imshow('contours', img) # вывод обработанного кадра в окно

    cv.waitKey()
    cv.destroyAllWindows()
Результат работы программы:

Видно, что алгоритм попытался вписать прямоугольники во вложенные мусорные контуры на самих объектах. Далее мы разберемся как с этим бороться.
Теперь попробуем тоже самое, но с эллипсами.
2. Функция OpenCV для поиска эллипсов fitEllipse
Как и в случае minAreaRect, функция поиска эллипсов не сможет отличить на картинке объект с действительно эллиптическим контуром от квадрата. Она лишь пытается эллипс вписать в любой контур с количеством точек >=5.
fitEllipse( контур )
контур — это контур, в который мы собираемся вписать прямоугольник (тип аргумента — Nx2 массив NumPy).
Слегка изменим предыдущую программу, убрав из неё minAreaRect и добавив fitEllipse.
#!/usr/bin/env python

import sys
import numpy as np
import cv2 as cv

hsv_min = np.array((0, 77, 17), np.uint8)
hsv_max = np.array((208, 255, 255), np.uint8)

if __name__ == '__main__':
    fn = 'donuts.jpg'
    img = cv.imread(fn)

    hsv = cv.cvtColor( img, cv.COLOR_BGR2HSV )
    thresh = cv.inRange( hsv, hsv_min, hsv_max )
    _, contours0, hierarchy = cv.findContours( thresh.copy(), cv.RETR_TREE, cv.CHAIN_APPROX_SIMPLE)
    for cnt in contours0:
        if len(cnt)>4:
            ellipse = cv.fitEllipse(cnt)
            cv.ellipse(img,ellipse,(0,0,255),2)

    cv.imshow('contours', img)

    cv.waitKey()
    cv.destroyAllWindows()
Условие
if len(cnt)>4:
необходимо для того, чтобы отсечь контуры с контурами меньше 5 точек. Результат работы программы:

Надо заметить, что эллипсы лучше пытаться вписать в округлые объекты, а прямоугольники в прямоугольные:) В противном случае, алгоритм может выдать неадекватные результаты.
3. Отсечение лишних контуров по площади
Следующий шаг — разберемся с паразитными микроконтурами, которые мы обнаружили на объектах. Избавиться от них можно, вычислив площадь занимаемую этими контурами, а затем просто отсечь контуры с маленькой площадью.
Внесем в нашу программу модификацию:
box = np.int0(box) # округление координат
area = int(rect[1][0]*rect[1][1]) # вычисление площади
if area > 500:
    cv.drawContours(img,[box],0,(255,0,0),2)
Запускаем программу.

Наконец, вычислим углы наклона всех прямоугольников относительно горизонта. Здесь нам не понадобятся специальные функции OpenCV, достаточно будет простой математики.
#!/usr/bin/env python

import sys
import numpy as np
import cv2 as cv
import math

hsv_min = np.array((0, 54, 5), np.uint8)
hsv_max = np.array((187, 255, 253), np.uint8)

color_blue = (255,0,0)
color_yellow = (0,255,255)

if __name__ == '__main__':
    fn = 'image2.jpg' # имя файла, который будем анализировать
    img = cv.imread(fn)

    hsv = cv.cvtColor( img, cv.COLOR_BGR2HSV ) # меняем цветовую модель с BGR на HSV
    thresh = cv.inRange( hsv, hsv_min, hsv_max ) # применяем цветовой фильтр
    _, contours0, hierarchy = cv.findContours( thresh.copy(), cv.RETR_TREE, cv.CHAIN_APPROX_SIMPLE)

    # перебираем все найденные контуры в цикле
    for cnt in contours0:
    rect = cv.minAreaRect(cnt) # пытаемся вписать прямоугольник
    box = cv.boxPoints(rect) # поиск четырех вершин прямоугольника
    box = np.int0(box) # округление координат
    center = (int(rect[0][0]),int(rect[0][1]))
    area = int(rect[1][0]*rect[1][1]) # вычисление площади

    # вычисление координат двух векторов, являющихся сторонам прямоугольника
    edge1 = np.int0((box[1][0] - box[0][0],box[1][1] - box[0][1]))
    edge2 = np.int0((box[2][0] - box[1][0], box[2][1] - box[1][1]))

    # выясняем какой вектор больше
    usedEdge = edge1
    if cv.norm(edge2) > cv.norm(edge1):
        usedEdge = edge2
    reference = (1,0) # горизонтальный вектор, задающий горизонт

    # вычисляем угол между самой длинной стороной прямоугольника и горизонтом
    angle = 180.0/math.pi * math.acos((reference[0]*usedEdge[0] + reference[1]*usedEdge[1]) / (cv.norm(reference) *cv.norm(usedEdge)))

    if area > 500:
        cv.drawContours(img,[box],0,(255,0,0),2) # рисуем прямоугольник
        cv.circle(img, center, 5, color_yellow, 2) # рисуем маленький кружок в центре прямоугольника
        # выводим в кадр величину угла наклона
        cv.putText(img, "%d" % int(angle), (center[0]+20, center[1]-20),
                   cv.FONT_HERSHEY_SIMPLEX, 1, color_yellow, 2)

    cv.imshow('contours', img)

    cv.waitKey()
    cv.destroyAllWindows()
Помним, что цветовые фильтры hsv_min и hsv_max нужно каждый раз настраивать под конкретный объект и освещение!
Запускаем программу, указав в ней в качестве исходного — изображение с макетными платами.

Ура! Работает. Ну и последний шаг — подключим видеопоток.
5. Определение угла поворота прямоугольника в видеопотоке
Здесь нам потребуется вспомнить урок про наложение текста и геометрических фигур на кадр в OpenCV.
#!/usr/bin/env python

import cv2 as cv
import numpy as np
import video
import math

if __name__ == '__main__':
    cv.namedWindow( "result" )
    cap = video.create_capture(0)

    hsv_min = np.array((0, 0, 255), np.uint8)
    hsv_max = np.array((72, 51, 255), np.uint8)

    color_blue = (255,0,0)
    color_red = (0,0,128)

    while True:
        flag, img = cap.read()
        img = cv.flip(img,1)
        try:
            hsv = cv.cvtColor(img, cv.COLOR_BGR2HSV )
            thresh = cv.inRange(hsv, hsv_min, hsv_max)
            _, contours0, hierarchy = cv.findContours( thresh.copy(), cv.RETR_EXTERNAL, cv.CHAIN_APPROX_NONE)

            for cnt in contours0:
                rect = cv.minAreaRect(cnt)
                box = cv.boxPoints(rect)
                box = np.int0(box)
                center = (int(rect[0][0]),int(rect[0][1]))
                area = int(rect[1][0]*rect[1][1])

                edge1 = np.int0((box[1][0] - box[0][0],box[1][1] - box[0][1]))
                edge2 = np.int0((box[2][0] - box[1][0], box[2][1] - box[1][1]))

                usedEdge = edge1
                if cv.norm(edge2) > cv.norm(edge1):
                    usedEdge = edge2

                reference = (1,0) # horizontal edge
                angle = 180.0/math.pi * math.acos((reference[0]*usedEdge[0] + reference[1]*usedEdge[1]) / (cv.norm(reference) *cv.norm(usedEdge)))

                if area > 500:
                    cv.drawContours(img,[box],0,color_blue,2)
                    cv.circle(img, center, 5, color_red, 2)
                    cv.putText(img, "%d" % int(angle), (center[0]+20, center[1]-20), cv.FONT_HERSHEY_SIMPLEX, 1, color_red, 2)
            cv.imshow('result', img)
        except:
            cap.release()
            raise
        ch = cv.waitKey(5)
        if ch == 27:
            break

    cap.release()
    cv.destroyAllWindows()
Помним про правильную настройку фильтров! Если всё сделано правильно, получится примерно это:
Your browser does not support the video tag.
К размышлению
Итак, хорошая новость — мы умеем определять угол наклона прямоугольника. Плохая новость — мы не можем быть уверены, что в кадре именно прямоугольник! Та же ситуация с эллипсом. Попробуем разобраться с более продвинутыми методами детектирования геометрических объектов на следующих уроках!
Last updated on July 7, 2021.
This tutorial is the second post in our three-part series on shape detection and analysis.
Last week we learned how to compute the center of a contour using OpenCV.
Today, we are going to leverage contour properties to actually label and identify shapes in an image, just like in the figure at the top of this post.
- Update July 2021: Added new sections, including how to utilize feature extraction, machine learning, and deep learning for shape recognition.
![]()
Looking for the source code to this post?
Jump Right To The Downloads Section
Before we get started with this tutorial, let’s quickly review our project structure:
|--- pyimagesearch
|    |--- __init__.py
|    |--- shapedetector.py
|--- detect_shapes.py
|--- shapes_and_colors.png
As you can see, we have defined a pyimagesearch module. Inside this module we have shapedetector.py which will store our implementation of the ShapeDetector class.
Finally, we have the detect_shapes.py driver script that we’ll use to load an image from disk, analyze it for shapes, and then perform shape detection and identification via the ShapeDetector class.
Before we get started, make sure you have the imutils package installed on your system, a series of OpenCV convenience functions that we’ll be using later in this tutorial:
$ pip install imutils
Defining our shape detector
The first step in building our shape detector is to write some code to encapsulate the shape identification logic.
Let’s go ahead and define our ShapeDetector. Open up the shapedetector.py file and insert the following code:
# import the necessary packages
import cv2

class ShapeDetector:
	def __init__(self):
		pass

	def detect(self, c):
		# initialize the shape name and approximate the contour
		shape = "unidentified"
		peri = cv2.arcLength(c, True)
		approx = cv2.approxPolyDP(c, 0.04 * peri, True)
Line 4 starts the definition of our ShapeDetector class. We’ll skip the __init__ constructor here since nothing needs to be initialized.
We then have our detect method on Line 8 which requires only a single argument, c, the contour (i.e., outline) of the shape we are trying to identify.
In order to perform shape detection, we’ll be using contour approximation.
As the name suggests, contour approximation is an algorithm for reducing the number of points in a curve with a reduced set of points — thus the term approximation.
This algorithm is commonly known as the Ramer-Douglas-Peucker algorithm, or simply the split-and-merge algorithm.
Contour approximation is predicated on the assumption that a curve can be approximated by a series of short line segments. This leads to a resulting approximated curve that consists of a subset of points that were defined by the original curve.
Contour approximation is actually already implemented in OpenCV via the cv2.approxPolyDP method.
In order to perform contour approximation, we first compute the perimeter of the contour (Line 11), followed by constructing the actual contour approximation (Line 12).
Common values for the second parameter to cv2.approxPolyDP are normally in the range of 1-5% of the original contour perimeter.
Note: Interested in a more in-depth look at contour approximation? Be sure to check out the PyImageSearch Gurus course where I discuss computer vision and image processing fundamentals such as contours and connected-component analysis in detail.
Given our approximated contour, we can move on to performing shape detection:
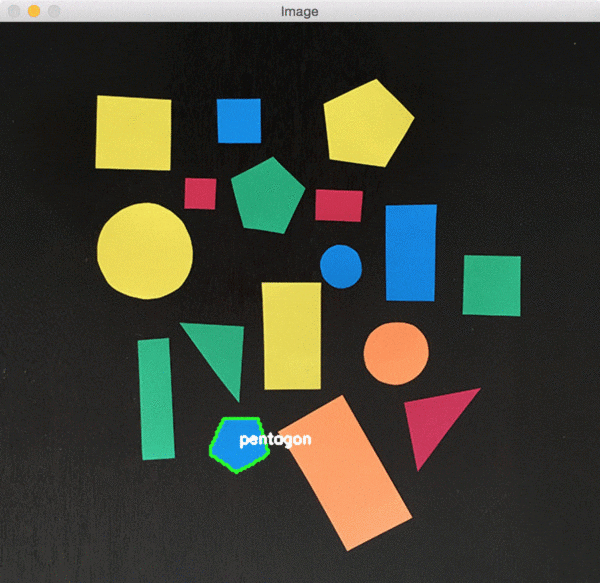
		# if the shape is a triangle, it will have 3 vertices
		if len(approx) == 3:
			shape = "triangle"

		# if the shape has 4 vertices, it is either a square or
		# a rectangle
		elif len(approx) == 4:
			# compute the bounding box of the contour and use the
			# bounding box to compute the aspect ratio
			(x, y, w, h) = cv2.boundingRect(approx)
			ar = w / float(h)

			# a square will have an aspect ratio that is approximately
			# equal to one, otherwise, the shape is a rectangle
			shape = "square" if ar >= 0.95 and ar <= 1.05 else "rectangle"

		# if the shape is a pentagon, it will have 5 vertices
		elif len(approx) == 5:
			shape = "pentagon"

		# otherwise, we assume the shape is a circle
		else:
			shape = "circle"

		# return the name of the shape
		return shape
It’s important to understand that a contour consists of a list of vertices. We can check the number of entries in this list to determine the shape of an object.
For example, if the approximated contour has three vertices, then it must be a triangle (Lines 15 and 16).
If a contour has four vertices, then it must be either a square or a rectangle (Line 20). To determine which, we compute the aspect ratio of the shape, which is simply the width of the contour bounding box divided by the height (Lines 23 and 24). If the aspect ratio is ~1.0, then we are examining a square (since all sides have approximately equal length). Otherwise, the shape is a rectangle.
If a contour has five vertices, we can label it as a pentagon (Line 31 and 32).
Otherwise, by process of elimination (in context of this example, of course), we can make the assumption that the shape we are examining is a circle (Lines 35 and 36).
Finally, we return the identified shape to the calling method.
Shape detection with OpenCV
Now that our ShapeDetector class has been defined, let’s create the detect_shapes.py driver script:
# import the necessary packages
from pyimagesearch.shapedetector import ShapeDetector
import argparse
import imutils
import cv2

# construct the argument parse and parse the arguments
ap = argparse.ArgumentParser()
ap.add_argument("-i", "--image", required=True,
	help="path to the input image")
args = vars(ap.parse_args())
We start off on Lines 2-5 by importing our required packages. Notice how we’re importing our implementation of the ShapeDetector class from the shapedetector sub-module of pyimagesearch.
Lines 8-11 handle parsing our command line arguments. We only need a single switch here, --image, which is the path to where the image we want to process resides on disk.
Next up, let’s pre-process our image:
# load the image and resize it to a smaller factor so that
# the shapes can be approximated better
image = cv2.imread(args["image"])
resized = imutils.resize(image, width=300)
ratio = image.shape[0] / float(resized.shape[0])

# convert the resized image to grayscale, blur it slightly,
# and threshold it
gray = cv2.cvtColor(resized, cv2.COLOR_BGR2GRAY)
blurred = cv2.GaussianBlur(gray, (5, 5), 0)
thresh = cv2.threshold(blurred, 60, 255, cv2.THRESH_BINARY)[1]

# find contours in the thresholded image and initialize the
# shape detector
cnts = cv2.findContours(thresh.copy(), cv2.RETR_EXTERNAL,
	cv2.CHAIN_APPROX_SIMPLE)
cnts = imutils.grab_contours(cnts)
sd = ShapeDetector()
First, we load our image from disk on Line 15 and resize it on Line 16. We then keep track of the ratio of the old height to the new resized height on Line 17 — we’ll find out exactly why we do this later in the tutorial.
From there, Lines 21-23 handle converting the resized image to grayscale, smoothing it to reduce high frequency noise, and finally thresholding it to reveal the shapes in the image.
After thresholding, our image should look like this:

Notice how our image has been binarized — the shapes appear as a white foreground against a black background.
Lastly, we find contours in our binary image, handle grabbing the correct tuple value from cv2.findContours based on our OpenCV version, and finally initialize our ShapeDetector (Lines 27-30).
The last step is to identify each of the contours:
# loop over the contours
for c in cnts:
	# compute the center of the contour, then detect the name of the
	# shape using only the contour
	M = cv2.moments(c)
	cX = int((M["m10"] / M["m00"]) * ratio)
	cY = int((M["m01"] / M["m00"]) * ratio)
	shape = sd.detect(c)

	# multiply the contour (x, y)-coordinates by the resize ratio,
	# then draw the contours and the name of the shape on the image
	c = c.astype("float")
	c *= ratio
	c = c.astype("int")
	cv2.drawContours(image, [c], -1, (0, 255, 0), 2)
	cv2.putText(image, shape, (cX, cY), cv2.FONT_HERSHEY_SIMPLEX,
		0.5, (255, 255, 255), 2)

	# show the output image
	cv2.imshow("Image", image)
	cv2.waitKey(0)
On Line 33 we start looping over each of the individual contours. For each of them, we compute the center of the contour, followed by performing shape detection and labeling.
Since we are processing the contours extracted from the resized image (rather than the original image), we need to multiply the contours and center (x, y)-coordinates by our resize ratio (Lines 43-45). This will give us the correct (x, y)-coordinates for both the contours and centroid of the original image.
Lastly, we draw the contours and the labeled shape on our image (Lines 44-48), followed by displaying our results (Lines 51 and 52).
To see our shape detector in action, just execute the following command:
$ python detect_shapes.py --image shapes_and_colors.png
As you can see from the animation above, our script loops over each of the shapes individually, performs shape detection on each one, and then draws the name of the shape on the object.
Determining object shape using feature extraction and machine learning

This post demonstrated how simple contour properties, including contour detection, contour approximation, and examining the number of points in a contour, can be used to recognize shapes in an image.
However, there are more advanced shape detection techniques. These methods utilize feature extraction/image descriptors and are used to quantify the shape in an image using a list of numbers (i.e., a “feature vector”).
The first method you should look into is the classic Hu moments shape descriptor. Hu moments are built into the OpenCV library via the cv2.HuMoments function. The result of applying cv2.HuMoments is a list of seven numbers used to quantify the shape in an image.
We then have Zernike moments which build on the research and work from Hu moments. The result of applying Zernike moments is a list of 25 numbers used to quantify the shape in the image. Zernike moments tend to be a bit more powerful than Hu moments but may require some manual parameter tuning (in particular, the radius of the moments).
Can we use deep learning for shape recognition?
In short, yes, absolutely. Deep learning-based models excel and object and shape recognition. And if you’re working with simple shapes, then even a shallow CNN will likely outperform Hu moments, Zernike moments, and contour-based shape recognition methods — provided you have enough data to train the CNN, of course!
If you’re interested in learning how to train your own custom deep learning shape recognition algorithms, be sure you go through my deep learning courses inside PyImageSearch University.
What’s next? I recommend PyImageSearch University.
Course information:
76 total classes • 90 hours of on-demand code walkthrough videos • Last updated: May 2023
★★★★★ 4.84 (128 Ratings) • 16,000+ Students Enrolled
I strongly believe that if you had the right teacher you could master computer vision and deep learning.
Do you think learning computer vision and deep learning has to be time-consuming, overwhelming, and complicated? Or has to involve complex mathematics and equations? Or requires a degree in computer science?
That’s not the case.
All you need to master computer vision and deep learning is for someone to explain things to you in simple, intuitive terms. And that’s exactly what I do. My mission is to change education and how complex Artificial Intelligence topics are taught.
If you’re serious about learning computer vision, your next stop should be PyImageSearch University, the most comprehensive computer vision, deep learning, and OpenCV course online today. Here you’ll learn how to successfully and confidently apply computer vision to your work, research, and projects. Join me in computer vision mastery.
Inside PyImageSearch University you’ll find:
- ✓ 76 courses on essential computer vision, deep learning, and OpenCV topics
- ✓ 76 Certificates of Completion
- ✓ 90 hours of on-demand video
- ✓ Brand new courses released regularly, ensuring you can keep up with state-of-the-art techniques
- ✓ Pre-configured Jupyter Notebooks in Google Colab
- ✓ Run all code examples in your web browser — works on Windows, macOS, and Linux (no dev environment configuration required!)
- ✓ Access to centralized code repos for all 500+ tutorials on PyImageSearch
- ✓ Easy one-click downloads for code, datasets, pre-trained models, etc.
- ✓ Access on mobile, laptop, desktop, etc.
Click here to join PyImageSearch University
Summary
In today’s post blog, we learned how to perform shape detection with OpenCV and Python.
To accomplish this, we leveraged contour approximation, the process of reducing the number of points on a curve to a more simple approximated version.
Then, based on this contour approximation, we examined the number of vertices each shape has. Given the vertex count, we were able to accurately label each of the shapes.
This lesson is part of a three part series on shape detection and analysis. Last week we covered how to compute the center of a contour. Today we covered shape detection with OpenCV. And next week we’ll discuss how to label the actual color of a shape using color channel statistics.
Be sure to enter your email address in the form below to be notified when the next post goes live — you won’t want to miss it!

Download the Source Code and FREE 17-page Resource Guide
Enter your email address below to get a .zip of the code and a FREE 17-page Resource Guide on Computer Vision, OpenCV, and Deep Learning. Inside you’ll find my hand-picked tutorials, books, courses, and libraries to help you master CV and DL!
To detect a rectangle and square in an image, we first detect all the contours in the image. Then Loop over all contours. Find the approximate contour for each of the contours. If the number of vertex points in the approximate contour is 4 then we compute the aspect ratio to make a difference between the rectangle and square. If the aspect ratio is between 0.9 and 1.1 we say it is a square else a rectangle See the below pseudocode.
for cnt in contours:
approx = cv2.approxPolyDP(cnt)
if len(approx) == 4:
   x, y, w, h = cv2.boundingRect(cnt)
   ratio= float(w)/h
   if ratio>=0.9 and ratio<=1.1:
      cv2.putText('Square')
   else:
      cv2.putText('Rectangle')
Steps
You can use the following steps to detect a rectangle and a square in the input image −
Import the required library. In all the following Python examples, the required Python library is OpenCV. Make sure you have already installed it.
import cv2
Read the input image using cv2.imread() and convert it to grayscale.
img = cv2.imread('shapes.jpg')
gray = cv2.cvtColor(img, cv2.COLOR_BGR2GRAY)
Apply thresholding on the grayscale image to create a binary image. Adjust the second parameter to get a better contour detection.
ret,thresh = cv2.threshold(gray,50,255,0)
Find the contours in the image using cv2.findContours() function.
contours, _ = cv2.findContours(thresh, cv2.RETR_TREE, cv2.CHAIN_APPROX_SIMPLE)
Select a contour (say first contour) cnt from the lists of contours. Or loop over all the contours.
Compute the approximate contour points for each contour cnt using cv2.approxPolyDP() function
approx = cv2.approxPolyDP(cnt,epsilon,True)
If the vertex points in the approximate contour approx is 4, then draw the contour on the image.
Compute the aspect ratio of the contour cnt. Set a range of aspect ratios to detect the square. We set it [0.9, 1.1]. If the ratio is between 0.9 and 1.1, the detected contour is a square else it is a rectangle.
Display the image with detected rectangle and square and drawn contours.
cv2.imshow("Shapes", img)
cv2.waitKey(0)
cv2.destroyAllWindows()
Let’s look at some examples for clear understanding.
Example
In the Python code below, we detect the rectangle and square in the input image.
import cv2 import numpy as np img = cv2.imread('shapes.jpg') gray = cv2.cvtColor(img, cv2.COLOR_BGR2GRAY) ret,thresh = cv2.threshold(gray,50,255,0) contours,hierarchy = cv2.findContours(thresh, 1, 2) print("Number of contours detected:", len(contours)) for cnt in contours: x1,y1 = cnt[0][0] approx = cv2.approxPolyDP(cnt, 0.01*cv2.arcLength(cnt, True), True) if len(approx) == 4: x, y, w, h = cv2.boundingRect(cnt) ratio = float(w)/h if ratio >= 0.9 and ratio <= 1.1: img = cv2.drawContours(img, [cnt], -1, (0,255,255), 3) cv2.putText(img, 'Square', (x1, y1), cv2.FONT_HERSHEY_SIMPLEX, 0.6, (255, 255, 0), 2) else: cv2.putText(img, 'Rectangle', (x1, y1), cv2.FONT_HERSHEY_SIMPLEX, 0.6, (0, 255, 0), 2) img = cv2.drawContours(img, [cnt], -1, (0,255,0), 3) cv2.imshow("Shapes", img) cv2.waitKey(0) cv2.destroyAllWindows()
Consider the following image as the Input File in the above program code.

Output
When you execute the above code, it will produce the following output.
Number of contours detected: 4
And we get the following window, showing the output −
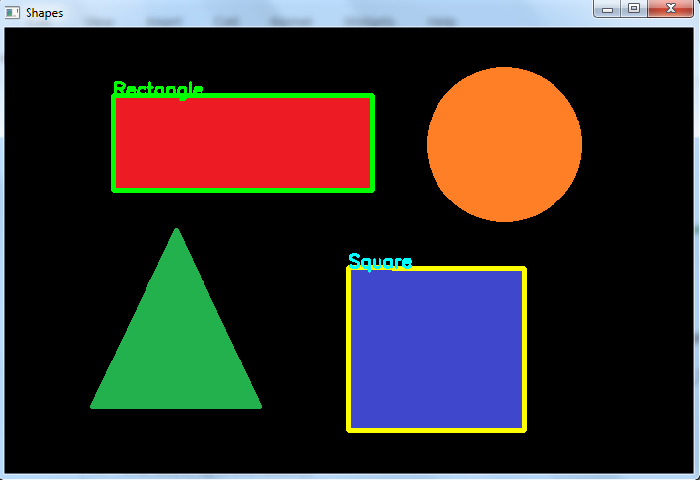
In the above output image, one rectangle and one square are detected.
В прошлой статье мы разобрались с контурами, теперь перейдем более сложной задачи : Поиску прямоугольных и круглых объектов на фото. А так же будем определять угол их него наклона. Применения такого алгоритма может быть например : когда манипулятору надо захватить объект.
Функция для поиска прямоугольников minAreaRect()
Данная функция пытается найти прямоугольник максимального размера, который может вписаться в заданный замкнутый контур. Надо заметить, что эта функция не определяет является ли контур прямоугольным, она пытается вписать в него прямоугольник оптимальным способом. Это важно!
minAreaRect( контур )
Если не знаете что такое контур в OpenCV и откуда его взять : тык-тык . Напишем программу, которая найдет на картинке все контуры в которые можно вписать прямоугольник :
import numpy as np
import cv2 as cv

hsv_min = np.array((98, 0, 142), np.uint8)
hsv_max = np.array((234, 155, 255), np.uint8)

if __name__ == '__main__':
    fn = '345.jpg'  # имя файла, который будем анализировать
    img = cv.imread(fn)

    hsv = cv.cvtColor(img, cv.COLOR_BGR2HSV)  # меняем цветовую модель с BGR на HSV
    thresh = cv.inRange(hsv, hsv_min, hsv_max)  # применяем цветовой фильтр
    contours0, hierarchy = cv.findContours(thresh.copy(), cv.RETR_TREE, cv.CHAIN_APPROX_SIMPLE)
    cv.imshow('filter', thresh)
    # перебираем все найденные контуры в цикле
    for cnt in contours0:
        rect = cv.minAreaRect(cnt)  # пытаемся вписать прямоугольник
        box = cv.boxPoints(rect)  # поиск четырех вершин прямоугольника
        box = np.int0(box)  # округление координат
        cv.drawContours(img, [box], -1, (255, 0, 0), 0)  # рисуем прямоугольник

    cv.imshow('contours', img)  # вывод обработанного кадра в окно

    cv.waitKey()
    cv.destroyAllWindows()

Не очень удачная фотка, зато можно понять алгоритм работы данной функции.Так же алгоритм вписывает треугольники во всем найденные контуры. Немного пояснений к коду:
- cv.boxPoints(rect) — Функция находит четыре вершины повернутого прямоугольника. Эта функция полезна для рисования прямоугольника.
- np.int0(box) — преобразуем массив в формат int64 .
>>> import numpy>>> numpy.int0 is numpy.int64True
Функция для поиска эллипсов fitEllipse()
Собственно эта функция работает так же как и minAreaRect() . Пытается вписать круг во все найденные контуры :
import numpy as np
import cv2 as cv

hsv_min = np.array((0, 77, 17), np.uint8)
hsv_max = np.array((208, 255, 255), np.uint8)

fn = '173442.jpg'
img = cv.imread(fn)

hsv = cv.cvtColor( img, cv.COLOR_BGR2HSV )
thresh = cv.inRange( hsv, hsv_min, hsv_max )
contours0, hierarchy = cv.findContours( thresh.copy(), cv.RETR_TREE, cv.CHAIN_APPROX_SIMPLE)
for cnt in contours0:
        if len(cnt)>4:
            ellipse = cv.fitEllipse(cnt)
            cv.ellipse(img,ellipse,(0,0,255),2)
cv.imshow('contours', img)

cv.waitKey()
cv.destroyAllWindows()

Условие
if len(cnt)>4:
необходимо для того, чтобы отсечь контуры с контурами меньше 5 точек. Так же мы можем поступить с прямоугольниками , посчитать площадь и отсечь маленькие :
box = np.int0(box) # округление координат
area = int(rect[1][0]*rect[1][1]) # вычисление площади
if area > 500:
   cv.drawContours(img,[box],0,(255,0,0),2)
Вычисление угла поворота прямоугольника в OpenCV .
Здесь нам не потребуется специальные функции , одна лишь математика :
import numpy as np
import cv2 as cv
import math

hsv_min = np.array((86, 11, 0), np.uint8)
hsv_max = np.array((132, 255, 255), np.uint8)

color_blue = (255, 0, 0)
color_yellow = (0, 255, 255)

if __name__ == '__main__':
    fn = '34562.jpg'  # имя файла, который будем анализировать
    img = cv.imread(fn)

    hsv = cv.cvtColor(img, cv.COLOR_BGR2HSV)  # меняем цветовую модель с BGR на HSV
    thresh = cv.inRange(hsv, hsv_min, hsv_max)  # применяем цветовой фильтр
    contours0, hierarchy = cv.findContours(thresh.copy(), cv.RETR_TREE, cv.CHAIN_APPROX_SIMPLE)

    # перебираем все найденные контуры в цикле
    for cnt in contours0:
        rect = cv.minAreaRect(cnt)  # пытаемся вписать прямоугольник
        box = cv.boxPoints(rect)  # поиск четырех вершин прямоугольника
        box = np.int0(box)  # округление координат
        center = (int(rect[0][0]), int(rect[0][1]))
        area = int(rect[1][0] * rect[1][1])  # вычисление площади

    # вычисление координат двух векторов, являющихся сторонам прямоугольника
        edge1 = np.int0((box[1][0] - box[0][0], box[1][1] - box[0][1]))
        edge2 = np.int0((box[2][0] - box[1][0], box[2][1] - box[1][1]))

    # выясняем какой вектор больше
        usedEdge = edge1
        if cv.norm(edge2) > cv.norm(edge1):
            usedEdge = edge2
        reference = (1, 0)  # горизонтальный вектор, задающий горизонт

    # вычисляем угол между самой длинной стороной прямоугольника и горизонтом
        angle = 180.0 / math.pi * math.acos((reference[0] * usedEdge[0] + reference[1] * usedEdge[1]) / (cv.norm(reference) * cv.norm(usedEdge)))

        if area > 100:
            cv.drawContours(img, [box], 0, (255, 0, 0), 2)  # рисуем прямоугольник
            cv.circle(img, center, 5, color_yellow, 2)  # рисуем маленький кружок в центре прямоугольника
        # выводим в кадр величину угла наклона
            cv.putText(img, "%d" % int(angle), (center[0] + 20, center[1] - 20), cv.FONT_HERSHEY_SIMPLEX, 1, color_yellow, 2)

    cv.imshow('contours', img)
    cv.waitKey()
    cv.destroyAllWindows()

Вместо заключения.
Итак, мы умеем определять угол наклона прямоугольника. Плохая новость — мы не можем быть уверены, что в кадре именно прямоугольник. Та же ситуация с эллипсом.
Ошибка в тексте? Выделите её и нажмите «Ctrl + Enter»
Here’s a complete Python solution. The main idea is:
- Apply pyramid mean shift filtering to help threshold accuracy
- Otsu’s threshold to get a binary image
- Find contours and filter using contour approximation
Here’s a visualization of each detected rectangle contour

Results

import cv2

image = cv2.imread('1.png')
blur = cv2.pyrMeanShiftFiltering(image, 11, 21)
gray = cv2.cvtColor(blur, cv2.COLOR_BGR2GRAY)
thresh = cv2.threshold(gray, 0, 255, cv2.THRESH_BINARY_INV + cv2.THRESH_OTSU)[1]

cnts = cv2.findContours(thresh, cv2.RETR_EXTERNAL, cv2.CHAIN_APPROX_SIMPLE)
cnts = cnts[0] if len(cnts) == 2 else cnts[1]
for c in cnts:
    peri = cv2.arcLength(c, True)
    approx = cv2.approxPolyDP(c, 0.015 * peri, True)
    if len(approx) == 4:
        x,y,w,h = cv2.boundingRect(approx)
        cv2.rectangle(image,(x,y),(x+w,y+h),(36,255,12),2)

cv2.imshow('thresh', thresh)
cv2.imshow('image', image)
cv2.waitKey()
