In this brief guide, we will see all the possible ways to find and list disk partitions in Linux and Unix-like operating systems. Before getting into the topic, let us take a quick look at what is disk partitioning and how disk partitions are named in Linux.
Disk partitioning in Linux
Disk partitioning or disk slicing is a method of dividing a physical storage disk device into multiple logical sections. These sections are known as partitions. A hard disk drive can contain one or several partitions.
In Linux and Unix-like systems, the disk is usually divided into three partitions:
- One partition is used for keeping the system files. It is usually mounted on
"/"(rootdirectory). - One partition is used for keeping the users configuration files and their personal data. It is mounted on
/homedirectory. - And a swap partition.
All partitions should be formatted with a filesystem, for example EXT4, before installing the OS and/or saving any data in it.
The partition table information is stored in Master Boot record (MBR) in BIOS-based systems and GUID Partition Table (GPT) in UEFI-based systems.
At system boot, BIOS or UEFI scans all storage devices, detects the MBR/GPT areas, finds the boot disks, loads the bootloader program (i.e. grub2) in memory from the default boot disk, executes the boot code to read the partition table and identify the /boot partition, loads the Kernel in memory, and finally passes the control to the Kernel. Kernel takes care of the rest of the boot process and loads the OS.
Disk and partition names in Linux
You need to know the correct names that Linux uses when you are creating, mounting, and deleting partitions.
The name of disks and the partitions in Linux differs from other operating systems. The basic naming scheme in Linux OS is given below:
- The name of the first floppy drive is
/dev/fd0. - The name of the second floppy drive is
/dev/fd1, and so on. - The first hard disk (the primary master) detected is named
/dev/sda. - The second hard disk detected is named
/dev/sdb, and so on. - The first SCSI CD-ROM is named
/dev/scd0. It is also known as/dev/sr0.
You might be wondering what sda does stands for. sd is originally for referring scsi disk devices, however it is now used to refer SATA devices and any removable devices in general.
The partitions on each disk are represented by appending a decimal number to the disk name. For example, sda1 is the first partition in the first SCSI hard drive, sda2 represents the second partition of the first disk drive, sdb1 is the first partition in the second hard drive and so on. In layman terms, s refers to the interface (SATA, SAS, or SCSI), d is for disk, a is for the device id, and the number is for partition id. The same applies to the subsequent disks added to the system.
Knowing Linux disks and partitions name is just enough for the purpose of this guide. If you want to know more details, a quick web search may yield many relevant results. Let us get back to the topic. There are many ways to view disk partitions in Linux. First, we will start with lsblk command line utlity.
1. List disk partitions in Linux using lsblk command
The lsblk utility is used to display information about a specified block device as well as all available block devices, along with their partitioning schemes in Linux. It reads the sysfs filesystem and udev db to collect information of disks and partitions and displays the output in tree-like format.
To list disk and partition information with lsblk command, simply run it without any options:
$ lsblk
Or,
$ sudo lsblk
Sample output:
NAME   MAJ:MIN RM  SIZE RO TYPE MOUNTPOINT
loop0    7:0    0   55M  1 loop /snap/core18/1705
loop1    7:1    0   55M  1 loop /snap/core18/1754
loop2    7:2    0 69.4M  1 loop /snap/lxd/15223
loop3    7:3    0 71.2M  1 loop /snap/lxd/15913
loop4    7:4    0 27.1M  1 loop /snap/snapd/7264
loop5    7:5    0 29.8M  1 loop /snap/snapd/8140
sda      8:0    0   20G  0 disk
├─sda1   8:1    0    1M  0 part
└─sda2   8:2    0   20G  0 part /
sr0     11:0    1 1024M  0 rom
lsblk commandAs you see in the above output, lsblk command lists one 20GB disk named sda, with two partitions namely sda1 and sda2. If you look under the Type column in the above output, it shows the type of the device i.e. disk or part (i.e. partition).
Did you notice there is one more partition name sr0? It represents the ISO image mounted as an optical medium.
You may have more than one devices in your system. In that case, just specify the disk device name like below:
$ lsblk /dev/sda
The above command will show the partition details in the first disk drive.
You can even display more details including filesystem type, UUID, Mountpoint etc., like below:
$ lsblk -io KNAME,TYPE,SIZE,MODEL,FSTYPE,UUID,MOUNTPOINT
Alternatively, you could use -fm option to display mountpoint, size, owner, mode:
$ lsblk -fm
2. Display disk partitions using fdisk command in Linux
Fdisk is a command line, dialog-driven program for managing partition tables and partitions on a hard disk in Linux.
To display disk partitions in Linux, run fdisk command with -l option as root or sudo user:
$ sudo fdisk -l
Sample output:
[...]
Disk /dev/sda: 20 GiB, 21474836480 bytes, 41943040 sectors
Disk model: VBOX HARDDISK
Units: sectors of 1 * 512 = 512 bytes
Sector size (logical/physical): 512 bytes / 512 bytes
I/O size (minimum/optimal): 512 bytes / 512 bytes
Disklabel type: gpt
Disk identifier: 46F42576-F542-4AD4-9BE4-31E59BAFE3C1

Device     Start      End  Sectors Size Type
/dev/sda1   2048     4095     2048   1M BIOS boot
/dev/sda2   4096 41940991 41936896  20G Linux filesystem
fdisk command in LinuxIn the above output, you will see all available disk partitions.
To view the partition table in a specific disk drive, explicitly mention its name like below:
$ sudo fdisk -l /dev/sda
3. Check Hard disk partitions using sfdisk in Linux
Sfdisk is is a script-oriented tool for partitioning any block device. Sfdisk usage is same fdisk’s usage.
To check the hard disk partitions in Linux with sfdisk command, run:
$ sudo sfdisk -l
You can also check the partitions in a specific device as well.
$ sudo sfdisk -l /dev/sda
4. Check Linux disk partitions using cfdisk
Cfdisk is a curses-based, command line program for partitioning any block device in Linux and Unix-like systems.
To check all available disk partitions in Linux using cfdisk, run:
$ sudo cfdisk
Sample output:
To exit, press q or choose Quit option by using arrow keys and hit ENTER.
By default, Cfdisk lists partition details of /dev/sda disk.
5. Find disk partitions in Linux using blkid
The blkid is a yet another command line program to list all recognized partitions and their UUID (Universally Unique Identifier).
To list al partitions in your Linux machine, run blkid as root or sudo user:
$ sudo blkid
Sample output:
/dev/sda2: UUID="81bb4976-a820-4e0d-92ab-1a754f9837bd" TYPE="ext4" PARTUUID="ea153271-0c12-4b95-9dee-3dab58a1fd03"
/dev/loop0: TYPE="squashfs"
/dev/loop1: TYPE="squashfs"
/dev/loop2: TYPE="squashfs"
/dev/loop3: TYPE="squashfs"
/dev/loop4: TYPE="squashfs"
/dev/loop5: TYPE="squashfs"
/dev/sda1: PARTUUID="02fcad04-66ea-41e0-8673-4e3fbbf1883a"
You can also list all partitions in a table, including current mountpoints:
$ sudo blkid -o list
Sample output:
device     fs_type label    mount point    UUID
------------------------------------------------------------------------
/dev/sda2  ext4             /              81bb4976-a820-4e0d-92ab-1a754f9837bd
/dev/loop0 squashfs         /snap/core18/1705
/dev/loop1 squashfs         /snap/core18/1754
/dev/loop2 squashfs         /snap/lxd/15223
/dev/loop3 squashfs         /snap/lxd/15913
/dev/loop4 squashfs         /snap/snapd/7264
/dev/loop5 squashfs         /snap/snapd/8140
/dev/sda1                   (not mounted)
6. Get disk partition details using hwinfo tool
Hwinfo is a free, open source and command line utility to find Linux system hardware information. It probes for the hardware present in your Linux system and displays the extensive details of each hardware device.
Hwinfo is not installed by default in many Linux distribution. Refer the following link to install Hwinfo in your Linux system.
- How To Find Linux System Hardware Information With Hwinfo
Once installed, run the following command to get the list of disk partitions in your Linux system with hwinfo utility:
$ hwinfo --block --short
Sample output:
disk:
  /dev/sda             VBOX HARDDISK
partition:
  /dev/sda1            Partition
  /dev/sda2            Partition
cdrom:
  /dev/sr0             VBOX CD-ROM
Here the --short option is used precisely display the disk name, partition names and the CD ROM in user-friendly format, excluding all other details.
If you want to display, full details of the partitions, just remove the --short option.
7. List Linux partition details with inxi
Inxi is a command line system information tool. This script is specifically built for console and IRC. It is also used as a debugging tool for forum technical support to quickly ascertain users’ system configurations and hardware.
Inxi is not available by default. You need to install it in your Linux box as shown in the following guide:
- How To Find Linux System Details Using inxi
Once installed, list the partition details with inxi, use -P flag:
$ inxi -P
Sample output:
Partition:
  ID-1: / size: 19.56 GiB used: 5.72 GiB (29.3%) fs: ext4
  dev: /dev/sda2
If you want to show full partition details, use -p (small letter):
$ inxi -p
Sample output:
Partition: ID-1: / size: 19.56 GiB used: 5.72 GiB (29.3%) fs: ext4 dev: /dev/sda2
           ID-2: /snap/core18/1705 raw size: 54.9 MiB size: <superuser/root required> used: <superuser/root required>
           fs: squashfs dev: /dev/loop0
           ID-3: /snap/core18/1754 raw size: 54.9 MiB size: <superuser/root required> used: <superuser/root required>
           fs: squashfs dev: /dev/loop1
           ID-4: /snap/lxd/15223 raw size: 69.3 MiB size: <superuser/root required> used: <superuser/root required>
           fs: squashfs dev: /dev/loop2
           ID-5: /snap/lxd/15913 raw size: 71.2 MiB size: <superuser/root required> used: <superuser/root required>
           fs: squashfs dev: /dev/loop3
           ID-6: /snap/snapd/7264 raw size: 27.1 MiB size: <superuser/root required> used: <superuser/root required>
           fs: squashfs dev: /dev/loop5
           ID-7: /snap/snapd/8140 raw size: 29.8 MiB size: <superuser/root required> used: <superuser/root required>
           fs: squashfs dev: /dev/loop4
8. Manually List all disk partitions by probing proc filesystem
Proc file system (or shortly procfs) is a virtual file system maintained by the Linux kernel. It is also sometimes referred to as a process information pseudo-file system. It doesn’t contain ‘real’ files but runtime system information such as system memory, devices mounted, hardware configuration etc. All these information are available under a special directory named /proc in Linux.
The disks and partitions details are available in /proc/partitions file. So, we can list all disk partitions by looking at the contents of this file using cat command:
$ cat /proc/partitions
Sample output:
major minor  #blocks  name

   7        0      56264 loop0
   7        1      56268 loop1
   7        2      71008 loop2
   7        3      72952 loop3
   7        4      30540 loop4
   7        5      27740 loop5
  11        0    1048575 sr0
   8        0   20971520 sda
   8        1       1024 sda1
   8        2   20968448 sda2
9. View disk partitions in Linux with parted
Parted is a command line program to manipulate disk partitions in Linux and Unix-like systems. It supports
multiple partition table formats, including MS-DOS and GPT. Parted is specifically used to create and manage partitions in disks larger than 2TB.
To view disk partitions in Linux, run parted command with -l option:
$ sudo parted -l
Sample output:
Model: ATA VBOX HARDDISK (scsi)
Disk /dev/sda: 21.5GB
Sector size (logical/physical): 512B/512B
Partition Table: gpt
Disk Flags:

Number  Start   End     Size    File system  Name  Flags
 1      1049kB  2097kB  1049kB                     bios_grub
 2      2097kB  21.5GB  21.5GB  ext4
All of the aforementioned tools are commandline-based. If you are a newbie who is not much comfortable with Terminal, you can use the following two graphical tools to check partition details in Linux.
10. View disk partition details using GParted in Linux
GNOME Partition Editor (or shortly GParted) is a graphical front-end to parted command line tool. Using GParted, you can create and manage disk partitions via a simple and easy-to-use graphical interface.
GParted is not installed by default, but it is available in the default repositories of several Linux distributions. So you can install GParted using your distribution’s default package manager. For example, Gpated can be installed on Debian, Ubuntu and other DEB-based systems like below:
$ sudo apt install gparted
To view your disk partition table, simply open GParted utility from menu or Dash.
Important Note: Just do not change anything unless you know what you are doing.
11. Find disk partitions with GNOME Disks
GNOME Disks or gnome-disk-utility is a graphical utility to view, modify and configure disks and media in Linux. It comes pre-installed in Linux distributions that has GNOME Desktop environment.
Open GNOME Disks utility to find all available partitions in your hard disk.
And, that’s all. These are the few ways to list Linux disk partitions. There are many other tools and commands available to find the partitions in a disk. I guess I’ve covered enough. If you think I missed any important tool in this list, feel free to leave a note in the comment section below.
Featured Image by Christopher Muschitz from Pixabay.
In this guide, we will show how to list storage disks and partitions in Linux systems. We will cover both command-line tools and GUI utilities. By the end of this guide, you will learn how to view or report information about disks and partitions on your Linux server or desktop computer, or workstation.
[ You might also like: 3 Useful GUI and Terminal Based Linux Disk Scanning Tools ]
1. List Linux Disks Using fdisk Command
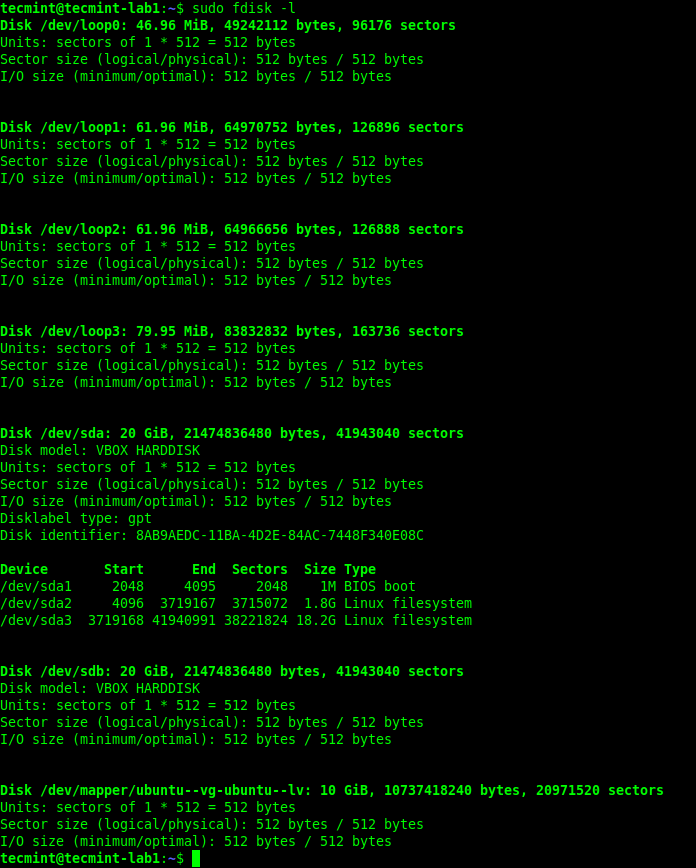
fdisk is a widely-used command-line tool for manipulating disk partition tables. You can use it to view disks and partitions on your Linux server as follows.
The -l flag implies list partitions, if no device is specified, fdisk will display partitions from all disks. It requires root privileges for you to invoke it, so use the sudo command where necessary:
$ sudo fdisk -l
2. View Linux Disk Partitions Using lsblk Command
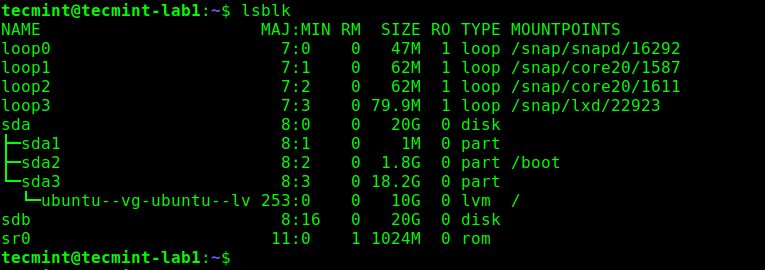
lsblk is a utility for listing block devices. You can use it to view disks and partitions on your Linux computer as follows. It runs well without the sudo command:
$ lsblk
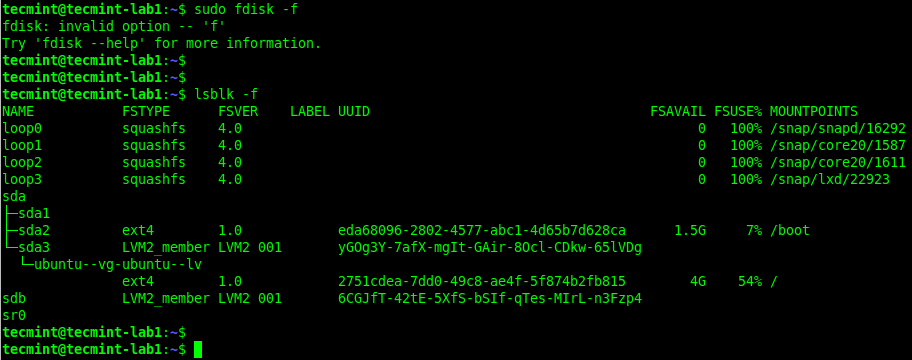
To view extra information about disks, use the -f command line option as shown:
$ lsblk -f
3. View Linux Disks Using hwinfo Command
hwinfo is another useful utility for viewing information about your hardware, particularly storage disks. If you can not find the hwinfo command on your system, run the following command to install it:
$ sudo apt install hwinfo         [On Debian, Ubuntu and Mint]
$ sudo yum install hwinfo         [On RHEL/CentOS/Fedora and Rocky Linux/AlmaLinux]
$ sudo emerge -a sys-apps/hwinfo  [On Gentoo Linux]
$ sudo pacman -S hwinfo           [On Arch Linux]
$ sudo zypper install hwinfo      [On OpenSUSE]
Once you have the hwinfo package installed, run the command with the --disk command line option as shown:
$ sudo hwinfo --disk
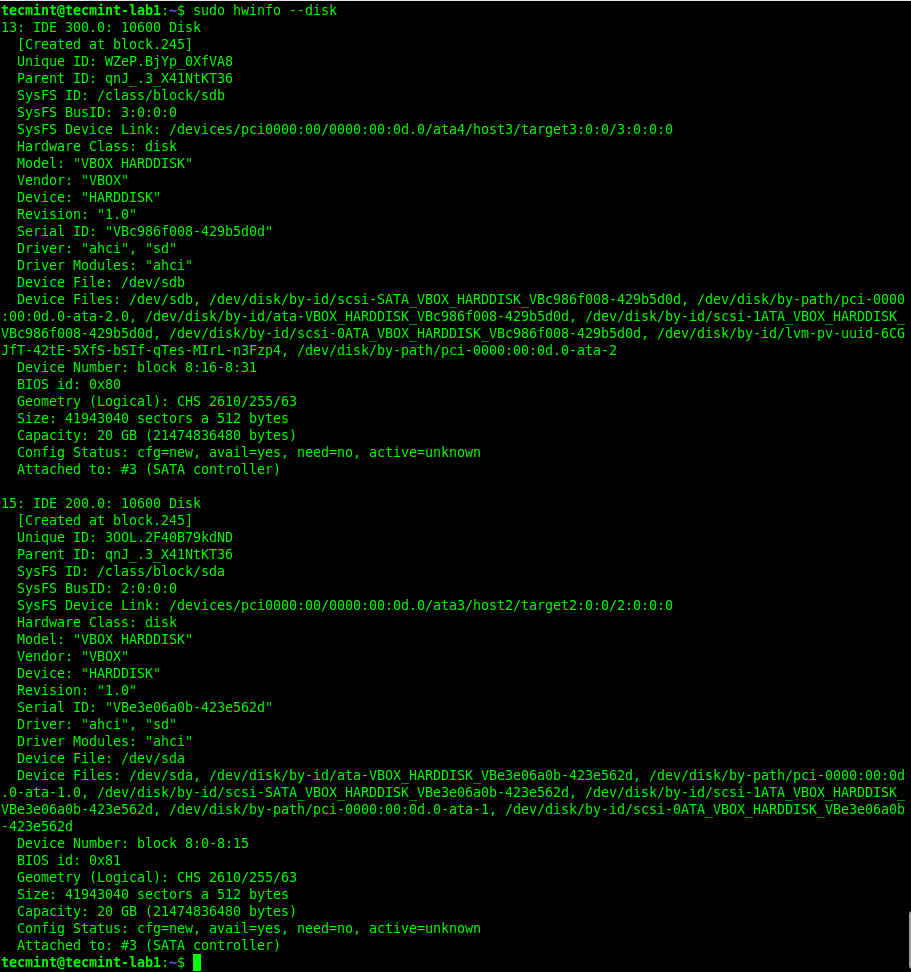
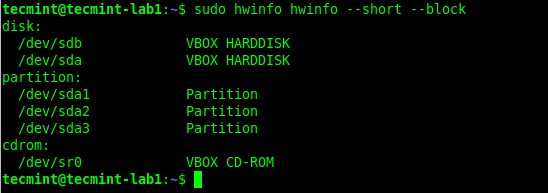
From the output of the previous command, there is a lot of information about a disk or its partitions that hwinfo displays. If you wish to view an overview of block devices, run this command:
$ sudo hwinfo --short --block
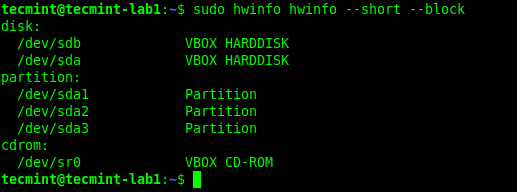
To show a summary of all disks, run the command:
$ sudo hwinfo --disk --short
4. Find Linux Partitions Information Using Disk Tool
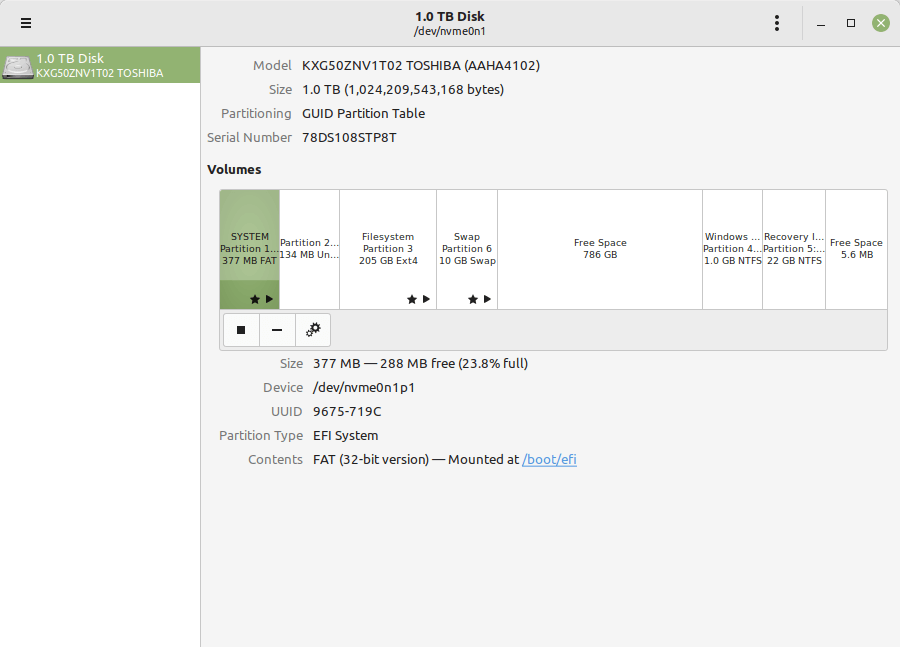
On a Linux desktop computer, you can also use a graphical user interface (GUI) application to view a list of disks attached to your computer. First, search for disks application in the system menu. Then open it to view your disks and their partitions.
That’s all for now. For more information about the commands used in this guide, check out their man pages. You can also share your thoughts with us via the comment form below.
If you read this far, tweet to the author to show them you care. Tweet a thanks
Aaron Kili is a Linux and F.O.S.S enthusiast, an upcoming Linux SysAdmin, web developer, and currently a content creator for TecMint who loves working with computers and strongly believes in sharing knowledge.
Each tutorial at TecMint is created by a team of experienced Linux system administrators so that it meets our high-quality standards.
Linux отображает подключённые жёсткие диски иначе, чем Windows. В операционной системе от Microsoft мы привыкли к тому, что у нас есть диск C, D, E, и нам не нужно задумываться о реальных именах разделов и жёстких дисков. Все диски размещены в проводнике и очень просто доступны.
В Linux такой возможности нет, как и нет такой абстракции. Диски и разделы именуются как есть, и вы будете иметь дело именно с этими именами. В этой статье мы разберём, как посмотреть список дисков Linux.
В Linux все отображается в файловом виде, в том числе и устройства. Все подключённые к операционной системе Linux устройства размещаются в каталоге /dev/ здесь вы найдете микрофоны, камеры, жёсткие диски, флешки, одним словом, все внешние и внутренние устройства.
Жёсткие диски имеют особенные названия. В зависимости от интерфейса, через который подключён жёсткий диск, название может начинаться на:
- sd – устройство, подключённое по SCSI;
- hd – устройство ATA;
- vd – виртуальное устройство;
- mmcblk – обозначаются флешки, подключённые через картридер;
В наше время большинство блочных устройств Linux подключаются через интерфейс SCSI. Сюда входят жёсткие диски, USB-флешки, даже ATA-диски теперь тоже подключаются к SCSI через специальный переходник. Поэтому в большинстве случаев вы будете иметь дело именно с дисками sd.
Третья буква в имени диска означает его порядковый номер в системе. Используется алфавитная система. Например sda – первый диск, sdb – второй диск, sdc – третий и так далее. Дальше следует цифра – это номер раздела на диске – sda1, sda2.
Самый простой способ увидеть все подключённые диски – это посмотреть содержимое каталога /dev/ и отфильтровать устройства sd:
ls -l /dev/
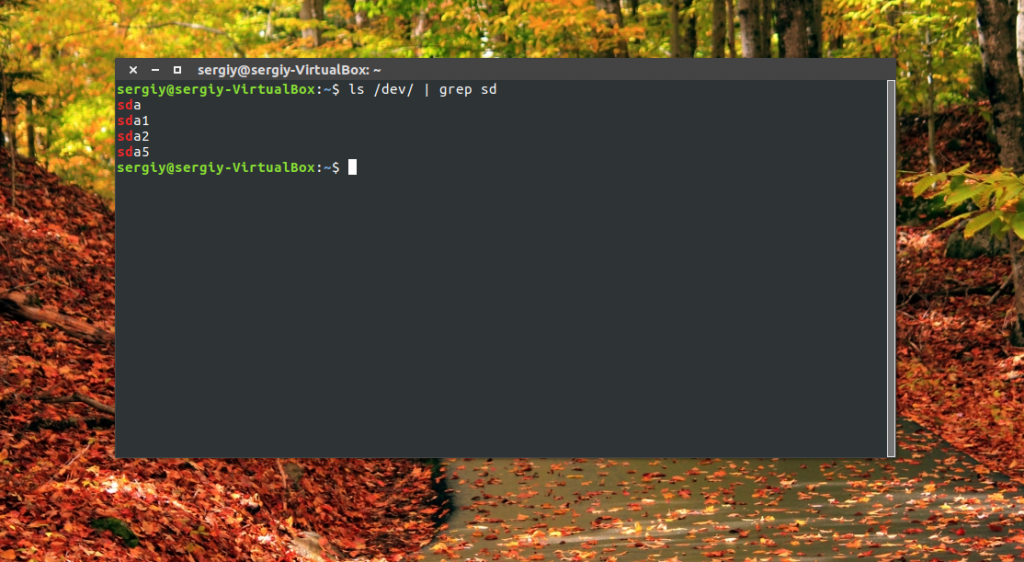
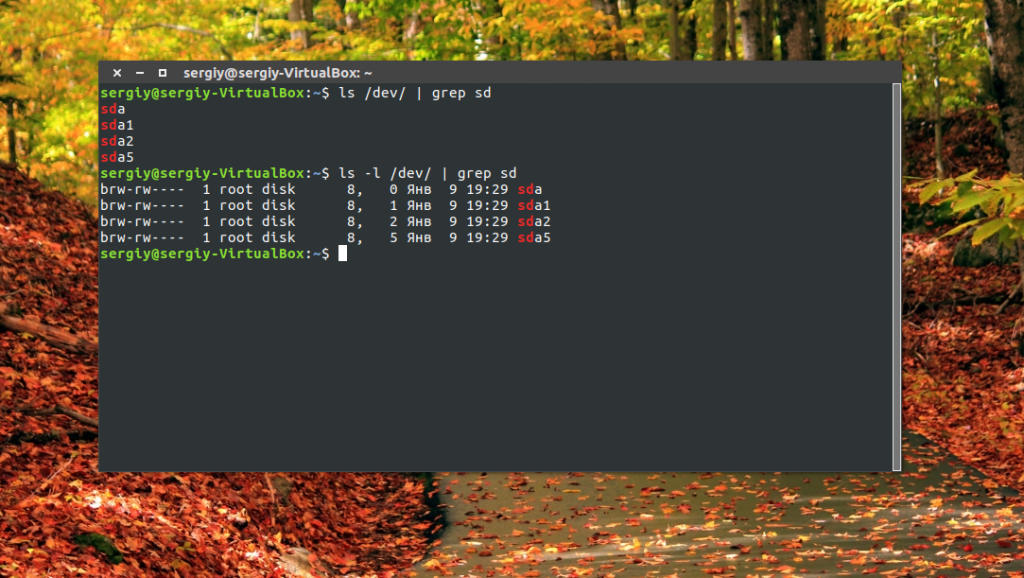
Как видите, в моей системе сейчас есть только один диск и два раздела. Дальше мы можем посмотреть, куда примонтирован каждый из разделов:
mount
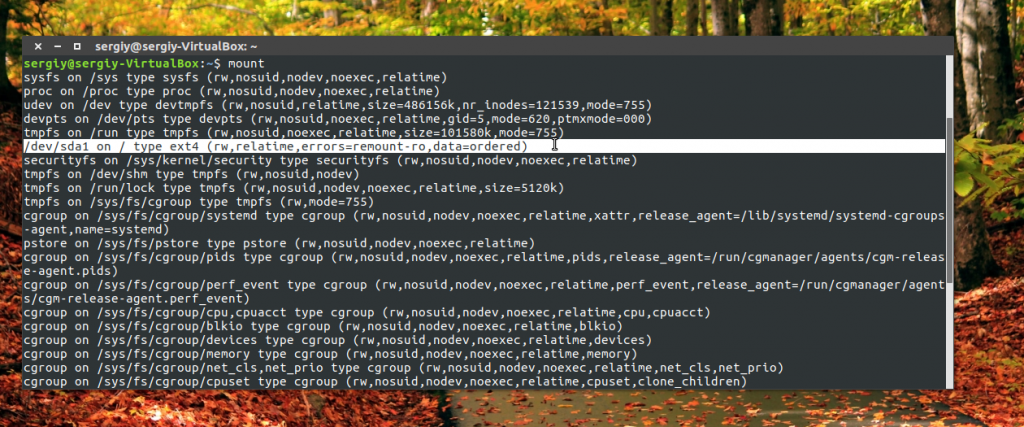
Здесь, кроме дисков, будут отображаться различные специальные файловые системы: procfs, sysfs, tmpfs, cgroup и так далее. Однако все эти команды не помогут нам получить доступ к информации о дисках. Поэтому нам понадобится кое-что другое. Посмотреть подключённые диски с выводом информации о размере и свободном пространстве можно с помощью утилиты df:
df -h
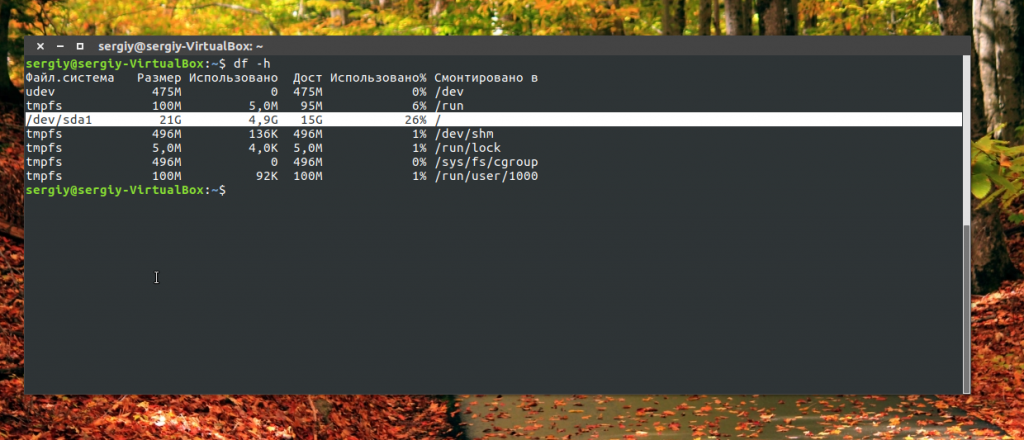
Здесь отображается уже подробная информация. Но вы можете узнать ещё больше с помощью команды lsblk:
lsblk
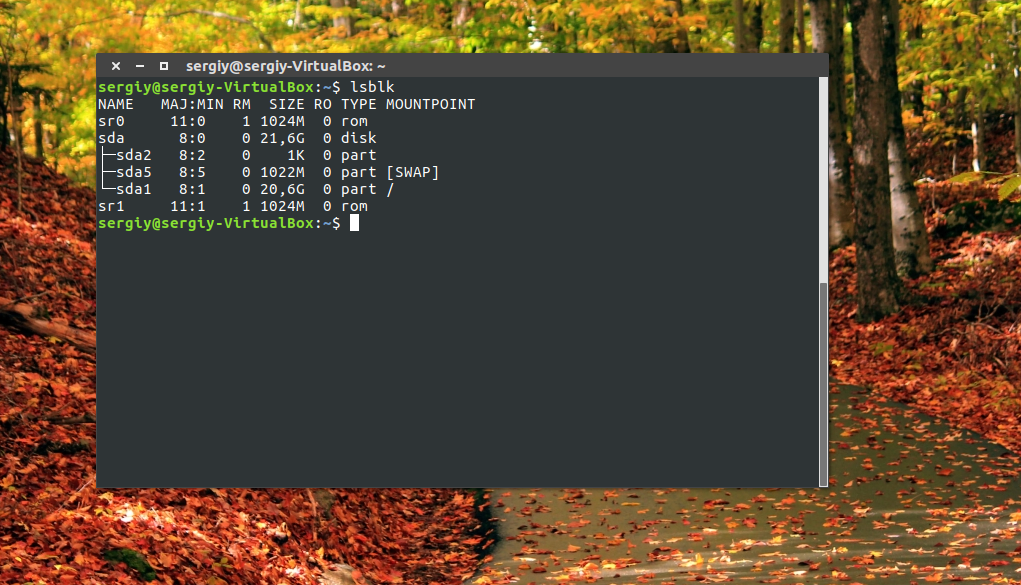
В этом случае список примонтированных дисков Linux включает ещё и информацию о точке монтирования, типе раздела (диск, раздел, привод) и его мажорном и минорном номере, по которым можно понять, что это за устройство. Если вам нужна информация о размере, то лучше использовать fdisk:
fdisk -l
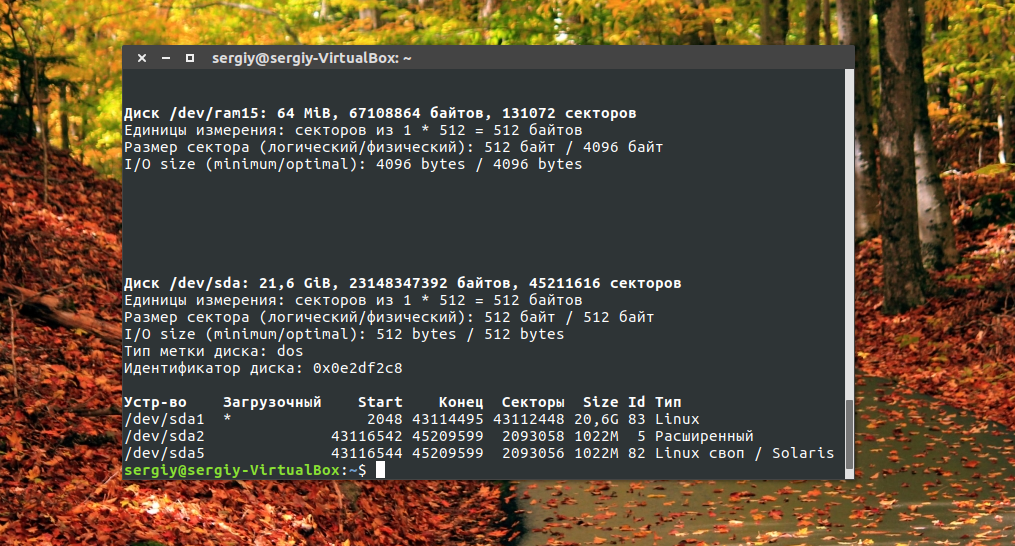
Это все утилиты, которыми вы можете воспользоваться, чтобы просмотреть список дисков Linux. Но есть ещё и графические утилиты.
Посмотреть список дисков в GUI
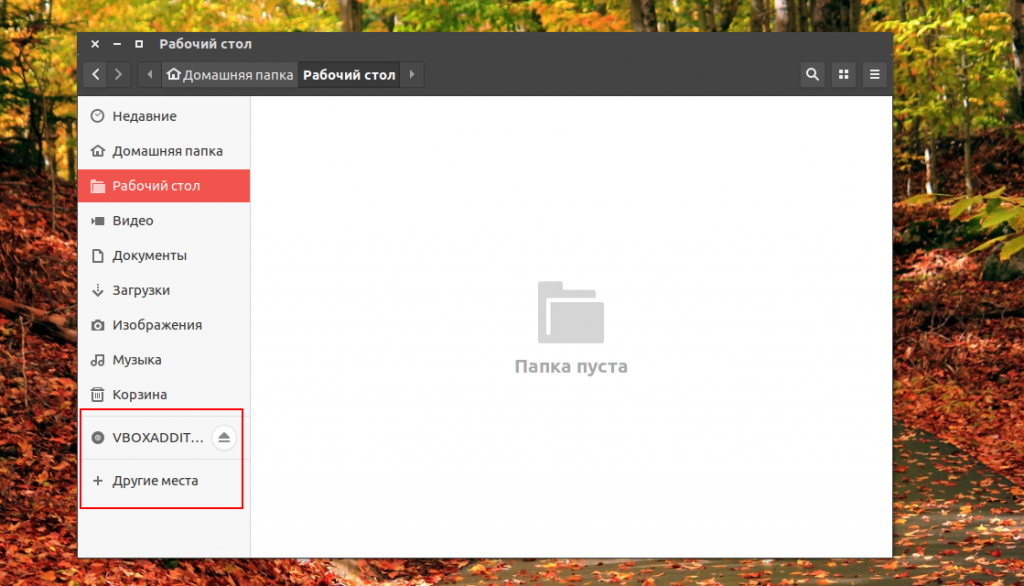
Во-первых, если к компьютеру подключено несколько дисков, то вы сможете их увидеть на левой панели файлового менеджера Nautilus или Dolphin. Там будет отображаться список подключенных устройств Linux, их метки и размер:
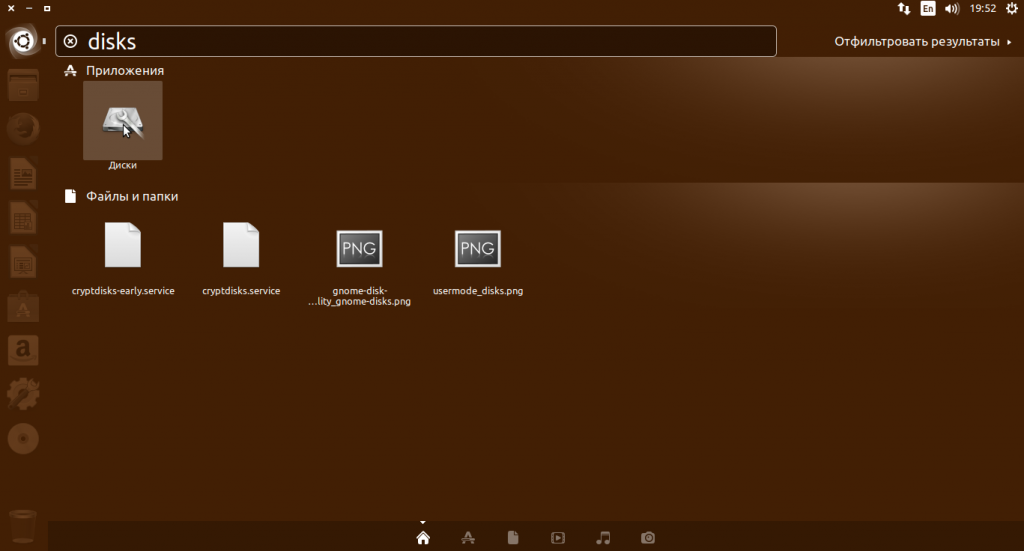
В Gnome есть программа Disks, которая позволяет настраивать поведение дисков, она же может отображать список подключенных устройств к системе. Вы можете найти её в главном меню:
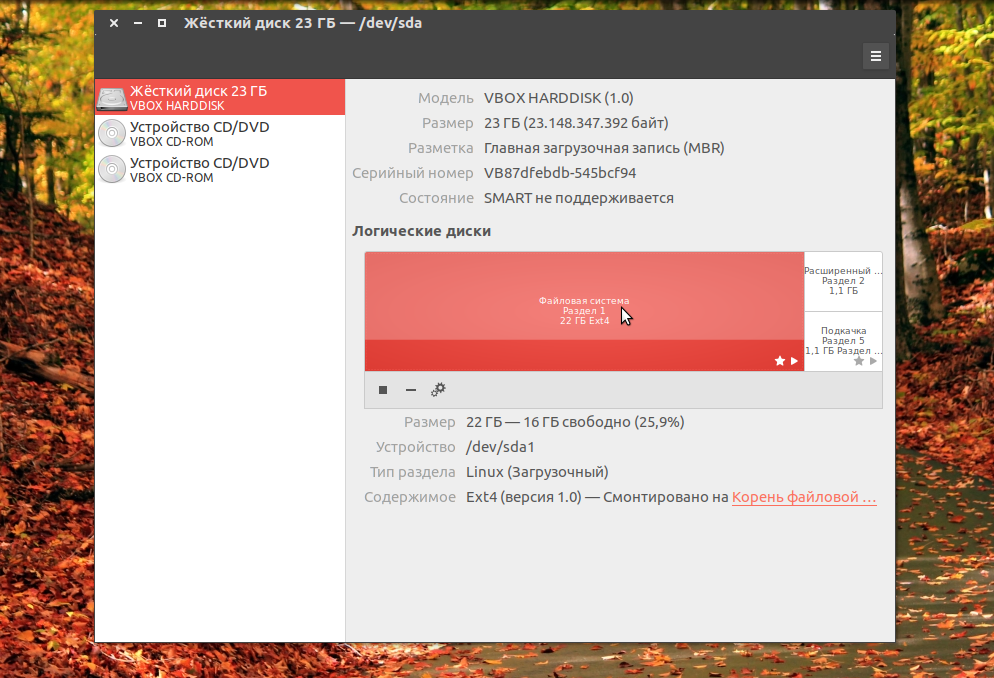
Утилита отображает всю доступную информацию о дисках и разделах на них, вы можете даже посмотреть информацию о состоянии smart. Список дисков находится на панели слева, а справа разделы на этом диске:
Ещё одна утилита, которую вы можете использовать, чтобы посмотреть список жёстких дисков Linux – это Gparted. Это редактор разделов для Linux, но вы можете посмотреть подключнёные диски и структуру каждого из них. Раскрывающийся список вы найдёте в верхнем правом углу:
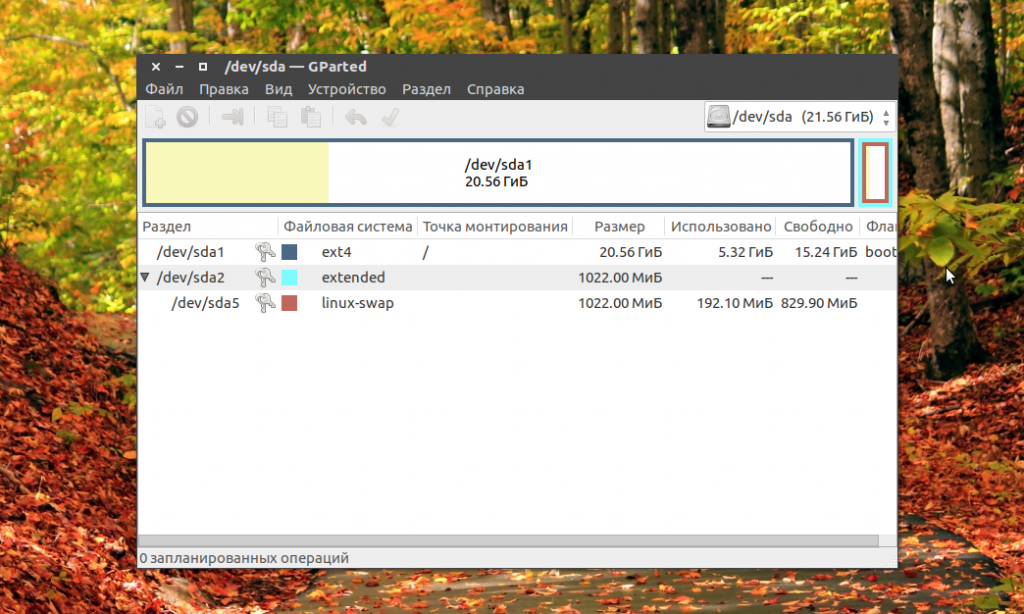
А в основной части окна программы отображается список разделов.
Выводы
В этой статье мы разобрали несколько способов посмотреть список примонтированных дисков Linux. Каждый из них может понадобиться в различных ситуациях. Если у вас остались вопросы, спрашивайте в комментариях!
Обнаружили ошибку в тексте? Сообщите мне об этом. Выделите текст с ошибкой и нажмите Ctrl+Enter.

Статья распространяется под лицензией Creative Commons ShareAlike 4.0 при копировании материала ссылка на источник обязательна .
Об авторе
![]()
Основатель и администратор сайта losst.ru, увлекаюсь открытым программным обеспечением и операционной системой Linux. В качестве основной ОС сейчас использую Ubuntu. Кроме Linux, интересуюсь всем, что связано с информационными технологиями и современной наукой.
В этом руководстве мы покажем, как составить список дисков и разделов в системах Linux.
Мы рассмотрим как инструменты командной строки, так и утилиты графического интерфейса.
К концу этого руководства вы узнаете, как просматривать или создавать отчеты о дисках и разделах на вашем сервере Linux, настольном компьютере или рабочей станции.
1. Список дисков Linux с помощью команды fdisk
fdisk – это широко используемый инструмент командной строки для работы с таблицами разделов дисков.
Вы можете использовать его для просмотра дисков и разделов на вашем Linux-сервере следующим образом.
Флаг -l означает список разделов, если устройство не указано, fdisk отобразит разделы со всех дисков.
Для его вызова требуются права root, поэтому при необходимости используйте команду sudo:
$ sudo fdisk -l

2. Просмотр разделов диска Linux с помощью команды lsblk
lsblk – это утилита для составления списка блочных устройств.
Вы можете использовать ее для просмотра дисков и разделов на вашем компьютере Linux следующим образом.
Она работает без команды sudo:
$ lsblk
Чтобы просмотреть дополнительную информацию о дисках, используйте параметр командной строки -f, как показано далее:
$ lsblk -f

3. Просмотр дисков Linux с помощью команды hwinfo
hwinfo – еще одна полезная утилита для просмотра информации о вашем оборудовании, в частности о дисках. Если вы не можете найти команду hwinfo в своей системе, выполните следующую команду для ее установки:
$ sudo apt install hwinfo         [На Debian, Ubuntu and Mint]
$ sudo yum install hwinfo         [На RHEL/CentOS/Fedora на Rocky Linux/AlmaLinux]
$ sudo emerge -a sys-apps/hwinfo  [На Gentoo Linux]
$ sudo pacman -S hwinfo           [На Arch Linux]
$ sudo zypper install hwinfo      [На OpenSUSE]
После установки пакета hwinfo выполните команду с параметром командной строки –disk, как показано на рисунке:
$ sudo hwinfo --disk
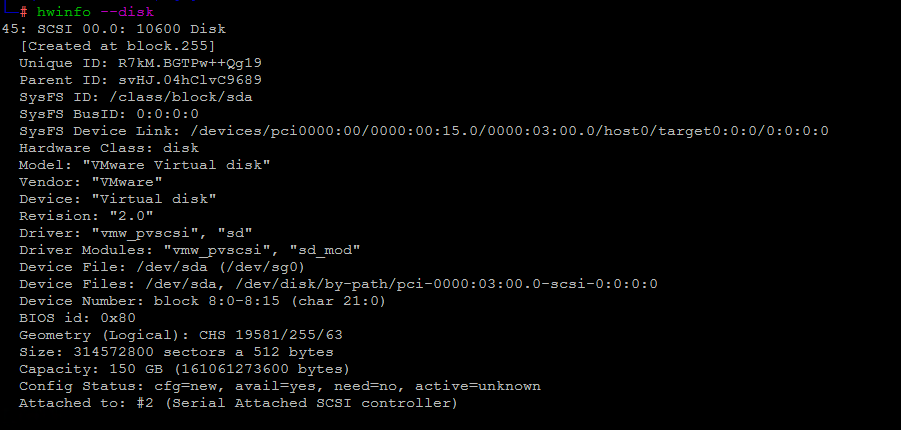
Из вывода предыдущей команды видно, что hwinfo отображает много информации о диске или его разделах.
Если вы хотите просмотреть обзор блочных устройств, выполните эту команду:
$ sudo hwinfo --short --block
Чтобы показать сводку по всем дискам, выполните команду:
$ sudo hwinfo --disk --short
4. Поиск информации о разделах Linux с помощью GUI
На настольном компьютере Linux для просмотра списка дисков, подключенных к компьютеру, можно также использовать приложение с графическим интерфейсом пользователя (GUI).
Сначала найдите приложение “Диски” в системном меню.
Затем откройте его, чтобы просмотреть диски и их разделы.
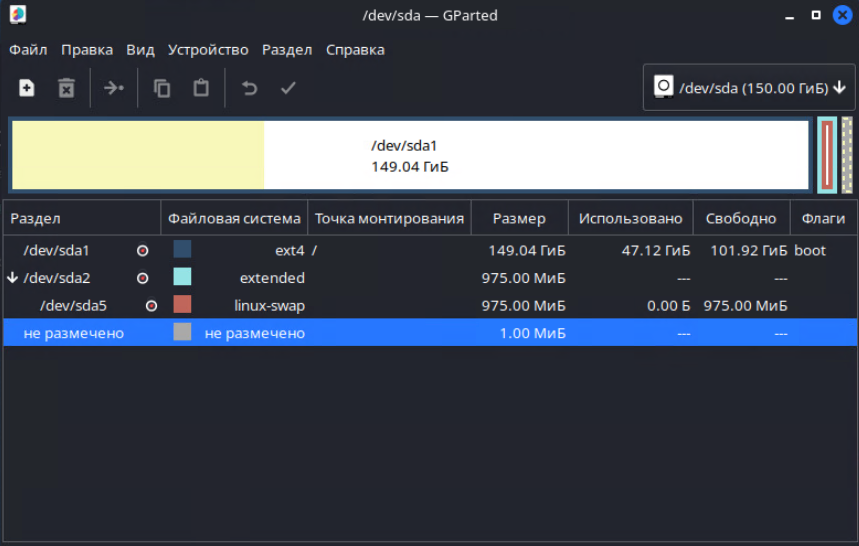
Например можно вызвать утилиту Gparted:
$ sudo gparted
см. также:
- 〽️ Как создать разделы диска в Linux
- 🖴 Как составить список дисков в командной строке Linux
- 🐧 Как смонтировать устройство на Linux
- 🎁 Как клонировать жесткий диск Linux с помощью Gparted
- 12 методов проверки разделов жесткого диска и сам жесткий диск в Linux
- 4 лучшие операционные системы Linux для спасения сломанных компьютеров
Linux system administrators generally list disks to check the whole disk space. Listing disks also helps see the attached disks to the system, partitions, and disk filesystem.
In a Linux system, there are several ways to list all the hard drives. In this tutorial, we learn how to list disks in Linux using the command line.
1. lsblk
lsblk (list block devices) is used to list information of all available block devices, such as hard disk, and flash drives.
Just typing the command lsblk will list all block devices in form of a tree format. This is a handy and simple way to list disks.
lsblkOutput:
sda      8:0    0 238.5G  0 disk
 ├─sda1   8:1    0   529M  0 part
 ├─sda2   8:2    0   100M  0 part /boot/efi
 ├─sda3   8:3    0    16M  0 part
 ├─sda4   8:4    0 165.8G  0 part
 ├─sda5   8:5    0    70G  0 part /
 └─sda6   8:6    0     2G  0 part [SWAP]
 zram0  252:0    0     8G  0 disk [SWAP]
2. df -h
The df command is used to list the amount of disk space available as a whole. Default df command prints device name, total blocks, used disk space, available disk space, percentage of used space, filesystem mount point, and also prints the remote-mounted filesystems such as NFS.
The command df -h list available space of all disks in a human-readable form.
sudo df -hOutput:
Filesystem      Size  Used Avail Use% Mounted on
 devtmpfs        5.8G     0  5.8G   0% /dev
 tmpfs           5.8G   90M  5.7G   2% /dev/shm
 tmpfs           2.4G   11M  2.4G   1% /run
 tmpfs           4.0M     0  4.0M   0% /sys/fs/cgroup
 /dev/sda5        69G   62G  3.1G  96% /
 tmpfs           5.8G  4.7M  5.8G   1% /tmp
/dev/sda2        96M   41M   56M  43% /boot/efi
 tmpfs           1.2G  200K  1.2G   1% /run/user/1000
An alternative command for df -h is findmnt –df which gives a similar output.
3. fdisk -l
The fdisk command is a text-based utility used to manage disk partitions. Using fdisk you can list disk partitions, create a new partition, delete an existing hard disk partition and view the size of the partition.
Use fdisk -l to view all available disk partitions
sudo fdisk -lOutput:
Disk /dev/sda: 238.47 GiB, 256060514304 bytes, 500118192 sectors Disk model: SK hynix SC300B Units: sectors of 1 * 512 = 512 bytes Sector size (logical/physical): 512 bytes / 4096 bytes I/O size (minimum/optimal): 4096 bytes / 4096 bytes Disklabel type: gpt Disk identifier: FF57C955-D98A-49C4-B1ED-835A44F2A0A4 Device Start End Sectors Size Type /dev/sda1 2048 1085439 1083392 529M Windows recovery environment /dev/sda2 1085440 1290239 204800 100M EFI System /dev/sda3 1290240 1323007 32768 16M Microsoft reserved /dev/sda4 1323008 349122559 347799552 165.8G Microsoft basic data /dev/sda5 349122560 495923199 146800640 70G Linux filesystem /dev/sda6 495923200 500117503 4194304 2G Linux swap Disk /dev/zram0: 8 GiB, 8589934592 bytes, 2097152 sectors Units: sectors of 1 * 4096 = 4096 bytes Sector size (logical/physical): 4096 bytes / 4096 bytes I/O size (minimum/optimal): 4096 bytes / 4096 bytesDisk /dev/loop0: 207.15 MiB, 217214976 bytes, 424248 sectors Units: sectors of 1 * 512 = 512 bytes Sector size (logical/physical): 512 bytes / 512 bytes I/O size (minimum/optimal): 512 bytes / 512 bytes Disk /dev/loop1: 99.18 MiB, 103993344 bytes, 203112 sectors Units: sectors of 1 * 512 = 512 bytes Sector size (logical/physical): 512 bytes / 512 bytes I/O size (minimum/optimal): 512 bytes / 512 bytes
4. parted -l
Parted is a useful and powerful tool used to manage hard disk partitions from the command line like list, create, shrink, delete, find and rescue disk partitions. With the parted command you can easily manage all hard disk partitions.
parted -l command will lists disks partition layout on all block devices.
sudo parted -lOutput:
Model: ATA SK hynix SC300B (scsi)
Disk /dev/sda: 256GB
Sector size (logical/physical): 512B/4096B
Partition Table: gpt
Disk Flags:
Number Start End Size File system Name Flags
1 1049kB 556MB 555MB ntfs Basic data partition hidden, diag
2 556MB 661MB 105MB fat32 EFI System Partition boot, esp
3 661MB 677MB 16.8MB Microsoft reserved partition msftres
4 677MB 179GB 178GB ntfs Basic data partition msftdata
5 179GB 254GB 75.2GB ext4
6 254GB 256GB 2147MB linux-swap(v1) swap
Model: Unknown (unknown)
Disk /dev/zram0: 8590MB
Sector size (logical/physical): 4096B/4096B
Partition Table: loop
Disk Flags:
Number Start End Size File system Flags
1 0.00B 8590MB 8590MB linux-swap(v1)5. cfdisk
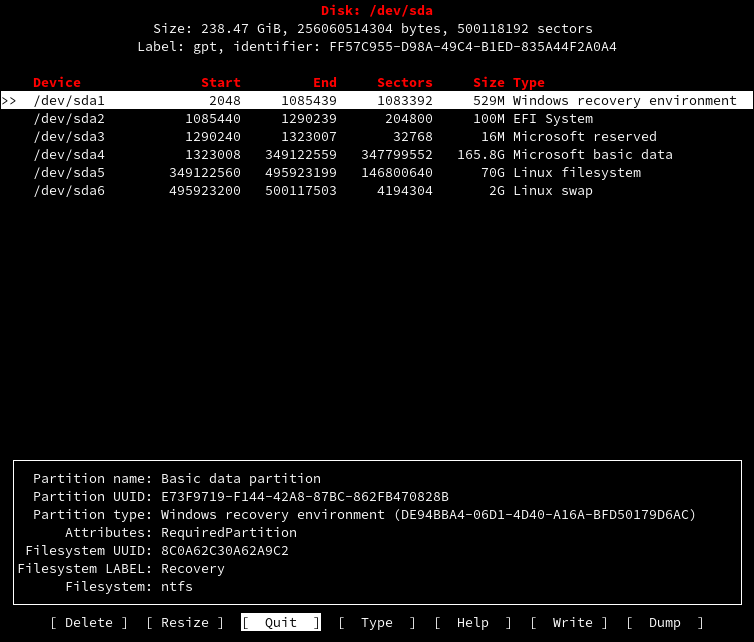
The cfdisk is slightly different from the above commands, it provides the graphics view in a text-based terminal interface to manage disks. Using cfdisk you can list, create, delete and modify partitions on a disk device.
sudo cfdiskOutput:
Disk: /dev/sda Size: 238.47 GiB, 256060514304 bytes, 500118192 sectors Label: gpt, identifier: FF57C955-D98A-49C4-B1ED-835A44F2A0A4 Device Start End Sectors Size Type
/dev/sda1 2048 1085439 1083392 529M Windows recovery environment
/dev/sda2 1085440 1290239 204800 100M EFI System
/dev/sda3 1290240 1323007 32768 16M Microsoft reserved
/dev/sda4 1323008 349122559 347799552 165.8G Microsoft basic data
/dev/sda5 349122560 495923199 146800640 70G Linux filesystem
/dev/sda6 495923200 500117503 4194304 2G Linux swap
┌──────────────────────────────────────────────────────────────────────────────────────────────────────────┐
│ Partition name: Basic data partition │
│ Partition UUID: E73F9719-F144-42A8-87BC-862FB470828B │
│ Partition type: Windows recovery environment (DE94BBA4-06D1-4D40-A16A-BFD50179D6AC) │
│ Attributes: RequiredPartition │
│ Filesystem UUID: 8C0A62C30A62A9C2 │
│Filesystem LABEL: Recovery │
│ Filesystem: ntfs │
└──────────────────────────────────────────────────────────────────────────────────────────────────────────┘
[ Delete ] [ Resize ] [ Quit ] [ Type ] [ Help ] [ Write ] [ Dump ]Example:
6. sfdisk -l
The sfdisk is a partitions table editor. It can list the partitions on a device, list the size of a partition, check the partitions on a device, and preparation a device. It is not designed for large partitions.
sfdisk -l will list partitions of disk.
sudo sfdisk -lOutput:
Disk /dev/sda: 238.47 GiB, 256060514304 bytes, 500118192 sectors
 Disk model: SK hynix SC300B
 Units: sectors of 1 * 512 = 512 bytes
 Sector size (logical/physical): 512 bytes / 4096 bytes
 I/O size (minimum/optimal): 4096 bytes / 4096 bytes
 Disklabel type: gpt
 Disk identifier: FF57C955-D98A-49C4-B1ED-835A44F2A0A4
 Device         Start       End   Sectors   Size Type
 /dev/sda1       2048   1085439   1083392   529M Windows recovery environment
 /dev/sda2    1085440   1290239    204800   100M EFI System
 /dev/sda3    1290240   1323007     32768    16M Microsoft reserved
 /dev/sda4    1323008 349122559 347799552 165.8G Microsoft basic data
 /dev/sda5  349122560 495923199 146800640    70G Linux filesystem
 /dev/sda6  495923200 500117503   4194304     2G Linux swap
 Disk /dev/zram0: 8 GiB, 8589934592 bytes, 2097152 sectors
 Units: sectors of 1 * 4096 = 4096 bytes
 Sector size (logical/physical): 4096 bytes / 4096 bytes
 I/O size (minimum/optimal): 4096 bytes / 4096 bytes
Disk /dev/loop0: 207.15 MiB, 217214976 bytes, 424248 sectors
 Units: sectors of 1 * 512 = 512 bytes
 Sector size (logical/physical): 512 bytes / 512 bytes
 I/O size (minimum/optimal): 512 bytes / 512 bytes
 Disk /dev/loop1: 99.18 MiB, 103993344 bytes, 203112 sectors
 Units: sectors of 1 * 512 = 512 bytes
 Sector size (logical/physical): 512 bytes / 512 bytes
I/O size (minimum/optimal): 512 bytes / 512 bytes7. ls -l /dev/disk/by-id
ls command is a very simple but powerful command used for listing files and directories. We can list disks by listing the directory /dev/disk/by-id.
ls -l /dev/disk/by-idOutput:
 total 0
 lrwxrwxrwx 1 root root  9 Jun 20 23:26 ata-SK_hynix_SC300B_HFS256G39MND-3510B_FI68N023911308NC9 -> ../../sda
 lrwxrwxrwx 1 root root 10 Jun 20 23:26 ata-SK_hynix_SC300B_HFS256G39MND-3510B_FI68N023911308NC9-part1 -> ../../sda1
 lrwxrwxrwx 1 root root 10 Jun 20 23:26 ata-SK_hynix_SC300B_HFS256G39MND-3510B_FI68N023911308NC9-part2 -> ../../sda2
 lrwxrwxrwx 1 root root 10 Jun 20 23:26 ata-SK_hynix_SC300B_HFS256G39MND-3510B_FI68N023911308NC9-part3 -> ../../sda3
 lrwxrwxrwx 1 root root 10 Jun 20 23:26 ata-SK_hynix_SC300B_HFS256G39MND-3510B_FI68N023911308NC9-part4 -> ../../sda4
 lrwxrwxrwx 1 root root 10 Jun 20 23:26 ata-SK_hynix_SC300B_HFS256G39MND-3510B_FI68N023911308NC9-part5 -> ../../sda5
 lrwxrwxrwx 1 root root 10 Jun 20 23:26 ata-SK_hynix_SC300B_HFS256G39MND-3510B_FI68N023911308NC9-part6 -> ../../sda6
 lrwxrwxrwx 1 root root  9 Jun 20 23:26 wwn-0x5ace42e0900dd482 -> ../../sda
 lrwxrwxrwx 1 root root 10 Jun 20 23:26 wwn-0x5ace42e0900dd482-part1 -> ../../sda1
 lrwxrwxrwx 1 root root 10 Jun 20 23:26 wwn-0x5ace42e0900dd482-part2 -> ../../sda2
 lrwxrwxrwx 1 root root 10 Jun 20 23:26 wwn-0x5ace42e0900dd482-part3 -> ../../sda3
 lrwxrwxrwx 1 root root 10 Jun 20 23:26 wwn-0x5ace42e0900dd482-part4 -> ../../sda4
 lrwxrwxrwx 1 root root 10 Jun 20 23:26 wwn-0x5ace42e0900dd482-part5 -> ../../sda5
 lrwxrwxrwx 1 root root 10 Jun 20 23:26 wwn-0x5ace42e0900dd482-part6 -> ../../sda6
You can also list by:
- by-label
- by-partlabel
- by-partuuid
- by-path
- by-uuid
8. lshw -class disk
lshw is a Linux tool that is used to generate detailed information on the system’s hardware configuration.
Use -class disk to list disk information.
sudo lshw -class diskOutput:
   *-disk
        description: ATA Disk
        product: SK hynix SC300B
        physical id: 0.0.0
        bus info: [email protected]:0.0.0
        logical name: /dev/sda
        version: 0P00
        serial: FI68N023911308NC9
        size: 238GiB (256GB)
        capabilities: gpt-1.00 partitioned partitioned:gpt
        configuration: ansiversion=5 guid=ff57c955-d98a-49c4-b1ed-835a44f2a0a4 logicalsectorsize=512 sectorsize=4096
Also, it is possible to output -class disk as -json or -html or -xml.
sudo lshw -class disk -jsonOutput:
 {
     "id" : "disk",
     "class" : "disk",
     "claimed" : true,
     "handle" : "GUID:ff57c955-d98a-49c4-b1ed-835a44f2a0a4",
     "description" : "ATA Disk",
     "product" : "SK hynix SC300B",
     "physid" : "0.0.0",
     "businfo" : "[email protected]:0.0.0",
     "logicalname" : "/dev/sda",
     "dev" : "8:0",
     "version" : "0P00",
     "serial" : "FI68N023911308NC9",
     "units" : "bytes",
     "size" : 256060514304,
     "configuration" : {
       "ansiversion" : "5",
       "guid" : "ff57c955-d98a-49c4-b1ed-835a44f2a0a4",
       "logicalsectorsize" : "512",
       "sectorsize" : "4096"
     },
     "capabilities" : {
       "gpt-1.00" : "GUID Partition Table version 1.00",
       "partitioned" : "Partitioned disk",
       "partitioned:gpt" : "GUID partition table"
     },
     "children" : [
 ]
 }
Conclusion
For all commands, except lsblk and ls -l dev/disk, need root access or superuser permissions to run it.
In this tutorial, we learned how to list disks in Linux using the command line.
