.children( [selector ] )Returns: jQuery
Description: Get the children of each element in the set of matched elements, optionally filtered by a selector.
-
version added: 1.0.children( [selector ] )
-
selector
A string containing a selector expression to match elements against.
-
Given a jQuery object that represents a set of DOM elements, the .children() method allows us to search through the children of these elements in the DOM tree and construct a new jQuery object from the matching elements. The .children() method differs from .find() in that .children() only travels a single level down the DOM tree while .find() can traverse down multiple levels to select descendant elements (grandchildren, etc.) as well. Note also that like most jQuery methods, .children() does not return text nodes; to get all children including text and comment nodes, use .contents().
The .children() method optionally accepts a selector expression of the same type that we can pass to the $() function. If the selector is supplied, the elements will be filtered by testing whether they match it.
Consider a page with a basic nested list on it:
|
1 2 3 4 5 6 7 8 9 10 11 12 13 14 15 16 17 |
|
If we begin at the level-2 list, we can find its children:
|
1 |
|
The result of this call is a red background behind items A, B, and C. Since we do not supply a selector expression, all of the children are part of the returned jQuery object. If we had supplied one, only the matching items among these three would be included.
Examples:
Find all children of the clicked element.
|
1 2 3 4 5 6 7 8 9 10 11 12 13 14 15 16 17 18 19 20 21 22 23 24 25 26 27 28 29 30 31 32 33 34 35 36 37 38 39 40 41 42 43 44 45 46 47 48 49 50 51 52 53 54 55 56 57 58 59 60 61 62 63 64 65 66 67 68 69 70 71 72 73 74 75 76 77 78 79 80 81 82 83 84 85 86 |
|
Demo:
Find all children of each div.
|
1 2 3 4 5 6 7 8 9 10 11 12 13 14 15 16 17 18 19 20 21 22 23 24 25 26 27 28 29 30 31 32 33 34 |
|
Demo:
Find all children with a class “selected” of each div.
|
1 2 3 4 5 6 7 8 9 10 11 12 13 14 15 16 17 18 19 20 21 22 23 24 25 26 27 28 29 30 31 |
|
Demo:
В этой статье рассмотрим методы jQuery для поиска в DOM-дереве необходимых элементов, связанных с элементами текущего набора определёнными отношениями.
find() – выбор потомков
Нахождение потомков для каждого элемента текущего набора в jQuery выполняется с помощью find().
Указать искомые элементы можно посредством селектора, ссылки на DOM-элементы или набора jQuery. В качестве результата этот метод возвращает новый объект jQuery, состоящий из найденных элементов.
Например, выбрать все элементы с классом «carousel-items», расположенные в «.carousel»:
<div class="carousel">
  <div class="carousel-items">
    <div class="carousel-item">...</div>
    <div class="carousel-item">...</div>
    <div class="carousel-item">...</div>
  <div class="carousel-items">
</div>

<script>
var carousel = $('.carousel');
// выберем потомков с классом carousel-item для элементов набора carousel
var items = carousel.find('.carousel-item');

// пример указания элементов в find посредством ссылки на DOM-элементы
// var elements = document.querySelectorAll('.carousel-item');
// var items = carousel.find(elements);

// с помощью набора jQuery
// var elements = $('.item');
// var items = carousel.find(elements);
</script>
children() – выбор дочерних элементов
Кроме find() в jQuery имеется ещё один похожий метод: children().
children() в отличие от find() выполняет поиск элементов только среди детей каждого элемента текущего набора (т.е. не опускается ниже одного уровня по DOM-дереву).
Для выбора всех дочерних элементов для каждого элемента текущего набора children() необходимо вызвать без аргументов:
<div class="message">
  <h3>...</h3>
  <p>...</p>
</div>
<div class="message">
  <h3>...</h3>
  <p>...</p>
</div>

<script>
  const elements = $('.message').children();
</script>
Если необходимо выбрать не все, а только определённые, то можно использовать селектор.
Например, выберем не все элементы, а только <h3>:
const elements = $('.message').children('h3');closest() – выбор ближайшего предка
В jQuery поиск ближайшего предка (включая сам этот элемент) выполняется с помощью метода closest().
Если более точно, то closest() выбирает для каждого элемента текущего набора первый элемент, соответствующий указанному (поиск начинается с самого элемента, а потом вверх по предкам).
Для указания искомый элементов можно использовать селектор, ссылку на DOM-элементы и набор jQuery.
Например, выбрать <ul> в качестве ближайшего предка для элементов текущего набора:
<ul>
  <li>One</li>
  <li class="active">Two</li>
  <li>Three</li>
</ul>

<script>
  // текущий набор
  var elements = $('li.active');
  // выберем ближайших предков по селектору ul для элементов, содержащихся в наборе elements
  var ul = elements.closest('ul');
</script>
next() – выбор следующего элемента
В jQuery получить для каждого элемента набора следующий элемент (при необходимости соответствующий указанному селектору) можно с помощью метода next().
При этом следующий элемент по отношению к исходному должен являться сиблингом (или другими словами находиться с ним на одном уровне вложенности). В качестве результата next() возвращает новый объект jQuery, состоящий из найденных элементов.
Например, выберем <li> расположенный после «.active»:
<ul>
  <li>One</li>
  <li class="active">Two</li>
  <li>Three</li>
  <li>Four</li>
  <li>Five</li>
</ul>

<script>
  const element = $('li.active').next('li');
</script>
Если необходимо выбрать не конкретный элемент, а просто следующий, то в этом случае вызывать next() необходимо без аргументов:
const element = $('li.active').next();Когда необходимо получить не один, а все следующие элементы для каждого элемента набора, следует использовать nextAll().
Например:
const elements = $('li.active').nextAll();Кроме next() и nextAll() в jQuery имеется ещё nextUntil(). Он позволяет получить все следующие элементы до указанного.
Например, выберем все <li> кроме последнего, расположенные после «.active»:
const elements = $('li.active').nextUntil('li','li:last-child');prev() – выбор предыдущего элемента
В jQuery кроме методов для выбора следующих элементов имеются аналогичные для получения предыдущих: prev(), prevAll() и prevUntil().
Например:
<div class="boxes">
  <div></div>
  <div></div>
  <div></div>
  <div class="current"></div>
  <div></div>
</div>

<script>
  var prev = $('.current').prev();
</script>
siblings() – выбор сиблингов
Получение сиблингов для каждого элемента набора в jQuery осуществляется с помощью метода siblings().
При этом, если нужно выбрать не все, а только определённые сиблинги, то можно указать соответствующий селектор. В качестве результата siblings() возвращает новый набор jQuery, состоящий из найденных элементов.
<ul>
  <li>One</li>
  <li class="active">Two</li>
  <li>Three</li>
  <li>Four</li>
  <li>Five</li>
</ul>

<script>
  var elements = $('li.active').siblings();
</script>
parent() – получение родителя
В jQuery получение родительского элемента для каждого элемента текущего набора осуществляется с помощью parent().
При необходимости в parent() мы можем передать селектор и тем самым указать, что нам нужны только элементы соответствующие ему.
Например, получим родительский элемент для <li> с классом active:
<ul>
  <li>One</li>
  <li class="active">Two</li>
  <li>Three</li>
</ul>

<script>
  const elements = $('li.active').parent();
</script>
В jQuery кроме parent() имеется ещё метод parents(). Он в отличие от первого получает для элементов набора не только их непосредственных родителей, а вообще всех предков (до <html>).
Например, получим всех предков для <li> с классом active:
<body>
  <ul>
    <li>One</li>
    <li class="active">Two</li>
    <li>Three</li>
  </ul>
  ...

<script>
  const elements = $('li.active').parents(); // <ul>, <body>, <html>
</script>
При необходимости можно выбрать не всех предков, а только тех, которые соответствует указанному селектору.
Например, получим предков, соответствующего селектору .one для элемента с классом three:
<div class="one">
  <div class="two">
    <div class="three">...</div>
  </div>
</div>

<script>
  var elements = $('.three').parents('.one');
</script>
Ограничить подъём по дереву DOM при получении предков можно посредством parentsUntil():
Например, получим предков являющимися <div> для элемента с классом active (при этом поиск предков должен ограничиваться элементом соответствующим селектору .container:
<div class="container">
  <div class="one">
    <div class="two">
      <div class="active">...</div>
    </div>
  </div>
</div>

<script>
  var elements = $('.three').parentsUntil('div', '.container');
</script>
offsetParent() – получение ближайшего позиционированного предка
В jQuery для получения ближайшего позиционированного предка можно воспользоваться offsetParent(). Этот метод не принимает никаких аргументов.
Этот метод может использоваться в операциях расчета смещений для выполнения анимации и размещения объектов на странице.
Например, найдём offsetParent для элемента с классом active:
<div class="container">
  <div class="one" style="position: relative;">
    <div class="two">
      <div class="active">...</div>
    </div>
  </div>
</div>

<script>
  var elements = $('.active').offsetParent();
</script>
contents() – выбрать все дочерние узлы
В jQuery метод children() используется, когда нужно получить все дочерние узлы (элементы, текстовые узлы и комментарии) для каждого элемента текущего набора.
Этот метод не принимает никаких аргументов.
.contents() и .children() аналогичны, за исключением того, что первый включает в себя текстовые узлы и комментарии.
Метод .contents() можно также использовать для получения содержимого iframe, если iframe находится в том же домене, что и главная страница.
Начиная с jQuery 3.2, .contents() также возвращает содержимое <template> элементов.
jQuery перемещения
Определение и применение
jQuery метод .children() возвращает дочерние элементы каждого элемента в наборе совпавших элементов, дополнительно может фильтроваться с помощью заданного селектора.
Обращаю Ваше внимание, что метод .children() отличается от метода .find() тем, что позволяет осуществить поиск элементов только на одном уровне вниз по дереву DOM, а метод .find() может пройти несколько уровней вложенности, чтобы выбрать всех потомков элемента.
jQuery метод .children(), как и большинство методов для фильтрации не возвращает текстовые узлы, чтобы получить все дочерние элементы, включая текстовые узлы и узлы комментариев Вы можете воспользоваться методом .contents().
jQuery синтаксис:
Синтаксис 1.0:
// возвращает дочерние элементы
$( selector ).children()

// возвращает дочерние элементы, если они соответствуют селектору
$( selector ).children( selector )

selector - Selector
Добавлен в версии jQuery
1.0
Значения параметров
| Параметр | Описание |
|---|---|
| selector | Строка селектор, использующаяся в качестве дополнительного фильтра. Если дополнительно указывается селектор, то выбор дочернего элемента (добавление в коллекцию jQuery) осуществляет только в том случае, если он соответствует этому селектору. Необязательный параметр. |
Пример использования
<!DOCTYPE html>
<html>
	<head>
		<title>Использование метода .children()</title>
		<script src = "https://ajax.googleapis.com/ajax/libs/jquery/3.1.0/jquery.min.js"></script>
		<script>
	$( document ).ready(function(){
	  $( "ul" ).children().css( "border", "1px solid green" );  // выбираем все дочерние элементы элементов <ul> в документе
	  $( "ul" ).children( ".active" ).css( "color", "red" );  // выбираем все дочерние элементы элементов <ul> в документе, если они имеют класс active
	});
		</script>
	</head>
	<body>
		<ul>
			<li>Элемент списка</li>
			<li class = "active">Элемент списка</li>
			<li>Элемент списка
				<ul>
					<li>Элемент списка</li>
					<li>Элемент списка</li>
					<li>Элемент списка</li>
				</ul>
			</li>
		</ul>
	</body>
</html>
В этом примере с использованием jQuery метода .children() мы выбираем все дочерние элементы элементов <ul> в документе, и с помощью метода .css() задаем им сплошную границу размером 1 пиксель зеленого цвета со всех сторон, в результате чего стили были применены ко всем элементам <li> в документе.
Во втором случае мы используем метод .children() с дополнительным фильтром, в которм мы указываем, что выбор дочернего элемента осуществляет только в том случае, если он соответствует классу active, в результате чего был выбран только один элемент <li> в документе.
Результат нашего примера:

В следующем примере мы рассмотрим отличие методов .children() и .find():
<!DOCTYPE html> <html> <head> <title>Отличие метода .find() от .children()</title> <script src = "https://ajax.googleapis.com/ajax/libs/jquery/3.1.0/jquery.min.js"></script> <script> $( document ).ready(function(){ $( ".children" ).click(function(){ // запускаем функцию при нажатии на элемент с классом children $( "*" ).css( "background", "#fff" ); // устанавливаем всем элементам цвет заднего фона белый $( "div" ).children( "span" ).css( "background", "red" ); // выбираем все дочерние элементы <span> элементов <div> в документе }) $( ".find" ).click(function(){ // запускаем функцию при нажатии на элемент с классом find $( "*" ).css( "background", "#fff" ); // устанавливаем всем элементам цвет заднего фона белый $( "div" ).find( "span" ).css( "background", "green"); // выбираем всех потомки <span> элементов <div> }) }); </script> </head> <body> <div> Текст <span><span>внутри</span></span> блока <h2>Заголовок <span><span>внутри</span></span> блока<h2> <p><span><span>Первый</span></span> параграф внутри блока</p> <p><span><span>Второй</span></span> параграф внутри блока</p> </div> </body> </html>
В этом примере с использованием jQuery метода .click() мы при нажатии на элемент <button> (кнопка) с классом children вызываем функцию, которая с помощью метода .css() устанавливает всем элементам цвет заднего фона белый. Кроме того, с использованием jQuery метода children() выбираем все дочерние элементы <span> элементов <div> в документе, и с помощью метода .css() устанавливаем им красный цвет заднего фона. В результате чего выбран будет только один элемент, так как только один элемент <span> является дочерним элементом.
Также с использованием jQuery метода .click() мы при нажатии на элемент <button> (кнопка) с классом find вызываем функцию, которая с помощью метода .css() устанавливает всем элементам цвет заднего фона белый. С использованием jQuery метода .find() выбирает все потомки <span> элементов <div> в документе, и с помощью метода .css() устанавливаем им зеленый цвет заднего фона. Как вы можете заметить выбраны будут все вложенные внутри <div> элементы <span>.
Результат нашего примера:

Перейти к содержимому
Методы jQuery children и find позволяют получить коллекции дочерних элементов. Их отличие в том, что children смотрит только прямых потомков, а find заходит глубже по иерархии, смотря потомков от потомков и т. д.
Синтаксис:
|
var childs1 = $(selector1).children(childselector); var finds1 = $(selector1).find(findselector); |
Здесь childselector и findselector — это необязательные параметры. С их помощью можно отфильтровать дочерние элементы. Можно вызывать без них:
|
var childs1 = $(selector1).children(); var finds1 = $(selector1).find(); |
Приведу пример. Пусть у нас есть HTML-страница со следующим содержимым:
|
... <div id=“myparentdivid”> <div id=“mychilddivid1”> </div> <div id=“mychilddivid2”> <div id=“mychilddivid3”> </div> </div> </div> ... |
Код, приведённый ниже, добавит текст «text1» в div с id=»mychilddivid1″, и текст «text2» в div с id=»mychilddivid3″.
|
$(“#myparentdivid”).children(“#mychilddivid1”).text(“text1”); $(“#myparentdivid”).find(“#mychilddivid3”).text(“text2”); |

Introduction to jQuery find child
The jquery find method is traversing the entire parent to child element in the document object model (DOM) Tree. It is a descendant element to search and design particular child elements of any parent element. It is used to filter the children elements of the parent element. It is used for designed particular child element, object through the selector of jQuery. It is traversing the child objects and grandchild objects using the selector element in the jQuery.
Syntax:
The basic jQuery find() method syntax is below:
$(Selector).find(selector/element)The basic jQuery find child syntax is below:
$("parent element").find("child element")The basic jQuery find child syntax on the web page.
<head>
<script >
$(document).ready(function() {
$(". parentclass1 ").find(".childclass1"). css({"background-color":  "orange"});
});
</script>
</head>
<body>
<div class ="parentclass1">
<p class="childclass1"> Hello, this is child class number1.
<span> this is great child class. </span>
</p>
<b class="childclass2"> hi, this is child class number2. </b>
</div>
</body>
Description:
- The selector used the parent class (parentclass1) which is placed inside of the div tag.
- The find method used first child class (childclass1) which is placed in the <p> tag.
- The CSS style applies only to the first child class with the background color.
- When jQuery find child uses a second child class or span tag in the find then CSS style applies only on this class or tag.
How does jQuery find child work?
Given below shows how jQuery find child works:
Step 1: There is two way to add jQuery in the web page.
- The jQuery file downloads from the respective website which is jQuery.com.
- The file is placed inside of head section of the html file.
<script src = "path/jquery-3.5.1.min.js">
</script>- The jQuery CDN file include in the head section of the html file.
<script src = "https://ajax.googleapis.com/ajax/libs/jquery/3.5.1/jquery.min.js">
</script>
Step 2: The parent, child and respective element placed in the body section.
- The main class, child, and grandchild elements created in the body section of the web page.
- The main class is the parent element placed inside the <div> tag.
- The ul is child element and li is grandchild element of the parent element.
<div class="main" >
Parent Class
<ul> Child class
<li> grandchild class 1</li>
<li> grandchild class 2</li>
<li> grandchild class 3</li>
</ul>
</div>
Step 3: The jQuery find child syntax used in the web page.
- The find method placed in the script tag along with parent and child elements.
<script>
$(document).ready(function(){
$("div").find(" ul").css({"color": "red"});
});
</script>- The below sample is a combination of all steps.
- The div tag selects the selector as a parent element in the script tag.
- The ul tag is used inside the find method as a find child element.
<!DOCTYPE html>
<html>
<head>
<script src = "https://ajax.googleapis.com/ajax/libs/jquery/3.5.1/jquery.min.js">
</script>
</head>
<body>
<div class="main">
Parent Class
<ul> Child class
<li> grandchild class 1</li>
<li> grandchild class 2</li>
<li> grandchild class 3</li>
</ul>
</div>
<script>
$(document).ready(function(){
$("div").find("ul").css({"color": "red"});
});
</script>
</body>
</html>
Examples
Given below are the examples mentioned:
Example #1
The basic parent and child element example.
Code:
<!DOCTYPE html>
<html>
<head>
<style>
.main * {
border: 1px solid grey;
color: black;
padding: 5px;
margin: 10px;
}
.main  {
border: 2px solid grey;
color: black;
padding: 5px;
margin: 10px;
}
</style>
<script src = "https://ajax.googleapis.com/ajax/libs/jquery/3.5.1/jquery.min.js">
</script>
</head>
<body>
<div class = "main" style = "width:200px;">
Parent Class
<ul> Child class
<li> grandchild class 1</li>
<li> grandchild class 2</li>
<li> grandchild class 2</li>
</ul>
</div>
<script>
$(document).ready(function(){
$("div").find("ul").css({"color": "red"});
});
</script>
</body>
</html>
Output:
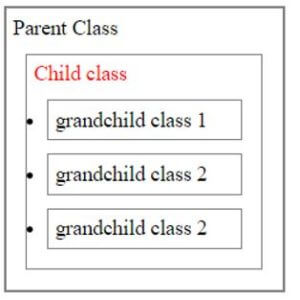
Description:
- The div is placed in the selector as a parent element.
- The ul is placed in the find method as a child element.
- Element placed in the script tag.
Example #2
The basic parent and grandchild element example.
Code:
<!DOCTYPE html>
<html>
<head>
<style>
.main * {
border: 1px solid grey;
color: black;
padding: 5px;
margin: 10px;
}
.main  {
border: 2px solid grey;
color: black;
padding: 5px;
margin: 10px;
}
</style>
<script src = "https://ajax.googleapis.com/ajax/libs/jquery/3.5.1/jquery.min.js">
</script>
</head>
<body>
<div class = "main" style =   "width: 200px;">
Parent Class
<ul> Child class
<li> grandchild class 1</li>
<li> grandchild class 2</li>
<li> grandchild class 2</li>
</ul>
</div>
<script>
$(document).ready(function(){
$("div").find("li").css({"color": "red"});
});
</script>
</body>
</html>
Output:

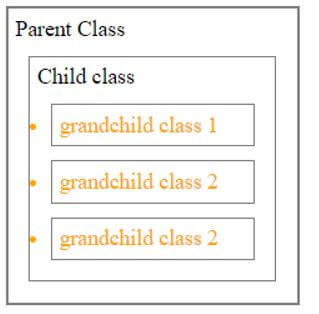
Description:
- The div is placed in the selector Element as a parent element.
- The li is placed in the find method as a grandchild element.
- The grandchild element becomes red after using the parent element in the selector.
Example #3
The basic child and grandchild element example.
Code:
<!DOCTYPE html>
<html>
<head>
<style>
.main * {
border: 1px solid grey;
color: black;
padding: 5px;
margin: 10px;
}
.main  {
border: 2px solid grey;
color: black;
padding: 5px;
margin: 10px;
}
</style>
<script src = "https://ajax.googleapis.com/ajax/libs/jquery/3.5.1/jquery.min.js">
</script>
</head>
<body>
<div class = "main" style = "width: 200px;">
Parent Class
<ul> Child class
<li> grandchild class 1</li>
<li> grandchild class 2</li>
<li> grandchild class 2</li>
</ul>
</div>
<script>
$(document).ready(function(){
$("ul").find("li").css({"color": "orange"});
});
</script>
</body>
</html>
Output:
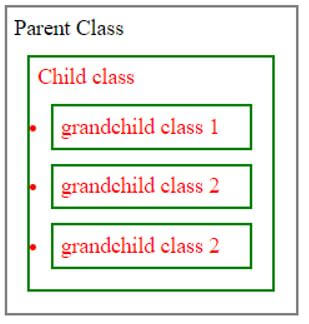
Description:
- The ul is placed in the selector as a parent element.
- The li is placed in the find method as find child.
- The li content becomes orange color from black color using it.
Example #4
The parent and their all child, grandchild element example.
Code:
<!DOCTYPE html>
<html>
<head>
<style>
.main * {
border: 1px solid grey;
color: black;
padding: 5px;
margin: 10px;
}
.main  {
border: 2px solid grey;
color: black;
padding: 5px;
margin: 10px;
}
</style>
<script src = "https://ajax.googleapis.com/ajax/libs/jquery/3.5.1/jquery.min.js">
</script>
</head>
<body>
<div class = "main" style = "width: 200px;">
Parent Class
<ul> Child class
<li> grandchild class 1</li>
<li> grandchild class 2</li>
<li> grandchild class 2</li>
</ul>
</div>
<script>
$(document).ready(function(){
$("div").find("*").css({"color": "red", "border":"2px solid green"});
});
</script>
</body>
</html>
Output:
Description:
- The div is placed in the selector as a parent element.
- The * Symbol is placed in the find method for filtering all elements.
- The all child, grandchild elements change the color from black to red and the border becomes a green color.
Conclusion
The jQuery find child is the method to filter all leaf elements of the root element. It is used for searching the descendant element easily. It makes easy coding for the developer and remove lengthy process. It helps the user to get required descendant elements of the selected element.
Recommended Articles
This is a guide to jQuery find child. Here we discuss how does jQuery find child works with programming examples for better understanding. You may also have a look at the following articles to learn more –
- jQuery is Visible
- jQuery redirect
- jQuery UI Button
- jQuery Parent
