
Из соображений безопасности и удобства, по умолчанию, после установки Windows система скрывает некоторые объекты — системные и критически важные файлы и папки, а также данные, используемые редко. При необходимости получить доступ к данным объектам, можно настроить показ скрытых файлов и папок. Для этого существуют различные способы.
Графический интерфейс
Реестр Windows
Командная строка
Файловые менеджеры
Способ 1. Графический интерфейс
Шаг 1. Открыть параметры папок.
В Windows 7 и младше открываем проводник и нажимаем клавишу Alt. Появится верхнее меню – переходим в разделы Сервис – Свойства папки.
В Windows 8 и 10 открываем проводник и разворачиваем ленту настроек
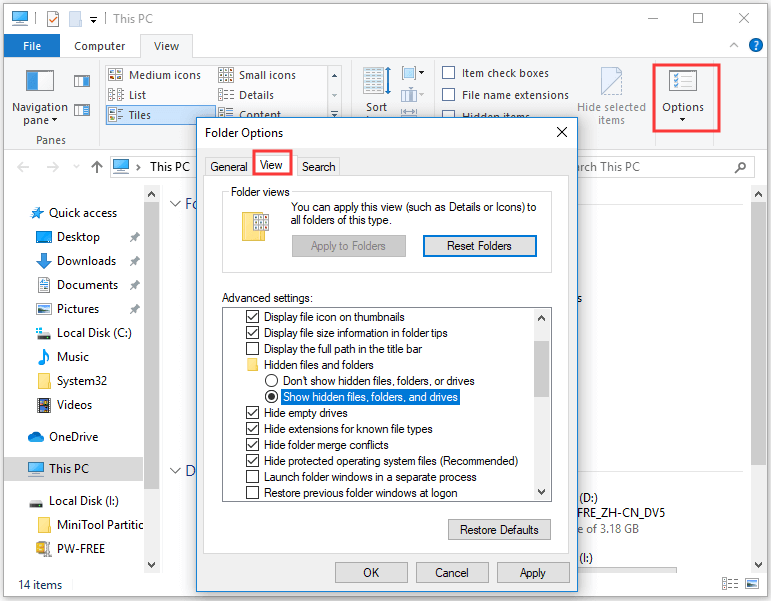
Теперь переходим в раздел Вид и нажимаем по Параметры.
Шаг 2. Настроить отображение скрытых файлов и папок.
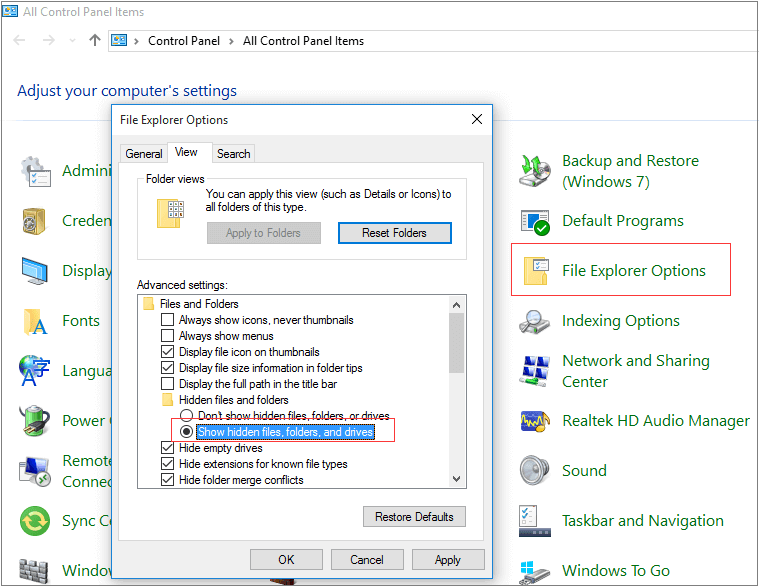
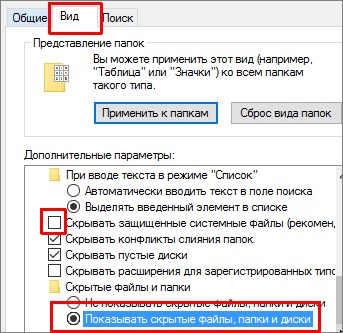
В открывшемся окне переходим на вкладку Вид, затем снимаем галочку Скрывать защищенные системные файлы и переключаем на Показывать скрытые файлы, папки и диски.
Нажимаем OK.
Способ 2. Реестр Windows
Настройка выполняется в ветке HKCUSoftwareMicrosoftWindowsCurrentVersionExplorerAdvanced. Необходимо создать или отредактировать ключ Hidden (тип REG_DWORD): значение 1 — показать скрытые файлы, 2 — скрыть.
В командной строке можно выполнить следующее.
Отобразить скрытые элементы:
reg add “HKCUSoftwareMicrosoftWindowsCurrentVersionExplorerAdvanced” /v Hidden /t REG_DWORD /d 1 /f
Скрыть:
reg add “HKCUSoftwareMicrosoftWindowsCurrentVersionExplorerAdvanced” /v Hidden /t REG_DWORD /d 2 /f
Способ 3. Командная строка
cmd
Команда dir показывает только не скрытые папки и файлы. Для отображения всех элементов вводим команду с ключом ah, например:
dir /ah c:
Powershell
Get-ChildItem -Force c:
Способ 4. Файловые менеджеры
Также для просмотра скрытого содержимого можно использовать файловые менеджеры. Например, в Far Manager они отображаются по умолчанию, а в Total Commander необходимо зайти в Конфигурация – Настройка и убедиться, что стоит галочка в пункте Показать скрытые/системные файлы:
Была ли полезна вам эта инструкция?
Да Нет
In this tutorial, you can learn how to show hidden files and folders in Windows 10 with CMD and other 4 ways. Also check how to show hidden files in Windows 10 with File Explorer, Control Panel, Registry or Folder Options. MiniTool software also offers a top data recovery program to help you recover any deleted/lost file in Windows 10.
Windows hide some files and folders related to the OS by default, to avoid accidental deletion or altering from users which may cause the malfunction of system. However, if you are a tech fanatic, and want to make the hidden files visible, you can try the solutions below to show hidden files Windows 10.
You can open Command Prompt in Windows 10 to show hidden files with attrib command. Detailed steps are as follows.
Step 1. Press Windows + R, type cmd, and press Ctrl + Shift + Enter to open elevated Command Prompt in your Windows 10 computer.
Step 2. Then you can type this command line: attrib -h -r -s /s /d E:*.*, and hit Enter to unhide the files and folders in drive E. You should replace the drive letter with the exact drive letter of your computer. You can open This PC to check the drive letters of your computer hard drive partitions.
To help you better understand this attrib command, below is the explanation of each part of the command line.
- –h: It clears the Hidden file attribute to show hidden files.
- –r: It clears the Read-only file attribute to allow you modify the file after it shows.
- –s: It clears the System file attribute.
- /s: It applies attrib and any command-line options to matching files in the current directory and all of its subdirectories.
- /d: It applies attrib and any command-line options to directories.
You can also show hidden files in Windows 10 with File Explorer. Check how to do it.
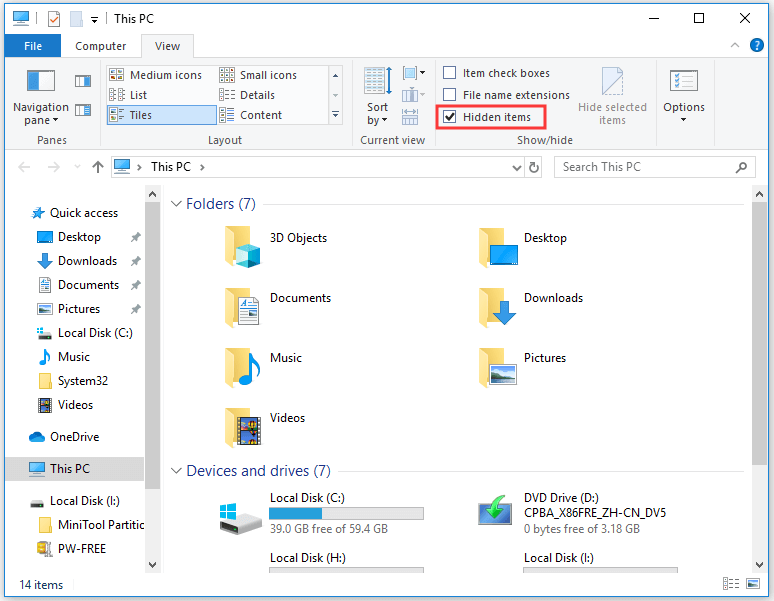
Step 1. You can click This PC to open File Explorer on Windows 10. You should expand the menu bar in File Explorer. If you don’t see the menu bar, you can click the ^ icon at the upper-right corner of File Explorer window.
Step 2. Next you can click View tab, and tick Hidden items box in Show/Hide section. This will let you view the hidden files and folders in Windows 10.
If you need to modify more file viewing options, you can click Options.
Another way to show hidden files in Windows 10 is through Control Panel.
Step 1. To open Control Panel Windows 10, you can click the Control Panel desktop shortcut icon, or click Start, type control panel, and select Control Panel to open it.
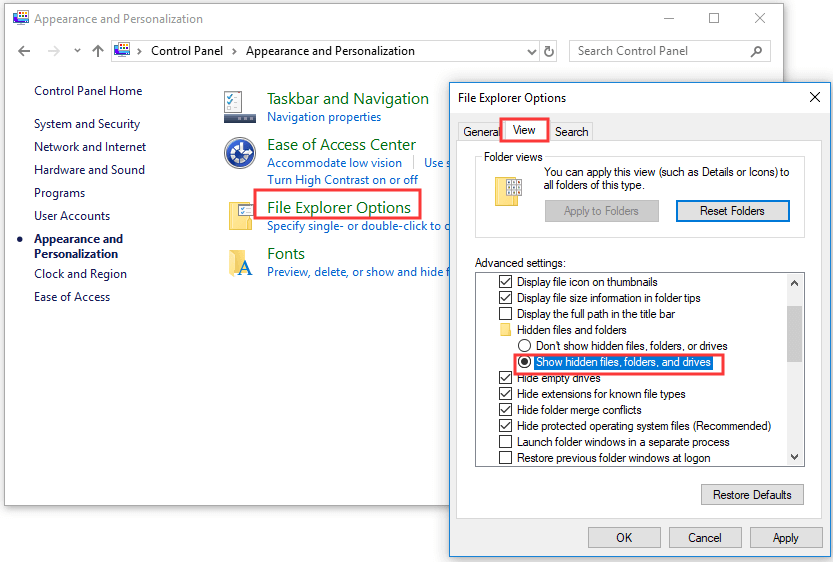
Step 2. Next you can click Appearance and Personalization, and click File Explorer Options.
Step 3. Then you can click View tab in File Explorer Options window. Find Show hidden files, folders, and drives option under Advanced settings, tick this option and click Apply and OK to reveal hidden files and folders.
If you also want to see the hidden operating system files, you can uncheck the Hide protected operating system files (Recommended) option.
Another way to view the hidden files in Windows 10 is to use Windows Registry Editor.
Step 1. You can press Windows + R, type regedit, and hit Enter to open Registry Editor in Windows 10.
Step 2. Next click as follows to find the target registry key: HKEY_CURRENT_USERSoftwareMicrosoftWindowsCurrentVersionExplorerAdvanced, and click Advanced key.
Step 3. Then you can find the Hidden REG_DWORD in the right window, double-click it, and set its data value as 1 to show hidden files, folders, and drives in Windows 10. If you don’t want to show hidden files, folders, and drives in future, you can follow the same operation to change its data value to the default 2.
You can also find the ShowSuperHidden REG_DWORD, double click it and change its data value to 1 to show protected operating system files in Windows 10. The default data value is 2 which will not show protected OS files.
You can also follow the same instruction in Way 1 to open File Explorer and expand its menu bar, and click View -> Options.
Then you can click View tab in Folder Options window, and navigate Show hidden files, folders, and drives option under Advanced settings. Tick this option and click Apply and OK to show hidden files and folders in your Windows 10 computer.
>> Quick Video Guide:
Bottom Line
This post introduces 5 ways to provide a full Windows 10 show hidden files guide to you. You can try any of them to show hidden files and folders in Windows 10.
As for recovering deleted/lost files and data from your Windows 10 computer and other storage devices, you can try MiniTool Power Data Recovery, a 100% clean and free data recovery program.
Free Download
Содержание материала
- Поиск с помощью командной строки
- Видео
- Системный реестр
- Командная строка
- Ищем скрытые элементы системным способом
- Способ второй. Через системный реестр
- Настройка видимости
- Поиск скрытых объектов через программы
Поиск с помощью командной строки
Одним из достаточно необычных и одновременно эффективных способов поиска скрытых папок на компьютере является команда «DIR», которую можно выполнить из командной строки Windows 10.
Чтобы воспользоваться данным способом вам необходимо открыть командную строку Windows 10. Это можно сделать разными способами, самый простой вариант – это нажать комбинацию клавиш Win-R и выполнить команду «CMD».
После выполнения команды «CMD» перед вами появится командная строка. В этом окне нужно ввести следующую команду:
Где:
- C:путь – это полный путь к папке, в которой вы хотите выполнить поиск. Если вы хотите найти все скрытые файлы на диске, то просто введите букву диска и двоеточие (например, D:). Но, нужно учитывать, что поиск всех скрытых папок на целом диске может занять много времени.
- /A:DH – параметр, указывающий на то, что искать нужно только папки (D – Directory) и только скрытые (H – Hide).
- /S – параметр разрешающий поиск во вложенных папках.
Например, если вам нужно найти все скрытые папки на диске D, то команда для поиска будет выглядеть следующим образом:
Если же вы хотите найти скрытые папки внутри какого-то конкретного каталога (например, D:TMP), то команда будет выглядеть так:
Чтобы продемонстрировать, как работает команда «DIR», мы создали папку D:TMP с несколькими обычными и скрытыми папками. Для того чтобы найти эти скрытые папки открываем командную строку Windows 10 и вводим команду «DIR D:TMP /A:DH /S».

После введения данной команды в командной строку будет выведен подробный отчет. Здесь будет указано, где находятся скрытые каталоги и как они называются.

При поиске скрытых папок на компьютере вы можете наткнуться на большое количество системных каталогов. Для того чтобы их исключить к параметру /A нужно добавить атрибут -S. В этом случае команда для поиска будет выглядеть как «DIR D: /A:DH-S /S».
После того как скрытые папки найдены, вы можете их открыть, просто введя их адрес в любом окне Проводника, либо сделать их видимыми при помощи команды Attrib.
Например, для того чтобы сделать видимыми все скрытые каталоги и файлы в определенном каталоге вам нужно ввести «attrib -s -h d:tmp* /s /d».
Системный реестр
В случае если отображение определенных папок в меню перекрывает вирус или вредоносная программа, предложенный выше способ может не принести желаемого результата. В этом случае необходимо внести вручную изменения соответствующих параметров в системном реестре. Для этого необходимо выполнить следующие действия:
- Через пусковую кнопку войти в параметры «Выполнить» и внести в поисковую строку команду «regedit». После ее активации на экране отобразиться окно системного реестра.
- В представленном списке необходимо по очереди перейти в разделы — HKEY_CURRENT_USER, Software, Microsoft, Windows, CurrentVersion, Explorer, Advanced, соблюдение указанной последовательности обязательно.
- В каждом переходе необходимо дважды кликнуть по пункту «Hidden» и в столбце «Значение» заменит 0 на 1.
После этого необходимо повторить переходы по указанному выше списку разделов, в пункте «Имя» у каждого из них необходимо двумя кликами активировать команду «CheckedValue» и присвоить ей номер 1. Перезагрузить ПК и проверить наличие ранее скрытых файловых документов.
Видео
Командная строка
Если файлы стали невидимыми из-за вируса, снять с них атрибуты можно при помощи команд.
- Перейдите в «Пуск» — «Программы» — «Стандартные».
- Кликните правой кнопкой мыши на «Командная строка».
- Выберите «От имени администратора».
- Откроется окно с чёрным фоном и белым шрифтом.
- Введите команду «cd [Путь к скрытому объекту]». Нажмите Enter.
- Напишите или скопируйте туда строчку «attrib -s -h -r -a /s /d *.*» без кавычек. Все атрибуты будут сняты.
- Звёздочки «*.*» обозначают все возможные названия объектов со всеми возможными форматами.
Ищем скрытые элементы системным способом
Применим саму функцию «Поиск» ОС Виндовс:
- Открываем «Проводник» и в верхней его части проходим в меню «Вид»;
- Обращаем наш взгляд на вкладку «Показать или скрыть» и разворачиваем его;
- Теперь нам нужно установить флажки над командой «Расширение имён файлов и во вкладке «Скрытые элементы».
Заметим, что скрытая папочка отличается он не скрытой тем, что они более прозрачна на вид. При этом, обычная папка имеет естественный вид. Когда подобные элементов довольно много, это можно сразу заметить.
- Далее, не закрывая это окно, переместимся к строке «Поиск». Она находится в углу справа окна. Рядом с ней расположен ярлык «Лупа». На примере показано название «Test» латиницей. Данную папку сделана скрытной;
- После того, как вы кликнули по данной поисковой строке, курсор сделался активным;
- Кроме всего, данному поиску можно дать дополнительные задания на поиск элементов определённого типа, или у него должен быть особый размер, даже дату изменения. Допустим, можно выбрать «В этом месяце».
После проделанного нажимаем «Ввод». У нас начинается поиск скрытых элементов.
На примере «Проводник» нашел несколько папок с таким заданием. Но, вообще, подобный поиск может довольно долго задержаться. Это зависит от того, сколько в общем у вас папок на компьютере, и, в частности, с именем «Test». Если вы дали дополнительное задание, вроде «Этого месяца» и объёма папки, время на поиск может увеличится.
Если же вы знаете приблизительно, где может находится искомый файл, нужно открыть этот диск и именно его добавить в ваш поиск. Этим вы гораздо сузите время поиска.
Кроме этого, в данный запрос можно вводить и расширения. Если вы ищете картинку, можно добавить .png, .jpeg. Если документ в Word, то расширение .docx
Способ второй. Через системный реестр
К сожалению, бывают ситуации, когда какой-то вирус скрыл папки или файлы и вам они не видны. Зачастую действия вируса делают невозможным выполнение предыдущего шага, т.к. блокируют настройки операционной системы..
В подобной ситуации на помощь приходит системный реестр, в котором нужно изменить параметры, отвечающие за отображение невидимых директорий и файлов и тем самым вернуть их отображение. Для этого необходимо проделать следующее:
- Перейдите в «Пуск» и нажмите кнопку «Выполнить». В открывшемся окошке введите «regedit» и нажмите «Enter» (для windows 7 и 8 достаточно ввести слово «regedit» в поисковую строку меню «Пуск»). Таким образом, на экране отобразится окно системного реестра, в котором требуется найти нужный нам пункт.
- С левой стороны окна вы увидите список разделов реестра. Перейдите в нём поочерёдно в следующие разделы: HKEY_CURRENT_USER, Software, Microsoft, Windows, CurrentVersion, Explorer, Advanced.
- После перехода в нужных раздел с правой стороны окна отыщите параметр «Hidden», кликните по нему два раза и замените в появившемся окошке в поле «Значение» цифру 0 на цифру 1. Если этого параметра в данном разделе нет, придётся создать его, кликнув по пустому пространству правой части окна реестра правой кнопкой мыши и выбрав в выпадающем списке пункт «Создать», а затем «Параметр». Переименуйте созданный параметр в «Hidden» и присвойте ему значение 1, кликнув по нему 2 раза.
- Далее следует перейти в раздел реестра: HKEY_LOCAL_MACHINE, SOFTWARE, Microsoft, Windows, CurrentVersion, Explorer, Advanced, Folder, Hidden, SHOWALL.
- Здесь найдите пункт «CheckedValue» и присвойте ему значение 1. Указанным выше способом создайте данный пункт при его отсутствии и также впишите в него цифру 1.
Настройка видимости
Вот как отобразить скрытые папки:
Теперь вы сможете увидеть спрятанные объекты: они будут прозрачными и тусклыми. Так вы отличите их от обычных каталогов.
Есть ещё несколько способов зайти в это меню. Эти варианты актуальны для Windows версии 7 и выше.
- Откройте любую директорию.
- Нажмите на «Упорядочить» в левом верхнем углу.
- «Параметры папок и поиска».
Или так:
- В любой директории есть строка меню. Если её не видно, зажмите клавишу Alt.
- В этой строке кликните на «Сервис».
- Пункт «Параметры папок».
Не рекомендуется включать отображение, если вам просто хочется посмотреть, что находится внутри каталога. Активируйте эту опцию, только если вам нужно что-то конкретное. Файлы прячут не просто так, а чтобы защитить систему.
Поиск скрытых объектов через программы
Существуют специальные программы для поиска и обработки невидимых каталогов, файлов. К данным приложениям относятся: Find Hidden, Hidden File Finder, которые рассмотрим ниже.
Find Hidden — это портативное бесплатное ПО, позволяющее быстро находить скрытые папки на компьютере в Windows, (а также файлы). Проделайте следующие шаги:
- Скачайте программу здесь. Извлеките из архива.
- Запустите исполняемый файл, подождите. Примите лицензионное соглашение, нажав ACCEPT.
- В настройке System Tools выберите тип искомых элементов, это обычные объекты и системные защищенные.
- Задайте место поиска (например, диск C). Выберите, что найти: файлы (Hidden Files Only) или папки (Hidden Directories Only). Если выбран режим поиска Hidden Files Only, можно задать определенное расширение, размер и дату (создания, изменения, открытия). В режиме поиска Hidden Directories Only можно задать дату. После задания параметров кликните на Search.
- Программа начнет искать невидимые элементы Windows. Вы увидите, сколько объектов просканировано и сколько невидимых найдено. В окне появится список папок (файлов) с их описанием. После полного сканирования директории, можно проделывать различные операции со скрытыми файлами, папками по клику ПКМ: смотреть свойства, расположение, изменять атрибуты и другое.
Hidden File Finder — это бесплатная программа для быстрого сканирования и обнаружения всех невидимых объектов в системе Windows. Чтобы найти скрытые папки (файлы) в Windows проделайте такие шаги:
- Скачайте приложение отсюда. Распакуйте и установите его.
- Запустите программу, отметьте галочкой сканирование всего ПК или укажите путь сканирования. Также Вы можете настроить параметры поиска, кликнув на соответствующую иконку. Для начала сканирования нажмите Start Scan.
- В процессе работы программы построится список из скрытых папок и файлов с их описанием. Синим цветом выделены каталоги, красным исполняемые файлы (можно проверить на вирусы). В окне программы дана информация о статусе сканирования. По клику ПКМ можно произвести операции: сменить атрибут, удалить, открыть место хранения, скопировать путь, проверить онлайн.
Вот такими способами можно найти скрытую папку на компьютере в Windows 10 (7, 8) или нужный файл. Первый способ подойдет, если Вы знаете, что ищете, а второй выдает полный список всех невидимых элементов, что облегчает поиск нужной информации.
Теги
Page Content: How to Show Hidden Files in 4 Ways
When your files are missing from your USB drive or hard drive, you may wonder “Is there a command on the Windows command-line that can list hidden folders?” Yes, there is a command to show hidden files. Besides, there are some other practical ways to unhide hidden files. The following table shows the outlines, go to check the details.
| Workable Solutions | Step-by-step Troubleshooting |
|---|---|
| Fix 1. Use data recovery software | Use EaseUS data recovery software to find all files and folders that were hidden somewhere…Full steps |
| Fix 2. Show hidden files CMD | Press Windows + X keys and select Command Prompt as an Administrator. Type attrib -h -r -s /s /d G:*.*…Full steps |
| Fix 3. Run third-party software | Start EaseUS CleanGenius, choose “File Showing” on the left pane. Next, choose the target drive…Full steps |
| Fix 4. Use Windows control panel | Open Windows Control Panel and navigate to File Explorer Options. Find the View tab, and tick the option…Full steps |
How Do I Make Hidden Files Visible
Suppose that you don’t actually delete anything off from a storage location, but files and folders disappeared from the computer hard drive, USB flash drive, or external hard disk mysteriously. What will you do?
If you have the same question of “How do I make hidden files visible” or “How do I see all hidden files”, don’t panic. Normally, files might be hidden by a virus, or simply because you don’t have permission to see all hidden files and folders in Windows.
The four most commonly applied approaches – Attrib CMD (Command Prompt), show hidden files CMD tool, Windows Control Panel, andEaseUS Data Recovery Wizard to show hidden files on a Windows computer are available here to help.
Method 1. Show/Recover Hidden Files with Data Recovery Software
Reliable data recovery software should also be an ideal choice to find all files and folders that were hidden somewhere by a virus or improper file option settings.
Here, EaseUS Data Recovery Wizard can help you find all hidden files on your computer or external storage devices and works effectively in deleted file recovery, formatted hard drive recovery, raw drive data recovery, and so on. Mac users can also download the Mac version of this software for restoring hidden and lost files with ease.
Let’s see how to bring your hidden files back by using EaseUS data recovery software:
Step 1. Select the virus infected drive to scan
Run EaseUS virus file recovery software on your Windows PC. Select the disk attacked by the virus to scan for lost or hidden files. Note that:
- If it’s an HDD where files were hidden or deleted by virus, it’s better to install the software on a different volume or an external USB drive to avoid data overwriting.
- If the infected device is an external hard drive, flash drive or memory card, it doesn’t matter to install the software on the local drive of the computer.
Step 2. Check all scanned results
EaseUS Data Recovery Wizard will immediately start a scan process to find your deleted or hidden files on the virus infected hard drive. To quickly locate the wanted files, you can use the Filter or type grouping feature to display only the pictures, videos, documents, emails, etc.
Step 3. Preview and recover deleted/hidden files
When the process finishes, you can preview the scanned files. Select the files you want and click the “Recover” button. You should save restored files to another secure location on your computer or storage device, not where they were lost.
Method 2. Show Hidden Files Using Attrib CMD
This command will show up all hidden files from manual file hidden methods or virus infection. The attrib command can also be applied to show hidden files on USB, SD cards, etc. external storage devices.
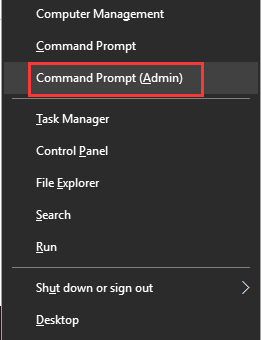
Step 1. Press Windows + X keys and select Command Prompt (CMD) as an Administrator. Or you can click the Windows icon, select “Search” and type the command prompt. Right-click on it and select to open Command Prompt as Administrator.
Step 2. Determine the drive or storage device where the files are hidden and you want to recover.
Step 3. Type attrib -h -r -s /s /d G:*.* and hit Enter. (If it’s drive D, then replace G: with the drive letter for your device).
Attrib syntax explanation
- –h clears the Hidden file attribute.
- –r clears the Read-only file attribute
- –s clears the System file attribute.
- /s applies attrib and any command-line options to matching files in the current directory and all of its subdirectories.
- /d applies attrib and any command-line options to directories.
Method 3. Run CMD Alternative to Show Hidden Files
Manual execution of the command line is suitable for computer professionals, since incorrect commands can do more harm than good. Therefore, for security and usability, we strongly recommend you try an automatic command line alternative – EaseUS CleanGenius. It is a practical tool that enables you to check and fix file system errors, enable/disable write protection and update your system with one-click instead of typing intricate command lines.
Follow the simple steps below to show hidden files with this 1-click-fix software.
Step 1. DOWNLOAD EaseUS CleanGenius for Free.
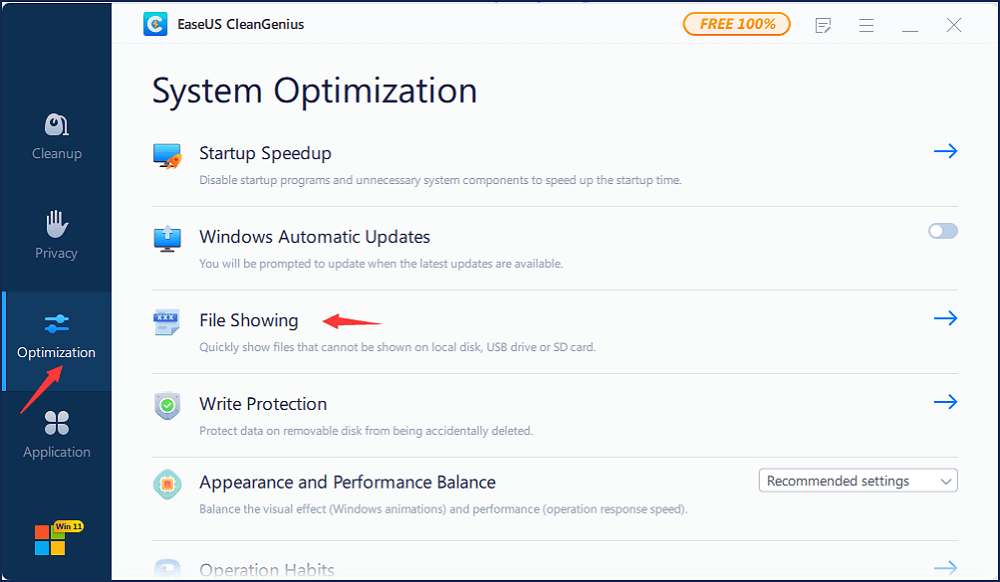
Step 2. Start EaseUS CleanGenius, choose “Optimization” on the left panel. Next, click “File Showing” on the right panel.
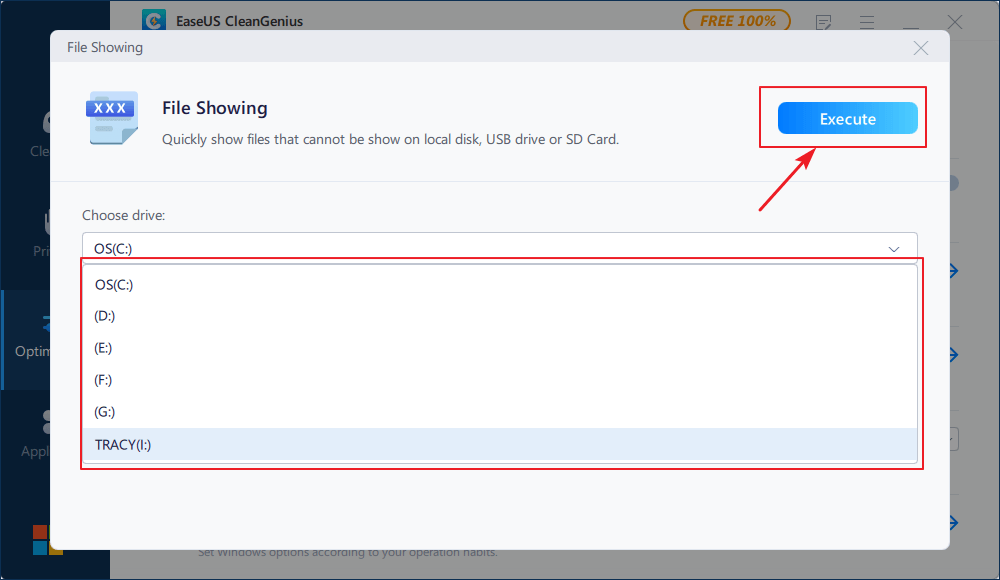
Step 3. Select the hard drive and click “Execute”.
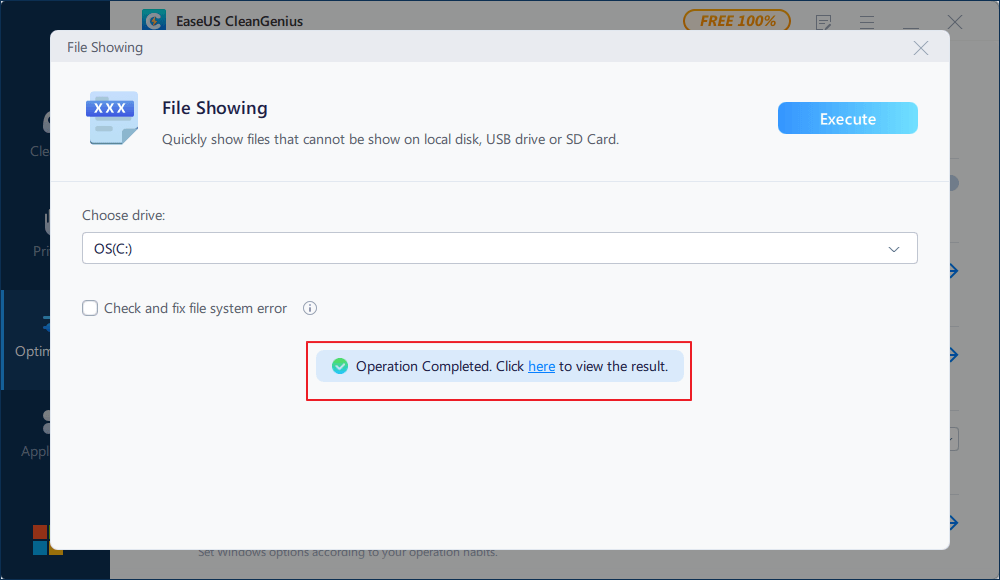
Step 4. After the operation completes, click the here link to check the hidden files.
Method 4. Unhide Hidden Files Using Windows Control Panel
When you can’t see some saved files on your computer hard drive or external storage devices but 100% for sure that these files are still there, follow tips here for help.
Step 1. Open Windows Control Panel and navigate to File Explorer Options in Windows 10, 8.1, and 8.
Step 2. On the File Explorer Options window, navigate to the View tab, under the Hidden files and folders section, tick the option of Show hidden files, folders, and drives.
Step 3. Re-open your local hard drive or device to check the hidden files and folder on your PC again.
If the hidden files fail to show up after trying Method 1 and Method 2, it’s highly possible that your files saved on the hard drive or external storage device were lost.
What Is the Best Way to Show Hidden Files
It’s a smart choice for you to take a deeper view of all file unhiding operations and choose the most applicable one for your own case.
| Comparison | Attrib CMD | CMD Alternative | Control Panel Settings | Data Recovery Software |
|---|---|---|---|---|
| Situations | Unhide files from virus or false operations | Unhide files with simple steps | Show hidden files from Windows File Explorer | Revive hidden files from virus or permission issues |
| Devices | Windows hard drive, USB, SD, external hard drive, etc. | Windows hard drive, USB, SD, external hard drive, etc. | Windows hard drive and partitions | Windows hard drive, USB, SD, external hard drive, etc. |
| OS | Windows only | Windows only | Windows and Windows Server OS | Windows, Windows Server OS, and macOS |
Command Prompt with Attrib command works 100% to find hidden items on PC as well as external storage devices. However, it requires higher-level computer skills. To unhide files with Control Panel Settings is easy to start but doesn’t support the case of virus infection.
While data recovery software offers both easy-to-use and powerful features in finding hidden documents, pictures, and all types of files for you. Let’s go through each file unhiding guide and make all your hidden files and folders visible again.
- Notice:
- If your hidden files were saved on an external storage device, connect it to your PC in advance. Then you may continue with the following solutions to make the computer display those hidden files.
Bottom Line
This page includes four practical methods to help you restore and show hidden files from Windows computer hard drive or external storage devices. Attrib command, Control Panel, and EaseUS data recovery software can all be applied to help you get rid of this issue on Windows 10/8/7/Vista and XP.
Here, we have collected some top questions and answers that you may also want to know such as how to remove viruses from PC, storage devices, or how to protect your valuable files. Check out and hope these answers can help:
Question 1: Why my hidden files are not showing?
If the Hidden files settings are no longer available after a scan, you only need to perform a reboot, after which they will be available once again.
Question 2: How do I show hidden files?
Open Control Panel > Appearance and Personalization > Folder Options > View > Under Advanced Settings, select Show hidden files, folders and drives > OK.
Question 3: Which command is used to display hidden files?
CMD attrib command – attrib -h -r -s /s /d G:*.* is used to show the hidden files.
Besides, reliable data recovery software also enables you to clearly view and revive all missing files with ease. All the detailed steps have been listed on this page and you go back to find the best solution anytime.
If you have further questions about finding missing or hidden files on your PC, use the Search option on the EaseUS website or go to the How-To directory page to find more answers.







 После проделанного нажимаем «Ввод». У нас начинается поиск скрытых элементов.


 Hidden File Finder — это бесплатная программа для быстрого сканирования и обнаружения всех невидимых объектов в системе Windows. Чтобы найти скрытые папки (файлы) в Windows проделайте такие шаги:


