If you have a scanner, you probably know about the TWAIN standard. Today, most scanning devices support TWAIN drivers so that users can enjoy a hassle-free experience while scanning the images. In this article, we will describe what TWAIN is and how you can install TWAIN driver on Windows 11/10 computers.
What is TWAIN and How did it make the image scanning easy?
TWAIN is a standard for scanning devices. It was first released in 1992 for the computers running on Windows and Macintosh operating systems. The release of TWAIN has made the process of image scanning hassle-free. Before TWAIN, users have to select a special application to receive the image from the scanner, then save the image to the disk. After that, they were able to open that image in the software of their choice to work with.
With TWAIN, there is no need to save the scanned image on the disk. TWAIN establishes a communication link between the image processing software and the devices such as scanners, digital cameras, etc. This lets users open the scanned image directly in the software which they use for image processing, provided they have installed a TWAIN driver on their system.
Every brand develops its own TWAIN drivers that support the scanners of that brand. You can download the drivers from the official website of the brand, the scanner of which you are using. Here, we will describe the process to install the TWAIN driver on Windows 11/10 for the five most popular brands:
- HP
- Cannon
- Epson
- Brother
- Xerox
1] HP TWAIN Scan
HP TWAIN Scan is a TWAIN-compliant software developed by HP enterprise for its MFP (Multifunction Printer). It is a free software that allows users to scan their documents and files from their computer connected to a network. The installation package of HP TWAIN Scan includes:
- HP Scan TWAIN driver.
- HP Device Selection tool.
- HP scan software.
Before you begin, make sure that you have updated the firmware of your printer to the latest version. You can find more information about updating the printer firmware from HP.com. After updating the firmware, you have to configure the network and security settings via EWS (Embedded Web Server).
When you are done, follow the below-listed instructions:
- First, you have to download the HP Scan TWAIN driver from its official website. Please note the location where you save the scan driver file.
- Double-click the downloaded file to run. it will launch the installation wizard.
- Accept the license agreement and follow the on-screen instructions.
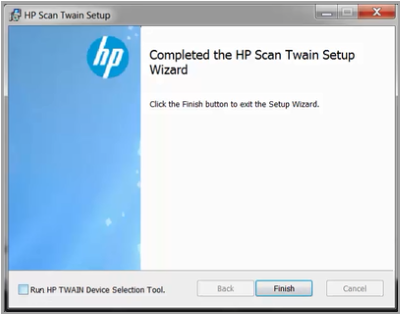
- On the HP Scan Twain Setup Wizard window, you will see Run HP TWAIN Device Selection Tool option at the bottom left side. If you select the checkbox adjacent to it, the HP TWAIN Device Selection tool will be installed automatically. If you deselect the checkbox, you have to install the tool manually.
- Click Finish to complete the setup.
HP TWAIN Scan is now installed on your computer.
2] Canon ScanGear Tool
Canon ScanGear tool is a TWAIN-compliant driver for the Canon scanner. Different versions of this tool support different Windows 10 architecture. You can visit Canon’s official website for more information. Follow the below-listed steps to install the Canon ScanGear tool on your computer:
- Visit Canon’s official website and download the Canon ScanGear Tool.
- The file will be downloaded in the self-extracting format.
- After downloading the file, double-click on it and the file will decompress automatically.
- The decompressed file will be available in a new folder of the same name as the compressed file.
- Open the folder containing the decompressed file. Double-click on the file to run.
- Follow the on-screen instructions to install the Canon ScanGear Tool.
3] Epson Scan and Epson Scan 2
Epson Scan and Epson Scan 2 are TWAIN-compliant drivers. The former supports 32-bit Windows architecture and the latter supports both 32-bit and 64-bit Windows architectures. You can download the web installer of these drivers from Epson’s official website or order a software CD.
Do note that you cannot use both Epson Scan and Epson Scan 2 on the same computer. For example, if you have installed Epson Scan on your system and you want to install Epson Scan 2, you have to uninstall the Epson Scan before installing Epson Scan 2.
Follow the below-listed instructions:
- Insert the software CD that you have ordered from Epson into the CD-ROM of your system.
- Click on the installation file and follow the on-screen instructions.
If you have downloaded the Epson Scan or Epson Scan 2 driver software from Epson’s official website, first, extract it if it is downloaded in the zip format. Then, click on the installation file to run it and follow the on-screen instructions.
4] Brother MFL-Pro Suite
Brother MFL-Pro Suite software comes with a TWAIN-compliant scanner driver. You can download either MFL-Pro USB or MFL-Pro Wireless scanner driver depending on your scanning device. We will explain here the installation instructions for both USB and wireless Brother scanner drivers.
Brother MFL-Pro Suite USB installation instructions
- Download the complete driver and software package from Brother’s official website and double-click on the installation file to run it. If you have ordered Brother CD, insert it into the CD ROM of your system.
- Accept the license agreement and click Next.
- Now, select Local Connection (USB) and then click Next.
- Now, you will be asked to connect the Brother machine to your computer via a USB cable. But before that make sure that you have turned ON the Brother machine.
- Select your Brother device model from the list and click Next.
- Select the Standard (Recommended) option and click Next.
- On the “Additional Software” screen, you can select any software from the list or leave it blank. Click Next.
- On the “Additional Options” screen, select the checkbox adjacent to the Desired optional software and click Next.
- Click Finish. The installation process is now complete.
Brother MFL-Pro Suite Wireless installation instructions
Download the software from Brother’s official website or run software CD. Run the installation file. You will see the installation wizard. Accept the license agreement and click Next.
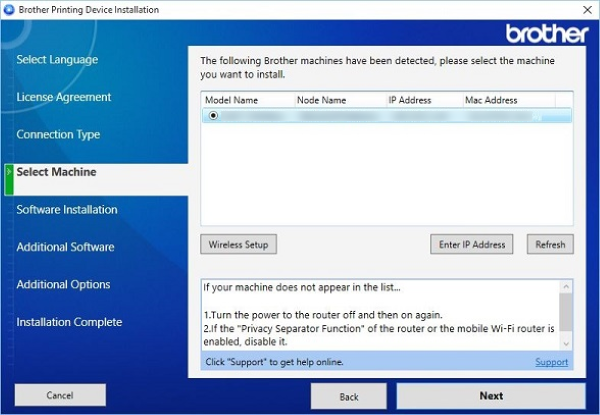
Select the wireless network (Wi-Fi) and click Next. Connect your Brother machine to the Wi-Fi network and select your machine from the list. When done, click Next. You should connect your computer and Brother machine to the same Wi-Fi network, otherwise, you will not see your machine in the list.
If despite connecting both computer and Brother device to the same network, you will not see Brother machine in the list, restart your router and wait for a minute. After that click Refresh.
Read: How to connect a Wireless Printer to Windows PC.
The remaining steps are the same as steps 6 to 9 of the Brother MFL-Pro Suite USB installation process described above.
5] Xerox WorkCenter Pro TWAIN Scan Driver
Visit Xerox’s official website and download the WorkCenter Pro TWAIN Scan driver. The file will be downloaded in a zip format. Extract it. This will create a new folder of the same name as the zip file. This folder contains the WorkCenter Pro TWAIN Scan driver file.
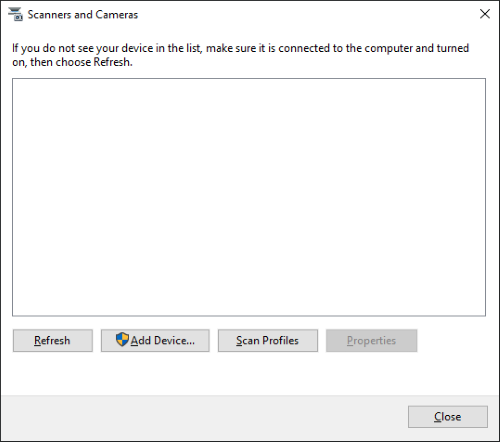
Launch the Run dialog box. Type Control Panel and click OK. Type View scanners and cameras in the search box and click on the respective link.
A new window will open. Click on the Add Device button. Click Yes if the UAC window prompts. This will open the Scanner and Camera Installation Wizard.
Now, click Next and then click on the Have Disk button.
Now, click on the Browse button and select the TWAIN driver file. Click Open and then OK. Now, you will see the Xerox WorkCenter Pro TWAIN Scan driver in the installation wizard window. Click Next. In the Name field, you can enter a new name or go with the default name. After that, click Next.
Now, Windows will display the Hardware Update Wizard. Click Next. If you get a warning message “The software you are installing has not passed Windows Logon testing,” select Continue Anyway.
Enter the printer’s Host Name or IP address in the required field and click Confirm. Click Next and then Finish. The driver is now installed on your computer.
There is no TWAIN-compliant device installed
After installing the TWAIN driver on your system, you can start scanning your documents and files. But, some users have reported that they were unable to scan their documents and files even after installing and configuring the TWAIN driver due to the following error message:
There is no TWAIN-compliant device installed
If you are also experiencing the same error on your system, the following troubleshooting steps may help you:
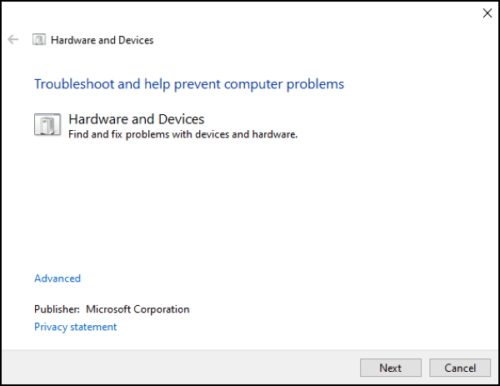
- Run the Hardware and Devices Troubleshooter.
- Disable the security software temporarily.
- Uninstall and reinstall the printer or scanner.
1] Run Hardware and Devices Troubleshooter
Windows troubleshooter is a built-in tool that scans for errors and fixes them if possible. You can run Hardware and Devices Troubleshooter on your system and see if it helps. This tool is hidden in Windows 10. Hence, you will not find it in the Settings app.
2] Disable your security software temporarily
Sometimes antivirus software blocks some programs from running. This may also be the cause of the error “no TWAIN-compliant device installed.” You can try disabling the Windows Defender or your antivirus software temporarily and check if it helps.
Do not forget to enable the security software again.
3] Uninstall and reinstall the printer or scanner
Please follow the instructions listed below:
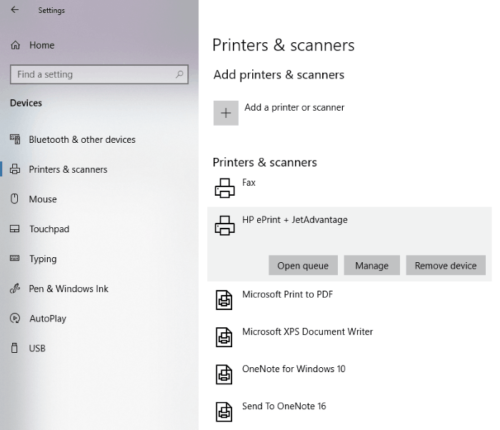
- Open the Settings app and click on Devices.
- Select Printers & Scanners from the left pane.
- Select the printer or scanner on the right side and then click on the Remove device button.
- Visit the manufacturer’s website and download the latest printer or scanner driver.
- Install the drivers and restart your system.
- Open Printers & Scanners in the Settings app again and click on the Add a printer or scanner button. Windows will detect the device automatically. If it does not detect the device, click on the link “The printer that I want isn’t listed.”
- Select your printer or scanner and follow the on-screen instructions.
Hope this helps.
Related posts:
- Why is my printer offline?
- Scanner is not working on Windows.
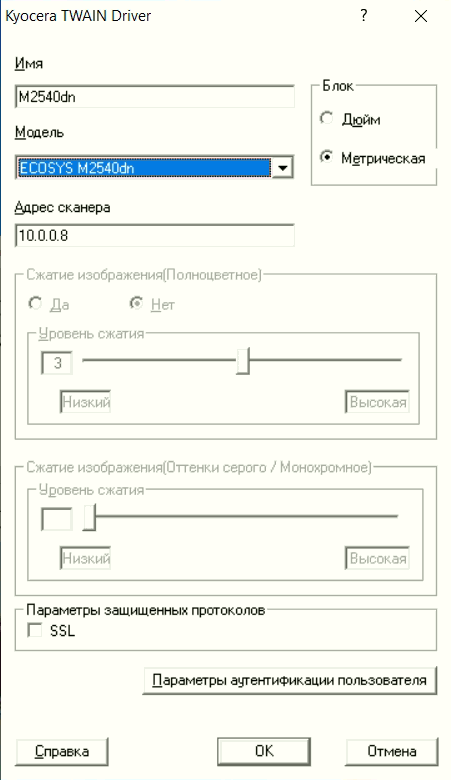
5. В следующем окне заполните поля (картинка 2):
Имя – произвольное название, например, модель вашего аппарата
Модель – необходимо выбрать из выпадающего списка вашу модель Kyocera. При этом, если Вы используете USB подключение, необходимо выбирать модель именно с USB в названии
Адрес сканера – пропишите IP-адрес Вашего МФУ. Если используется USB подключение, то поле остаётся пустым (или неактивным)
По завершении нажмите кнопку OK внизу окна.
6. Ваш аппарат должен появиться в списке установленных сканеров (картинка 3). После этого нажмине кнопку Закрыть.
Для сканирования Ваших документов используйте приложения поддерживающие функцию сканирования через TWAIN, например: Adobe Photoshop, Corel Paint Shop Pro и т.п. или же можно воспользоваться бесплатной программой Paperscanfree.
Приятного сканирования!
!! Если Вам необходимо настроить сетевое сканирование в общую папку, на почту или на FTP сервер, подробную инструкцию можно прочитать по этой ссылке.
Что делать если Windows 7 не видит TWAIN-драйвер сканера Kyocera? Вернее отказывается запускать процесс сканирования, ругаясь на то, что устройство не подключено.
Сегодня столкнулся с интересной проблемой, связанной с МФУ Kyocera (версия устройства не имеет значения) и работой TWAIN-драйвер на Windows 7. На чистой системе с родным драйвером никаких проблем с настройкой сканирования, как правило не возникает. Обычно такие МФУ я настраиваю на работу по сети, даже при подключении единственного компьютера (никогда не знаешь заранее когда понадобится срочно подключить дополнительных пользователей).
Для настройки функции сканирования МФУ Kyocera совсем не обязательно скачивать полный комплект драйверов, достаточно загрузить TWAIN scanner driver под вашу версию Windows с сайта производителя. После чего всё легко настраивается через графический интерфейс утилиты Kyocera TWAIN driver (выбираем из списка свою модель и прописываем сетевой адрес, присвоенный устройству).
По идее, этого достаточно для нормальной работы. В моём случае, в списке доступных сканеров XnView (довольно удобно использовать для сканирования) отображал ещё пару давно не существующих МФУ и сканера Canon.
Как принудительно очистить список доступных TWAIN устройств
Удаление драйверов для Canon, через установку и удаление программ, никакого эффекта на список доступных сканеров не оказало. Такое поведение Windows по складированию всякого мусора уже никого не удивляет. Драйвера TWAIN устройств находятся в каталоге:
C:Windowstwain_32
У каждой МФУ или сканера имеется своя папка (например, у Kyocera этот каталог называется KMTWAIN). В общем, прибив папки с именами CANON в каталоге twain_32, избавился от лишних устройств, которых уже нет. Таким же образом поступил и с KMTWAIN, после чего переустановил заново Kyocera TWAIN scanner driver.
В случае подобных непонятных “багов” всегда не лишним бывает удаление временных файлов из папок:
C:WindowsTemp
C:Usersимя_пользователяAppDataLocalTemp
После этих нехитрых манипуляций, сканер заработал. Как видите, никакого шаманства. Можно ещё проверить запущена ли Служба загрузки изображений Windows (WIA). Если у вас остались вопросы по настройке сканирования МФУ Kyocera оставляйте их в комментариях.
Подписывайтесь на канал Яндекс.Дзен и узнавайте первыми о новых материалах, опубликованных на сайте.
ЕСЛИ СЧИТАЕТЕ СТАТЬЮ ПОЛЕЗНОЙ,
НЕ ЛЕНИТЕСЬ СТАВИТЬ ЛАЙКИ И ДЕЛИТЬСЯ С ДРУЗЬЯМИ.
https://mdex-nn.ru/page/ne-rabotaet-twain-scaner-kyocera.html
У многих возникает вопрос: как настроить сканирование на МФУ Kyocera с помощью TWAIN-драйвера. Давайте разберём этот вопрос 🙂
- Первым делом необходимо скачать сам драйвер сканера. Это можно сделать в разделе «Центр поддержки» на официальном сайте Kyocera:
https://www.kyoceradocumentsolutions.ru/index/service_support/download_center.html
Перейдите по ссылке выше, найдите Ваше МФУ с помощью поля поиска, после чего перейдите на страницу устройства, в раздел «Драйверы»
- Найдите в списке драйверов «TWAIN scanner driver» (может называться иначе, однако везде будет слово «TWAIN»), скачайте его и установите
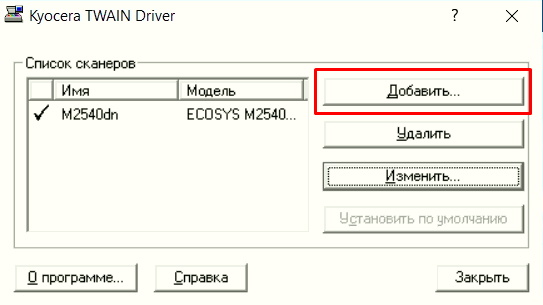
- После установки драйвера, запустите утилиту «Kyocera TWAIN Driver», которая устанавливается вместе с драйверами, и нажмите кнопку «Добавить…»:
- В окне добавления устройства:
- В поле «Имя» введите произвольное имя, которое будет отображаться в списке устройств. Во избежание путаницы, рекомендуем вводить в это поле модель вашего МФУ
- В выпадающем списке «Модель» выберите модель Вашего устройства, чтобы утилита правильно подобрала параметры работы со сканнером
- Если используете подключение через локальную сеть – в поле «Адрес сканера» укажите IP-адрес МФУ Kyocera. При подключении через интерфейс USB – указывать IP-адрес не нужно
После завершения настройки драйвера сканера, нажмите кнопку “ОК”.
На этом настройка сканера Kyocera завершена. Для сканирования Вы можете использовать любую программу для сканирования с поддержкой TWAIN, например:
- NAPS2
- PaperScan
- HippoScan
- ScanLite
- EasyScan
- WinScan2PDF
Если возникнут сложности вы можете обратиться к нам за помощью.
Нам понадобиться от вас удаленный доступ.
✅ В данной статье я расскажу и покажу, где скачивать драйвера для сканеров Kyocera, а так же как их устанавливать. Как я заметил из частых вопросов, самый большой и нервный касается подключения МФУ к компьютеру по usb проводу и установка драйверов для сканера. Если у вас при установке драйверов не работает сканер, эта статья будет очень вам полезной.
🌟Всем привет! Удалось мне через одного читателя закрыть полный цикл статей которые посвящены установки и настройки МФУ Kyocera по сети и через USB провод. Давайте освежим и вспомним какие статьи уже есть по данному вопросу:
- настройка сетевого сканированию
- сканирование по usb
- ошибка при сканировании
🔥Теперь мы завершаем цикл статей по настройке МФУ киосер статьей в которой мы рассмотрим где теперь можно скачать драйвера для сканера kyocera^
- WIA драйвера для сканера Kyocera
- TWAIN драйвера ✅ для сканера Kyocera
🔥 Если вы стали счастливым обладателем МФУ киосера и вы подключаете его к компьютеру через USB провод, то могу сразу предупредить, что вероятность работы сканера будет у вас 50 на 50
Вся причина в том, что МФУ Kyocera очень капризная к данным кабелям и если он не экранированный и не имеет ферритовых колец, а также очень тонкий (дешевый китайский кабель с алишки за 100 руб) сканер работать не будет! НО принтер будет работать, ему все равно какой юсб кабель!!!! к чему я это пишу:
если у вас не заработал сканер после моей инструкции, то проблема не в инструкции, а в проводе USB!
В момент подключения МФУ к компьютеру по USB у вас в диспетчере устройств будет висеть сканер как неизвестное устройство: kyocera ecosys и название модели МФУ
код устройства USBVID_0482&PID_0636&REV_0000&MI_01

Если это так, тогда дальше действуем по инструкции.
Инструкция по установки WIA или TWAIN драйвера для сканера Kyocera
admin
Запрос на обновленные драйвера для сканера Kyocera
Задать вопрос
Если вы не хотите с сайта Kyocera скачивать почти 3 Гигабайта драйверов под все устройства, а вам нужны только обновленные драйвера для сканера TWAIN и WIA пишите мне запрос я Вам вышлю ссылку.
- Подготовительные работы мы провели и проверили что название МФУ весит в списке устройств, провода все подключили переходим к скачиванию драйверов
- несколько лет назад, а может позже официальный сайт Kyocera был изменен и при поиске драйверов на сайте в списке загрузок показывается теперь только драйвера для печати. В моем случае у меня была модель ECOSYS M2535dn
- переходим на официальный сайт куосера и через поиск находим нашу модель принтера
- как видим у нас на вкладке Drivers нет драйверов для сканера (есть TWAIN scanner driver (TWAINScannerDriver_v2.0.8106.zip но они не рабочие почему то )
- Теперь чтобы скачать драйвера мы должны спуститься вниз страницы и нажать на большой баннер Центр загрузки
- Теперь мы перешли на страниц Download Center, где делаем следующие действия:
1) в правой части из списка выбираем модель нашего принтера
2) нажимаем кнопку Go
3) в загрузившейся странице переходим на вкладку Software / CDs
4) в CD Image выбираем образ диска со всеми драйвера для следующих модель устройств: DVD-Image for ECOSYS M2030dn; M2035dn; M2530dn; M2535dn; M6026cdn; M6526cdn; M6026cidn; M6526cidn; TASKalfa 266c1 - после того как вы скачали данный образ, его можно смонтировать или разархивировать, где нам будет интересовать папка Scanner
- Теперь снова переходим в диспетчер устройств и подсовываем нашему неизвестному устройству драйвера из папки Scanner
- После чего ждем какое то кол-во времени и в результате драйвера установились удачно и можно пользоваться сканером!
- Вот и все! Говорим спасибо автору или пишем что у вас не получилось и пытаемся разобраться в чем проблема.
Вот и все, вроде бы легкая задача, но из-за того что драйвера которые представлены в списке не устанавливаются и сканер все равно не появляться и не работает создает большую проблему для всех!
admin
Запрос на обновленные драйвера для сканера Kyocera
Задать вопрос
Если вы не хотите с сайта Kyocera скачивать почти 3 Гигабайта драйверов под все устройства, а вам нужны только обновленные драйвера для сканера TWAIN и WIA пишите мне запрос я Вам вышлю ссылку.
Данная статья закрывает такие вопросы как:
- не устанавливается сканер Kyocera что делать?
- почему не сканирует мфу Киосера?
- настройка сканирования kyocera через twain драйвер
- не устанавливаются драйвера на принтер киосера
- где скачать драйвера на сканер киосера
- скачать WIA и TWAIN драйвера на сканер
- настройка сканирования kyocera через wia драйвер
