Roblox Explorer – What is it?
Explorer of roblox studio helps us finding all the instances available in the space available to use them into the game creation.
The content it has in it can be found in the parenting structure. Means all the specific category wise content will be available in that parenting category. We can see all the content in that particular category by using drop-down arrow shown before the parent category name available in the explorer.
Page Contents
- Roblox Explorer – What is it?
- Let’s See How to Open Explorer in Roblox Studio Again?
- The Quick Path to Reopen Roblox Explorer:
- How to Open Properties in Roblox Studio?
- The Quick Path to Reopen Roblox Properties:
Sometimes, by mistake or unknowingly roblox studio explorer gets disappeared from its place. It can cause lots of time waste when you are working on serious roblox game development.
In this case, finding and re-opening the explorer become a time-consuming task. But don’t worry, this roblox studio tutorial will guide you through this. It’s not really that hard to open the explorer in roblox studio.
Let’s See How to Open Explorer in Roblox Studio Again?
To save the time, just follow the path given below to reopen the roblox explorer:
The Quick Path to Reopen Roblox Explorer:
Roblox Main Menu >> View Tab >> Explorer
Follow the below-mentioned step by step guide with images if you did not understood the above-mentioned path.
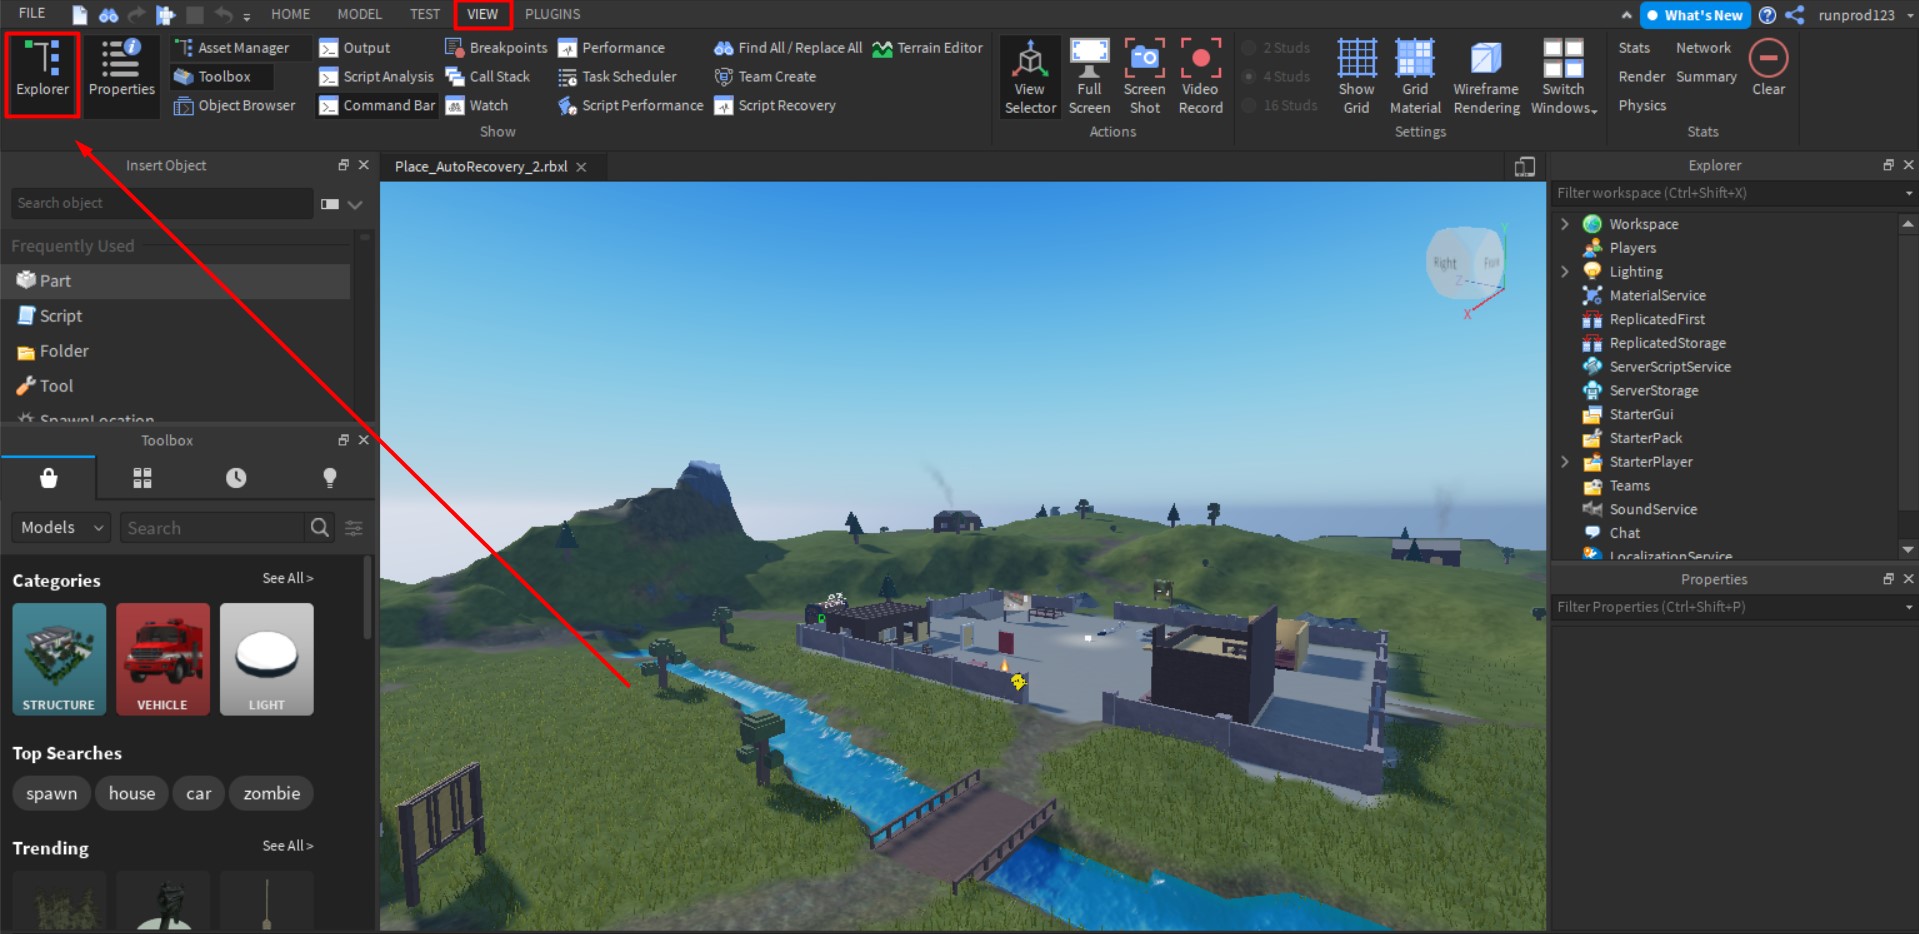
In order to open the explorer, just go to the primary menus of the roblox studio and click on the view tab.
The starting menu option you will see that “explorer”.
You just need to enable the explorer tab again from that menu. Just click on the explorer option, and it will automatically start showing you the explorer in its place.
Also,
If you are not aware about how you can open properties tab in roblox studio, then read the guide below:
How to Open Properties in Roblox Studio?
Follow this quick path given below to reopen properties in roblox studio.
The Quick Path to Reopen Roblox Properties:
Roblox Main Menu >> View Tab >> Properties
Again the step by step guide with images to open properties menu in roblox studio given below:
I see the same issue is happening with the “properties tab” of the roblox studio. People also asking about how to open properties in roblox studio.
Properties menu is also situated beside the explorer menu we just found from the tutorial given above.
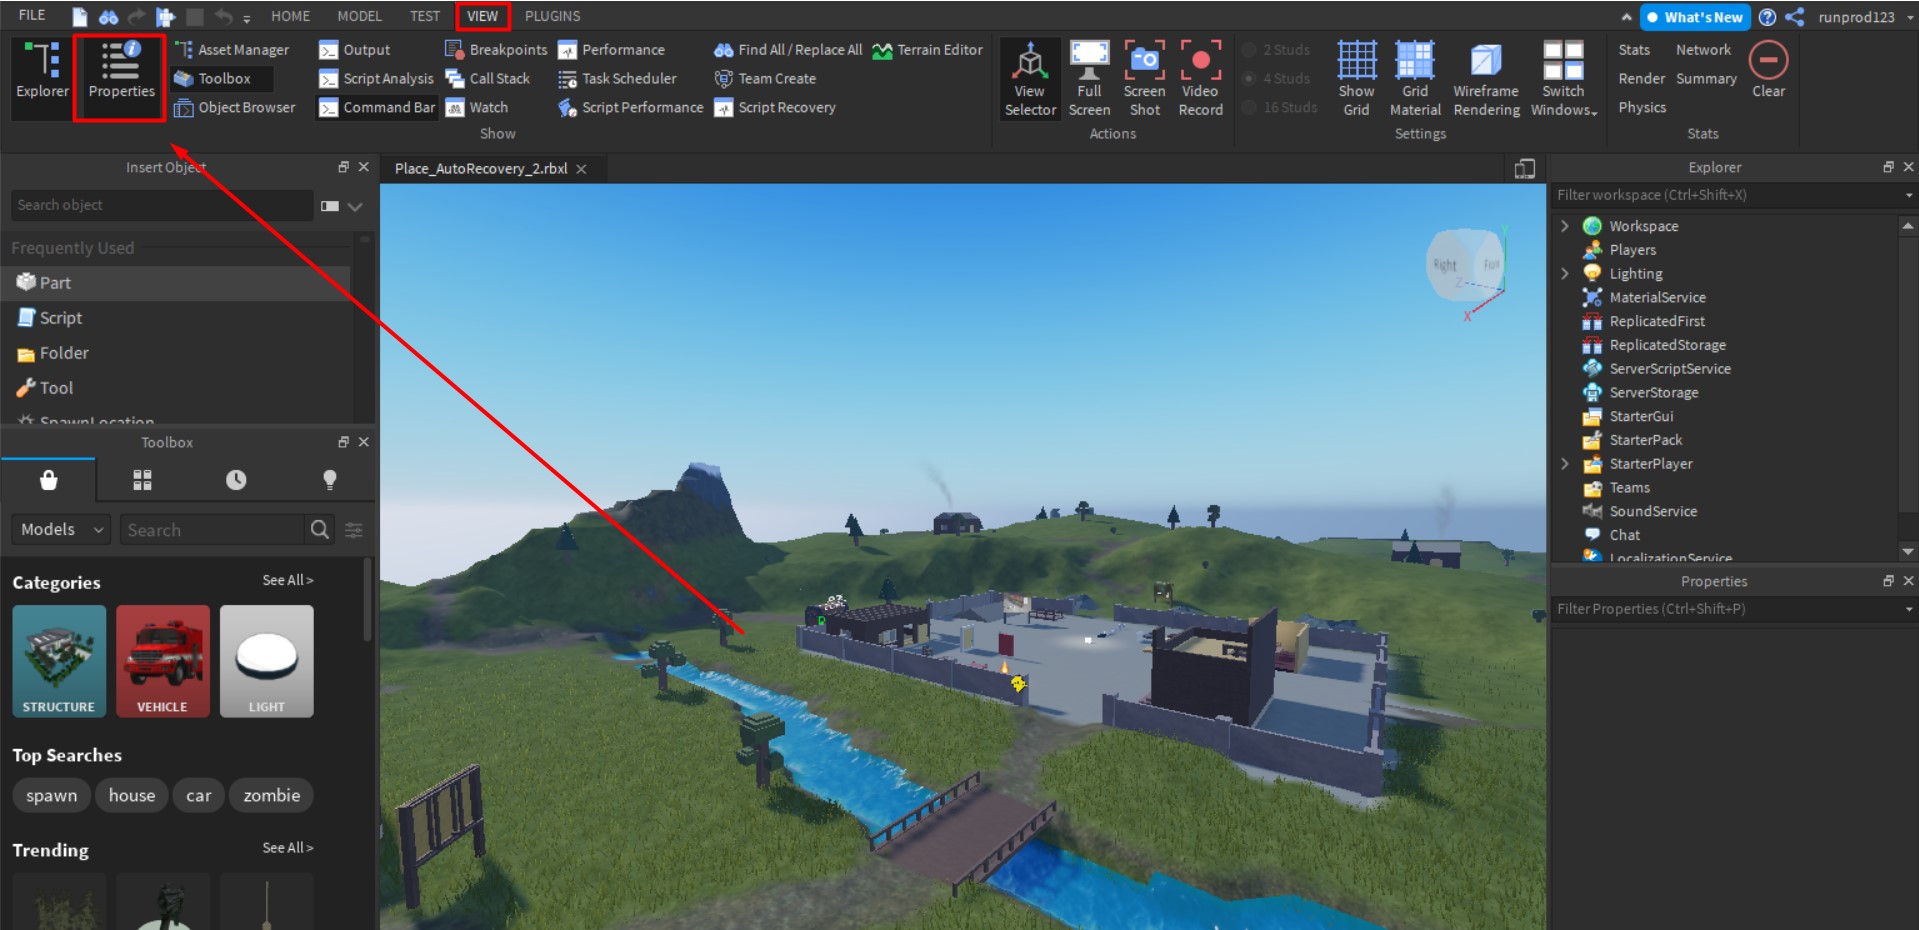
From main menu of the roblox studio, select view tab again and the second left option is there for roblox properties menu. Click on it and you will get properties menu re-appears in your studio.
So here is the quick navigation for you to get properties menu in the studio.
Follow this path:
Open Roblox Studio >> Go to View Menu (see image above) >> Click on Properties (second option beside Explorer) if it is disabled, it will get enabled when clicked and you will see your properties menu also appeared below the explorer menu in roblox studio.
The properties menu will show you the internal elements of any object that you have selected in explorer menu above. You can change the particular element conditions as per your needs by working them in properties.
If any problem persists, consider closing and again opening the roblox studio once. It may solve the issue.
But before that, consider saving the project first in roblox studio; it may cause losing your entire work done.
If you have any questions regarding roblox studio or you are facing any unpredictable issues regarding it, then you can write us about your concern, and we will try our level best solve your problem as a true roblox fan.
About The Author

NoSurveyNoHumanVerification
I am a Tech Geek who loves to play games and enjoy writing. I am co-admin of NoSurveyNoHumanVerification and responsible for all content ideas. Contact me at : [email protected]
Роблокс Студио автоматически устанавливается вместе с игрой Роблокс и находится в той же папке. Обычно после установке на рабочем столе появляются два ярлыка с Роблокс плеером и Студио. Но если вдруг вы удалили эти ярлыки, я покажу вам 4 способа где можно их найти и как открыть Роблокс Студио на вашем ПК и даже на телефоне.
Содержание:
- Как открыть Роблокс Студио на компьютере
- Как открыть Роблокс Студио на телефоне
- Как открыть Explorer в Роблокс студио
- Как открыть Properties в Роблокс студио
- Как открыть ToolBox в Роблокс студио
- Роблокс Студио НЕ ЗАХОДИТ или выдает ошибку, что делать?
Как открыть Роблокс Студио на компьютере
Способ №1
- Заходите на официальный сайт Roblox.com и переходите во вкладку Create;
- Нажимаете на кнопку Edit на любой карте (одна карта у Вас будет по любому, даже если вы никогда и ничего не создавали);
- Далее появится всплывающее окошко в котором необходимо нажать «Открыть приложение Roblox«


Способ №2
Найти и запустить Роблокс Студио можно если ввести в поиск на вашем ПК слово Roblox (смотри скриншот)
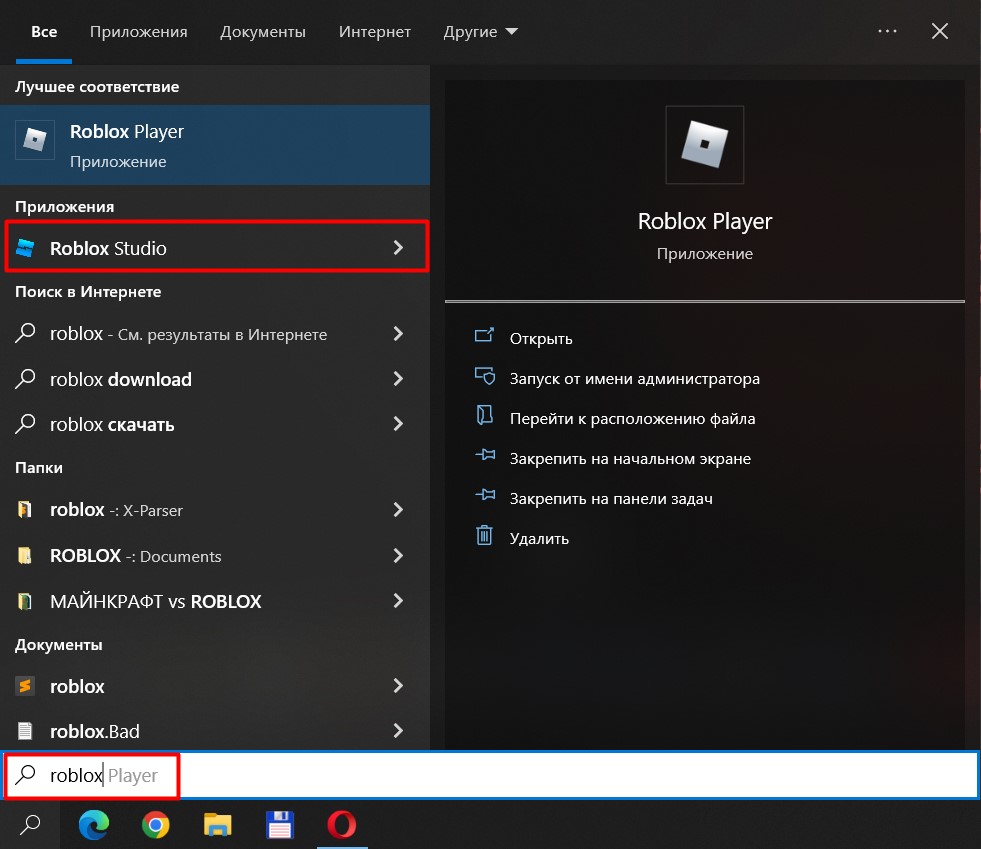
Способ №3
Если нажать кнопку «Пуск» можно попробовать найти приложение Roblox среди других программ.

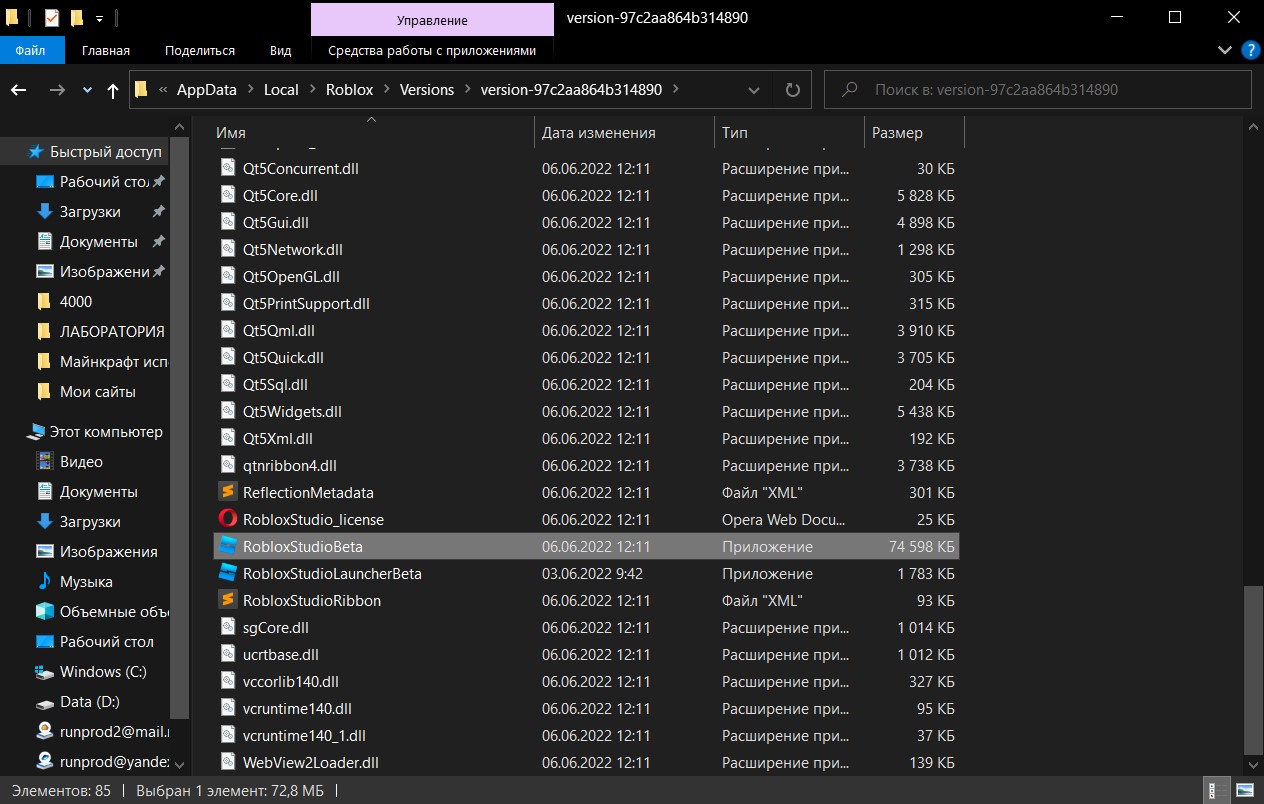
Способ №4
Роблокс студио можно найти по следующему адресу:
C:UsersИмя_ПользователяAppDataLocalRobloxVersionsversion-ваша_версия
Как открыть Роблокс Студио на Телефоне
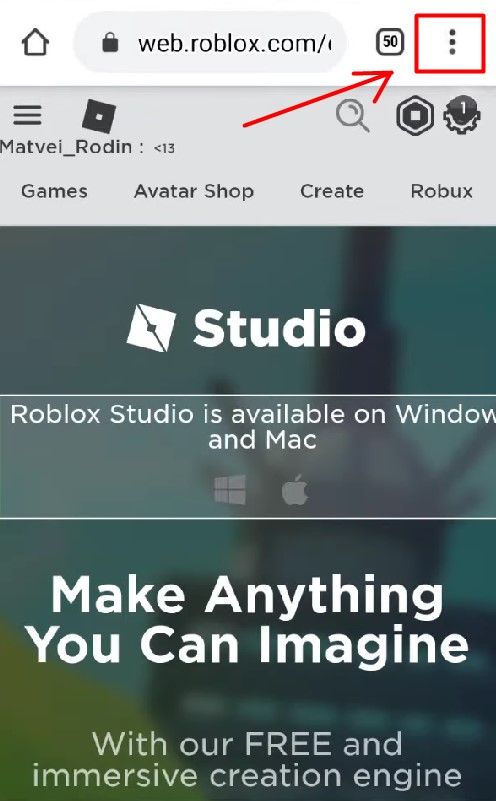
- Перейдите на сайт Roblox.com и нажмите Continue in Browser

2. Перейдите во вкладку Create

3. Нажмите на три точки в верхнем правом углу и в открывшемся меню поставьте галочку в пункте «Версия для ПК»
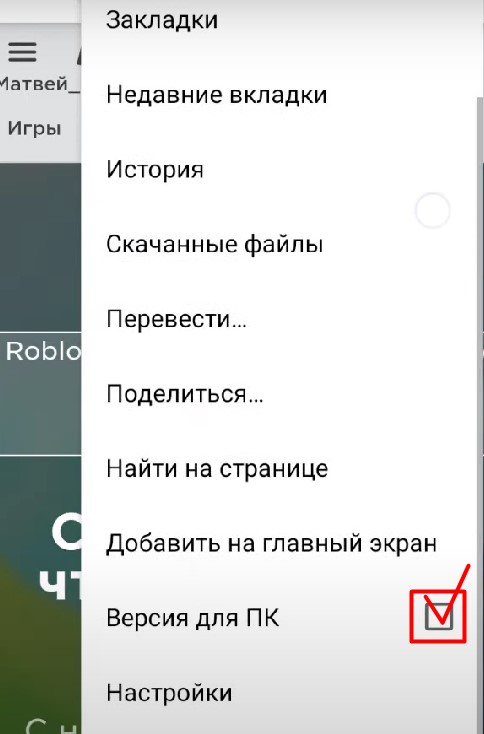
4. Готово, вы вошли в Роблокс Студио с телефона. Для того что бы открыть сам редактор придется все же скачать Роблокс на ПК.
Как открыть Explorer в Роблокс студио
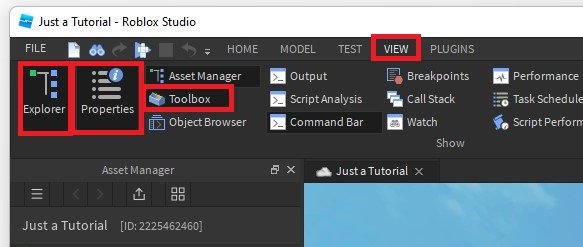
Что бы открыть панель Explorer в Роблокс Студио, нужно перейти во вкладку VIEW и нажать на кнопку Explorer в верхнем левом углу.
Как открыть Properties в Роблокс студио
Что бы открыть панель Properties в Роблокс Студио, нужно перейти во вкладку VIEW и нажать на кнопку Properties в верхнем левом углу.
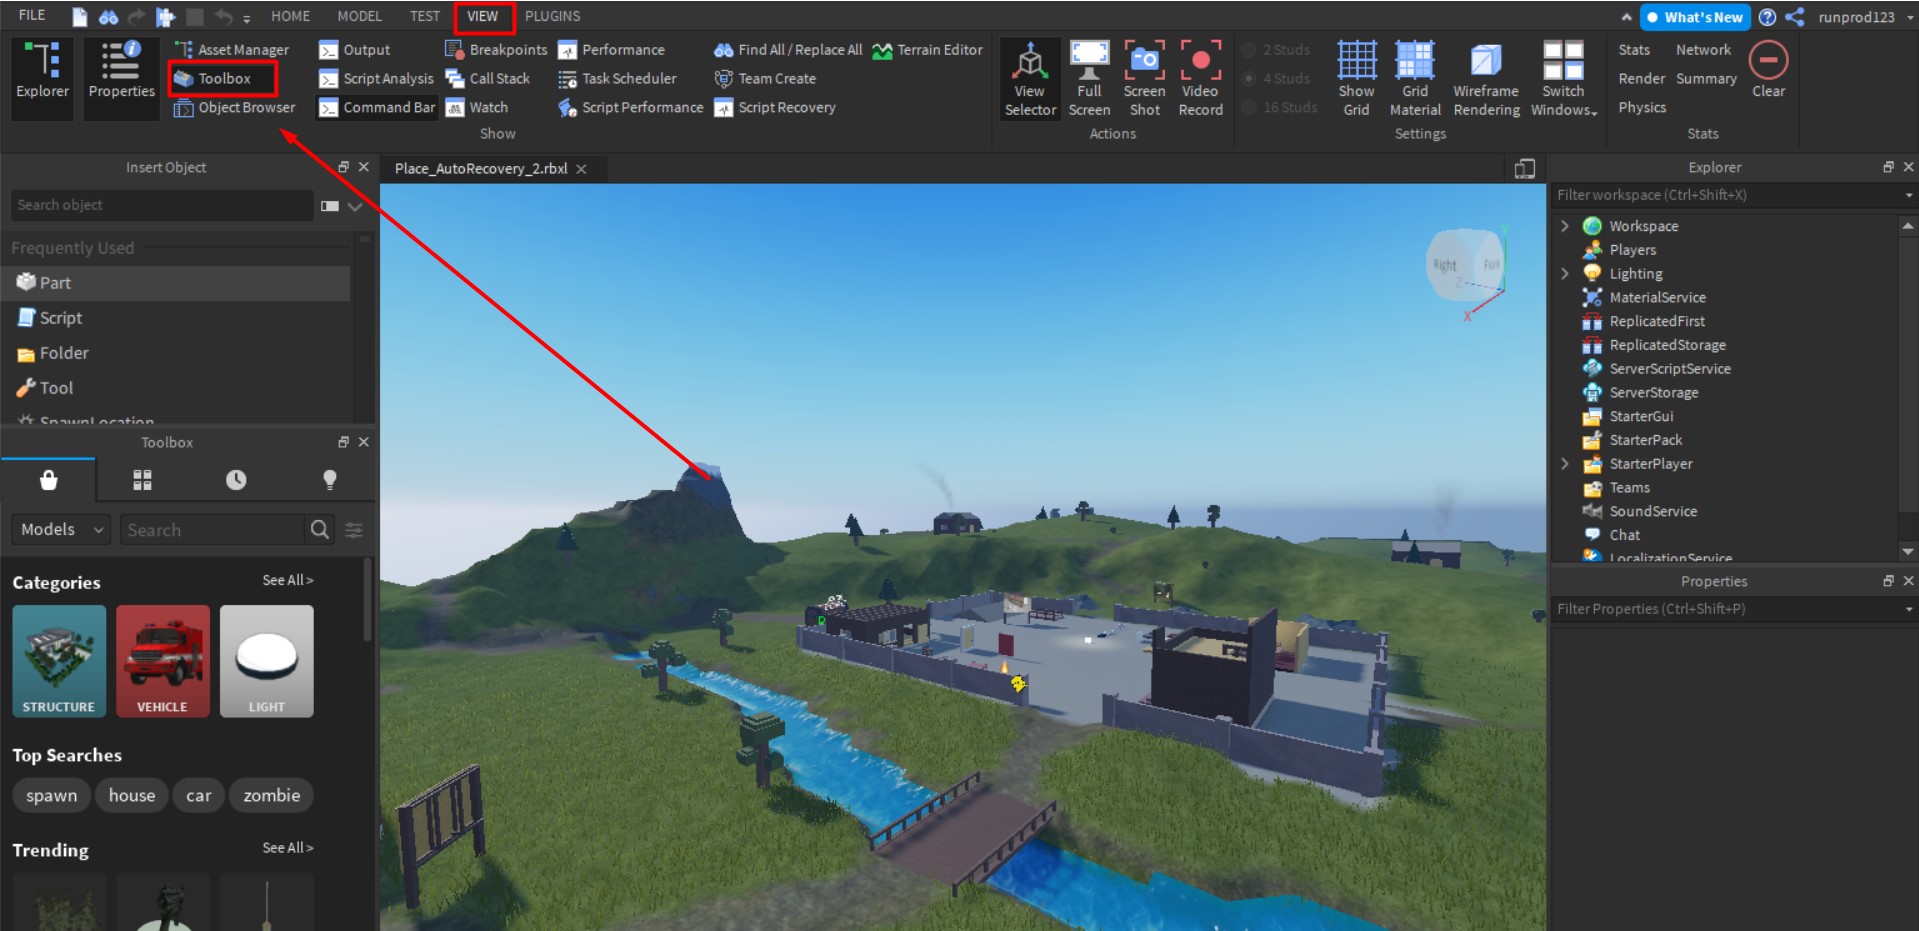
Как открыть ToolBox в Роблокс студио
Что бы открыть панель ToolBox в Роблокс Студио, нужно перейти во вкладку VIEW и нажать на кнопку ToolBox в верхнем левом углу.

Roblox is a massive multiplayer online game platform that allows users to create their games and play games developed by other users. With over 100 million monthly active users, Roblox has become one of the most popular gaming platforms worldwide. However, as a new player, finding your way around Roblox Studio to create new Roblox experiences can be a bit overwhelming, and that’s where the Explorer Tab comes in handy. Sometimes the Roblox Studio Explorer tab will disappear and this guide will help you find it again.
Launch Roblox Studio
Navigate to Roblox.com and navigate to your Profile. Under Creations, select your preferred experience where you want to make changes, and click on the burger menu on the top right.
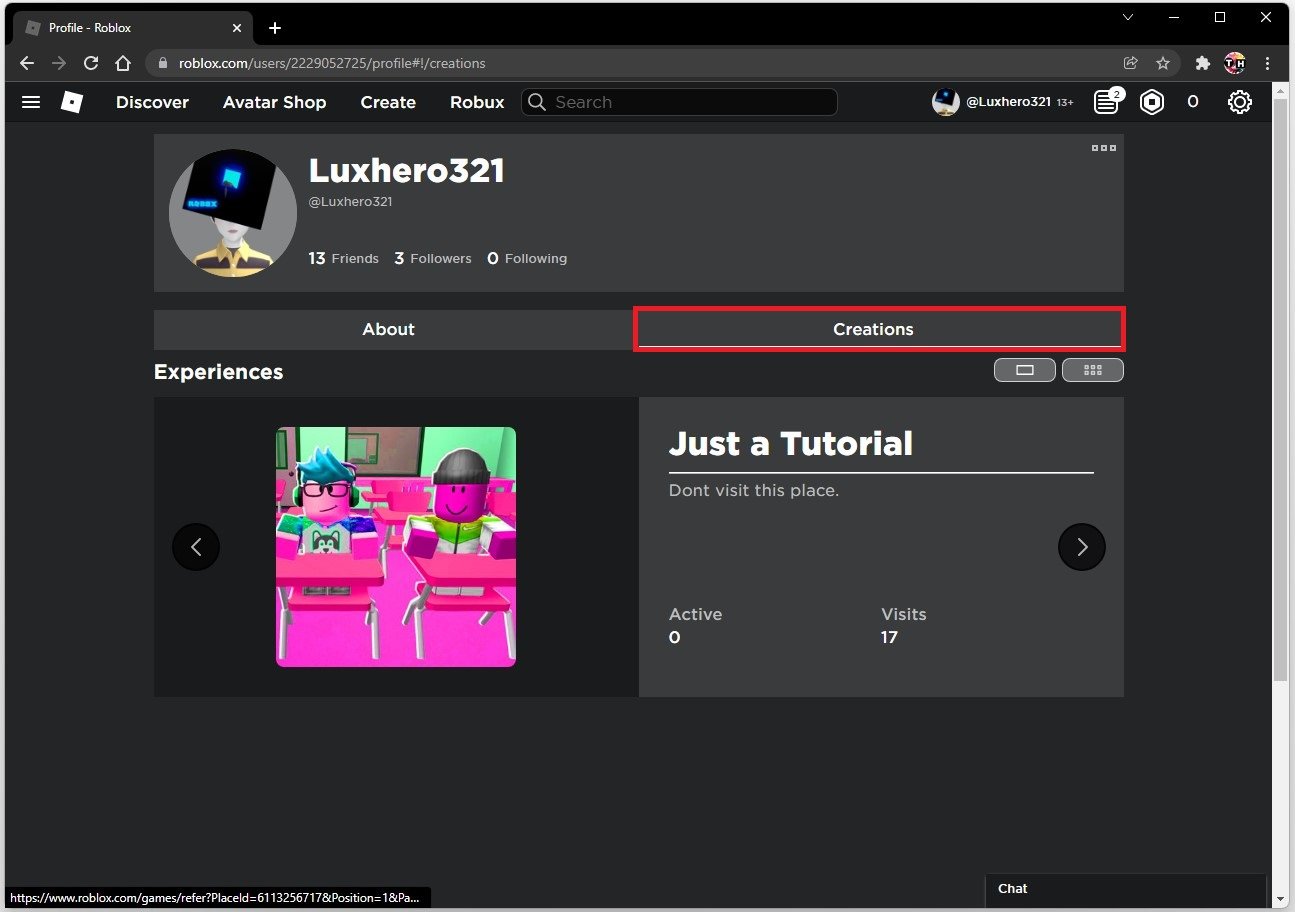
Roblox Account > Creations
Select Edit. This will launch Roblox Studio in case it’s not yet running on your PC.
Roblox Experience > Edit
Toggle the Explorer Window
Navigate to the View tab on the top navigation. Click on Explorer to toggle your Explorer window. By default, it will be located on the right side of your interface.
Roblox Studio > View > Explorer
You can also open up your Properties or Toolbox window from here.
Roblox Explorer Window

Содержание
- How to Open Explorer in Roblox Studio? Step By Step Guide
- Roblox Explorer – What is it?
- Let’s See How to Open Explorer in Roblox Studio Again?
- The Quick Path to Reopen Roblox Explorer:
- How to Open Properties in Roblox Studio?
- The Quick Path to Reopen Roblox Properties:
- Project Intro and File Set Up
- Creating a New Experience
- Closing Extra Windows
- Deleting the Baseplate
- Using the Explorer
- Testing the Obby
- Stopping a Test
- Saving Projects
- Explorer Window
- Parent-Child Hierarchy
- Expanding and Collapsing Branches
- Inserting and Parenting
- Insert New Object
- Paste From Clipboard
- Changing Parents
- Filtering Objects
- Organizing by Folders
- Selecting Filtered Results
- Select All
- Shift-Select
- Drag Select
- Introduction to Roblox Studio
- Getting Started
- Creating a New Experience
- Moving the Camera
- Building Your Experience
- Working with Parts
- Inserting Parts
- Moving Parts
- Scaling Parts
- Rotating Parts
- Anchoring Parts
- Customizing Colors and Materials
- Deleting the Baseplate
- Inserting Assets
- Playtesting Your Experience
- Publishing Your Experience
How to Open Explorer in Roblox Studio? Step By Step Guide
Roblox Explorer – What is it?
Explorer of roblox studio helps us finding all the instances available in the space available to use them into the game creation.
The content it has in it can be found in the parenting structure. Means all the specific category wise content will be available in that parenting category. We can see all the content in that particular category by using drop-down arrow shown before the parent category name available in the explorer.
In this case, finding and re-opening the explorer become a time-consuming task. But don’t worry, this roblox studio tutorial will guide you through this. It’s not really that hard to open the explorer in roblox studio.
Let’s See How to Open Explorer in Roblox Studio Again?
To save the time, just follow the path given below to reopen the roblox explorer:
The Quick Path to Reopen Roblox Explorer:
Roblox Main Menu >> View Tab >> Explorer
Follow the below-mentioned step by step guide with images if you did not understood the above-mentioned path.
In order to open the explorer, just go to the primary menus of the roblox studio and click on the view tab.
The starting menu option you will see that “explorer”.
You just need to enable the explorer tab again from that menu. Just click on the explorer option, and it will automatically start showing you the explorer in its place.
If you are not aware about how you can open properties tab in roblox studio, then read the guide below:
How to Open Properties in Roblox Studio?
Follow this quick path given below to reopen properties in roblox studio.
The Quick Path to Reopen Roblox Properties:
Roblox Main Menu >> View Tab >> Properties
Again the step by step guide with images to open properties menu in roblox studio given below:
I see the same issue is happening with the “properties tab” of the roblox studio. People also asking about how to open properties in roblox studio.
Properties menu is also situated beside the explorer menu we just found from the tutorial given above.
From main menu of the roblox studio, select view tab again and the second left option is there for roblox properties menu. Click on it and you will get properties menu re-appears in your studio.
So here is the quick navigation for you to get properties menu in the studio.
Follow this path:
Open Roblox Studio >> Go to View Menu (see image above) >> Click on Properties (second option beside Explorer) if it is disabled, it will get enabled when clicked and you will see your properties menu also appeared below the explorer menu in roblox studio.
The properties menu will show you the internal elements of any object that you have selected in explorer menu above. You can change the particular element conditions as per your needs by working them in properties.
If any problem persists, consider closing and again opening the roblox studio once. It may solve the issue.
But before that, consider saving the project first in roblox studio; it may cause losing your entire work done.
If you have any questions regarding roblox studio or you are facing any unpredictable issues regarding it, then you can write us about your concern, and we will try our level best solve your problem as a true roblox fan.
Источник
Project Intro and File Set Up
In an obby , short for obstacle course, players jump from object to object while avoiding obstacles to get to the end of a level. Missing a jump means falling to your doom.
Creating a New Experience
Time to get started!
Open Roblox Studio if you haven’t already.
Upon opening, you should see a number of templates. If not, in the upper left corner, click New.

Click the Baseplate template to open it.

Templates are pre-built projects you can use as a starting place for your own experiences.
When you first open up Studio, it’ll have some windows open which you don’t need. Close these so you have more room to work on your game.
Close the Toolbox by clicking the Г— on that window.

Check that your workspace looks like below.

If you want to reopen a window you closed, go to the View tab and click on the name of the window you want to open.
Deleting the Baseplate
A classic part of obbies is falling and having to restart if you make a mistake, so you’ll need to remove the Baseplate from the project before building your obby.
Using the Explorer
One way to delete objects is using the Explorer . This window lists all of the objects within your experience. You can use it to select and work with parts even if you can’t see them in the game editor window.
Look for the Explorer window on the right. If the Explorer window isn’t visible, select the View tab and click the Explorer button.

Click the small arrow next to Workspace to expand the tree.

Click on Baseplate to select it.

Press Delete on the keyboard to remove the baseplate.

Testing the Obby
Next, we’ll test what we have so far so you can see how the respawn mechanic works.
Click the Play button in the top-left corner.

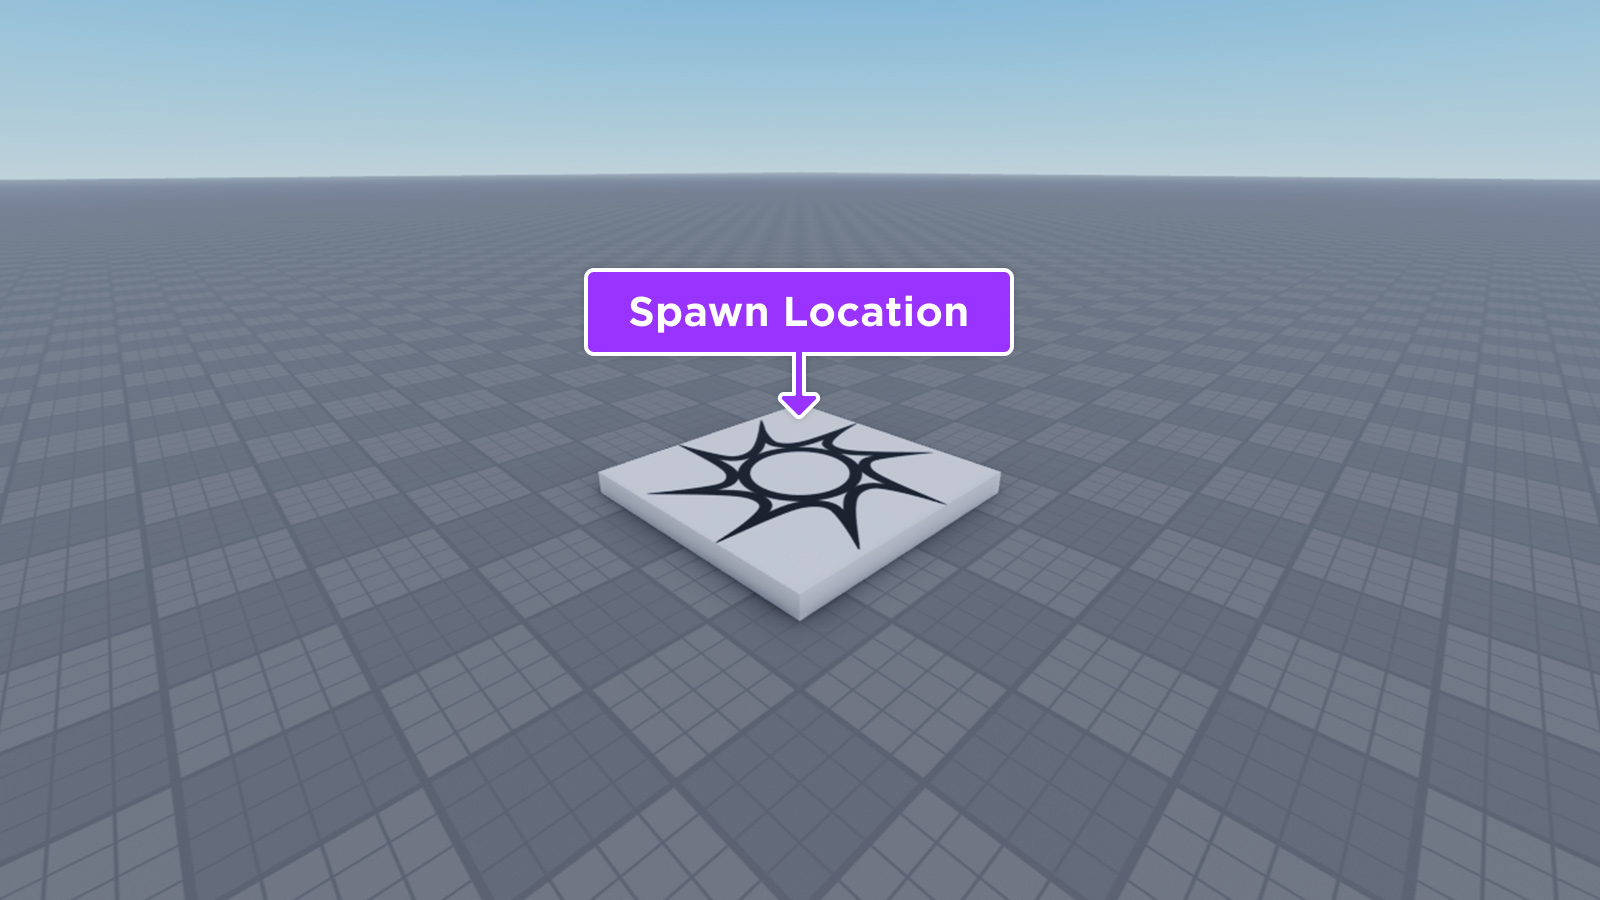
Run off the side of the spawn location. You should respawn at the beginning after a short drop. Controls are listed below if you need them.
![]()
| Action | Control |
|---|---|
| Move | W A S D or arrow keys |
| Jump | Spacebar |
| Rotate View | Hold and drag mouse to look around |
Stopping a Test
Once you’ve play-tested, you can stop the test and close the template.
Stop play-testing by clicking the red Stop button.

Saving Projects
Whenever you are working, save every 10 minutes. That way if anything goes wrong, at least you haven’t lost much work. Once published, you can edit it from any computer.
To save projects in Roblox, you’ll name them and store them to your Roblox account online.
Select File в†’ Publish to Roblox to open the publishing window.

Enter a place name and an optional description.
![]()
When ready, click the Create button.
Studio will save a temporary backup of your work every so often. If for some reason you can’t find your file, go to File > Advanced > Recent. There you can find saved backups.
Источник
Explorer Window
The Explorer window shows a hierarchical list of every instance inside an experience. At the highest level of the hierarchy are the services; Workspace , for example, is where visible 3D content such as parts are stored.
Parent-Child Hierarchy
Roblox uses the concept of parenting to organize objects. All children of a parent object appear under its branch when expanded .
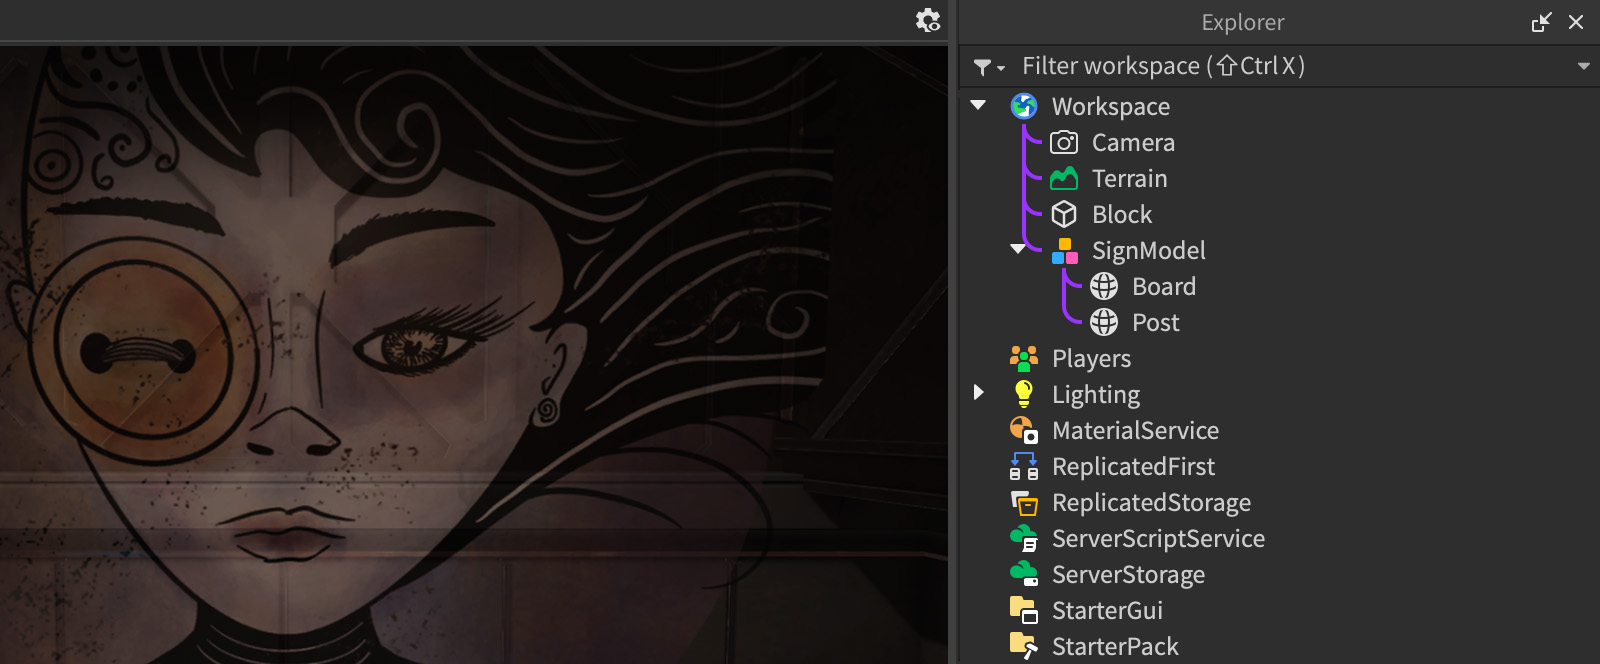 Camera, Terrain, Block, and SignModel as children of Workspace; Board and Post as children of SignModel
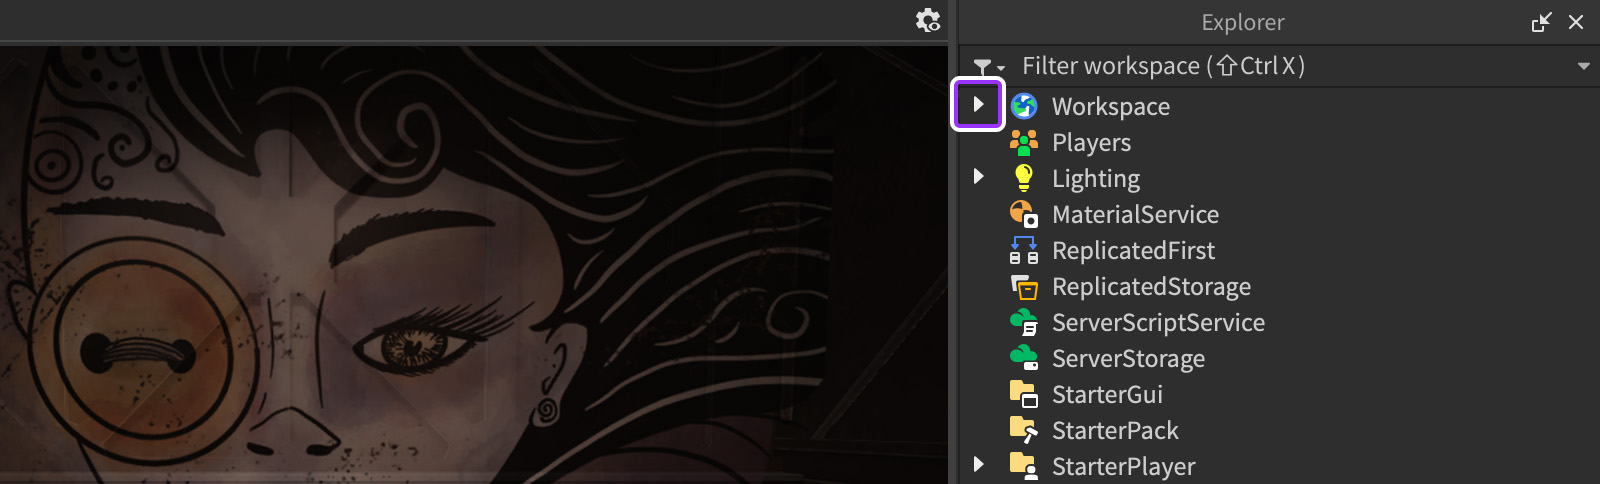
Expanding and Collapsing Branches
Clicking the arrow next to a parent branch, or pressing в†’ or в†ђ when a parent is selected, expands or collapses only that branch (nested child branches remain in their current state). To expand or collapse all branches within a multi-nested hierarchy, hold Shift when clicking the arrow.
Inserting and Parenting
Insert New Object
Some objects like primitive parts can be inserted from the Model tab, but a full array of objects can be inserted through any of the following methods:
Hover over the object’s parent and click the вЉ• button.
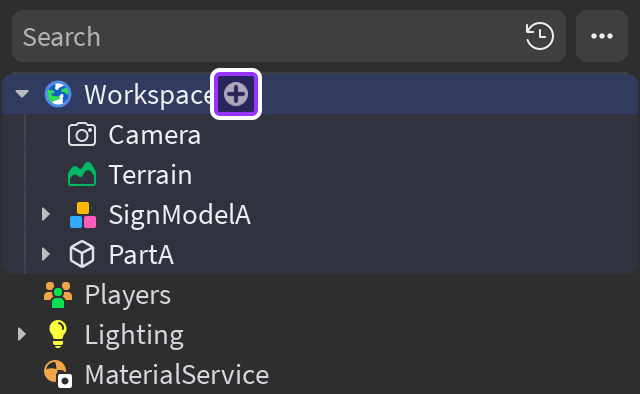
Right-click the object’s parent and select Insert Object .
Select the object’s parent and press Ctrl / вЊ + I .
Each method opens an insertion window which contains a list of objects, sorted by category. You can quickly locate familiar objects by typing a search query in the input field:

If desired, you can further customize the behavior of the insertion workflow as follows:


Toggle an expanded (wider) view of the insertion popup.

Additional settings for object insertion.
Paste From Clipboard
For an object copied to the clipboard, you can paste it as a new child to the Workspace , or into one or more existing parents.
Press Ctrl / вЊ + V to paste the object into the top-level Workspace .
Right-click specific parent(s) and choose one of the following options from the context menu:
| Paste Into | Pastes the child geometrically on top of the original. | Ctrl / вЊ + Shift + V |
| Paste Into at Original Location | Pastes the child at the same CFrame it was authored at. |
If you select multiple objects and right-click, the options above will appear as Paste Into Selected [] , and completing the operation will paste the clipboard item(s) into all of the selected parents. This is a convenient way to paste the same child into multiple parents, such as a common Texture into several different Parts .
Changing Parents
To change the parent of one or more children (reparent), simply drag and drop them onto the new parent.
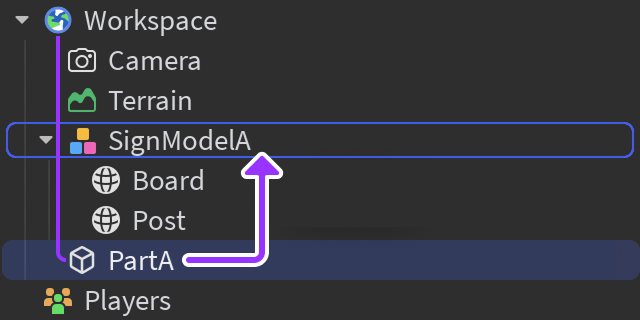 Reparent BlockB from Workspace to SignModel
Filtering Objects
You can filter objects by typing a query into the Filter Workspace input near the top of the window. This input can be quickly accessed by pressing Ctrl / вЊ + Shift + X .

Organizing by Folders
Like directories/folders on a computer, the Folder object is a useful way to organize objects. For instance, if you want to store all environmental sounds in a logical place, you can create a folder and place multiple Sound objects within it.
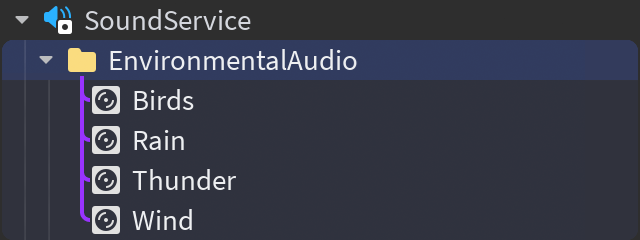
You can organize objects into folders as follows:
Create a Folder instance through a standard insertion method, then drag and drop existing objects into it.
Select multiple objects, right-click them, and then select Group as a Folder from the context menu or press Alt / вЊҐ + Ctrl / вЊ + G .
Selecting Filtered Results
Within a filtered hierarchy, certain key shortcuts and mouse operations behave differently than they do within a non-filtered hierarchy.
Select All
Within a non-filtered hierarchy, pressing Ctrl / вЊ + A selects all objects.
Within a filtered hierarchy, pressing Ctrl / вЊ + A selects only the filter-matching objects.

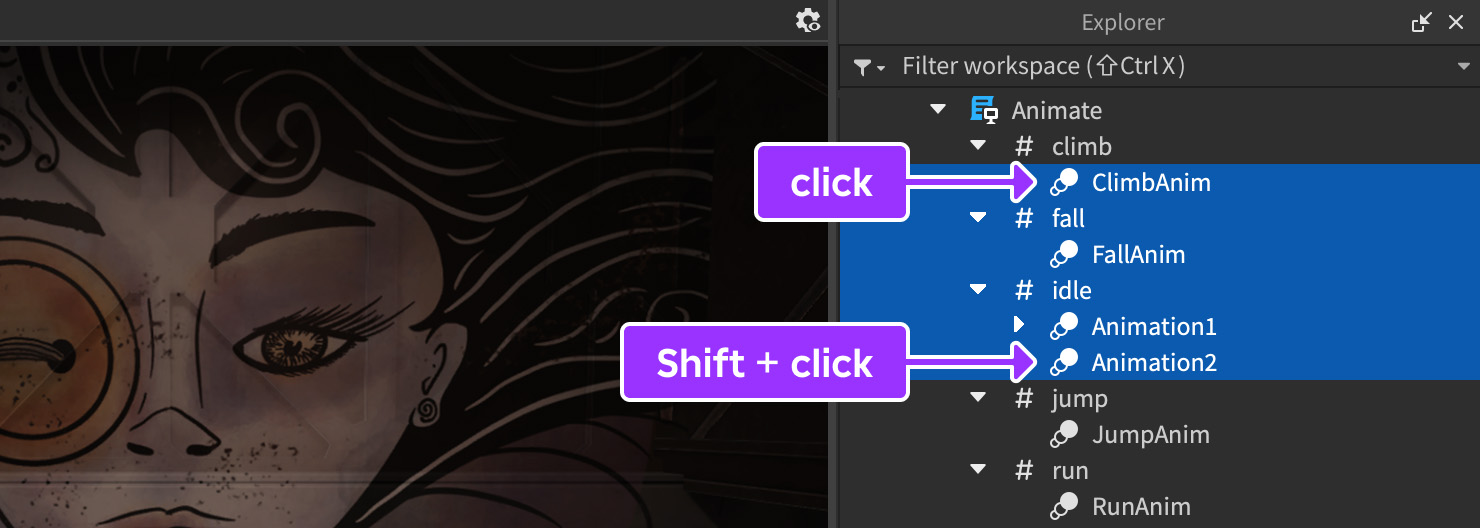
Shift-Select
Within a non-filtered hierarchy, clicking an object and then Shift -clicking another object selects everything within the range.
Within a filtered hierarchy, if both the initially clicked object and the Shift -clicked object match the filter query, only filter-matching objects within the range are selected.
Drag Select
Clicking and dragging from the right side of the window initiates a selection box. Within a non-filtered hierarchy, everything within the box is selected.
Within a filtered hierarchy, only filter-matching objects within the selection box are selected.
Источник
Introduction to Roblox Studio
This tutorial explains the basics of Roblox Studio by building, playtesting, and publishing a simple platformer experience. A platformer, or «obby», is a game in which users navigate through a path of platforms while avoiding obstacles and clearing treacherous gaps.
Follow each section and learn how to:
Getting Started
Roblox Studio is the essential building tool for Roblox experiences. It’s free to use on Windows and Mac devices, and it doesn’t require you to purchase a license. If you haven’t installed Studio yet, see Setting Up Roblox Studio .
Creating a New Experience
The Baseplate template provides a spawn location and a baseplate . A spawn location is a platform that marks where users appear in the world at the start of the experience and where they respawn when their health reaches zero. A baseplate is Studio’s default floor that prevents users from falling when they walk off the spawn location.
To create a new experience in Studio:
Open Studio. In the left-hand navigation, ensure that New is in focus.

Under the All Templates tab, select the Baseplate template.
A new experience opens. In the viewport, a SpawnLocation object displays at the center of your camera view.
Moving the Camera
Now that your experience is open in Studio, click inside the viewport and move the camera around to get a better view. For keyboard and mouse controls, see the following table.
| Key/Shortcut | Action |
|---|---|
| W | Moves the camera forward. |
| S | Moves the camera back. |
| A | Moves the camera left. |
| D | Moves the camera right. |
| Q | Moves the camera down. |
| E | Moves the camera up. |
| Shift | In combination with any movement key, changes the camera speed. You can customize the camera speed within Studio Settings . |
| F | Focuses the camera on a selected part. |
| Right Mouse Button | When pressed, dragging the mouse moves the camera view around. |
| Middle Mouse Button | When pressed, dragging the mouse pans the camera. |
| Mouse Scroll Wheel | Zooms the camera in or out. |
Building Your Experience
When you are comfortable navigating the viewport with the camera, you can begin building your experience by adding platforms of different shapes and colors for users to jump between to reach the end of the experience. In addition, you can also insert user-generated models from the Creator Marketplace to add a theme to your environment.
Working with Parts
A Part is Roblox’s primary building block. You can move , resize , rotate , and customize part properties to affect their appearance, such as their color and material . This tutorial uses parts to build a series of platforms.
Inserting Parts
There are five different part types that you can insert through the Parts section of the Home or Model tabs:
To insert a part:
In the menu bar, select the Model tab.
Navigate to the Parts section.
Under the Part icon, click the dropdown arrow. A dropdown menu displays.

From the dropdown menu, select a part. A new part appears in the viewport at the center of your camera view.

Moving Parts
The new part is the first platform that users jump to, so move it a little farther from the spawn location. Parts can move along the X, Y, and Z axes, which are color-coded:
Studs are Studio’s basic measurement unit. By default, parts move incrementally by snapping 1 stud at a time along the grid. Snapping is useful when positioning parts that should be exactly aligned with each other, such as the walls of a building. To move a part:
In the Tools section, select the Move tool, then select the part you want to move in the Workspace.

Click and drag the arrow that is pointing in the direction you want to move the part. The new part is the first platform users jump to, so move the part slightly away from the spawn platform to give users an easy first jump.

If you want to adjust or disable the snapping behavior, edit the Move field in the Snap to Grid section and move the part again.

As you insert and move parts, remember to move the camera to view your obby from multiple angles. Parts might not appear as you expect if you only look from one direction.
Scaling Parts
Similar to moving , parts scale along the X, Y, and Z axis. You can make a part larger or smaller by using the Scale tool. To scale a part:
In the Tools section of the Model tab, select the Scale tool, then select the part you want to scale.

Click and drag a ball to scale the part in that direction.

Rotating Parts
Similar to moving and scaling , parts rotate around the X, Y, and Z axes. You can rotate a part to a new angle using the Rotate tool.
By default, parts rotate by snapping 45В° at a time along the grid. Snapping is useful when you are rotating parts that should have edges that exactly align with each other, such as two halves of a roof on a building. To rotate a part:
In the Tools section of the Model tab, select the Rotate tool, then select the part you want to rotate.

Click and drag a circle to rotate the part in that direction.

If you want to adjust or disable the snapping behavior, edit the Rotate field in the Snap to Grid section and rotate the part again.

Anchoring Parts
When you playtest your experience , gravity pulls each part to the baseplate. To prevent any forces from changing the position of a part, anchor it in place. To anchor a part:
Open the Explorer window. The Explorer window lists all objects in your experience. If the Explorer window isn’t visible, select the View tab and click the Explorer button.

In the Explorer window, select the part you want to anchor.
Open the Properties window. The Properties window lets you inspect and change properties for any selected object. If the Properties window isn’t visible, select the View tab and click the Properties button.

In the Properties window, find and toggle the Anchored property.

Customizing Colors and Materials
You can customize the appearance of a part by changing its Part.BrickColor , Part.Color , or Material property. The Material of a part changes its physical traits and appearance to reflect real-word objects. For example, parts with a concrete material sink faster in water than parts with a plastic material because real-world concrete is heavier than real-world plastic.
To customize a part’s color and material:
In the Explorer window, select a part.
In the Properties window, click the color box to the left of the Color property. The Colors popup displays.
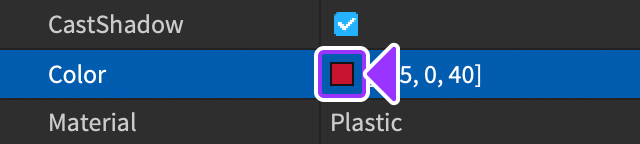
Select a color, then click the OK button.
In the Material field, click on the existing material. A dropdown arrow displays.
Click the dropdown arrow. The material options display.

Select a material for the part.
Deleting the Baseplate
If a user were to play your experience right now and miss a platform, they would fall and safely land on the baseplate. You may want to provide a consequence when they make a mistake, such as forcing them to restart the obby each time they fall. If you delete the baseplate, the user’s character falls below the height threshold. This causes the character to dissemble and respawn from the spawn location.
To delete the baseplate:
In the Explorer window, click the Baseplate .

Inserting Assets
The Creator Marketplace is an asset sharing platform within Studio that you can use to quickly find and insert ready-made models, images, meshes, plugins, audio, and videos into your experience that were made by Roblox and the Roblox community. This platform is very useful for filling out 3D environments and adding themes to your creations. For more information on how to find, filter, and insert assets, see Creator Marketplace .
To insert an asset:
Navigate to the View tab, then select Toolbox . The Toolbox window displays.

Under the Marketplace tab, click on the Search field and type anything you want to find.
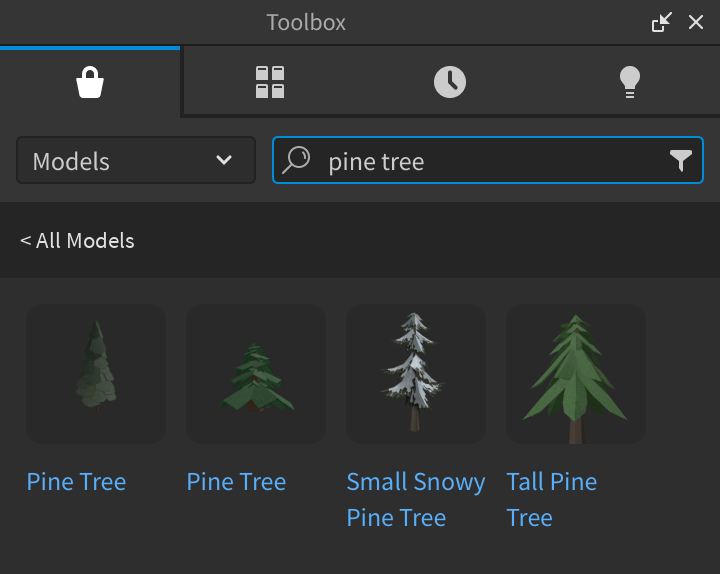
Click on an asset. The asset displays within your experience.

Any creator can upload an asset to the Creator Marketplace and these assets might not work as you expect. To learn how to inspect an asset before inserting it, see Asset Inspection .
Playtesting Your Experience
Playtesting is a vital step before publishing any experience because you need to verify that everything works and that users can reach the final platform. When you playtest your platformer, consider its difficulty and how that might effect the user’s experience. If any jumps are too hard, users may get frustrated, but if every jump is too easy, they may get bored.
To playtest your experience:
Navigate to the menu bar.
Click the Play button.
While playtesting, you can use the same controls as a default Roblox experience:
| Control | Action |
|---|---|
| W | Moves the camera forward. |
| S | Moves the camera back. |
| A | Moves the camera left. |
| D | Moves the camera right. |
| Spacebar | Your playable character jumps. |
| Hold and drag the Right Mouse Button | Moves the camera view around. |
To stop playtesting:
Navigate to the menu bar.
Click the Stop button.
Publishing Your Experience
After you are happy with your experience, you can publish it to the cloud to allow other users on Roblox to play it. To publish your experience:
In the menu bar, select File . A pop-up menu displays.
Select Publish to Roblox . A dialog displays.
Fill in the following fields:
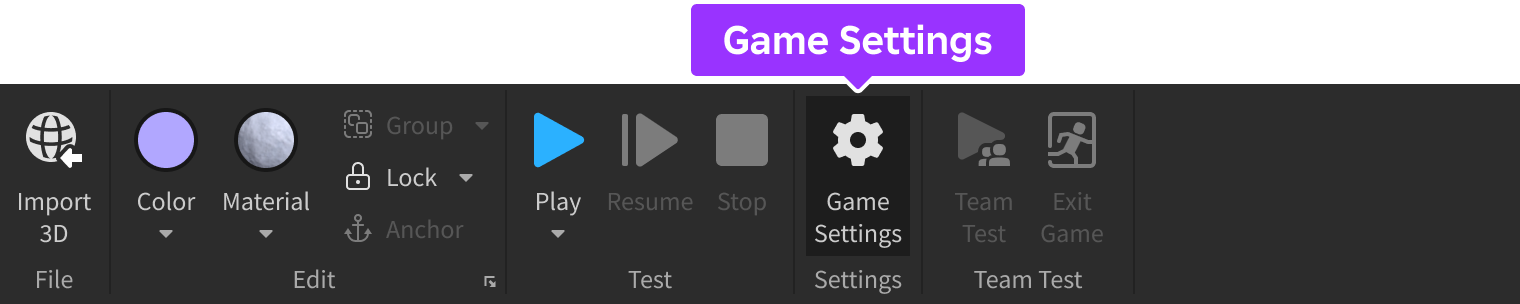
Click the Create button. The Game Settings menu is now available for your experience.
From the Home tab, click the Game Settings button.
In the Permissions tab, choose which users can access the experience:
In the bottom-right corner, click the Save button.
In the upper-right corner of Studio, click the Share button. Various options display for sharing the experience with others.
Try playing your obby with friends and compete to reach the end of the course the fastest.
Congratulations on creating your first Roblox experience! To add more features to your obby and learn more about building immersive experiences on Roblox, check out our tutorials .
Источник

The Explorer window
The Explorer is a window in Roblox Studio that shows the hierarchy of instances that are within the ![]() DataModel. The Explorer can be opened by clicking the “View” tab of the toolbar found at the top of Roblox Studio and then clicking on “Explorer”.
DataModel. The Explorer can be opened by clicking the “View” tab of the toolbar found at the top of Roblox Studio and then clicking on “Explorer”.
Navigation
In order to open up a closed object’s hierarchy, click on the small “+” to the side of it. To close an opened object’s hierarchy, click on the small “-” to the side of it. If the object does not have anything inside it, it will not display a “+” or “-“. To move an object into another object’s hierarchy, simply click and drag the object onto another one. Some objects cannot be moved inside each other normally – however, this can be bypassed. Click on the object, press the keys Ctrl + C, then click on the instance you want to move the object into, right click it, and press “Paste Into”.
Hierarchy
The typical hierachy consists of the following instances:
-


Workspace
-

Camera
-

Terrain
-
-

Lighting
-

Players
-

ReplicatedFirst
-

ReplicatedStorage
-

ServerStorage
-

StarterGui
-

StarterPack
-

StarterPlayer
-

StarterCharacterScripts
-
StarterPlayerScripts
-
-

Teams
-

Soundscape
-

Chat
-

LocalizationService
-

TestService
Previously, Teams and TestService had to be added under Model > Service. Starter places now include these services.
Gallery
The Explorer in 2017.
