Каждый администратор должен обладать
информацией что и куда у него подключено. Администрирование Mikrotik – не исключение.
Рассмотрим типовые точки внимания, которые можно быстро проверить и собрать
нужную информацию.
Кто подключен по Wi–Fi
Если Микротик у нас выполняет роль
маршрутизатора по беспроводному каналу, то поиск подключенных устройств будет в
разделе:
“Wireless“ – “Registration“
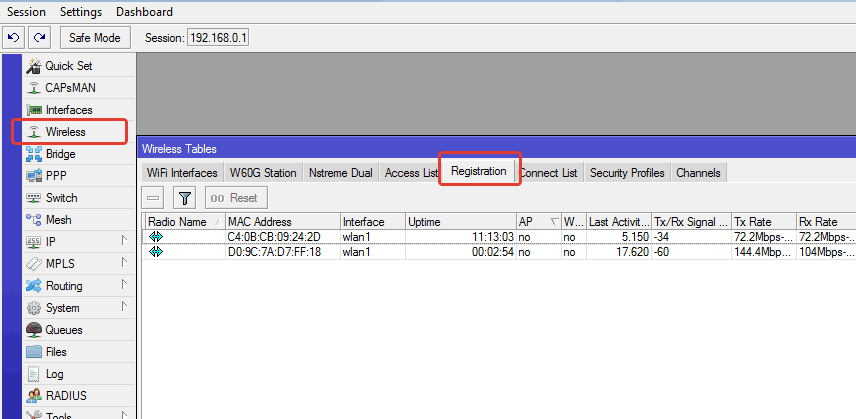
В этом окне отображаются
характеристики клиентов – их MAC-адрес,
время подключения и скорость соединения.
ARP-кеш
При взаимодействии на L2-L3, наш коммутатор-маршрутизатор
запоминает MAC-адреса
фреймов и их привязку к IP-адресам,
а также интерфейсы, со стороны которых эти фреймы приходят, что тоже может
служить точкой внимания администратора. Найти это место легко:
“IP“ – “ARP“

Обращаем внимание на интерфейс, ведь
зачастую кадры, приходящие на аплинк нам неинтересны (в случае на скрине –
интерфейс провайдера).
DHCP
Если наш маршрутизатор выступает в
роли сервера DHCP,
можно посмотреть список узлов, арендовавших IP-адрес в разделе
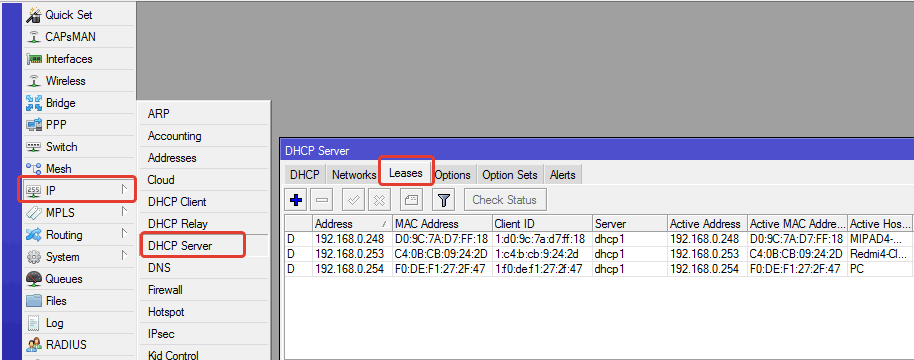
“IP“ – “DHCP Server“ на вкладке “Leases“.
PPP
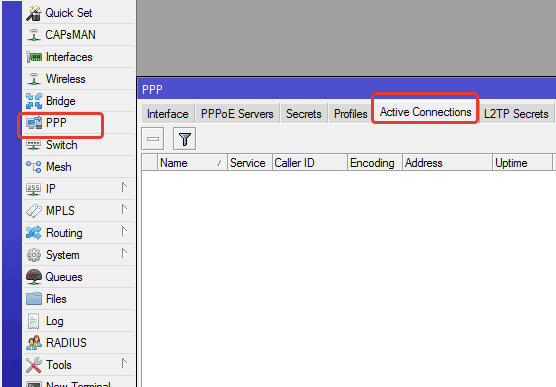
Если бы мы использовали PPP, то сведения об активных
подключениях были бы в разделе “PPP“
на вкладке “Active Connections“
Соседи-Микроты

А если сеть большая и наш Mikrotik не
единственный? Есть инструмент полуактивной разведки, показывающий соседние
устройства: “IP“ – “Neighbor“
Кроме перечисленных способов есть ещё средства активной разведки, такие как “Torch” и “IP Scan“, находящиеся в разделе “Tools“, первое напоминает WireShark (сетевой сниффер), второе – NMap (сетевой сканер). Для решения определённых задач они вполне могут подойти.
Источник: https://litl-admin.ru/zhelezo/kak-v-mikrotik-posmotret-kto-podklyuchen.html
Содержание
- Как в Mikrotik посмотреть кто подключен
- Кто подключен по Wi — Fi
- ARP -кеш
- Соседи-Микроты
- Смотрим список подключенных клиентов в Mikrotik
- Подключенные устройства (клиенты) в Mikrotik
- Заключение
- Manual:IP/Firewall/Connection tracking
- Contents
- Connection tracking entries
- Properties
- Connection tracking settings
- Микротик список всех подключенных устройств
- Как получить данные о беспроводных клиентах, подключенных к Mikrotik RouterBoard?
Как в Mikrotik посмотреть кто подключен
Каждый администратор должен обладать информацией что и куда у него подключено. Администрирование Mikrotik – не исключение. Рассмотрим типовые точки внимания, которые можно быстро проверить и собрать нужную информацию.
Кто подключен по Wi — Fi
Если Микротик у нас выполняет роль маршрутизатора по беспроводному каналу, то поиск подключенных устройств будет в разделе:
В этом окне отображаются характеристики клиентов – их MAC -адрес, время подключения и скорость соединения.
ARP -кеш
При взаимодействии на L 2- L 3, наш коммутатор-маршрутизатор запоминает MAC -адреса фреймов и их привязку к IP -адресам, а также интерфейсы, со стороны которых эти фреймы приходят, что тоже может служить точкой внимания администратора. Найти это место легко:
Обращаем внимание на интерфейс, ведь зачастую кадры, приходящие на аплинк нам неинтересны (в случае на скрине – интерфейс провайдера).
Если наш маршрутизатор выступает в роли сервера DHCP , можно посмотреть список узлов, арендовавших IP -адрес в разделе
Если бы мы использовали PPP , то сведения об активных подключениях были бы в разделе » PPP» на вкладке « Active Connections«
Соседи-Микроты
А если сеть большая и наш Mikrotik не единственный? Есть инструмент полуактивной разведки, показывающий соседние устройства: » IP» – » Neighbor«
Кроме перечисленных способов есть ещё средства активной разведки, такие как «Torch» и «IP Scan«, находящиеся в разделе «Tools«, первое напоминает WireShark (сетевой сниффер), второе — NMap (сетевой сканер). Для решения определённых задач они вполне могут подойти.
Источник
Смотрим список подключенных клиентов в Mikrotik
Бывают случаи, что необходимо посмотреть список подключенных устройств на вашем роутере. В разных роутерах данный функционал реализован по разному, и чаще всего у пользователя не возникает проблем с просмотром подключенных устройств. В роутерах Mikrotik дела обстоят совершенно иначе, данные устройства требуют определенных знаний, как в настройке, так и в эксплуатации данных устройств. Про настройку PPPoE соединения на ройтурах Mikrotik можно прочитать в данной статье. А в данной статье рассмотрим способ узнать какие устройства на данный момент подключены к роутеру Mikrotik.
Подключенные устройства (клиенты) в Mikrotik
Как обычно, все манипуляции мы будем совершать через специализированную утилиту Winbox, которую вы можете скачать с официального сайта Mikrotik. Для скачивания не обязательно переходить на сам сайт, достаточно нажать на данную ссылку и загрузка Winbox начнется. В том случае, если вы работаете из под операционной системы Linux, вам необходимо установить пакет Wine для запуска Winbox. После чего вы спокойно сможете запустить Winbox через Wine, и Winbox прекрасно будет работать. Но, вернемся к просмотру списка подключенных клиентов в роутерах Mikrotik. Что бы просмотреть всех клиетов, которые на данный момент подключены к Mikrotik, запускаем Winbox,логинемся, а затем переходим во вкладку
IP
DHCP Server

И в открывшемся окне переходим во вкладку
Leases
В данном окне будут отображаться все подключенные устройства (клиенты), которые в данный момент находятся в сети:

Заключение
Одно из преимуществ данных роутеров, так это то, что изучив одно устройство Mikrotik, вы спокойно сможете разбираться с любым другим устройством от данного производителя. Так как во всех устройствах Mikrotik используется одна и та же операционная система. Так же для пользователей продукции Mikrotik могу порекомендовать канал на youtube под названием Mikrotik Training.
А на этом сегодня все. Надеюсь данная статья будет вам полезна.
Журнал Cyber-X
Источник
Manual:IP/Firewall/Connection tracking
Contents
Connection tracking entries
Sub-menu: /ip firewall connection
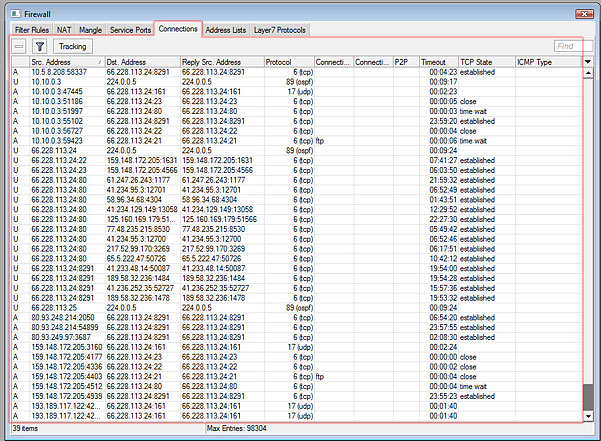
There are several ways to see what connections are making their way though the router.
In the Winbox Firewall window, you can switch to the Connections tab, to see current connections to/from/through your router. It looks like this:
Properties
All properties in connection list are read-only
| Property | Description |
|---|---|
| assured (yes | no) | Indicates that this connection is assured and that it will not be erased if maximum possible tracked connection count is reached. |
| confirmed (yes | no) | Connection is confirmed and a packet is sent out from the device. |
| connection-mark (string) | Connection mark that was set by mangle rule. |
| connection-type (pptp | ftp) | Type of connection, property is empty if connection tracking is unable to determine predefined connection type. |
| dst-address (ip[:port]) | Destination address and port (if protocol is port based). |
| dstnat (yes | no) | Connection has gone through DST-NAT (for example, port forwarding). |
| dying (yes | no) | Connection is dying due to connection timeout. |
| expected (yes | no) | Connection is setup using connection helpers (pre-defined service rules). |
| fasttrack (yes | no) | Whether the connection is FastTracked. |
| gre-key (integer) | Contents of the GRE Key field. |
| gre-protocol (string) | Protocol of the encapsulated payload. |
| gre-version (string) | Version of GRE protocol used in the connection. |
| icmp-code (string) | ICMP Code Field |
| icmp-id (integer) | Contains the ICMP ID |
| icmp-type (integer) | ICMP Type Number |
| orig-bytes (integer) | Amount of bytes sent out from the source address using the specific connection. |
| orig-fasttrack-bytes (integer) | Amount of FastTracked bytes sent out from the source address using the specific connection. |
| orig-fasttrack-packets (integer) | Amount of FastTracked packets sent out from the source address using the specific connection. |
| orig-packets (integer) | Amount of packets sent out from the source address using the specific connection. |
| orig-rate (integer) | Data rate at which packets are sent out from the source address using the specific connection. |
| protocol (string) | IP protocol type |
| repl-bytes (integer) | Amount of bytes received from the destination address using the specific connection. |
| repl-fasttrack-bytes (string) | Amount of FastTracked bytes received from the destination address using the specific connection. |
| repl-fasttrack-packets (integer) | Amount of FastTracked packets received from the destination address using the specific connection. |
| repl-packets (integer) | Amount of packets received from the destination address using the specific connection. |
| repl-rate (string) | Data rate at which packets are received from the destination address using the specific connection. |
| reply-dst-address (ip[:port]) | Destination address (and port) expected of return packets. Usually the same as «src-address:port» |
| reply-src-address (ip[:port]) | Source address (and port) expected of return packets. Usually the same as «dst-address:port» |
| seen-reply (yes | no) | Destination address has replied to the source address. |
| src-address (ip[:port]) | Source address and port (if protocol is port based). |
| srcnat (yes | no) | Connection is going through SRC-NAT, including packets that were masqueraded through NAT. |
| tcp-state (string) | Current state of TCP connection :
|
| timeout (time) | Time after connection will be removed from connection list. |
Connection tracking settings
Sub-menu: /ip firewall connection tracking
Источник
Микротик список всех подключенных устройств

Нарисовал на досуге скрипт, выводящий список задействованных интерфейсов роутера и подключенных к ним устройств. Надеюсь пригодится для упрощения ревизии устройств в сети. Особенность скрипта в том, что используется информация от DHCP сервера, где всем клиентам предоставлены СТАТИЧЕСКИЕ адреса, при этом задействованы комментарии, в которых описаны названия DHCP клиентов.
Код нужно скопировать в буфер и просто вставить в терминале Mikrotik’а:
Теперь разбираюсь, что это за нЕвидаль такая.
Надо признать, что до запуска скрипта не подозревал о проблемах в сети.
Конструктивная критика и усовершенствования только приветствуются.

Попробовал скрипт на нескольких своих роутерах.
Вот какие замечания/предложения:
1. Если скрипт находит на интерфейсе mac-адрес устройства, которого нет в /ip dhcp-server lease, то надо поискать его в других местах . например в (в /ip arp и взять оттуда также и комментарий к этому хосту (устройству)
2. Если уж скрипт находит VPN-интерфейсы (типа pptp, l2tp, ovpn и т.д., то можно из них брать информацию и выводить её тоже (адреса, клиентов и прочее, что можно «добыть»)
3. Надо искать и выводить информацию о динамических IP-хостах с опрашиваемых интерфейсов.
Источник
Как получить данные о беспроводных клиентах, подключенных к Mikrotik RouterBoard?

Рис.1. Mikrotik Routerboard список подключенных клиентов.
На вкладке Registration мы видим подключенных клиентов. Информация о клиентах поделена на столбики. Поле Radio Name в первых двух строках пусто, потому что клиенты используют TP-Link TL-WN321G, TP-Link TL-WN422G. У тех клиентов, которые используют Ubiquiti NanoStation M2, Ubiquiti NanoStation M2 Loco, Ubiquiti Nanostation2 или другие устройства Ubiquiti Networks, поле Radio Name будет заполнено.

Рис.2. Mikrotik Routerboard Беспроводной клиент General.
Данные об устройствах можно извлекать и использовать их в скриптах.

Воспользовавшись консолью, перейдем в раздел /interface wireless registration-table.

Рис.4. Mikrotik Routerboard раздел registration-table.
Нажав клавишу TAB на клавиатуре, можно увидеть доступные команды.

Рис.5. Mikrotik Routerboard список устройств.
Команда print выведет доступные устройства.

Рис.6. Mikrotik Routerboard извлекаем данные.
Извлекаем данные из поля radio-name:
:local a [/in wi reg get number=4 radio-name]; :put $a;
Создаем переменную a и присваиваем ей значение полученное при помощи метода get:
:local a [/in wi reg get number=4 radio-name];
Выводим значение на экран:

Рис.7. Mikrotik RouterBoard данные получены.
Источник
Summary
Neighbor Discovery protocols allow us to find devices compatible with MNDP (MikroTik Neighbor Discovery Protocol), CDP (Cisco Discovery Protocol), or LLDP (Link Layer Discovery Protocol) in the Layer2 broadcast domain. It can be used to map out your network.
Neighbor list
The neighbor list shows all discovered neighbors in the Layer2 broadcast domain. It shows to which interface neighbor is connected, its IP/MAC addresses, and other related parameters. The list is read-only, an example of a neighbor list is provided below:
[admin@MikroTik] /ip neighbor print
 # INTERFACE ADDRESS         MAC-ADDRESS       IDENTITY   VERSION    BOARD
 0 ether13   192.168.33.2    00:0C:42:00:38:9F MikroTik   5.99       RB1100AHx2
 1 ether11   1.1.1.4         00:0C:42:40:94:25 test-host  5.8        RB1000
 2 Local     10.0.11.203     00:02:B9:3E:AD:E0 c2611-r1   Cisco I...
 3 Local     10.0.11.47      00:0C:42:84:25:BA 11.47-750  5.7        RB750
 4 Local     10.0.11.254     00:0C:42:70:04:83 tsys-sw1   5.8        RB750G
 5 Local     10.0.11.202     00:17:5A:90:66:08 c7200      Cisco I...
Sub-menu: /ip neighbor
| Property | Description |
|---|---|
| address (IP) | The highest IP address configured on a discovered device |
| address6 (IPv6) | IPv6 address configured on a discovered device |
| age (time) | Time interval since last discovery packet |
| discovered-by (cdp|lldp|mndp) | Shows the list of protocols the neighbor has been discovered by. The property is available since RouterOS version 7.7. |
| board (string) | RouterBoard model. Displayed only to devices with installed RouterOS |
| identity (string) | Configured system identity |
| interface (string) | Interface name to which discovered device is connected |
| interface-name (string) | Interface name on the neighbor device connected to the L2 broadcast domain. Applies to CDP. |
| ipv6 (yes | no) | Shows whether the device has IPv6 enabled. |
| mac-address (MAC) | Mac address of the remote device. Can be used to connect with mac-telnet. |
| platform (string) | Name of the platform. For example “MikroTik”, “cisco”, etc. |
| software-id (string) | RouterOS software ID on a remote device. Applies only to devices installed with RouterOS. |
| system-caps (string) | System capabilities reported by the Link-Layer Discovery Protocol (LLDP). |
| system-caps-enabled (string) | Enabled system capabilities reported by the Link-Layer Discovery Protocol (LLDP). |
| unpack (none|simple|uncompressed-headers|uncompressed-all) | Shows the discovery packet compression type. |
| uptime (time) | Uptime of remote device. Shown only to devices installed with RouterOS. |
| version (string) | Version number of installed software on a remote device |
Starting from RouterOS v6.45, the number of neighbor entries are limited to (total RAM in megabytes)*16 per interface to avoid memory exhaustion.
Discovery configuration
It is possible to change whether an interface participates in neighbor discovery or not using an Interface list. If the interface is included in the discovery interface list, it will send out basic information about the system and process received discovery packets broadcasted in the Layer2 network. Removing an interface from the interface list will disable both the discovery of neighbors on this interface and also the possibility of discovering this device itself on that interface.
/ip neighbor discovery-settings
| Property | Description |
|---|---|
| discover-interface-list (string; Default: static) | Interface list on which members the discovery protocol will run on |
| lldp-med-net-policy-vlan (integer 0..4094; Default: disabled) |
Advertised VLAN ID for LLDP-MED Network Policy TLV. This allows assigning a VLAN ID for LLDP-MED capable devices, such as VoIP phones. The TLV will only be added to interfaces where LLDP-MED capable devices are discovered. Other TLV values are predefined and cannot be changed:
When used together with the bridge interface, the (R/M)STP protocol should be enabled with Additionally, other neighbor discovery protocols (e.g. CDP) should be excluded using |
| mode (rx-only | tx-only | tx-and-rx; Default: tx-and-rx) |
Selects the neighbor discovery packet sending and receiving mode. The setting is available since RouterOS version 7.7. |
| protocol (cdp | lldp | mndp; Default: cdp,lldp,mndp) | List of used discovery protocols |
Since RouterOS v6.44, neighbor discovery is working on individual slave interfaces. Whenever a master interface (e.g. bonding or bridge) is included in the discovery interface list, all its slave interfaces will automatically participate in neighbor discovery. It is possible to allow neighbor discovery only to some slave interfaces. To do that, include the particular slave interface in the list and make sure that the master interface is not included.
/interface bonding
add name=bond1 slaves=ether5,ether6
/interface list
add name=only-ether5
/interface list member
add interface=ether5 list=only-ether5
/ip neighbor discovery-settings
set discover-interface-list=only-ether5
Now the neighbor list shows a master interface and actual slave interface on which a discovery message was received.
[admin@R2] > ip neighbor print
 # INTERFACE ADDRESS                                           MAC-ADDRESS       IDENTITY   VERSION    BOARD
 0 ether5    192.168.88.1                                      CC:2D:E0:11:22:33 R1         6.45.4 ... CCR1036-8G-2S+
   bond1
LLDP
Depending on RouterOS configuration, different type-length-value (TLV) can be sent in the LLDP message, this includes:
- Chassis subtype (MAC address)
- Port subtype (interface name)
- Time To Live
- System name (system identity)
- System description (platform – MikroTik, software version – RouterOS version, hardware name – RouterBoard name)
- Management address (all IP addresses configured on the port)
- System capabilities (enabled system capabilities, e.g. bridge or router)
- LLDP-MED Media Capabilities (list of MED capabilities)
- LLDP-MED Network Policy (assigned VLAN ID for voice traffic)
- Port Extension (Port Extender and Controller Bridge advertisement)
- End of LLDPDU

В этой статье мы рассмотрим настройку протокола Mikrotik Neighbors Discovery Protocol (MNDP). С помощью этого протокола устройства фирмы Mikrotik могут обнаружить другие устройства, совместимые с MNDP, CDP (Cisco Discovery Protocol) или LLDP (Link Layer Discovery Protocol).
Обнаружение происходит в одном широковещательном домене с интерфейсом, на котором работает протокол MNDP.
Neighbors Discovery Mikrotik.
Чтобы посмотреть, как по умолчанию настроен протокол, откроем Winbox:
- IP => Neighbors => Discovery Settings.
Как мы видим, по умолчанию протокол слушает все интерфейсы, кроме динамических.
Протокол MNDP может слушать следующие интерфейсы:
- All – Все интерфейсы;
- Dynamic – Динамические интерфейсы;
- Static – Статические интерфейсы;
- None – Не один интерфейс.
А также есть возможность добавлять свои списки интерфейсов. Как это сделать рассмотрим на примерах ниже.
Примеры обнаружения
Какую же информацию мы можем узнать о соседних устройствах? Откроем:
- IP => Neighbors.
А также эту информацию можно получить из командной строки:
/ip neighbor print detail
MNDP. Примеры настройки
Очень важный момент, для безопасности. Если мы включаем возможность обнаруживать другие устройства с помощью Mikrotik Neighbors Discovery Protocol, этим самым мы даем возможность обнаружить себя.
Не рекомендуется держать возможность обнаружить себя на внешних интерфейсах.
Отключить Mikrotik Neighbors Discovery на внешних интерфейсах
Чтобы отключить возможность обнаружить себя на внешних интерфейсах (например, для провайдера) по протоколу MNDP, при этом видеть устройства поддерживающих данную возможность во внутренней локальной сети, выполним следующие действия:
- Interface => Interface List => Lists => “+”.
Создадим новый интерфейс с такими параметрами:
- Name – произвольное имя для интерфейса;
- Include – какие интерфейсы по умолчанию в себя включает.
Далее вкладка Interface List. Добавим к созданному интерфейсу внешний порт (для моей конфигурации это ether1):
Следующим шагом откроем:
- IP => Neighbors => Discovery Settings.
В открывшемся окне выберем созданный интерфейс.
Обратите внимание, что перед Discovery стоит “!”. Это означает инверсия. Другими словами, мы слушаем все интерфейсы, кроме динамических и Ether1.
Отключить Mikrotik Neighbors Discovery Protocol полностью.
Для роутеров Mikrotik есть возможность полностью отключить MNDP. Это приемлемо, если присутствует только одно устройство Mikrotik и нет необходимости использовать MNDP.
Для этого перейдем:
- IP => Neighbors => Discovery Settings.
Выполним следующую настройку:
- Interface: none;
- OK.
Настройка MNDP Mikrotik завершена.
Содержание
- Как в Mikrotik посмотреть кто подключен
- Кто подключен по Wi — Fi
- ARP -кеш
- Соседи-Микроты
- Привязка IP адреса к MAC адресу в MikroTik
- Как узнать IP по MAC адресу и наоборот: через командную строку и Web-интерфейс роутера
- Узнать MAC-адрес по IP
- Определить IP адрес по MAC-адресу
- Узнать всю информацию о сети в роутере
- Command Line Interface
- Login Options
- Banner and Messages
- Command Prompt
- Hierarchy
- Item Names and Numbers
- Item Names
- Item Numbers
- General Commands
- Input Modes
- Quick Typing
- Console Search
- Internal Chat System
Как в Mikrotik посмотреть кто подключен
Каждый администратор должен обладать информацией что и куда у него подключено. Администрирование Mikrotik – не исключение. Рассмотрим типовые точки внимания, которые можно быстро проверить и собрать нужную информацию.
Кто подключен по Wi — Fi
Если Микротик у нас выполняет роль маршрутизатора по беспроводному каналу, то поиск подключенных устройств будет в разделе:
В этом окне отображаются характеристики клиентов – их MAC -адрес, время подключения и скорость соединения.
ARP -кеш
При взаимодействии на L 2- L 3, наш коммутатор-маршрутизатор запоминает MAC -адреса фреймов и их привязку к IP -адресам, а также интерфейсы, со стороны которых эти фреймы приходят, что тоже может служить точкой внимания администратора. Найти это место легко:
Обращаем внимание на интерфейс, ведь зачастую кадры, приходящие на аплинк нам неинтересны (в случае на скрине – интерфейс провайдера).
Если наш маршрутизатор выступает в роли сервера DHCP , можно посмотреть список узлов, арендовавших IP -адрес в разделе
Если бы мы использовали PPP , то сведения об активных подключениях были бы в разделе » PPP» на вкладке « Active Connections«
Соседи-Микроты
А если сеть большая и наш Mikrotik не единственный? Есть инструмент полуактивной разведки, показывающий соседние устройства: » IP» – » Neighbor«
Кроме перечисленных способов есть ещё средства активной разведки, такие как «Torch» и «IP Scan«, находящиеся в разделе «Tools«, первое напоминает WireShark (сетевой сниффер), второе — NMap (сетевой сканер). Для решения определённых задач они вполне могут подойти.
Источник
Привязка IP адреса к MAC адресу в MikroTik
DHCP сервер по истечении какого-то времени может назначить новому устройству IP адрес, который раньше присваивался другому устройству. Поэтому ограничения скорости будут действовать для нового устройства, и не понятно какие ограничения будут у старого устройства. Чтобы этого не произошло, нужно привязать IP адрес к MAC адресу конкретного устройства.
Если устройство уже подключалось к роутеру и получало IP адрес, то выполнить привязку можно простым способом:
- Откройте меню IP — DHCP Server;
- Перейдите на вкладку Leases;
- Выберите в списке устройство, которому нужно привязать MAC адрес к IP адресу;
- Нажмите кнопку Make Static.

Добавить MAC адрес устройства и назначить ему IP адрес можно вручную:
- Нажмите «красный плюсик»;
- Перейдите на вкладкуGeneral;
- В поле Address укажите IP адрес, который должен присваиваться устройству;
- В поле MAC Address укажите MAC адрес устройства;
- В списке Server выберите название DHCP сервера;
- Нажмите кнопку Make Static;
- Нажмите кнопку OK.

Печатная версия Поделитесь статьёй:
Источник
Как узнать IP по MAC адресу и наоборот: через командную строку и Web-интерфейс роутера
Всем привет. Сегодня мы разберем вопрос, как можно узнать MAC по IP, и наоборот, IP по MAC-адресу. В первую очередь давайте разъясним один очень важный момент. Данную информацию вы можете узнать только в вашей локальной сети: домашней или корпорационной. В глобальной сети интернет инфу о подключенных устройствах узнать нельзя.
ПОМОЩЬ! Если при прочтении у вас появятся какие-то вопросы, или что-то будет не получаться, то пишите в комментариях.
Узнать MAC-адрес по IP
Чтобы узнать MAC адрес по IP нужно запустить командную строку. Далее мы воспользуемся специальным протоколом, который работает в сети с MAC. Попросту просканируем сеть и посмотрим нужные нам данные.
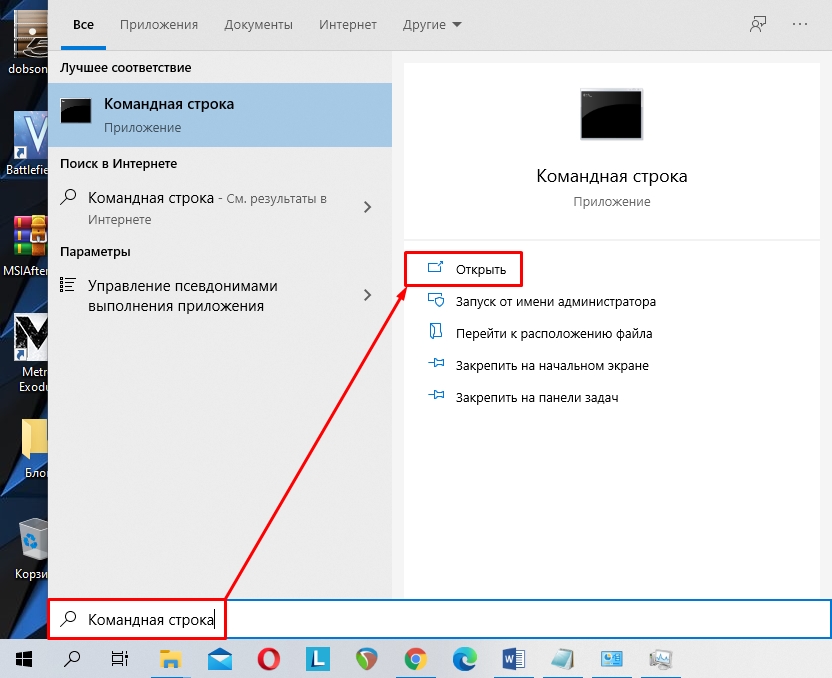
- В поисковой строке вводим название системной утилиты, далее запускаем с обычными правами.
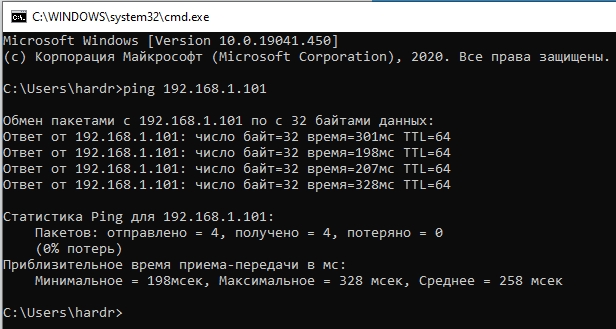
- Теперь вам нужно пропинговать нужное вам устройство. Для этого вводим команду:
ПРИМЕЧАНИЕ! Вместо IP введите сетевые цифры вашего устройства.
- Теперь вводим команду с ARP протоколом, который должен вывести нужные нам данные:
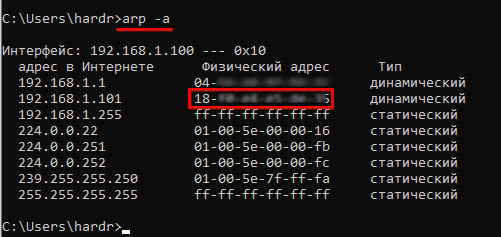
- Напротив, нужного IP вы увидите MAC.
Лучше команды вводить сразу по очереди, в противном случае IP может измениться, и вы не сможете увидеть физический адрес аппарата. Также напомню, что на многих устройствах МАК пишется на этикетке. Например, на том же роутере он сразу же написан на бумажке, которая находится под корпусом аппарата.
Определить IP адрес по MAC-адресу
- Ищем в системе командную строку и запускаем её.
- Теперь вводим команду сканирования всех устройств в сети в нужном диапазоне:
for /L %a in (1,1,254) do @start /b ping 192.168.1.%a -n 2 > nul

- Данная команда полностью пропингует IP всей вашей локальной сети в диапазоне от 192.168.1.1 до 192.168.254. Если шлюз или роутер имеет другой адрес, например – 192.168.100.1, то измените предпоследнюю цифру с «192.168.1.%a» на «192.168.100.%a».
- После этого прописываем такую же команду как в прошлой главе:
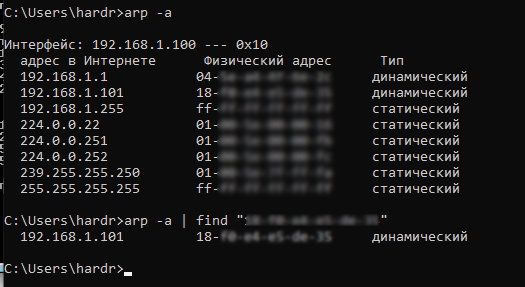
- Выведется полный список всех подключенных к роутеру устройств. Если список слишком большой, то вы можете ввести поиск IP по конкретному МАК-адресу:
Вместо вышеуказанного MAC- нужно ввести тот, который нужен вам.
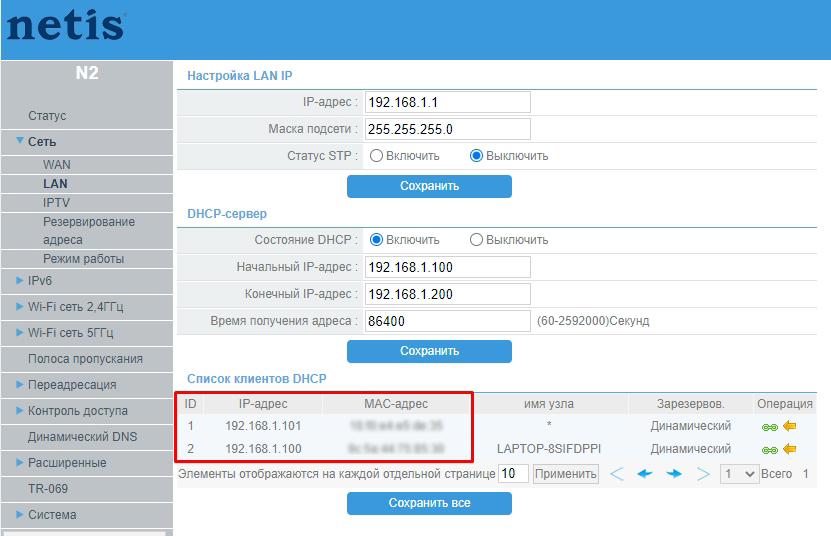
Узнать всю информацию о сети в роутере
Так как обычно локальную сеть дома строит сам роутер, то узнать заводской адрес можно в специальной админ-панели. Чтобы туда войти, нужно вписать в адресную строку подключенного к сети устройства IP или DNS маршрутизатора. Очень часто используются: 192.168.1.1 или 192.168.0.1. Также адрес можно подсмотреть на этикетке под роутером. Если вы не можете найти этот адрес или есть сложности с входом в Web-интерфейс – смотрим эту инструкцию. Для авторизации нужно будет также ввести логин и пароль. Значения по умолчанию находятся там же на этикетке.
Теперь вам нужно найти раздел, который покажет вам все подключённые устройства – он может называться как «LAN», «DHCP», «Сеть» или «Локальная сеть». Ищем таблицу, где и будет представлена информация о подключенных локальных IP и физический адрес устройства. Также там будет наименование устройства. Вообще можете просто пошариться по разделам, их должно быть не так много – просто ищите подобную таблицу.
Если у вас есть сложность с поиском данного раздела – смотрим эту инструкцию. Тут же можно зарезервировать адрес, а также заблокировать или наоборот внести его в белый список – об этом подробно написано тут.
Напомню, что если у вас ещё остались вопросы, то вы всегда можете обратиться ко мне в комментариях, и я вам обязательно помогу.
Источник
Command Line Interface
The console is used for accessing the MikroTik Router’s configuration and management features using text terminals, either remotely using a serial port, telnet, SSH, console screen within WinBox, or directly using monitor and keyboard. The console is also used for writing scripts. This manual describes the general console operation principles. Please consult the Scripting Manual on some advanced console commands and on how to write scripts.
Login Options
Console login options enable or disable various console features like color, terminal detection, and many other.
Additional login parameters can be appended to the login name after the ‘+’ sign.
If the parameter is not present, then the default value is used. If the number is not present then the implicit value of the parameter is used.
Example: admin+c80w — will disable console colors and set terminal width to 80.
| Param | Default | Implicit | Description |
|---|---|---|---|
| «w» | auto | auto | Set terminal width |
| «h» | auto | auto | Set terminal height |
| «c» | on | off | disable/enable console colors |
| «t» | on | off | Do auto-detection of terminal capabilities |
| «e» | on | off | Enables «dumb» terminal mode |
The login process will display the MikroTik banner and short help after validating the user name and password.
After the banner can be printed other important information, like system note set by another admin, the last few critical log messages, demo version upgrade reminder, and default configuration description.
For example, the demo license prompt and last critical messages are printed
Command Prompt
At the end of the successful login sequence, the login process prints a banner that shows the command prompt, and hands over control to the user.
Default command prompt consists of user name, system identity, and current command path/>
For example, change the current path from the root to the interface then go back to the root
Use up arrow to recall previous commands from command history, TAB key to automatically complete words in the command you are typing, ENTER key to execute the command, Control-C to interrupt currently running command and return to prompt and ? to display built-in help, in RouterOS v7, F1 has to be used instead.
The easiest way to log out of the console is to press Control-D at the command prompt while the command line is empty (You can cancel the current command and get an empty line with Control-C, so Control-C followed by Control-D will log you out in most cases).
It is possible to write commands that consist of multiple lines. When the entered line is not a complete command and more input is expected, the console shows a continuation prompt that lists all open parentheses, braces, brackets, and quotes, and also trailing backslash if the previous line ended with backslash-white-space.
When you are editing such multiple line entries, the prompt shows the number of current lines and total line count instead of the usual username and system name.
Sometimes commands ask for additional input from the user. For example, the command ‘ /password ‘ asks for old and new passwords. In such cases, the prompt shows the name of the requested value, followed by colon and space.
Hierarchy
The console allows the configuration of the router’s settings using text commands. Since there is a lot of available commands, they are split into groups organized in a way of hierarchical menu levels. The name of a menu level reflects the configuration information accessible in the relevant section.
For example, you can issue the /ip route print command:
Instead of typing `/ip route` path before each command, the path can be typed only once to move into this particular branch of the menu hierarchy. Thus, the example above could also be executed like this:
Each word in the path can be separated by space (as in the example above) or by «/»
Notice that the prompt changes in order to reflect where you are located in the menu hierarchy at the moment. To move to the top level again, type » / «
To move up one command level, type » .. «
You can also use / and .. to execute commands from other menu levels without changing the current level:
Item Names and Numbers
Many of the command levels operate with arrays of items: interfaces, routes, users, etc. Such arrays are displayed in similarly-looking lists. All items in the list have an item number followed by flags and parameter values.
To change the properties of an item, you have to use the set command and specify the name or number of the item.
Item Names
Some lists have items with specific names assigned to each of them. Examples are interface or user levels. There you can use item names instead of item numbers.
You do not have to use the print command before accessing items by their names, which, as opposed to numbers, are not assigned by the console internally, but are properties of the items. Thus, they would not change on their own. However, there are all kinds of obscure situations possible when several users are changing the router’s configuration at the same time. Generally, item names are more «stable» than the numbers, and also more informative, so you should prefer them to numbers when writing console scripts.
Item Numbers
Item numbers are assigned by the print command and are not constant — it is possible that two successive print commands will order items differently. But the results of the last print commands are memorized and, thus, once assigned, item numbers can be used even after add, remove and move operations (since version 3, move operation does not renumber items). Item numbers are assigned on a per session basis, they will remain the same until you quit the console or until the next print command is executed. Also, numbers are assigned separately for every item list, so ip address print will not change the numbering of the interface list.
You can specify multiple items as targets to some commands. Almost everywhere, where you can write the number of items, you can also write a list of numbers.
General Commands
There are some commands that are common to nearly all menu levels, namely: print, set, remove, add, find, get, export, enable, disable, comment, move . These commands have similar behavior throughout different menu levels.
| Property | Description |
|---|---|
| add | This command usually has all the same arguments as a set, except the item number argument. It adds a new item with the values you have specified, usually at the end of the item list, in places where the order of items is relevant. There are some required properties that you have to supply, such as the interface for a new address, while other properties are set to defaults unless you explicitly specify them. |
- copy-from — Copies an existing item. It takes default values of a new item’s properties from another item. If you do not want to make an exact copy, you can specify new values for some properties. When copying items that have names, you will usually have to give a new name to a copy
- place-before — places a new item before an existing item with a specified position. Thus, you do not need to use the move command after adding an item to the list
- disabled — controls disabled/enabled state of the newly added item(-s)
- comment — holds the description of a newly created item
- add command returns the internal number of items it has added
edit This command is associated with the set command. It can be used to edit values of properties that contain a large amount of text, such as scripts, but it works with all editable properties. Depending on the capabilities of the terminal, either a full-screen editor or a single line editor is launched to edit the value of the specified property. find The find command has the same arguments as a set, plus the flag arguments like disabled or active that take values yes or no depending on the value of the respective flag. To see all flags and their names, look at the top of the print command’s output. The find command returns internal numbers of all items that have the same values of arguments as specified. move Changes the order of items in the list. Parameters:
- the first argument specifies the item(-s) being moved.
- the second argument specifies the item before which to place all items being moved (they are placed at the end of the list if the second argument is omitted).
print Shows all information that’s accessible from a particular command level. Thus, /system clock print shows system date and time, /ip route print shows all routes etc. If there’s a list of items in current level and they are not read-only, i.e. you can change/remove them (example of read-only item list is /system history , which shows a history of executed actions), then print command also assigns numbers that are used by all commands that operate with items in this list.
- from — show only specified items, in the same order in which they are given.
- where — show only items that match specified criteria. The syntax of where the property is similar to the find command.
- brief — forces the print command to use tabular output form
- detail — forces the print command to use property=value output form
- count-only — shows the number of items
- file — prints the contents of the specific sub-menu into a file on the router.
- interval — updates the output from the print command for every interval seconds.
- oid — prints the OID value for properties that are accessible from SNMP
- without-paging — prints the output without stopping after each screenful.
remove Removes specified item(-s) from a list. set Allows you to change values of general parameters or item parameters. The set command has arguments with names corresponding to values you can change. Use ? or double Tab to see a list of all arguments. If there is a list of items in this command level, then the set has one action argument that accepts the number of items (or list of numbers) you wish to set up. This command does not return anything.
Input Modes
It is possible to switch between several input modes:
- Normal mode — indicated by normal command prompt.
- Safe mode — safe mode is indicated by the word SAFE after the command prompt. In this mode, the configuration is saved to disk only after the safe mode is turned off. Safe mode can be turned on/off with Ctrl+c or F4.Read more >>
- Hot-lock mode — indicated by additional yellow >. Hot-lock mode autocompletes commands and can be turned on/off with F7
Quick Typing
There are two features in the console that help entering commands much quicker and easier — the [Tab] key completions, and abbreviations of command names. Completions work similarly to the bash shell in UNIX. If you press the [Tab] key after a part of a word, the console tries to find the command within the current context that begins with this word. If there is only one match, it is automatically appended, followed by a space:
/inte[Tab]_ becomes /interface _
If there is more than one match, but they all have a common beginning, which is longer than that what you have typed, then the word is completed to this common part, and no space is appended:
/interface set e[Tab]_ becomes /interface set ether_
If you’ve typed just the common part, pressing the tab key once has no effect. However, pressing it for the second time shows all possible completions in compact form:
The [Tab] key can be used almost in any context where the console might have a clue about possible values — command names, argument names, arguments that have only several possible values (like names of items in some lists or name of the protocol in firewall and NAT rules). You cannot complete numbers, IP addresses, and similar values.
Another way to press fewer keys while typing is to abbreviate command and argument names. You can type only the beginning of the command name, and, if it is not ambiguous, the console will accept it as a full name. So typing:
It is possible to complete not only the beginning, but also any distinctive sub-string of a name: if there is no exact match, the console starts looking for words that have string being completed as first letters of a multiple word name, or that simply contain letters of this string in the same order. If a single such word is found, it is completed at the cursor position. For example:
Console Search
Console search allows performing keyword search through the list of RouterOS menus and the history. The search prompt is accessible with the [Ctrl+r] shortcut.
Internal Chat System
RouterOS console has a built-in internal chat system. This allows remotely located admins to talk to each other directly in RouterOS CLI. To start the conversation prefix the intended message with the # symbol, anyone who is logged in at the time of sending the message will see it.
Источник
