Q: How to fix my micro SD card that became a read-only memory card?
Your sd card isn’t working correctly and has been set to read only on Android, what’s this error message? Since the Android external memory card has turned to read only all of a sudden, I can no longer add, write, or delete things from it. How to fix the SD card that mounted as read only?
SD card read only, also known as SD card write-protected, refers to a memory card or micro SD card that you can read, however, cannot modify data on it.
| Workable Solutions | Step-by-step Troubleshooting |
|---|---|
| 1. Physical Write Protection Tab | Step 1: Take out the memory card that is currently in a read only state from your device…Full steps |
| 2. CMD | Step 1: Plug the read only micro SD card into Windows and click start….Full steps |
| 3. Write Protection Removal Software | Step 1: DOWNLOAD and install EaseUS CleanGenius (free) on your computer…Full steps |
| 4. FAT32 to NTFS Converter | Step 1. Install and launch EaseUS Partition Master on your computer….Full steps |
SD Card Read Only Symptoms
Usually, a memory SD card or USB flash drive itself has been locked into “read only” mode; it’s because the card is getting old, damaged, corrupted, or infected by a virus. Sometimes, human error will also make SD card read only.
When your Android or camera external SD card mounted as read only, it will prevent you from writing, deleting, copying or moving data on it. Here we’ll teach you how to fix a read-only SD card to read-write by [1] checking the write protection tab, or using the [2] Windows command, [3] automatic write protection removal software & [4] a third-party FAT32 to NTFS converter. As long as you successfully remove read only from the SD card, you can go on formatting the SD card freely as you want.
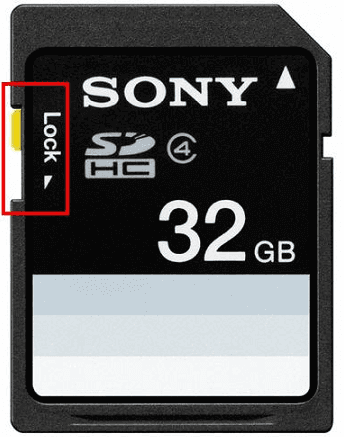
Method 1. Unlock Read-Only SD Card with Physical Write Protection Tab
Most memory cards for Android or Nintendo Switch use are usually with a physical write protection tab. If you find such a tab on your card, then first you need to slide it to the unlocked position to remove the read only attribute.
Step 1: Take out the memory card that is currently in a read only state from your device.
Step 2: Check if there is a physical lock switch on it.
Step 3: Position the lock switch from ON to OFF and unlock the SD card.
This is a basic way to remove this error when your SD card becomes read-only, so share it to let more people know about it.
Method 2. Remove Read Only from SD Card Using CMD
Related post: How to fix the external hard drive read only on Mac.
Step 1: Plug the read-only micro SD card into Windows.
Step 2: Click “Start” > “Run” and enter cmd.
Step 3:Enter diskpart.
Step 4: Type list volume. Now you’ll see all your connected drives, see which one is the memory card drive.
Step 5: Type select volume #. # represents the letter of your memory card drive.
Step 6: Type attributes disk clear readonly > removing the write protection.
Copy all the commands here:
diskpart
list volume
select volume #
attributes disk clear readonly
Method 3. Fix Read Only SD Card Using Write Protection Removal Software
If you don’t consider yourself a pro-computer user and you’re not familiar with command-lines, don’t worry. There are graphical-based solutions to help you remove write-protection from your hard drives, USB drives, and even SD cards.
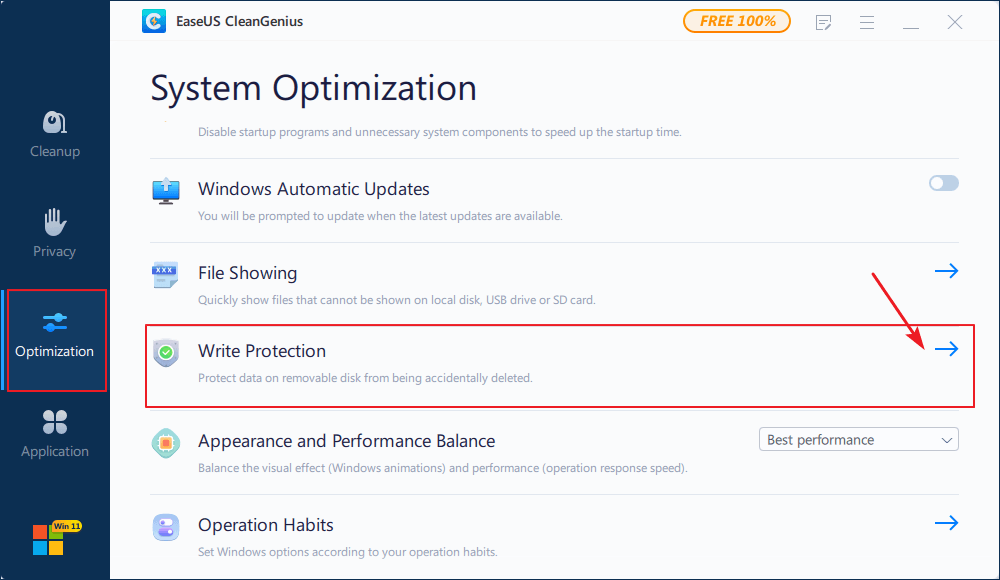
EaseUS CleanGenius is one of these tools that helps you fix aforementioned issues on your drives without knowing a thing about command-line.
Here’s an easy-to-follow guide on how to use this tool to get your issues sorted:
Step 1: DOWNLOAD and install EaseUS CleanGenius (free) on your computer.
Step 2: Run EaseUS CleanGenius on your PC, select Optimization and choose the Write Protection mode.
Step 3: Select the device that is write-protected and click Disable to remove the protection.
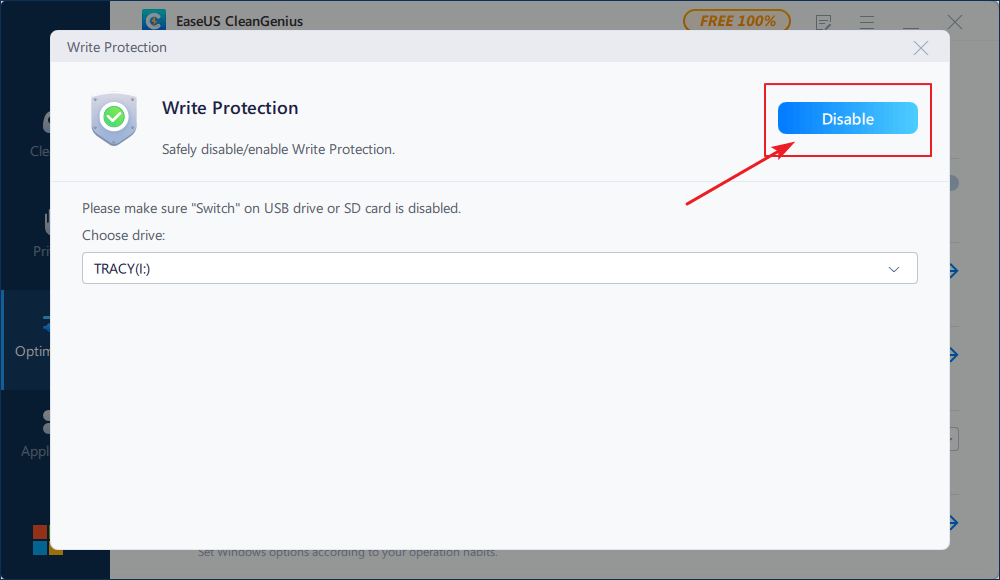
Now open your SD. You should be able to edit, delete, copy or move files without a hitch.
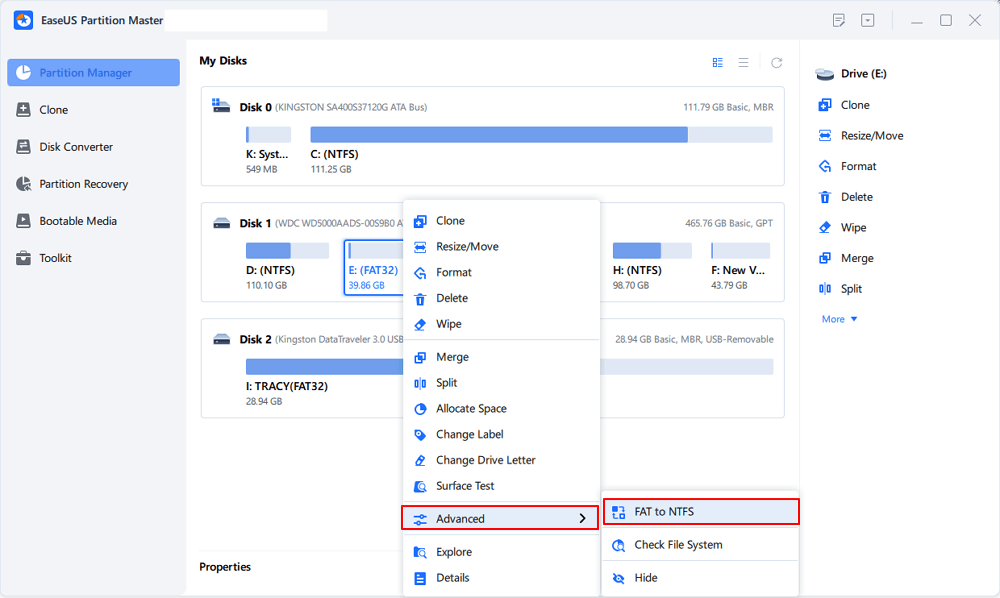
Method 4. Change Read Only SD Card Using FAT32 to NTFS Free Converter
SD cards are usually formatted with FAT32. One solution to fix SD card read only issue is to convert the FAT32 file system to NTFS for free. Diskpart command can help you with the conversion, however, with a complete data loss. An easier and safer way to convert to NTFS without data loss is with the help of EaseUS Partition Master Free.
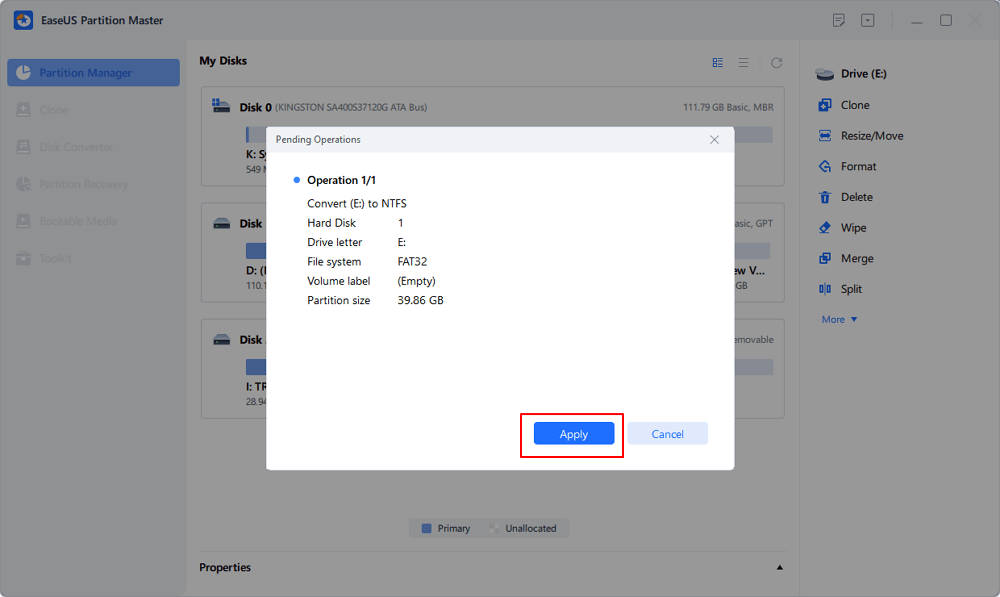
Step 1. Install and launch EaseUS Partition Master on your computer.
Step 2. On Partition Manager, right-click on a FAT32 partition and click “Advanced”, select “NTFS to FAT”.
Step 3. Click “Proceed” on the pop-up dialog box to continue.
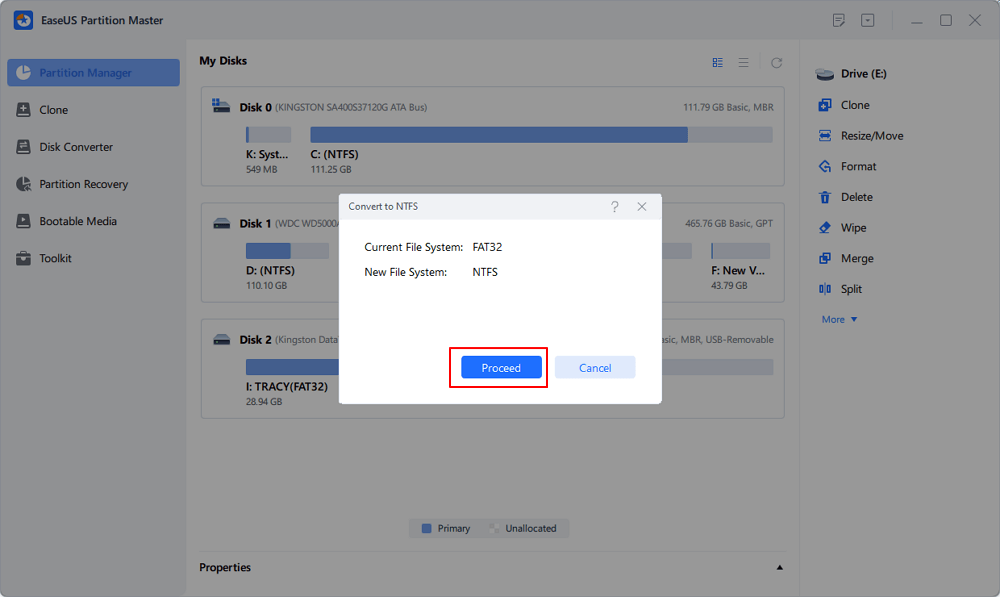
Step 4. Click “Apply” to start the converting process. Wait until the operation process is finished.
How to Format Read Only SD Card to Normal
Many people tend to format a memory card when mounted as read-only on their Android phones. However, you all end up with failure because of the error that Windows was unable to complete the format, just like how Windows Disk Management fails to format a write-protected SD card. Only when you removed the read-only attribution on the SD card, you can then format it and restore SD card full capacity.
It’s easy to format a read-only SD card by using EaseUS free partition manager software again. Just plug in your SD card with the read-only problem that you have fixed and follow the simple steps to get a full fix.
Step 1. Find your SD card and right-click the partition you want to format and choose “Format”.
Step 2. Set a new partition label, file system (NTFS/FAT32/EXT2/EXT3/EXT4/exFAT), and cluster size to the selected partition, then click “OK”.
Step 3. Click “Yes” on the pop-up window to continue.
Step 4. Click the “Execute 1 Task(s)” button on the toolbar, then click “Apply” to start formatting your SD card.
By formatting an SD card that was mounted as read-only can help restore its full capacity and make it work as a new storage card.
If memory card read only case occurs, how to change read only memory card to normal will be your first concern. Then how to solve this problem? Then post will provide 5 solutions to fix a read only memory card. Hope one of them can be useful for your case.
I have a MicroSD card for my camera. When I insert a MicroSD memory card into a card reader and connect it to computer, folders on my micro SD card appear as read-only when I check their properties. Can someone help me? Any advice would be appreciated. Thank you!
You might have the same annoyance like the case above: memory card read only. Then we will show you the symptoms to let you make sure if your problem is what we are focusing on in this article. The part following the symptoms will be solutions.
Symptoms of Read Only Mode
If data is truly read only, then you can read it, but you cannot do any other operations to it including you cannot modify it, save it, delete it, or move it. The main purpose of read only is to control how you use the data.
Memory/SD card read only Windows 10/8/7 is a complicated task and it can be caused by many factors and here list some common reasons:
- Physical write protection tab on the memory card or the memory card adapter and the tab is locked to enable write protection.
- The memory card becomes read only due to the use of some programs or software.
- The file system of memory card is corrupted.
How to Change Read Only Memory Card to Normal?
Like we said, various reasons can cause memory card read only, and it is difficult to know which one causes the read only mode of your memory card exactly.
Therefore, some solutions may not work for your specific problem. That is why we provide several solutions in this post and we hope at least one of them can help you get out of this dilemma.
Now let’s learn how to change SD card from read only in the following part. All the Windows tools needed will be illustrated by using Windows 10.
Solution 1: Check the physical write protection tab
The first one is an easy one. If your memory card or memory card adapter has a physical write-protect tab, check if it is in the unlocked position. If not, slide it to the unlocked position. If it is in such position already, keep trying other ways in the following contents.
Solution 2: Convert FAT to NTFS
In general, the file system of memory card is FAT32. One solution which is worth trying is to convert it to NTFS. This way can help people to fix memory card read only issue too.
Step 1: Connect the memory card to the computer.
Step 2: Press Win (its icon is next to Ctrl) and R keys on the keyboard at the same time and type cmd.exe in the Run window.
Step 3: Use the convert command: type convert # (# should be the drive letter of your read only memory card): /fs:ntfs /nosecurity /x and hit Enter.
Step 4: Type exit and hit Enter.
After you exit from the cmd box, you can go back to the Windows Explorer to check if you have removed read only memory card. This solution will not cause data loss, but now your SD card becomes NTFS.
If you have the need to change it back to FAT32, it is not easy. You can only format it to FAT32 which will result in data loss.
But there is no need to worryere we provide you with a partition management program – MiniTool Partition Wizard if you need. With this software, you can convert NTFS to FAT easily and safely. While it is not free, you need to pay to get the registration code.
If you are a personal user, the professional edition can totally meet your need. Click the button below to get this tool.
Buy Now
Now the step-by-step guide to convert NTFS to FAT without bringing any data loss will be listed below:
Step 1: Please install the program on your computer. Then open it by double clicking on its icon. After that, launch to its main interface by choosing Launch Application.

Step 2: In the main interface, you can see the SD card has a NTFS partition. To convert NTFS to FAT, there are three approaches:
- Select the memory card and choose Convert NTFS to FAT from the left action panel under Change Partition.
- Choose Convert NTFS to FAT from the drop-down list after clicking on Partition from the menu bar.
- Choose Convert NTFS to FAT from the pop-up menu after right-clicking on the target partition

Step 3: Now you can preview the memory card becomes FAT immediately. If it is satisfying, please click Apply from the upper left corner to complete the change. It will jump a Apply Changes box, click OK.

Now converting NTFS to FAT of your memory card is successful, and this operation causes no data loss.
Click to Tweet
Solution 3: Remove read only from memory card using diskpart utility
Diskpart is a console utility which enables you to manage disk partitions and volumes. To remove read only from memory card, using diskpart commands to remove read only mode is a good way. Now you can follow the step-by-step guide to have a try.
Step 1: Open Command Prompt box by typing command in the Search tab which is next to the Win icon, and then click Command Prompt.
Step 2: When you get the Command Prompt box, please type the following commands to it:
- Type diskpart and hit Enter
- Type list disk and hit Enter
- Type select disk # and hit Enter (# should be the drive letter of your read-only memory card.)
- Type attributes disk clear readonly and hit Enter
- Type exit and hit Enter
Now re-connect the read only memory card to see if remove read only form memory card successful.
Solution 4: Adjust registry key by using Registry Editor
Step 1: Open Run box by choosing Run after right-clicking on Start.
Step 2: Type regedit and hit Enter key to open Registry Editor.
Step 3: View these two catalogues below to see if there is a StorageDevicePolicies item in them:
- HKEY_LOCAL_MACHINESYSTEMCurrentControlSet001Control
- HKEY_LOCAL_MACHINESYSTEMCurrentControlSetControl
If one of the catalogues has this item, directly turn to step 5. If it doesn’t have a folder named StorageDevicePolicies – create it by these two steps:
- Right-click on the current catalogue
- In the pop-up menu select New – Key and name it StorageDevicePolicies.
Step 4: Select the new folder StorageDevicePolicies and right click on the right column. Then choose New a create a new DWORD value (select a new value of the parameter DWORD (32-bit) for a 32-bit OS or QWORD (64-bit) for a 64-bit one respectively), named WriteProtect.
Step 5: Right click on the name of WriteProtect, and then choose Modify…. After that, change the value data from 0 to 1. Then close Registry Editor.

Step 6: Insert the memory card after restarting the computer, and then check if it is changed to normal status.
Solution 5: Fix a read only memory card by formatting it
If these above solutions cannot solve your specific problem, then you can consider formatting the memory card. While for your information, formatting will cause data loss. If your data is very important, think carefully before using this kind of method.
If formatting is your one last chance, we highly recommend saving your data first because this method will cause data loss.
To recover data from a USB drive, SD card, etc., all you need is just a top data recovery software. Due to its ease of operation and high security, MiniTool Power Data Recovery is what we highly recommend to you.
The trial edition of this program cannot save the found data, but it can scan the target partition to check if you can find the wanted data. If you want to have a try, click the below button to download it.
Free Download
Well now we will show you the detailed steps to guide you how to recover data from a read only memory card.
It has four modules: This PC, Removable Disk Drive, Hard Disk Drive, and CD/DVD Drive. To recover data from the memory card, the Removable Disk Drive is what you need.
First of all, you need to install this software on your computer, and then open it to enter This PC interface by default.
Step 1: Select the Removable Disk Drive first. Double click on the memory card partition or click Scan after selecting the memory card partition. Then the software will start scanning it immediately.
Tip: Settings in this interface helps you to find the target files quickly by specifying file systems and file types.

Step 2: After scanning, the results will be displayed in the scan result interface and it is the time you need to find the wanted files.
Tip: When the found partitions exceed 10, only 10 partitions at most will be listed each time. You can click Show More Partitions to load more partitions if currently displayed partitions do not contain what you want.

By the way, if your target is a .txt or image file, you can preview it by clicking Preview button. Only the file which is smaller than 20 MB is allowed to be previewed. You can use it to make sure if these chosen files are the needed ones.
Step 3: After checking all the files you want, click Save to recover data from the read only memory card. While in the trial edition, you will receive a message as the following interface:
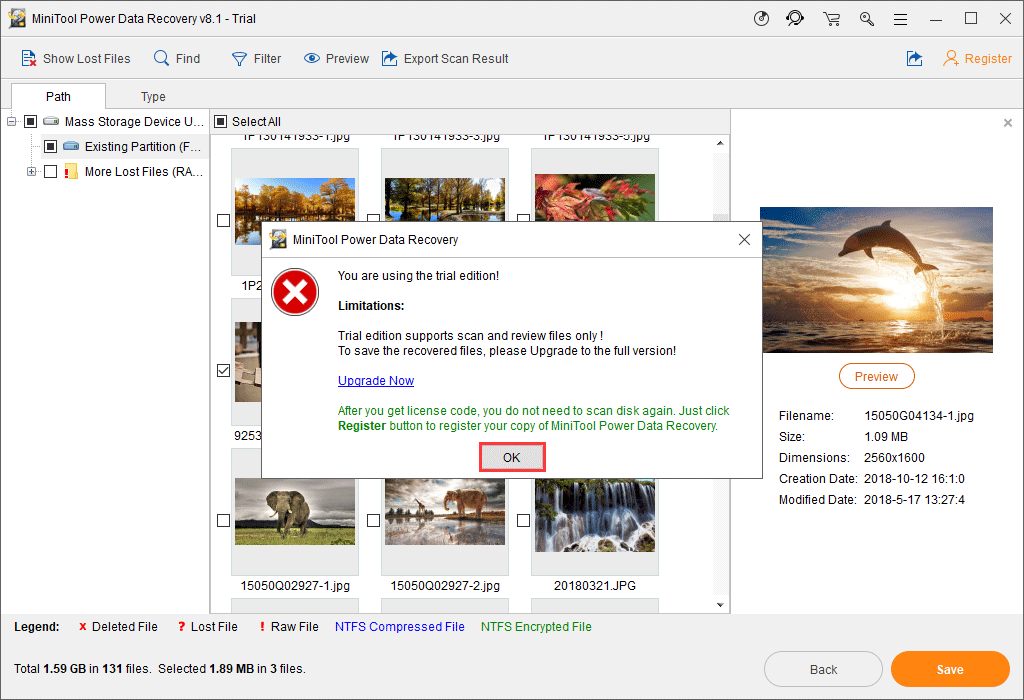
As mentioned before, the trial edition does not support data saving. It can only scan to check the desired data exists or not. To recover it, you need to update it to the full edition to meet your demands.
At the time that you are about to save found data, don’t forget to store the data to another drive, since the original device is still in read only mode.
After recovering data from the read only memory card, now you can format it without worrying about data. We will show you how to change SD card from read only with diskpart utility.
Diskpart is a console utility which helps you to manage disk partitions and volumes by typing specific commands. When a problem memory/SD card read only Windows 10 appears, you can try to format it with Windows 10 diskpart. Now fix a read only memory card by this way:
Press Win and R to open Run box, and then type diskpart in the box.
- Type list disk and hit Enter to show the list of available disks.
- Type select disk # (where # stands for your read only memory card) and hit Enter to select the target partition.
- Type clean and hit Enter.
- Type create partition primary to create a new partition on the read only memory card.
- Type select partition 1 to select the partition on the disk.
- Type active to activate the disk.
- Type format fs=ntfs to format it to NTFS.
Close the diskpart utility, then you can pull out and re-connect the SD card to the computer to check if it is not in read only mode.
Verdict
How to change read only memory card to normal? Five solutions are mentioned in this article to solve memory card read only issue. According to your own specific case, you can try one or more of them.
If you have any better ideas or any questions, you can leave your comment on the comment zone. At the same time, if you have any problems during using MiniTool software, you can send an email to [email protected]. We will try our best to be helpful.
Two possibilities, first is that being a hardware thing, as micro SDHC have a little notch you can easily notice which matches another notch in the reader and that basically just enables it in read-only mode. That you can’t change, just try to use another reader or you could put a piece of silicon or tape on notch, easiest thing is to use another reader.
Second possibility is that being a file permission issue, in which case you can do the following :
In terminal, use these commands:
gksudo nautilus
This will launch nautilus in root shell and bypass all permissions.
OR:
sudo fdisk -l
This will give you a list of the drives on your system, figure out which drive it is in the list, easiest way is to look for the blocks as this is the space. It will probably be /dev/sdb or /dev/sdc, then
sudo chown -hR <your username> <the SDHC drive, /dev/sdb for example>
this will change ownership of the drive to you. OR:
sudo chmod -R 777 <the SDHC drive, /dev/sdb for example>
Though if you just execute the first command sudo nautilus it will save you all this trouble, but you’ll have to do it every time you use the SDHC.
If all of this doesn’t work, use this command :
sudo mount --options remount,rw <the SDHC drive, /dev/sdb for example, find it using fdisk -l>
If there’s anything you don’t understand just comment.
Содержание
- microSD карта GOOD RAM защищена от записи
- Снятие защиты от записи с карты памяти
- Подготовка к снятию защиты от записи
- Отключение защиты карты памяти
- Способ 1: «Редактор реестра»
- Способ 2: «Командная строка»
- Способ 3: «Управление дисками»
- Способ 4: «Редактор локальной групповой политики»
- Способ 5: Форматирование с изменением файловой системы
- Способ 6: Восстановление поврежденного накопителя
- Заключение
- Как убрать режим «только для чтения» с флешки
- Что это за режим?
- Причины появления
- Как его включить?
- Как его убрать?
- Для флешек Transcend
- Заключение
- Почему смартфон не видит карту памяти и что с этим делать
- Содержание
- Содержание
- Неправильная установка
- Программный сбой
- Не поддерживается файловая система
- Отсутствие разрешений
- Карта несовместима со смартфоном
- Окислились контакты
- Карта просто сломана
- Неисправное гнездо установки карты памяти
microSD карта GOOD RAM защищена от записи
Карта памяти microSD GOOD RAM долго использовалась в смартфоне SAMSUNG. Однажды она перешла в режим чтения (read only). При этом чтение данных с нее осталось возможным.
Попытка восстановления карты памяти microSD произвожу при помощи переходника на SD карту и USB.
При попытке форматирования средствами WINDOWS появляется ошибка «Windows не удается завершить форматирование». При попытке удаления файлов на карте памяти они исчезают, но при извлечении и повторном подключении карты памяти, снова появляются.
В свойствах карты памяти отображается USBVID_0123&PID_4567. Какой-либо связанной информации в Интернете по этому коду нет.

Попробовал отформатировать карту памяти в программе SDFormatter в режиме Quick format и Overwrite format.
Оба форматирования завершаются сообщением об успешном итоге, но при повторной установке карты памяти в компьютер, все ее содержимое осталось на месте.
Программа DMDE также не дала результата.

Также попытался отформатировать карту памяти в фотоаппарате Canon. Форматирование также произошло успешно, но содержимое осталось на месте.
Слышал о существовании «клипсы» для разблокировки SD-карт, но ее у меня не было и судя по отзыву она мне не помогла бы.

Запусти diskpart (от имени администратора), далее:
list disk — номер, под которым числится карта памяти в системе
attributes disk — значения текущего состояния
attributes disk clear readonly — сброс режима write–protected

Однако, это все так же ничего не дало. После чтения различной информации в Интернете, узнал, что при каких-либо сбоях в работе карты памяти специально сделан на аппаратном уровне режим Read Only. В данном режиме читать данные можно, а записать нельзя. Ремонт данной карты не имеет смысла и ее можно выбросить.
Источник
Снятие защиты от записи с карты памяти

При длительном и активном использовании карты памяти формата SD или microSD можно столкнуться с определенного рода проблемами. Одной из таковых является защита от записи, из-за которой на накопитель невозможно поместить никакие файлы. О том, как ее снять, расскажем сегодня.
Подготовка к снятию защиты от записи
Прежде всего отметим, что в случае с картами памяти защита от записи бывает двух типов – физическая (аппаратная) и программная. Первая устанавливается с помощью специального переключателя непосредственно на самом накопителе или переходнике, который используется для подключения microSD. Следовательно, отключить ее так же просто, как и включить – достаточно перевести в неактивное положение показанный на изображении ниже переключатель, то есть установить его вверх, в направлении к контактам на обратной стороне. 
Читайте также: Что делать, если карта памяти не читается устройством
Помимо этого, возможная причина проблемы может заключаться в банальном загрязнении контактов накопителя. Внимательно осмотрите их на предмет наличия пыли и мелкого мусора и, если потребуется, избавьтесь от него с помощью ваты (или ватной палочки), смоченной в спирте. Делайте это аккуратно, чтобы мелкие ворсинки на остались на контактах, а после подождите несколько секунд, чтобы жидкость наверняка испарилась, и проверьте работу карты. 
Вполне вероятно, что отсутствие возможности записи данных могло быть спровоцировано вирусным заражением накопителя, поэтому рекомендуем выполнить его проверку и, если вредоносное ПО будет обнаружено, удалить его. Инструкция ниже ориентирована на флешки, но применима в том числе и к SD/microSD-картам. 
Подробнее: Как проверить карту памяти на вирусы
Отключение защиты карты памяти
К сожалению, значительно чаще защита от записи оказывается именно программной, а потому так просто снять ее не получится. В данном случае необходимо действовать комплексно, поочередно прибегая к различным вариантам решения проблемы, которая обычно при попытках взаимодействия с накопителем (форматирование, удаление файлов, их перемещение, вставка и т. д.) сопровождается следующим уведомлением:

Примечание: При выполнении всех нижеизложенных рекомендаций карта памяти должна быть подключена к компьютеру. Кроме того, некоторые из рассмотренных далее способов подразумевают форматирование, а потому если на накопителе хранятся важные данные, скопируйте их в любое удобное место на диске компьютера.
Способ 1: «Редактор реестра»
Вполне возможно, что защита от записи установлена на уровне операционной системы, а не на самом накопителе. В таком случае для ее снятия необходимо обратиться к «Редактору реестра» Windows.

HKEY_LOCAL_MACHINESYSTEMCurrentControlSetControl 
Найдите в этом расположении каталог «StorageDevicePolicies», а если такового нет, создайте его. Для этого нажмите правой кнопкой мышки (ПКМ) по директории Control, выберите в меню пункты «Создать» — «Раздел» и назовите его «StorageDevicePolicies», но без кавычек.


Если защита от записи была установлена именно на уровне Windows, после запуска системы она будет снята, и вы сможете нормально пользоваться картой памяти. Но если это простое решение не поможет, переходите к следующему.
Способ 2: «Командная строка»
Консоль или «Командная строка» — эффективное средство управления операционной системой и ее компонентами, не имеющее графического интерфейса, но наделенное рядом полезных инструментов. В числе последних утилита Diskpart, с помощью которой можно снять защиту от записи с SD или microSD-карты.


Далее введите следующую команду и подтвердите ее выполнение нажатием клавиши «ENTER»:
где № — номер диска, соответствующий карте памяти.

Примечание: На данном этапе следует быть предельно внимательным, так как при неправильном выборе накопителя вы рискуете потерять важные данные.
attributes disk clear readonly
clean
create partition primary 
select partition
active
format fs=ntfs

Обратите внимание на последнюю команду – если на SD/microSD использовалась файловая система NTFS, форматировать нужно в FAT32, то вводить в таком случае следует format fs=fat32.

Проверьте, можно ли теперь записать данные на карту памяти. Если проблема по-прежнему не исчезла, не отчаивайтесь – у нас есть еще несколько решений.
Способ 3: «Управление дисками»
Стандартное средство управление дисками, интегрированное во все версии Windows, позволяет делать практически те же действия, что мы выполнили в предыдущем способе (начиная с удаления и очистки), но, в отличие от «Командной строки», оно наделено графическим интерфейсом и более интуитивно в использовании.


Выберите в меню пункт «Удалить том» и подтвердите выполнение операции.


По завершении процедуры проверьте, снята ли защита от записи с накопителя.
Способ 4: «Редактор локальной групповой политики»
Существует еще один случай, когда защита от записи установлена на уровне операционной системы – это может быть продиктовано правилами локальной групповой политики. Следовательно, при таком положении дел наша с вами задача заключается в их изменении.
Примечание: Данный способ может быть выполнен только в Windows Pro, Enterprise и Education. В версии Home «Редактор локальной групповой политики» отсутствует.

Конфигурация компьютераАдминистративные шаблоныСистемаДоступ к съемным запоминающим устройствам

Установите маркер напротив параметра «Отключено», после чего нажмите по кнопкам «Применить» и «ОК».

Если вы в точности выполнили все предложенные выше рекомендации, защита от записи наверняка будет снята с карты памяти. Однако если она по-прежнему работает некорректно, можно смело сказать, что причина возникновения рассматриваемой нами проблемы куда более серьезна, а значит, и действовать нужно соответствующим образом.
Способ 5: Форматирование с изменением файловой системы
К сожалению, иногда даже после выполнения всех предложенных выше рекомендаций карта памяти остается защищенной от записи. В таком случае остается только одно решение – ее форматирование, что подразумевает удаление всех содержащихся на накопителе данных. Помимо очистки, необходимо также изменить файловую систему. Так, если изначально на SD/microSD используется FAT32, необходимо назначить NTFS, если по умолчанию используется вторая, необходимо переключиться на первую. По завершении процедуры можно будет заново установить предпочтительную систему, выполнив форматирование еще раз. 
На нашем сайте есть отдельная статья, посвященная форматированию карты памяти, с ней и рекомендуем ознакомиться. Обратите особое внимание на программу HDD Low Level Format Tool, которая в решении задач, подобных нашей, зарекомендовала себя наилучшим образом. Дополнительно предлагаем ознакомиться с материалом, рассказывающем об устранении возможных проблем с форматированием. 
Подробнее:
Форматирование карты памяти в Windows
Что делать, если карта памяти не форматируется
Как пользоваться программой HDD Low Level Format Tool
В качестве альтернативы стандартным решениям рассмотрим еще один способ, который часто оказывается весьма эффективным – очистку накопителя с помощью мобильного девайса на Android. Правда, подойдет он только для карточек формата microSD.


По завершении процедуры форматирования работоспособность карты памяти будет полностью восстановлена, а защита от записи снята. 
Особенно хорош такой подход в случаях, когда изначально планировалось использовать microSD в смартфоне или планшете с Android.
Способ 6: Восстановление поврежденного накопителя
В том случае, даже если форматирование не помогло снять защиту от записи или же его попросту не удалось выполнить, причина остается только одна – это повреждение карты памяти. То, какой характер имеет проблема – аппаратный или программный, — и можно ли ее устранить, поможет узнать представленное по ссылке ниже пошаговое руководство. Но будьте готовы к тому, что устройство хранение данных окажется неисправным и его попросту придется заменить.
Заключение
Снять защиту от записи с карты памяти бывает довольно сложно, но чаще всего эта проблема решаема стандартными средствами ОС Windows.
Помимо этой статьи, на сайте еще 12244 инструкций.
Добавьте сайт Lumpics.ru в закладки (CTRL+D) и мы точно еще пригодимся вам.
Отблагодарите автора, поделитесь статьей в социальных сетях.
Источник
Как убрать режим «только для чтения» с флешки
Что это за режим?
Дорогие друзья, сегодня мы с вами поговорим о том, как сделать флешку только для чтения и убрать этот режим. Но прежде всего мы, естественно, немного почерпнём теоретических знаний, которые помогут ответить на другой вопрос: для чего нужна подобная функция? Дело в том, что многие пользователи зачастую попадают в неловкие ситуации, когда им надо, например, снять режим «только для чтения». И они судорожно пытаются найти ответ на этот вопрос, но не обращают внимание на то, что им такие возможности могут пригодиться.

Из этого обзора вы точно будете знать, как снять режим «только для чтения» с флешки
Действительно, мы периодически не замечаем, что некоторые внезапные проблемы имеют некоторые особенности. Подумайте: раз такой режим существует, то наверняка у него есть предназначение, ведь люди пользуются bv иногда. Отсюда назревает вопрос самому себе: может ли он пригодиться? Вот чтобы точно ответить на него, нужно узнать об этой функции, немного подумать, а потом уже решить. Поэтому мы с вами начинаем с некоторой теоретической части.
Итак, режим «только для чтения» предлагает установить ограничение на некоторые действия с флешкой. По сути, возможности с включённой опцией понятны из названия: вы имеете право только просматривать файлы в установленном носителе информации. То есть, нельзя будет ни перенести туда новые, ни удалить уже имеющиеся.
Для чего это может быть нужно? Например, если вы даёте флешку с фотографиями своему другу или подруге, но боитесь, что они могут случайно или ещё каким-нибудь образом удалить оттуда изображения. Тогда ставится ограничение, о котором мы сегодня говорим, после чего они ничего не смогут сделать с флешкой. Только если они не разозлятся и не отформатируют её. Ещё очень важный момент: такое ограничение иногда может спасти вашу флешку от записи на неё вирусных программ, так как доступ к записи закрыт.
Причины появления
Конечно, не всегда этот режим ставится пользователем самостоятельно. Наверняка вы замечали, что он может появиться совершенно неожиданно. Скорее всего, именно поэтому вы сейчас пытаетесь снять с флешки только чтение. Давайте рассмотрим причины появления этого эффекта, чтобы предупредить проблему в будущем:

Чтобы правильно извлечь флешку, нужно щелкнуть на соответствующую кнопку
Как его включить?
Итак, если вдруг понадобилось сделать флешку только для чтения, то давайте рассмотрим два способа, которые помогут это совершить:

Включить режим только для чтения на флешке можно с помощью переключателя

Второй способ подключения режима «Только для чтения» — поставить галочку возле соответствующей надписи
Как его убрать?
Если включить эту функцию легко, то изменить флешку «только для чтения» будет немного сложнее. Стоит сказать, что всё зависит от природы появления. Поэтому мы будем идти от наиболее безобидных причин до злосчастной работы вирусов. Если какой-то способ вам не помогает, то переходите к следующему пункту. Поехали:

Отключить режим можно также простым изменением параметров
Для флешек Transcend
Эти флешки могут не поддаваться на действия, которые легко излечивают девайсы других производителей. Однако такая ситуация предусмотрена, и на сайте Transcend-info.com можно найти специальную утилиту. Для этого в окне поиска введите Recovery и тут же увидите список сразу из двух таких программ. Та, что называется JetFlash Online Recovery наверняка вам поможет. Её нужно скачать и запустить, и найденные проблемы обычно исправляются.
Заключение
Уважаемые читатели, сегодня мы разобрали все вопросы, касающиеся режима «только для чтения» флешки: как сделать его и убрать, почему он мог появиться. Если вы не смогли ничего сделать с флешкой, то можно воспользоваться интересным советом. Он подходит больше для людей, у которых на носителе информации хранятся фотографии, видео и документы.
Надеемся, что вы смогли решить свою проблему, а также почерпнули дополнительную полезную информацию для себя, которая принесёт пользу в дальнейшем. Не забываем делиться своим мнением, впечатлением, а также личным опытом в комментариях. Расскажите, каким образом вы побороли эту неприятную ситуацию, какой способ помог?
Источник
Почему смартфон не видит карту памяти и что с этим делать


Содержание
Содержание
Смартфон перестал видеть привычную карту памяти или не хочет работать с новой? Выдает ошибки вроде «SD‑карта не работает», «SD‑карта не поддерживается»? Чаще всего проблема решается самостоятельно и быстро. Вот, что делать, если смартфон не видит карту памяти.
Неправильная установка
Если вы устанавливаете новую карту памяти, убедитесь, что она зашла в подпружиненный слот до конца. Должен раздаться легкий щелчок, и SD-карта должна быть полностью «утоплена» внутрь.

Если же лоток съемный, устанавливаем карту памяти согласно миниатюрной схеме, указанной на самом лотке. Промахнуться не получится — карта займет положение как на скриншоте ниже, по-другому она просто не встанет. После этого смартфон должен сразу же увидеть накопитель. Если этого не произошло, перезагрузите девайс.

Программный сбой

В очень редких случаях ПО смартфона может глючить и не видеть SD-карту при подключении, либо в процессе использования выдать ошибку, что карта отключена. Рецепт от этой болезни одинаковый: вытаскиваем накопитель, переподключаем его, перезагружаем гаджет.
Иногда помогает обновление прошивки устройства.
Зайдите в настройки смартфона в «Система». Выберите пункт «Беспроводное обновление». Обновите устройство до актуальной версии.
Не поддерживается файловая система
Если карта памяти раньше использовалась в связке с ПК или смартфоном с другой ОС, то девайс может не распознать накопитель. Чтобы избавиться от проблемы, отформатируйте SD-карту в нужный формат.
Помните: форматирование уничтожает с накопителя все данные, поэтому заблаговременно скопируйте их на ПК или в облако.
Если первый способ не сработал, отформатировать накопитель можно из меню Recovery. На разных моделях данный режим включается по-разному, но чаще всего нужно:

Если форматирование со смартфона по каким-то причинам невозможно, то «обнулите» карту памяти, используя компьютер. Для этого:


Также можно отформатировать накопитель сторонними программами, например, SD Card Formatter, которые как раз для этого и предназначены.
Отсутствие разрешений
В последних версиях ОС Android в целях безопасности многие приложения требуют предоставить им дополнительные права, в том числе, и на использование памяти устройства. Если права не предоставить, то, например, приложение «Камера» не будет видеть SD-карту, хотя, в целом, накопитель в настройках смартфона отображаться будет. Чтобы исправить проблему:
Карта несовместима со смартфоном

Большинство SD-карт совместимы с любыми устройствами, включая смартфоны, планшеты и т. д. Но в очень редких случаях можно столкнуться с несовместимостью карты памяти и конкретного мобильного устройства. Чаще всего это происходит с накопителями большой емкости, например, 256 ГБ.
Бюджетные смартфоны могут иметь ограничения на работу с такими объемными SD-картами. Чтобы исключить проблему, заранее изучите спецификации вашего смартфона и убедитесь, поддерживает ли он накопители такого объема.
Окислились контакты
Если накопитель хранился в условиях повышенной влажности, или ваш смартфоном попал под дождь, контакты карты памяти могли окислиться.

Чтобы справиться с проблемой, достаточно вынуть накопитель и потереть контакты (желтые полоски) обычным ластиком. Также можно протереть контакты ватной палочкой, смоченной в спирте.
Карта просто сломана

Никакая электроника не застрахована от поломок. Поэтому, если вы испробовали все предыдущие шаги и не добились успеха, возможно SD-карта просто неисправна. Для проверки установите ее в другой девайс (ПК/смартфон). Если результат будет тот же, возможно, накопитель «умер».
Восстанавливать его в специализированных сервисах экономически невыгодно, да и не всегда возможно. Проще приобрести новый, более надежный.
Неисправное гнездо установки карты памяти
Если смартфон технически поддерживает ваш накопитель, и он без проблем функционирует в других устройствах, то, возможно, есть проблемы в гнезде установки накопителя. Чтобы это проверить, вставьте в гаджет другой накопитель. Если девайс не увидит и его, то имеет смысл отнести телефон на диагностику в сервисный центр.
Источник
We often get some errors while using our SD Card. In fact, these are very common in terms of SD Cards. One of the errors that become a pain in the head is “un SD Card showing as read only“. The reason when it gets problematic is when it frequently shows “Memory Card Read Only”. However, there is a solution for the SD card showing as read-only. These solutions are some of the best ones and the most effective for all Windows devices. Evidently, when you try to access the data on the SD card, besides the data, it shows the SD card read-only error message. So if you are facing the same issue and struggling to find a solution to it, then keep on reading this article.

- Part 1: What is Un SD Card Showing As Read Only?
-
Part 2: How to Fix SD Card Read Only Error?
- Fix 1: Unlock the Write Protection Lock
- Fix 2: Use CMD Remove SD Card Read Only Error
- Fix 3: Remove SD Card Read Only with Diskpart
- Fix 4:Run Check Disk Tool to Disable SD Card Read Only Mode
- Fix 5: Modified Windows Registry Key to Disable SD Card Read Only Mode
- Fix 6: Convert your SD Card from FAT32 to NTFS
- Fix 7: Format your SD Card
- Bonus Tips: How to Recover Data from Formatted SD Card?HOT
Part 1: What Does a Read-Only SD Card Mean?
SD card read only errors are also known as SD Card Write Protected. Despite the name, it can read the name but cannot modify it. Sometimes this error occurs on Android. Sometimes it turns to read only all of a sudden. This makes it impossible to add, write, or delete anything from the SD card.
The main causes of the error “SD Card Read Only” are the following:
- Sometimes we lock the SD card, which is then enabled for write protection.
- The Physical Write protection tab on the SD card
- Due to the software or program, the SD card shows the error “SD card read-only.”
- There may be corrupted files on the SD card.
Part 2: How to Fix an SD Card Read-Only Error?
Sometimes a big-looking error just requires a minute of the solution, but the unfortunate thing is that you don’t know the solution. Likewise, the ” SD Card Read Only Error” has some of the best solutions. The reasons for this particular error can be anything. The most common one is already mentioned above. Moreover, the solution is the same. So we have brought some reliable solutions that can solve the “SD Card Read Only Problem”.
Fix 1: Unlock the Write Protection Lock.
There is a small switch on the SD card. Sometimes, when you remove the SD card from a smartphone or from a Nintendo switch, there is a physical write protection tab. No, there are instructions given on the SD card that which directions lock the card and which not. Here are the steps that you need to take to remove the physical write protection.
Step 1: Take out the SD card that still has the “Read-only” error.
Step 2: Now see if the physical lock on the SD card is enabled.
Step 3: If it is, then position the switch from on to off.
In this way, the lock will be back on the open side.
Fix 2: Using CMD to Remove SD Card Read-Only Error
The following are the steps to use CMD to remove the “SD Card read only error”:
Step 1: In the first step, plug the SD card into Windows.
Step 2: Click on the Start button and type CMD in the search and open the result.
Step 3: Now type diskpart in the CMD search.
Step 4: Afterwards, type in the list volume.
Step 5: All the discs on the windows will start to show up. Find the SD Card Disk now.
Step 6: Then type “select volume”. Instead of #, type the letter of your memory card drive.
Step 7: Now, type disc clear read-only attributes.
Step 8: Afterwards, the write protection will be removed.
Fix 3: Remove SD Card Read Only with Diskpart
Sometimes the SD Card is set as read-only in Diskpart. However, you can change it from reading Only to normal by following these steps.
Step 1: Click on search and type Diskpart and run it as an administrator.
Step 2: When it is launched, then type the following command lines one by one and hit enter after each one.
Step 3: “list disk select disc n,” where “n” refers to the disc number of the read-only memory card. disc clear read-only attributes “
Then disconnect the memory card, close the diskpart, and reconnect again.
Fix 4: Run Check Disk Tool to Disable SD Card Read Only Mode
If the case is that the SD card is only corrupted because of file system corruption, you can use the check disc tool again on the SD card. Here are the following steps:
Step 1: Start File Explorer.
Step 2: Now find out the drive of the SD Card and then right-click on it.
Step 3: Now choose properties in the menu.
Step 4: Afterwards, click on “check now.”
Now check the automatically fixed file system and click on start.
Fix 5: Modified Windows Registry Key to Disable SD Card Read Only Mode
Following are the steps to modify the Windows registry key to disable SD card read-only mode:
Step 1: At the bottom of your window, type “Regedit” in the search and hit enter.
Step 2: Now a registry editor will open up.
Step 3: Now navigate the following path: ComputerHKEY_LOCAL_MACHINESYSTEMCurrentControlSetControlStorageDevicePolicies.
Step 4: Now click twice on write-protect and set the value data to 0. Afterwards, click the “OK” button.
Now close the registry editor and then check whether the error is solved.
Fix 6: Change the format of your SD card from FAT32 to NTFS.
The following are the steps to convert your SD card from FAT 32 to NTFS:
Step 1: Insert or connect the memory card to a computer.
Step 2: Now press the windows button and click on the R key. On the same computer type cmd.exe and run it.
Step 3: Now insert the command into cmd and type “convert #” (# is the letter of the SD card disk) and hit enter.
Step 4: Afterwards, type “Exit” and press enter.
Now disconnect the memory card and reconnect again and check whether the issue is resolved or not.
Fix 7: Format your SD Card
If the issue is still not resolved with all the above solutions, then it’s time to format the SD card. The reason is that some corrupted or malware files sabotage the memory card, which ends up showing the SD card only read error. Moreover, there are other reasons as well, like hardware etc. So obviously, you will be worried about the data that will be removed, but we have a better solution for that too. But first, let’s discuss how to format the SD card.
Note: Never install or insert anything into the SD card after formatting it; otherwise, it will not be recoverable.
Step 1: Open File Explorer.
Step 2: Right-click on the SD card disc.
Step 3: Then select the format in the popup menu.
Step 4: Afterwards, check on all the data and click format.
Bonus Tips: How to Recover Data from Formatted SD Card?
Well when we format our SD card the first thing that comes to mind is we have lost all of our data. But despite the formatted SD card you can still recover your data using some simple ways. With a few clicks you can recover all of your data within a few seconds. So you will have your data recovered as well the SD card read only error will vanish too. Now for the recovery of data, this is where the 4DDiG comes to the rescue. Tenorshare 4DDiG is one of the best recovery programmes that provide some of the best features. The fascinating thing is that it works on both Windows and macOS. So, if you want to recover data, you can simply download the Tenorshare 4DDiG and recover whatever you want.
Why you should choose Tenorshare 4DDiG:
- Recover data from a PC, a Mac, a hard drive, a USB flash drive, an SD card, a camera, an SSD, and other external devices.
- Support for more than 1000+ file types like photos, video, audio, office documents, archives, etc.
- Recover data lost due to deletion, formatting, system crash or virus attack.
How to recover data from an SD card using 4DDiG:
- Launch Tenorshare 4DDiG on your Windows computer, then select the SD card disk from where you lost files.
- Wait for 4DDiG to start scanning your chosen device, and then it will list out all the scanned files. You can preview these files one by one and choose the one you want to recover.
- Here, go to the Recover button, and after choosing the location to store the recovered files. Afterwards, the whole data recovery process is done.
Conclusion
“SD card read-only error” is one of the most common head problems, especially for users of SD cards. This can happen normally. Likewise, there are a lot of ways to solve this specific error. Moreover, there is also a chance you could lose some data during the process. In fact, if you format the card, you will lose all of your data. But no worries, 4DDiG is one of the best platforms that you can use to recover data.
Tenorshare 4DDiG SD Card Data Recovery
4DDiG is your best choice to recover any SD card data. It can recover corrupted/deleted/formatted SD Card data on Windows and Mac.
Free Download
Free Download
BUY NOW
BUY NOW
