When managing and maintaining a website, there are a handful of HTTP status codes to be aware of. Some, such as the HTTP 499 error, can cause a timeout that interrupts your workflow. Therefore, you’ll need to ensure that your site is configured properly to avoid this issue.
Whether you’re seeing the HTTP 499 status code frequently or for the first time, it may indicate an issue with your website that needs to be addressed. The good news is that there are multiple steps you can take to resolve it.
Check Out Our Video Guide to Fixing the 499 Error
In this post, we’ll explain the HTTP 499 status code and what can cause the error. Then we’ll walk you through five potential solutions you can use to fix it. Let’s get started!
What the HTTP 499 Status Code Means
The HTTP 499 status code, also known as a “client closed request,” is a special case of the 502 Bad Gateway Error. It indicates that the client has closed the connection while the server is still processing the request.
HTTP 499 falls within the category of client-based errors. This means the issue is on the client side. Other common errors in this category include HTTP 400 Bad Request and HTTP 404 Not Found. With these errors, the problems are usually easy to define. However, HTTP 499 is more general.
The HTTP 499 error can happen on both Nginx and Apache servers. However, it is more common on Nginx servers because it was created by Nginx.
HTTP 499 is more common on Nginx because the server software handles client connections differently than Apache. With Nginx, each client connection is processed in a separate thread. Therefore, if one client connection takes a long time to process, it won’t slow down the other clients.
However, with Apache, all client connections are processed in the same thread. This can cause problems if one client connection takes a long time to process because it will slow down all other clients.
The HTTP 499 error can cause a timeout that interrupts your workflow- but with a little help from this guide, you can get right back on track 👩💻Click to Tweet
What Causes the HTTP 499 Error
Typically, the HTTP 499 error appears in Nginx logs. This can happen for several reasons, but most commonly, it’s due to either a browser timing out or a user canceling the request.
For example, a website may encounter an HTTP code 499 when it’s loaded with too much traffic. Alternatively, the error can happen when the request comes from algorithms that create issues within the site.
In some cases, this status code may also display when there is no response from the server, and the client has timed out waiting for a response. In these cases, it’s usually best to just try again later. However, if you are consistently getting this status code from a particular server, it may be worth investigating further to see if there is an overarching issue.
How To Fix the HTTP 499 Error (5 Potential Solutions)
Now that we understand more about the HTTP 499 error, let’s look at how to resolve it. Below are five potential solutions for the HTTP 499 status code!
1. Clear Your Browser Cache and Try Again
As we mentioned earlier, this error may be a temporary issue that can be resolved by simply trying to load the page again. It might be that your host or server is overloaded. Therefore, we recommend clearing your browser cache and trying again.
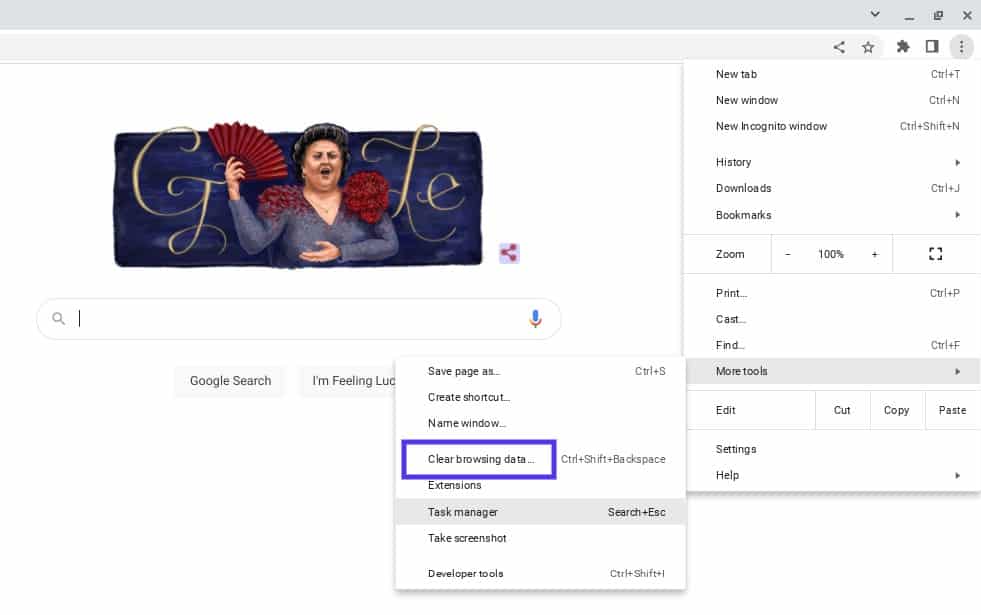
The process for clearing the cache will vary depending on your browser. If you’re using Google Chrome, you can navigate to the three vertical dots in the upper right-hand corner of the window, then go to More tools > Clear browsing data:
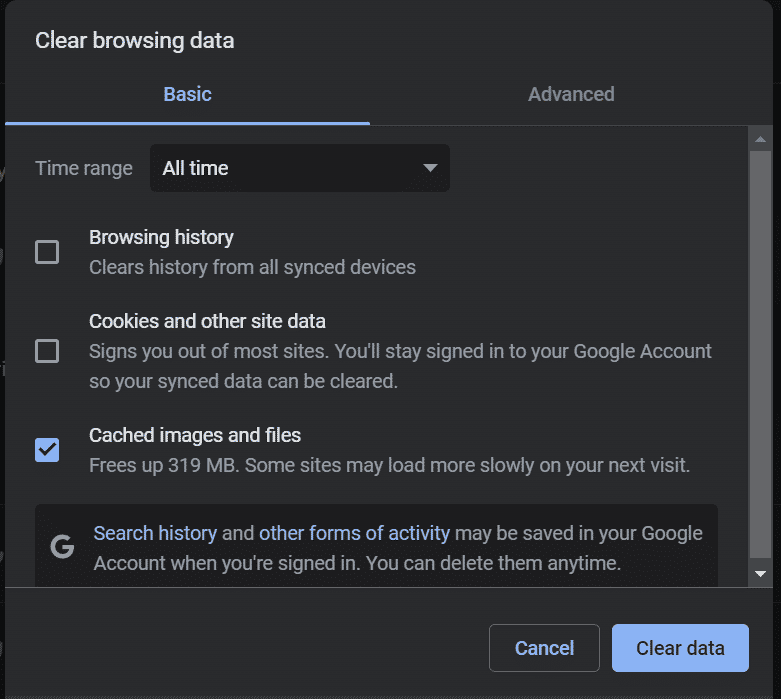
You’ll then be prompted to choose which data to clear from your browser cache:
When you’re done, reload your browser. You can also try using a different browser in the meantime. Then revisit your site to see whether the error message is still showing.
2. Disable Your Plugins and Extensions
Some users have reported that certain plugins cause the HTTP 499 status code error. Therefore, we recommend temporarily disabling your plugins to see if this resolves the issue.
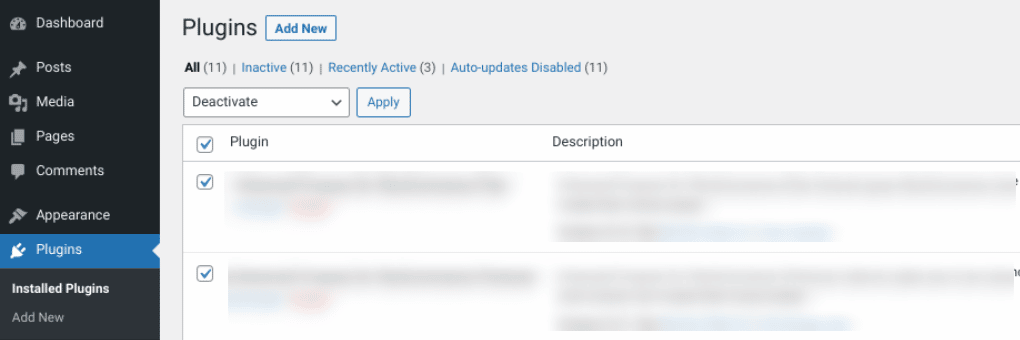
You can do this by navigating to your Plugins screen in the WordPress dashboard, selecting all of them, then clicking on Deactivate > Apply from the bulk actions menu:
You can also connect to your site via a File Transfer Protocol (FTP) client or File Manager, then navigate to your plugins folder (wp_content > plugins). Right-click on the plugins folder and rename it to something such as “plugins_old.”
This will deactivate all of the plugins on your WordPress site. You can revisit your website to see whether the error message is still showing. If not, you can try activating your plugins one by one until you find the tool causing the issue.
3. Check Your Error Logs
When troubleshooting the HTTP 499 code, it’s essential to leverage your error logs. This approach will make it easier to narrow down the issue and determine whether it results from a specific plugin or tool.
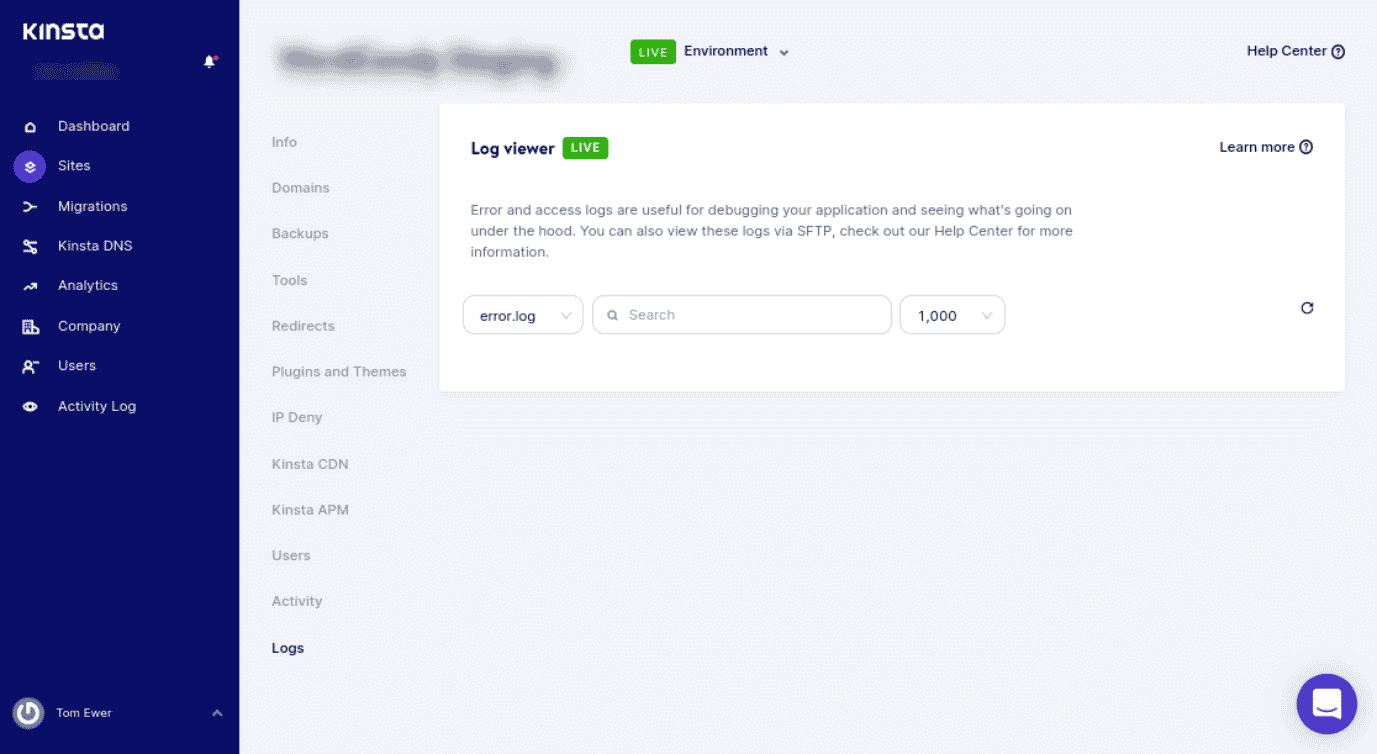
If you’re not a Kinsta user, you can enable and view error logs by turning on WordPress debugging mode. However, if you’re a Kinsta user, you can quickly and easily see errors in the Log viewer from your MyKinsta dashboard:
You can also check your log files in Nginx (/var/log/nginx.error.log) and Apache (/var/log/apache2/error.log). Furthermore, Kinsta users can take advantage of our analytics tool to take a closer look at errors on your site. Then you can understand how often they’re occurring and whether the HTTP 499 error is an ongoing issue.
4. Use an Application Performance Monitoring (APM) Tool
When managing a website, it’s important to have reliable solutions for identifying and troubleshooting errors on your site. We recommend using an Application Performance Monitoring (APM) tool.
APM tools can help you narrow down which script or plugin may lead to various errors, such as HTTP 499. We include our Kinsta APM, as well as a variety of other DevKinsta tools, with all of our plans:
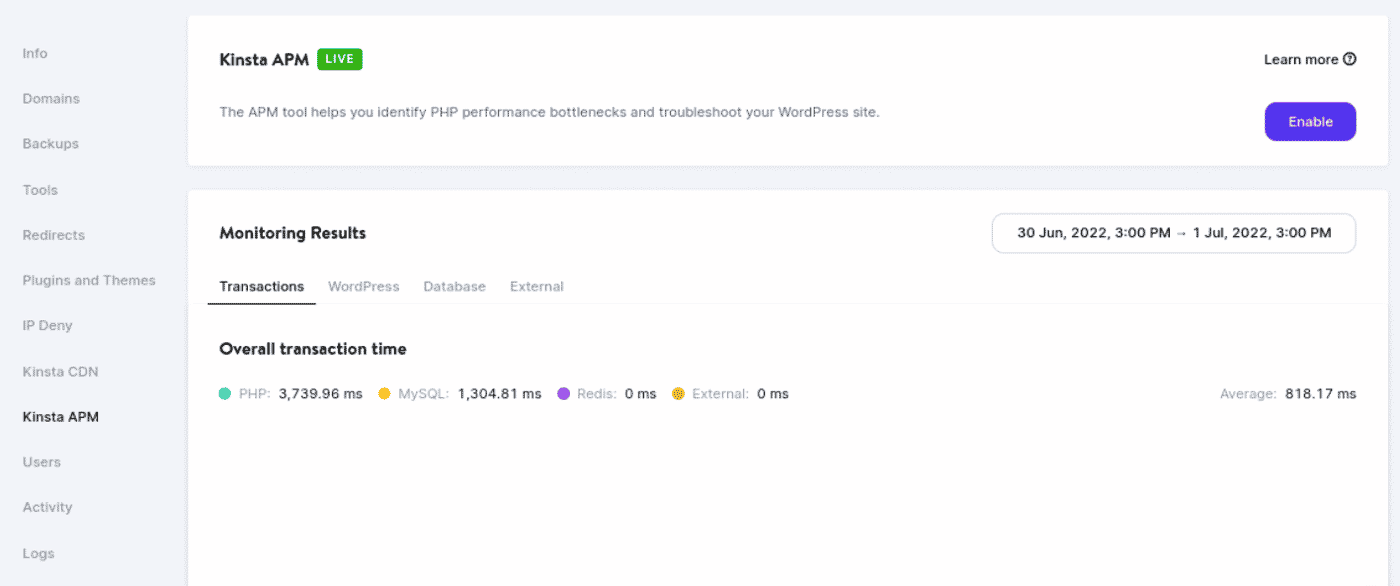
For example, your APM tool can help you collect valuable data and determine which applications are causing delays. Once enabled, you can use KinstaAPM to view the slowest transactions on your site, trace their timelines, and figure out the causes of issues. Our APM also provides insight into your PHP processes, MySQL queries, external HTTP requests, and more.
5. Contact Your Web Host and Request a Timeout Increase
As we’ve discussed, sometimes HTTP 499 errors can occur when a request is canceled because it’s taking too long. Some hosting providers use a ”kill script”.
In short, a kill script forces a request to be terminated after a certain amount of time. This script is often used in shared hosting environments to prevent long requests from impacting other sites.
If you’re a Kinsta user, this isn’t something you need to worry about. Each site hosted on our platform runs on an isolated software container that includes all resources and software. Everything is completely private, and none of your resources are shared, so we don’t run kill scripts.
However, when it comes to the HTTP 499 error, it’s important to note that the “client” may be a proxy, such as a Content Delivery Network (CDN) or load balancer. A load balancing service can act as a client to the Nginx server and proxy data between your server and users. This can cause a timeout that cancels the request to the Nginx server.
PHP timeouts happen if a process runs longer than the maximum execution time (max_execution_time) or max_input_time specified in your server’s PHP configuration. You may encounter timeouts if you have a busy website or scripts that need longer execution times. Therefore, it might be necessary to extend your timeout value.
Let’s say you have a request that is expected to take 20 seconds to complete. If you have an application with a timeout value of 10 seconds, the application will probably time out before completing the request. You’ll likely see the HTTP 499 status code in such an instance.
Therefore, it’s wise to check with your host about the values set on your server. At Kinsta, the default max_execution_time and max_input_time values are set to 300 seconds (5 minutes). The maximum PHP timeout values vary depending on your plan.
If necessary, you can reach out to your hosting provider to request a timeout increase. As a Kinsta user, you can open a ticket with our support team.
With help from this guide, you can ensure your site is properly configured to avoid seeing this error in the future. ✅ Here’s how… 🚀Click to Tweet
Summary
There are a wide variety of HTTP status codes to be aware of as a website owner. Some of the trickiest are client-based errors, such as the HTTP 499 code. The good news is that you can take a handful of steps to resolve this issue.
In this post, we discussed five potential solutions you can use to fix the HTTP 499 status code error. All of them are viable options; if one doesn’t work, another one should.
Do you want to troubleshoot and resolve issues in WordPress as painlessly as possible? Check out Kinsta hosting plans to learn how our APM tool and other solutions can streamline your website maintenance and management!
Understand the HTTP 499 Client Closed Request error: What are the causes and how to fix it.
Table of Contents
- What is the 499 Client Closed Request error?
- How to fix the 499 Client Closed Request error
-
499 error when the website is behind a proxy
- The right way to set the timeouts
- 499 when your server closed the connection
- How to fix the 499 error when your application dies
- 499 when your server is under a DOS or DDOS attack
- How to fix the 499 error when DOS/DDOS attacks:
-
499 error when the website is behind a proxy
- All HTTP Status Codes
What is the 499 Client Closed Request error?
The 499 HTTP is a non-standard status code introduced by Nginx when a client, for instance a browser, closes the connection while Nginx is processing the request.
There are various reasons why the client would not process the request and ended up with a 499 error code. In the following sections, we will help you identify the different causes and how to fix them in each case.
499 error when the website is behind a proxy
You may find 499 errors when you have a Load Balancing service between your users and your Nginx. A similar situation occurs when your Nginx site is served by a CDN or is behind a WAF (Web Application Firewall).
The 499 error happens when the front server attending your browser request is an Nginx server in reverse proxy mode, and it sends the request to your server site, but your site process exceeds the waiting time of the front server.

To fix this error, you can:
- Increase the processing capacity of your application server. By increasing the “processing power”, you will reduce the waiting time of the Nginx clients in front of your service.
- If you cannot increase the power of your application server, then increase the timeouts of your proxies (load balancer, CDN, firewall, …).
At Wetopi you can increase the size of your server with a single click.
★ Zero-config: configuration files for all server services are transparently adjusted to the power.
The right way to set the timeouts
If there are proxies on your setup such as a “Load balancer”, a Firewall, a CDN, etc, you should set the timeouts so that you timeout first your application server and then the other proxies to the user.
Example:
User → CDN → Nginx Load Balancer → Nginx application → Php_fpm
It’s recommended to set the timeouts like this:
- n seconds to
Php_fpmtimeout.
Set thephp.inimax_execution_timeand
therequest_terminate_timeoutin yourphp_fpmconfig file.
- n+1 seconds to Nginx application timeout.
Set thefastcgi_read_timeoutin your nginx config.
- n+2 seconds to timeout to Nginx Load Balancer
In your location doing theproxy_passset the timeouts of:proxy_connect_timeoutproxy_send_timeoutproxy_read_timeout - n+3 seconds of timeout for your CDN. NOTE: If you can’t set the timeouts of your CDN, then find what is its timeout and adjust the others according to it.
It provides a correct chain of timeouts: Setting an incremental chain of timeouts lets you find who is reaching the timeout.
499 when your server closed the connection
This could be your case, If:
- your site is running with an Nginx server and,
- the request is passed to an application processor e.g.
php_fpm, or - the request is passed to your API
This setup is configured using the nginx fastcgi_pass directive.
This 499 error code is produced when your server is too slow.
e.g. your WordPress page process takes too long or freezes
To correct this error, you can:
- Increase the processing capacity of your server. By increasing “processing power”, you will reduce the period Nginx waits.
- If you cannot increase your server power, increase Nginx timeouts with the directive:
fastcgi_read_timeout.
How to fix the 499 error when your application dies
If your application dies without an answer, the solution could be in your API or CGI code.
NOTE: This is the least common case, PHP and other processors always throw a note to notify a problem. If the app was throwing an error, Nginx would pass you a 5XX error code, not a 499.
If your application freezes, you have 2 options:
- First, tell the Nginx to wait longer. Increase the timeouts of your Nginx by modifying the
fastcgi_read_timeout. - If waiting longer does not solve the problem, increase the processing capacity of your server.
- If the 499 error occurs on a specific page or request, it could be a “hung” or “code freeze” in your application or content manager. If you use WordPress, check plugin compatibility. If database queries are made, check the good status of tables and indexes.
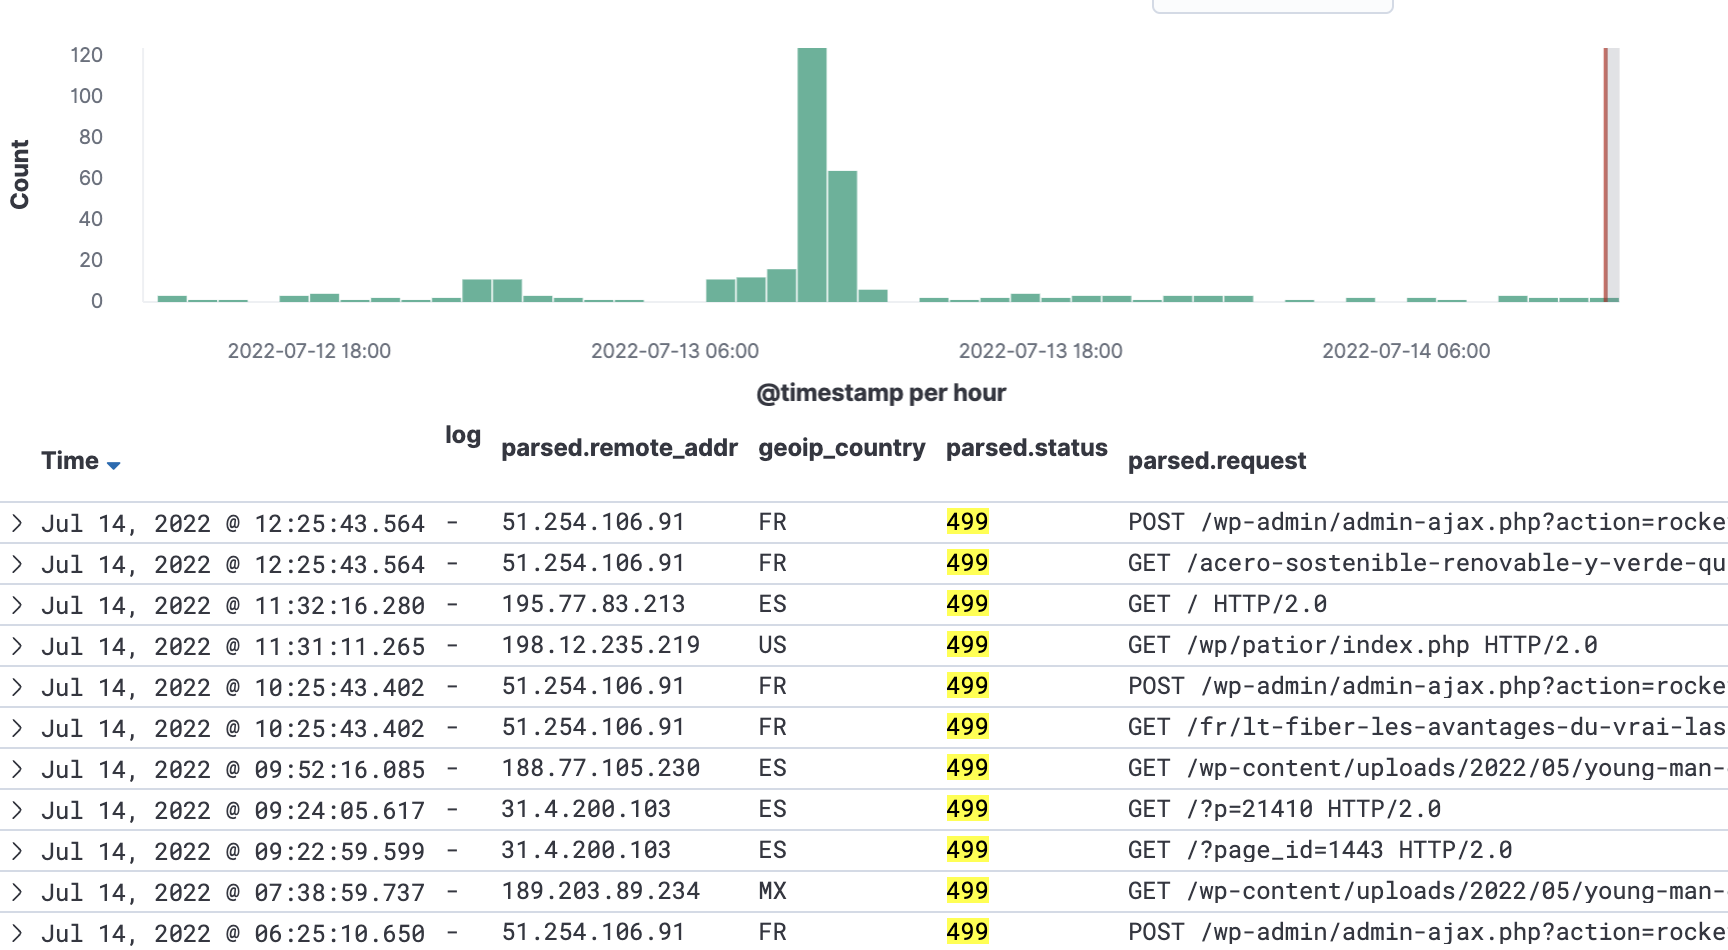
499 when your server is under a DOS or DDOS attack
There might be a case when someone attacks, and intentionally consumes the server resources. This makes the server unable to process the request and return the result on time.
To verify if this is your case: look at your analytics, and search for spikes in traffic with requests giving the 499 status code:
How to fix the 499 error when DOS/DDOS attacks:
In this case, the best solution is a combination of security measures:
- Prevention: avoid non-legit traffic. You can filter malicious traffic with a combination of public and private blacklists.
- Add infrastructure protection against DOS (Denial of Service) and DDOS (Distributed Denial of Service). Find a hosting provider with infrastructure ready to mitigate this kind of attack.
- Add a protection layer, a security proxy, in front of your server, or
- Add an external security service. A well-known one is Cloudflare. They put a distributed infrastructure in front of your server to fight against DDOS attacks.
At Wetopi, as WordPress specialists, we know how important it is to add strong measures of security.
We apply three techniques to filter traffic:Shared security heuristic learning,
Blacklisting from external sources and
Mitigation of DDoS attacks.
We are techies passionate about WordPress. With wetopi, a Managed WordPress Hosting, we want to minimize the friction that every professional faces when working and hosting WordPress projects.
Not a wetopi user?
Free full performance servers for your development and test.
No credit card required.
All HTTP Status Codes
200 OK
201 Created
202 Accepted
203 Non-Authoritative Information
204 No Content
205 Reset Content
206 Partial Content
207 Multi-Status
208 Already Reported
226 IM Used
300 Multiple Choices
301 Moved Permanently
302 Found
303 See Other
304 Not Modified
305 Use Proxy
307 Temporary Redirect
308 Permanent Redirect
400 Bad Request
401 Unauthorized
402 Payment Required
403 Forbidden
404 Not Found
405 Method Not Allowed
406 Not Acceptable
407 Proxy Authentication Required
408 Request Timeout
409 Conflict
410 Gone
411 Length Required
412 Precondition Failed
413 Payload Too Large
414 Request-URI Too Long
415 Unsupported Media Type
416 Requested Range Not Satisfiable
417 Expectation Failed
418 I’m A Teapot
421 Misdirected Request
422 Unprocessable Entity
423 Locked
424 Failed Dependency
426 Upgrade Required
428 Precondition Required
429 Too Many Requests
431 Request Header Fields Too Large
444 Connection Closed Without Response
451 Unavailable For Legal Reasons
499 Client Closed Request
In my case, I was impatient and ended up misinterpreting the log.
In fact, the real problem was the communication between nginx and uwsgi, and not between the browser and nginx. If I had loaded the site in my browser and had waited long enough I would have gotten a “504 – Bad Gateway”. But it took so long, that I kept trying stuff, and then refresh in the browser. So I never waited long enough to see the 504 error. When refreshing in the browser, that is when the previous request is closed, and Nginx writes that in the log as 499.
Elaboration
Here I will assume that the reader knows as little as I did when I started playing around.
My setup was a reverse proxy, the nginx server, and an application server, the uWSGI server behind it. All requests from the client would go to the nginx server, then forwarded to the uWSGI server, and then response was sent the same way back. I think this is how everyone uses nginx/uwsgi and are supposed to use it.
My nginx worked as it should, but something was wrong with the uwsgi server. There are two ways (maybe more) in which the uwsgi server can fail to respond to the nginx server.
1) uWSGI says, “I’m processing, just wait and you will soon get a response”. nginx has a certain period of time, that it is willing to wait, fx 20 seconds. After that, it will respond to the client, with a 504 error.
2) uWSGI is dead, or uWSGi dies while nginx is waiting for it. nginx sees that right away and in that case, it returns a 499 error.
I was testing my setup by making requests in the client (browser). In the browser nothing happened, it just kept hanging. After maybe 10 seconds (less than the timeout) I concluded that something was not right (which was true), and closed the uWSGI server from the command line. Then I would go to the uWSGI settings, try something new, and then restart the uWSGI server. The moment I closed the uWSGI server, the nginx server would return a 499 error.
So I kept debugging with the 499 erroe, which means googling for the 499 error. But if I had waited long enough, I would have gotten the 504 error. If I had gotten the 504 error, I would have been able to understand the problem better, and then be able to debug.
So the conclusion is, that the problem was with uWGSI, which kept hanging (“Wait a little longer, just a little longer, then I will have an answer for you…”).
How I fixed that problem, I don’t remember. I guess it could be caused by a lot of things.
Whether you’re browsing the internet as a user or maintaining and managing a website as a web admin, you’ll encounter certain common errors or HTTP error codes on a daily basis. Some error codes, such as HTTP 499, can cause downtime that can affect businesses of all sizes.
After all, websites are one of the primary ways customers access and interact with products or services.
When a user tries to access a website, but it’s not available due to any reason, they often receive an error message generally represented as an HTTP status code that indicates the type of error.
Like HTTP status codes 100-500, there is plenty of HTTP error codes out there, ranging from 100 to 500. However, for now, we’ll focus on the most frustrating, dreadful, and common HTTP error code – the 499 error.
In this blog, we’ll be explaining what HTTP error 499 actually means, its causes, tips to prevent it, and the best working methods to fix it. Let’s get started!
What is HTTP 499 Status Code Error?
The HTTP 499 error status code is a unique and special case of the 502 Bad Gateway error that is caused by the client side. The 499 error indicates that a client closed the connection before the server could send a response, and the server is still processing the request.
Error 499 is unique because it doesn’t occur from the server end, unlike most errors where the server is often the main culprit due to misconfiguration or some software bug.
But in this particular type of error, the main culprit is the client (web browser or a user agent) that closed the connection before the server could send a response. This means the server was doing its job correctly – processing the request – but the client didn’t wait for the response to be sent back.
This error has not been listed or a part of the official HTTP/1.1 standard, hence it is not well recognized by all web servers.
Similarly, we have two more common errors that fall into the same category: HTTP 404 Not Found error and HTTP 400 Bad Request error, which you must also check out.
Why does the HTTP 499 Status code Occur?
Http 499 status code is specific to only Nginx web servers only and there can be multiple reasons why it can happen. But some of the most common are:
- Network Issues: Network problems can cause lost connections between client and server due to issues like dropped connections or high latency.
- Server-side issue: Server issues like high load or misconfiguration can cause delayed response or failure to respond to client requests.
- Client Side issue: Termination of connection before response due to canceled request or navigating away from the page during loading of the page by the client.
- Firewalls and Anti-virus software: Firewall or Anti-virus software interference can lead to lost connections or blocking of communication between client and server.
- Misconfigured Server: If the server is not properly configured, it won’t be able to handle incoming requests from clients correctly, which may result in Error 499.
To better understand what is triggering error 499, you need to have a basic understanding of how modern web applications work.
In a general web application, a client or your browser sends a request to a web server. Then the web server processes the request and sends a response back to the client.
During the entire communication process between the client and the web server, there are usually security devices installed, such as firewalls or load balancers. These devices play an important role in distributing traffic across multiple servers and filtering out malicious requests.
However, sometimes these devices can be misconfigured and can cause 499 errors to occur. Another common cause for triggering 499 errors is on the client side.
For example, a user may close the browser or switch to another page before the server sends back the response to the browser.
Alternatively, any installed extensions or proxy servers used may also interfere with the communication between the client and the server, causing the 499 error.
These are some of the general and common reasons that might trigger Error 499. However, to determine the exact cause of the error, further investigation is needed, along with trying different troubleshooting methods discussed below.
Now that you understand the meaning of the HTTP 499 status code and some of the main reasons that cause it, let’s check out the top 5 methods that can help you fix it.
1. Purge your browser cache and Reload again
As we mentioned earlier, the HTTP 499 error is not a permanent issue and can sometimes be easily fixed by simply reloading or refreshing the web browser. It is also possible that your server or host may be overburdened with multiple requests, so you should clear your browser cache and try browsing the site again.
Note: Since Chrome has a major Browser market share, here we will be using Chrome for this tutorial.
Step 1: Depending on your browser, navigate to the settings menu. In Google Chrome, you can click on the three vertical dots in the upper right corner of the window.
Step 2: Select “More tools” and Click on “Clear browsing data“.

Step 3: A pop-up window will open on which, you can select all three options under the “Basic” section or just select the “Cached images and files” as shown in the picture below.
Step 4: Click on “Clear data” to initiate the process.

2. Check on a Different Browser or Device
If the error still appears, you can try accessing the website on a different browser or even on a different device to see if the error is specific to the device or configuration.
3. Temporarily disable Plugins or Extensions
Some reports have shown that faulty plugins and extensions can also cause the HTTP status499 error. Therefore, you should check whether a faulty plugin is the main culprit or not.
To do this, Go to your WordPress Dashboard > Plugins and select all the plugins, and then click on Deactivate > Apply from the bulk action menu.

In case you are unable to log in to your WordPress dashboard for any reason, you can alternatively connect to your site via FTP or a file transfer protocol client such as FileZilla. Go to the wp_content folder > plugins and right-click on the plugin folder you want to edit and rename it to anything you like.
This method will help you deactivate all the installed plugins on your WordPress site. You can then check for the faulty plugins by activating them one by one and trying to access the site simultaneously to see if the error message still appears. Repeat the process until you find the faulty plugin.
4. Check Error Logs
If you have access to the Error logs, look out for the suspicious entries that correspond to the time that the HTTP 499 status error code appears.
Read: 🚩 If you do not have any idea about Error logs, Please check out our Comprehensive dedicated blog on “How to Set up and Use WordPress Error Log?“
5. Disable Firewall or Antivirus Software
Certain firewalls or antivirus software may interfere with communication between the client and the server, resulting in 499 errors. Try disabling your firewall or antivirus software temporarily to see if it resolves the issue.
Therefore, you can try temporarily disabling them and check whether it fixes the issue or not.
For Windows users:
Step 1: First, you need to open your computer’s control panel. To do this, click on the “start” menu on your desktop and type in “control” in the search field.
Step 2: Next, select “System and Security” from the control panel options. This will take you to a new page.
Step 3: On the new page, you’ll see an option for “Windows Defender Firewall.” Click on “Allow an app or feature through Windows Firewall.”

Step 4: In the next window, you’ll see a list of apps and features that are allowed to communicate through your firewall. To change these settings, click on “Change settings.”

Step 5: If you don’t see your DNS client on the list, you can add it by clicking on the plus (+) icon.
Step 6: To temporarily disable your firewall, uncheck the box next to “Windows Defender Firewall” and click on “OK” to save your changes.
Step 7: Alternatively, you can adjust your firewall settings by finding the DNS client or any other application you want to configure and checking or unchecking the boxes next to the desired settings.
Step 8: Once you’re done adjusting your settings, click on “OK” to save your changes.
Note: It’s important to only disable your firewall temporarily if you need to troubleshoot a connectivity issue. Leaving your computer without a firewall can expose it to potential security threats.
6. Contact Your Web Host
If none of the above methods can fix Error 499, the final option is to contact your web host. Sometimes, the request may be canceled due to taking too long to process, causing Error 499. To prevent server overload, web hosts generally use a kill script to forcibly terminate such requests.
The server may be configured to have a response timeout period, and exceeding the set limit may result in a connection being closed and a 499 error occurs. For instance, suppose you have a request that is expected to take 15 seconds to complete, but the server timeout value is set to 10 seconds. This will result in a timeout before completing the request.
Therefore, it is highly recommended to check with your web host about the timeout values set on the server, and if possible, request an extension of the timeout value.
If you are a WPOven user, you don’t need to worry about this issue. Each site is hosted on a Virtual Private Server, and all resources are allocated dedicatedly.
Conclusion
In this blog, we have discussed the 499 error, a frustrating and common error that can cause downtime for websites. We have explained how this error is caused by the client, such as a web browser, closing the connection before the server can send a response.
However, with the right precautions, you can prevent the 499 error from occurring. This includes optimizing your website’s code and configuration, as well as regularly monitoring your server logs for any errors. Additionally, having a reliable web host and a backup plan can also help minimize downtime.
If you do encounter the 499 error, don’t panic! There are several effective methods to fix it, including tweaking your website’s settings or contacting your web host for assistance. By taking these steps, you can quickly resolve the issue and get your website back up and running.
In conclusion, website availability is critical for any business that wants to succeed in today’s digital world. By understanding the causes and solutions of the 499 error, you can ensure that your website is always accessible to your customers. So take the necessary precautions and always stay vigilant to keep your website running smoothly!
Frequently Asked Questions
What is Cloudflare 499 error?
The 499 error code is a specific code used by Nginx, indicating that the client has closed the connection while the server is still processing the request.
What is Nginx 499 error code?
The Nginx 499 error code is an HTTP status code exclusive to Nginx web servers, which means the client has closed the connection while the server is still processing the request. Hence it is considered a client-side error.
What is AWS load balancer 499 error?
If the server is unable to respond to the request within the load balancer’s timeout limit, the connection will be terminated, resulting in an error 499 being displayed.
NGINX error 499 is a particular case of the 502 Bad Gateway Error. At Bobcares, we can handle your NGINX issues with our Server Management Services.
NGINX Error 499
The NGINX error 499 is the HTTP 499 error that occurs on Nginx. It is common on Nginx servers because it was created by Nginx. It is a “client closed request” because it occurs when the client closes the connection while the server is still processing the request. So it falls in the category of client-based error.

The error is more common on Nginx because the server software handles client connections differently than Apache. Nginx in its own thread handles each client connection. As a result, if one client connection takes a long time to process, it will not affect the other clients.
Reasons For The NGINX Error 499
Some of the possible reasons for the error are as follows:
- Browser timing out
- User canceling the request
- Request from algorithms that create issues within the site
- No response from the server, and the client has timed out
Troubleshooting NGINX Error 499
In this section, we will provide four methods to fix the error:
1. Clear the Browser’s Cache and Retry: The method to clear the browser cache will vary depending on the browser. Clearing the browser cache and reloading the site after some time is a good solution to fix the error.
2. With the help of an APM tool: We can use APM tools to identify and troubleshoot the errors on the site, including error 499.
3. Request a timeout increase from the provider: If we have a busy website or scripts that require longer execution times, we may experience timeouts. As a result, it may be necessary to increase the timeout value. So we must contact the web host and request a timeout increase.
4. Make use of the error logs: By checking the error logs, it is easier to isolate the problem and determine whether NGINX error 499 is caused by a specific plugin or tool. We can also check the log files in Nginx (/var/log/nginx.error.log) and Apache (/var/log/apache2/error.log).
[Need help with another issue? We’re here to help.]
Conclusion
The article briefly explains the NGINX error 499 and its possible causes. Lastly, we also included 4 methods from our Support team to fix the issue.
PREVENT YOUR SERVER FROM CRASHING!
Never again lose customers to poor server speed! Let us help you.
Our server experts will monitor & maintain your server 24/7 so that it remains lightning fast and secure.
GET STARTED
