How to Fix Opening Browser Failed in Samsung Device, If you are unable to get “View” message on your device through using a (Samfirm Tool), so this error can easily be fixed by following some easy steps from below, and you can easily receive a popup message with “View” option in your new Samsung Galaxy devices to easily bypass frp account.
We will just update driver from (Lib) folder, which is already available in your C driver > Samfirm > Lib, we only have to update this one manually, and after that your device will be detected by Samfirm tool, and will be able to send message in your connected Samsung Galaxy device, so ho we do that, just follow steps carefully.
-If you are trying to open “Youtube/Google” with other than (Samfirm tool), so we would recommend you to first download and install Samfimr Tool V2.1 [DOWNLOAD].
-Install latest Samsung USB Driver [DOWNLOAD].
-Connect Device with PC. (Do make sure, WiFi is connect to your Samsung Devic).
-Open “Device Manager”, and go to “Other Device”
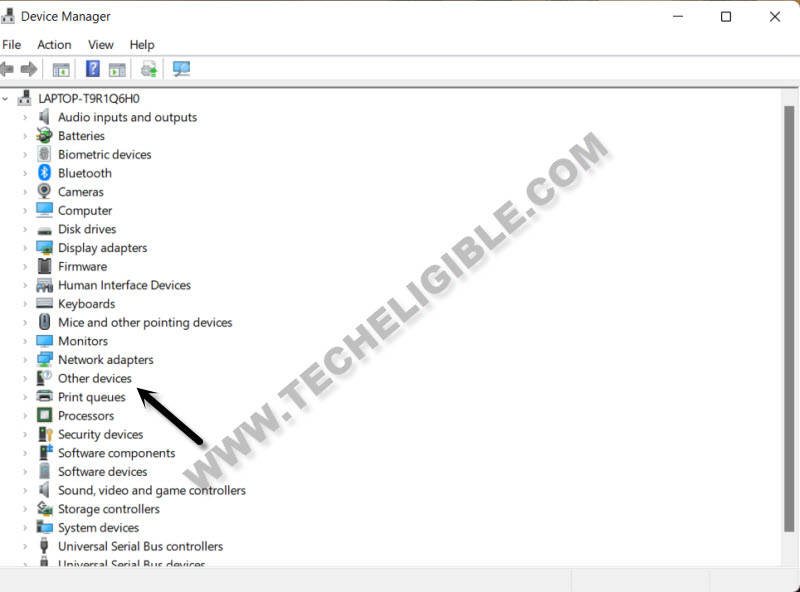
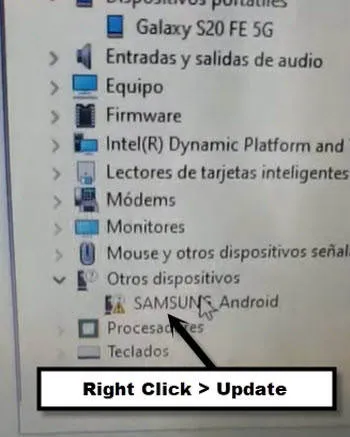
-There you will see an exclamation sign with (SAMSUNG_Android), that means the driver is not working properly, and that is why you are unable to get result which you are required with Samfirm tool.
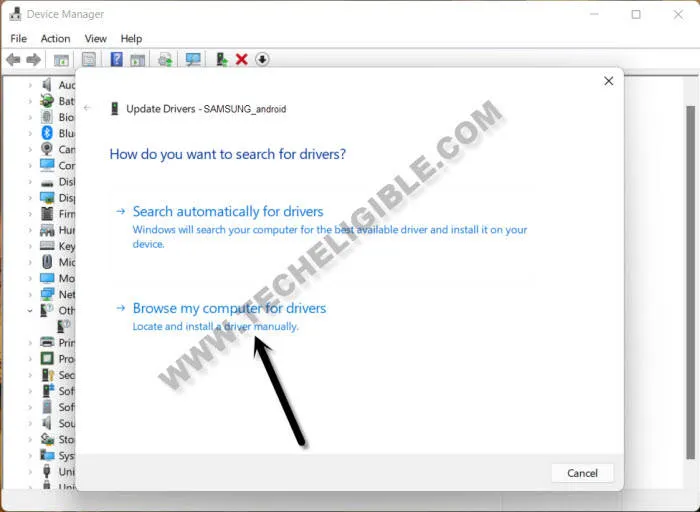
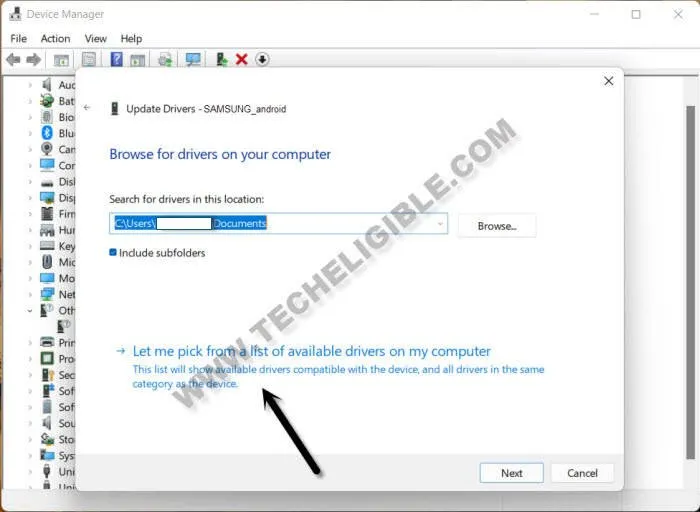
-Right click on “SAMSUNG_Android”, and click to “Update Drivers”.
-Select “Browser my Computer for Driver”.
-Select “Let me Pick from a list of available driver on my Computer”.
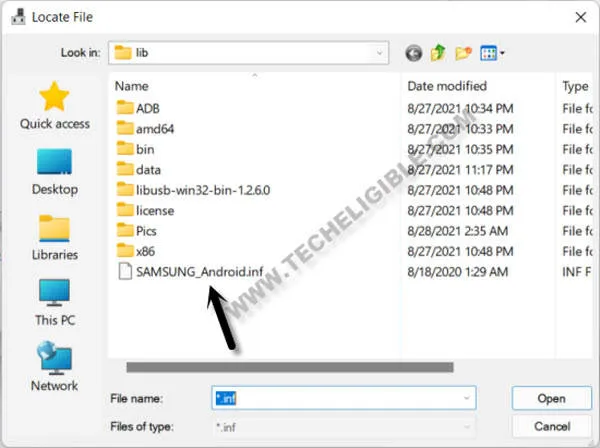
-Click on “libusbK USB Devices, after that click on “Have Disk..”.

-Now we just have to click on “Browse”, and click on “Samsung_Android.inf“.
Note: After hitting on “Browser”, we will automatically get into the the “Lib” folder, if we do not, so just go to that folder manually, for that, you can hit on > Browser > C Drive > Program file > Samfirm > Lib.
-Now click to “Update > Next > Yes”.
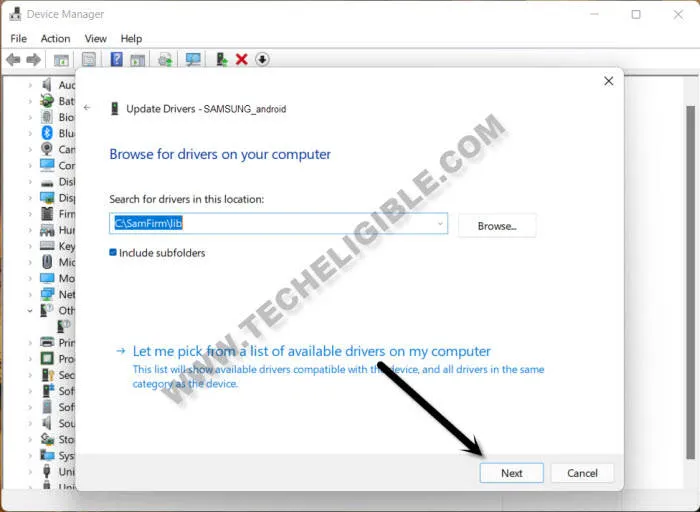
-The driver will be installed and updated from the Lib folder of (Samfirm tool), and then the exclamation sign will just disappear, and you can easily receive popup message in your Samsung device, because we are done now from Fix Opening Browser Failed in Samsung Device.
If you want to bypass FRP lock from your Samsung Galaxy Android 11, Android 8, Android 9, Android 10, phone by using the Easy Samsung FRP Tool or SamFirm AIO Tool and getting Launching Browser Event Failed, Then this article will help you to find the best solution to Fixed Samsung FRP Unlock Launching Browser Event Failed Without PC No Easy FRP Tool or No SamFirm Tool easily. So, follow these simple steps below to fix the problem easily.
SamFirm or Easy Samsung FRP Tool is an MTP open browser program that can help you to access the device browser on your FRP-enabled phone. But, with the Samsung latest security patch update, it has been fixed and the tool wouldn’t help you to Open the device browser. So you have to find some alternative solution to access the device browser and bypass the FRP lock successfully.
Here on this page, we will guide on how to fix Samsung FRP Unlock Launching Browser Event Failed Without PC Easy Samsung FRP Tool and SamFirm AIO Tool easily.
More: Alliance Shield X APK Latest Version 2022 Free Download
- First, Switch on your Samsung Android 11 phone
- Click on Start button
- Agree to Terms & Conditions and click Next
- Connect your Samsung Galaxy phone to a Wifi network

- Now press the Volume UP & Power Key at the same time
- Tap Use
- Again Tap the Volume UP & Power Key quickly to enable Talkback

- Now Draw “L”
- Double tap to select Talkback Settings
- Press the Volume UP & Power Key again to turn Off the Talkback.
- Select Braille Keyboard

- Tap How to Use Braille Keyboard
- A popup will appear, Tap on Gboard

- Now it will lead you to the Google Play Store Sign In screen
- Tap on “3 dots” Select Play Protect =>> Learn More

- Long Press on any Text =>> Then Select All =>> Copy =>> Close
- Now Go back to the main Welcome Screen
- Tap START
- Go to the WiFi Screen

- Click on Add Network =>> Advanced =>> Proxy =>> Manual
- Now you need Pin/Puk enable Sim Card

- Long Press on the Proxy Field =>> Select Paste & Continuously Tap on the Proxy Field & Insert the SIM Card at the same time.
- Now Eject the SIM Card while Screen showing up screen lock

- Swipe Left the Timeline bar and then tap on lock icon
- Then you will see Galaxy Setup
- Swipe Left Notification bar
- First Tap on the Settings icon & then tap the bell icon & tap on the Android Setup several times.

- Now you can use the Notification Bar
- Tap on Media =>> Grant the Permission
- Then Tap on Galaxy Store Icon
- Now Galaxy Store will open
- Tap Agree

- Then Tap on the Search Icon and Search for Samsung Internet
- Sign in with Samsung Account
- Install the Samsung Internet
- Once the installation process has been done => Tap Open…
- Tap on the Search bar and type any of these two below URL’s.
- https://tiny.cc/frptools
- Or
- https://bit.ly/2NKxXYs
- Go to the FRP bypass APK =>> Tap To Open FRP APPS section
- Select Open Settings App =>> Tap Open
- Now it will lead you to the Settings app
- We’ll need another Samsung Android phone now to make a cloud backup and then we restore that backup to our FRP locked phone.
- Go to settings =>> Accounts & backup
- Enter your own Google & Samsung Account (I’ve already added my both accounts)
- Open Play Store – Download & Install Alliance Shield X App

- Go to Settings =>> Accounts & backup =>> Backup & Restore =>> Backup data

- Uncheck everything except Apps and then tap Back up
- All data backed up Tap done, Let’s back to our FRP Locked phone

- Go to Settings =>> Accounts & backup =>> Backup & Restore =>> Restore data
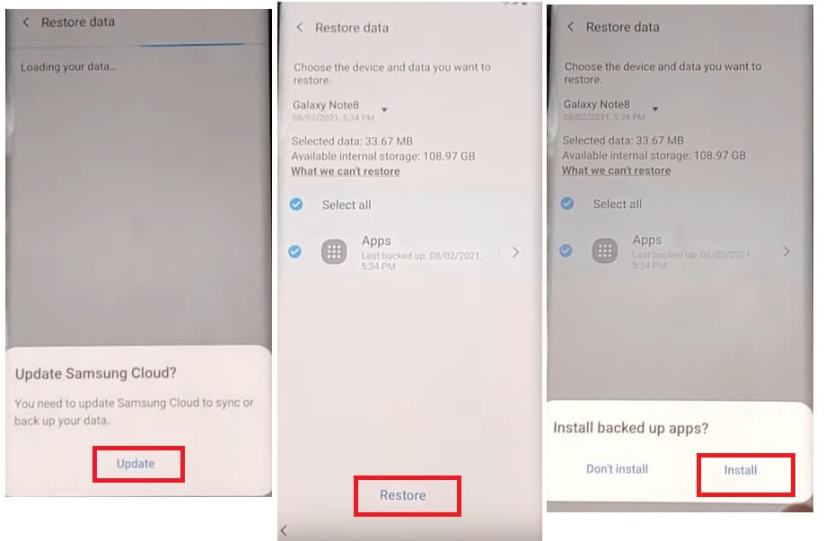
- Update Samsung Cloud? Tap Update and wait for app to be updated, Then restore data again
- Select all =>> Tap Restore
- Go back to menu and Open Alliance Shield X App
- Tap Next => Next => Next => Got IT

- Click on register and then enter your username, password, email & confirmation code, Tap Submit and check your email for verification link
- Name your Device: Android 11 FRP & tap next

- Enable Device Admin and then tap Activate (You must see Admin enabled)
- Tap Next
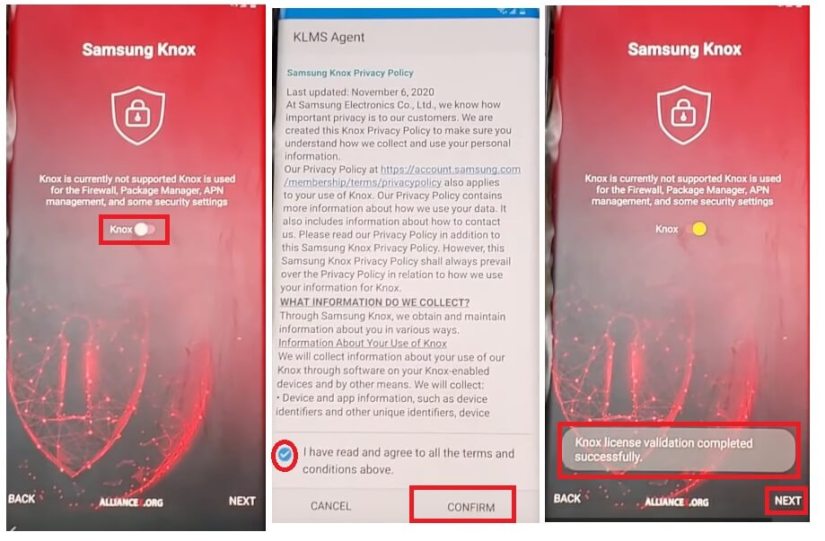
- Enable Knox and then tap Confirm (you must see knox license validation successfully)
- Tap Next =>> Finish
- Knox and Admin must be in Green to Bypass FRP lock on Samsung A50 Android 11

- Go to App Manager and Search for Service Mode => Activities

- Search & Open: com.sec.android.app.modemui.activities.usbsettings

- Put an check on MTP + ADB and then connect USB Cable to phone
- Download: Samsung ADB Download Mode FRP Tool on PC:
- Run the Tool

- Go to Adb Section =>> Click on Remove Google Account
- It will take some time
- Once Finish, It will reboot your Samsung Android 11 phone
- Setup all initial steps
- On the Select Home App =>> Tap on the Screen once
- That’s it.
Read More: Alliance Shield X Fixed Too Many Devices Error Solution Latest

I write about Android FRP Solutions, Android problems, GSM tutorials. If your device stuck at the Google Account Verification screen then here you can find all the possible ways to Bypass it. In my free time, I love to play games:
 12-22-2020, 11:02 |
#1 (permalink) |
|
somratjisan No Life Poster
Join Date: Mar 2008 Location: In My Shop, Bangladesh Posts: 900 Member: 733449 Status: Offline Sonork: 100.334100 Thanks Meter: 280 |
Problem Launching browser event Failed» ( Solved ) I am using Windows 10 64 bit os, I can’t use EasySamsungFrp2020_v1 Software anymore, because always «Launching browser event I try Install new driver, uninstall driver, disable driver signature, but always failed. How to solve this problem?
Searching for Samsung MTP Port |
 |

| 12-22-2020, 21:48 |
#2 (permalink) |
|
Moh3en.pc No Life Poster
Join Date: Jan 2012 Location: YOUR HEART Posts: 2,514 Member: 1712884 Status: Offline Thanks Meter: 854 |
My problem solved after Enabling test mod on windows Run Command Prompt as Administrator and execute the following command: bcdedit.exe /set nointegritychecks on This will automatically disable driver signature enforcement on your device. If you wish to enable this feature back again, you need to execute the following command in an elevated cmd window: bcdedit.exe /set nointegritychecks off To be able to do this, Secure Boot Policy will have to be disabled. If you decide to exit this mode, run the following command: bcdedit /set testsigning off |
| |
| 12-22-2020, 23:23 |
#3 (permalink) |
|
easy-team Product Manager
Join Date: Feb 2016 Location: EFT Dongle Posts: 10,726 Member: 2536865 Status: Offline Sonork: 100.1584728 Thanks Meter: 19,183 |
we already add a button to disable driver signature ! |
| |

| 12-23-2020, 08:45 |
#4 (permalink) |
|
somratjisan No Life Poster
Join Date: Mar 2008 Location: In My Shop, Bangladesh Posts: 900 Member: 733449 Status: Offline Sonork: 100.334100 Thanks Meter: 280 |
Quote:
Originally Posted by Moh3en.pc My problem solved after Enabling test mod on windows Run Command Prompt as Administrator and execute the following command: bcdedit.exe /set nointegritychecks on This will automatically disable driver signature enforcement on your device. If you wish to enable this feature back again, you need to execute the following command in an elevated cmd window: bcdedit.exe /set nointegritychecks off To be able to do this, Secure Boot Policy will have to be disabled. If you decide to exit this mode, run the following command: bcdedit /set testsigning off Problem not solved
C:Windowssystem32>bcdedit.exe /set nointegritychecks on |
| |

| 12-23-2020, 08:51 |
#5 (permalink) |
|
somratjisan No Life Poster
Join Date: Mar 2008 Location: In My Shop, Bangladesh Posts: 900 Member: 733449 Status: Offline Sonork: 100.334100 Thanks Meter: 280 |
Quote:
Originally Posted by easy-team we already add a button to disable driver signature ! Disable Drivers Signature not working on this windows 10 64 bit |
| |
| 12-23-2020, 09:37 |
#6 (permalink) |
|
easy-team Product Manager
Join Date: Feb 2016 Location: EFT Dongle Posts: 10,726 Member: 2536865 Status: Offline Sonork: 100.1584728 Thanks Meter: 19,183 |
http://www.youtube.com/watch?v=v=71YAIw7_-kg |
| |
|
The Following 2 Users Say Thank You to easy-team For This Useful Post: |
| 12-23-2020, 10:58 |
#7 (permalink) |
|
somratjisan No Life Poster
Join Date: Mar 2008 Location: In My Shop, Bangladesh Posts: 900 Member: 733449 Status: Offline Sonork: 100.334100 Thanks Meter: 280 |
Quote:
Originally Posted by easy-team http://www.youtube.com/watch?v=v=71YAIw7_-kg My problem solved by other way, Anyway Thanks for cooperation. |
| |
|
The Following 2 Users Say Thank You to somratjisan For This Useful Post: |
| 01-12-2021, 07:17 |
#8 (permalink) |
|
razzakcox Insane Poster
Join Date: Nov 2009 Location: Cox’s Bazar Age: 36 Posts: 60 Member: 1166990 Status: Offline Thanks Meter: 7 |
same problem |
| |

| 01-12-2021, 07:32 |
#9 (permalink) |
|
razzakcox Insane Poster
Join Date: Nov 2009 Location: Cox’s Bazar Age: 36 Posts: 60 Member: 1166990 Status: Offline Thanks Meter: 7 |
SamsungFrp2020 help need
Searching for Samsung MTP Port |
| |
| 01-12-2021, 20:24 |
#10 (permalink) |
|
Chijohn Freak Poster
Join Date: May 2020 Location: Globe Posts: 211 Member: 2955840 Status: Offline Thanks Meter: 75 |
Quote:
Originally Posted by razzakcox SamsungFrp2020 help need
Searching for Samsung MTP Port If the problem is not from driver signature. I hope your computer is on test mode if yes. Note that is not every build that the eftfrp will work. Some build the software will launch the browser on your phone why its won’t work in some. |
| |
| 01-21-2021, 09:58 |
#11 (permalink) |
|
-=P.F.U=- No Life Poster
Join Date: Mar 2018 Location: Future…. ✌️ Posts: 698 Member: 2825953 Status: Offline Thanks Meter: 245 |
Installing Drivers… Launching browser event Failed After reinstall new WIN 10 64B now problem reaming, disable driver signature not working.
Searching for Samsung MTP Port Found at COM30
Installing Drivers… |
| |
| 04-20-2021, 13:59 |
#12 (permalink) |
|
ahmedksal No Life Poster
Join Date: Jul 2003 Location: LEBANON Posts: 2,726 Member: 33690 Status: Offline Thanks Meter: 3,391 |
same here samsung s10 android Q version
Searching for Samsung MTP Port |
| |
| 04-20-2021, 20:30 |
#13 (permalink) |
|
rashidmohamm Freak Poster
Join Date: Sep 2011 Location: Sudan Posts: 447 Member: 1648903 Status: Offline Thanks Meter: 136 |
Use Easy Samsung Frp 2020 v2 with internet on pc |
| |
| 04-20-2021, 20:35 |
#14 (permalink) |
|
rashidmohamm Freak Poster
Join Date: Sep 2011 Location: Sudan Posts: 447 Member: 1648903 Status: Offline Thanks Meter: 136 |
Searching for Samsung MTP Port windows 10-64 |
| |
| 07-01-2021, 10:35 |
#15 (permalink) |
|
Svetli No Life Poster
Join Date: Apr 2000 Location: Bulgaria Kyustendil Age: 46 Posts: 1,096 Member: 1191 Status: Offline Thanks Meter: 125 |
After this log on phone display no message to open URL. Mobile is Z Fold 2 5G F916 with Firmware F916XXS1… Other way to remove FRP ? Quote:
Originally Posted by rashidmohamm Searching for Samsung MTP Port windows 10-64 |
| |
![]()
Vscode Error : Open browser failed!! Please check if you have installed the browser correctly!
seanmars, seeker-yang, zhuoyan, neyasbltb88, BStojanoska, shikerby, DianaNites, FubinSama, shamishekhar, azizmohammadi289, and 15 more reacted with thumbs up emoji
igolskyi, vishtechnor, UtekarDeven, surajgautamg77, bangyadiii, AnkitaPal12, julianszch, faizal28, naveen995, hsibin, and 8 more reacted with eyes emoji
![]()
Getting this error too when trying to open Google Chrome on Arch Linux.
![]()
Get this error too on Windows 10 + Google Chrome.
![]()
After I reinstalled the system, I installed this plugin and it looks like there is no problem.
![]()
After I reinstalled the system, I installed this plugin and it looks like there is no problem.
Reinstalled what system?
![]()
Same issue. The solution is simple. Find the name of the exec command, for google chrome in arch linux is google-chrome-stable. Edit the command name in ~/.vscode/extensions/techer.open-in-browser-2.0.0/out/config.js. Change google-chrome to google-chrome-stable. Reload vscode.
As reference in the repo out/config.js
seanmars, Milkysilk, zhengtianle, BStojanoska, SadWood, catlair, unixc3t, fairyland-cat, jeoy, shanehh, and 16 more reacted with thumbs up emoji
SadWood, igolskyi, and RaulOn18 reacted with hooray emoji
igolskyi, ghazthiskc19, fengjrrz, Ruixi-rebirth, and RaulOn18 reacted with confused emoji
994AK, igolskyi, ghazthiskc19, and RaulOn18 reacted with heart emoji
igolskyi, NikitaOtr, and RaulOn18 reacted with rocket emoji
igolskyi, ghazthiskc19, RaulOn18, haribaz, and Yamuna-Devi10 reacted with eyes emoji
![]()
After I installed Chinese version Firefox in kali Linux,the extension can’t open html file no longer.
![]()
Available with version 1.1.0
![]()
@b1tdust
Still not working after doing that, on ubuntu 18.04 here.
![]()
I’m facing the same issue in win10…could some please help with this!!!!
![]()
I experienced this and I found a solution for my error!
The folder that I put the .html file had an «&» in the title. Once I removed the «&» in the folder title, I haven’t experienced this error.
Happy coding!
![]()

please anyone solve my problem asap
![]()
![]()
@b1tdust is right,the same browser on different OS may has different name. maybe I could figure it out.
![]()
Same issue. The solution is simple. Find the name of the exec command, for google chrome in arch linux is google-chrome-stable. Edit the command name in ~/.vscode/extensions/techer.open-in-browser-2.0.0/out/config.js. Change google-chrome to google-chrome-stable. Reload vscode.
As reference in the repo out/config.js
@b1tdust even after doing this procedure, same error appearing
![]()
I have The same problem, and it started after i installed nodeJs on my Computer, It didn’t work either
After i tryed to debugg in VS-Code with Node something happend. I have checked all the settings for Live Server Extension, The settings for the envirement variables on the computer and even re-installed VS-Code but nothing work. ???
![]()
Any suggestions ?? My Config for Live Server looks like this:
{
«webRoot»: «${workspaceFolder}»,
«window.zoomLevel»: 1,
«liveServer.settings.CustomBrowser»: «chrome»
}
![]()
If you have a ‘&’ in your file path, delete it.
![]()
const chromeItem = {
    description: "Windows, Mac, Linux",
    detail: "A fast, secure, and free web browser built for the modern web",
    label: "Google Chrome",
    standardName: platform === 'win32'
        ? 'chrome'
        : (platform === 'darwin'
            ? 'google chrome'
            : 'chromium-browser'),
    acceptName: ['chromium-browser', 'chrome', 'google chrome', 'google-chrome'$
};
It is necessary to edit config in in file ~/.vscode/extensions/techer.open-in-browser-2.0.0/out/config.js.
google-chrome to chromium-browser at standardName:platform
![]()
same issue..I have installed live server too .But both are not working
![]()
@kickgod
open-in-browser by coderfee
install this extension it will work for all linux distros
then press ctrl+k then D it will open your HTML file in default browser.
![]()
I’m having this issue on Windows.
I reinstalled VS code and the extension and the same error comes up.
I looked at the Github repo. but in not sure what to do.
does someone know what to do? to resolve this issue?
![]()
I’m having this issue on Windows.
I reinstalled VS code and the extension and the same error comes up.
I looked at the Github repo. but in not sure what to do.
does someone know what to do? to resolve this issue?
same problem
![]()
"use strict";
Object.defineProperty(exports, "__esModule", { value: true });
const platform = process.platform;
const chromeItem = {
    description: "Windows, Mac, Linux",
    detail: "A fast, secure, and free web browser built for the modern web",
    label: "Google Chrome",
    standardName: platform === 'win32'
        ? 'chrome'
        : (platform === 'darwin'
            ? 'google chrome'
            : 'google-chrome-stable'), //if you use google chrome stable version use this. if beta set to "google-chrome-stable".
    acceptName: ['chrome', 'google chrome', 'google-chrome', 'gc', '谷歌浏览器']
};
const chromiumItem = {
    description: "Mac",
    detail: "A fast, secure, and free web browser built for the modern web",
    label: "Google Chromium",
    standardName: "Chromium",
    acceptName: ['chromium']
};
const firefoxItem = {
    description: "Windows, Mac, Linux",
    detail: "A fast, smart and personal web browser",
    label: "Mozilla Firefox",
    standardName: "firefox",
    acceptName: ['firefox', 'ff', 'mozilla firefox', '火狐浏览器']
};
const firefoxDeveloperItem = {
    description: "Mac",
    detail: "A fast, smart and personal web browser",
    label: "Mozilla Firefox Developer Edition",
    standardName: "FirefoxDeveloperEdition",
    acceptName: ['firefox developer', 'fde', 'firefox developer edition']
};
const ieItem = {
    description: "Windows",
    detail: "A slightly outdated browser",
    label: "Microsoft IE",
    standardName: "iexplore",
    acceptName: ['ie', 'iexplore']
};
const edgeItem = {
    description: "Windows",
    detail: "A modern browser aiming to replace ie",
    label: "Microsoft Edge",
    standardName: "MicrosoftEdge",
    acceptName: ['edge', 'msedge', 'microsoftedge']
};
const safariItem = {
    description: "Mac",
    detail: "A fast, efficient browser on Mac",
    label: "Apple Safari",
    standardName: "safari",
    acceptName: ['safari']
};
const operaItem = {
    description: "Windows, Mac",
    detail: 'A fast, secure, easy-to-use browser',
    label: 'Opera',
    standardName: 'opera',
    acceptName: ['opera']
};
const browsers = [chromeItem, firefoxItem, operaItem];
if (process.platform === 'win32') {
    browsers.push(ieItem);
    browsers.push(edgeItem);
}
else if (process.platform === 'darwin') {
    browsers.push(safariItem);
    browsers.push(chromiumItem);
    browsers.push(firefoxDeveloperItem);
}
exports.default = {
    browsers: browsers,
    app: 'open-in-browser'
};
//# sourceMappingURL=config.js.map
i’m on arch linux with google chrome stable version and i solved this issue with this.
![]()
I had the same problem and i changed «chrome» in setting.json (Vscode) to :
«liveServer.settings.CustomBrowser»: «google-chrome-stable»,
ps: I use manjaro !
![]()
![]()
Workaround in Archlinux
export BROWSER="/usr/bin/firefox" && code .
Or add variable BROWSER in ~/.bashrc
export BROWSER="/usr/bin/firefox"
then run
source ~/.bashrc
![]()
"use strict";
Object.defineProperty(exports, "__esModule", { value: true });
const platform = process.platform;
const chromeItem = {
    description: "Windows, Mac, Linux",
    detail: "A fast, secure, and free web browser built for the modern web",
    label: "Google Chrome",
    standardName: platform === 'win32'
        ? 'chrome'
        : (platform === 'darwin'
            ? 'google chrome'
            : 'google-chrome-stable'), //if you use google chrome stable version use this. if beta set to "google-chrome-stable".
    acceptName: ['chrome', 'google chrome', 'google-chrome', 'gc', '谷歌浏览器']
};
const chromiumItem = {
    description: "Mac",
    detail: "A fast, secure, and free web browser built for the modern web",
    label: "Google Chromium",
    standardName: "Chromium",
    acceptName: ['chromium']
};
const firefoxItem = {
    description: "Windows, Mac, Linux",
    detail: "A fast, smart and personal web browser",
    label: "Mozilla Firefox",
    standardName: "firefox",
    acceptName: ['firefox', 'ff', 'mozilla firefox', '火狐浏览器']
};
const firefoxDeveloperItem = {
    description: "Mac",
    detail: "A fast, smart and personal web browser",
    label: "Mozilla Firefox Developer Edition",
    standardName: "FirefoxDeveloperEdition",
    acceptName: ['firefox developer', 'fde', 'firefox developer edition']
};
const ieItem = {
    description: "Windows",
    detail: "A slightly outdated browser",
    label: "Microsoft IE",
    standardName: "iexplore",
    acceptName: ['ie', 'iexplore']
};
const edgeItem = {
    description: "Windows",
    detail: "A modern browser aiming to replace ie",
    label: "Microsoft Edge",
    standardName: "MicrosoftEdge",
    acceptName: ['edge', 'msedge', 'microsoftedge']
};
const safariItem = {
    description: "Mac",
    detail: "A fast, efficient browser on Mac",
    label: "Apple Safari",
    standardName: "safari",
    acceptName: ['safari']
};
const operaItem = {
    description: "Windows, Mac",
    detail: 'A fast, secure, easy-to-use browser',
    label: 'Opera',
    standardName: 'opera',
    acceptName: ['opera']
};
const browsers = [chromeItem, firefoxItem, operaItem];
if (process.platform === 'win32') {
    browsers.push(ieItem);
    browsers.push(edgeItem);
}
else if (process.platform === 'darwin') {
    browsers.push(safariItem);
    browsers.push(chromiumItem);
    browsers.push(firefoxDeveloperItem);
}
exports.default = {
    browsers: browsers,
    app: 'open-in-browser'
};
//# sourceMappingURL=config.js.map
i’m on arch linux with google chrome stable version and i solved this issue with this.
What’s this file name and where did you put it?
You have to set default extension name in plugin open-in-browser with new as gc, google-chrome,chrome in vs code setting extensions. It work fine!!
![]()
I’m currently facing this problem with windows10
Pls how do I fix it
How to Fix Opening Browser Failed in Samsung Device, If you are unable to get “View” message on your device through using a (Samfirm Tool), so this error can easily be fixed by following some easy steps from below, and you can easily receive a popup message with “View” option in your new Samsung Galaxy devices to easily bypass frp account.
We will just update driver from (Lib) folder, which is already available in your C driver > Samfirm > Lib, we only have to update this one manually, and after that your device will be detected by Samfirm tool, and will be able to send message in your connected Samsung Galaxy device, so ho we do that, just follow steps carefully.
Fix Opening Browser Failed:
-If you are trying to open “Youtube/Google” with other than (Samfirm tool), so we would recommend you to first download and install Samfimr Tool V2.1 [DOWNLOAD].
-Install latest Samsung USB Driver [DOWNLOAD].
-Connect Device with PC. (Do make sure, WiFi is connect to your Samsung Devic).
-Open “Device Manager”, and go to “Other Device”
-There you will see an exclamation sign with (SAMSUNG_Android), that means the driver is not working properly, and that is why you are unable to get result which you are required with Samfirm tool.
-Right click on “SAMSUNG_Android”, and click to “Update Drivers”.
-Select “Browser my Computer for Driver”.
-Select “Let me Pick from a list of available driver on my Computer”.
-Click on “libusbK USB Devices, after that click on “Have Disk..”.
-Now we just have to click on “Browse”, and click on “Samsung_Android.inf“.
Note: After hitting on “Browser”, we will automatically get into the the “Lib” folder, if we do not, so just go to that folder manually, for that, you can hit on > Browser > C Drive > Program file > Samfirm > Lib.
-Now click to “Update > Next > Yes”.
-The driver will be installed and updated from the Lib folder of (Samfirm tool), and then the exclamation sign will just disappear, and you can easily receive popup message in your Samsung device, because we are done now from Fix Opening Browser Failed in Samsung Device.
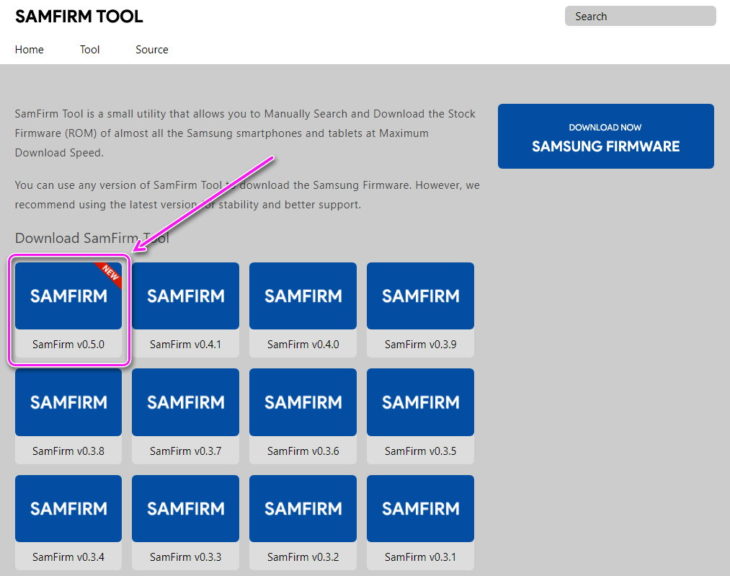
SamFirm
версия: 0.5.0
Последнее обновление программы в шапке: 07.07.2022


Краткое описание:
Скачивание послед. оф. прошивок для устройств ряда Samsung.
Описание:
SamFirm (сокр. от Samsung Firmware) — программа для скачивания последних прошивок для устройств серии Samsung. Качает быстро и стабильно, без всякого гемороя и регистрации, а также СМС и просьбы выкл. AdBlock. Пишем в поля нужные данные и качаем. После распаковываем и шьем Odin‘ом.
— Framework можно загрузить на свое корыто тут.
Через .NET Version Detector. Распаковываем, запускаем, смотрим. (запуск лучше от админа делать)
— .NET Version Detector v18-R1.exe ( 848 КБ )
Можно ещё через CMD, но там геморой, да и не всегда точно показывает из-за разных сборок Win.
— Прекрасно видно что у меня стоят версии 2.0, 3.0, 3.5 и 4.7.2. Подмечу что версии выше 4.0.0, как в данном случае, заменяют версию 4.0.

*Пункт 2 по усмотрению.
*Пункт 4 не обязателен.

- Q: CRC не прошел проверку. Пример, Пост elena2211, #82631785
- Z: Убрать галку на «Check CRC32» и попытаться снова. Пример, Пост LinkinPro, #82632204

- Египет:
— EGY
- Монголия:
— MPC
- Чили:
— CHB
— CHE
— CHL
— CHT
- ЮАР (Южная Африка):
— MID
— ARB
— XSG
— AFR
— ITO
— XFA
— XFC
— XFM
— XFV
— XFE
Русский интерфейс: Да
Было слушно, поэтому я замутил архив/XML нужных настроек — заходим, вписываем регион и модель, качаем. Все!
— ZIP‘ник: Просто распаковать и пользоваться — SamFirm v0.3.6 [Mod].zip ( 4.93 МБ )
Samfirm — программа для скачивания прошивок для устройств Samsung
SamFirm – это программа для поиска и загрузки официальных прошивок на смартфоны от Samsung. Софт работает сразу после установки и не требует регистрации учетной записи.
Возможности программы
SamFirm используется для скачивания прошивок с серверов Samsung. Это удобнее, чем искать те на тематических форумах, поскольку:
- необходимо указать только модель устройства и регион, для которого она была выпущена;
- скачанные прошивки являются официальными, без модификаций от пользователей, способных нести в себе трекеры отслеживания, вирусы или бесполезные приложения.
На серверах Самсунг хранится только последняя версия прошивки для конкретной модели.
Как установить ПО
Проще всего это сделать, скачав установочный файл по прямой ссылке ниже. После скачивания нужно запустить файл и подтвердить стандартные вопросы установки.
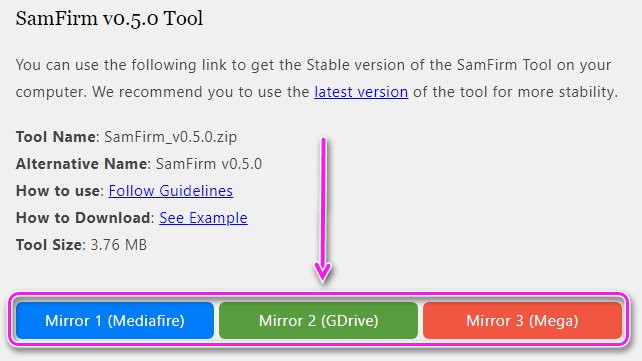
Также это можно сделать, посетив официальный сайт:
- На главной странице, щелкните по последней доступной версии.

- Оказавшись в следующем окне, пролистайте его вниз и выберите источник загрузки из 3 предложенных вариантов.

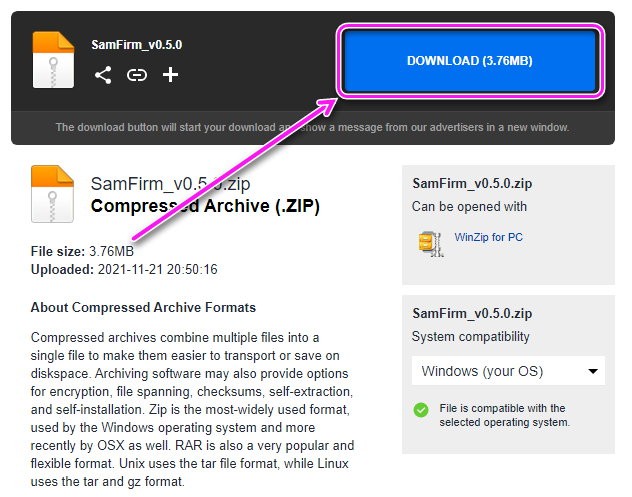
- Для примера выбираем MediaFire и оказываемся на другом сайте. Кликаем по «Download».

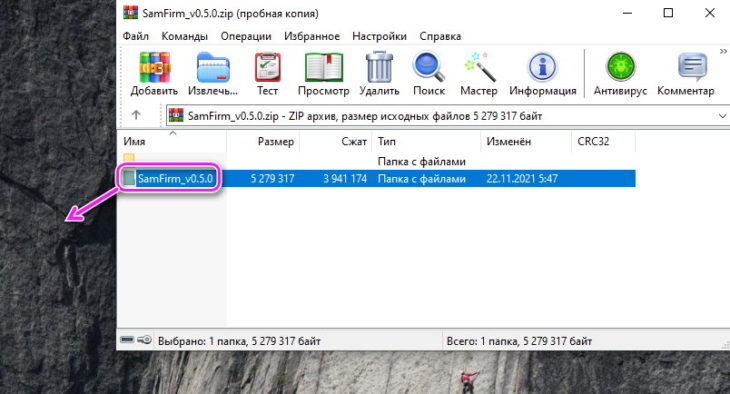
- Откройте загруженный архив и переместите расположенную в нем папку на рабочий стол или в другую директиву.

- Зайдите в папку и запустите приложение «SamFirm».
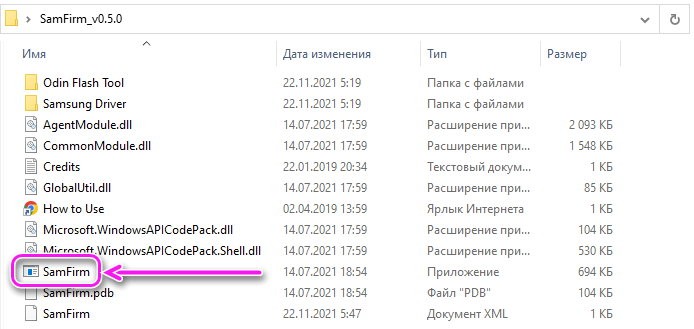
Внутри лежат ссылки на драйвера и программу для прошивки Самсунг. Чтоб с поиском апдейтов не было проблем, установите/обновите:
- NET Framework до версии 3.5 или выше;
- MS Visual C++ 2008 (x86);
- MS Visual C++ 2010 (x86).
Весь дополнительный софт загружают с официального сайта Microsoft.
Также в интернете можно найти SamFirm AiO 1.4.2 от разработчика Mahmoud Salah. По факту, это та же самая программа, но с никнеймом разработчика, слегка преображенным интерфейсом и прямыми ссылками на загрузку NET Framework и MS Visual C++.
Системные требования
Скачать SamFirm Tool можно бесплатно на любой ПК под управлением Windows 7 / 8 / 8.1 / 10 / 11. Официальной версии на русском языке нет, но он встречается в пользовательских модификациях.
Как пользоваться Samfirm
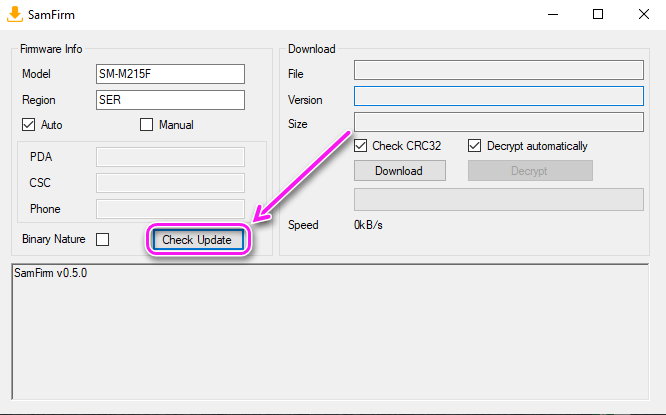
Как выглядит инструкция по использованию Самфирм:
- После запуска, в строчку «Model» введите название модели девайса. К примеру, не A52, а SM-A525F. Развернутое название модификации узнают из мануала для пользователя или на тематических форумах.
- В «Region» нужно указать региональный код девайса. Это 3 последних буквы в артикуле, нанесенном на коробку. Смартфоны, предназначенные для продажи на территории России, обозначают как AZC/BLN/EMT/ERS/GEO/MTV/SER/SNT.
- Поставьте отметку рядом с «Auto» для автоматического определения частей прошивки. Если оставить флажок рядом с «Manual» можно вручную указать части прошивки в 3 поля ниже: «PDA», «CSC» и «Phone».
- Отметьте «Binary Nature» для загрузки многофайловой сервисной прошивки, если таковая нужна.
- Обязательно поставьте отметки рядом с «Check CRC32» и «Decrypt automatically». Первая функция нужна для проверки суммы прошивки, вторая для ее расшифровки.
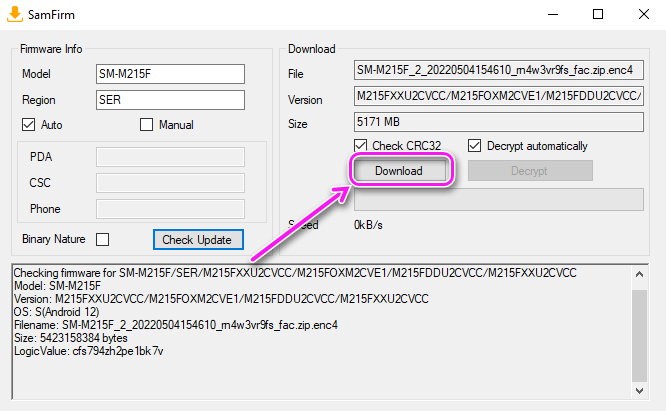
- Теперь жмите на «Check Update», чтобы запустить поиск прошивки.

- После нахождения подходящего варианта, жмите на «Download».

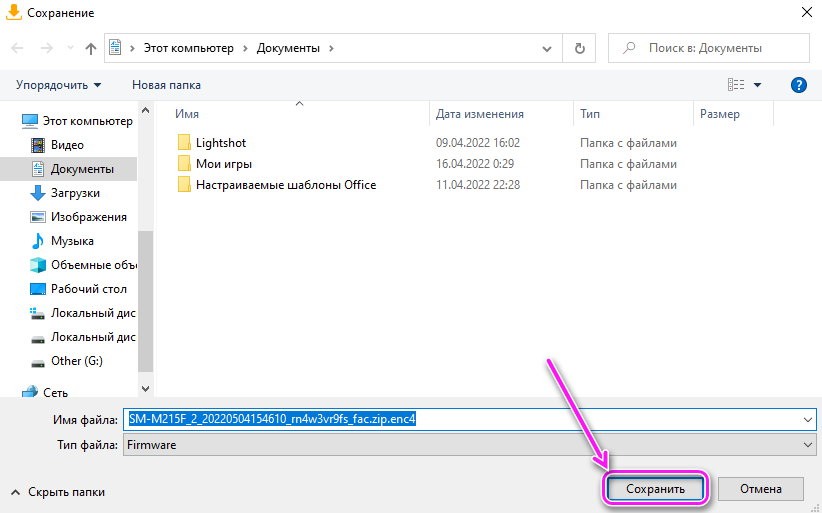
- Укажите папку, куда «Сохранить» загружаемые файлы.

- После загрузки и расшифровки, переходите к прошивке девайса с помощью Odin.
Когда операция завершится, закройте окно софта.
Возможные проблемы программы
Разберемся с часто возникающими ошибками.
Появляется сообщение installing drivers failed
Скачайте актуальные драйвера для устройства на Windows. Ссылка на их загрузку находится в папке с SamFirm. Если это не помогло, попробуйте:
- разместить программу так, чтобы на пути папки не было кириллицы, например – Disk C / Programs / SamFirm;
- отключите обязательную проверку подписи драйвера – ищите способ, как это сделать для конкретной ОС в интернете.
Не находит прошивку
Что делать в таком случае:
- переустановить софт, отмеченный выше;
- проверить правильность ввода модели и/или региона;
- попробовать найти прошивку вручную «Manual».
Ошибка Error: CRC does not match. Please redownload the file
Отключите проверку CRC32.
Ошибка opening the browser on your device failed
Встречается на сборке SamFirm от Mahmoud Salah. Решается отключением обязательной проверки подписи драйвера.
Программа не видит телефон
Во время поиска прошивки не нужно подключать смартфон к ПК. Если появляется проблема с определением девайса во время прошивки – установите драйвера и найдите инструкцию по обходу FRP на конкретной модели.
Преимущества и недостатки программы
- в распакованном виде занимает 5 МБ;
- находит актуальные и официальные прошивки;
- легко разобраться даже без знания английского языка;
- в папке с софтом есть ссылки на дополнительное ПО.
- необходимо устанавливать дополнительный софт.
Как удалить SamFirm
Перенести папку с программой в корзину или отметить ее левой кнопкой мышки и щелкнуть по «Delete».
Samfirm installing drivers failed что делать

1.4.0
• Added One Click Bypass FRP (MTP Mode) => Supported Nokia Devices ( first in world )
Support More Models For Brands :-
Nokia / Huawei / Sony / Lenovo
== added Support To Download More Tools :-
** Sony Tools
** MTK Flash Tools
** SPD Flash Tools
** QLM Flash Tools
************************
== added ADB functions :-
** Read Device info
** Enable Arabic Language
** Reset Screenlock
** Reset FRP
** Reboot Device
************************
== added Fastboot functions :-
** Read Device info
** Reboot Device
************************
== Fixed Some Bugs For :-
-bypass FRP MTP
-Check internet Connection
************************
************************
== add New Method To MTP Bypass FRP.
== Bypass FRP (Offline)
== Support Bypass FRP For Sharp Devices ( New )
== One Click Read info
== One Click Format + FRP
== One Click Format Userdata
== One Click FRP
== One Click FRP( Samsung mtk) no need to select any partition
== One Click Reset Mi Account AntiRelock
Just Click >> Connect Brom >>> Opreation Done
If you’r Osis 64Bit you Must Disable Signature Drivers First
Before Make ByPass FRP
see How To make it
=====================================
Problem 2#
installing Drivers. Failed
when Make MTP Bypass FRP
Fix
you need To Extract Tool into another partion
Dont Extract in C Partion
Fix
you Need to Disable Signature Drivers First
Before Make ByPass FRP
From Software Tools (tab)

SamFirm Tool Aio is a small Utility program that you can use to download Samsung and Apple Firmware, Flash tools, ADB File, Sboot file, This Tool also helps to Bypass FRP in MTP mode from Samsung phones. If you have a phone with FRP Google lock message, then follow these simple steps and download SamFirm Tool v1.4.3 latest setup to fix your phone.
Google provides the new FRP feature on Android R11, Android Q10, Pie 9, Oreo 8.0. versions. Samfirm tool developed by Mohmoud Salah for Samsung Smartphones to Bypass FRP Lock. Samfirm tool perfectly helps for Android R11, Android Q10, Pie 9, Oreo 8.0.
Samfirm tool Aio (V1.4.3) (Latest Version) Free download that can be used Easy no need any Software Box. Samfirm FRP Tool 2021 used to Bypass the Samsung FRP Google Lock.
The URL FOR Samfirm FRP Tool V1.4.3, is quoted her in order to enable you to get a VIEW and Cancel pop-up on your SAMSUNG Phone and to access YouTube through the Chrome Browser.
How to use Samfirm Tool
► Download SamFirm FRP Bypass Tool
► Extract the Tool and install it.
► Install Samsung USB Driver
Important Step: Disable the Antivirus Protection first, otherwise, you will not able to Download and use this SamFirm FRP Tool V1.4.3
Download SamFirm FRP Tool V1.4.3 ( All Version )
Here, you will get the direct download link to download the SamFirm FRP Unlock Tool V1.4.3 all other versions easily, Also make sure to install the Samsung USB Driver on your computer.
Fix Server Error & install Driver Failed Samsung,Mi,Sony,Nokia FRP One click tool to open browser to remove frp.

How To Bypass «Fix Server Error & install Driver Failed Samsung,Mi,Sony,Nokia FRP One click tool to open browser to remove frp.»?
1# Connect your phone on wifi.
2# Download 2021 FRP bypass tool.
3# Install Samsung Usb driver.
4# Connect your phone on pc.
5# Open Download Frp bypass tool.
6# Select Samsung Android Port.
7# Then Click View tab now your phone open google crome then many method avaiable after open google crome on youtube.
8# Now your One click tool to open browser to remove frp on all samsung Task complite.
If You Problem Show Same Post «Fix Server Error & install Driver Failed Samsung,Mi,Sony,Nokia FRP One click tool to open browser to remove frp»Join Video?
And now you know about Fix Server Error & install Driver Failed Samsung,Mi,Sony,Nokia FRP One click tool to open browser to remove frp If you think i was able to help you in anyway, or if you enjoyed my post, i would love to hear from you. Any kind of suggestions or advice is always welcomed. Leave a comment below i will definetaly reply.
Samfirm with error correction: Could not send BinaryInform. Status code 200/401 Authorization failed
Breadcrumb
Kelison
Member
Hello guys to anyone who wants to use samfirm and is getting the error: Could not send BinaryInform. Status code 200/401
Authorization failed.
I corrected this error, remembering that the credits for the development of the samfirm are from the user zxz0O0, I just corrected the error that arose recently
updated links 1/8/2021 to version 0.3.7.1
correction in binary nature
The program needs some windows add-ons, installed if you don’t have them, download and install.
Guys the version I made available for download has a WebBrowser where it loads information related to downloads, friend YandereSan recommends another variation of samfirm, the recommendation of which is in the third comment, thanks for your attention.
mzia khan
New member
Hello guys to anyone who wants to use samfirm and is getting the error: Could not send BinaryInform. Status code 200/401
Authorization failed.
I corrected this error, remembering that the credits for the development of the samfirm are from the user zxz0O0, I just corrected the error that arose recently
The program needs some windows add-ons, installed if you don’t have them, download and install.
debloated
New member
YandereSan
Senior Member
You did a lot more than that. Why do you have an iframe connecting to your domain? Proxy’s blocking it, but if I had to guess, you likely have adsense there.
To everyone else, use the following:
Kelison
Member
You did a lot more than that. Why do you have an iframe connecting to your domain? Proxy’s blocking it, but if I had to guess, you likely have adsense there.
To everyone else, use the following:
weltinho21
New member
Hello guys to anyone who wants to use samfirm and is getting the error: Could not send BinaryInform. Status code 200/401
Authorization failed.
I corrected this error, remembering that the credits for the development of the samfirm are from the user zxz0O0, I just corrected the error that arose recently
updated links 1/8/2021 to version 0.3.7.1
correction in binary nature
The program needs some windows add-ons, installed if you don’t have them, download and install.
Guys the version I made available for download has a WebBrowser where it loads information related to downloads, friend YandereSan recommends another variation of samfirm, the recommendation of which is in the third comment, thanks for your attention.
Breadcrumb
agreenbhm
Senior Member
Hi @acasilver, thanks for the tool. I have a couple of concerns:
3) Related to item 2: why is an Internet connection required to use certain features of the software? When attempting MTP FRP, where nothing external is needed dynamically, this function will fail if no Internet connection is present. Why are Internet connection checks required?
SamFirm seems to do what is advertised, but I’m a bit suspicious of it due to the concerns listed. Please let me know your thoughts.
Elek-315
Member
fenek81
Member
@acasilver
The file with version 1.4.1 Chrome sees as a malicious file, can you do something about it?

SamFirm A.i.o_v1.4.1
demovirus
New member
Attachments
acasilver
Member
acasilver
Member
@acasilver
The file with version 1.4.1 Chrome sees as a malicious file, can you do something about it?
SamFirm A.i.o_v1.4.1
acasilver
Member
Cristian77777
New member
Attachments
acasilver
Member
Hi @acasilver, thanks for the tool. I have a couple of concerns:
3) Related to item 2: why is an Internet connection required to use certain features of the software? When attempting MTP FRP, where nothing external is needed dynamically, this function will fail if no Internet connection is present. Why are Internet connection checks required?
SamFirm seems to do what is advertised, but I’m a bit suspicious of it due to the concerns listed. Please let me know your thoughts.
iffone
New member
acasilver
Member
caden2517
New member
demovirus
New member
vovanxp
Member
Checking firmware for ( SM-G970F / SER ) Error: Could not send BinaryInform. Status code 200/400
Request was invalid. Are you sure the input data is correc?
ggroup
Senior Member
note: disabled signature drivers
rochater
Member
tuncay_93
Senior Member
@rochater
kcwind
Member
BrauVargas
New member
Esa aplicación puede cambiar el IMEI?
Translation: Can that app change the IMEI?
Senior Member
Similar threads
Breadcrumb
Top Liked Posts
1.2.0
• Added Some opreations in MTP Mode
• Read Device information
• Factory Reset
• Enter Download Mode
• Exit Download Mode
1.3.0
• Added Samsung Bypass FRP (MTP Mode) => Open Youtube URl
1.3.1
• Added Samsung Bypass FRP (MTP Mode) => Open Apps From Galaxy Store ( first in world )
1.3.2
• Added One Click Bypass FRP (MTP Mode) => Supported More Brands ( first in world )
No Need To Select Any Devices Or Brands
Just Connect & Click Bypass FRP
1.3.3
•Fixed Some Bugs (With Some Users Using Windows 7 )
• Added One Click Bypass FRP (MTP Mode) => Supported Google Pixel Devices ( first in world )
1.4.0
• Added One Click Bypass FRP (MTP Mode) => Supported Nokia Devices ( first in world )
Support More Models For Brands :-
Nokia / Huawei / Sony / Lenovo
== added Support To Download More Tools :-
** Sony Tools
** MTK Flash Tools
** SPD Flash Tools
** QLM Flash Tools
************************
== added ADB functions :-
** Read Device info
** Enable Arabic Language
** Reset Screenlock
** Reset FRP
** Reboot Device
************************
== added Fastboot functions :-
** Read Device info
** Reboot Device
************************
== Fixed Some Bugs For :-
-bypass FRP MTP
-Check internet Connection
************************
************************
== add New Method To MTP Bypass FRP.
== Bypass FRP (Offline)
== Support Bypass FRP For Sharp Devices ( New )
== One Click Read info
== One Click Format + FRP
== One Click Format Userdata
== One Click FRP
== One Click FRP( Samsung mtk) no need to select any partition
== One Click Reset Mi Account AntiRelock
Just Click >> Connect Brom >>> Opreation Done
If you’r Osis 64Bit you Must Disable Signature Drivers First
Before Make ByPass FRP
see How To make it
=====================================
Problem 2#
installing Drivers. Failed
when Make MTP Bypass FRP
Fix
you need To Extract Tool into another partion
Dont Extract in C Partion
Fix
you Need to Disable Signature Drivers First
Before Make ByPass FRP
From Software Tools (tab)
Hi @acasilver, thanks for the tool. I have a couple of concerns:
3) Related to item 2: why is an Internet connection required to use certain features of the software? When attempting MTP FRP, where nothing external is needed dynamically, this function will fail if no Internet connection is present. Why are Internet connection checks required?
SamFirm seems to do what is advertised, but I’m a bit suspicious of it due to the concerns listed. Please let me know your thoughts.
== Software Tools (tab)
1.2.0
• Added Some opreations in MTP Mode
• Read Device information
• Factory Reset
• Enter Download Mode
• Exit Download Mode
1.3.0
• Added Samsung Bypass FRP (MTP Mode) => Open Youtube URl
1.3.1
• Added Samsung Bypass FRP (MTP Mode) => Open Apps From Galaxy Store ( first in world )
1.3.2
• Added One Click Bypass FRP (MTP Mode) => Supported More Brands ( first in world )
No Need To Select Any Devices Or Brands
Just Connect & Click Bypass FRP
1.3.3
•Fixed Some Bugs (With Some Users Using Windows 7 )
• Added One Click Bypass FRP (MTP Mode) => Supported Google Pixel Devices ( first in world )
If you’r Osis 64Bit you Must Disable Signature Drivers First
Before Make ByPass FRP
see How To make it
Как исправить Не удалось установить ошибку драйвера hcmon

Если во время установки продуктов VMware (vSphere, Remote Console и т. Д.) Вы получили сообщение об ошибке «Не удалось установить драйвер hcmon», не беспокойтесь. Вы можете решить проблему с помощью одного из решений в этой статье.
Что такое драйвер HCMON?
Драйвер HCMON — это виртуальный драйвер USB. Это позволяет физическим USB-портам подключаться к виртуальным машинам.
Как исправить эту ошибку?
Ошибка возникает из-за разных проблем. Мы публикуем 5 лучших решений в этой статье. Вы можете исправить эту ошибку с помощью одного из этих решений. Возможно, вам не придется пробовать их все. Просто пройдите вниз, пока не найдете тот, который работает для вас.
Решение 1: Установите продукт как администратор
Решение 2: Обновите драйверы
Решение 3: Удалите драйвер hcmon.sys
Решение 4: Установите продукт с помощью PowerShell
Решение 5: Установите .NET Framework 3.5.1
Решение 1. Установите продукт от имени администратора.
Когда вы устанавливаете продукт, вам необходимо установить драйвер hcmon. Windows может видеть это как пользователь, добавляющий оборудование к ПК. Но у этого пользователя нет разрешения на это. В этом случае эта ошибка может возникнуть. Попробуйте установить продукт от имени администратора:
1) Щелкните правой кнопкой мыши на загруженном установочном файле.
2) Нажмите Запустить от имени администратора. Если вы не видите опцию «Запуск от имени администратора», это решение не применимо к вам. Пропустите и перейдите к другим решениям.

Решение 2. Обновите драйверы
Поврежденные драйверы, особенно графические драйверы, могут вызвать эту ошибку. Чтобы устранить проблему, попробуйте обновить драйверы.
Если у вас нет времени, терпения или навыков работы с компьютером для обновления драйверов вручную, вы можете сделать это автоматически с Водитель Легко.
Driver Easy автоматически распознает вашу систему и найдет для нее правильные драйверы. Вам не нужно точно знать, на какой системе работает ваш компьютер, вам не нужно рисковать загрузкой и установкой неправильного драйвера, и вам не нужно беспокоиться об ошибках при установке.
Вы можете автоматически обновить драйверы с помощью БЕСПЛАТНОЙ или Профессиональной версии Driver Easy. Но в версии Pro это займет всего 2 клика (и вы получите полную поддержку и 30-дневную гарантию возврата денег):
1) Скачать и установите Driver Easy.
2) Запустите Driver Easy и нажмите Сканировать сейчас. Driver Easy проверит ваш компьютер и обнаружит проблемы с драйверами.

3) Нажмите Обновить кнопка рядом с помеченными драйверами для автоматической загрузки и установки правильной версии их драйвера (вы можете сделать это с бесплатной версией). Или нажмите Обновить все для автоматической загрузки и установки правильной версии всех драйверов, которые отсутствуют или устарели в вашей системе (для этого требуется версия Pro — вам будет предложено выполнить обновление при нажатии кнопки «Обновить все»).

Решение 3. Удалите драйвер hcmon.sys
Возможно, драйвер HCMON установлен. Одним из возможных решений является удаление драйвера hcmon.sys. Следуй этим шагам:
1) Перейти к Диспетчер устройств.
2) Нажмите Посмотреть > Показать скрытые устройства.

3) Двойной щелчок Драйверы без Plug and Play.
4) Щелкните правой кнопкой мыши hcmon и нажмите Удалить.
6) Удалить C: Windows system32 Drivers hcmon.sys файл.
7) Перезагрузите компьютер.
Решение 4. Установите продукт с помощью PowerShell
Попробуйте установить продукт в PowerShell. Следуйте инструкциям ниже:
1) Введите «powershell» в поле поиска. Щелкните правой кнопкой мыши Windows PowerShell (Имя может отличаться в зависимости от используемой версии Windows.) И нажмите Запустить от имени администратора.

2) Перейдите в место, где вы сохранили установочный файл. Это чтобы получить имя MSI.
3) Тип . xxxx.msi в командной строке PowerShell и нажмите Войти на вашей клавиатуре. XXXX означает имя файла MSI. Замените его своим именем файла MSI.
В моем случае мой файл «VMware-VMRC-10.0.1-5898794»:

Поэтому я набрал «. VMware-VMRC-10.0.1-5898794.msi»:

Решение 5. Установите .NET Framework 3.5.1
Для успешной установки продукта убедитесь, что на вашем компьютере установлена .NET Framework 3.5.1. Если нет, установите его.
Нажмите здесь, чтобы перейти на страницу загрузки Microsoft для загрузки .NET Framework 3.5.1. Затем установите его на свой компьютер.
If you want to bypass FRP lock from your Samsung Galaxy Android 11, Android 8, Android 9, Android 10, phone by using the Easy Samsung FRP Tool or SamFirm AIO Tool and getting Launching Browser Event Failed, Then this article will help you to find the best solution to Fixed Samsung FRP Unlock Launching Browser Event Failed Without PC No Easy FRP Tool or No SamFirm Tool easily. So, follow these simple steps below to fix the problem easily.
SamFirm or Easy Samsung FRP Tool is an MTP open browser program that can help you to access the device browser on your FRP-enabled phone. But, with the Samsung latest security patch update, it has been fixed and the tool wouldn’t help you to Open the device browser. So you have to find some alternative solution to access the device browser and bypass the FRP lock successfully.
Here on this page, we will guide on how to fix Samsung FRP Unlock Launching Browser Event Failed Without PC Easy Samsung FRP Tool and SamFirm AIO Tool easily.
More: Alliance Shield X APK Latest Version 2022 Free Download
- First, Switch on your Samsung Android 11 phone
- Click on Start button
- Agree to Terms & Conditions and click Next
- Connect your Samsung Galaxy phone to a Wifi network
- Now press the Volume UP & Power Key at the same time
- Tap Use
- Again Tap the Volume UP & Power Key quickly to enable Talkback
- Now Draw “L”
- Double tap to select Talkback Settings
- Press the Volume UP & Power Key again to turn Off the Talkback.
- Select Braille Keyboard
- Tap How to Use Braille Keyboard
- A popup will appear, Tap on Gboard
- Now it will lead you to the Google Play Store Sign In screen
- Tap on “3 dots” Select Play Protect =>> Learn More
- Long Press on any Text =>> Then Select All =>> Copy =>> Close
- Now Go back to the main Welcome Screen
- Tap START
- Go to the WiFi Screen
- Click on Add Network =>> Advanced =>> Proxy =>> Manual
- Now you need Pin/Puk enable Sim Card
- Long Press on the Proxy Field =>> Select Paste & Continuously Tap on the Proxy Field & Insert the SIM Card at the same time.
- Now Eject the SIM Card while Screen showing up screen lock
- Swipe Left the Timeline bar and then tap on lock icon
- Then you will see Galaxy Setup
- Swipe Left Notification bar
- First Tap on the Settings icon & then tap the bell icon & tap on the Android Setup several times.
- Now you can use the Notification Bar
- Tap on Media =>> Grant the Permission
- Then Tap on Galaxy Store Icon
- Now Galaxy Store will open
- Tap Agree
- Then Tap on the Search Icon and Search for Samsung Internet
- Sign in with Samsung Account
- Install the Samsung Internet
- Once the installation process has been done => Tap Open…
- Tap on the Search bar and type any of these two below URL’s.
- https://tiny.cc/frptools
- Or
- https://bit.ly/2NKxXYs
- Go to the FRP bypass APK =>> Tap To Open FRP APPS section
- Select Open Settings App =>> Tap Open
- Now it will lead you to the Settings app
- We’ll need another Samsung Android phone now to make a cloud backup and then we restore that backup to our FRP locked phone.
- Go to settings =>> Accounts & backup
- Enter your own Google & Samsung Account (I’ve already added my both accounts)
- Open Play Store – Download & Install Alliance Shield X App
- Go to Settings =>> Accounts & backup =>> Backup & Restore =>> Backup data
- Uncheck everything except Apps and then tap Back up
- All data backed up Tap done, Let’s back to our FRP Locked phone
- Go to Settings =>> Accounts & backup =>> Backup & Restore =>> Restore data
- Update Samsung Cloud? Tap Update and wait for app to be updated, Then restore data again
- Select all =>> Tap Restore
- Go back to menu and Open Alliance Shield X App
- Tap Next => Next => Next => Got IT
- Click on register and then enter your username, password, email & confirmation code, Tap Submit and check your email for verification link
- Name your Device: Android 11 FRP & tap next
- Enable Device Admin and then tap Activate (You must see Admin enabled)
- Tap Next
- Enable Knox and then tap Confirm (you must see knox license validation successfully)
- Tap Next =>> Finish
- Knox and Admin must be in Green to Bypass FRP lock on Samsung A50 Android 11
- Go to App Manager and Search for Service Mode => Activities
- Search & Open: com.sec.android.app.modemui.activities.usbsettings
- Put an check on MTP + ADB and then connect USB Cable to phone
- Download: Samsung ADB Download Mode FRP Tool on PC:
- Run the Tool
- Go to Adb Section =>> Click on Remove Google Account
- It will take some time
- Once Finish, It will reboot your Samsung Android 11 phone
- Setup all initial steps
- On the Select Home App =>> Tap on the Screen once
- That’s it.
Read More: Alliance Shield X Fixed Too Many Devices Error Solution Latest
I write about Android FRP Solutions, Android problems, GSM tutorials. If your device stuck at the Google Account Verification screen then here you can find all the possible ways to Bypass it. In my free time, I love to play games:
– Hello everyone, in today’s video I would like to share with you how to Fix FRP Unlock “Failed Launching browser event” Samsung FRP Tool V2
How to Fix FRP Unlock ” Failed Launching browser event” Samsung FRP Tool V2
Download File: https://ictfix.net
READ MORE
How to Fix Crash App “Android System Webview” Update
If your Install is successful, please donate to ME, Thanks!
👍👍👍 http://bit.ly/donatePhoneGaming
———————————-
FOLLOW US 👍
▶️ https://ictfix.net/
▶️ FACEBOOK: https://www.facebook.com/gsmfixchannel/
▶️ SUBSCRIBE: https://goo.gl/EfqA7U
▶️ GOOGLE+: https://goo.gl/RYW8j5
▶️ Twitter: https://twitter.com/bacba_channe
