IP-адреса Comodo Secure DNS
• 8.26.56.26
• 8.20.247.20
IP-адреса Google Public DNS
Протокол Интернета 4 (TCP/IPv4)
• 8.8.8.8
• 8.8.4.4
IP-адреса OpenDNS Premium DNS
Выберите политику защиты
Фильтрация опасных сайтов
• 208.67.222.222
• 208.67.220.220
Блокировка взрослого контента
• 208.67.222.123
• 208.67.220.123
IP-адреса Norton ConnectSafe
Выберите политику защиты
Безопасность (вредоносное ПО, фишинг, мошеннические веб-сайты и веб-прокси)
• 199.85.126.10
• 199.85.127.10
Безопасность + Порнография
• 199.85.126.20
• 199.85.127.20
Безопасность + Порнография + Несемейный контент
• 199.85.126.30
• 199.85.127.30
IP-адреса Яндекс. DNS
Выберите политику защиты
Без фильтрации (скорость)
IPv4
• 77.88.8.8
• 77.88.8.1
IPv6
• 2a02:6b8::feed:0ff
• 2a02:6b8:0:1::feed:0ff
Фильтрация опасных сайтов
IPv4
• 77.88.8.88
• 77.88.8.2
IPv6
• 2a02:6b8::feed:bad
• 2a02:6b8:0:1::feed:bad
Фильтрация опасных сайтов и сайтов для взрослых
IPv4
• 77.88.8.7
• 77.88.8.3
IPv6
• 2a02:6b8::feed:a11
• 2a02:6b8:0:1::feed:a11
IP-адреса MetaCert DNS
блокировать порно-сайты, без ограничения доступа к остальным ресурсам в Интернете
• 184.169.223.35
• 54.247.162.216
А картинку на почту скину
Столкнулись с интересной проблемой у одного из заказчиков после перенастройки VPN сервера Windows Server 2012 с PPTP на L2TP/ IPSec (из за отключения поддержки PPTP VPN в iOS). Изнутри корпоративной сети VPN клиенты без каких-либо проблем подключаются к VPN серверу, а вот внешние Windows клиенты при попытке установить соединение с L2TP VPN сервером, выдают такую ошибку:
The network connection between your computer and the VPN server could not be established because the remote server is not responding. This could be because one of the network devices (e.g. firewalls, NAT, routers, etc) between your computer and the remote server is not configured to allow VPN connections. Please contact your Administrator or your service provider to determine which device may be causing the problem.

В других версиях Windows о наличии аналогичной проблемы могут свидетельствовать ошибки VPN подключения 800, 794 или 809.
Стоит отметить, что данный VPN сервер находится за NAT, а на маршрутизаторе настроен проброс портов, необходимых для работы L2TP:
- UDP 1701 — Layer 2 Forwarding Protocol (L2F) & Layer 2 Tunneling Protocol(L2TP)
- UDP 500
- UDP 4500 NAT-T – IPSec Network Address Translator Traversal
- Protocol 50 ESP
В правилах Windows Firewall VPN сервера эти порты также открыты. Т.е. используется классическая конфигурация. Для подключения используется встроенный VPN клиент Windows.
Если подключаться к этому же VPN серверу через PPTP, подключение успешно устанавливается.
VPN ошибка 809 для L2TP/IPSec в Windows за NAT
Как оказалось, проблема эта уже известна и описана в статье https://support.microsoft.com/en-us/kb/926179. По умолчанию встроенный VPN клиент Windows не поддерживает подключение к L2TP/IPsec через NAT. Дело в том, что IPsec использует протокол ESP (Encapsulating Security Payload) для шифрования пакетов, а протокол ESP не поддерживает PAT (Port Address Translation). Если вы хотите использовать IPSec для коммуникации, Microsoft рекомендует использовать белые IP адреса на VPN сервере.
Но есть и обходное решение. Можно исправить этот недостаток, включив поддержку протокола NAT—T, который позволяет инкапсулировать пакеты протокола ESP 50 в UDP пакеты по порту 4500. NAT-T включен по-умолчанию почти во всех операционных системах (iOS, Android, Linux), кроме Windows.
Если VPN сервер L2TP/IPsec находится за NAT, то для корректного подключения внешних клиентов через NAT необходимо на стороне Windows сервера и клиента внести изменение в реестр, разрешающее UDP инкапсуляцию пакетов для L2TP и поддержку (NAT-T) для IPsec.
- Откройте редактор реестра
regedit.exe
и перейдите в ветку:- Для Windows 10,8.1,7 и Windows Server 2016,2012R2,2008R2 — HKEY_LOCAL_MACHINESYSTEMCurrentControlSetServicesPolicyAgent
- Для Windows XP/Windows Server 2003 — HKEY_LOCAL_MACHINESYSTEMCurrentControlSetServicesIPSec
- Создайте DWORD параметр с именем AssumeUDPEncapsulationContextOnSendRule и значением 2;
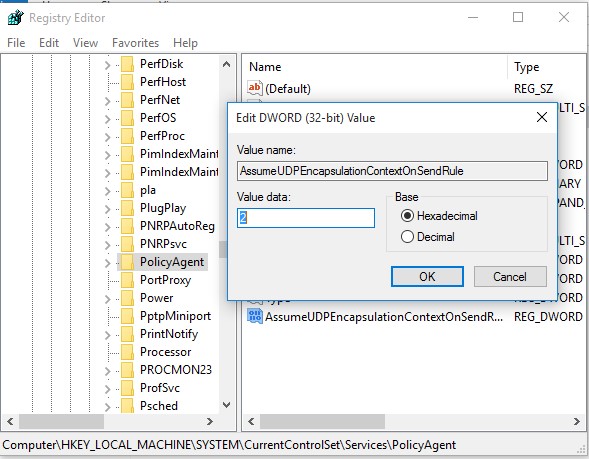
Примечание. Возможные значения параметра AssumeUDPEncapsulationContextOnSendRule:
- 0 – (значение по-умолчанию), предполагается, что VPN сервер подключен к интернету без NAT;
- 1 – VPN сервер находится за NAT;
- 2 — и VPN сервер и клиент находятся за NAT.
- Осталось перезагрузить компьютер и убедиться, что VPN туннель успешно создается.
Если и Windows VPN сервер и клиент находятся за NAT, нужно изменить это параметре на обоих системах.
Можно использовать командлет PowerShell для внесения изменений в реестр:
Set-ItemProperty -Path "HKLM:SYSTEMCurrentControlSetServicesPolicyAgent" -Name "AssumeUDPEncapsulationContextOnSendRule" -Type DWORD -Value 2 –Force;
После включения поддержки NAT-T, вы сможете успешно подключаться к VPN серверу с клиента через NAT (в том числе двойной NAT).
В некоторых случаях для корректной работы VPN необходимо открыть дополнительное правило в межсетевом экране для порта TCP 1701 (в некоторых реализациях L2TP этот порт используется совмести с UDP 1701).
NAT-T не корректно работал в ранних редакциях Windows 10, например, 10240, 1511, 1607. Если у вас старая версия, рекомендуем обновить билд Windows 10.
L2TP VPN не работает на некоторых Windows компьютерах в локальной сети
Есть еще один интересный баг. Если в вашей локальной сети несколько Windows компьютеров, вы не сможете установить более одного одновременного подключения к внешнему L2TP/IPSec VPN серверу. Если при наличии активного VPN туннеля с одного клиента, вы попытаетесь подключиться к тому же самому VPN серверу с другого компьютера, появится ошибка с кодом 809 или 789:
Error 789: The L2TP connection attempt failed because the security layer encountered a processing error during initial negotiations with the remove computer.
Что интересно, эта проблема наблюдется только с Windows-устройствами. На устройствах с Linux/MacOS/Android в этой же локальной сети таких проблем нет. Можно без проблем одновременно подключиться к VPN L2TP серверу с нескольких устройств.
По информации на TechNet проблема связана с некорректной реализацией клиента L2TP/IPSec клиента в Windows (не исправляется уже много лет).
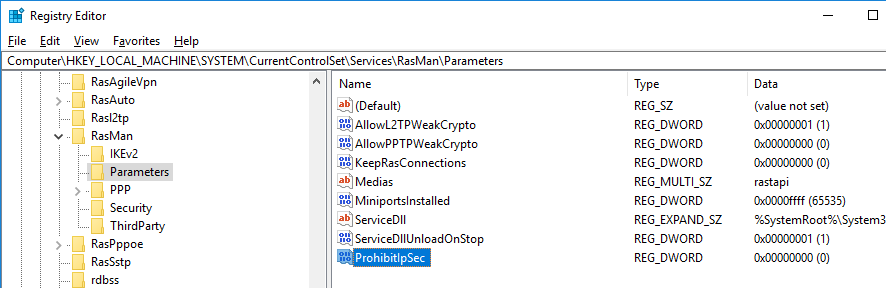
Для исправления этого бага нужно изменить два параметра реестра в ветке HKEY_LOCAL_MACHINESYSTEMCurrentControlSetServicesRasManParameters и перезагрузите компьютре:
- AllowL2TPWeakCrypto – изменить на 00000001 (ослабляет уровень шифрования, для L2TP/IPSec используются алгоритмы MD5 и DES)
- ProhibitIPSec – изменить на 00000000 (включает шифрование IPsec, которое часто отключается некоторыми VPN клиентами или утилитами)
Для изменения этих параметров реестра достаточно выполнить команды:
reg add "HKEY_LOCAL_MACHINESystemCurrentControlSetServicesRasmanParameters" /v AllowL2TPWeakCrypto /t REG_DWORD /d 1 /f
reg add "HKEY_LOCAL_MACHINESystemCurrentControlSetServicesRasmanParameters" /v ProhibitIpSec /t REG_DWORD /d 0 /f
Это включает поддержку нескольких одновременных L2TP/IPSec-подключений в Windows через общий внешний IP адрес (работает на всех версиях, начиная с Windows XP и заканчивая Windows 10).

Провайдер блокирует GRE протокол, проверено, хотя в тех поддержке отрицают это.
Поэтому вместо OpenVPN подняли l2tp+ipsec
Но, видимо, провайдер блокирует порты 1701 500 4500
Реально ли обойти блокировку и каким способом?
-
Вопрос заданболее трёх лет назад
-
20123 просмотра
Пригласить эксперта
OpenVPN вроде не использует GRE. У него порт udp 1194 . Определяется в конфиге сервера.
GRE это PPTP VPN порт 1723 и сам 47 протокол. В вашем случае нужно использовать OpenVPN. Пролезет в любом случае.
Обойти ограничение GRE не так легко – его ничем не замаскируешь (ну кроме как внутри . Тут ещё проблема в том, что сам провайдер может не знать, что он его блокирует. Там нужно сделать немало хитрых телодвижений, чтобы инкапсулировать gre/ipip внутри pptp, например.
PPTP внутри PPTP тоже не работает с дефолтными конфигами сервера.
Ну и не забывайте, что для GRE/ipip необходим выделенный вам белый адрес (прямо на интерфейсе машины).
Так же дешевые роутеры не умеют работать с трансляцией gre/pptp трафика (обычно, роутеры умеющие это маркируются с vpn-passthrough).
Ну а из вариантов – пропустить GRE через то, что само по себе является “другим” L2. Например, через Hyperboria.
Решил проблему следующим путем.
купил роутер asus rt-n10u черный
поставил на него прошивку ddwrt c встроенным openvpn клиентом
на удаленном сервере поднял openvpn сервер
прописал сертификаты в клиенте на роутере
выставил mtu 1440
добавил правила в iptables на роутере
iptables -I INPUT 2 -i tun0 -j ACCEPT
iptables -I FORWARD -i br0 -o tun0 -j ACCEPT
iptables -I FORWARD -i tun0 -o br0 -j ACCEPT
и теперь пофиг на блокировку провайдера, все затевалось ради того, чтоб без подключить дома ip телефон к офисной атс
Прежде всего: провайдер не блокирует GRE, но существует известная проблема с работой GRE через NAT: https://ru.wikipedia.org/wiki/GRE_(%D0%BF%D1%80%D0…
Т.е. если провайдер выдаёт вам (или вашему роутеру) серый IP, то GRE (а с ним и PPTP) работать вряд ли будет.
Как было верно замечено ранее, OpenVPN и GRE – не связанные вещи. OpenVPN работать должен был. Если он не работал, а решить проблему удалось заменой/перепрошивкой/перенастройкой вашего роутера, то и была проблема не на стороне провайдера.
-
Показать ещё
Загружается…
19 мая 2023, в 17:38
500 руб./за проект
19 мая 2023, в 17:35
2000 руб./за проект
19 мая 2023, в 16:45
1500 руб./за проект
Минуточку внимания
-

-
raymercastillo
just joined
- Posts: 6
- Joined: Sat Oct 31, 2020 10:04 pm
VPN IPSEC port change 500
Mon Feb 01, 2021 4:07 pm
Greetings, I have a rb4011 computer with an ipsec vpn responding, I would like to change the default port that the service has to another port such as 55555 and not use 500 or 4500, since the internet provider has port 500 blocked with your firewall
-
-
afuchs
Frequent Visitor

- Posts: 81
- Joined: Wed Jul 03, 2019 11:10 am
Re: VPN IPSEC port change 500
Mon Feb 01, 2021 4:49 pm
I never used any other than the default ports, but perhaps, this is the setting:
IPSec-port.PNG
You do not have the required permissions to view the files attached to this post.
-
-
raymercastillo
just joined
- Posts: 6
- Joined: Sat Oct 31, 2020 10:04 pm
Topic Author
Re: VPN IPSEC port change 500
Mon Feb 01, 2021 5:21 pm
I never used any other than the default ports, but perhaps, this is the setting:
IPSec-port.PNG
Greetings thanks for answering, I have certainly carried out several tests in what you indicate, although I do not see results, only that I see that it uses port 4500 when changing it where you indicated, I ask you where you indicated the change, you do it on the server or on the client to get an idea and retest
-

-
16again
Frequent Visitor
- Posts: 78
- Joined: Fri Dec 29, 2017 12:23 pm
Re: VPN IPSEC port change 500
Tue Feb 02, 2021 12:07 am
From wiki txt, the port option is only half of the solution:
Sub-menu: /ip ipsec peer
port (integer:0..65535; Default: 500) Communication port used (when router is initiator) to connect to remote peer in cases if remote peer uses non-default port.
Seems to me RouterOS lacks the other half of solution, being responder and listening on non-default port. Hackish this can be accomplished using dNAT rule
-
-
Van9018
Long time Member

- Posts: 558
- Joined: Mon Jun 16, 2014 6:26 pm
- Location: Canada – Abbotsford
Re: VPN IPSEC port change 500
Tue Feb 02, 2021 12:28 am
IP > Firewall > NAT
I haven’t tested the rules below. Packet sniffer, torch and the packet flow diagram (https://wiki.mikrotik.com/wiki/Manual:Packet_Flow) will help with troubleshotting.
You’d need 4 rules on both endpoints
chain=dst-nat src-address=<ip of local WAN interface> dst-address=<ip of remote WAN interface> proto=udp dst-port=500 action=dst-nat to-port=55555
chain=dst-nat src-address=<ip of local WAN interface> dst-address=<ip of remote WAN interface> proto=udp dst-port=4500 action=dst-nat to-port=55554
You can’t use the same to-port for 500 and 4500, so to-port would be 55555 and 55554 respectively.
The above rules change the destination port.
When the remote end point receives the packets, they have to be translated again but in reverse
chain=dst-nat src-address=<ip of remote WAN interface> dst-address=<ip of local WAN interface> proto=udp dst-port=55555 action=dst-nat to-port=500
chain=dst-nat src-address=<ip of remote WAN interface> dst-address=<ip of local WAN interface> proto=udp dst-port=55554 action=dst-nat to-port=4500
Содержание
- Ошибки при установке VPN соединения с сервером L2TP IPSec Mikrotik
- Proxy-arp на внутреннем бридже
- Глюк default policy на микротик
- Ошибки firewall на всех этапах
- Port error mikrotik vpn
- Re: VPN Server: Problems with L2TP IPsec: failed to pre-process ph2 packet
- Mikrotik L2TP/IPSec за NAT: ipsec,error failed to pre-process ph2 packet
- Не работает проброс портов на Mikrotik, когда подключен как VPN клиент?
- Port error mikrotik vpn
- L2TP/IPsec with IP pool for more users
- IKEv2/IPsec (VPN Reconnect)
- IKEv2 with pre shared key
- IKEv2 with username and password
- IKEv2 with certificates
- Connection problems
- MikroTik VPN error messages
- VPN types
- Ports
- IKEv2 authentication option
- MikroTik authentication methods
- Prepare certificates for clients
- Windows IKEv2 client certificate setup
- macOS client certificate setup
- iOS IKEv2 certificate setup
- Android IKEv2 certificate setup
- Certificate file extensions
- Certificate encryptions
- Contact Us
- Tikdis
Ошибки при установке VPN соединения с сервером L2TP IPSec Mikrotik

При настройке VPN-сервера на Mikrotik, могут быть ошибки. Некоторые из них не связаны с очепятками и недостатком знаний. Могут встречаться нелогичные или специфичные для какой-то ситуации ошибки.
Proxy-arp на внутреннем бридже
При подключении по VPN вы можете неприятно удивиться, почему вы можете открыть страницу логина в роутер, 192.168.88.1 (если у вас такой), но не сможете открыть ни один внутренний ресурс. Штука в том, что надо включить proxy-arp на внутреннем интерфейсе, за которым есть нужный вам ресурс. У меня proxy-arp включен на весь bridge-local. Этот параметр позволяет взаимодействовать хостам, находящимся в разных сегментах сети, между друг другом.
Меню Interfaces -> открываете bridge-local, в пункте ARP выбираете proxy-arp.
Глюк default policy на микротик
При абсолютно верных настройках L2TP/IPSec подключения на клиенте (например, Windows 7) и на сервере (Mikrotik), не удается установить VPN-подключение. При этом в лог Mikrotik идет сообщение «failed to pre-process ph2 packet», а на клиенте Windows 7 выходит ошибка 789: попытка L2TP-подключения не удалась из-за ошибки, произошедшей на уровне безопасности. Данная проблема может иметь место на прошивках вплоть до последней стабильной на текущий момент (6.30).
Решение: удалить созданную по умолчанию группу в меню IP — IPSec — Groups, создать новую и указать ее в IP — IPSec — Peers в поле Policy Template Group.
По сообщению Hopy, еще одним решением проблемы с группами может стать выполнение этой команды после пересоздания группы:
ip ipsec peer set 0 policy-template-group=*FFFFFFFF
Возможно, это наследие от старых конфигураций, точного ответа нет, но тем не менее, это вариант. Кстати, возможно по этой причине (и ей подобным) все же стоит выполнять полный сброс устройства перед начальной настройкой. Но требованием это не является, это уж точно.
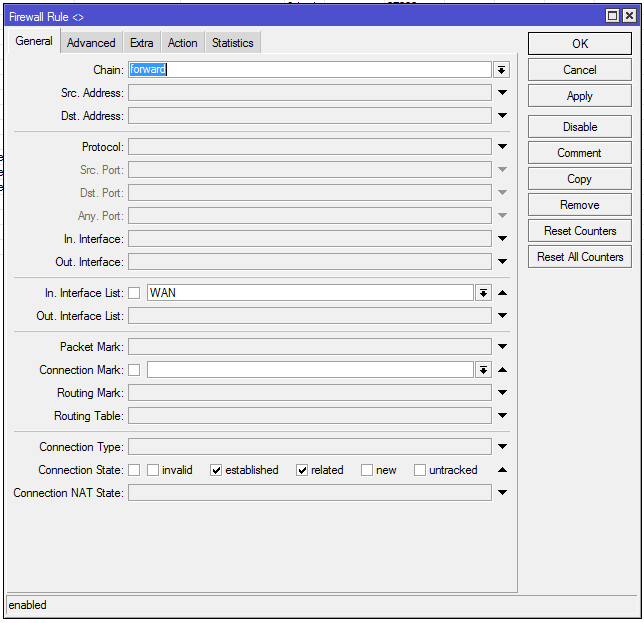
Ошибки firewall на всех этапах
Ну и не забывайте про то, что в нормальной ситуации при подключении удаленного клиента действуют сразу несколько ограничений, в числе которых брандмауэр клиента, брандмауэр шлюза клиента (или провайдерский прокси), брандмауэр самого микротик (и не только цепочка input — серьезно помешать может цепочка forward), который вы раньше настроили максимально строго, не так ли? Всякие NAT через NAT и траверсом погонять могут. Так что старайтесь всегда разумно и спокойно локализовывать проблему.
Источник
Port error mikrotik vpn
Wed Oct 28, 2020 1:50 am
RouterOS: 6.47.6
FritzOS: 7.21
The Mikrotik router is to be the vpn server (L2TP IPSec) and I am trying with the win 10 built-in-vpn-client to connect to the vpn server.
So I did a Port-Forwarding on FritzBox 7590:
UDP: 500, 1701, 4500 and ESP-Protocol.
When I try to connect I get this error: «failed to pre-process ph2 packet«.
I also searched for a solution for this error message, but I couldn’t find a clear answer for that.
So maybe you can tell me if there are any errors in my setup or what other things can be the reason for this connection problem.
L2TP-Server setup:
here is the IPsec-setup:
I dont know if it is important, but I wonder that there are no packets count on port 1701 and for protocol 50. But maybe its normal at this time.
If you need further information just let me know.
Thx in advance!
Re: VPN Server: Problems with L2TP IPsec: failed to pre-process ph2 packet
Wed Oct 28, 2020 3:30 am
I’m not completely sure if that’s it, because I don’t use it like this. But Windows client doesn’t like L2TP/IPsec servers behind NAT and needs small config change:
Now few things I’m sure about:
— Don’t forward port 1701 at all, that’s for L2TP and it will be coming encrypted inside IPSec. FritzBox will never see any port 1701 traffic.
— You don’t see any hits on router for port 1701, because IPSec part didn’t finish, so no L2TP came yet.
— You won’t see ESP packets either, because when there’s NAT on either side, ESP packets are encapsulated in UDP (port 4500).
— Config export (/export hide-sensitive file=yourconfig) is usually better than screenshots, much less work and less chance to miss something.
Источник
Mikrotik L2TP/IPSec за NAT: ipsec,error failed to pre-process ph2 packet
При использовании Mikrotik за NAT (в частности за всякими USB GSM модемами) в режиме клиента L2TP/IPSec, у некоторых операторов в определенных режимах, получал проблему с ошибкой ipsec,error failed to pre-process ph2 packet.
Но с появлением RoS 6.38 появилась возможность справиться с ошибкой.
Итак, ошибка появляется в обычной конфигурации клиента L2TP как на картинке: 
Основная проблема в том, что политика IPSec, применяемая в такой настройке, прибита гвозьдями и использует ike1. Ike1 в свою очередь, в реализации RoS, имеет проблему при прохождении NAT без проброса портов и как отягчающие обстоятельство: множественные туннели с l2tp тоже не проходят из-а одного NAT (а количество клиентов на модеме огромное).
Решить проблему можно при использование IKE2 (а для кучи клиентов за одним NAT нужно отказаться от авторизации PSK в пользу RSA Signature), который невозможно настроить из меню выше, но можно сделать трюк: заходим в меню IP -> IPSec 
Копируем динамически создаваемый пир, и меняем в нем настройки как показано ниже: 
А именно меняем Exchange Mode на IKE2, в закладке Encryption настраиваем необходимые параметры шифрования.
Осталось отключить в настройках L2TP/IPSec использование IPSec.
Вот собственно и все, соединение поднимается, шифрование работает.
Источник
Не работает проброс портов на Mikrotik, когда подключен как VPN клиент?
Есть роутер RB950, он является шлюзом для небольшого офиса. Микрот подключен к PPTP серверу как клиент и весь офис выходит в интернет через этот ВПН сервер. В туннель завернуто так: все соединения с src — ЛАН и dst — НЕ ЛАН маркируются и маркированные пакеты отправляются в туннель. При этом, конечно же, прописан маршрут по умолчанию, который направляет маркированный трафик через шлюз=ВПН. Пытаюсь пробросить порт, чтобы извне (когда стучусь на внешний стат. адрес) получить доступ к компьютеру в локалке. Проблема в том что когда маршрута по умолчанию для ВПН нет, всё работает отлично. Как только я прописываю маршрут по умолчанию для ВПН — проброс перестает работать. Раньше так же делал и всё работало, а сейчас не хочет. В чём может быть проблема?
P.S. На втором скрине видно правила маскарадинга и правило проброса.
Фаервол пробовал выключать, проблема НЕ в нем точно.


- Вопрос задан более двух лет назад
- 304 просмотра
/ip firewall mangle add chain=prerouting in-interface=INTERNET action=mark-connection new-connection-mask=from_internet
/ip firewall mangle add chain=prerouting src-address=192.168.0.0/24 connection-mark=from_internet action=mark-routing new-routing-mark=main
Источник
Port error mikrotik vpn
In macOS: Go to network settings, Add VPN, using type L2TP via IPSEC . add the routers IP and the chosen user. In authentication add the password for the user and as key/shared secret use the ipsec-secret. In options, enable ‘Send all traffic over VPN connection’, and you are done.
Beware, for several users behind the same NAT (MikroTik or most other), only one can connect at a time to the same server using L2TP/IPsec.
L2TP/IPsec with IP pool for more users
The command /interface l2tp-server server set . , enables the LT2P server and also creates a dynamic ipsec peer. To show the dynamic settings, run: /ip ipsec peer print. If you need advanced changes, you can copy this peer, and then disable the dynamic creation with /interface l2tp-server server set use-ipsec=no.
Some MikroTik routers have hardware acceleration for AES CBC encryption. This might reorder the packets, which can create speed huge issues with some (Windows) OSes. You may use proposal to switch from AES CBC to AES CTR, to switch to software decoding, if you have plenty of CPU power available. Only CBC is hardware accelerated. Or look into changing MSS.
IKEv2/IPsec (VPN Reconnect)
Fast and easy — using pre shared key or certificates. IKEv2 was implemented in MikroTik RouterOS 6.39.
IKEv2 with pre shared key
Only works on macOS and iOS etc. Windows 7, 8 and 10 do not support IKEv2 pre-shared key.
IKEv2 with username and password
Windows 7, 8 and 10 do not support EAP-only. That means EAP (Extensible Authentication Protocol) without using certificates are not possible on Windows.
IKEv2 with certificates
First we create certificates, requirements:
- Common name should contain IP or DNS name of the server (required by Windows)
- Subject Alt name should have IP or DNS of the server (required by some VPN clients)
- EKU tls-server and tls-client is required for Windows.
Now that we have certificates, server can be configured. Note that windows client requires modeconf, so we will use it to give out IP addresses from pool and send DNS, we also need to modify default template a little, to allow policies only from specific source addresses and generate unique level (required by multiple clients behind the same public IP):
On your client, you should now package the CA, the client certificate and the private key in a .p12 container file, to be able to install the certificates on Windows, macOS, iOS and Android. On your Windows/macOS/Linux client, use the openssl tool to create the file client1.p12:
Connection problems
If you can’t connect from your client, start by enabling the ipsec logging in the router. As a default the router only shows errors in the log, and not the issue creating the error.
/system logging add topics=ipsec
Then use Winbox and the Log menu.
Remember to disable the ipsec logging when done, as it consumes extra CPU.
MikroTik VPN error messages
- Failed to pre-proces ph2 packet
Your IPsec policy is missing or invalid, check:
/ip ipsec policy print
Maybe your IPsec peer is not set to generate a policy. Check: ip ⇢ ipsec ⇢ peer ⇢ advanced tab . or from terminal:
:put [/ip ipsec peer get value-name=generate-policy number=0]. - Unstable connection
/ip ipsec peer
add address=0.0.0.0/0 dpd-interval=2s enc-algorithm=3des exchange-mode=main-l2tp generate-policy=port-override secret=1234567890 - On iOS and macOS rekey fails after 480 seconds = 8 minutes and VPN disconnects
For iOS and macOS clients, make sure that on RouterOS server’s peer settings modp2048 (DH Group 14) is enabled, otherwise rekey will fail after 480 seconds which is 8 minutes (in peer use: sha256 + aes-256 + enable modp2048. In proposals use: sha256 + aes-256 cbc + set PFS Group=none.)
(Log will say «killing ike», and debug log will say «KE size differs from expected 128 != 256)
VPN types
- IKEv2: A modern, secure, fast and very stable VPN solution. Bult-in support in Windows and macOS. Can reconnect and re-establish the connection on poor connections or when the client switches access point on a WiFI network. Also called VPN Reconnect and VPN Connect.
- L2TP/IPsec: Works very well, but a major drawback might be that only one L2TP might exist from clients behind the same NAT to the same server. L2TP is an unencrypted VPN tunnel, and IPsec is encrypting all packets.
- SSTP: Good Windows proprietary solution, when firewalls restricts you. Tunnels PPP inside a SSL/TLS connection. The macOS default VPN client do not support SSTP.
- OpenVPN: Very secure, but usually also slower, tunnels PPP packets inside SSL. OpenVPN is not supported in Windows or macOS per default.
- PPTP: Very old and insecure. If only used internally, if only speed (and not security) is important, it might be usable, bot otherwise you should not use it. Removed from macOS in Sierra (2016).
- IKEv2. User authentication by password or certificate or machine authentication by certificate or shared secret.
- L2TP is actually L2TP/IPSec . so yes, it is IPsec encrypted even though it only says L2TP in the menu. User authentication using MS-CHAPV2 and machine authentication by shared secret.
- IPSec is actually Cisco IPSec. User authentication by password and machine authentication by shared secret and certificate.
- iOS certificates supported:
- PKCS#1 (.cer, .crt, .der)
- PKCS#12 (.p12, .pfx)
Ports
These are the ports you need to open to allow VPN access. You need to work with ports in the IP protocols TCP (protocol 6), UDP (protocol 17) and GRE (protocol 47).
- PPTP ports
TCP port 1723 (control)
GRE (data) - L2TP/IPsec ports
UDP port 500 (IKE control)
UDP port 4500 (NAT-T)
UDP port 1701 outbound (L2TP control and data) - SSTP port
TCP port 443 (control and data) - IKEv2 ports
UDP port 500 (control)
UDP port 4500 (data as ESP encapsulated inside UDP)
IKEv2 authentication option
- pre-shared key (mac only)
Supported on iOS and macOS. Not supported on Windows 7, 8, 10. - EAP-only (no Windows)
EAP username and password without certificate. Windows can only authenticate with EAP-MSCHAPv2. - PEAP (Protected EAP, Windows 7)
Wraps another EAP method (like EAP-MSCHAPv2) in a TLS tunnel. - EAP-TLS (Windows 7)
Also wraps EAP. - EAP-TTLS, EAP-AKA, EAP-AKA, EAP-SIM (Windows 8)
Not MikroTik supported, almost all require a trusted certificate on the router.
MikroTik authentication methods
- eap-radius: IKEv2 EAP RADIUS passthrough authentication for responder (RFC 3579).
Most clients also need a server certificate set.
Use certificate=none to authenticate using EAP-only (RFC 5998) for clients supporting only username+password. - pre-shared-key — authenticate by a shared password/key/secret.
- rsa-signature — authenticate using client/server RSA certificates.
- rsa-key — authenticate using a RSA key imported in Ipsec key menu.
- pre-shared-key-xauth — mutual PSK authentication + xauth username/password.
passive parameter identifies server/client side - rsa-signature-hybrid — responder certificate authentication with initiator Xauth.
passive parameter identifies server/client side
Extended information in the MikroTik IPsec wiki.
Prepare certificates for clients
Windows and macOS: Package «ca», «client.cer» and «client.key» in a .p12 file container
openssl pkcs12 -export -out client1.p12 -inkey cert_export_client1.key -in cert_export_client1.crt -certfile cert_export_capfx.crt
macOS, if you are missing the private key for a cert:
openssl pkcs12 -export -clcerts -inkey client.key -in client.crt -out client.p12 -name «username2017»
Windows IKEv2 client certificate setup
- Open MMC: Win+R ⇢ mmc ⇢ Ctrl+M ⇢ add «Certificates» from the list and choose «Local Computer».
- Import certificates: Right click on «Personal» folder ⇢ «All Tasks» ⇢ «Import. » ⇢ Select client1.p12 file.
CA and client certificate should now appear in the folder «Personal ⇢ Certificates». - Trust the CA: Drag and drop CA from «Personal ⇢ Certificates» to «Trusted Root Certificates» folder.
CA certificate needs to be in the Trusted Root list, only the client certificate should stay in «Personal». - Create new VPN: Choose VPN type IKEv2, and router IP in server address field.
- Change cert type: Control panel ⇢ Network ⇢ Network connections: Right click VPN ⇢ Settings ⇢ Security: [v] «Use machine certificates».
- Advanced
- Create VPN using with powershell
- Add-VpnConnection -Name VPN -ServerAddress aaa.bbb.ccc.ddd
- Set-VpnConnection «VPN» -SplitTunneling $true
- Set-VpnConnection «VPN» -RememberCredential $true
- Enable split-tunneling manually
- Control Panel ⇢ Network and Sharing Center ⇢ Change Adapter Settings ⇢ Right click on the VPN connection: Properties ⇢ Networking ⇢ Internet Protocol Version 4 (TCP/IPv4) ⇢ Properties
- Advanced ⇢ Deselect «Use default gateway on remote network»
- Add needed routes, ex:
macOS client certificate setup
- Import certificates: Doubleclick the «client1.p12» — key ring will open and import two «Certificates» and also install the private key.
If asked, choose «Login» as place to store certificate — then type certificate password when asked. - Trust the CA: Click «Login ⇢ Certificates» — double click the «ca» certificate (search for it’s name).
- Change to «Using this certificate: always approve» — close window — enter your computers password and OK.
- Issues?
- If your personal certificate only show in the folder «Certificates» and not in «My Certificates», it is because the private key is missing. When you add the matchin private key to the key ring, the certificate will also show under «My certificates» with an arrow, where you can see the private key below.
- Instead of using a .p12, you can also choose to import the .cer files individually, and the private key afterwards. If you get the private key as a .key file, you first need to convert it to .p12:
openssl pkcs12 -export -clcerts -inkey client1.key -in client.cer -out client.p12 -name «client1»
- Create new VPN: Add new VPN choosing VPN type IKEv2.
Use the router IP in server address and external id. If you have several different VPN connections in the same router using different IPs, the external id should still be the primary IP.
Under authentication button, choose «Authentication: None» and then browse and select the certificate.
(You can also choose «Authentication: certificate», but this is not the correct way.)
You can only choose certificates, that are listed in the macOS key ring folder «My certificates». Certificates . for which there is installed a private key are also listed under «My certificates»
iOS IKEv2 certificate setup
- Use Airdrop or e-mail to transfer the .p12 file to the iOS iPhone/iPad and click on the certificate icon. Enter password etc. The installed certificates can be found in «Settings ⇢ General ⇢ Descriptions».
- Typically pkcs12 bundle contains also CA certificate, but iOS do not install this CA, so Self-signed CA certificate must be installed separately.
- RemoteID must be set equal to common-name or subjAltName of server’s certificate.
Android IKEv2 certificate setup
- Native Android do not currently support IKEv2 properly, instead install open source and free Strongswan.
- Click client.p12 to install ca, cert and key. Enter the .p12 encryption password and choose to save as VPN.
- Open Strongswan and add new VPN as «type=IKEv2 Certificate», use router IP and select the certificate.
Certificate file extensions
- .csr
A Certificate Signing Request, in PKCS10 format. Often used on web servers to request an SSL certificate from a certificate provider. - .cer (also named .crt and .der)
An X.509 certificate in binary format. - .key
Can be a public or private PKCS#8 keys as binary DER or ASCII PEM. Usually the private key for a .cer certificate. - .pem (.pub)
An X.509 certificate that is Base-64 encoded and have a header and footer added.
Can also function as a container that holds several certificates and keys.
.pub is usually a public key, while .pem is a private key.
Headers used are «BEGIN RSA PRIVATE KEY» and «BEGIN DSA PRIVATE KEY». - .ppk
A container file including public and private key, created by the popular SSH client Putty, originally created for SSH usage on Windows. The public key is stored in plaintext, while the private key is encrypted. Short for «PuTTY private key».
# .pub: ssh public key
# .pem: ssh private key - .pfx
Originally a Windows certificate container, but have for many years now been an alias for .p12 on Windows. Since the .p12 extension works everywhere on all OSes and all Windows versions, you should use the .p12 extension instead of .pfx. - .p12 (.pkcs12, PKCS #12)
An encrypted container, that usually stores a private key, it’s certificate and the CA certificate chain. You will usually need to supply the encryption password, to access the certificates inside the .p12.
Certificate encryptions
PKCS are «the Public Key Cryptography Standards», se thorough description on Wikipedia. The most used are:
- PKCS#8
A public and private certificate keypair. When writing a private key in PKCS#8 format in a file, it needs to stored in either DER encoding or PEM encoding. DER and PEM encodings are describes in other chapters in this book. Header used in files are «BEGIN PRIVATE KEY». - PKCS#12
See the .pfx and .p12 file format above.
Tikdis is official danish distributor of MikroTik routers, switches, WiFi equipment and all other MikroTik devices. We are certified administrators and engineers in MikroTik equipment.
Contact Us
Tikdis
Aarhusvej 201
DK-8464 Galten
DenmarkИсточник
- Import certificates: Doubleclick the «client1.p12» — key ring will open and import two «Certificates» and also install the private key.
- Create VPN using with powershell
