A “Permission denied” error means that the server rejected your connection. There could be several reasons why, and the most common examples are explained below.
Should the sudo command or elevated privileges be used with Git?
You should not be using the sudo command or elevated privileges, such as administrator permissions, with Git. If you have a very good reason you must use sudo, then ensure you are using it with every command (it’s probably just better to use su to get a shell as root at that point). If you generate SSH keys without sudo and then try to use a command like sudo git push, you won’t be using the same keys that you generated.
Check that you are connecting to the correct server
Typing is hard, we all know it. Pay attention to what you type; you won’t be able to connect to “githib.com” or “guthub.com”. In some cases, a corporate network may cause issues resolving the DNS record as well.
To make sure you are connecting to the right domain, you can enter the following command:
$ ssh -vT git@github.com
> OpenSSH_8.1p1, LibreSSL 2.7.3
> debug1: Reading configuration data /Users/YOU/.ssh/config
> debug1: Reading configuration data /etc/ssh/ssh_config
> debug1: /etc/ssh/ssh_config line 47: Applying options for *
> debug1: Connecting to github.com port 22.
The connection should be made on port 22, unless you’re overriding settings to use SSH over HTTPS.
Always use the “git” user
All connections, including those for remote URLs, must be made as the “git” user. If you try to connect with your GitHub username, it will fail:
$ ssh -T GITHUB-USERNAME@github.com
> Permission denied (publickey).
If your connection failed and you’re using a remote URL with your GitHub username, you can change the remote URL to use the “git” user.
You should verify your connection by typing:
$ ssh -T git@github.com
> Hi USERNAME! You've successfully authenticated...
Make sure you have a key that is being used
- Open TerminalTerminalGit Bash.
- Verify that you have a private key generated and loaded into SSH.
# start the ssh-agent in the background
$ eval "$(ssh-agent -s)"
> Agent pid 59566
$ ssh-add -l -E sha256
> 2048 SHA256:274ffWxgaxq/tSINAykStUL7XWyRNcRTlcST1Ei7gBQ /Users/USERNAME/.ssh/id_rsa (RSA)
If you have GitHub Desktop installed, you can use it to clone repositories and not deal with SSH keys.
-
If you are using Git Bash, turn on ssh-agent:
# start the ssh-agent in the background
$ eval "$(ssh-agent -s)"
> Agent pid 59566
If you are using another terminal prompt, such as Git for Windows, turn on ssh-agent:
# start the ssh-agent in the background $ eval $(ssh-agent -s) > Agent pid 59566 -
Verify that you have a private key generated and loaded into SSH.
$ ssh-add -l -E sha256
> 2048 SHA256:274ffWxgaxq/tSINAykStUL7XWyRNcRTlcST1Ei7gBQ /Users/USERNAME/.ssh/id_rsa (RSA)
- Open TerminalTerminalGit Bash.
- Verify that you have a private key generated and loaded into SSH.
$ ssh-add -l -E sha256
> 2048 SHA256:274ffWxgaxq/tSINAykStUL7XWyRNcRTlcST1Ei7gBQ /Users/USERNAME/.ssh/id_rsa (RSA)
The ssh-add command should print out a long string of numbers and letters. If it does not print anything, you will need to generate a new SSH key and associate it with GitHub.
Tip: On most systems the default private keys (~/.ssh/id_rsa and ~/.ssh/identity) are automatically added to the SSH authentication agent. You shouldn’t need to run ssh-add path/to/key unless you override the file name when you generate a key.
Getting more details
You can also check that the key is being used by trying to connect to git@github.com:
$ ssh -vT git@github.com
> ...
> debug1: identity file /Users/YOU/.ssh/id_rsa type -1
> debug1: identity file /Users/YOU/.ssh/id_rsa-cert type -1
> debug1: identity file /Users/YOU/.ssh/id_dsa type -1
> debug1: identity file /Users/YOU/.ssh/id_dsa-cert type -1
> ...
> debug1: Authentications that can continue: publickey
> debug1: Next authentication method: publickey
> debug1: Trying private key: /Users/YOU/.ssh/id_rsa
> debug1: Trying private key: /Users/YOU/.ssh/id_dsa
> debug1: No more authentication methods to try.
> Permission denied (publickey).
In that example, we did not have any keys for SSH to use. The “-1” at the end of the “identity file” lines means SSH couldn’t find a file to use. Later on, the “Trying private key” lines also indicate that no file was found. If a file existed, those lines would be “1” and “Offering public key”, respectively:
$ ssh -vT git@github.com
> ...
> debug1: identity file /Users/YOU/.ssh/id_rsa type 1
> ...
> debug1: Authentications that can continue: publickey
> debug1: Next authentication method: publickey
> debug1: Offering RSA public key: /Users/YOU/.ssh/id_rsa
Verify the public key is attached to your account
You must provide your public key to GitHub to establish a secure connection.
-
Open Terminal.
-
Start SSH agent in the background.
$ eval "$(ssh-agent -s)" > Agent pid 59566 -
Find and take a note of your public key fingerprint.
$ ssh-add -l -E sha256 > 2048 SHA256:274ffWxgaxq/tSINAykStUL7XWyRNcRTlcST1Ei7gBQ /Users/USERNAME/.ssh/id_rsa (RSA) -
In the upper-right corner of any page, click your profile photo, then click Settings.

-
In the “Access” section of the sidebar, click SSH and GPG keys.
-
Compare the list of SSH keys with the output from the
ssh-addcommand.

-
Open the command line.
-
Start SSH agent in the background.
$ ssh-agent -s > Agent pid 59566 -
Find and take a note of your public key fingerprint.
$ ssh-add -l -E sha256 > 2048 SHA256:274ffWxgaxq/tSINAykStUL7XWyRNcRTlcST1Ei7gBQ /Users/USERNAME/.ssh/id_rsa (RSA) -
In the upper-right corner of any page, click your profile photo, then click Settings.
-
In the “Access” section of the sidebar, click SSH and GPG keys.
-
Compare the list of SSH keys with the output from the
ssh-addcommand.
-
Open Terminal.
-
Start SSH agent in the background.
$ eval "$(ssh-agent -s)" > Agent pid 59566 -
Find and take a note of your public key fingerprint. If you’re using OpenSSH 6.7 or older:
$ ssh-add -l
> 2048 a0:dd:42:3c:5a:9d:e4:2a:21:52:4e:78:07:6e:c8:4d /Users/USERNAME/.ssh/id_rsa (RSA)
If you’re using OpenSSH 6.8 or newer:
$ ssh-add -l -E md5 > 2048 MD5:a0:dd:42:3c:5a:9d:e4:2a:21:52:4e:78:07:6e:c8:4d /Users/USERNAME/.ssh/id_rsa (RSA) -
In the upper-right corner of any page, click your profile photo, then click Settings.
-
In the “Access” section of the sidebar, click SSH and GPG keys.
-
Compare the list of SSH keys with the output from the
ssh-addcommand.
If you don’t see your public key in GitHub, you’ll need to add your SSH key to GitHub to associate it with your computer.
Warning: If you see an SSH key you’re not familiar with on GitHub, delete it immediately and contact GitHub Support, for further help. An unidentified public key may indicate a possible security concern. For more information, see “Reviewing your SSH keys.”
I’m trying to login to the server using ssh, and I realise that I forgot my password. I’m using this command:
ssh root@this-is-my-domain.com
I don’t know what to do, I searched for a solution but nothing helped me. I’m using Ubuntu 14.04.
Any help?
asked Mar 1, 2016 at 0:28
![]()
2
If you are not using ssh public key, and you just forget your root password, you can reset your root password using Digital Ocean control panel
If you are using ssh public key and you forget the password to that key, you can force SSH to use your Digital Ocean password instead of the key
ssh -o PreferredAuthentications=password -o PubkeyAuthentication=no user@host
answered Mar 1, 2016 at 0:36
![]()
Xiongbing JinXiongbing Jin
11.6k3 gold badges47 silver badges41 bronze badges
3
If you get Permission denied while using ssh to login, you probably need to edit the /etc/ssh/sshd_config file.
Change PasswordAuthentication value to yes.
PasswordAuthentication yes
![]()
NAND
6618 silver badges22 bronze badges
answered Oct 15, 2019 at 12:34
![]()
IsaacEIsaacE
3052 silver badges10 bronze badges
3
I faced a similar problem while trying to ssh into another machine. These steps helped me to get to a solution:
1 — sudo passwd root – Change root password (optional)
2 — sudo install openssh-server
3 — cd /etc/ssh
4 — sudo nano sshd_config
(Now uncomment line PermitRootLogin and change it to yes,
Uncomment Authorized keys file,
Uncomment PasswordAuthentication and change it to yes)
5 — sudo systemctl restart ssh
Now you are good to go, and can easily connect over ssh using the root account.
6 — su -
7 — ssh root@ip-of-device
![]()
answered Jul 7, 2021 at 6:56
![]()
You should not try to login as root as it is disabled by default.
If you have been given a username and password try using those instead. However if your root user has been enabled, root is sometimes the default password for Ubuntu.
![]()
Rajohan
1,4012 gold badges10 silver badges26 bronze badges
answered Mar 17, 2021 at 15:56
![]()
27 мая, 2017 12:10 пп
36 066 views
| Комментариев нет
Linux, SSH, VPS
В первой статье этой серии вы узнали о том, как и в каких ситуациях вы можете попробовать исправить ошибки SSH. Остальные статьи расскажут, как определить и устранить ошибки:
- Проблемы с подключением к серверу: здесь вы узнаете, как исправить ошибки подключения к серверу.
- Ошибки протокола: в этой статье вы узнаете, что делать, если сбрасываются клиентские соединения, клиент жалуется на шифрование или возникают проблемы с неизвестным или измененным удаленным хостом.
- Ошибки оболочки: это руководство поможет исправить ошибки ветвления процессов, валидации оболочки и доступа к домашнему каталогу.
После установления соединения и инициирования протокола система может проверить подключение пользователя к системе. SSH поддерживает множество механизмов аутентификации. В этом руководстве рассмотрены два наиболее распространенных механизма: парольная аутентификация и аутентификация на основе SSH-ключей.
Требования
- Убедитесь, что можете подключиться к виртуальному серверу через консоль.
- Проверьте панель на предмет текущих проблем, влияющих на работу и состояние сервера и гипервизора.
Основные ошибки
Отказ в доступе (парольная аутентификация)
Примечание: Если вы настроили на сервере SSH-ключи и отключили PasswordAuthentication, сервер не поддерживает паролей. Используйте SSH-ключ, чтобы подключиться к серверу.
Клиенты PuTTY и OpenSSH выдают такое сообщение:
root@111.111.111.111's password:

Permission denied (publickey,password).

PuTTY Error output

root@111.111.111.111's password:

Access denied

Server sent disconnect message

type 2 (protocol error):

"Too many authentication failures for root"
Это значит, что аутентификация прошла неудачно. Ошибка может быть вызвана рядом проблем. Вот несколько советов по устранению этой ошибки:
- Убедитесь, что вы используете правильное имя пользователя. В CoreOS используйте пользователя core. В FreeBSD используйте аккаунт пользователя freebsd.
- Парольная аутентификация пользователя может быть нарушена. Проверьте, поддерживает ли парольную аутентификацию веб-консоль сервера. Если она не поддерживает пароли, вам придется попытаться сбросить пароль или обратиться за помощью к службе поддержки, чтобы восстановить доступ.
- Убедитесь, что сервер поддерживает парольную аутентификацию.
Отказ в доступе (аутентификация на основе SSH-ключей)
Этот метод использует криптографические ключи для аутентификации пользователя.
Читайте также:
- Как настроить SSH-ключи
- Создание SSH-ключей для PuTTY
Вы можете получить такую ошибку:
Permission denied (publickey).

PuTTY Error output

Disconnected: No supported authentication methods available (server sent: publickey)
Многие наиболее распространенные проблемы, связанные с аутентификацией на основе ключей, вызваны неправильными правами доступа к файлам или правами собственности. Чтобы устранить проблему, попробуйте сделать следующее:
- Убедитесь, что файл authorized_keys и сам закрытый ключ имеют правильные права доступа и собственности.
- Убедитесь, что сервер поддерживает аутентификацию на основе ключей SSH.
- Убедитесь, что клиент SSH может получить закрытый ключ. Если вы используете PuTTY, убедитесь, что ключи SSH правильно настроены в сессии. Если вы используете OpenSSH, убедитесь, что у закрытого ключа SSH есть соответствующие привилегии.
- Убедитесь, что файл authorized_keys содержит правильный открытый ключ, и что открытый ключ добавлен на сервер.
- Возможно, вы используете закрытый ключ, который больше не поддерживается сервисом OpenSSH. Эта ошибка обычно затрагивает серверы OpenSSH 7+ при использовании закрытого DSA-ключа SSH. Обновите конфигурацию сервера.
Консоль не поддерживает пароли
Если вы не можете восстановить доступ к консоли, это может указывать на проблемы с файловой системой или конфигурацией в подсистеме PAM, которые влияют на механизм аутентификации. Эта ошибка также повлияет на попытки сбросить пароль root и войти в систему через консоль.
В консоли появляется форма аутентификации:
Ubuntu 14.04.4 LTS server tty1

server Login:

Password:
Но после ввода пароля появляется ошибка:
Login incorrect
После сброса пароля вы получите:
You are required to change your password immediately (root enforced)

Changing password for root.

(Current) UNIX Password:
Повторно введите текущий пароль. Если соединение закроется, возможно, вы допустили ошибку, повторно вводя пароль. Повторите попытку.
При успешном завершении вам будет предложено дважды ввести новый пароль:
Enter new UNIX password:

Retype new UNIX password:
Однако если после повторного ввода правильного нового пароля сессия перезапустится (т.е. снова вернется форма для входа в систему) или появится сообщение об ошибке, это означает, что проблема в одном из файлов, в котором хранятся данные аутентификации.
В таком случае рекомендуется обратиться за помощью в службу поддержки хостинг-провайдера, подготовить сервер к повторному развёртыванию или исправить ошибки в настройках PAM.
Устранение неполадок
Проверка доступных методов аутентификации
Если вы используете подробный вывод или следите за логами SSH-клиента, убедитесь, что в сообщении, описывающем методы аутентификации, указаны password и/или publickey.
debug1: Authentications that can continue: publickey,password
Если вы не нашли в списке метод аутентификации, который хотите использовать, откройте файл /etc/ssh/sshd_config. В нём часто допускается ошибка: PasswordAuthentication имеет значение yes, а PermitRootLogin – no или without-password для пользователя root.
Исправьте эту ошибку, перезапустите сервис.
Настройка прав доступа и собственности
Сервер и клиент OpenSSH имеют строгие требования к привилегиям и правам собственности на файлы ключей.
Сервер и клиент OpenSSH должны иметь следующие права:
- ~./ssh – 700.
- ~./ssh должен принадлежать текущему аккаунту.
- ~/.ssh/authorized_keys – 600.
- ~/.ssh/authorized_keys должен принадлежать текущему аккаунту.
Кроме того, клиент должен также иметь такие права:
- ~ / .ssh / config – 600.
- ~ / .ssh / id_ * – 600.
Эти изменения можно внести с помощью консоли.
Проверка открытого и закрытого ключа
Если вы забыли, какой закрытый ключ соответствует тому или иному открытому ключу, инструменты OpenSSH и PuTTY помогут вам сгенерировать открытый ключ на основе зарытого ключа. Полученный результат вы можете сравнить с файлом ~/.ssh/authorized_keys.
Чтобы восстановить открытый ключ на основе закрытого ключа в среде OpenSSH, используйте ssh-keygen и укажите путь к закрытому ключу.
ssh-keygen -y -f ~/.ssh/id_rsa

ssh-rsa AAAAB3NzaC1yc2EAAAADAQABAAABAQCfBiMwCU1xoVVp0VbSYV3gTDV/jB57IHdILQ8kJ2622//Lmi4gDPlxA6HXVKq8odkGD/5MjqUw85X2rwEbhoBul74+LCToYJvvvBaDPCgg5z1icCKIJ1m/LJBrGNqPKCgqFWu0EH4/EFP2XIQqWqX1BZtJu/2YWrTr+xFOE/umoYmOd+t3dzQqMsv/2Aw+WmA/x/B9h+41WrobDgCExYNLPYcD0PO7fpsa8CcrZCo+TUWCe7MgQQCSM6WD4+PuYFpUWGw3ILTT51bOxoUhAo19U8B2QqxbMwZomzL1vIBhbUlbzyP/xgePTUhEXROTiTFx8W9yetDYLkfrQI8Q05+f
В среде PuTTY команда PuTTYgen.exe загружает интерфейс, в котором можно использовать опцию Load и импортировать закрытый ключ. PuTTY хранит такие файлы в формате .ppk (нужно знать место хранения файла).
Импортировав ключ, вы увидите окно с разделом Public key for pasting into OpenSSH authorized_keys file. В нём и будет искомый открытый ключ. Выделите текст и вставьте его в файл. Он сгенерирует открытый ключ.
ssh-rsa AAAAB3NzaC1yc2EAAAADAQABAAABAQCfBiMwCU1xoVVp0VbSYV3gTDV/jB57IHdILQ8kJ2622//Lmi4gDPlxA6HXVKq8odkGD/5MjqUw85X2rwEbhoBul74+LCToYJvvvBaDPCgg5z1icCKIJ1m/LJBrGNqPKCgqFWu0EH4/EFP2XIQqWqX1BZtJu/2YWrTr+xFOE/umoYmOd+t3dzQqMsv/2Aw+WmA/x/B9h+41WrobDgCExYNLPYcD0PO7fpsa8CcrZCo+TUWCe7MgQQCSM6WD4+PuYFpUWGw3ILTT51bOxoUhAo19U8B2QqxbMwZomzL1vIBhbUlbzyP/xgePTUhEXROTiTFx8W9yetDYLkfrQI8Q05+f imported-openssh-key
Можно проигнорировать комментарий после открытого ключа (imported-openssh-key).
В любом случае этот открытый ключ нужно добавить в файл ~/.ssh/authorized_keys.
OpenSSH 7 и устаревшие ключевые алгоритмы
В системах с OpenSSH 7 (FreeBSD и CoreOS по умолчанию) старые ключи DSA не поддерживаются.
Ключи ssh-dss считаются слабыми, вместо них рекомендуют использовать более надёжные современные алгоритмы.
Следовательно, в данном случае лучшим решением будет создать новые ключи и добавить их на хосты.
Однако в качестве обходного пути вы можете установить в PubkeyAcceptedKeyTypes значение +ssh-dss в файле /etc/ssh/sshd_config.
Заключение
Если у вас не получается самостоятельно настроить аутентификацию SSH, вы можете обратиться за помощью к службе поддержки своего хостинг-провайдера.
Читайте также: Как настроить SSH-ключи
Tags: OpenSSH, PuTTY, SSH
We’ve all been there. You try to connect to your VPS, only to run into the dreaded permission denied (publickey) error. Unfortunately, the reason for this differs, which can make troubleshooting harder, but generally the issue falls into four categories:
- You’re trying to connect to the wrong server
- Your local machine doesn’t have a matching key for your VPS server
- Your key isn’t in the authorized_keys file on your VPS server
- Your local machine has too many keys
Let’s run through the troubleshooting process to determine what’s creating your ssh permission denied error and solve the root cause:
Run ssh -vvv [email protected] for more info
You can save a lot of time by determining why you can’t connect before you proceed. The following command will show you exactly what SSH is doing when you initiate a connection with your VPS server:
ssh -vvv [email protected]
Naturally, you should replace your.vps.ip with the relevant IP address, which can be found in your control panel. Note down any output.
Make sure you’re connecting to the right server
It sounds basic, but it’s all too easy to do. You may have typed in a single digit of your server’s IP address wrong, or tried to connect to an old, expired server rather than your new one.
Double-check your credentials in your server control panel and be sure to copy and paste the information rather than typing it to ensure accuracy. You’d be surprised how easy it is to get two numbers mixed up.
Additionally, if you’ve just created the server, wait a few minutes a try again. Sometimes the server may indicate that it’s live even if it’s not quite ready for connection.
Try logging in with a password instead
For the short term, you may be able to log in with a password instead. This won’t work if you’re using PuTTy, or if you have password authentication disabled. You can give it a try with the following command:
ssh -o PreferredAuthentications=password -o PubkeyAuthentication=no [email protected]
If you don’t have password authentication enabled, you can change that by clicking on the server in your BitLaunch control panel, selecting “Access”, and entering a password. This will reboot your server and reset your password.
On your local machine, run ssh-keygen -R your.server.ip to get rid of your old key.
Now, you should be able to connect to your server both if your local machine or VPS server didn’t have a matching key.
Manually add your SSH key to the VPS server
Now that you’re able to log in to your VPS server with a password, you can add an SSH key again.
Generate a key with:
ssh-keygen -t rsa
Then, if needed, copy it to your vps manually by typing ssh-copy-id [email protected].
Alternatively, copy it via SSH with:
cat ~/.ssh/id_rsa.pub | ssh [email protected] "mkdir -p ~/.ssh && cat >> ~/.ssh/authorized_keys"
You may want to make SSH keys your sole authentication method by editing the ssh_config file:
sudo nano /etc/ssh/sshd_config
Change PasswordAuthentication yes to PasswordAuthentication no, and save the changes.
Manually choose which key to use
If you have too many keys on your local machine, your ssh -vvv output will have the output too many authentication failures for root. You can bypass this by explicitly mentioning the correct key, like so:
ssh -i /home/bitlaunch/.shh/id_rsa [email protected]
If you’re still struggling with these steps and you’re a BitLaunch customer, reach out to our expert support, who will be happy to aid you further.
If you aren’t a BitLaunch customer, please feel free to sign up for a bitcoin vps today.
Introduction
The SSH Permission denied error appears after permission-related settings are modified on the SSH server. Usual scenarios include a new package installation or the creation of new users.
In this tutorial, you will learn how to troubleshoot the SSH Permission denied error and reconnect to your SSH server.
Prerequisites
- SSH client on the local machine and SSH server on the remote system
- A user account to access the remote server (for password-based login)
- A user account with sudo or root privileges
The SSH Permission denied error appears when trying to SSH into a server:
Permission denied (publickey,gssapi-keyex,gssapi-with-mic)
Following the Permission denied statement, the bracket contains the attempted authentication methods that failed at the initiation of the connection. The error suggests that the public key is the issue, which is misleading.
One reason for the error may be sshd_config, the file that contains SSH server configuration. The other possibility is that the authorized_keys file has insufficient permissions. This file contains the list of public keys for the clients allowed to SSH into the server. Consequently, the system’s inability to read from the file results in the Permission denied error.
How to fix SSH Permission denied
Both solutions contain steps you need to perform on the server-side. Start by opening the terminal on your server and proceed with one of the solutions below.
Solution 1: Enable Password Authentication
If you want to use a password to access the SSH server, a solution for fixing the Permission denied error is to enable password login in the sshd_config file.
To do this, open the file in a text editor. This example uses the nano editor:
sudo nano /etc/ssh/sshd_configIn the file, find the PasswordAuthentication line and make sure it ends with yes.
Find the ChallengeResponseAuthentication option and disable it by adding no.
If lines are commented out, remove the hash sign # to uncomment them.
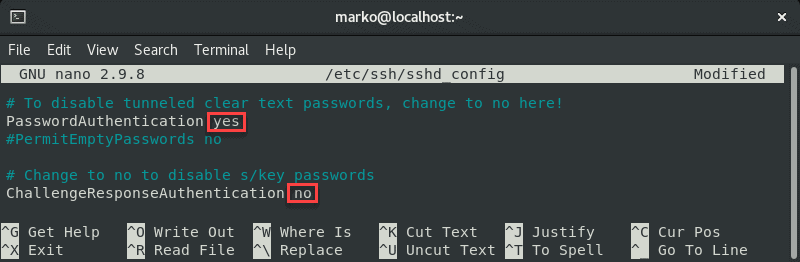
Save the file and exit.
Restart the SSH service by typing the following command:
sudo systemctl restart sshdSolution 2: Change File System Permissions
Using the password-based login as the SSH authentication method is not recommended due to security concerns. Therefore, the following solution may be preferable since it troubleshoots the public key authentication method.
First, open the sshd_config file using a text editor:
sudo nano /etc/ssh/sshd_configIn the file, make sure the following options are set as follows:
PermitRootLogin no
PubkeyAuthentication yes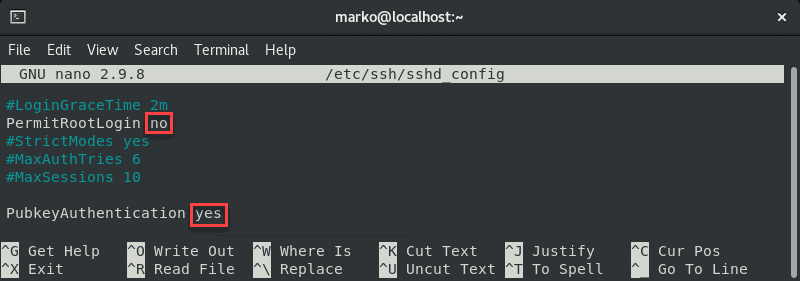
Note: The steps above are considered best security practices. If you need to use root login, set the relevant line to yes.
Comment out the GSSAPI-related options by adding the hash sign at the beginning of the line:
#GSSAPIAuthentication yes
#GSSAPICleanupCredentials no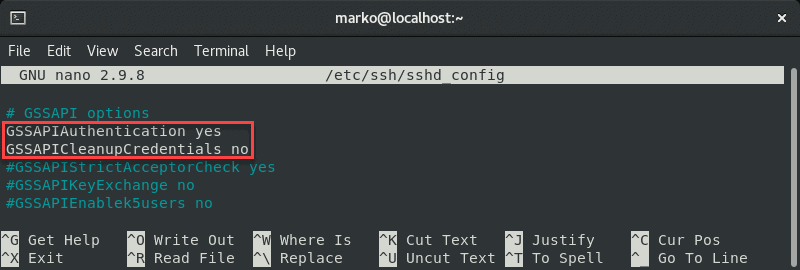
Also, make sure the UsePAM line is set to yes:
UsePAM yes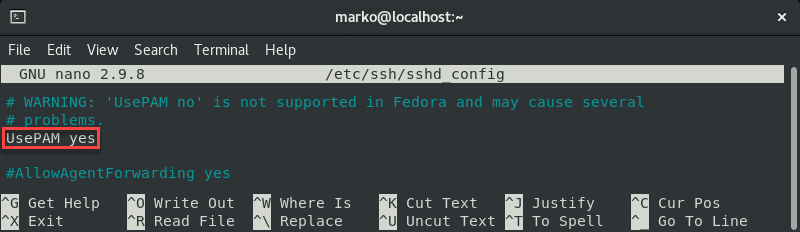
Save the file and restart the sshd service:
systemctl restart sshdNow navigate to your home folder and check the permissions:
ls -ld
If your owner permissions are not set to read, write, and execute (drwx------), use the chmod command to change them:
chmod 0700 /home/[your-username]Now go to the .ssh folder and recheck the permissions:
ls -ld
This directory should also have read, write, and execute permissions for the file owner. To enforce them, use chmod again:
chmod 0700 /home/your_home/.sshThe .ssh folder contains the authorized_keys file. Check its permissions with:
ls -ld authorized_keys
The file owner should have read and write permissions. To set them, use:
chmod 0600 /home/[username]/.ssh/authorized_keysNow try logging in with the key pair again. The output below shows a successful login attempt.

Conclusion
This tutorial covered the steps necessary to troubleshoot the SSH Permission denied (publickey,gssapi-keyex,gssapi-with-mic) error. By completing the steps in the guide, you should fix the error and successfully SSH into your server.
