PowerShell Grep equivalent cmdlet is Select-String which uses regular expressions to search string in files. Select-String cmdlet in Powershell works similar to grep in UNIX and findstr in PowerShell.
Select-String searches for text or text patterns in the input string or file. It displays the file name, line number, and text in the line containing the match.

In this article, we will discuss PowerShell grep equivalent Select-String to search string in the files recursively using the Get-ChildItem, search string in the text that matches the patterns.
Get-ChildItem in PowerShell gets one or more child items based on search criteria.
Using the Select-String cmdlet in PowerShell with Get-ChildItem to search for the string in the file recursively.
Get-ChildItem -Path D:PowerShell -Recurse | Select-String -Pattern 'PSIsContainer'
In the above PowerShell script, Get-ChildItem uses the parameter -Recurse to get one or more child items for the path specified and pipe output to the Select-String command.
PowerShell Tip: How to search for files in PowerShell!
Select-String uses a Pattern parameter to specify a string to find string in the file.
On successful match of string in a file, Select-String returns the filename, line number, and a line containing the search text in it.
The output of the grep equivalent Select-String command to find string in file is:

PowerShell find string in file
Use Select-String in PowerShell to find a string in the file. It uses regular expression matching to search for patterns in the file.
Select-String -Path D:PowerShell*.* -Pattern 'Get-'
In the above PowerShell script, Select-String uses Pattern ‘Get-‘ to search string in the file specified by the Path parameter.
The output of the script to grep a text file is:
PS C:> Select-String -Path D:PowerShell*.* -Pattern 'Get-'

D:PowerShellGetFileProperties-Assignment.txt:1:Get-ChildItem -File | Select name,CreationTime
D:PowerShellprint-spooler-service-Test.ps1:1:$PrintSpooler = Get-Service -Name Spooler
D:PowerShellprint-spooler-service.ps1:1:$PrintSpooler = Get-Service -Name Spooler
Select-String displays the output on the console. It finds the string in the file and prints its filename, line number, and line containing the text.
PowerShell Tip: How to find the file last modified date using PowerShell!
Search for String in File Using Get-Content
The Get-Content gets the content of the file specified by the path parameter. It reads the content of the file and returns the string object.
Use the Get-Content to search for a string in the file using the following command.
Get-Content -Path C:Windowsmy.ini
Get-Content -Path C:Windowsmy.ini | Select-String -Pattern "basedir*"
In the above PowerShell script,
The Get-Content reads the content of the file my.ini specified by the Path parameter.
It pipes the content of the string object to the Select-String command. It uses the Pattern parameter to find the string in the string object.
The output of the above script to search string in string object is:

Search String in Hash variable
Using the Select-String in PowerShell, you can search string in the hash variable.
let’s consider an example where hash contains the below key-value data pair and is stored in the $mysqlInfo variable.
$mysqlInfo = @{
basedir='C:/Program Files/mysql'

datadir='C:/Program Files/mysql/data'

port='3306'

}
Use the Select-String to specify the pattern to find the string in the variable.
$mysqlInfo |Out-String -Stream | Select-String -Pattern 'datadir'
In the above PowerShell script, the $mysqlInfo variable input pipes to the Out-String -Stream. It formatted the string objects into multiple single-line string objects.
Select-String uses the Pattern parameter to specify the input string to search in variable and returns the output as follows:
$mysqlInfo |Out-String -Stream | Select-String -Pattern 'datadir'

datadir          C:/Program Files/mysql/data
PowerShell Tip: PowerShell Select-String Ignore Case search and CaseSensitive Search!
Conclusion
I hope the above article using the Select-String to search string in file and variable is helpful to you.
Use Select-String to find the string in file or variable similar to the grep command in UNIX and findstr in windows.
You can find more topics about PowerShell Active Directory commands and PowerShell basics on the ShellGeek home page.
В мире Linux/Unix для поиска определенного текста или ошибок в лог файлах используется команда grep. Grep позволяет быстро и удобно найти/выбрать любых данные из результатов выполнения другой команды:
command | grep search
В PowerShell для поиска текста в файлах можно использовать командлет Select-String.
Например, следующая команда выведет все строки текстового файла, содержащие ключевую фразу ERROR:
Select-String -Path c:tmpmakeapp_sxtracesxs.txt -Pattern "ERROR"

Команда вывела номера строк, в которых содержится искомый тескт и их содержимое.
Если вам нужно выполнить поиск вхождения строки по всем txt файлам в определенном каталоге, выполните команду:
Select-String -Path c:tmp*.txt -Pattern "ERROR"
Такую команду удоно исопльзовать, если нужно выполнить поиск по всем файлам в каталоге. Например, для поиска в транспортных логах/smtp Exchange.
С помощью опций Exclude/Include можно включить, исключить определенннные файлы для поиска. Следующий пример выполнит поиск по всем txt и log файлам, имя которых не содежит copy:
$path = "c:tmp*"
Select-String -Path $path -Pattern "ERROR" -Include "*.txt","*.log" -Exclude "*copy*"
Предудущий пример выполняет поиск текста только в указанном каталоге. Для рекурсивного поиска по файлам во вложенных каталогах используйте Get-ChildItem:
Get-ChildItem -Path 'c:tmp' -Recurse -include "*.mp3","*.avi" -ErrorAction SilentlyContinue | Select-String -SimpleMatch "ERROR","WARNING"
When you need to search through a string or log files in Linux we can use the grep command. For PowerShell, we can use the grep equivalent Select-String. We can get pretty much the same results with this powerful cmdlet.
Select-String uses just like grep regular expression to find text patterns in files and strings. It can search through multiple files and report the location including the line number of the string for each file. It’s also possible to find only the first occurrence of string or for example, return only the files that don’t match a string.
- Finding a String with PowerShell Select-String
- Select-String Parameters
- Showing lines before and after with Context
- Return True or False with Quiet
- Return only the matched string with Raw
- Search through multiple file types
- List only the files with Select-String
- Return lines without pattern
- Find files that not Match pattern
- PowerShell Select-String Recursive
- PowerShell Select-String Multiple Patterns
- Wrapping Up
In this article, we are going to take a look at the PowerShell grep equivalent Select-String. We are going to take a look at different examples that you can use to find a string with PowerShell. Make sure you read through the end for a nice little bonus tip!
Finding a String with PowerShell Select-String
Before we dive into all the possibilities of the select-string cmdlet, let’s first take a look at a couple of common examples. To search for a particular string in log files we can use the following cmdlet in PowerShell:
# Search for the string error in the path
Select-String -Pattern "error" -Path "C:templog*.log"

# or in short:
Select-String "error" "C:templog*.log"
The grep equivalent would be:
grep "error" .log*.log
By default, the output of the select-string cmdlet will show the filename, line number, and the complete line where the string was found:
The advantage of PowerShell is that we can easily format the output to a more readable format. If you for example are only interested in the filename, path, and line number then you could format the results into a table and select only the fields that you need:
Select-String -Pattern "error" -Path "C:templog*.log" | Select LineNumber, FileName, Path

# Result:
LineNumber Filename         Path
---------- --------         ----
         9 01032022-app.log C:templog1032022-app.log
        18 04032022-app.log C:templog4032022-app.log
         7 05032022-app.log C:templog5032022-app.log
         9 11022022-app.log C:templog11022022-app.log
         9 11032021-app.log C:templog11032021-app.log
         9 11102021-app.log C:templog11102021-app.log
        38 11102021-app.log C:templog11102021-app.log
         9 15032022-app.log C:templog15032022-app.log
Select-String Parameters
So we have taken a quick look at the basic usage of the cmdlet, now let’s dive a bit deeper into all the possibilities of the search-string cmdlet in PowerShell. The cmdlet comes with a couple of parameters that will help us with searching for strings and selecting the results:
| Parameter | Description |
|---|---|
| -Pattern | The text or string to find. Accepts a regular expression |
| -Path | Specify the file or path to files to search through. Accepts wildcards |
| -CaseSensitive | Search-string is case sensitive |
| -Context | Show lines before and/or after the pattern |
| -Quiet | Only return true or false |
| -Raw | Return only the matched string like grep |
| -List | List only the first match in the files. Used to get a list of files with pattern |
| -SimpleMatch | Treat the pattern as a simple string |
| -Include | Specifies files to include in the search (“*.txt”,”*.log”) |
| -Exclude | Specifies files to exclude from the search path |
| -NotMatch | Return only the items that didn’t match the pattern |
| -AllMatches | Return all matches of the result |
Showing lines before and after with Context
The Select-String cmdlet returns the line where it found the string that we searched for. But when searching through log files, for example, you probably also want to know what happened before or after the error.
This is where the -context parameter comes in. It allows you to specify the number of lines that need to be returned for and/or after the matched line. The first digit is the number of lines before, the second is the number of lines after. If you only supply a single digit then it will be used for both.
# Return 3 lines before
Select-String -Pattern "error" -Path "C:templogsub*.log" -Context 3,0

# Return 2 lines before and 2 lines after the error:
Select-String -Pattern "error" -Path "C:templogsub*.log" -Context 2
The line that matched the pattern is indicated with > and the string is highlighted:
Return True or False with Quiet
When using the PowerShell grep equivalent select-string inside a script you sometimes only need to know if the string exists or not. By default, the cmdlet will return a MatchInfo object. An object with the line number, path, string, etc.
To check if the log files contain an error or not we can do the following:
# Returns true or False
Select-String -Pattern "error" -Path "C:templogsub*.log" -Quiet

# Result:
True
Return only the matched string with Raw
If you are used to the Linux grep command then you may have noticed that the result of select-string is slightly different. The PowerShell equivalent returns an object, instead of only the string that the grep command does.
When you add the -raw parameter to your command then the cmdlet will only return the string that matched the pattern:
Select-String -Pattern "error" -Path "C:templogsub*.log" -Raw

# Result:
2022-03-01 10:59:21 [ERROR] - String failed to be a string
Search through multiple file types
The path parameter already accepts wildcards, allowing us to search through multiple files. But in this case, we can only search through one file type. When using the -include parameter we can specify multiple file types that we want to search through.
To use the parameter we still need to supply the path, otherwise, the cmdlet will search in the script root location.
# Search in the txt and log files
Select-String -Pattern "error" -Path "C:templogsub*" -Include "*.txt","*.log"

# Result
C:templogsubLT3452-process.log:4:2022-03-01 10:59:21 [ERROR] - String failed to be a string
C:templogsubLT4423-process.txt:3:2022-02-01 05:49:21 [ERROR] - Squirrel failed to find process
It’s also possible to exclude file extensions with the -exclude parameter.
List only the files with Select-String
When searching through multiple files with the select-string cmdlet, PowerShell will return all instances of the string that it has found. But sometimes you only want to know if a log file, for example, contains an error.
If we search through the log files for the pattern error we can see that the file 11102021-app.log is found two times:
Select-String -Pattern "error" -Path "C:templog*" | Select LineNumber, Filename

# Result:
LineNumber Filename
---------- --------
         9 01032022-app.log
        18 04032022-app.log
         7 05032022-app.log
         9 11022022-app.log
         9 11032021-app.log
         9 11102021-app.log
        38 11102021-app.log
         9 15032022-app.log
By using the parameter -List only the first instances are returned, resulting in a unique list of filenames that contain the matching pattern:
Select-String -Pattern "error" -Path "C:templog*" -List | Select LineNumber, Filename
Return lines without pattern
All this time we have been searching for strings inside log files that contain the string “error”. But what if you want to get the opposite? All the lines that don’t contain the word “error”?
For this, we can use the -NotMatch parameter. This will return all the lines in the path that don’t match the pattern that we have supplied:
Select-String -Pattern "error" -Path "C:templog*" -NotMatch | Select LineNumber, Filename
Find files that not Match pattern
The Select-String cmdlet searches on line level through files. This means that we can’t simply use this cmdlet to return only the files that don’t contain a particular string.
To get all the files that don’t contain the string we will need to use the Get-ChildItem cmdlet, and use the Select-String cmdlet on each file.
By using the -quiet parameter we can return true or false, allowing us to only select (and return) the files that don’t contain the pattern:
Get-ChildItem -path "C:templog*" | Where-Object { !( $_ | Select-String -Pattern "error" -Quiet ) }

# Result:

    Directory: C:templog

Mode                 LastWriteTime         Length Name
----                 -------------         ------ ----
d----           15-3-2022    13:52                sub
-a---           15-3-2022    14:09           4120 04032022-app.log
-a---           15-3-2022    12:59           2860 11032022-app.log
PowerShell Select-String Recursive
The select-string cmdlet in PowerShell only searches in the given directory. It won’t go through the subfolders, even if you use wildcards. To search in all subfolders as well we will need to combine the cmdlet with Get-ChildItem.
So to search in all subfolders we first will get all the items with Get-Childitem using the parameter -Recurse to search recursive. And then pass each file to the Select-String cmdlet:
Get-ChildItem -path "C:templog*" -Recurse | Select-String -Pattern "error" | Select LineNumber, Filename, Path
PowerShell Select-String Multiple Patterns
When searching through log files of other text files you sometimes need to search for multiple patterns. Now you could simply run the Select-String cmdlet twice, but that isn’t really efficient.
Luckily we can supply multiple patterns to the Select-String cmdlet. You can simply create an array with strings or comma-separated the strings:
Select-String -Pattern "error","warning" -Path "C:templog*" -List | Select LineNumber, Filename, Pattern
As you can see I have added the property Pattern to the select statement. This way we can see which pattern has matches in the file and on which line.
Wrapping Up
The PowerShell grep equivalent Select-String is a great tool to find strings inside text files or other output streams. If you really like to use the command grep, then I have a small tip for you. You can create a new alias in PowerShell so that the select-string cmdlet is used when you type grep.
To create the alias type:
new-alias grep select-string
Now you can use grep just like in Linux:
I hope you found this article useful, if you have any questions, just drop a comment below.
В Powershell есть командлет, похожий на grep в Linux, Select-String. С помощью него мы можем искать как файлы, так и вхождения строк и, по желанию, используя регулярные выражения.
Для поиска внутри файла можно выполнить следующий командлет:
Select-String -Path *.txt -Pattern "fix"Где:
- Path – путь до директории или документа. В моем случае будут искаться все файлы с расширением .txt, т.к. знак * говорит что мы не знаем что находится слева. Если путь не указан, то он используется по умолчанию, откуда запущен powershell.
- Pattern – строка, которую мы ищем внутри файла. Этот ключ используется для регулярных выражений. Для использования простого поиска, без регулярки, нужно ставить -SimpleMatch

Мы можем искать не только в файлах, но и в самих строках:
$str = "Hello World"
Select-String -InputObject $str -SimpleMatch "hello","idk"
Где:
- InputObject – объект, в котором мы будем искать переменную
- SimpleMatch – простое совпадение. В моем случае их два. Если “hello” или “idk” будет в строке, то команда вернет строку.
Если мы используем путь в какую-то папку, то мы можем включать и исключать какие-то свойства:
$path =  "C:Folder1New folder*"
Select-String -Path $path -SimpleMatch "fix" -Include "*.txt" -Exclude "text*" -CaseSensitive
Где:
- $path – переменная с путем, которая включает все файлы в папке “New Folder”.
- Include – включает все файлы. В моем случае с расширением .txt
- Exclude – исключает все файлы, которые начинаются на text.
- CaseSensitive – учет регистра. В powershell, по умолчанию, буква “а” и “А” одинаковые, а с этим ключом они будут разными.
Т.к. командлет ищет только в текущей папке, но мы можем использовать другой, который рассматривался тут, для более глубокого поиска файлов через Powershell:
Get-ChildItem -Path 'C:Folder1' -Recurse -Exclude "*.mp3" | Select-String -SimpleMatch "fix"Где:
- Recurse – рекурсивный поиск т.е. поиск по всем папкам включительно.
- Exclude – исключаем файлы с расширением mp3
Если в папке много файлов, то конечно быстрее будет сначала отфильтровать файлы через powershell Get-ChildItem, а затем искать в них нужные строки через Select-String.
С помощью такой команды мы можем исключить файлы, к которым у нас нет доступа иначе может быть ошибка:
Get-ChildItem -Path 'C:Folder1' -Recurse -Exclude "*.mp3" -ErrorAction SilentlyContinue |
  Select-String -SimpleMatch "fix" -NotMatch
Где:
- NoMatch – говорит, что нам нужны только те строки, где нет “fix” или дословно “Не совпадает”
- ErrorAction – со значением SilentlyContinue – говорит “не уведомлять об ошибках”.
Разницу с Nomatch можно увидеть на картинке:

Если файл или строка в другой кодировке, то мы можем указать дополнительный ключ в виде -Encoding. Он может принимать следующие значения:
- ASCII
- BigEndianUnicode
- OEM
- Unicode
- UTF7
- UTF8
- UTF8BOM
- UTF8NoBOM
- UTF32
…
Теги:
#powershell
PowerShell is awesome if you haven’t used it but it’s absolutely foreign if you’re used to Unix-like Bash-like shells. For instance, there’s no grep, and ls -al won’t work (but ls will and it’ll display all files with details!).
If you switch from Linux to Windows, you might be tempted to either install Cygwin or all of your GNU utilities. Or you might go the Linux subsystem route (which is a totally fair way to go) but if you want to go the PowerShell route, here’s a neat little tip!
What’s grep?
Grep is basically a utility that lets you filter some data using various patterns. There’s a LOT more to it but my own common usage of it is:
$ cat .bash_history | grep ssh
ssh root@0.0.0.0
ssh deploy@0.0.0.0
ssh ubuntu@0.0.0.0
Enter fullscreen mode
Exit fullscreen mode
This will filter out the output of cat and return only commands that include ssh. I use this to remind myself of IPs of servers I’ve recently used. Or I might do this:
$ cat package.json | grep webpack
    "start:dev": "webpack --config webpack/dev.config.js",
    "webpack": "3.8.1",
    "webpack-dev-server": "^2.9.4",
    "webpack-merge": "^4.1.1",
Enter fullscreen mode
Exit fullscreen mode
to get all of my webpack plugins, scripts, and figure out the latest version of webpack. It’s a handy utility, and I use it all the time. To filter lists of files in a folder and pipe them to another command or whatever else.
Grep is POWERFUL and it’s super featureful but I won’t get into that in this article.
So what does PowerShell have that’s the equivalent?
Introducing Select-String
One thing that’s immediately apparent about PowerShell is that its commands have better naming conventions. In fact, PS script is more like a programming language than Bash.
PowerShell piping is like Bash piping though it has some differences that I won’t go into right now.
cat package.json | Select-String -Pattern webpack
ls ./src/components/ | Select-String -Pattern View
Enter fullscreen mode
Exit fullscreen mode
Select-String supports regular expressions so you can also write more complicated stuff like:
C:> cat post.md | Select-String -Pattern "^w*:"

title: How to "grep" in PowerShell
published: false
description:
tags:
Enter fullscreen mode
Exit fullscreen mode
This will extract the front-matter from this post (at the time of writing this section).
How about searching through multiple files?
Absolutely! Grep has a pretty easy syntax for it: grep $PATTERN glob/pattern/**. An -r flag will recursively search through a path.
You might use it to identify where you’re using @select in your Angular application. @select is a decorator provided by the angular-redux store.
$ grep -r "@select" *.ts
comments-list.component.ts:  @select(['comments']) comments: Observable<IComment[]>;
comments-list.component.ts:  @select(authorsSelector) authors: Observable<any>;
comments-list.component.ts:  @select(['topComment']) topComment: Observable<IComment>;
Enter fullscreen mode
Exit fullscreen mode
So what about PowerShell? In PowerShell, you have to specify an argument but the explicitness actually makes a lot of sense:
C:> Select-String -Path *.ts -Pattern "@select"

comments-list.component.ts:51:  @select(['comments']) comments: Observable<IComment[]>;
comments-list.component.ts:53:  @select(authorsSelector) authors: Observable<any>;
comments-list.component.ts:55:  @select(['topComment']) topComment: Observable<IComment>;
Enter fullscreen mode
Exit fullscreen mode
Cool, what about recursion? Err…well, to have true recursion working and scan “n” levels deep, you’ll need to string a few commands together so we’ll skip that for now.
Happy PowerShelling!
Advanced Examples
Before I leave, I’d like to impart some fun advanced commands. Like I said, PowerShell piping isn’t like Linux piping. One of the big differences is that PowerShell utilizes “objects”.
So here’s a great example:
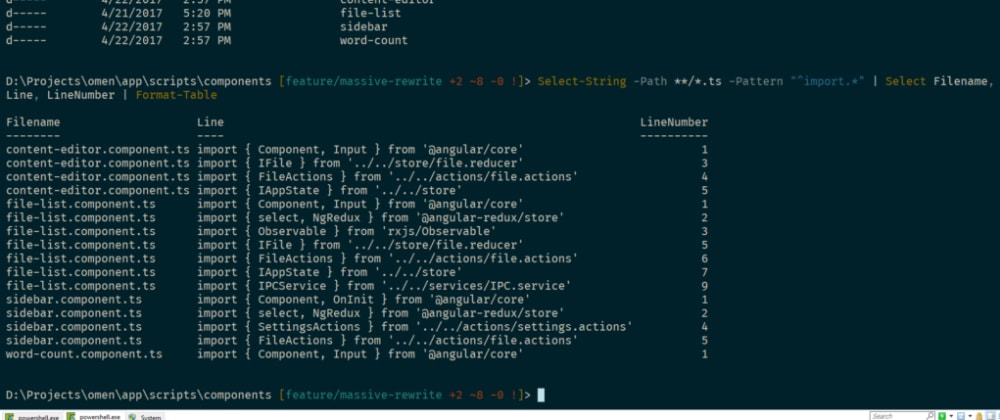
C:> Select-String -Path *.ts -Pattern "@select" | Select Filename, LineNumber, Line, Path | Format-Table
Enter fullscreen mode
Exit fullscreen mode
What this will do is: find files and matches to our pattern in all of TypeScript files in our current directory, select only the information we want to see, and transform it into a nice looking table like so (edited to fit site width):
Filename                    LineNumber   Line               Path
--------                    ----------   ----               ----
comments-list.component.ts  51           @select(['comme... C:comments-list...
comments-list.component.ts  53           @select(authors... C:comments-list...
comments-list.component.ts  55           @select(['topCo... C:comments-list...
Enter fullscreen mode
Exit fullscreen mode
You can then save it into a file via Out-File <filename> like so:
C:> Select-String -Path *.ts -Pattern "@select" | Select Filename, LineNumber, Line, Path | Format-Table | Out-File selectors.txt
Enter fullscreen mode
Exit fullscreen mode
Or output to a CSV:
C:> Select-String -Path *.ts -Pattern "@select" | Select Filename, LineNumber, Line, Path | Format-Table | Export-Csv -path selectors.csv -NoTypeInformation
Enter fullscreen mode
Exit fullscreen mode
What I love about PowerShell is that this stuff is built-in and it has sensible names. When I read bash scripts, it can be confusing. I mean, what does awk do? What about sed? Can you infer their jobs based on their names? Or what their flags mean?
