The code is:
import pyautogui
startButton = pyautogui.locateOnScreen('start.png')
print startButton
Or:
import pyautogui
startButton = pyautogui.locateCenterOnScreen('start.png')
print startButton
The output is:
None
Note: the correct syntax seems to be in place according to the documentation.
Note: I have tried also with image full path. The image is on the screen and it is not overlapped by other images. The pil library is also installed. Other pyautogui features work (including taking screenshot)
Please let me know what I am missing out. Or please suggest another Python library for image detection.
![]()
asked Oct 2, 2015 at 12:35
![]()
0
Here is the syntax I use for this:
import pyautogui
start = pyautogui.locateCenterOnScreen('start.png')#If the file is not a png file it will not work
print(start)
pyautogui.moveTo(start)#Moves the mouse to the coordinates of the image
If you are using multiple monitors at the same time it only scans the primary one.
This program scans the pixels of your screen and color matches pixels with your PNG file. If the image color(shadows of the image, the image is changing colors, etc.) changes in any way it will reply with “None”.
answered Apr 15, 2016 at 19:43
![]()
Malachi BazarMalachi Bazar
1,6851 gold badge18 silver badges20 bronze badges
None means that PyAutoGui was unable to find your image on the screen.
Make sure:
- The window is open where Start.png was sampled from, and
- The resolutions from when you took the sample and the current monitor are the same.
answered Oct 30, 2015 at 15:27
![]()
AP.AP.
7,8942 gold badges24 silver badges33 bronze badges
Try installing opencv & decrease confidence. That worked for me
import pyautogui
startButton = pyautogui.locateOnScreen('start.png', confidence = 0.7)
print(startButton)
answered Jul 5, 2020 at 15:36
![]()
KKWKKW
3471 silver badge11 bronze badges
As I understand the problem can be fix by turning the image to RGB. The code will look something like this:
import pyautogui
from PIL import Image

im1=pyautogui.screenshot()
im2=pyautogui.screenshot("newone.png")
image.open("newone.png").convert("RGB").save("newone.png")
answered Nov 1, 2017 at 22:09
![]()
Franco MFranco M
1091 silver badge6 bronze badges
You need to put the whole path of the image in pyautogui.locateCenterOnScreen(), like this:
pyautogui.locateCenterOnScreen('C:/Users/User/Desktop/start.png')
This worked for me. You might also want to add x_cord, y_cord = in front of that command, so you can use it later.
![]()
answered Mar 13, 2020 at 16:29
![]()
Urban P.Urban P.
1191 silver badge9 bronze badges
I had a very analogical problem. For me the solution was to use python 2.7 instead of 3.x. It is probably caused by less flexible functionality of python 3. I prefer to use it and pyautogui works fantastically. The pillow module (or commonly known as PIL) which must be installed when installing pyautogui, however seems to have less functionality working with python 3.
answered Mar 1, 2016 at 9:58
![]()
L_PavL_Pav
2811 gold badge3 silver badges11 bronze badges
0
I faced the same issue with pyautogui. Though it is a very convenient library, it is quite slow.
I gained a x10 speedup relying on cv2 and PIL:
def benchmark_opencv_pil(method):
    img = ImageGrab.grab(bbox=REGION)
    img_cv = cv.cvtColor(np.array(img), cv.COLOR_RGB2BGR)
    res = cv.matchTemplate(img_cv, GAME_OVER_PICTURE_CV, method)
    # print(res)
    return (res >= 0.8).any()
Where using TM_CCOEFF_NORMED worked well. (obviously, you can also adjust the 0.8 threshold)
Source : Fast locateOnScreen with Python
For the sake of completeness, here is the full benchmark:
import pyautogui as pg
import numpy as np
import cv2 as cv
from PIL import ImageGrab, Image
import time

REGION = (0, 0, 400, 400)
GAME_OVER_PICTURE_PIL = Image.open("./balloon_fight_game_over.png")
GAME_OVER_PICTURE_CV = cv.imread('./balloon_fight_game_over.png')


def timing(f):
    def wrap(*args, **kwargs):
        time1 = time.time()
        ret = f(*args, **kwargs)
        time2 = time.time()
        print('{:s} function took {:.3f} ms'.format(
            f.__name__, (time2-time1)*1000.0))

        return ret
    return wrap


@timing
def benchmark_pyautogui():
    res = pg.locateOnScreen(GAME_OVER_PICTURE_PIL,
                            grayscale=True,  # should provied a speed up
                            confidence=0.8,
                            region=REGION)
    return res is not None


@timing
def benchmark_opencv_pil(method):
    img = ImageGrab.grab(bbox=REGION)
    img_cv = cv.cvtColor(np.array(img), cv.COLOR_RGB2BGR)
    res = cv.matchTemplate(img_cv, GAME_OVER_PICTURE_CV, method)
    # print(res)
    return (res >= 0.8).any()


if __name__ == "__main__":

    im_pyautogui = benchmark_pyautogui()
    print(im_pyautogui)

    methods = ['cv.TM_CCOEFF', 'cv.TM_CCOEFF_NORMED', 'cv.TM_CCORR',
               'cv.TM_CCORR_NORMED', 'cv.TM_SQDIFF', 'cv.TM_SQDIFF_NORMED']


    # cv.TM_CCOEFF_NORMED actually seems to be the most relevant method
    for method in methods:
        print(method)
        im_opencv = benchmark_opencv_pil(eval(method))
        print(im_opencv)
And the results show a x10 improvement.
benchmark_pyautogui function took 175.712 ms
False
cv.TM_CCOEFF
benchmark_opencv_pil function took 21.283 ms
True
cv.TM_CCOEFF_NORMED
benchmark_opencv_pil function took 23.377 ms
False
cv.TM_CCORR
benchmark_opencv_pil function took 20.465 ms
True
cv.TM_CCORR_NORMED
benchmark_opencv_pil function took 25.347 ms
False
cv.TM_SQDIFF
benchmark_opencv_pil function took 23.799 ms
True
cv.TM_SQDIFF_NORMED
benchmark_opencv_pil function took 22.882 ms
True
Automating any kind of task is pretty tricky, and the more complex the task, the harder it is to automate. At some point or the other, the need for Image Recognition with Pyautogui arises, so that we can locate elements on the screen. Without this feature, we would face numerous issues, such as being unable to find an element if it’s position on screen was slightly changed.
How Image Recognition works in PyAutoGUI
First we need to understand how exactly image recognition works in Pyautogui. Simply put, PyAutoGUI has a variety of “locate” functions, which take a source image as a parameter, and then try to find a match from whatever is currently displaying on your screen. (This means if you are searching for something that is currently minimized, or off-screen, then PyAutoGUI will not be able to find it).
Once a match has been found, depending on the function called, we can either have it’s top-left coordinates returned, or a “Box” object, with the top-left coordinates as well as the width and height.
Here are some of the various functions that we can use in Pyautogui for Image Recognition.
- locateOnScreen(image) -> Returns (left, top, width, height) coordinate of first found instance of the
imageon the screen. - locateCenterOnScreen(image) -> Returns the x and y coordinates of the center of the first found instance of the
imageon the screen. - locateAllOnScreen(image) -> Returns a list with (left, top, width, height) tuples for each image found on the screen.
Image Detection with PyAutoGUI
We will now show you a small example of how we can practically apply Image recognition in Pyautogui, and automate a task.
Calculator App
We will be creating a simple program that uses the Calculator app in Windows, and performs a simple addition operation on it between two numbers. Here is what the app looks like on PC.
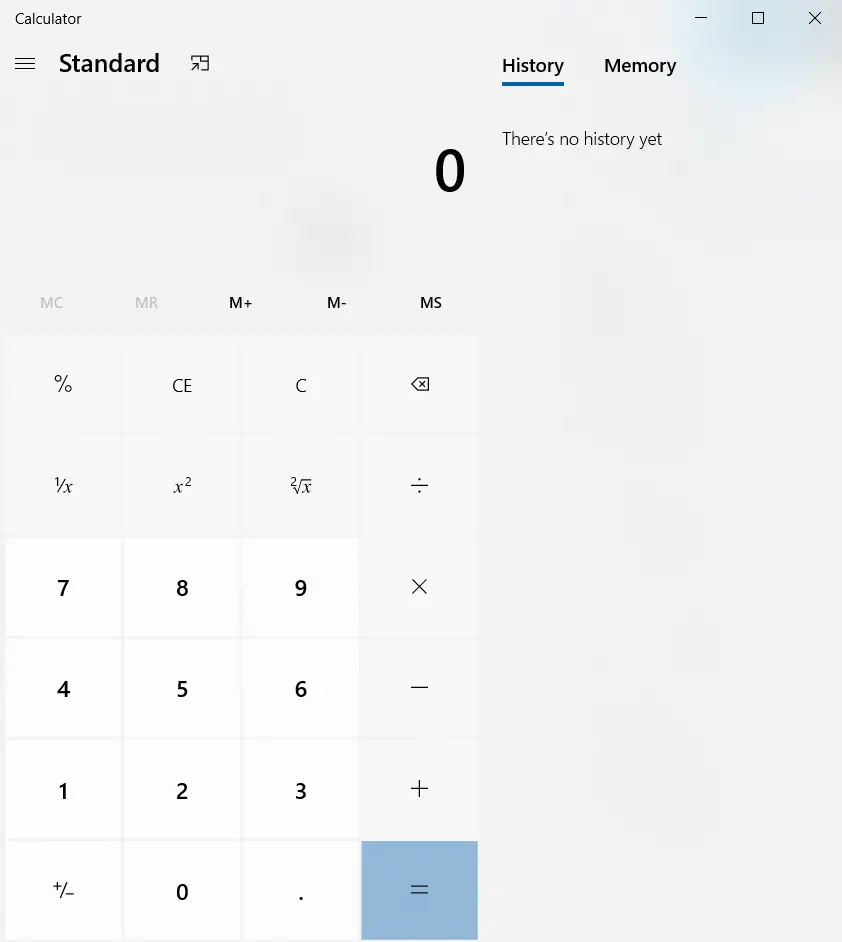
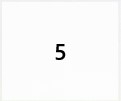
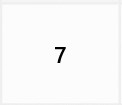
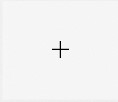
For this program, I have taken screen-shots of 4 of it’s buttons, pictured below.
Note: These images, may or may not work for you. The Pyautogui functions for image detection needs the correct image dimensions, so if the default calculator app size is different on your system, then it won’t return a match. I advise you to take the screenshots yourself. (I used Windows Snipping tool + Paint)
Now let’s try using one of the above-mentioned functions for image detection. We will use the one with just returns the x and y coordinates, as we aren’t concerned with the width or height right now.
import pyautogui

x, y= pyautogui.locateCenterOnScreen("5.jpg")
pyautogui.moveTo(x, y, duration = 0.1)
pyautogui.leftClick()
Now what this code should do, is locate the number 5 on the calculator, move the mouse cursor over to it, and then click it. However, this code and the underlying logic is pretty tricky, so there is a very good chance you will face an error here.
Let’s try and analyze why these errors can occur, and how to get around them.
Possible Errors, and their Reasons
1# The most obvious issue is that you don’t have your Calculator App open on screen. Even if it’s open however, there can be issues. For example, you have it minimized or it is being covered by some other window. Both of these cases will cause it to fail.
2# You may have tried re-sizing the Calculator Window. If for example, the image you took was of dimensions 20×20, and the button on the calculator has been resized to 40×40, then it will not return a match.
3# (MOST IMPORTANT) You tried using a .jpg instead of a .png. (And yes, I know I used a .jpg in the above example). I will be addressing this issue in the next section in more detail.
Using PyAutoGUI with OpenCV
(Don’t be scared off by the title, it’s alot easier than it looks, trust me)
The problem with the default use of pyautogui is that it searches only for exact matches. But often that’s not very practical, as there can be minor changes in color, tone, etc. Luckily pyautogui offers a simple solution.
All of it’s locate functions have the confidence parameter, which takes in a float value ranging from 0 to 1.0. The default value is 1.0, which states that only 100% matches should be returned. If you gave a value of 0.8 on the other hand, it will return matches that only match atleast 80%.
Now I mentioned in the earlier that a .jpg would (likely) not work. This is because they apply compression on the image, which slightly changes the pixel composition, hence it returns a “not found” exception. Using the confidence parameter will remove this problem entirely. Just set a value like 0.9, and it won’t cause any problems.
There is one slight caveat to this though. You must have OpenCV installed, as it is a dependency for the confidence parameter to work. The full OpenCV package is a bit complex to install, luckily there is a smaller version (with lesser features) we can acquire that will be enough for our purposes.
Run the following command:
pip install opencv-pythonNow let’s get back to our code.
Completing our Program
I will write out the complete code here, that I have used to automate this task. Try it out yourself and let me know the results!
import pyautogui

x, y= pyautogui.locateCenterOnScreen("5.jpg", confidence = 0.9)
pyautogui.moveTo(x, y, duration = 0.1)
pyautogui.leftClick()

x, y= pyautogui.locateCenterOnScreen("plus.jpg", confidence = 0.9)
pyautogui.moveTo(x, y, duration = 0.1)
pyautogui.leftClick()

x, y= pyautogui.locateCenterOnScreen("7.jpg", confidence = 0.9)
pyautogui.moveTo(x, y, duration = 0.1)
pyautogui.leftClick()

x, y= pyautogui.locateCenterOnScreen("equals.jpg", confidence = 0.9)
pyautogui.moveTo(x, y, duration = 0.1)
pyautogui.leftClick()
Normally I would have provided the images as a download, but due to various problems that can occur, it’s best if you do that part yourselves.
Another interesting feature that PyAutoGUI has that may come in handy for you, is the Screenshot ability. This allows you take to take screenshots of the full screen or of specific regions, and save them to a file.
Note: For a complete project based around this idea, you would need to take images for each button. To make it even more interesting, you could have the user enter expressions, and the program will automatically solve it.
This marks the end of the Image Recognition with Pyautogui Tutorial. Any suggestions or contributions for CodersLegacy are more than welcome. Questions regarding the article content can be asked in the comments section below.
#python #pyautogui
#python #pyautogui
Вопрос:
Я хотел бы создать скрипт, который нажимает на изображения в зависимости от того, что запрашивается, он должен проходить через список изображений. так, например, если программа попросит пользователя щелкнуть по зеленому кружку:
 question_list = greencircle, redcircle, bluesquare, redtriangle

if(greencircle == greencircle.png){
    pyautogui.click(greencircle.png)
}
может кто-нибудь помочь с этим?
Комментарии:
1. Если вам нужно распознавание изображений, вы должны использовать OpenCV для распознавания изображений на экране и pyautogui для щелчка по ним после получения их координат.
2. Способ задать свой первый вопрос! Добро пожаловать!! Основываясь на документации, похоже, что pyautogui.click() — правильный синтаксис. Можете ли вы уточнить, какую проблему вы видите? pyautogui.readthedocs.io/en/latest
3. @StephenGodderidgeThanks спасибо! Итак, в основном у меня есть приложение для моего школьного проекта, и у меня есть программа, которая просит пользователя щелкнуть по чему-то, в основном как изображение из reCAPTCHA. Моя программа просто не работает, и я не знаю почему
4. Итак, программа должна знать, что представляет собой каждое изображение, верно? Таким образом, он может выбирать, какое изображение щелкнуть? Если это так, я бы пошел с тем, что предложил @Nastor. Проверьте OpenCV для распознавания изображений. Вот удобный учебник, с которого вы могли бы начать: learnopencv.com/image-recognition-and-object-detection-part1
5. Разве opencv не принимает только камеру? Мне нужно сделать снимок на экране, чтобы камера не разрешалась
Ответ №1:
PyAutoGUI имеет встроенную вызываемую функцию locateOnScreen() , которая возвращает координаты x, y центра изображения, если она может найти его на текущем экране (он делает снимок экрана, а затем анализирует его).
Изображение должно точно совпадать, чтобы это работало; т. Е. Если вы хотите нажать на button.png эту кнопку, изображение должно быть того же размера / разрешения, что и кнопка в вашей Windows, чтобы программа ее распознала. Один из способов добиться этого — сделать снимок экрана, открыть его в paint и вырезать только ту кнопку, которую вы хотите нажать (или вы можете попросить PyAutoGUI сделать это за вас, как я покажу в более позднем примере).
 import pyautogui

question_list = ['greencircle', 'redcircle', 'bluesquare', 'redtriangle']

user_input = input('Where should I click? ')

while user_input not in question_list:
    print('Incorrect input, available options: greencircle, redcircle, bluesquare, redtriangle')
    user_input = input('Where should I click?')

location = pyautogui.locateOnScreen(user_input   '.png')
pyautogui.click(location)
Приведенный выше пример требует, чтобы у вас уже был greencircle.png и все другие .png в вашем каталоге
PyAutoGUI также может делать снимки экрана, и вы можете указать, в какой области экрана делать снимок pyautogui.screenshot(region=(0, 0, 0, 0)) . Первые два значения — это координаты x, y для верхнего левого края области, которую вы хотите выбрать, третье — как далеко вправо (x), а четвертое — как далеко вниз (y).
В следующем примере делается снимок экрана с логотипом Windows 10, сохраняется в файл, а затем нажимается на логотип с помощью указанного файла .png
 import pyautogui

pyautogui.screenshot('win10_logo.png', region=(0, 1041, 50, 39))
location = pyautogui.locateOnScreen('win10_logo.png')
pyautogui.click(location)
Вам также не нужно сохранять снимок экрана в файл, вы можете просто сохранить его как переменную
 import pyautogui

win10 = pyautogui.screenshot(region=(0, 1041, 50, 39))
location = pyautogui.locateOnScreen(win10)
pyautogui.click(location)
Для того, чтобы программа определяла, нажал ли пользователь в определенной области (скажем, на логотип Windows 10), потребуется другая библиотека, такая как pynput.
 from pynput.mouse import Listener

def on_click(x, y, button, pressed):
    if 0 < x < 50 and 1080 > y > 1041 and str(button) == 'Button.left' and pressed:
        print('You clicked on Windows 10 Logo')
        return False    # get rid of return statement if you want a continuous loop

with Listener(on_click=on_click) as listener:
    listener.join()
СОБИРАЕМ ВСЕ ЭТО ВМЕСТЕ
 import pyautogui
from pynput.mouse import Listener

win10 = pyautogui.screenshot(region=(0, 1041, 50, 39))
location = pyautogui.locateOnScreen(win10)

# location[0] is the top left x coord
# location[1] is the top left y coord
# location[2] is the distance from left x coord to right x coord
# location[3] is the distance from top y coord to bottom y coord

x_boundary_left = location[0]
y_boundary_top = location[1]
x_boundary_right = location[0]   location[2]
y_boundary_bottom = location[1]   location[3]


def on_click(x, y, button, pressed):
    if x_boundary_left < x < x_boundary_right and y_boundary_bottom > y > y_boundary_top and str(button) == 'Button.left' and pressed:
        print('You clicked on Windows 10 Logo')
        return False    # get rid of return statement if you want a continuous loop


with Listener(on_click=on_click) as listener:
    listener.join()
4 ответа
Нет означает, что PyAutoGui не смог найти ваше изображение на экране, убедитесь, что окно открыто, где было выбрано Start.png, и что разрешения [с того момента, когда вы взяли образец и текущий монитор] одинаковы.
AP.
30 окт. 2015, в 15:58
Поделиться
Как я понимаю, проблему можно исправить, повернув изображение в rgb.
это будет что-то вроде….
import pyautogui
from PIL import Image
im1=pyautogui.screenshoot()
im2=pyautogui.screenshoot("newone.png")
image.open("newone.png").convert("RGB").save("newone.png")
С уважением
Franco M
01 нояб. 2017, в 23:58
Поделиться
Вот синтаксис, который я использую для этого:
import pyautogui
start = pyautogui.locateCenterOnScreen('start.png')#If the file is not a png file it will not work
print(start)
pyautogui.moveTo(start)#Moves the mouse to the coordinates of the image
Если вы одновременно используете несколько мониторов, он просматривает только основной.
Эта программа сканирует пиксели вашего экрана, а цвет соответствует пикселям с вашим PNG файлом. Если цвет изображения (тени изображения, изображение меняет цвета и т.д.), Изменяется каким-либо образом, он будет отвечать “Нет”.
Malachi Bazar
15 апр. 2016, в 20:40
Поделиться
У меня была очень аналогичная проблема. Для меня было решение использовать python 2.7 вместо 3.x. Вероятно, это связано с менее гибкими функциями python 3. Я предпочитаю использовать его, а pyautogui работает фантастически. Модуль подушки (или широко известный как PIL), который должен быть установлен при установке pyautogui, однако, похоже, имеет меньшую функциональность, работающую с python 3.
L_Pav
01 март 2016, в 10:23
Поделиться
Ещё вопросы
- 1Сценарий Python, который перемещает определенные файлы между сегментами S3
- 1Раскраска арабского текста в Textview выглядит отдельно
- 1Найдите совпадение в строке файла, затем перейдите к следующему файлу
- 0как я могу разрешить / usr / bin / ld: не могу найти ошибку -lconfig ++
- 1Как проверить элемент управления загрузкой файлов в пользовательском валидаторе
- 0Ошибка № 1064 в запросе SQL
- 0Как отобразить ответ из базы данных на представление codeigniter в формате строки
- 0что такое цель: x86_64-redhat-linux?
- 0функция вызова при нажатии кнопки
- 0Ошибка: «Ответ» не был объявлен в этой области
- 0Codeigniter возвращает false из моделей
- 0Исправление синтаксической ошибки переменной селектора jQuery
- 1JTextField Width
- 0Как вызвать метод / функцию 50 раз в секунду
- 1Как установить адаптеры вложенных представлений рециркулятора при использовании привязки данных?
- 0Как я могу добиться этого удивительного слайд-шоу?
- 0Некоторая довольно сложная тригонометрия для изменения размеров окна
- 1Как получить шаги из Google Fit API?
- 0путевые точки бесконечной прокрутки не работали
- 1База данных для оружия?
- 0Массив проверки кода Jquery равен нулю или нет
- 0не может получить 2-й дататабельно свой собственный CSS
- 0обработка параллелизма в cron php
- 0PHP – Как добавить переменную в тело письма
- 0Почему переполнение вывода std :: cout?
- 1Python OpenCV предупреждение libpng: iCCP: известен неправильный профиль sRGB
- 1WebView не работает с net :: ERR_CACHE_READ_FAILURE
- 1Как рассчитать сумму целых чисел ArrayList из пользовательского ввода
- 0Как выбрать элемент кроме его дочерних элементов?
- 1Есть ли чистый способ передачи данных из полученного ответа на мой собственный ответ?
- 0Как объединить несколько индексов в Sphinx
- 1Robolectric Unit Test завершается неудачно с NoClassDefFoundError, когда приложение зависит от AppsFlyerLib
- 1Сериализация ответа xml для модификации с SimpleXML в kotlin
- 0Magento – setRelatedLinkData () сохраняет только одну ссылку
- 0Как я могу получить данные ассоциации из списка пользователей через отношения многие ко многим в доктрине построения запросов
- 0Как определить служебную переменную как текущий маршрут?
- 1Сбой Chrome. Работает ли ноутбук Jupyter?
- 1Понимание круговых зависимостей в ES6
- 0Подогнать мою страницу с экраном при уменьшении или уменьшении
- 0Как удалить первый элемент из класса контейнера в программе на C ++?
- 1Добавить пробел между виджетами WxPython
- 1Получить данные из строки сетки ExtJS, используя селен
- 1Как скопировать / повторить массив N раз в новый массив? [Дубликат]
- 1Как бороться с большим массивом (100.000 объектов)?
- 0Не получайте ответа от Instagram API
- 1Камера «Bitmap imageBitmap = (Bitmap) extras.get (» data «);» выдает ошибку Nullpointer
- 0IMG с вызовом JavaScript не работает на Ipad?
- 0Как сделать внутренний выбор внутри запросов pdo?
- 1Как вернуть ключи карты в соответствии с условием?
