 |
Work in Progress
This article is work in progress. Please, help this article by expanding it. |
Utopia is an Environmental location in Raft. Originally hinted at the start of the game prior, it is the third area that you will go to in The Third Chapter, and the final one overall.
Summary[]
Utopia is a story island unlocked after collecting a note at Temperance. It was originally hinted at the radio tower as a location in the lore of Raft. The player can find out some information from the whiteboard found in the Radio Tower’s control room.
It is basically a floating town in the middle of submerged skyscrapers. With it’s own working power, water purifier and farm.
Characters[]
The main characters of Utopia consists of Detto, a young child who helps the player with useful clues scattered all over the town, Olof, a tyranical dictator who will attack the player with explosives when confronted, and Olof’s hyenas who are lead by Alpha, a mutant hyena boss that the player has to fight. The rest of the people of Utopia have been locked up by Olof, and can be freed by using the master key the player receives after defeating Olof.
The Whiteboard[]
The following can be read on the whiteboard:
- On March 23, 2020 scientists predict that all ice on Earth will melt in two years.
- By October 16, 2023 Australia is completely underwater.
- By February 20, 2028 a picture of Earth heavily flooded is portrayed.
- It includes a picture captioned “UTOPIA?” which is rumoured to be safe and populated.
- Utopia appears to be a mostly submerged futuristic city.
- The whiteboard estimates the location of Utopia but no context for the hints are given.
Points of Interest[]
- Detto’s Raft
- A large expanse of dirt and irrigation pipes, with three large pipe routers made of concentric circles, and a large building locked with a code. The large building has a harpoon launcher on top of it.
- Your first task will likely be to decipher Detto’s clue in the form of a map. Take one of the nearby shovels and dig out the dirt patches that correspond to the red circles. If you guess right, part of Detto’s code will appear in your inventory. If not, tiny bugs similar to the ones roaming in Tangaroa will appear, creating a temporary zone around the digging spot that damages the player. The damage is minimal, and can be avoided entirely by digging from as far away as possible. Once you have collected three parts of the code, go to the buildings front door and interact with it to automatically input the code. Inside will be a blueprint and a harpoon.
- The next task is far longer. You must restore power to the irrigation system by creating a connection to a generator (look for two bright red large bundles of cable anchored to the side of the nearby skyscraper, your goal is to connect the two) using spare cables lying around in a puzzle similar to the Moontown puzzle in Temperance, complicated by the fact that you cannot interact with ziplines while dragging cable. Remember, you can start dragging cable from either end, so you can climb to point A, zipline to point B, start your connection, then drop down and climb back up to A to complete the connection.
- This area introduces the main mechanic of Utopia- there are red boxes and cages scattered around most areas that can be picked up then placed down wherever the player wants, similar to tamed livestock. Boxes will snap to stack on top of each other automatically when in range. The player can jump two boxes high, and to get higher will need to build an adjacent stack, as the snapping prevents the player from staggering the boxes to form single column stairs. Areas meant to be solved with these boxes will usually have an unusually smooth surface covering the walls and floor around it, whether metal or wood. Hyenas also first appear here. To take them out safely, you can shoot them with a bow while backing away.
- Use these mechanics to connect the power, then rotate the concentric rings in each of the three large pipe routers scattered in the field to make water flow to a tank near Detto’s house. This will cause the carbon dioxide cannister inside to float up. Grab it then head up to the top of the house with a zipline tool, shoot the harpoon cannon, and zipline over to the new area. grab the key located there and zipline down to the next area.
- The main village
- There are several locked doors here. One is locked with chains in a pentagram pattern, and ends the games story upon unlocking. There is a key on its front steps that matches the one you ziplined to. Take it and head to the locked door with two locks and open it. From here the path is fairly linear, with shortcuts you can unlock as you progress.
- The Market
- First you will parkour through the netting layer below, which features moving fans that knock the player back upon contact, usually leading to having to restart from the last checkpoint. Sometimes you will need to intentionally slow down in order to have enough time to jump again after landing. the first and only parkour “checkpoint” is located only a few obstacles in and is represented by having a different, higher net below you. Past this point difficulty spikes with strict timing and patterns to memorize.
- If for whatever reason you would like to skip the parkour, once you get to the second checkpoint you can fall into the net, walk to below the parkours end, stand on one of the counterweights for the pulley system and activate the pulley to cause it to rise. This is easier with the blocky counterweight.
- you will then reach a series of balance puzzles, interspersed with Olof encounters. The goal of the puzzles is to raise a set of cogwheels nearby to the correct floor by using a pulley. The cogwheels are too heavy to jump or climb ladders with, so to get them on the pulley you will need to first lower the cogwheel side as far as possible, then use the boxes to create a staircase. To get around the no jumping restriction, place the cogwheel on the step above you, jump to that step and pick it up, and repeat. The goal of the balance puzzle is usually to get the weight on both sides equal, where the cogs weigh 1 unit. You can only have 2 weights at a time on each side, and only one of each weight per side at a time. The end goal is to bring the cogwheels to mechanisms that need them, which open the way forward or create shortcuts.
- From here, expect mostly Olof encounters. When you defeat him, grab the key around his neck and return to the village to free the trapped people and end the story.
- First you will parkour through the netting layer below, which features moving fans that knock the player back upon contact, usually leading to having to restart from the last checkpoint. Sometimes you will need to intentionally slow down in order to have enough time to jump again after landing. the first and only parkour “checkpoint” is located only a few obstacles in and is represented by having a different, higher net below you. Past this point difficulty spikes with strict timing and patterns to memorize.
- Postgame market
- Once the island and the story are completed, the market will transform, populating with various NPCs, with many minor NPCs for ambiance alongside Detto, Bruno, and Hanne, plus Olof in a cage. Market stalls will fill with food, some of which can be taken by the player for free. This makes Utopia a good location for obtaining bananas, though there are no banana seeds. The three vending machines will appear. By this point, enough shortcuts should be unlocked to get to the market directly from the first elevator.
Bossfights/encounters[]
| It has been suggested that this page be split into its own page at Utopia’s Boss fight.
Do not split pages unless a consensus has been reached. |
Throughout your journey you will encounter Olof Wilkstrom, initially he poses no danger, and allows the player to traverse upward through utopia. However, he eventually begins to attack the player with a variety of methods, starting after you repair the elevator with a cogwheel, and reach the 26th floor.
First encounter[]
– Olof sits overlooking the player in a small arena. There are boxes scattered around said arena, that the player must bring to Olof’s overlook, and stack them on top of each other in order to reach him. This is the only step of the first encounter. Upon reaching Olof’s perch, he will run away to the warehouse.
Boss attacks[]
– Olof will only throw small firebombs that act like a molotov cocktail. They land, glowing red for a few seconds before they combust into flames. As long as the player does not trap themselves in a corner, these bombs pose little threat. The crates, despite being wooden, do not burn in the fire.
Second encounter[]
– After climbing up into Olof’s overlook he will run away to the aforementioned warehouse. In the room he stood in, you can find the electric zipline tool blueprint. You should bring weapons with you to the second encounter, as the warehouse is full of hyenas. Upon entering the warehouse you are confronted with two locked doors on either side, and holes in the floor. Both Olof, and the hyenas are unable to attack you until you drop down, however there is no way through the locked doors until after this encounter.
– Upon dropping down, you’re confronted with a similar scenario to the previous encounter, but with hyenas. There are boxes scattered throughout the room you must stack against the wall to reach Olof, who is standing on some metal stairs. The Hyenas are released in waves of 3, but the subsequent wave does not appear until the previous group of hyenas are dead. Thus it is recommended to leave one alive and simply dodge it by jumping and sprinting while stacking boxes, as the window between waves to stack boxes is very small, and the waves can happen an unlimited number of times.
-When you reach Olof, he will again run away to an Arena, where the final boss awaits.
Boss attacks[]
– Olof continues to throw his firebombs into the arena while the player is chased around by hyenas.
– The hyenas only bite and drag you along the floor. The player can interrupt being dragged by hitting the hyena that has a hold of them.
Third and final encounter[]
– Upon climbing the warehouse and walking down a long hallway connecting it to the next encounter, you will reach Alpha’s arena. Olof takes a brief moment to introduce Alpha before releasing him into the arena to fight you. Alpha is a special hyena, who has been imbued with some kind of poison which he leaves a pool of poison every time the player strikes him. Generally the player is able to outrun Alpha, and land hits at minimal risk. However occasionally, Olof throws Alpha a steak, which gives the hyena the brief ability to use his special attacks. You cannot attack Alpha while Olof is feeding him steak.
Boss attacks[]
– For a large majority of the bossfight Alpha only uses a generic hyena bite as their only attack. However, as was mentioned in the overview of the encounter, periodically Olof throws Alpha meat, which powers him up.
– For a short time, this gives Alpha the ability to jump, across the arena if need be, and land with a shockwave, as well as releasing a large poison puddle. He jumps a maximum of three times before returning to normal.
– Alpha also becomes capable of rendering the player incapable of any movement or action, while repeatedly biting the player, by pinning them to the floor.
After killing Alpha, the player is led to an elevator to confront Olof one last time, where he trips and falls out of a window, rendering him stuck, and leaving the Mastery Key free to grab.
Strategies[]
First encounter[]
For the first encounter there isn’t much to say by way of strategy. Grab the boxes and stack them as quickly as possible to avoid getting burned. The player is also free to leave and come back at any point during this encounter.
Second encounter[]
– If you are badly hurt from the previous fight, go back to your raft and heal before returning, Olof will not return to his post.
– It is recommended to leave one hyena alive, that way a full wave will be unable to spawn and it will be easiest to stack the boxes. After all 3 hyenas are killed, the breather period is very short, and the durability on the player’s weaponry will be whittled down if the player is forced to continue to fight wave after wave of hyenas.
Third and final encounter[]
– It is STRONGLY recommended that the player return to their raft and replenish thirst and hunger, and heal to full health, as Alpha is far more difficult to avoid than the previous encounters.
– Dragging out the fight will likely result in incapacitation, the quicker Alpha is killed, the fewer chances Olof is given to feed him and allow him to use his high damaging special attacks.
– Carry nothing but weaponry and healing salve. In case the player is incapacitated during the fight, it would be unwise to risk losing other valuables not needed to fight Alpha.
After killing Alpha and confronting Olof, don’t forget that master key!
Special Places[]
- Detto’s house
- Farm
- Warehouse
- Marketplace
Unique Items[]
Blueprints[]
Resources[]
Trivia[]
While the residents of Utopia are locked up, they can be heard having conversations among each other pieced together from their respective dialogues.
Bruno: This Olof fellow doesn’t seem like the nicest type.
Noah: Olof happened because we were naive.
Larry: Listening to Olof was a mistake to say the least.
Hanne: Personally I would like to see him work to rebuild what he destroyed.
Larry: I need to get better at reading people.
Max: I don’t think I can say “I told you so” enough.
Larry: In hindsight, yes, Olof did seem a bit maniacal. Don’t worry, I’m disappointed in myself too.
Isac: We’re lucky nobody got seriously hurt.
Noah: We need to be more careful in the future.
Isac: Oh, this? It’s just a scratch. Don’t worry.
Noah: So we should be more vigilant in the future. But we also can’t lose what makes Utopia great.
Oliver: Urgh, I’m so tried of this.
Noah: We need to be strong, and not let fear guide us.
Isac: I tried to deal with these hounds at first. But there were too many of them.
Ika: I was only here to move some produce. Then boom! Rabid hyenas everywhere.
Oliver: Those hyenas were so rude.
Ulla: Olof’s Hyenas seem to be affliced by some kind of rapid mutation.
Oliver: Bad enough we have to deal with an endless ocean. Now there’s these rabid animals also.
Johan: I fled Tangaroa during the riots. *Sigh*. Such a crazy day. Then I found Utopia, and this whole thing happened.
Ika: So annoying.
Johan: I just want to tend to a garden in peace. *Sigh*.
Detto: Okay okay. So how do we dry the world? Great question! Um…
Hanne: Well, it’s not the easiest task in the world.
Detto: I’m working on it, okay?
Ulla: There is something deeply wrong with those hyenas.
Detto: How long do you think it takes to build a floating city? A couple of weeks maybe?
Vanessa: This place is a mess. There’s hyena hair everywhere.
History[]
| Full Release | |
|---|---|
| Version 1.0 | Utopia available in game. |
| Early Access | |
| Update 14 | Utopia is added in game files but inaccessible. |
| Update 1 | Utopia is mentioned for the first time on a whiteboard found in the Radio Tower’s control room |
Gallery[]
-
The Whiteboard
| Environment | |||||||||
|---|---|---|---|---|---|---|---|---|---|
| Locations |
|
||||||||
| Objects |
|
Утопия (Utopia) – девятый сюжетный остров, добавленный в Version 1.0. Представляет из себя торчавшие из воды небоскрёбы, рядом с которыми стоят деревянные домики. На этом острове есть все, кого мы знаем(те кто выжил:). Например: Ханна, Бруно, Рубен, Детто и др. Так же на острове есть другие люди. Разработчики называли это место так:
"Это место, где все нити связаны вместе, и вы столкнетесь с последним испытанием. Однако мы считаем, что лучше всего, если вы узнаете об этом сами".
Утопия состоит из двух уровней и одного трёхстадийного босса.
Уровень 1
Самый низ Утопии. Тут много домиков и имеется тюрьма, где заперты все жители. Возле тюрьмы лежит записка, где нам говорят, что Улоф Вилкстром захватил всласть на Утопии вместе со своими гиенами. Также возле тюрьмы лежит первый ключ, нам нужно найти такой же второй и открыть путь на второй уровень.
На первом уровне все крутится вокруг гарпуна. Нам нужно найти провода, провести их, настроить трубы, найти код и только тогда гарпун выстрелит, мы по зиплайну дойдём до места его приземления и там будет второй ключ.
Уровень 2
Когда мы откроем дверь и поднимемся на лифте следует сложный участок с паркуром. Попав в головоломку с грузиками, в первую очередь нас встретит Улоф Вилкстром, скажет нам убираться и уйдёт. Нам нужно доставить шестерёнку наверх. Мы не можем прыгать и лазать по лестницам, когда у нас в руках шестерёнка. Когда мы доставили шестерёнку наверх, мы попадаем во вторую часть головоломки с грузиками. Там нас снова встретит Улоф и скажет, что он избавил всех от муторной работы. Снова доставляем шестерёнку наверх. Потом кладём шестерёнку на специальную платформу и нажимаем рычаг. Далее снова проходим паркур. Берём шестерёнку и чиним лифт. Поднимаемся.
Улоф Вилкстром. Первая стадия
Нас встретит недовольный Улоф. Он станет кидать в нас бомбы! Нам нужно поставить ящики так, что бы мы смогли на них залезть. Улоф просто убежит как последний трус.
Улоф Вилкстром. Вторая стадия
Улоф станет кидать в нас бомбы. Нам нужно поставить ящики так, что бы мы смогли на них залезть. Однако не всё так просто, тут есть гиены. А если вы помните, гиены могут схватить вас за ногу и оттащить.
Финальный босс
Улоф создал гиену по имени Альфа. Это последний и самый сложный босс. Что бы её убить, бить её без перерывно около 15 минут.
Финал
Улоф упал из окна, запутался в гирлянде, обронил ключ от тюрьмы. Мы спасаем всех жителей Утопии. Теперь в зоне прохождения первого босс-файта будут проходить люди и рассказывать свою историю.
Скриншоты
Будут добавлены позже…
На чтение 2 мин Просмотров 1.6к. Опубликовано 5 июля, 2022
Прочтите это руководство, чтобы найти все ключи от входа на остров Утопия!
Raft — это игра на выживание в открытом мире, в которой игрокам нужно создать собственный плот, чтобы плыть по океану в одиночку или с друзьями. В этом руководстве мы расскажем вам, где находятся все ключи от входа на остров Утопия.
Raft: Расположение ключей от входа
Остров Утопия — это последнее место, которое игрокам нужно исследовать после завершение Острова Умеренности в Главе 3. Чтобы войти в здание, вам нужно будет найти два ключа от входа.
Первый ключ можно найти внутри здание с красным крестиком на нем, которое видно из дома Детто на острове Утопия. Вам нужно будет выстрелить из пушки, чтобы выпустить гарпун, а затем проложить путь к зданию на расстоянии. Чтобы выстрелить из пушки, вам понадобится гарпун из канистры с углекислым газом, который также можно найти в доме Детто и получить к нему доступ после того, как вы найдете три кода.

После того, как вы используете зиплайн для входа здания, вы найдете первый ключ, лежащий на маленьком столике внутри.

Чтобы найти второй ключ, вам нужно выйти из здания через дверь справа. Используйте зиплайн, чтобы спуститься и добраться до деревянной платформы. Там вы найдете дверь с надписью «Требуются 2 ключа для входа».

Идите дальше по деревянной дорожке, затем поверните налево, а затем направо. Там вы найдете большую хижину с дверями, запертыми на цепи. Второй вход можно найти прямо перед хижиной вместе с запиской.
Все, теперь идите вперед и откройте дверь, используя эти ключи от входа!

Raft

Not enough ratings

Кратки гайд по прохождению утопии
Краткое описание действий с минимальными подробностями
UPD: Сразу скажу что гайд достаточно сложный в понимании, ибо я не запаривался, полагаю что к вечеру этого дня будут уже норм гайды, но если лень ждать то можно и по этому)
Первым делом вам нужно будет найти замурованную цепями дверь и подобрать там ключик, а так же записку


В этом руководстве показан ближайший конец игры, он показывает, что происходит, когда вы завершаете построение антенн и приемников.
Изготовление оборудования
Во-первых, вам нужно будет сделать свое оборудование.
Антенны: (3 необходимо)
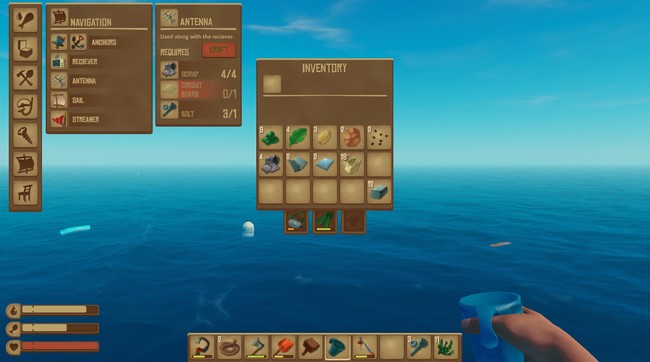
Сначала это антенны, вам нужно будет сделать 3 из них. для их создания вам понадобятся:
4 Лом (найден в сундуках острова, под водой или из бочек в море)
1 (изготовлен из 1 пластика, 2 медных слитка и 1 Vine Goo из горящих морских водорослей)
1 Болт (может быть изготовлен с 1 металлическим слитком или найден в сундуках острова)
Приемник: (требуется 1)
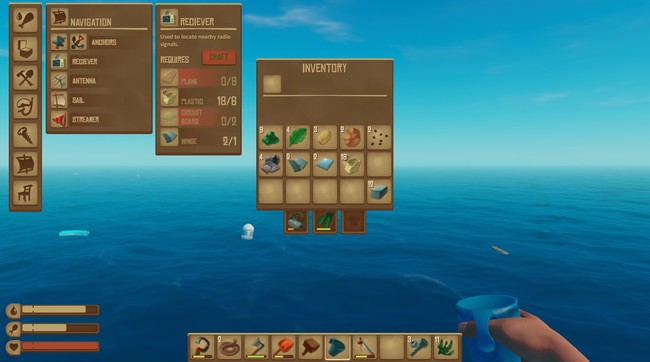
Во-вторых, приемник. Вам понадобится:
8 Доски (найдены в сундуках, в море или с деревьев, собранных на островах топором)
6 Пластик (найти в сундуках или в виде плавающих частей в море)
2 (изготовлено из 1 пластика, 2 медных слитка и 1 Vine Goo из горящих морских водорослей)
1 Петля (найден в сундуках или обработан с 1 металлическим слитком)
Батарея: (требуется не менее 1)
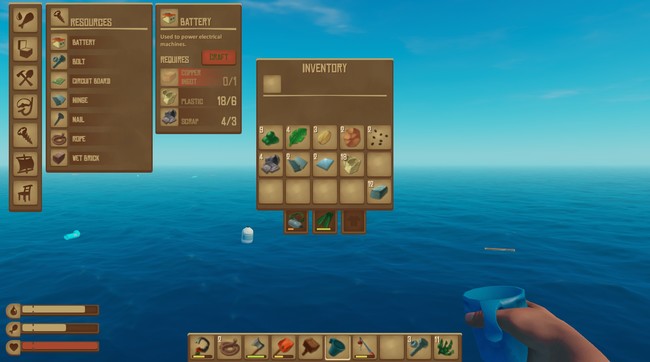
Наконец, это аккумулятор, вам может потребоваться больше одного, если вы оставите приемник слишком долго. Для создания потребуется:
1 Медный слиток (сделанный путем помещения медной руды в плавильную печь)
6 Пластик (найти в сундуках или в виде плавающих частей в море)
3 Лом (найти в сундуках на островах, под водой или из бочек в море)
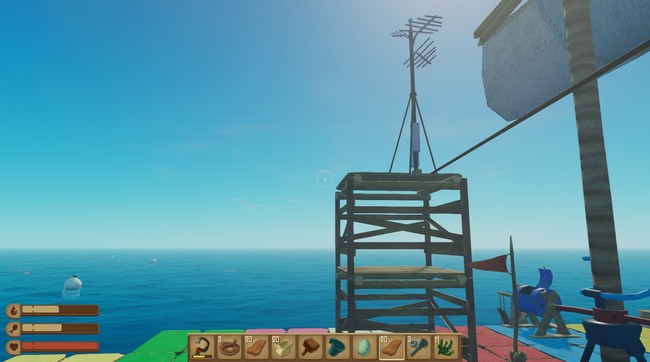
Размещение
При размещении приемника и антенны, убедитесь, что они находятся на одной высоте, иначе они не будут работать. Любые ошибки можно исправить, просто удерживая X на объекте, чтобы забрать его обратно.
Вот краткий список, чтобы помочь вам заставить их работать:
- Антенны должны быть на той же высоте, что и приемник
- У вас должно быть 3 антенны
- Антенны нельзя распологать слишком далеко от приемника
- Антенны нельзя распологать слишком близко к приемнику
- Антенны нельзя распологать слишком близко друг к другу
После выполнения всех этих вещей все должно работать.
Найти свой путь

После того, как вы успешно построили приемник и антенны, поместите батарею с правой стороны приемника в гнездо. Затем вы можете включить приемник. после его включения вы увидите зеленую точку, расположенную вокруг края круга, это ваша цель. Середина сонара – это вы и будете учитывать направление, в котором находится приемник.
Например:
Вы помещаете приемника, включаете его, а точка находится на левой стороне (или на западе) гидролокатора, вы можете буквально поворачивать это направление, в этом случае на 90 градусов слева и отплыть прямо в этом направлении.
Расстояние от объекта показано в метрах справа от гидролокатора.
Советы:
- Включите приемник только тогда, когда вам нужно проверить направление или расстояние
- Используйте парус и направляйте его в направлении сигнала
- Используйте весло, чтобы получить дополнительную скорость или помочь вашему плоту идти в этом направлении
- Если вы играете в мультиплеере, то чем больше игроков гребет, тем быстрее вы сможете добраться туда
- Делайте запасные батареи, если вы считаете, что они вам понадобятся
- Наличие сетевых сборщиков на краю вашего плота поможет вам продолжать получать ресурсы на вашем пути
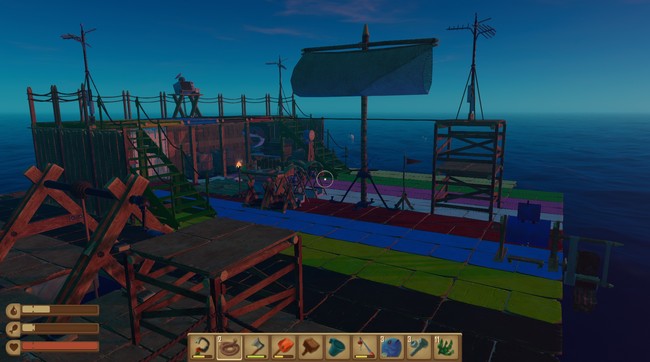
Буровая платформа
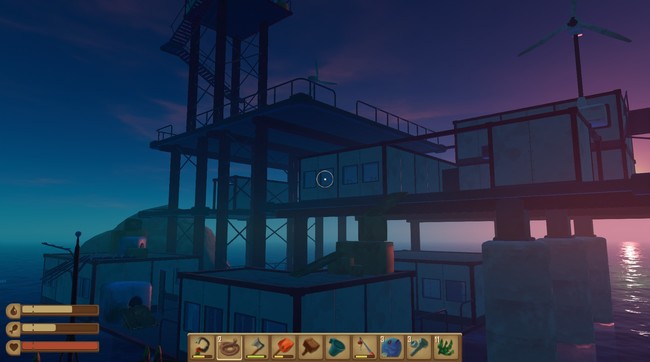
Теперь, когда вы достигли места назначения, вы обнаружили самую крупную структуру, которая вам встречалась – буровая платформа. Она заброшена, но все еще содержит некоторые материалы, которые вы можете собрать.
Подъем
Используйте этот проход, если возможно:
Затем следуйте этим скриншотам, чтобы добраться до вершины:
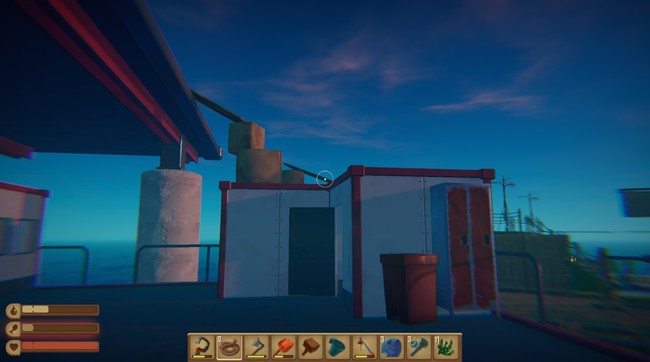
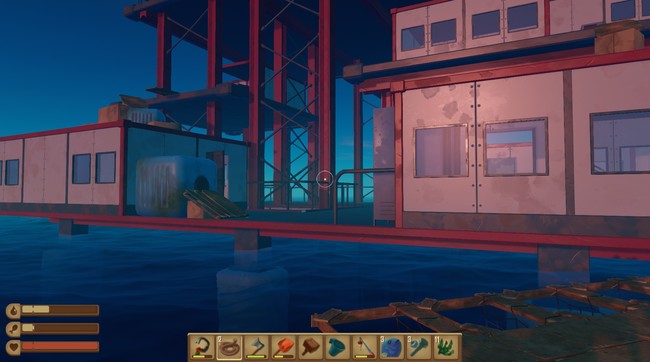
Подпрыгните вверх по красной бочке, затем до верхнего уровня
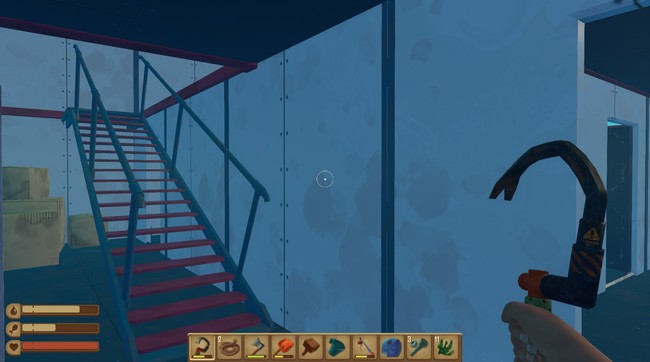
Найдите эти лестницы до крыши

Когда на крыше переходите через красную балку справа и прыгайте на разбитый металлический подиум вдоль стороны здания
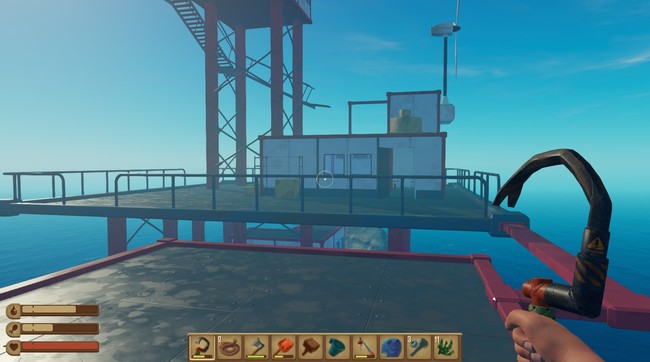
Затем идите по другой красной балке, затем на ящики с левой стороны.
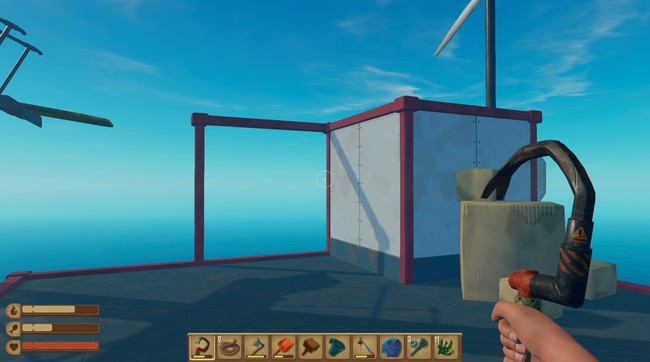
Затем вы можете вскочить с ящиков на маленькую крышу, а затем перейти к мостику до башни
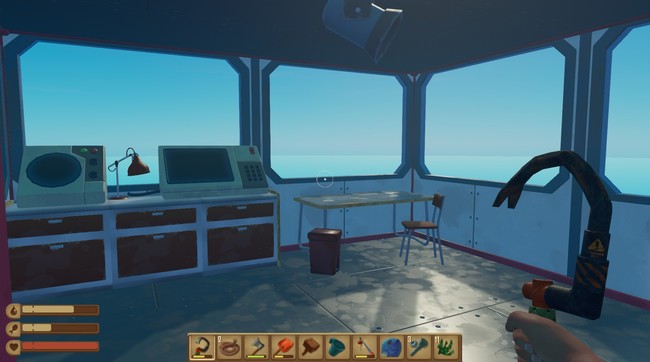
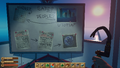
Внутри башни
В башне не так много, кроме ящика на полу и карты.
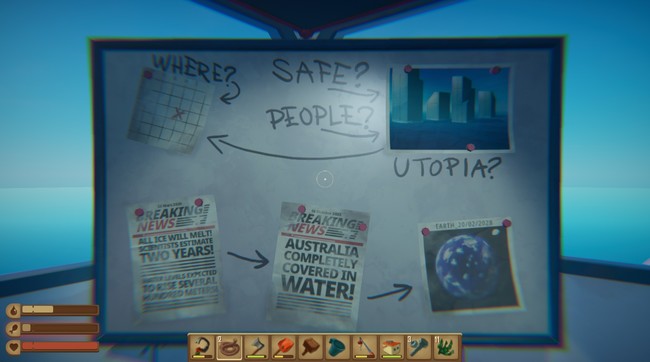
Перейдем к самой интересной части доски, так называемой «Утопии», в правом верхнем углу изображена фотография, которая показывает, как выглядят здания в воде, похожие на небоскребы. тот, кто покинул эту доску, должен был уйти, чтобы найти это место в надежде на лучшее выживание, есть карта с отображением слева от нее, которая показывает, что она находится в H? числа не видны на оси Y карты, но мы знаем, что она расположена в секции H по оси X.
Поиск “Утопии”
Я до сих пор не могу найти это место “Утопии”. Возможно, что в этой версии игры ее просто нет.
Я обновлю это руководство, если когда-нибудь её найду 🙂
Спасибо за чтение!!
Спасибо за чтение этого гайда. Мне потребовалось некоторое время, чтобы создать его, поэтому если бы вы могли оставить положительный рейтинг, это было бы очень здорово! Пожалуйста, не стесняйтесь оставлять любые комментарии ниже.
Если я что-нибудь еще найду, то обязательно обновлю это руководство с подробной информацией для всех вас. До тех пор постарайтесь, чтобы вас не съела акула 🙂
