Interestingly virtually all answers revolve around XPath’s function contains(), neglecting the fact it is case sensitive – contrary to the OP’s ask.
If you need case insensitivity, that is achievable in XPath 1.0 (the version contemporary browsers support), though it’s not pretty – by using the translate() function. It substitutes a source character to its desired form, by using a translation table.
Constructing a table of all upper case characters will effectively transform the node’s text to its lower() form – allowing case-insensitive matching (here’s just the prerogative):
[
  contains(
    translate(text(), 'ABCDEFGHIJKLMNOPQRSTUVWXYZ', 'abcdefghijklmnopqrstuvwxyz'),
    'my button'
  )
]
# will match a source text like "mY bUTTon"
The full Python call:
driver.find_elements_by_xpath("//*[contains(translate(text(), 'ABCDEFGHIJKLMNOPQRSTUVWXYZЙ', 'abcdefghijklmnopqrstuvwxyzй'), 'my button')]")
Naturally this approach has its drawbacks – as given, it’ll work only for Latin text; if you want to cover Unicode characters – you’ll have to add them to the translation table. I’ve done that in the sample above – the last character is the Cyrillic symbol "Й".
And if we lived in a world where browsers supported XPath 2.0 and up (🤞, but not happening any time soon ☹️), we could having used the functions lower-case() (yet, not fully locale-aware), and matches (for regex searches, with the case-insensitive ('i') flag).
Как вы, возможно, уже поняли, чтобы управлять элементами страницы, нам нужно сначала найти их. Selenium использует так называемые локаторы, чтобы находить элементы на веб-странице.
В Selenium есть 8 методов которые помогут в поиске HTML элементов:
| Цель поиска Используемый метод |
Пример | ||
| Поиск по ID find_element_by_id(“user”) |
|
||
| Поиск по имени find_element_by_name(“username”) |
|
||
| Поиск по тексту ссылки find_element_by_link_text(“Login”) |
|
||
| Поиск по частичному тексту ссылки find_element_by_partial_link_text(“Next”) |
|
||
| Поиск используя XPath find_element_by_xpath(‘//div[@id=”login”]/input’) |
|
||
| Поиск по названию тэга find_element_by_tag_name(“body”) |
|||
| Поиск по классу элемента find_element_by_class_name(“table”) |
|
||
| Поиск по CSS селектору find_element_by_css_selector(‘#login > input[type=”text”]’) |
|
Вы можете использовать любой из них, чтобы сузить поиск элемента, который вам нужен.
Запуск браузера
Тестирование веб-сайтов начинается с браузера. В приведенном ниже тестовом скрипте запускается окно браузера Firefox, и осуществляется переход на сайт.
|
from selenium import webdriver driver = webdriver.Firefox() driver.get(“http://testwisely.com/demo”) |
Используйте webdriver.Chrome и webdriver.Ie() для тестирования в Chrome и IE соответственно. Новичкам рекомендуется закрыть окно браузера в конце тестового примера.
Поиск элемента по ID
Использование идентификаторов — самый простой и безопасный способ поиска элемента в HTML. Если страница соответствует W3C HTML, идентификаторы должны быть уникальными и идентифицироваться в веб-элементах управления. По сравнению с текстами тестовые сценарии, использующие идентификаторы, менее склонны к изменениям приложений (например, разработчики могут принять решение об изменении метки, но с меньшей вероятностью изменить идентификатор).
|
driver.find_element_by_id(“submit_btn”).click() # Клик по кнопке driver.find_element_by_id(“cancel_link”).click() # Клик по ссылке driver.find_element_by_id(“username”).send_keys(“agileway”) # Ввод символов driver.find_element_by_id(“alert_div”).text # Получаем текст |
Поиск элемента по имени
Атрибут имени используются в элементах управления формой, такой как текстовые поля и переключатели (radio кнопки). Значения имени передаются на сервер при отправке формы. С точки зрения вероятности будущих изменений, атрибут name, второй по отношению к ID.
|
driver.find_element_by_name(“comment”).send_keys(“Selenium Cool”) |
Поиск элемента по тексту ссылки
Только для гиперссылок. Использование текста ссылки — это, пожалуй, самый прямой способ щелкнуть ссылку, так как это то, что мы видим на странице.
|
driver.find_element_by_link_text(“Cancel”).click() |
HTML для которого будет работать
|
<a href=“/cancel”>Cancel</a> |
Поиск элемента по частичному тексту ссылки
Selenium позволяет идентифицировать элемент управления гиперссылкой с частичным текстом. Это может быть полезно, если текст генерируется динамически. Другими словами, текст на одной веб-странице может отличаться при следующем посещении. Мы могли бы использовать общий текст, общий для этих динамически создаваемых текстов ссылок, для их идентификации.
|
# Полный текст ссылки “Cancel Me” driver.find_element_by_partial_link_text(“ance”).click() |
HTML для которого будет работать
|
<a href=“/cancel”>Cancel me</a> |
Поиск элемента по XPath
XPath, XML Path Language, является языком запросов для выбора узлов из XML документа. Когда браузер отображает веб-страницу, он анализирует его в дереве DOM. XPath может использоваться для ссылки на определенный узел в дереве DOM. Если это звучит слишком сложно для вас, не волнуйтесь, просто помните, что XPath — это самый мощный способ найти определенный веб-элемент.
|
# Клик по флажку в контейнере с ID div2 driver.find_element_by_xpath(“//*[@id=’div2′]/input[@type=’checkbox’]”).click() |
HTML для которого будет работать
|
<form> <div id=“div2”> <input value=“rules” type=“checkbox”> </div> </form> |
Некоторые тестеры чувствуют себя “запуганными” сложностью XPath. Тем не менее, на практике существует только ограниченная область для использования XPath.
Избегайте XPath из Developer Tool
Избегайте использования скопированного XPath из инструмента Developer Tool.
Инструмент разработчика браузера (щелкните правой кнопкой мыши, чтобы выбрать «Проверить элемент», чтобы увидеть) очень полезен для определения веб-элемента на веб-странице. Вы можете получить XPath веб-элемента там, как показано ниже (в Chrome):
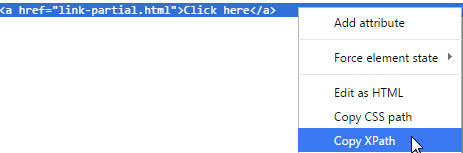
Скопированный XPath для второй ссылки «Нажмите здесь» в примере:
|
//*[@id=“container”]/div[3]/div[2]/a |
Этот метод работает. Тем не менее, этот подход не рекомендуется для постоянного применения, поскольку тестовый сценарий является довольно хрупким и изменчивым.
Попытайтесь использовать выражения XPath, которое менее уязвимо для структурных изменений вокруг веб-элемента.
Поиск элемента по имени тега
В HTML есть ограниченный набор имен тегов. Другими словами, многие элементы используют одни и те же имена тегов на веб-странице. Обычно мы не используем локатор tag_name для поиска элемента. Мы часто используем его с другими элементами в цепочке локаторах. Однако есть исключение.
|
driver.find_element_by_tag_name(“body”).text |
Вышеприведенная тестовая инструкция возвращает текстовое содержимое веб-страницы из тега body.
Поиск элемента по имени класса
Атрибут class элемента HTML используется для стилизации. Он также может использоваться для идентификации элементов. Как правило, атрибут класса элемента HTML имеет несколько значений, как показано ниже.
|
<a href=“back.html” class=“btn btn-default”>Cancel</a> <input type=“submit” class=“btn btn-deault btn-primary”> Submit </input> |
Вы можете использовать любой из них.
|
driver.find_element_by_class_name(“btn-primary”).click() # Клик по кнопки driver.find_element_by_class_name(“btn”).click() # Клик по ссылке # # |
Метод class_name удобен для тестирования библиотек JavaScript / CSS (таких как TinyMCE), которые обычно используют набор определенных имен классов.
|
driver.find_element_by_id(“client_notes”).click() time.sleep(0.5) driver.find_element_by_class_name(“editable-textarea”).send_keys(“inline notes”) time.sleep(0.5) driver.find_element_by_class_name(“editable-submit”).click() |
Поиск элемента с помощью селектора CSS
Вы также можете использовать CSS селектор для поиска веб-элемента.
|
driver.find_element_by_css_selector(“#div2 > input[type=’checkbox’]”).click() |
Однако использование селектора CSS, как правило, более подвержено структурным изменениям веб-страницы.
Используем find_elements для поиска дочерних элементов
Для страницы, содержащей более одного элемента с такими же атрибутами, как приведенный ниже, мы могли бы использовать XPath селектор.
|
<div id=“div1”> <input type=“checkbox” name=“same” value=“on”> Same checkbox in Div 1 </div> <div id=“div2”> <input type=“checkbox” name=“same” value=“on”> Same checkbox in Div 2 </div> |
Есть еще один способ: цепочка из find_element чтобы найти дочерний элемент.
|
driver.find_element_by_id(“div2”).find_element_by_name(“same”).click() |
Поиск нескольких элементов
Как следует из названия, find_elements возвращает список найденных элементов. Его синтаксис точно такой же, как find_element, то есть он может использовать любой из 8 локаторов.
Пример HTML кода
|
<div id=“container”> <input type=“checkbox” name=“agree” value=“yes”> Yes <input type=“checkbox” name=“agree” value=“no”> No </div> |
Выполним клик по второму флажку.
|
checkbox_elems = driver.find_elements_by_xpath(“//div[@id=’container’]//input[@type=’checkbox’]”) print(len(checkbox_elems)) # Результат: 2 checkbox_elems[1].click() |
Иногда find_element вылетает из-за нескольких совпадающих элементов на странице, о которых вы не знали. Метод find_elements пригодится, чтобы найти их.
Время на прочтение
7 мин
Количество просмотров 277K
Продолжение перевода неофициальной документации Selenium для Python.
Перевод сделан с разрешения автора Baiju Muthukadan.
Оригинал можно найти здесь.
Содержание:
1. Установка
2. Первые Шаги
3. Навигация
4. Поиск Элементов
5. Ожидания
6. Объекты Страницы
7. WebDriver API
8. Приложение: Часто Задаваемые Вопросы
4. Поиск элементов
Существует ряд способов поиска элементов на странице. Вы вправе использовать наиболее уместные для конкретных задач. Selenium предоставляет следующие методы поиска элементов на странице:
- find_element_by_id
- find_element_by_name
- find_element_by_xpath
- find_element_by_link_text
- find_element_by_partial_link_text
- find_element_by_tag_name
- find_element_by_class_name
- find_element_by_css_selector
Чтобы найти все элементы, удовлетворяющие условию поиска, используйте следующие методы (возвращается список):
- find_elements_by_name
- find_elements_by_xpath
- find_elements_by_link_text
- find_elements_by_partial_link_text
- find_elements_by_tag_name
- find_elements_by_class_name
- find_elements_by_css_selector
[Как вы могли заметить, во втором списке отсутствует поиск по id. Это обуславливается особенностью свойства id для элементов HTML: идентификаторы элементов страницы всегда уникальны. — Прим. пер.]
Помимо общедоступных (public) методов, перечисленных выше, существует два приватных (private) метода, которые при знании указателей объектов страницы могут быть очень полезны: find_element and find_elements.
Пример использования:
from selenium.webdriver.common.by import By

driver.find_element(By.XPATH, '//button[text()="Some text"]')
driver.find_elements(By.XPATH, '//button')
Для класса By доступны следующие атрибуты:
ID = "id"
XPATH = "xpath"
LINK_TEXT = "link text"
PARTIAL_LINK_TEXT = "partial link text"
NAME = "name"
TAG_NAME = "tag name"
CLASS_NAME = "class name"
CSS_SELECTOR = "css selector"
4.1. Поиск по Id
Используйте этот способ, когда известен id элемента. Если ни один элемент не удовлетворяет заданному значению id, будет вызвано исключение NoSuchElementException.
Для примера, рассмотрим следующий исходный код страницы:
<html>
 <body>
  <form id="loginForm">
   <input name="username" type="text" />
   <input name="password" type="password" />
   <input name="continue" type="submit" value="Login" />
  </form>
 </body>
<html>
Элемент form может быть определен следующим образом:
login_form = driver.find_element_by_id('loginForm')
4.2. Поиск по Name
Используйте этот способ, когда известен атрибут name элемента. Результатом будет первый элемент с искомым значением атрибута name. Если ни один элемент не удовлетворяет заданному значению name, будет вызвано исключение NoSuchElementException.
Для примера, рассмотрим следующий исходный код страницы:
<html>
 <body>
  <form id="loginForm">
   <input name="username" type="text" />
   <input name="password" type="password" />
   <input name="continue" type="submit" value="Login" />
   <input name="continue" type="button" value="Clear" />
  </form>
</body>
<html>
Элементы с именами username и password могут быть определены следующим образом:
username = driver.find_element_by_name('username')
password = driver.find_element_by_name('password')
Следующий код получит кнопку “Login”, находящуюся перед кнопкой “Clear”:
continue = driver.find_element_by_name('continue')
4.3. Поиск по XPath
XPath – это язык, использующийся для поиска узлов дерева XML-документа. Поскольку в основе HTML может лежать структура XML (XHTML), пользователям Selenium предоставляется возможность посредоством этого мощного языка отыскивать элементы в их веб-приложениях. XPath выходит за рамки простых методов поиска по атрибутам id или name (и в то же время поддерживает их), и открывает спектр новых возможностей, таких как поиск третьего чекбокса (checkbox) на странице, к примеру.
Одно из веских оснований использовать XPath заключено в наличии ситуаций, когда вы не можете похвастать пригодными в качестве указателей атрибутами, такими как id или name, для элемента, который вы хотите получить. Вы можете использовать XPath для поиска элемента как по абсолютному пути (не рекомендуется), так и по относительному (для элементов с заданными id или name). XPath указатели в том числе могут быть использованы для определения элементов с помощью атрибутов отличных от id и name.
Абсолютный путь XPath содержит в себе все узлы дерева от корня (html) до необходимого элемента, и, как следствие, подвержен ошибкам в результате малейших корректировок исходного кода страницы. Если найти ближайщий элемент с атрибутами id или name (в идеале один из элементов-родителей), можно определить искомый элемент, используя связь «родитель-подчиненный». Эти связи будут куда стабильнее и сделают ваши тесты устойчивыми к изменениям в исходном коде страницы.
Для примера, рассмотрим следующий исходный код страницы:
<html>
 <body>
  <form id="loginForm">
   <input name="username" type="text" />
   <input name="password" type="password" />
   <input name="continue" type="submit" value="Login" />
   <input name="continue" type="button" value="Clear" />
  </form>
</body>
<html>
Элемент form может быть определен следующими способами:
login_form = driver.find_element_by_xpath("/html/body/form[1]")
login_form = driver.find_element_by_xpath("//form[1]")
login_form = driver.find_element_by_xpath("//form[@id='loginForm']")
- Абсолютный путь (поломается при малейшем изменении структуры HTML страницы)
- Первый элемент form в странице HTML
- Элемент form, для которого определен атрибут с именем id и значением loginForm
Элемент username может быть найден так:
username = driver.find_element_by_xpath("//form[input/@name='username']")
username = driver.find_element_by_xpath("//form[@id='loginForm']/input[1]")
username = driver.find_element_by_xpath("//input[@name='username']")
- Первый элемент form с дочерним элементом input, для которого определен атрибут с именем name и значением username
- Первый дочерний элемент input элемента form, для которого определен атрибут с именем id и значением loginForm
- Первый элемент input, для которого определен атрибут с именем name и значением username
Кнопка “Clear” может быть найдена следующими способами:
clear_button = driver.find_element_by_xpath("//input[@name='continue'][@type='button']")
clear_button = driver.find_element_by_xpath("//form[@id='loginForm']/input[4]")
- Элемент input, для которого заданы атрибут с именем name и значением continue и атрибут с именем type и значением button
- Четвертый дочерний элемент input элемента form, для которого задан атрибут с именем id и значением loginForm
Представленные примеры покрывают некоторые основы использования XPath, для более углубленного изучения рекомендую следующие материалы:
- W3Schools XPath Tutorial
- W3C XPath Recommendation
- XPath Tutorial — с интерактивными примерами
Существует также пара очень полезных дополнений (add-on), которые могут помочь в выяснении XPath элемента:
- XPath Checker — получает пути XPath и может использоваться для проверки результатов пути XPath
- Firebug — получение пути XPath — лишь одно из многих мощных средств, поддерживаемых этим очень полезным плагином
- XPath Helper — для Google Chrome
4.4. Поиск гиперссылок по тексту гиперссылки
Используйте этот способ, когда известен текст внутри анкер-тэга [anchor tag, анкер-тэг, тег «якорь» — тэг — Прим. пер.]. С помощью такого способа вы получите первый элемент с искомым значением текста тэга. Если никакой элемент не удовлетворяет искомому значению, будет вызвано исключение NoSuchElementException.
Для примера, рассмотрим следующий исходный код страницы:
<html>
 <body>
  <p>Are you sure you want to do this?</p>
  <a href="continue.html">Continue</a>
  <a href="cancel.html">Cancel</a>
</body>
<html>
Элемент-гиперссылка с адресом «continue.html» может быть получен следующим образом:
continue_link = driver.find_element_by_link_text('Continue')
continue_link = driver.find_element_by_partial_link_text('Conti')
4.5. Поиск элементов по тэгу
Используйте этот способ, когда вы хотите найти элемент по его тэгу. Таким способом вы получите первый элемент с указанным именем тега. Если поиск не даст результатов, будет возбуждено исключение NoSuchElementException.
Для примера, рассмотрим следующий исходный код страницы:
<html>
 <body>
  <h1>Welcome</h1>
  <p>Site content goes here.</p>
</body>
<html>
Элемент заголовка h1 может быть найден следующим образом:
heading1 = driver.find_element_by_tag_name('h1')
4.6. Поиск элементов по классу
Используйте этот способ в случаях, когда хотите найти элемент по значению атрибута class. Таким способом вы получите первый элемент с искомым именем класса. Если поиск не даст результата, будет возбуждено исключение NoSuchElementException.
Для примера, рассмотрим следующий исходный код страницы:
<html>
 <body>
  <p class="content">Site content goes here.</p>
</body>
<html>
Элемент “p” может быть найден следующим образом:
content = driver.find_element_by_class_name('content')
4.7. Поиск элементов по CSS-селектору
Используйте этот способ, когда хотите получить элемент с использованием синтаксиса CSS-селекторов [CSS-селектор — это формальное описание относительного пути до элемента/элементов HTML. Классически, селекторы используются для задания правил стиля. В случае с WebDriver, существование самих правил не обязательно, веб-драйвер использует синтаксис CSS только для поиска — Прим. пер.]. Этим способом вы получите первый элемент удовлетворяющий CSS-селектору. Если ни один элемент не удовлетворяют селектору CSS, будет возбуждено исключение NoSuchElementException.
Для примера, рассмотрим следующий исходный код страницы:
<html>
 <body>
  <p class="content">Site content goes here.</p>
</body>
<html>
Элемент “p” может быть определен следующим образом:
content = driver.find_element_by_css_selector('p.content')
На Sauce Labs есть хорошая документация по селекторам CSS.
От переводчика: советую также обратиться к следующим материалам:
- 31 CSS селектор — это будет полезно знать! — краткая выжимка по CSS-селекторам
- CSS селекторы, свойства, значения — отличный учебник параллельного изучения HTML и CSS
Перейти к следующей главе
The technique to verify if the requirements given by the user meet with the actual software product developed is known as Software Testing. Moreover, it also checks if the final software product developed is error-free or not. Software testing can either be performed manually or with the help of software testing tools. The testing which is done automatically through the inbuilt tools is known as Automation Testing. An incredible library in Python, Selenium helps you in automated testing of the software. While doing automation testing, are you not able to find an element by text in the required web page? Then, you are at an appropriate place. In this article, we will be discussing the appropriate steps along with an example to do the same.
Syntax: driver.find_element_by_xpath(“//tag [contains( text(), ‘word’)]”)
Parameters:
- tag: Here, tag stands for the tag name which contains the particular word.
- word: Here, word stands for the text which has to be found in a particular string. We don’t need to write a complete sentence which we want to find, but we can write a few words which are unique in the web page.
Example: For instance, consider this simple page source:
HTML
<!DOCTYPE html>
<html>
<body>
<button type= “button” >Geeks For Geeks</button>
</body>
<html>
Once you have created a driver, you can grasp an element using:
button = driver.find_element_by_xpath (“//button[contains( text( ), ‘Geeks for Geeks’)]”)
Let’s understand this with implementation:
Step 1: First, import the libraries, selenium, and time.
Python
from selenium import webdriver
from time import sleep
Step 3: Next, establish a connection with the web driver through the executable path.
Python3
driver = webdriver.Chrome(
executable_path="#path where you have installed webdriver")
Step 4: Now, obtain the website in which you want to find the element.
Python3
driver.get("#Enter the website URL")
Step 5: Then, make python sleep for few seconds so, by that time, the webpage gets loaded.
Python3
Step 6: Finally, find the desired element through text on the given web page.
Python3
driver.find_element_by_xpath(“//
‘
Below is the full implementation:
Python
from selenium import webdriver
from time import sleep
driver = webdriver.Chrome(
executable_path="C:seleniumchromedriver_win32chromedriver.exe")
sleep(3)
driver.find_element_by_xpath("// a[contains(text(),
'5 CHEAP HOLIDAY')]").click()
sleep(4)
Output:

Further, the text to be found is searched and displays the output as given below.

More locators for locating single elements:
Locators |
Description |
|---|---|
| find_element_by_id | The first element with the id attribute value matching the location will be returned. |
| find_element_by_name | The first element with the name attribute value matching the location will be returned. |
| find_element_by_xpath | The first element with the xpath syntax matching the location will be returned. |
| find_element_by_link_text | The first element with the link text value matching the location will be returned. |
| find_element_by_partial_link_text | The first element with the partial link text value matching the location will be returned. |
| find_element_by_tag_name | The first element with the given tag name will be returned. |
| find_element_by_class_name | The first element with the matching class attribute name will be returned. |
| find_element_by_css_selector | The first element with the matching CSS selector will be returned. |
Last Updated :
03 Mar, 2021
Like Article
Save Article
Find element by Text in Selenium is used to locate a web element using its text attribute. The text value is used mostly when the basic element identification properties such as ID or Class are dynamic in nature, making it hard to locate the web element.
Sometimes, developers tend to group similar web elements with the same ID or the same Class together. For example, if you have an element with the tag as Button which has a dynamic ID and Class name, where ID is getting changed from ‘ID-3465-text1’ to ‘ID-4434-textE2,’ and the Class name gets changed from “ID-Class-text45” to “ID-Class-text73” on every new session.
In such cases, it becomes very difficult to locate the web elements using ID or Class attribute, and this is when the Text attribute comes to the rescue while performing Selenium automation testing.
The text value can be fully matched or partially matched to locate the element. In this article on how to find element by text in Selenium WebDriver, you will read about how to use the Text attribute in order to find any element.
Let’s get started!
TABLE OF CONTENTS
- What is Find Element In Selenium?
- What is Find Element By Text In Selenium?
- Find Element By Text In Selenium for complete Text match
- Find Element By Text In Selenium for partial Text match
What is Find Element In Selenium?
When you start writing your Selenium automation script, interaction with web elements becomes your first and a very vital step because it’s the WebElements that you play around with within your test script. Now, interaction with these web elements can only happen if you identify them using the right approach.
Find Element method in Selenium is a command which helps you identify a web element. There are multiple ways that Find Element provides to uniquely identify a web element within the web page using Web locators in Selenium like ID, Name, Class Name, etc. Here is the syntax of Find Element In Selenium.
The syntax of Find Element is
|
WebElement elementName= driver.findElement(By.<LocatorStrategy>(“LocatorValue”)); |
As shown in the above syntax, this command accepts the “By” object as the argument and returns a WebElement object. The “By” is a locator or query object and accepts the locator strategy. The Locator Strategy can assume the below values:
- ID
- Name
- Class Name
- Tag Name
- Link Text
- Partial Link Text
- XPath
- CSS Selector
Also read – FindElement And FindElements In Selenium [Differences]
What is Find Element By Text in Selenium?
We saw in the previous section about find element in Selenium and its syntax. Now, you must be wondering how to find element by text in Selenium WebDriver.
You can also watch this video to learn how to find elements by Text in Selenium WebDriver using Java.
The answer is by making use of XPath in Selenium!!
Wondering how? Let’s look at the sections below.
In order to use Text, you will need to make use of XPath as your Locator Strategy and the text attribute of the element in the Locator Value.
The basic format of XPath in Selenium is as below.
|
XPath = //tagname[@Attribute=’Value’] |
However, before we get started, it’s important to understand two built-in methods of Selenium, which will ultimately be used in findElement.
- text() – This is a built-in method in Selenium that is used with XPath in order to locate an element based on its exact text value. The syntax of using text() with findElement is:
- contains() – Similar to the text() method, contains() is another built-in method which is used with XPath. However, this is used when we want to write the locator based on a partial text match. The syntax of using text() & contains() with findElement is:
|
WebElement ele = driver.findElement(By.xpath(“//<tagName>[text()=’text value’]”)) |
|
WebElement ele=driver.findElement(By.xpath(“//<tagName>[contains(text(),’textvalue’)]”)) |
Let us now read about these in detail.

Find Element by Text in Selenium for Complete Text match
Now that you saw the syntax for using text() in case of complete text match. In this section on how to find element by text in Selenium, let us see it using an example.
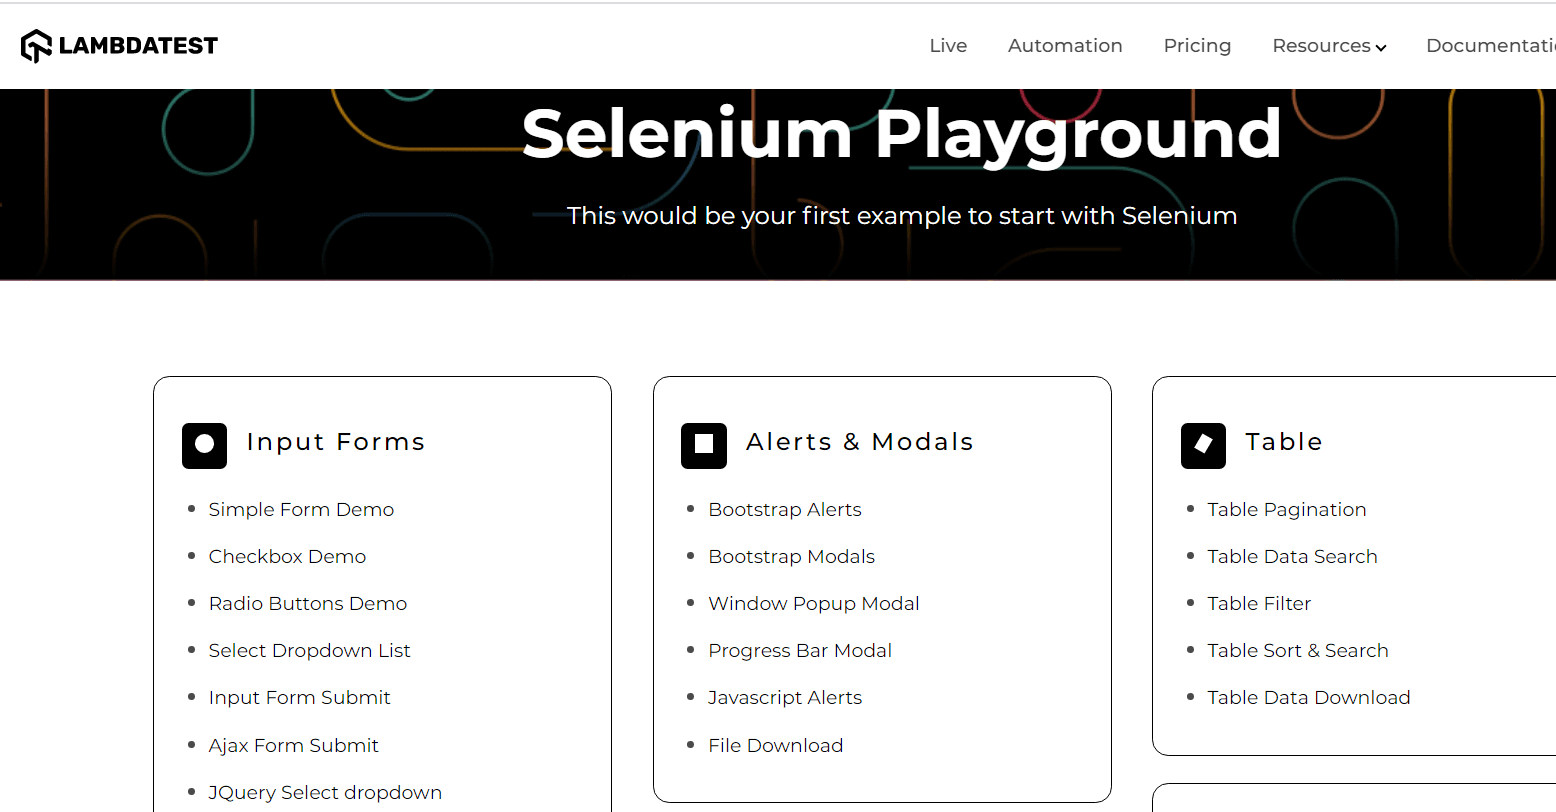
We will use Selenium Playground offered by LambdaTest for understanding the same. LambdaTest is a cloud-based cross browser testing platform that supports Selenium Grid, providing a solution to every obstacle you face while performing automation testing using your local machine. Test Automation Platforms like LambdaTest offer a Selenium Grid consisting of 3000+ online browsers for you to perform Selenium automation testing effortlessly.
Use Case
- Log in to Selenium Playground.
- Identify the Web Element for the Checkbox Demo link on the above web page using the text() method.
- Click on it and print the page header.
Implementation
We will implement the case using Selenium with Java and use the cloud Selenium Grid offered by LambdaTest for executing our test case.
Selenium Grid refers to a software testing setup that enables QAs to perform parallel testing across multiple browsers and devices with unique operating systems. When the entire setup of Selenium Grid is accessible using cloud-based servers, it is called Selenium Grid Cloud. An online Selenium Grid helps you focus on writing better Selenium test scripts rather than worrying about infrastructure maintenance.
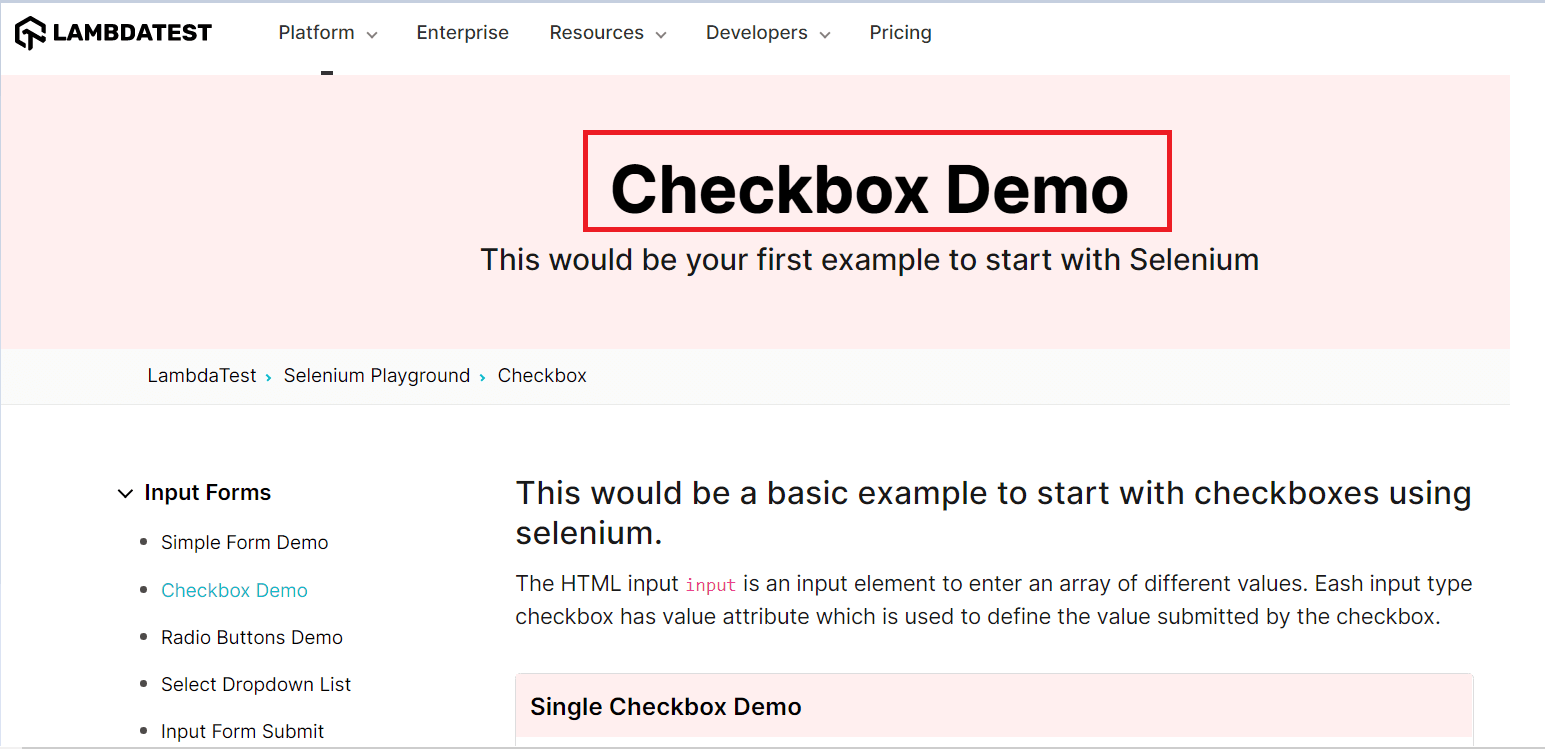
Let us now inspect the locator for the Checkbox Demo page. In order to inspect, you can simply right-click on the Web Element and click on Inspect. On the Elements tab, you can start writing your locator.
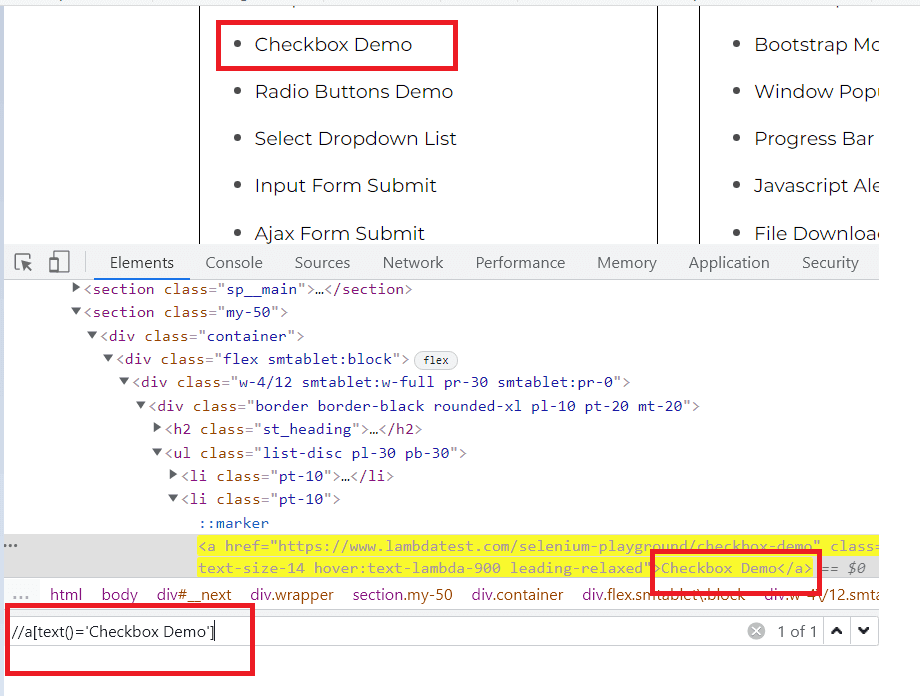
As shown in the above picture, we use the Checkbox Demo text with its tag a for a complete match, and hence, the correct implementation here would be:
|
WebElement checkbox= driver.findElement(By.xpath(“//a[text()=’Checkbox Demo’]”)) |
Let us now use the same and write our test case.
You can refer to the below testcase.
|
1 2 3 4 5 6 7 8 9 10 11 12 13 14 15 16 17 18 19 20 21 22 23 24 25 26 27 28 29 30 31 32 33 34 35 36 37 38 39 40 41 42 43 44 45 46 47 48 49 50 51 52 53 54 55 56 57 58 59 60 61 62 63 64 65 66 67 68 69 70 |
package LambdaTest; import org.openqa.Selenium.By; import org.openqa.Selenium.WebElement; import org.openqa.Selenium.remote.DesiredCapabilities; import org.openqa.Selenium.remote.RemoteWebDriver; import org.testng.Assert; import org.testng.annotations.AfterTest; import org.testng.annotations.BeforeTest; import org.testng.annotations.Listeners; import org.testng.annotations.Test; import java.net.MalformedURLException; import java.net.URL; import java.util.List; @Listeners({util.Listener.class}) class AutomationUsingFindElementByText { public String username = “YOUR USERNAME”; public String accesskey = “YOUR ACCESSKEY”; public static RemoteWebDriver driver = null; public String gridURL = “@hub.lambdatest.com/wd/hub”; @BeforeTest public void setUp() throws Exception { DesiredCapabilities capabilities = new DesiredCapabilities(); capabilities.setCapability(“browserName”, “chrome”); capabilities.setCapability(“version”, “96.0”); capabilities.setCapability(“platform”, “win10”); // If this cap isn’t specified, it will just get the any available one capabilities.setCapability(“build”, “AutomationUsingFindElement”); capabilities.setCapability(“name”, “AutomationUsingFindElementSuite”); try { driver = new RemoteWebDriver(new URL(“https://” + username + “:” + accesskey + gridURL), capabilities); } catch (MalformedURLException e) { System.out.println(“Invalid grid URL”); } catch (Exception e) { System.out.println(e.getMessage()); } } @Test public void findElementByCompleteTextMatch() { try { System.out.println(“Logging into Lambda Test Selenium Playground”); driver.get(“http://labs.lambdatest.com/Selenium-playground/”); WebElement checkBoxDemoPage= driver.findElement(By.xpath(“//a[text()=’Checkbox Demo’]”)); checkBoxDemoPage.click(); System.out.println(“Clicked on the Checkbox Demo Page”); WebElement header=driver.findElement(By.xpath(“//h1”)); System.out.println(“The header of the page is:”+header.getText()); } catch (Exception e) { } } @AfterTest public void closeBrowser() { driver.close(); System.out.println(“The driver has been closed.”); } } |
You can use the below testng.xml file for running the above testcase.
|
<?xml version=“1.0” encoding=“UTF-8”?> <!DOCTYPE suite SYSTEM “http://testng.org/testng-1.0.dtd”> <suite name=“AutomationUsingFindElementSuite”> <test name=“AutomationUsingFindElementTest” > <classes> <class name=“LambdaTest.AutomationUsingFindElementByText” > </class> </classes> </test> </suite> |
And the below pom.xml file for installing all the necessary dependencies.
|
1 2 3 4 5 6 7 8 9 10 11 12 13 14 15 16 17 18 19 20 21 22 23 24 25 26 27 28 29 30 31 32 33 34 35 36 37 38 39 40 41 42 43 |
<?xml version=“1.0” encoding=“UTF-8”?> <project xmlns=“http://maven.apache.org/POM/4.0.0” xmlns:xsi=“http://www.w3.org/2001/XMLSchema-instance” xsi:schemaLocation=“http://maven.apache.org/POM/4.0.0 http://maven.apache.org/xsd/maven-4.0.0.xsd”> <modelVersion>4.0.0</modelVersion> <groupId>org.example</groupId> <artifactId>LambdaTest</artifactId> <version>1.0–SNAPSHOT</version> <dependencies> <dependency> <groupId>org.Seleniumhq.Selenium</groupId> <artifactId>Selenium–api</artifactId> <version>4.0.0–alpha–7</version> </dependency> <dependency> <groupId>org.Seleniumhq.Selenium</groupId> <artifactId>Selenium–remote–driver</artifactId> <version>4.0.0–alpha–7</version> </dependency> <dependency> <groupId>org.Seleniumhq.Selenium</groupId> <artifactId>Selenium–chrome–driver</artifactId> <version>4.0.0–alpha–7</version> </dependency> <dependency> <groupId>org.testng</groupId> <artifactId>testng</artifactId> <version>6.14.3</version> </dependency> <dependency> <groupId>io.github.bonigarcia</groupId> <artifactId>webdrivermanager</artifactId> <version>4.4.3</version> </dependency> </dependencies> <properties> <maven.compiler.source>8</maven.compiler.source> <maven.compiler.target>8</maven.compiler.target> </properties> </project> |
Github
Code Walkthrough
In this section on how to find element by text in Selenium, let’s look at the different areas of code in detail.
- Imported Dependencies: Here, we have imported all the necessary classes of Selenium WebDriver, WebDriverWait, Desired Capabilities, and RemoteWebDriver to set the respective browser capabilities and run the test cases on the grid.
- Global Variables: As we have used a Selenium Grid Cloud like LambdaTest to perform our test execution, we are using the below-shown variables.
Here, you can populate the values for your corresponding username and access key, which can be collected by logging into your LambdaTest Profile Section. You can copy the Username and the Access Token to be used in the code. However, the grid URL will remain the same, as shown below.
- @BeforeTest(Setup Method): Here, we have used the LambdaTest Desired Capabilities Generator and have set the necessary capabilities of browser name, version, platform, etc., for our Selenium Remote WebDriver. After that, we are opening the website in the launched browser.
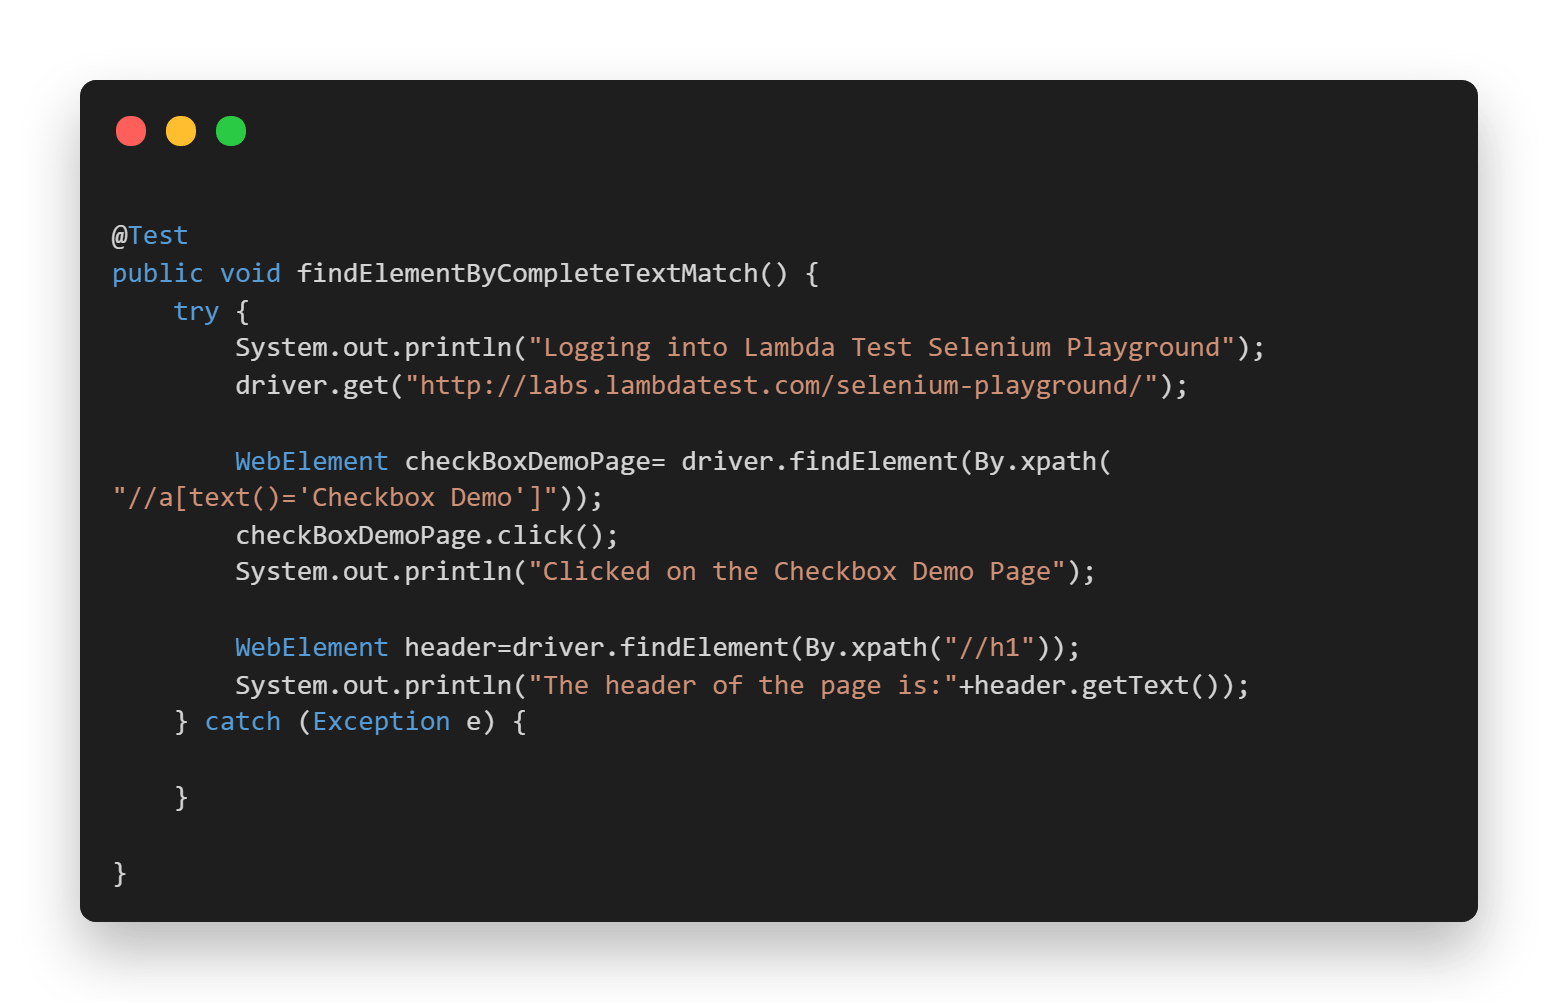
- @Test(findElementByCompleteTextMatch): In this case, we are first logging into the Selenium Playground web page. After that, we locate the Checkbox Demo button using a complete text match and click on the same. In the end, we are printing the header of the web page.
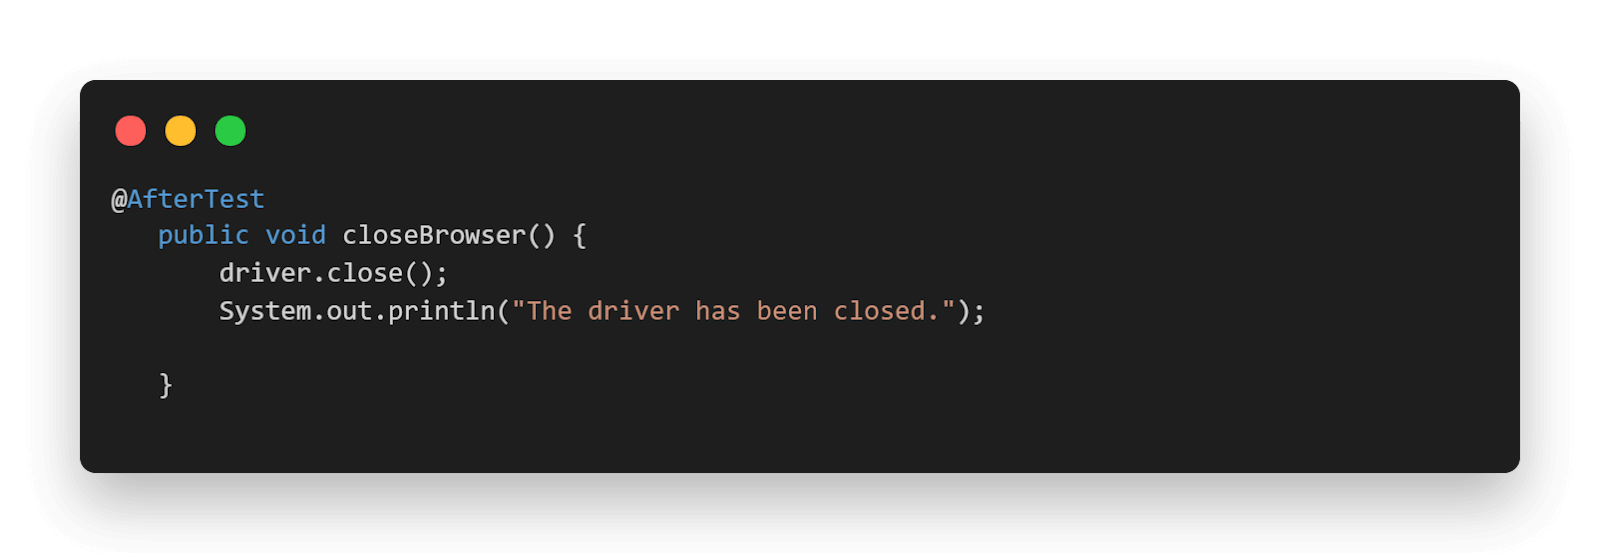
- @AfterTest(closeBrowser): Here, we are just closing the launched browser.

We have also used the Listener class here in order to customize the TestNG Report. TestNG provides us with a lot of Listeners (e.g., IAnnotationTransformer, IReporter, etc.). These interfaces are used while performing Selenium automation testing mainly to generate logs and customize the TestNG reports.
If you want to know more about Event Listeners In Selenium WebDriver watch this video to learn how the Listeners “listen” to the event defined in the Selenium script and behave accordingly.
Also read: How To Use TestNG Reporter Log In Selenium
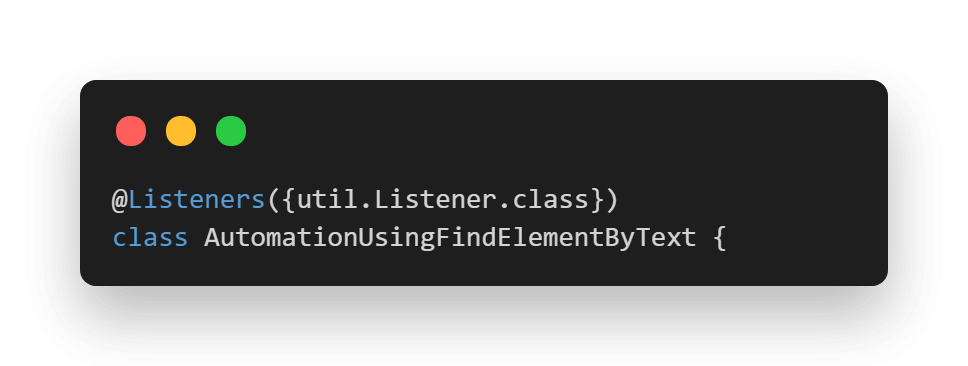
To implement the Listener class, you can simply add an annotation in your test class just above your class name.
Syntax:
|
@Listeners(PackageName.ClassName.class) |

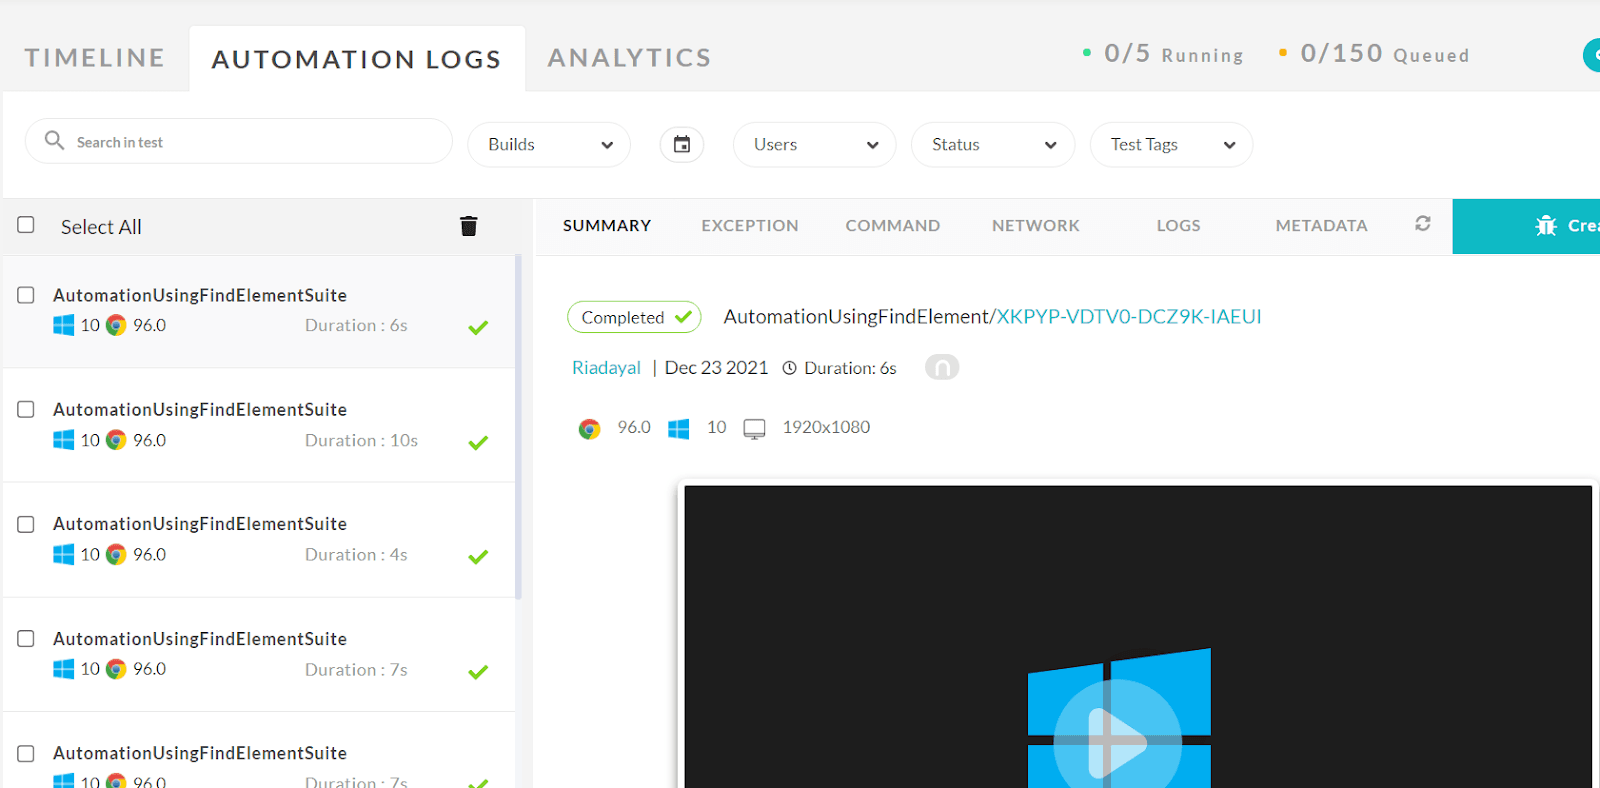
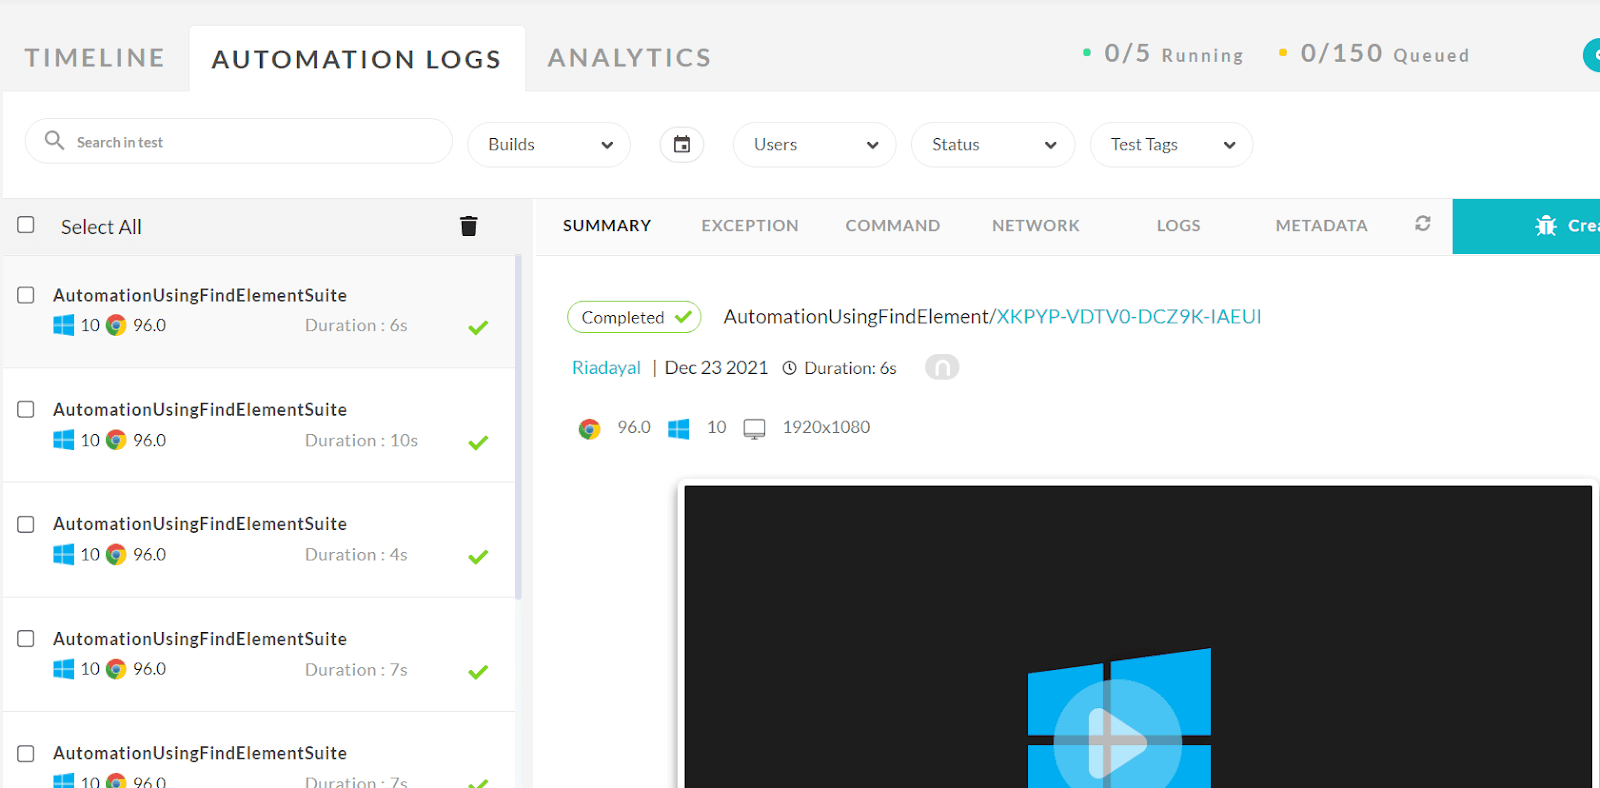
Once the tests are completed, you can also view your test results, logs, and the test recording as well in your LambdaTest Automation Dashboard.
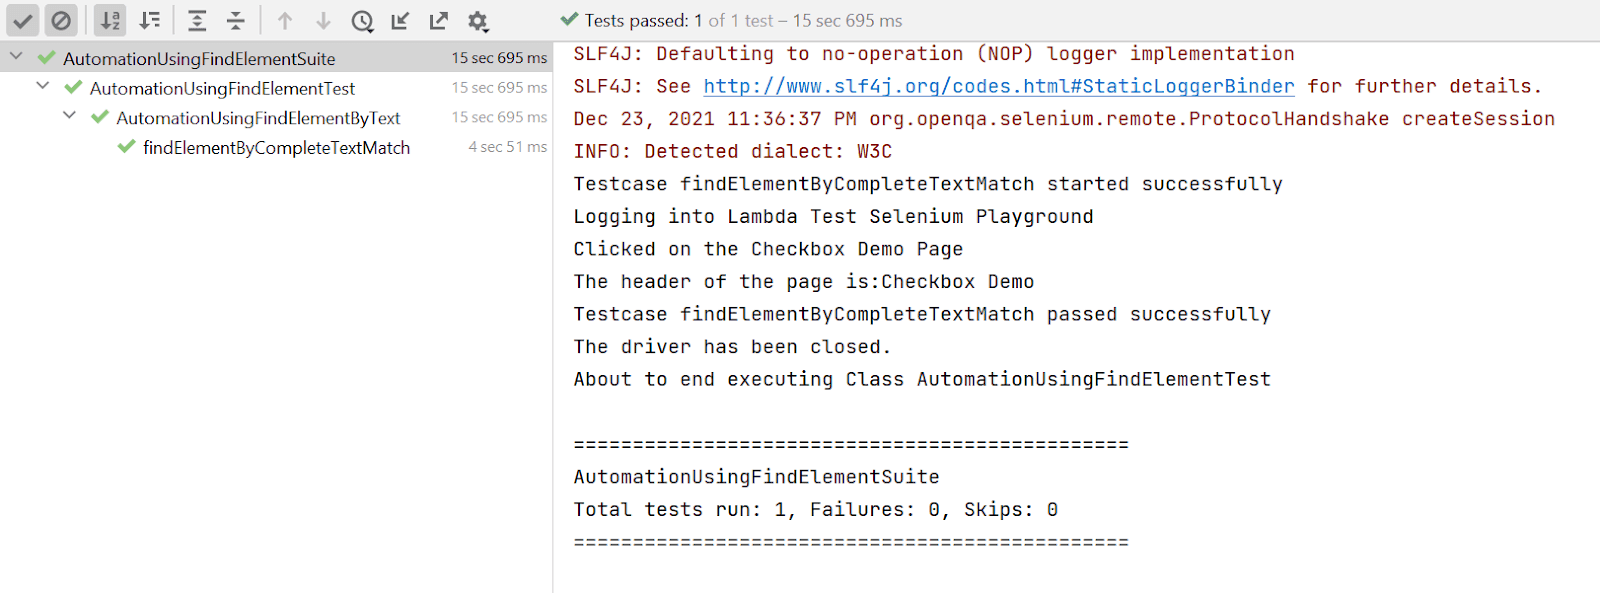
Console Output
Once you run the test case, the console output will look something like the below:
The below video will help you write your first test script in Selenium using Java by interacting with different web elements.
You can also Subscribe to the LambdaTest YouTube Channel and stay updated with the latest tutorials around Selenium testing, Cypress E2E testing, CI/CD, and more.
Find Element by Text in Selenium for Partial Text match
In the previous example of this article on how to find element by text in Selenium WebDriver, you saw how you could use findElement by Text for a complete text match. In this section, we will understand how we can use partial Text match in order to locate web elements.
Also read – Find Elements With Link Text & Partial Link Text In Selenium
Use Case
- Log in to Selenium Playground.
- Identify all the Web Elements which have a table in their names.
- Print the text of all such Web Elements.

Let us see the locator for the above test case.
Implementation
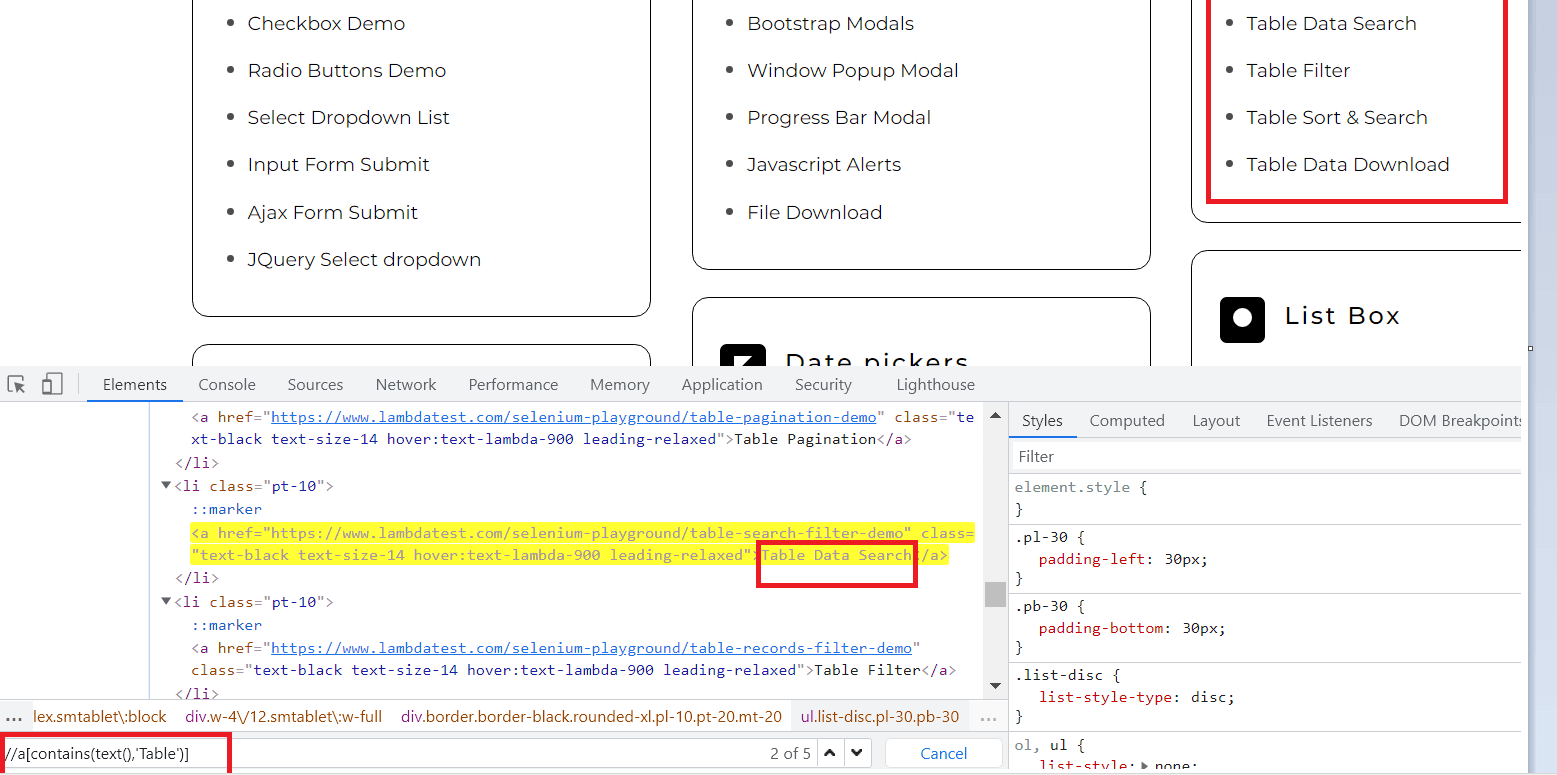
As shown in the above picture, we use the Table text with its tag a for a partial match, and as a result, we get a total of 5 Web Elements using the above locator. Since there are more than 1 Web Element, in this case, we will use FindElements.
FindElements in Selenium returns you the list of web elements that match the locator value, unlike FindElement which returns only a single web element. In case, there are no matching elements within the web page, FindElements returns an empty list.
The syntax of FindElements in Selenium is:
|
List<WebElement> listName= driver.findElements(By.<LocatorStrategy>(“LocatorValue”)) |
Hence, the correct implementation using FindElements with partial text match here would be:
|
List<WebElement> tableOptions=driver.findElements(By.xpath(“//a[contains(text(),’Table’)”) |
Let us now use the same and write our test case.
You can refer to the below testcase.
|
1 2 3 4 5 6 7 8 9 10 11 12 13 14 15 16 17 18 19 20 21 22 23 24 25 26 27 28 29 30 31 32 33 34 35 36 37 38 39 40 41 42 43 44 45 46 47 48 49 50 51 52 53 54 55 56 57 58 59 60 61 62 63 64 65 |
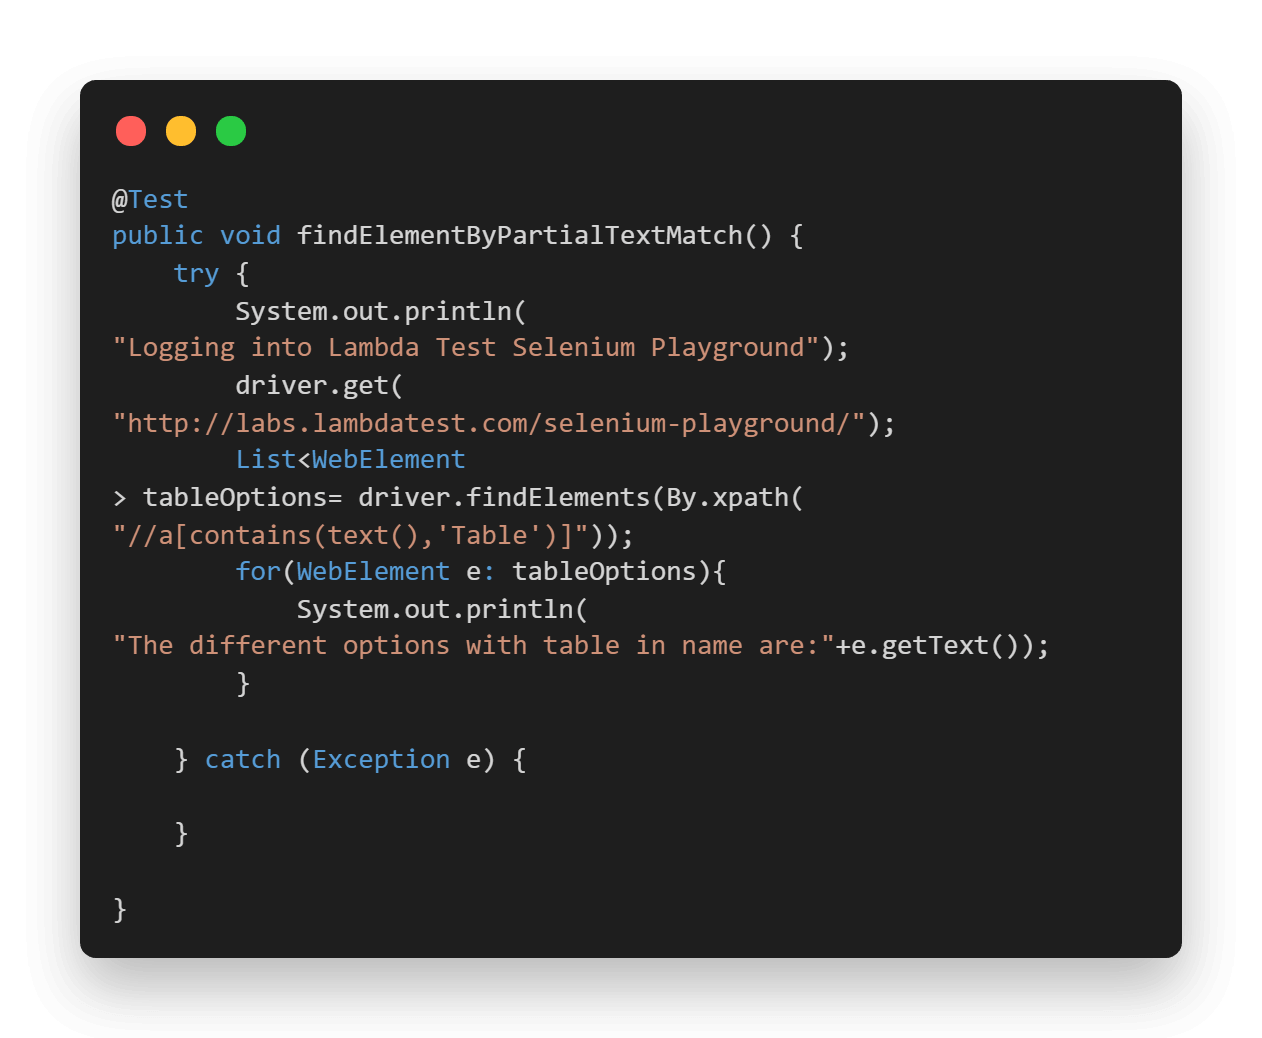
package LambdaTest; import org.openqa.Selenium.By; import org.openqa.Selenium.WebElement; import org.openqa.Selenium.remote.DesiredCapabilities; import org.openqa.Selenium.remote.RemoteWebDriver; import org.testng.Assert; import org.testng.annotations.AfterTest; import org.testng.annotations.BeforeTest; import org.testng.annotations.Listeners; import org.testng.annotations.Test; import java.net.MalformedURLException; import java.net.URL; import java.util.List; @Listeners({util.Listener.class}) class AutomationUsingFindElementByText { public String username = “YOUR USERNAME”; public String accesskey = “YOUR ACCESSKEY”; public static RemoteWebDriver driver = null; public String gridURL = “@hub.lambdatest.com/wd/hub”; @BeforeTest public void setUp() throws Exception { DesiredCapabilities capabilities = new DesiredCapabilities(); capabilities.setCapability(“browserName”, “chrome”); capabilities.setCapability(“version”, “96.0”); capabilities.setCapability(“platform”, “win10”); // If this cap isn’t specified, it will just get the any available one capabilities.setCapability(“build”, “AutomationUsingFindElement”); capabilities.setCapability(“name”, “AutomationUsingFindElementSuite”); try { driver = new RemoteWebDriver(new URL(“https://” + username + “:” + accesskey + gridURL), capabilities); } catch (MalformedURLException e) { System.out.println(“Invalid grid URL”); } catch (Exception e) { System.out.println(e.getMessage()); } } @Test public void findElementByPartialTextMatch() { try { System.out.println(“Logging into Lambda Test Selenium Playground”); driver.get(“http://labs.lambdatest.com/Selenium-playground/”); List<WebElement> tableOptions= driver.findElements(By.xpath(“//a[contains(text(),’Table’)]”)); for(WebElement e: tableOptions){ System.out.println(“The different options with table in name are:”+e.getText()); } } catch (Exception e) { } } @AfterTest public void closeBrowser() { driver.close(); System.out.println(“The driver has been closed.”); } } |
You can use the below testng.xml file for running the above testcase.
|
<?xml version=“1.0” encoding=“UTF-8”?> <!DOCTYPE suite SYSTEM “http://testng.org/testng-1.0.dtd”> <suite name=“AutomationUsingFindElementSuite”> <test name=“AutomationUsingFindElementTest” > <classes> <class name=“LambdaTest.AutomationUsingFindElementByText” > </class> </classes> </test> </suite> |
And the below pom.xml file for installing all the necessary dependencies.
|
1 2 3 4 5 6 7 8 9 10 11 12 13 14 15 16 17 18 19 20 21 22 23 24 25 26 27 28 29 30 31 32 33 34 35 36 37 38 39 40 41 42 43 |
<?xml version=“1.0” encoding=“UTF-8”?> <project xmlns=“http://maven.apache.org/POM/4.0.0” xmlns:xsi=“http://www.w3.org/2001/XMLSchema-instance” xsi:schemaLocation=“http://maven.apache.org/POM/4.0.0 http://maven.apache.org/xsd/maven-4.0.0.xsd”> <modelVersion>4.0.0</modelVersion> <groupId>org.example</groupId> <artifactId>LambdaTest</artifactId> <version>1.0–SNAPSHOT</version> <dependencies> <dependency> <groupId>org.Seleniumhq.Selenium</groupId> <artifactId>Selenium–api</artifactId> <version>4.0.0–alpha–7</version> </dependency> <dependency> <groupId>org.Seleniumhq.Selenium</groupId> <artifactId>Selenium–remote–driver</artifactId> <version>4.0.0–alpha–7</version> </dependency> <dependency> <groupId>org.Seleniumhq.Selenium</groupId> <artifactId>Selenium–chrome–driver</artifactId> <version>4.0.0–alpha–7</version> </dependency> <dependency> <groupId>org.testng</groupId> <artifactId>testng</artifactId> <version>6.14.3</version> </dependency> <dependency> <groupId>io.github.bonigarcia</groupId> <artifactId>webdrivermanager</artifactId> <version>4.4.3</version> </dependency> </dependencies> <properties> <maven.compiler.source>8</maven.compiler.source> <maven.compiler.target>8</maven.compiler.target> </properties> </project> |
GitHub
Also, read – How To Get Text Of An Element In Selenium?
Code Walkthrough
In this section on how to find element by text in Selenium, let us now check the test case walkthrough in detail. The BeforeTest and import statements remain the same as we saw in our previous example.
@Test(findElementByPartialTextMatch): In this case, we are first logging into the Selenium Playground web page. After that, we locate all the Web Elements which have Table in their text and store them in a list. Later, we iterate over the list and print their text.
Once the tests are completed, you can also view your test results, logs, and the test recording as well in your LambdaTest Automation Dashboard.
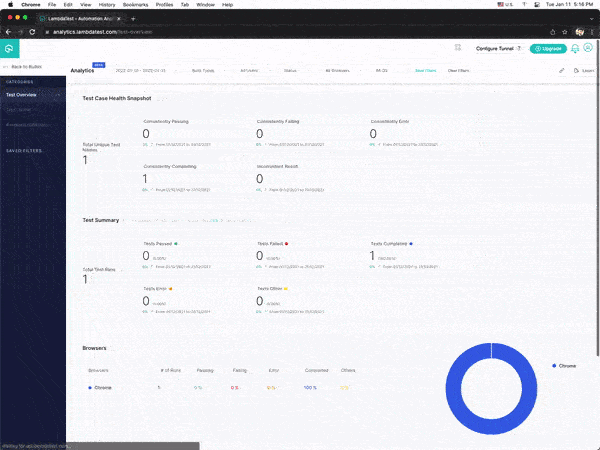
You can also see the test results on the LambdaTest Analytics Dashboard. The dashboard shows all the details and metrics related to your tests.
Navigate to the LambdaTest Analytics Dashboard to view the metrics of your tests. You can quickly assess test performance and overall health from Test Overview. The Test Summary will show how many passed and failed tests your team has run and the overall efficiency of these tests.
Console Output
Once you run the test case, the console output will look something like the below:
If you’re a developer or a tester and want to take your skills to the next level, this Selenium 101 certification from LambdaTest can help you reach that goal.
Here’s a short glimpse of the Selenium 101 certification from LambdaTest:
Conclusion
In this Selenium Java tutorial on how to find element by text in Selenium WebDriver, we explored finding an element using text in Selenium. We saw how we could use the text() method in case of both complete and partial text matches. We also saw how we could use it in the case of FindElements and get a list of Web Elements through text match. In the end, we also implemented the cases using Selenium with Java on a cloud Selenium Grid.
Honestly, using text() is one of my personal favorite methods in Selenium when it comes to locating Web Elements, as it’s very easy to implement and can be tweaked in any way to match our use case.
I hope you enjoyed reading this article on how to find element by text in Selenium, learned some more about FindElement By Text, and I believe this method will become your personal favorite too. 🙂
Happy Testing!!
Frequently Asked Questions (FAQs)
How do you search text in Selenium?
The ‘findElement’ method returns a WebElement object. This object has a ‘getText’ method, which returns the visible text on that element. To find a particular element, use the ‘findElement’ method with appropriate locators.
What is text () in XPath?
In XPath, text() is a node test that matches a text node. A text node is the kind of node that contains the text between the start and end tags when elements are written in HTML source code or in XML source code.
How do I find an element in Selenium?
You can use the following methods:
- ID.
- Name.
- ClassName.
- TagName.
- Link Text/Partial Link Text.
- CSS Selector.
- XPATH Selector.

Ria Dayal
A Senior Quality Engineer By Profession, an automation enthusiast and loves to anchor. Her expertise revolves around Selenium, Java, Rest Assured, and Jenkins. Shell scripting too interests her a lot.
Ria enjoys reading novels and writing is her comfort zone.
