![]()
After clicking Install in LibUSB, it tells me "System Policy has been modified
to reject unsigned drivers."

Windows 8 x64

Enabled test mode to allow installation of unsigned drivers (allegedly) but
still no luck.
Original issue reported on code.google.com by yami...@gmail.com on 5 Jul 2013 at 5:15
![]()
![]()
Well, that's what I get for trying to do things on no sleep.

Forgot to run inf-wizard as admin.

Got everything installed, neat and tidy, but the chatpad still won't really
work. I got it to type a lower-case r, by pressing the button repeatedly, but
it won't recognize any more button presses. So I know that it is, at least,
getting the signal, but it won't catch the keypresses (other than that one).
Original comment by yami...@gmail.com on 5 Jul 2013 at 5:34
![]()
Good to know about the admin option, I'll make sure to put that in the
installation instructions.

Regarding the chatpad issue, I'm going to copy your information to Issue #2,
please monitor that issue for any updates.
Original comment by ksbarnes@skyag.net on 5 Jul 2013 at 5:36
- Changed state: Invalid
![]()
in the instructions its still missing on step 8 for libusb

you should change it to exectue as admin

had the same problem
Original comment by loggjohn...@gmail.com on 11 May 2014 at 3:22
![]()
I’m getting the same issue when installing lib. i get “system policy has been modified…. dada di da” despite disabellingsecure boot in my bios. I’m literally ready to chuck this out the window, anyone have any ideas
![]()
@Timlazisa The issue is still occurring when running the libUSB installer as admin correct? Which OS are you running on and what version of LibUSB are you using? Do you happen to have a work/school account on your device that is allowed to manage the computer/configured to allow you to access some internal work/school resources? Those things can sometimes interfere with installation. This project should be compatible with Windows 10 with Secure Boot enabled and no test mode. (have been able to confirm this on one of my laptops). LibUSB should be signed if I recall right. I might have to try doing a fresh install of this to see if I can reproduce the issue if none of the other items are a factor. Might need to tweak the install process with some recent updates if things have changed.
Just tag me in a response with that info so that I get notified. I’ll see what I can do to help troubleshoot. If you’re on Windows 11, I do have a computer with Windows 11 setup, so I can try an install there as well.
![]()
![]()
Just to make sure, by libgenusb, are you talking about the inf-wizard in libusb 1.2.6.0 or is that just the version of libusb and the download you used (libusb-win32-bin-1.2.6.0). If the download was named libgenusb-32-bin-1.2.6.0, that could potentially be the wrong download, but if the download was named libusb-win32-bin-1.2.6.0.zip, that should be the right one.
Is the driver policy error showing up on the step for the filter driver or the inf-wizard step?
![]()
![]()
Ok. Got it. Sorry for the late response @Timlazisa. I’ll try working through a fresh install of this application on my system to see if I can recreate the issue. I have a machine that I haven’t installed this project on before. It appears that some others have had similar issues with libusb, getting the same error, so I may try following the advice I found in this libusb issue, then I’ll update the installation directions on this repo accordingly. If you’re feeling adventurous enough to try the suggestions in that issue, you’re welcome to, but no worries if you can’t. I just won’t really be able to get around to this for about a week or two. It may also be possible to run this application with only the filter driver step, based on some testing I did a while ago if I tweak things a bit, though that may be an enhancement I make a little later.
![]()
Hi thanks for the update. No rush. It may be just easier to buy a
controller that actually works with DRL out of the box!
Tim
…
On Sun, 5 Dec 2021 at 23:45, Kyler Nelson ***@***.***> wrote:
Ok. Got it. Sorry for the late response @Timlazisa
<https://github.com/Timlazisa>. I’ll try working through a fresh install
of this application on my system to see if I can recreate the issue. I have
a machine that I haven’t installed this project on before. It appears that
some others have had similar issues with libusb, getting the same error, so
I may try following the advice I found in this libusb issue
<https://sourceforge.net/p/libusb-win32/mailman/libusb-win32-devel/thread/CAGjSPUDC9krp-PvPnMbFJCML616ouB6VBKkxjcvEwVUbzAnBPg%40mail.gmail.com/>,
then I’ll update the installation directions on this repo accordingly. If
you’re feeling adventurous enough to try the suggestions in that issue,
you’re welcome to, but no worries if you can’t. I just won’t really be able
to get around to this for about a week or two. It may also be possible to
run this application with only the filter driver step, based on some
testing I did a while ago, if I tweak things a bit, though that may be an
enhancement I make a little later.
—
You are receiving this because you were mentioned.
Reply to this email directly, view it on GitHub
<#1 (comment)>,
or unsubscribe
<https://github.com/notifications/unsubscribe-auth/APRW4XJUKZBI7SHT5YL7F6LUPP2RHANCNFSM5INWKBSA>
.
Triage notifications on the go with GitHub Mobile for iOS
<https://apps.apple.com/app/apple-store/id1477376905?ct=notification-email&mt=8&pt=524675>
or Android
<https://play.google.com/store/apps/details?id=com.github.android&referrer=utm_campaign%3Dnotification-email%26utm_medium%3Demail%26utm_source%3Dgithub>.
![]()
Was this ever solved? I am still currently having this issue.
![]()
Was this ever solved? I am still currently having this issue.
I haven’t been able to get to the bottom of this, but I have a couple of things to suggest.
I’d start by double-checking that the LibUSB version downloaded was 1.2.0.0 or newer (I may need to update the project README of it specified an older version). Those versions are signed so they shouldn’t be encountering this error in most circumstances.
If you do have a new enough version, you could try using Zadig to attach the driver since that sometimes works better.
Let me know if neither of those things work. If not, it might be that there’s a slight tweak that we need to do to a registry value due to some change in driver signatures in Windows 10 that affects devices that were not upgraded from a certain older version of windows 10 or earlier.
![]()
Yeah, as this is a first time install, I picked the newest version, for my x64 machine, making sure to get the inf-wizard from 1.2.6.0.
I tried Zadig with the following settings. However, it timed out-

The weirdest thing about this – I have distinct memories of using my chatpad on my (Windows 7) PC somehow, I remember reassigning the buttons for Il-2 1946 distinctly, with the buttons lighting up. I don’t have any wired connection means apart from the charger cable for a battery-powered 360 controller. Nor did I buy controller companion. So I have no idea how I recall doing it, because there isn’t an Xjoy or LibUSB folder on my old HDD.
EDIT: Orrr it’s maybe not so weird. Those 2017 files and folders – SkyAg – leads back to you!

But I still don’t know how I managed this without LibUSB or Xjoy.
Let me know if neither of those things work. If not, it might be that there’s a slight tweak that we need to do to a registry value due to some change in driver signatures in Windows 10 that affects devices that were not upgraded from a certain older version of windows 10 or earlier.
And yes, after Windows 7 bricked I installed Win10.
![]()
Yeah, as this is a first time install, I picked the newest version, for my x64 machine, making sure to get the inf-wizard from 1.2.6.0.
I tried Zadig with the following settings. However, it timed out-
Let me know if neither of those things work. If not, it might be that there’s a slight tweak that we need to do to a registry value due to some change in driver signatures in Windows 10 that affects devices that were not upgraded from a certain older version of windows 10 or earlier.
And yes, after Windows 7 bricked I installed Win10.
Can you check the HKEY_LOCAL_MACHINESYSTEMCurrentControlSetControlCIPolicy registry key to see if a DWORD value called UpgradedSystem exists? If not, create it and set its value to 1, reboot the system, and try installing again. I’d suggest trying both Zadig and the installers included in libusb-win32 to see if either one of those work after that registry change.
Let me know if either of those things makes a difference. If that fixes it, I’ll certainly need to update the install instructions for this. If not, I’ll have to do some digging.
I’ve been wanting to get an installer put together at some point since the install process is quite a pain as of right now, but it’s been such a long while since I’ve had much free time to work on this project. I’ll probably put together an installer when I do eventually get around to some other changes I’ve been wanting to make. I’d really like to replace libusb-win32 with usbdk since it can allow the chatpad app to disconnect and reconnect on the fly in case some games don’t play nice with this driver, then I’d like to replace vJoy with ViGemBus since it actually creates a virtual Xinput-capable device, which should solve a lot of compatibility problems that the current app has (and those components are much easier to automate the installation for). usbdk and ViGemBus are newer drivers that weren’t aroudn when this project was originally started, and I also suspect they will play nicer in general on newer systems.
The weirdest thing about this – I have distinct memories of using my chatpad on my (Windows 7) PC somehow, I remember reassigning the buttons for Il-2 1946 distinctly, with the buttons lighting up. I don’t have any wired connection means apart from the charger cable for a battery-powered 360 controller. Nor did I buy controller companion. So I have no idea how I recall doing it, because there isn’t an Xjoy or LibUSB folder on my old HDD.
EDIT: Orrr it’s maybe not so weird. Those 2017 files and folders – SkyAg – leads back to you!
But I still don’t know how I managed this without LibUSB or Xjoy.
Yeah, this is the same codebase you would have been running back then, probably with only minimal changes since 2017, so I’d think you would have had LibUSB or vJoy at the time. If you had the LibUSB install files from your previous setup, I’d say to try that, but it seems that’s not possible and Windows 7 required manual installation of the xbox 360 drivers in some cases, unlike Windows 10.
SkyAG is the original author, while I made a few contributions to the project back when it was hosted on Google Code and I have used it off and on since then, so I can see how that breadcrumb trail brought you here. Someone else migrated it to GitHub when Google Code shut down, then that person transferred the repo to me when I touched base and they noticed I was a contributor. I recently managed to reconnect with SkyAG (see #78), so they have access to this project now, but they’ve handed primary maintenance off to me.
If we’re still stuck, I could try touching base with SkyAG to see if they have any info that may help with this, but I’m expecting I may need to try setting this up on a computer with a fresh Windows install to see if that yields anything insightful.
![]()
Can you check the
HKEY_LOCAL_MACHINESYSTEMCurrentControlSetControlCIPolicyregistry key to see if a DWORD value calledUpgradedSystemexists? If not, create it and set its value to 1, reboot the system, and try installing again. I’d suggest trying both Zadig and the installers included in libusb-win32 to see if either one of those work after that registry change.
So it turns out it didn’t exist-

So, with the drivers reset (removed from libUSB, returned it back to stock Microsoft ones, confirmed by controller connecting again), and the computer rebooted after this, I tried again and got the same error –

So I try installing it under test mode. Still nothing –

I then disable driver signature enforcement in boot. It successfully installs –

Yet now it won’t even detect the Xbox 360 Wireless Receiver, in the chatpad app, whereas before it did even when I couldn’t install the unsigned driver in inf-wizard:

So now I’m really at a loss!
And for record, mine is the official Microsoft Wireless Receiver.
![]()
Can you check the
HKEY_LOCAL_MACHINESYSTEMCurrentControlSetControlCIPolicyregistry key to see if a DWORD value calledUpgradedSystemexists? If not, create it and set its value to 1, reboot the system, and try installing again. I’d suggest trying both Zadig and the installers included in libusb-win32 to see if either one of those work after that registry change.So it turns out it didn’t exist-
So, with the drivers reset (removed from libUSB, returned it back to stock Microsoft ones, confirmed by controller connecting again), and the computer rebooted after this, I tried again and got the same error –
So I try installing it under test mode. Still nothing –
I then disable driver signature enforcement in boot. It successfully installs –
Yet now it won’t even detect the Xbox 360 Wireless Receiver, in the chatpad app, whereas before it did even when I couldn’t install the unsigned driver in inf-wizard:
So now I’m really at a loss!
And for record, mine is the official Microsoft Wireless Receiver.
@eggplantedd thanks for the very thorough investigation. As I did some digging around, it turns out the version of libusb-win32 that I’ve been using is version 1.2.6.0, while the latest is 1.2.7.3 I’d thought I’d been on the latest version this whole time, but it appears that is not the case. I’d try version 1.2.6.0 to see if it makes any difference since there were some changes in how the libusb-win32 project signed the driver in 1.2.7.3
I saw your Windows version is 10 pro, so you may want to check the following group policy option using gpedit: User Configuration > Administrative Templates > System > Driver Installation to see if it’s set to something other than “not configured” for whatever reason.
If version 1.2.6.0 doesn’t work, does installing the driver by right-clicking the generated .inf using the install option manage to install properly (in or out of test mode) with the device being recognized by the app with that method? If you haven’t installed the filter driver yet and the device is not recognized, but the driver installed, I would suggest installing the filter driver as well. The bin/<arch> directory of the libusb-win32 zip should include a testlibusb-win.exe file that should indicate if libusb-win32 is seeing the device. I’d suggest checking that application to see if it shows up there while not being found by the chatpad program.
You may also want to try installing the filter driver first, or see if it will even work with just the filter driver alone and no inf-wizard (I recall getting this to work with just the filter once, skipping the inf-wizard, but I don’t remember if I had to do anything else.) to see if that makes a difference.
If you can get 1.2.6.0 working, but only in test mode, I’d suggest disabling secure boot and booting in normal mode to see if everything works correctly. Secure Boot can sometimes require certain constraints on kernel drivers, so testing this could help us eliminate yet another variable.
-
HP1983
- Posts: 3
- Joined: Tue Feb 13, 2018 5:16 pm
WIN10 Driver Installation
The driver for firmware flashing will not be installed when running the installation wizard.
I receive the message: “System policy has been modified to reject unsigned drivers.”
I’m running WIN10 Home as an administrator and with the latest updates.
Can anyone give me a hint on how to proceed?
-
grsbanks
- Posts: 1122
- Joined: Tue Apr 25, 2017 11:23 am
- Location: Preston, Lancs, UK
-
Contact:
Re: WIN10 Driver Installation
Post
by grsbanks » Tue Feb 13, 2018 5:31 pm
Restart Windows with driver signature enforcement deactivated.
https://windowsreport.com/driver-signat … indows-10/ (ignore the prompts to download “repair tools”, they’re just ads for bloatware on the page)
Note that you’ll have to reinstall the drivers whenever you install an Insider Preview of W10 if you’re using that channel. Because the drivers are unsigned, Windows boots them out when you do an update.
There are only 10 kinds of people in the world: those who understand binary and those who do not.
-

Jeff O.
- Posts: 19
- Joined: Fri Jul 21, 2017 10:40 pm

Re: WIN10 Driver Installation
Post
by Jeff O. » Fri Feb 16, 2018 2:44 am
grsbanks wrote: ↑
Tue Feb 13, 2018 5:31 pm
Note that you’ll have to reinstall the drivers whenever you install an Insider Preview of W10 if you’re using that channel. Because the drivers are unsigned, Windows boots them out when you do an update.
Is there any way to tell if Windows did indeed boot my driver? I suspect so, as I had no luck updating to 3.3. Does the driver have a name I could look for if I did a “driverquery” from a command prompt? Finally, if it did boot the driver on an update, is there any way to tell Windows to leave it the heck alone the next time?
-
grsbanks
- Posts: 1122
- Joined: Tue Apr 25, 2017 11:23 am
- Location: Preston, Lancs, UK
- Contact:
Re: WIN10 Driver Installation
Post
by grsbanks » Fri Feb 16, 2018 10:30 am
Yup.
Fire up the device manager, connect the DM42 and put it into bootloader mode.
If you find an “STM Device un DFU Mode” in the “Universal Serial Bus controllers” branch then you have to reinstall the drivers.
Windows thinks it knows best and does not give you the opportunity to tell it to leave your drivers alone. If the driver isn’t signed, it gets the boot.
There are only 10 kinds of people in the world: those who understand binary and those who do not.
-
toml_12953
- Posts: 769
- Joined: Wed May 03, 2017 7:46 pm
- Location: Malone, NY USA
Re: WIN10 Driver Installation
Post
by toml_12953 » Fri Feb 16, 2018 1:54 pm
grsbanks wrote: ↑
Fri Feb 16, 2018 10:30 am
If the driver isn’t signed, it gets the boot.
I thought if the driver isn’t signed then it doesn’t get the boot. ![]()
Tom L
Some people call me inept but I’m as ept as anybody!
DM10L SN: 059/100
DM41X SN: 00023 (Beta)
DM41X SN: 00506 (Shipping)
DM42 SN: 00025 (Beta)
DM42 SN: 00221 (Shipping)
WP43 SN: 00025 (Prototype)
-
Jeff O.
- Posts: 19
- Joined: Fri Jul 21, 2017 10:40 pm
Re: WIN10 Driver Installation
Post
by Jeff O. » Fri Feb 16, 2018 2:59 pm
grsbanks wrote: ↑
Fri Feb 16, 2018 10:30 am
Yup.Fire up the device manager, connect the DM42 and put it into bootloader mode.
If you find an “STM Device un DFU Mode” in the “Universal Serial Bus controllers” branch then you have to reinstall the drivers.
Thanks, I will check this tonight. I’m thinking it must be gone, as when I tried to update, the dm_tool kept saying “”No DFU capable devices found”.
grsbanks wrote: ↑
Fri Feb 16, 2018 10:30 am
Windows thinks it knows best and does not give you the opportunity to tell it to leave your drivers alone. If the driver isn’t signed, it gets the boot.
Great, so now I have keep track of windows updates and keep re-learning how to install unsigned drivers.
-
grsbanks
- Posts: 1122
- Joined: Tue Apr 25, 2017 11:23 am
- Location: Preston, Lancs, UK
- Contact:
Re: WIN10 Driver Installation
Post
by grsbanks » Fri Feb 16, 2018 3:44 pm
Jeff O. wrote: ↑
Fri Feb 16, 2018 2:59 pm
Great, so now I have keep track of windows updates and keep re-learning how to install unsigned drivers.
Only when a new complete build gets installed.
Also, when you do install the drivers and generate the .INF file, make a note of where you generate it and next time, all you have to do is tell Windoze you want to update the drivers for the “STM Device in DFU Mode” and point it to that .inf file using the “Have Disk…” option.
There are only 10 kinds of people in the world: those who understand binary and those who do not.
-
Jeff O.
- Posts: 19
- Joined: Fri Jul 21, 2017 10:40 pm
Re: WIN10 Driver Installation
Post
by Jeff O. » Sat Feb 17, 2018 11:46 pm
grsbanks wrote: ↑
Fri Feb 16, 2018 10:30 am
Fire up the device manager, connect the DM42 and put it into bootloader mode.If you find an “STM Device un DFU Mode” in the “Universal Serial Bus controllers” branch then you have to reinstall the drivers.
That is exactly what I found. Put windows in “allow unsigned drivers” mode, re-installed driver and updated to V3.3 successfully. Thanks for your help.
grsbanks wrote: ↑
Fri Feb 16, 2018 3:44 pm
Also, when you do install the drivers and generate the .INF file, make a note of where you generate it and next time, all you have to do is tell Windoze you want to update the drivers for the “STM Device in DFU Mode” and point it to that .inf file using the “Have Disk…” option.
I wondered about the old .inf file. I just re-ran the inf-wizard and wrote over the old .inf. I’ll try to remember this shortcut for next time.
 В этой инструкции — три способа отключить проверку цифровой подписи драйвера в Windows 10: один из них работает однократно при загрузке системы, два других отключают проверку подписи драйверов навсегда, но не всегда. Это может пригодиться в тех случаях, когда драйвер не устанавливается, а ОС сообщает, что INF стороннего производителя не содержит информации о подписи или о других проблемах подписи, приводящих к ошибке при установке устройства.
Надеюсь, вы знаете, зачем вам потребовалось отключать эту функцию, потому как такие изменения настроек Windows 10 могут привести к повышению уязвимости системы перед вредоносным ПО. Возможно, существуют иные способы установить драйвер вашего устройства (либо другой драйвер), без отключения проверки цифровой подписи и, если такой способ имеется, лучше воспользоваться им. Если вы хотите серьезно подойти к вопросу, то можно также самостоятельно подписать драйвер цифровой подписью (не для начинающих).
Отключение проверки подписи драйвера с помощью параметров загрузки
Первый способ, отключающий проверку цифровой подписи единожды, при перезагрузке системы и до следующей перезагрузки — использование параметров загрузки Windows 10.
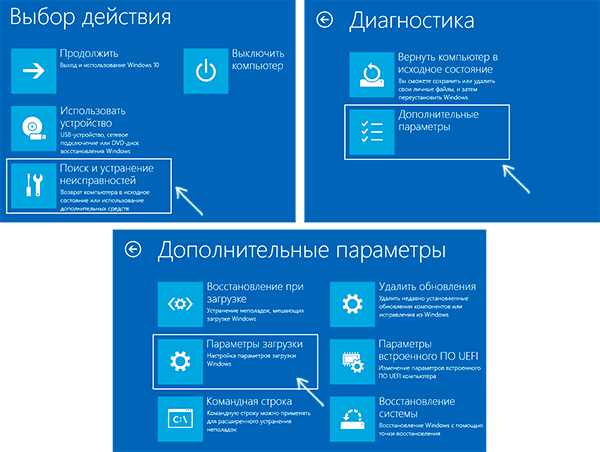
- Для того, чтобы воспользоваться способом, зайдите в «Параметры» — «Обновление и безопасность» — «Восстановление». Затем, в разделе «Особые варианты загрузки» нажмите «Перезагрузить сейчас».

- После перезагрузки, пройдите по следующему пути: «Поиск и устранение неисправностей» (или «Диагностика») — «Дополнительные параметры» — «Параметры загрузки» и нажмите кнопку «Перезагрузить».

- После перезагрузки появится меню выборов параметров, которые будут использоваться в этот раз в Windows 10.

- Для того, чтобы отключить проверку цифровой подписи драйверов, выберите соответствующий пункт, нажав клавишу 7 или F7 (или Fn+F7 на некоторых ноутбуках).
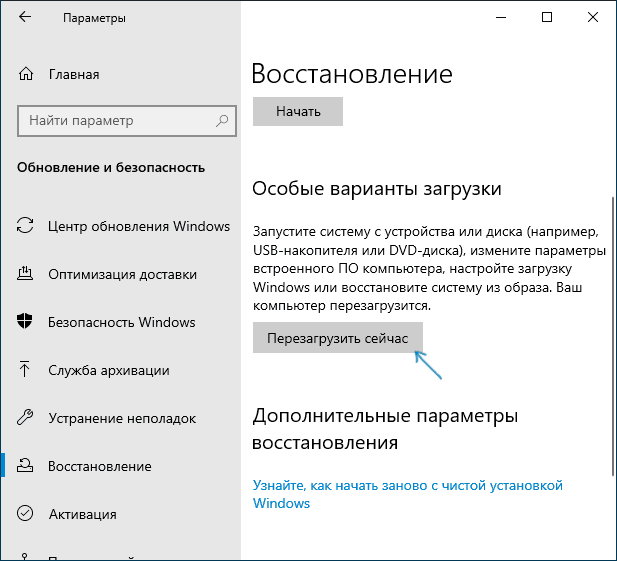
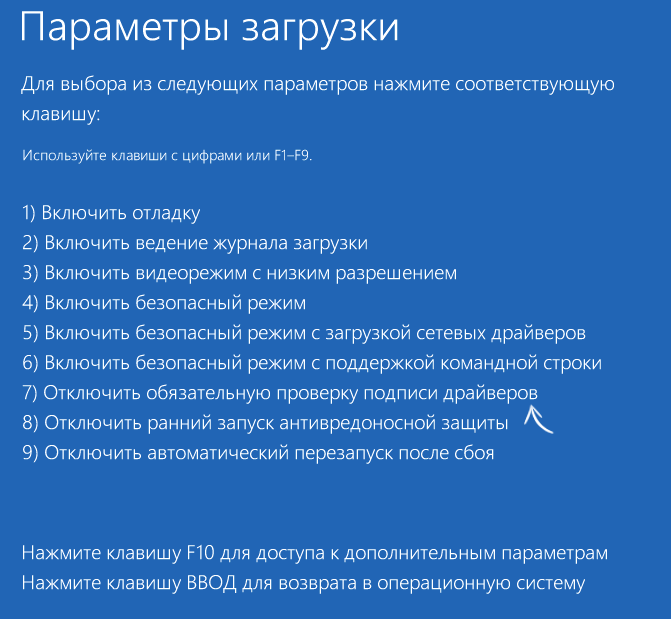
Готово, после перезагрузки Windows 10 запустится с отключенной проверкой подписи драйверов и вы сможете установить свой драйвер без цифровой подписи.
Видео инструкция по отключению проверки цифровой подписи драйверов
Обычно, даже после перезагрузки в обычном режиме, установленное таким образом устройство продолжает работать, однако в некоторых случаях драйвер слетает и приходится повторять процедуру. Отсюда частый вопрос о том, как отключить проверку цифровой подписи Windows 10 навсегда. К сожалению, это не всегда возможно (но можно подписать драйвер самостоятельно, о чем упоминалось в начале инструкции), тем не менее обычный метод для постоянного отключения описан далее.
С помощью командной строки
Этот способ должен отключить проверку цифровой подписи драйверов навсегда — с использованием командной строки для редактирования параметров загрузки. Ограничения способа: у вас либо должен быть компьютер с BIOS, либо, если у вас UEFI, требуется отключить Secure Boot (это обязательно). К сожалению, в последних версиях Windows 10 описываемое обычно не срабатывает, но попробовать можно.
Действия следующие — запустите командную строку Windows 10 от имени администратора (Как запустить командную строку от имени администратора). В командной строке по порядку введите следующие две команды:
- bcdedit.exe -set loadoptions DISABLE_INTEGRITY_CHECKS
- bcdedit.exe -set TESTSIGNING ON
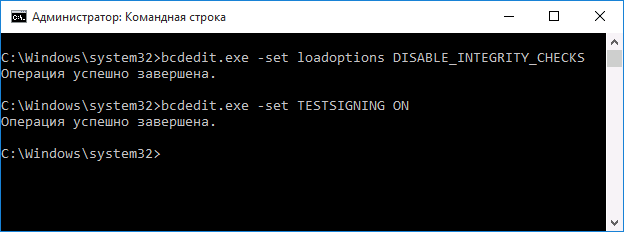
После того, как обе команды будут выполнены, закройте командную строку и перезагрузите компьютер. Проверка цифровых подписей будет отключена, с одним лишь нюансом: в правом нижнем углу вы будете наблюдать уведомление о том, что Windows 10 работает в тестовом режиме (чтобы убрать надпись и вновь включить проверку, введите в командной строке bcdedit.exe -set TESTSIGNING OFF).
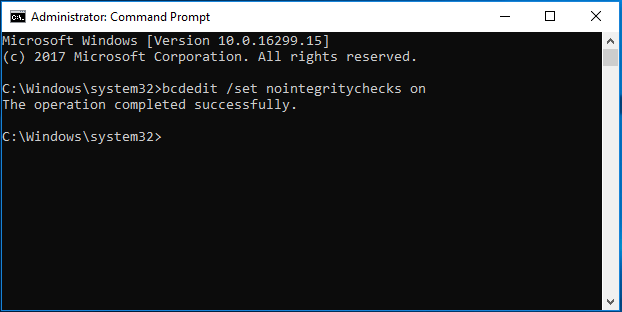
И еще один вариант отключения проверки подписи с помощью bcdedit, который по некоторым отзывам срабатывает лучше (проверка не включается снова автоматически при следующих загрузка Windows 10):
- Загрузить компьютер в безопасном режиме (см. Как зайти в безопасный режим Windows 10).
- Открыть командную строку от имени администратора и ввести следующую команду (нажав Enter после нее).
- bcdedit.exe /set NOINTEGRITYCHECKS ON
- Перезагрузить Windows 10 в обычном режиме.
В дальнейшем, если требуется снова включить проверку, сделайте это тем же способом, но вместо on в команде используйте off.
Отключение проверки в редакторе локальной групповой политики
Проверку подписи драйверов ранее можно было отключить (на сегодня метод не работает) с помощью редактора локальной групповой политики, однако эта возможность присутствует только в Windows 10 Pro (нет в домашней версии). Для запуска редактора локальной групповой политики, нажмите клавиши Win+R на клавиатуре, а затем введите gpedit.msc в окно «Выполнить», нажмите Enter.
В редакторе перейдите к разделу Конфигурация пользователя — Административные шаблоны — Система — Установка драйвера и дважды кликните по параметру «Подписывание кода для пакетов драйверов» (ранее пункт назывался «Цифровая подпись драйверов устройств») в правой части.
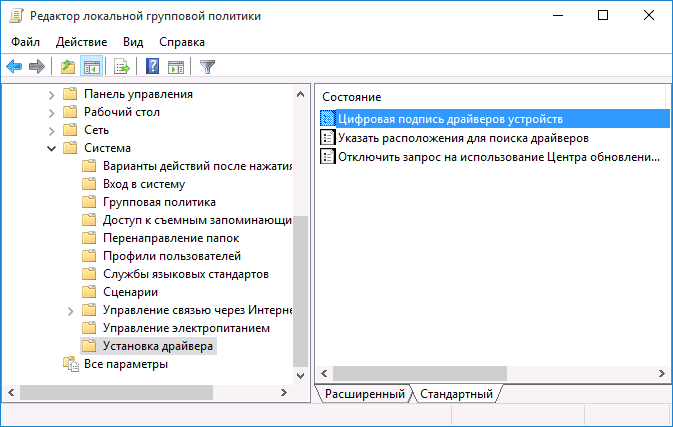
Откроется оно с возможными значениями данного параметра. Отключить проверку можно двумя способами:
- Установить значение «Отключено».
- Установить значение «Включено», а затем, в разделе «Если Windows обнаруживает файл драйвера без цифровой подписи» установить «Пропустить».
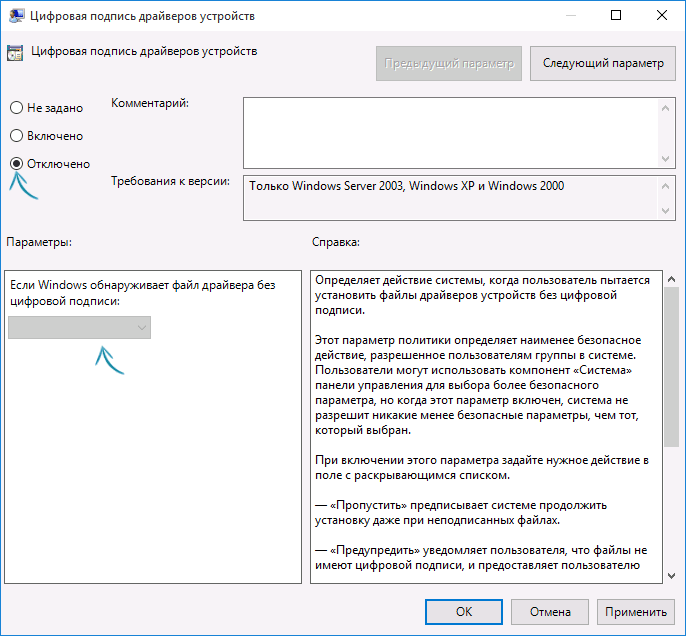
После установки значений, нажмите Ок, закройте редактор локальной групповой политике и перезагрузите компьютер (хотя, в общем-то, должно сработать и без перезагрузки).
Blog RadioSpy
радиоприем, программы, оборудование, etc…
RTL-SDR: первое включение
- Подключите антенну к донглу и вставьте его в USB порт компьютера. От автоматической установки откажитесь. С диска также ничего не устанавливайте.
Качаем необходимые компоненты
**** Абзацы, начинающиеся со слов «На некоторых ПК …» можно пропустить, и вернуться к ним в случае возникновения проблем.
Если у вас Windows XP:
- На Windows XP новые версии SDRSharp не работают из-за перехода на .Net Framework 4.6. В этом случае, скачайте одну из старых версий отсюда. Cамая свежая версия из поддерживаемых — 1361.
- Также, скачайте драйвер Zadig (версию для XP), на данный момент это zadig_xp_2.2.
- На некоторых ПК может отсутствовать Net Framework 3.5, необходимый для работы SDRSharp. Проверить установленные версии можно специальной утилиткой.
Если у вас Vista или новее (Windows 7, 8, 10):
- Установите пакет .Net Framework 4.6, если он еще не установлен. В Windows 10 он есть по умолчанию, в других системах нужно устанавливать отдельно. Пакет Net Framework 3.5 также должен присутствовать. Проверить установленные версии можно специальной утилиткой.
- На некоторых ПК может потребоваться установка Microsoft Visual C++ (2005, 2010 и обновления с приставкой SP1, также, нелишним будет пакет 2013). Установленные версии можно посмотреть через Пуск — Панель управления — Программы — Программы и компоненты.
- Скачайте SDR# (точнее, набор программ, включающий SDR#: SDR Software Package — Download).
- Распакуйте архив, запустите install-rtlsdr.bat и подождите, пока скачаются драйвера для rtl-sdr донгла. По окончанию процесса, окно автоматически закроется. Если батник не срабатывает, можно скачать вручную (раз и два) и скопировать rtlsdr.dll из папки х32 (или х64, смотря какая разрядность системы) и Zadig в папку с Шарпом.
Установка драйвера Zadig
- Запустите Zadig.exe. В строке выберите приемник, обычно он называется Bulk-In Interface или RTL2832U. Если такого нет, просто вытащите свисток из USB и посмотрите, что исчезнет из списка.
- Нажмите Install Driver. Ставим на обе булки (Interface 0 и 1), если их две.
- Если строка пустая, то Options — галочка List All Devices. Выбираем наш свисток и переустанавливаем драйвер.

Запуск SDRSharp
- Запустите SDRSharp.exe. В разделе Source нужно выбрать RTL-SDR / USB. В настройках (значок шестеренки) ставим галочку RTL AGC, усиление RF Gain добавляем до 20-30 дБ. В разделе Radio модуляция WFM, галочки FM STEREO и Correct IQ. Теперь можно нажать на старт (кнопка play) и настроиться на какую-нибудь станцию FM диапазона.

Переключение в КВ режим для приемников RTL-SDR.COM V3: Настройки — Sampling Mode — Direct Sampling (Q branch). Усиление в данном режиме не регулируется.
Если возникли какие-то проблемы — вам сюда.
Более детальные настройки, плагины и другие программы см. в разделе Wiki.
Источник
Blog RadioSpy
радиоприем, программы, оборудование, etc…
RTL_SDR: краткое руководство (перевод)
Перевод статьи Quick Start Guide (www.rtl-sdr.com)
прим. 10/2015 — перевод обновлен!
Эта страница является руководством по запуску RTL-SDR в системе Windows. Если у вас возникнут проблемы, внизу страницы есть список их решений.
Оборудование
В настоящее время, наиболее распространенными RTL-SDR приемниками являются R820T / R820T2, которые обычно продаются за $ 20 USD.
Для устойчивой работы нужен хотя бы двухъядерный процессор, но существуют программы и способы уменьшения нагрузки на процессор, позволяющие использовать RTL-SDR и на менее мощных компьютерах.
Чтобы получить максимум удовольствия от RTL-SDR, вам понадобится приличная антенна. Комплектная подойдет лишь для тестирования и приема ряда сильных сигналов. Для начала, ТВ-усы уже будут работать гораздо лучше. Вы можете также улучшить эффективность антенны, поместив ее на металлическую поверхность. Для общего сканирования рекомендуются широкополосные scantenna или дискоконусная антенна. Вы также можете сделать широкополосную дисковую антенну из алюминиевых крышек от кастрюль.
SDR# (SDRSharp): руководство по установке (проверено на Windows 7/8/10 32/64 бит)
2. У вас должен быть установлен Microsoft .NET 4.6 redistributable для работы SDRSharp. Большинство Windows 10 ПК уже имеют его по умолчанию, но для компьютеров с более старыми ОС может потребоваться отдельная установка. Обратите внимание, что .NET 4.6 не совместим с Windows XP. Также, о братите внимание, что на некоторых компьютерах вам может понадобиться установить Visual C ++ Runtime, если он еще не установлен.
3. SDRSharp — самая простая и наиболее часто используемая программа для RTL-SDR. Перейдите по ссылке www.sdrsharp.com или www.airspy.com и нажмите Download в верхнем меню. Под “Core Tools” нажмите кнопку Download напротив SDR#, чтобы скачать sdrsharp.zip.
4. Распакуйте sdrsharp.zip в папку на вашем ПК.
5. Запустите install-rtlsdr.bat внутри извлеченной папки. Это запустит командную строку, которая скачает SDRSharp и все файлы, необходимые для работы SDRSharp с RTL-SDR. По завершению операции, к омандная строка автоматически закроется.

6. Подключите ваш донгл и не устанавливайте какие-либо программы, которые идут в комплекте, от автоматической установки также откажитесь. Если вы уже установили драйверы с CD диска, удалите их в первую очередь.
7. В папке sdrsharp н айдите файл zadig.exe. Щелкните правой кнопкой мыши этот файл и выберите «Запуск от имени администратора».
8. В Zadig перейдите в Options -> List All Devices и убедитесь что опция включена (стоит галочка).

9. Выберите «Bulk-In, Interface (Interface 0)» из выпадающего списка. Убедитесь, что WinUSB выбран в поле Driver. (Обратите внимание, на некоторых ПК вы можете увидеть что-то вроде RTL2832UHIDIR или RTL2832U вместо bulk. Это также верный выбор). (Однако, не выбирайте “USB Receiver (Interface 0)”).

10. Нажмите кнопку Install Driver. Вы можете получить предупреждение, что издатель не может быть проверен, просто нажмите «Все равно установить этот драйвер». Это позволит установить драйверы, необходимые для запуска донгла в качестве SDR. Обратите внимание, что вам может понадобиться запуск zadig.exe снова, если вы подключите донгл к другому порту USB, или если захотите использовать несколько донглов вместе.

11. Запустите SDRSharp.exe. Вы можете получить сообщение, что Windows защитил ваш компьютер, это ложная тревога. Просто нажмите «Подробнее» а затем «работать в любом случае». Установите в качестве источника «RTL-SDR (USB)» в левом верхнем углу SDRSharp.

12. Нажмите кнопку Play (треугольник). Ваш RTL-SDR готов к использованию! Если все работает, вы должны быть в состоянии производить настройку на частоты.
13. Внимание! Не забудьте также настроить параметры усиления RF, нажав кнопку Настройки (выглядит как шестеренка) вверху рядом с кнопкой Play. По умолчанию коэффициент усиления устанавливается на ноль. При нулевом усилении вы, вероятно, не примете ничего, кроме очень сильных FM радиостанций — увеличьте коэффициент усиления, пока не начнете принимать другие сигналы.

Поиск неисправностей
- Я получаю ошибку “1 compatible devices have been found but are all busy”
Чтобы исправить это, может понадобиться переустановить драйверы через Zadig и попробовать разные порты USB на ПК. Вы можете также попробовать отключить все другие устройства USB, подключенные к компьютеру. Кроме того, некоторые порты USB 3.0 глючат при подключении к 2.0 порту USB. Некоторые пользователи также имели успех с установкой в безопасном режиме. Убедитесь, что вы не выбрали “USB Receiver (Interface 0)” в Zadig, а вместо этого выбрали Bulk in interface, или RTL2838UHIDIR или что-то еще с префиксом RTL. Если вы не видите это, убедитесь, что “Options->List All Devices” отмечено, и что “Ignore Hubs or Composite Parents” не отмечено. Другая вещь это попытаться отключить автоматическую установку драйвера Windows. Инструкции по отключению могут быть найдены здесь. Эта ошибка также иногда происходит после того, как компьютер был выключен — просто отсоедините и подсоедините донгл.
- Я получаю ошибку “No compatible devices found” при попытке запуска донгла в SDR #
Длинные удлинители USB низкого качества могут иногда вызывать эту ошибку. Некоторые порты USB 3.0 также несовместимы с донглом и вызывают эту ошибку. Один пользователь устранил эту ошибку, установив Zadig в безопасном режиме. Наконец, есть небольшой шанс, что донгл действительно неисправен. Если донгл производит ту же ошибку на нескольких компьютерах, донгл, вероятно, неисправен и должен быть возвращен или заменен.
- Я получаю ошибку“Unable to load DLL ‘rtlsdr’: the specified module could not be found. (Exception from HRESULT: 0x8007007E)”
Обычно установка Visual C++ Runtime решает эту проблему. На большинстве ПК это уже установлено, но если у вас свежеустановленная версия Windows, этого может и не быть.
- Посередине спектра стоит сигнал, который никак не исчезает
Это нормально и является побочным эффектом конструкций большинства RTL-SDR. В SDR# его м ожно удалить алгоритмически, установив флажок “Correct IQ”.
- Zadig долго пытается установить драйвер, и это не удается
Вы, наверное, не запустили Zadig в режиме администратора. Щелкните правой кнопкой мыши по Zadig и выберите «Запуск от имени администратора».
- Я не вижуBulk-In, Interface (Interface 0)
Убедитесь, что в “Options->List All Devices” галочка стоит, и что в “Ignore Hubs or Composite Parents” галочка снята. Некоторые люди сообщают, что видят что-то еще кроме Bulk in interface. Он может быть показан как бренд вашего донгла или что-то с приставкой «RTL». В редких случаях вы можете получить неисправный донгл, который не будет показываться в Zadig независимо от того, в какой USB-порт или компьютер вы его воткнули. В этом случае вы должны попросить замену.
- Я не вижу RTL-SDR /USB в SDRSharp
Вы, возможно, скачали версию без поддержки RTL-SDR. Убедитесь, что вы загрузили официальную версию с сайта sdrsharp.com.
- Порты USB 3.0 не работают
Как правило, USB 3.0 работает с RTL-SDR, но есть некоторые контроллеры, которые просто не определяют донгл. В этом случае используйте порт USB 2.0.
- При запуске install.bat я получаю ошибки в командной строке вроде “The system cannot find the file specified” и папка sdrsharp не загружается
Это, вероятно, потому, что вы не распаковали файлы и пытаетесь запустить install.bat изнутри архива. Убедитесь, что вы извлекли или переместили unzip.exe, Install.bat и httpget.exe файлы из архива в другую папку.
- Когда я запускаю install-rtlsdr.bat, окно появляется на короткое время и исчезает.Ничего не устанавливается.
Вероятно, ошибка или неправильная конфигурация в некоторых версиях Windows, где командные файлы не могут быть запущены. Один из способов — установить SDR # и драйверы RTL-SDR вручную. У нас есть инструкции для этого здесь: rtl-sdr.com/manual-installation-of-sdr/ .
- Zadig выдает ошибку “System policy has been modified to reject unsigned drivers” в Windows 8
Windows 8 может создавать проблемы с неподписанными драйверами Zadig. Некоторые пользователи сообщают о получении ошибки “System policy has been modified to reject unsigned drivers”. Чтобы это решить, скачайте и используйте новую версию 2.1 Zadig отсюда.
- Прием в SDR# кажется очень слабым / приемник нечувствителен
Убедитесь, что вы увеличили слайдер усиления ВЧ в настройках. Кроме того, в зонах с плохим приемом штатной антенны в помещении может быть недостаточно. Попробуйте антенну, размещенную высоко снаружи. В некоторых случаях в основании штатной антенны может оторваться кабель. В редких случаях, если вы все еще не можете принять что-либо, а другое радио может, то вы, возможно, получили неисправный донгл и должны попросить замену.
- SDR# выдает ошибку“Application failed to initialize properly (0xc0000135). Click OK to terminate.”
Это может означать, что у вас не установлен необходимый пакет .NET Framework.
- SDR# выдает ошибку“Object reference not not to an instance of an object”
Это может означать, что у вас нет звукового драйвера, правильно установленного на вашем компьютере, или у вас нет каких-либо доступных выходных аудиоустройств. Включите их в свойствах воспроизведения звука.
- Донгл постоянно отключается от порта USB
Первым делом убедитесь, что это виноват не USB кабель, подключив донгл непосредственно в компьютер. Если он по-прежнему часто отключается, он может быть неисправен, и вы должны попросить замены.
- Донгл не подключается и светодиод не загорается на моделях со светодиодами
Донгл неисправен и должен быть возвращен.
- Кажется, что мой компьютер не является достаточно мощным, чтобы запустить SDR #, так как он использует около 100% CPU
Для графического GUI SDR программного обеспечения, как SDR #, рекомендуется, по крайней мере, двухъядерный процессор. Если у вас вполне приличный процессор и все равно он испытывает высокую загрузку, попробуйте уменьшить частоту дискретизации до 1 Msps или меньше, уменьшить разрешение дисплея FFT (или выключить его), выключить Correct IQ и снизить порядок фильтра.
- Zadig как-то нарушил работу клавиатуры / мыши / другого устройства
Это потому, что вы, вероятно, установили драйвер Zadig на другое устройство. Убедитесь, что вы выбрали RTL-SDR (Bulk-In Interface, Interface 0). Zadig перезаписывает драйвера. Чтобы вернуть старые драйверы, вы должны быть в состоянии сделать это в диспетчере устройств Windows, обновив программное обеспечение драйвера.
- Мой R820T2 RTL-SDR показывается как R820T, когда я запускаю диагностическую программу rtl_test
R820T2 и R820T идентичны в электронном виде, исключая некоторые незначительные изменения в ширине максимума фильтра ПЧ. Это может быть причиной лучшей работы R820T2. Таким образом R820T2 будет отображаться как R820T, так как не существует никакого различия между ними в цифровой части схемы. Вы можете проверить, что у вас R820T2, прочитав маркировку на чипе.
Как установить усиление
Усиление может быть настроено в SDRSharp в настройках (шестеренка). Попытайтесь получить как можно более сильный сигнал, в то же время, сохраняя уровень шума минимальным. Начните с небольшого усиления и плавно двигайте ползунок. Остановите его до точки, когда уровень шума начнет расти.
Плагины SDRSharp
Официальные плагины можно найти тут, и наш неофициальный список — тут.
Руководства по SDRSharp
Хорошее руководство по опциям SDRSharp можно найти тут (англ) или тут (англ). (русские тут и тут)
Источник
Original from
vdsp5.0++ Windows rejected the installation of an unsigned device driver.
Install visualDSP5.0++ under win10 system, the system prompts to refuse to install unsigned driver during the installation process! [Insert picture description here] vdsp5.00++ installation failed
vdsp5.00++ installation failed
Problem:
I am trying to install VisualDSP++ on Windows XP but the installation breaks on a rejected unsigned driver installation. What should I do?
Solution:
The installation error you are receiving indicates a problem with the installation of unsigned drivers. This is related to the OS checking for digital driver verification of the EZ-Kit and Emulator drivers. Do not delete or uninstall the failed VisualDSP++ 5.0 installation, because when the install failed it was almost complete. Follow the instructions below to complete the installation manually. 1.Restart the installation by double-clicking Setup.exe.
2.Follow the steps in the Installation Wizard’s dialog boxes until the Install Path selection dialog appears.
3.Click on Advanced… when asked for the install path, this will bring up the Advanced menu.
4.Add -no-setup-inf to Additional options.
5.Click OK and proceed with the rest of the installation as before.
6.After the installation completes, plug in the device and wait for the New Device wizard to start.
7.Proceed to install the drivers for the device by manually browsing to the folder containing the drivers (C:Program FilesAnalog DevicesVisualDSP 5 .0SetupEmu_Drivers)
problem:
I tried to install VisualDSP5.0++ on Windows 10, but the installation was interrupted when I refused to install the unsigned driver. what should I do?
solution:
The installation error you received indicates a problem with the installation of the unsigned driver. This is related to the digital driver verification related to EZ-Kit and Emulator drivers by the operating system. Do not delete or uninstall the failed VisualDSP++ 5.0 installation, because when the installation fails, the installation is almost complete. Please follow the instructions below to complete the installation manually. 1. Restart the installation by double-clicking Setup.exe.
2. Follow the steps in the «Installation Wizard» dialog box until the «Install Path Selection» dialog box appears.
3. When asked about the installation path, click Advanced…, which will pop up the «Advanced» menu.
4. Add -no-setup-inf to other options.
5. Click «OK», and then continue the rest of the installation as before.
6. After the installation is complete, insert the device and wait for the «New Device» wizard to start.
7. Continue to install the device driver by manually browsing to the folder containing the driver (C:Program FilesAnalog DevicesVisualDSP 5.0SetupEmu_Drivers)
Welcome to Markdown editor
Hello there! This is your first time usingMarkdown editor Welcome page displayed. If you want to learn how to use the Markdown editor, you can read this article carefully to learn about the basic syntax of Markdown.
New change
We have carried out some functional expansion and grammatical support to the Markdown editor. In addition to the standard Markdown editor functions, we have added the following new functions to help you use it to blog:
- Brand new interface design , Will bring a new writing experience;
- Set your favorite code highlighting style in the creation center, MarkdownDisplay the selected highlight style of the code slice Display
- increased Picture drag Function, you can drag and drop the local pictures directly to the editing area to display directly;
- Brand newKaTeX mathematical formula grammar;
- Added supportMermaid syntax of Gantt chart1 Features;
- increased Multi-screen editing Markdown article function;
- increased Focus writing mode, preview mode, concise writing mode, synchronous scroll wheel settings for left and right areas And other functions, the function button is located between the editing area and the preview area;
- increased Checklist Features.
Function shortcut
Withdraw:Ctrl/Command + Z
Redo:Ctrl/Command + Y
Bold:Ctrl/Command + B
Italic:Ctrl/Command + I
Title:Ctrl/Command + Shift + H
Unordered list:Ctrl/Command + Shift + U
Ordered list:Ctrl/Command + Shift + O
Check list:Ctrl/Command + Shift + C
Insert code:Ctrl/Command + Shift + K
Insert link:Ctrl/Command + Shift + L
Insert picture:Ctrl/Command + Shift + G
Find:Ctrl/Command + F
Replace:Ctrl/Command + G
Reasonable creation of headings is helpful for the creation of the catalog
Enter directly once#And pressspaceAfter that, a level 1 heading will be generated.
Enter 2 times#And pressspaceLater, level 2 headings will be generated.
and so on, we support level 6 headings. Help to useTOCAfter the grammar, a perfect directory is generated.
How to change the style of text
Emphasized text Emphasized text
Bold text Bold text
Markup text
Delete text
Quoted text
H2O is liquid.
210 The result of the operation is 1024.
Insert link and image
Link:link.
Picture:
Picture with dimensions:
Centered picture:
Centered and dimensioned pictures:
Of course, in order to make it more convenient for users, we have added the image drag and drop function.
How to insert a beautiful piece of code
go withBlog settingsPage, select a code piece highlighting style you like, the same highlight is shown belowCode piece.
// An highlighted block
var foo = 'bar';
Generate a list that suits you
- Project
- Project
- project
- Project
- Item 1
- Item 2
- Item 3
- Scheduled Tasks
- mission accomplished
Create a table
A simple table is created like this:
| project | Value |
|---|---|
| computer | $1600 |
| Cell phone | $12 |
| catheter | $1 |
Setting content is centered, left, right
use:---------:Centered
use:----------On the left
use----------:Right
| first row | the second list | Third column |
|---|---|---|
| The first column of text is centered | The second column of text is right | The third column of text is left |
SmartyPants
SmartyPants converts ASCII punctuation characters into «smart» printed punctuation HTML entities. E.g:
| TYPE | ASCII | HTML |
|---|---|---|
| Single backticks | 'Isn't this fun?' |
‘Isn’t this fun?’ |
| Quotes | "Isn't this fun?" |
“Isn’t this fun?” |
| Dashes | -- is en-dash, --- is em-dash |
– is en-dash, — is em-dash |
Create a custom list
- Markdown
- Text-to-HTML conversion tool
- Authors
- John
- Luke
How to create a footnote
A text with footnotes.2
Comments are also essential
Markdown converts the text toHTML。
KaTeX mathematical formula
You can render LaTeX mathematical expressions usingKaTeX:
Gamma formula display
Γ
(
n
)
=
(
n
−
1
)
!
∀
n
∈
N
Gamma(n) = (n-1)!quadforall ninmathbb N
Is through Euler integration
Γ
(
z
)
=
∫
0
∞
t
z
−
1
e
−
t
d
t
.
Gamma(z) = int_0^infty t^{z-1}e^{-t}dt,.
You can find more information aboutLaTeX Mathematical expressionhere.
New Gantt chart function to enrich your articles
Mon 06
Mon 13
Mon 20
completed
processing
Plan one
Plan two
Existing task
Adding GANTT diagram functionality to mermaid
- AboutGantt chart Grammar, referencehere,
UML diagram
You can use UML diagrams for rendering.Mermaid. For example, a sequence diagram produced below:
Zhang San
Li Si
Wang Wu
Hello there! Li Si, how are you doing?
How are you, Wang Wu?
I am fine, thanks!
I am fine, thanks!
Li Si thought for a long time,
Text is too long
Not fit on one line.
Looking at Wang Wu…
Very good…Wang Wu, how are you?
Zhang San
Li Si
Wang Wu
This will produce a flowchart. :
link
rectangle
round
Rounded rectangle
diamond
- AboutMermaid Grammar, referencehere,
Flowchart flow chart
We will still support the flow chart of flowchart:
Created with Raphaël 2.2.0
Start
My operation
confirm?
End
yes
no
- AboutFlowchart flow chart Grammar, referencehere.
Export and import
Export
If you want to try this editor, you can edit this article at will. When you have finished writing an article, find it in the upper toolbarArticle export , Generate a .md file or .html file for local saving.
Import
If you want to load a .md file that you have written, you can select the import function in the upper toolbar to import the file with the corresponding extension.
Continue your creation.
-
mermaid syntax description ↩︎
-
Footnote explanation↩︎
Any hardware devices attached to your Windows system require you to install hardware drivers to work properly. The hardware drivers have low-level access to your Windows system so that they can work as they should. Since the drivers get access to the kernel, Windows requires those drivers to be officially signed. This means Microsoft tries to block any attempt to install unsigned drivers in Windows.
However, there will be times when you need to install unofficial drivers, unsigned drivers, or even old drivers with no digital signature. It’s possible but not quite as easy as installing signed drivers.
Note: Checking driver signatures is a security feature and disabling it is not recommended. Only install unsigned drivers from trusted sources. Always back up your computer fully before proceeding and ensure you’ve created a recovery drive. An untrusted driver could render your PC unusable without a complete format.
Content
- 1. Install Unsigned Drivers From Advanced Boot Menu
- 2. Install Unsigned Drivers by Enabling Test Mode
- 3. Install Unsigned Drivers by Disabling Integrity Checks
- Frequently Asked Questions
There are three different ways to install unsigned drivers in Windows. Each works, so pick the one you feel most comfortable using or whichever works best for you.
The easiest way to install unsigned drivers is to use the Windows Advanced Boot menu. To do that:
- Press Win + X, navigate to “Shutdown,” then Shift + left-click on the “Restart” option. This action will restart your system and will take you to the Advanced Boot menu.

- Select the “Troubleshoot” option in the Advanced Boot menu.

- In the Troubleshoot section, select “Advanced Options.”

- Select “Start-up Settings.” The Startup Settings option will allow you to boot your Windows system in different modes.

- Click on the “Restart” button to continue.

- Since we need to install unsigned drivers, press F7 on your keyboard to select the seventh option: “Disable driver signature enforcement.”

As soon as you select it, your system will boot into Windows. You can then install unsigned drivers in Windows without issues. After installing, restart your system, and the Driver Signature Enforcement will be automatically enabled from the next reboot.
If you ever want to install another unsigned driver, you have to go through the above process again. This method is ideal if you just need to install an unsigned driver once or rarely.
2. Install Unsigned Drivers by Enabling Test Mode
Another way to install unsigned drivers in Windows is to enable the Test Mode. The good thing about this method is that it will stay enabled until you manually turn it off — a pretty useful way if you are testing different drivers.
To begin, open your Start menu and type “command prompt.” Select “Run as administrator” under Command Prompt.

The above action will open the Command Prompt with admin rights, which are required to enable Test Mode. At the prompt, copy and execute the below command:
bcdedit /set testsigning on

You’ll see that the command has been successfully executed. Just restart your system, and you’ll be booted into Test Mode. When you are in Test Mode, you can install the unsigned drivers. Moreover, you will also see a watermark, something like the one in the screenshot below, to let you know that your Windows system is in Test Mode.

Once you are done installing the driver, it is important that you turn off Test Mode. To do that, use the below command as an admin and reboot your system:
bcdedit /set testsigning off

3. Install Unsigned Drivers by Disabling Integrity Checks
You can also disable the integrity checks to install unsigned drivers in Windows. Disable integrity checks by opening the Command Prompt as admin (Start, search for Command Prompt, select “Run as administrator”), and execute the below command:
bcdedit /set nointegritychecks off

After executing the command, just restart your system, and you can install the unsigned driver on your Windows machine.
Just like with Test Mode, it is important to reverse the changes you made. To re-enable integrity check, execute the below command as an admin in the command prompt:
bcdedit /set nointegritychecks on

Now, restart the system, and you are good to go.
Frequently Asked Questions
1. Are unsigned drivers safe?
It depends on the source. If you trust the source, it’s generally safe to install unsigned drivers.
Windows blocks unsigned drivers by default for a couple of reasons: they can be a source of viruses and they may not function correctly.
If you’re not getting the driver from a trusted source, such as the hardware developer, there is a risk of things going wrong once it’s installed. Be careful if you’re downloading drivers from random forums or suspicious sites full of ads and pop-ups. Those could be problematic.
To be safe:
- Set a System Restore point before installing. This will let you roll back your system to before you installed the driver. Obviously, this won’t help much in the event of a virus, but it will undo any system changes.
- Always scan the downloaded driver with your anti-virus software first. You can also check the site and download link using VirusTotal. Also, watch for any common red flags that the site isn’t safe.
2. What’s special about signed drivers?
Signed drivers are verified to work with your system. They’ve been checked and should work without any issues with your specific Windows version.
Unsigned drivers haven’t been verified to work with your version of Windows or even Windows at all. Think of it as similar to installing an app made for Windows 7 on Windows 11. It might work fine or cause glitches or not work at all.
Also, with unsigned drivers, you don’t know when they might have been changed, which makes it even trickier to determine if they’re right for your system.
3. How can I identify unsigned drivers on my PC?
You can use the in-built Signature Verification Tool (sigverif.exe) to scan your system and ensure all drivers are verified and haven’t been altered.
Press Win +R to open the Run tool. Then, type sigverif.exe and press OK. Follow the prompts to run the sigverif tool.
This is also a great way to ensure only the unsigned drivers you’ve authorized yourself are installed. Malicious drivers that have installed behind the scenes can show up on this scan too.

Crystal Crowder
Crystal Crowder has spent over 15 years working in the tech industry, first as an IT technician and then as a writer. She works to help teach others how to get the most from their devices, systems, and apps. She stays on top of the latest trends and is always finding solutions to common tech problems.
Subscribe to our newsletter!
Our latest tutorials delivered straight to your inbox
The easiest way to install unsigned drivers is to use the Windows 10 Advanced Boot menu. To do that, press “Win + X,” navigate to “Shutdown” and then “Shift + Left Click” on the “Restart” option. 2. The above action will restart your system and will take you to the Advanced Boot menu.
How do I install a non signed driver in Windows 10?
Steps to Follow to follow to install the drivers which are not digitally signed:
- Click the Start menu and select Settings.
- Click Update and Security.
- Click on Recovery.
- Click Restart now under Advanced Startup.
- Click Troubleshoot.
- Click Advanced options.
- Click Startup Settings.
- Click on Restart.
How do I fix unsigned drivers in Windows 10?
How to Install Unsigned Drivers in Windows 10
- STEP 1: Press the Windows key + [X] key combination, then navigate to Shut down or sign out.
- STEP 2: Press [Shift] + left click on the Restart option.
- STEP 3: Under Choose an option, select Troubleshoot.
- STEP 4: In the Troubleshoot section, select Advanced options.
To install the driver manually, you need to do the following:
- Open Device Manager. …
- Device Manager will now appear. …
- Select the Browse my computer for driver software option. …
- Choose Let me pick from a list of device drivers on my computer option.
- Click the Have Disk button.
- Install from Disk window will now appear.
How do I remove unsigned drivers in Windows 10?
Choose Troubleshoot > Advanced options > Startup Settings and click the Restart button. When your computer restarts you’ll see a list of options. Press F7 on your keyboard to select Disable driver signature enforcement. Your computer will now restart and you’ll be able to install unsigned drivers.
How do I force an unsigned driver to install?
The easiest way to install unsigned drivers is to use the Windows 10 Advanced Boot menu. To do that, press “Win + X,” navigate to “Shutdown” and then “Shift + Left Click” on the “Restart” option. 2. The above action will restart your system and will take you to the Advanced Boot menu.
How do I install a digitally signed driver?
Install Drivers in Test Mode
Go to shut down your computer, then hold “Shift + Left Click” on the Restart option. Select Troubleshoot -> Advanced Options -> Start Up Settings -> Restart -> Disable signature requirement. By putting Windows 10 into test mode, you should be able to install the drivers without issue.
Where can I find unsigned drivers in Windows 10?
Press the Windows + R keys to open the Run dialog box. Type sigverif and click OK. When the File Signature Verification utility opens, click Start. It will scan your entire system for unsigned drivers.
Should I disable driver signature enforcement?
Driver signing enforcement ensures that only drivers that have been sent to Microsoft for signing will load into the Windows kernel. This prevents malware from burrowing its way into the Windows kernel. Disable driver signing and you’ll be able to install drivers that weren’t officially signed.
How do I force a graphics driver to install?
Open Device Manager.
- Open Device Manager. For Windows 10, right-click the Windows Start icon or open Start menu and search for Device Manager. …
- Double-click the installed Display Adapter in Device Manager.
- Click the Driver tab.
- Verify the Driver Version and Driver Date fields are correct.
Why are my drivers not installing?
A driver installation may fail for a number of reasons. Users may be running a program in the background that inteferes with the installation. If Windows is performing a background Windows Update, a driver installation may also fail.
Does Windows 10 install drivers automatically?
Windows 10 automatically downloads and installs drivers for your devices when you first connect them. Even though Microsoft has a vast amount of drivers in their catalog, they are not always the latest version, and many drivers for specific devices are not found. … If necessary, you can also install the drivers yourself.
This tutorial explains how to disable installation of unsigned device drivers in Windows 10. Being the primary system software installed on any computer, an Operating System has to take care of a lot of things, such as memory management, hardware optimization, and resource allocation/de-allocation. But that’s just scratching the surface. In addition to that, the OS also has to take care of the overall stability and integrity of the system, by ensuring the security of the data stored on it.
And being the freshest and the most radically overhauled Windows version till date, Windows 10 surely doesn’t disappoint in this regard. Microsoft’s newest offering includes a whole truckload of incredible features that ensure that your computer (and the data stored on it) remains safe, and works exactly the way it’s supposed to.
Thanks to one such feature, Windows 10 can automatically prevent the installation of hardware devices that come with unsigned drivers. Flummoxed? Head past the jump to find out how to disable installation of unsigned device drivers in Windows 10.

What Are Unsigned Device Drivers? And Why You Should Care?
For any device to be installed on a computer running Windows OS, its associated device driver(s) must pass the Windows Hardware Quality Level (WHQL) tests. Device drivers that pass these tests are provided with a digitally signed certification file from Microsoft, which is included with the driver installation package, and these drivers are then termed signed. And conversely, the drivers
It’s very important that digitally unsigned drivers are not allowed to be installed on the computer, as they might include malicious code. And though the OS explicitly gives a warning whenever the installation of an unsigned driver is attempted, this warning can be bypassed. Therefore, it’s best to restrict the installation of unsigned drivers as much as possible.
Disabling unsigned drivers from being installed in Windows 10 is a fairly straightforward task, and takes nothing more than a little tinkering with the Group Policy. Here’s a step by step tutorial, illustrating how to do it:
Step 1: Type in gpedit.msc at the Run prompt, and hit OK to launch the Windows Local Group Policy Editor. Now, use the left pane, and navigate to User Configuration > Administrator Templates > System, and double-click the Driver Installation option in the right pane.

Step 2: From the sub-options displayed in the right pane, right click on Code signing for device drivers, and click on Edit to bring up the configuration box. Now, change the value of the setting to Enabled, and move down to the Options box. Finally, use the drop-down menu with the “When Windows detects a driver file without a digital signature” text, and select Block. Once done, click Apply > OK. Here’s a screenshot.

That’s it people. Going forward, Windows 10 will straightaway block all unsigned device drivers from getting installed at all. Now that, is great.
Related: How To Manually Update Device Drivers In Windows 10?
Closing Thoughts
Being the freshest version of Windows out there, Windows 10 includes a bevy of unique features and security enhancements, and the ability to disable the installation of unsigned device drivers is one such very important feature. Try it out, and let me know your thoughts in the comments below.
-
MiniTool
-
MiniTool News Center
- How to Install Unsigned Drivers on Windows 10? 3 Methods for You
By Vera | Follow |
Last Updated April 08, 2022
![]()
Driver signatures are enforced by default for knowing the software publisher and some information of the release. If the drivers you have downloaded are not signed, you couldn’t install. How to install unsigned drivers on Windows 10? MiniTool Solution, a PC software provider, will show you 3 simple methods for this work.
Can’t Install Unsigned Drivers Windows 10
Hardware drivers are necessary for all the hardware devices that are attached to your Windows computer so that they could work properly. Because of the access to the kernel, the drivers need to be signed officially.
If the drivers you have got are not signed by Microsoft, they are not allowed to install on your computer. This is a protection move for your PC since you can clearly know some information on the software publisher, release time, etc. This way can avoid malware attack to a certain degree.
Usually, when installing unsigned drivers on Windows 10, Windows pops up a warning saying Windows can’t verify the publisher of this driver software.
If you still need to install unofficial drivers, old drivers with no digital signature or unsigned drivers, you need to spend some time. How to install unsigned driver on Windows 10 in this way? Follow these methods given below now.
Tip: Unsigned drivers may sometimes cause the blue screen of death — driver_power_state_failure. If you are bothered by this BSOD error, refer to this post — Top 6 Solutions to Drive Power State Failure Windows 10/8/7.
How to Install Unsigned Drivers Windows 10
Method 1: Use the Advanced Boot Menu
This is a temporary way to let driver signature enforcement disabled. It will become enabled the next time you reboot Windows 10 unless you try this way again. The following are the instructions:
Step 1: Click the Start button, choose the Power button, press Shift and click Restart.
Step 2: After Windows enters WinRE, go to Troubleshoot > Advanced options > Startup Settings >Restart.
Related article: A Detailed Introduction to Windows RE
Step 3: To install driver without digital signature, press F7 to choose the Disable driver signature enforcement option.

Step 4: The system will boot to Windows and then you can install any driver that is not signed. After installation, you can restart Windows to let the option get enabled automatically.
Method 2: Enable Test Mode Windows 10
In Windows, there is a mode feature called Test Mode. If you enable it, driver signature enforcement will be turned off until you leave this mode. This is a permanent method and you can install unsigned drivers in Windows 10 easily in this mode.
Step 1: Run Command Prompt as administrator.
Step 2: Input the command in the window: bcdedit /set testsigning on and press Enter.

Step 3: Restart your Windows and then you will find a watermark appearing at the bottom right corner of your desktop to tell you that you are in Test Mode. Just install your unsigned drivers.
Note: After installation, disable the mode by using this command — bcdedit /set testsigning off in the Command Prompt window.
Method 3: Disable Integrity Checks
To install driver without digital signature in Windows 10, you can choose to disable the integrity checks. The operations are very simple by following the guide below.
Step 1: Similarly, run Command Prompt as admin.
Step 2: Type the bcdedit /set nointegritychecks off command and press Enter.
Step 3: Restart your operating system and then you can perform an installation for the unsigned drivers.
Note: Just like Test Mode, you should enable the integrity checks after installation. Using the bcdedit /set nointegritychecks on command can do this work.
Final Words
Right now, we have shown you 3 methods to install unsigned drivers Windows 10. If you have a need, just try one of these methods. But you should note that the drivers that are not signed are not really safe, so you had better only install unsigned drivers from trusted sources. If not necessary, install the driver from the official websites.
Besides, we recommend that you back up your operating system regularly with the professional Windows backup software — MiniTool ShadowMaker to avoid system breakdown caused by virus attacks, mistaken operations, and more.
Free Download
About The Author

Position: Columnist
Vera is an editor of the MiniTool Team since 2016 who has more than 5 years’ writing experiences in the field of technical articles. Her articles mainly focus on disk & partition management, PC data recovery, video conversion, as well as PC backup & restore, helping users to solve some errors and issues when using their computers. In her spare times, she likes shopping, playing games and reading some articles.
-
HP1983
- Posts: 3
- Joined: Tue Feb 13, 2018 5:16 pm
WIN10 Driver Installation
The driver for firmware flashing will not be installed when running the installation wizard.
I receive the message: «System policy has been modified to reject unsigned drivers.»
I’m running WIN10 Home as an administrator and with the latest updates.
Can anyone give me a hint on how to proceed?
-
grsbanks
- Posts: 1122
- Joined: Tue Apr 25, 2017 11:23 am
- Location: Preston, Lancs, UK
- Contact:
Re: WIN10 Driver Installation
Post
by grsbanks » Tue Feb 13, 2018 5:31 pm
Restart Windows with driver signature enforcement deactivated.
https://windowsreport.com/driver-signat … indows-10/ (ignore the prompts to download «repair tools», they’re just ads for bloatware on the page)
Note that you’ll have to reinstall the drivers whenever you install an Insider Preview of W10 if you’re using that channel. Because the drivers are unsigned, Windows boots them out when you do an update.
There are only 10 kinds of people in the world: those who understand binary and those who do not.
-
Jeff O.
- Posts: 19
- Joined: Fri Jul 21, 2017 10:40 pm
Re: WIN10 Driver Installation
Post
by Jeff O. » Fri Feb 16, 2018 2:44 am
grsbanks wrote: ↑
Tue Feb 13, 2018 5:31 pm
Note that you’ll have to reinstall the drivers whenever you install an Insider Preview of W10 if you’re using that channel. Because the drivers are unsigned, Windows boots them out when you do an update.
Is there any way to tell if Windows did indeed boot my driver? I suspect so, as I had no luck updating to 3.3. Does the driver have a name I could look for if I did a “driverquery” from a command prompt? Finally, if it did boot the driver on an update, is there any way to tell Windows to leave it the heck alone the next time?
-
grsbanks
- Posts: 1122
- Joined: Tue Apr 25, 2017 11:23 am
- Location: Preston, Lancs, UK
- Contact:
Re: WIN10 Driver Installation
Post
by grsbanks » Fri Feb 16, 2018 10:30 am
Yup.
Fire up the device manager, connect the DM42 and put it into bootloader mode.
If you find an «STM Device un DFU Mode» in the «Universal Serial Bus controllers» branch then you have to reinstall the drivers.
Windows thinks it knows best and does not give you the opportunity to tell it to leave your drivers alone. If the driver isn’t signed, it gets the boot.
There are only 10 kinds of people in the world: those who understand binary and those who do not.
-
toml_12953
- Posts: 757
- Joined: Wed May 03, 2017 7:46 pm
- Location: Malone, NY USA
Re: WIN10 Driver Installation
Post
by toml_12953 » Fri Feb 16, 2018 1:54 pm
grsbanks wrote: ↑
Fri Feb 16, 2018 10:30 am
If the driver isn’t signed, it gets the boot.
I thought if the driver isn’t signed then it doesn’t get the boot. ![]()
Tom L
Some people call me inept but I’m as ept as anybody!
DM10L SN: 059/100
DM41X SN: 00023 (Beta)
DM41X SN: 00506 (Shipping)
DM42 SN: 00025 (Beta)
DM42 SN: 00221 (Shipping)
-
Jeff O.
- Posts: 19
- Joined: Fri Jul 21, 2017 10:40 pm
Re: WIN10 Driver Installation
Post
by Jeff O. » Fri Feb 16, 2018 2:59 pm
grsbanks wrote: ↑
Fri Feb 16, 2018 10:30 am
Yup.
Fire up the device manager, connect the DM42 and put it into bootloader mode.
If you find an «STM Device un DFU Mode» in the «Universal Serial Bus controllers» branch then you have to reinstall the drivers.
Thanks, I will check this tonight. I’m thinking it must be gone, as when I tried to update, the dm_tool kept saying “»No DFU capable devices found».
grsbanks wrote: ↑
Fri Feb 16, 2018 10:30 am
Windows thinks it knows best and does not give you the opportunity to tell it to leave your drivers alone. If the driver isn’t signed, it gets the boot.
Great, so now I have keep track of windows updates and keep re-learning how to install unsigned drivers.
-
grsbanks
- Posts: 1122
- Joined: Tue Apr 25, 2017 11:23 am
- Location: Preston, Lancs, UK
- Contact:
Re: WIN10 Driver Installation
Post
by grsbanks » Fri Feb 16, 2018 3:44 pm
Jeff O. wrote: ↑
Fri Feb 16, 2018 2:59 pm
Great, so now I have keep track of windows updates and keep re-learning how to install unsigned drivers.
Only when a new complete build gets installed.
Also, when you do install the drivers and generate the .INF file, make a note of where you generate it and next time, all you have to do is tell Windoze you want to update the drivers for the «STM Device in DFU Mode» and point it to that .inf file using the «Have Disk…» option.
There are only 10 kinds of people in the world: those who understand binary and those who do not.
-
Jeff O.
- Posts: 19
- Joined: Fri Jul 21, 2017 10:40 pm
Re: WIN10 Driver Installation
Post
by Jeff O. » Sat Feb 17, 2018 11:46 pm
grsbanks wrote: ↑
Fri Feb 16, 2018 10:30 am
Fire up the device manager, connect the DM42 and put it into bootloader mode.
If you find an «STM Device un DFU Mode» in the «Universal Serial Bus controllers» branch then you have to reinstall the drivers.
That is exactly what I found. Put windows in «allow unsigned drivers» mode, re-installed driver and updated to V3.3 successfully. Thanks for your help.
grsbanks wrote: ↑
Fri Feb 16, 2018 3:44 pm
Also, when you do install the drivers and generate the .INF file, make a note of where you generate it and next time, all you have to do is tell Windoze you want to update the drivers for the «STM Device in DFU Mode» and point it to that .inf file using the «Have Disk…» option.
I wondered about the old .inf file. I just re-ran the inf-wizard and wrote over the old .inf. I’ll try to remember this shortcut for next time.
In Windows 7 during Installation Setup one could press F8 and Force Unsigned Driver installation.
When I try to press F8 during Windows 10 setup nothing happens.
How can I enable installation of unsigned driver during Windows 10 Setup?
Almost all guides on the internet refer to a situation where Windows 10 is already installed. That’s not what I am looking for.
I want to select or push such an option during clean install of Windows 10 i.e. by some means instruct Windows 10 installer during clean installation process to disable Driver Signature Enforcement.
Is this possible?
In Windows 7 setup it was easy. Just press F8 and select that option during clean installer setup.
asked Sep 27, 2018 at 16:34
![]()
rajeevrajeev
1,5447 gold badges31 silver badges52 bronze badges
1
The only unsigned driver that might be needed during installation might be the storage controller driver. If it is missing you will get promoted during the installation process: https://www.partitionwizard.com/partitionmagic/hard-disk-not-detected.html
Other drivers have to be installed afterwards or manually included into the installation package. Not sure the second one can be done without an enterprise license.
answered Sep 27, 2018 at 17:59
![]()
4
I think you would need to slipstream the driver into your boot media.
If you have problems with it, you might also need to disable Secure Boot in the BIOS.
See the Microsoft article
Add and Remove Drivers to an offline Windows Image,
where is described using the DISM command to inject the driver with the
/ForceUnsigned parameter so as to accept the unsigned driver and
to override the requirement that drivers installed on X64-based computers must have a digital signature.
answered Sep 27, 2018 at 19:35
![]()
harrymcharrymc
434k30 gold badges499 silver badges879 bronze badges
1
I found a backdoor method:
- Create a bootable WinPE USB
- Copy your drivers onto the WinPE drive
- Boot into WinPE
- Use drvload to load your drivers
- Verify your device is accessible (mine was an AMD B450 SATA RAID)
I actually used DISM to put the drivers into my PE boot.wim - If installing windows from USB swap out the drives, run DISKPART and RESCAN
- Run Setup.exe from your install drive
For some odd reason Windows then partitioned my drive as MBR and
then complained it needs to be GPT, so I to get a CMD prompt, ran DISKPART and CLEANed my target disk, then went back to Setup, Refresh, selected the disk again and this time it partitioned it correctly. Go figure.
answered Jan 9, 2020 at 15:53
![]()
