To update the android studio from 1.5 preview 2 to 2.2 preview 1, I have downloaded required zip the unzipped it and installed it and its working fine. Now I want to change the sdk path of it. My android studio installation path is E:android-studio and I want to put sdk in this folder. Before it was in someother folder E:foldersdk and now when I am putting it in Eandroid-studio and setting sdk path in studio the error is title of the question. Is this a rule not to put sdk in installation folder? Should I keep the old sdk path as it is?
asked May 30, 2016 at 16:15
![]()
4
Load 6 more related questions
Show fewer related questions
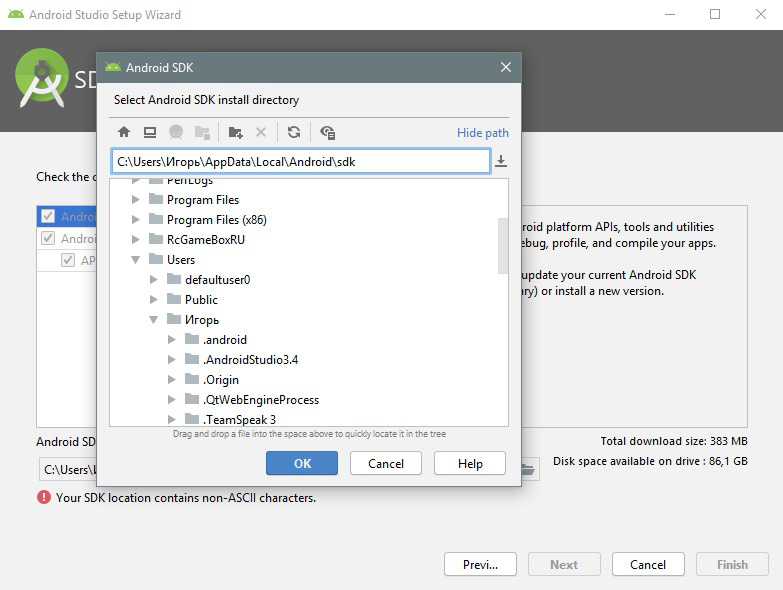
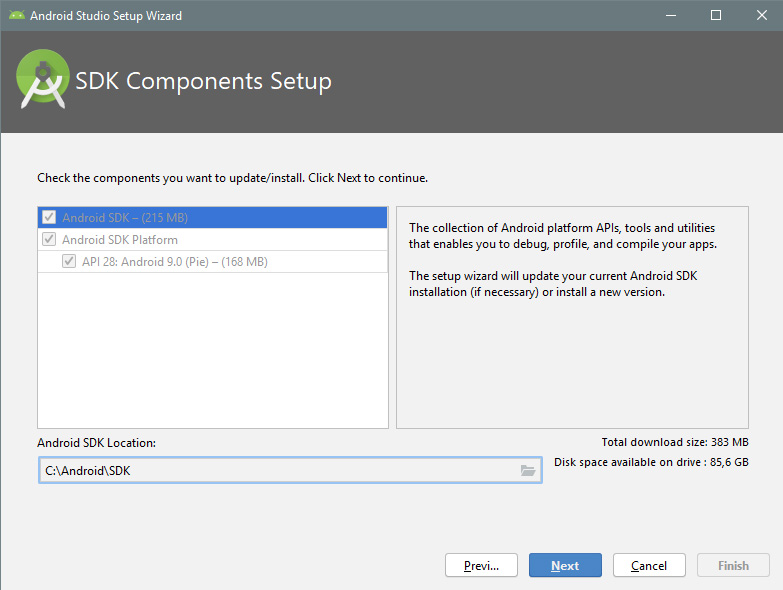
При установке Android Studio столкнулся с проблемой установки SDK. Нажать кнопку “Next” нельзя, а внизу с пометкой “внимание” находится надпись: Your SDK location contains non-ASCII characters. Что делать в такой ситуации? Я нашел два рабочих решения.
Содержание:
- Причина ошибки
- Варианты устранения ошибки
- Вариант 1: изменение пути
- Вариант 2: смена имени пользователя
Причина ошибки
Она банальна. Имя вашей учетной записи Windows написано не на английском. А программа брезгует устанавливать файлы в директорию, если папка в ней указана на другом языке (русский, турецкий, испанский, арабский и прочее).
Варианты устранения ошибки
Процесс устранения сводится к тому, чтобы обеспечить англоязычный путь к Android SDK.
Вариант 1: изменение пути
Банальный способ, который помог обойти ошибку:
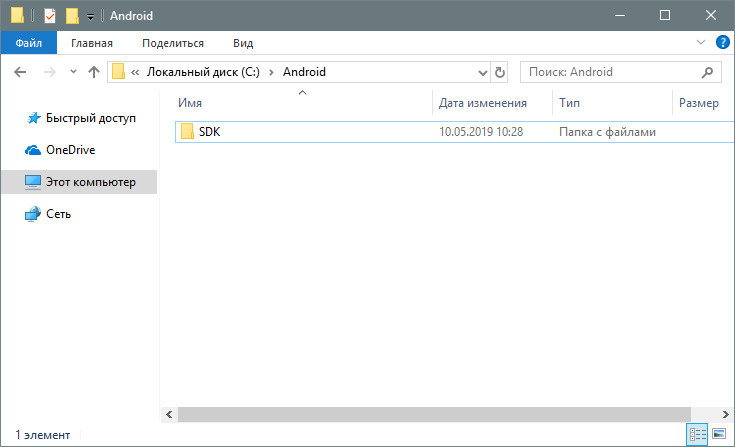
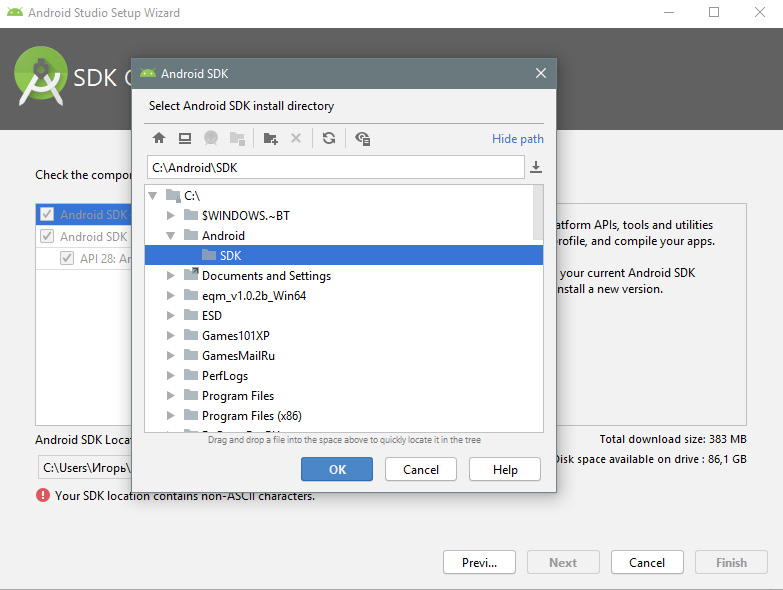
- Зайдите на диск C: и создайте две папки AndroidSDK.

- Вернитесь в Android Studio Setup Wizard.
- В пути Android SDK Location выберите путь установки C: Android SDK.
- Нажимайте Next и ждите завершения установки.
Вариант 2: смена имени пользователя
Более замороченный способ со сменой имени профиля на англоязычное. Пока вы находитесь в этой учетной записи, переименовать папку невозможно. Поэтому:
- Через поиск найдите CMD и откройте от имени администратора.
- Введите команду net user Администратор /active:yes
- Выйдите из системы и зайдите в профиль только что включенной учетки администратора.
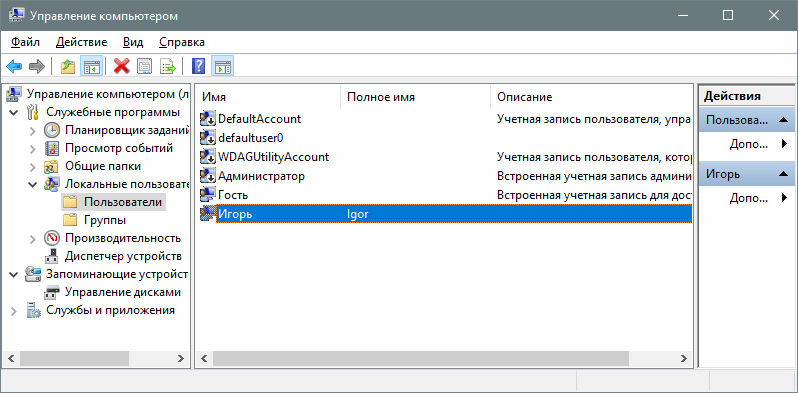
- Нажмите ПКМ на Пуск и выберите “Управление компьютером”.
- Перейдите в раздел Управление компьютером – Локальные пользователи – Пользователи, нажмите ПКМ по имени учетной записи и отредактируйте ее.
- Далее перейдите в Проводник – Диск C: – Пользователи и переименуйте папку на такое же имя, как редактировали до этого.
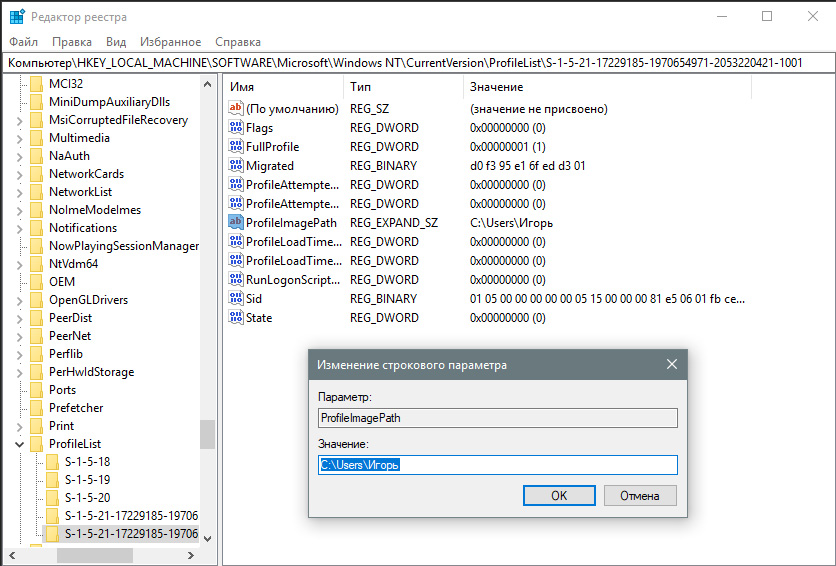
- Теперь откройте строку Выполнить (Win+R) и введите regedit
- Перейдите по директории HKEY_LOCAL_MACHINE SOFTWARE Microsoft Windows NT CurrentVersion ProfileList
- Измените параметр вашего старого имени на новое.
- Выйдите из учетной записи Администратора и зайдите в свою.
- Вновь откройте командную строку и пропишите net user Администратор /active:no.
- Приступайте к установке Android Studio.
Кстати говоря, способ, который находится в поиске, на первой странице в ютубе, не работает. По отзывам видно, что не у одного меня.
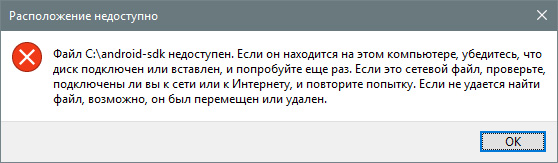
При создании символической ссылки командой mklink /D “C: android-sdk” “C: Users Игорь AppData Local Android sdk, она не отображается в пути установщика, а через проводник выдает “расположение недоступно”.
В общем, устаняйте ошибку Android Studio, а сайт добавляйте в закладки. И до скорых встречь!
При установке Android Studio столкнулся с проблемой установки SDK. Нажать кнопку «Next» нельзя, а внизу с пометкой «внимание» находится надпись: Your SDK location contains non-ASCII characters . Что делать в такой ситуации? Я нашел два рабочих решения.
Она банальна. Имя вашей учетной записи Windows написано не на английском. А программа брезгует устанавливать файлы в директорию, если папка в ней указана на другом языке (русский, турецкий, испанский, арабский и прочее).
Процесс устранения сводится к тому, чтобы обеспечить англоязычный путь к Android SDK.

Кстати говоря, способ, который находится в поиске, на первой странице в ютубе, не работает. По отзывам видно, что не у одного меня.
При создании символической ссылки командой mklink /D «C: android-sdk» «C: Users Игорь AppData Local Android sdk, она не отображается в пути установщика, а через проводник выдает «расположение недоступно».
В общем, устаняйте ошибку Android Studio, а сайт добавляйте в закладки. И до скорых встречь!
Источник
Не устанавливается SDK в Android studio
Устанавливаю три дня разные версии андроид стюдио, скачивал отдельно sdk, но по какой то приичине он то ли не открывается сам, то ли не дает установиться по какой то причине.
Ситуация:
1. Скрин 1 — запуская андроид стюдио, сразу ошибка с sdk надо
2. Cкрин 2 — выбираю другой путь и появляется Next и дальше запускается програма
3. Скрин 3 — сразу появляется кнопка финиш в новом окне — нажимаем
4. Скрин 4 — при старте нового проекта говорит SDK
5. Скрин 5 — открылся менеджер SDK ГДЕ НИЧЕГО НЕЛЬЗЯ ВЫБРАТЬ!!
Ля у меня крыша едет с этим зверем от того, что я даже не могу понять что он хочет то вообще??
Знающие если кто сталкиваля или есть хотя=бы предположения как решить вопрос с SDK — буду благодарен ОТ ДУШИ!
P.S. : до этого установил Java jdk


1. В первом случае ему не нравится что ты себя считаешь его господином.
Your SDK location contains non-ASCII characters. Если простыми словами, студия ругается на русские символы в пути а конкретно на слово «Господин».
2. Во второй случае установщик ругается на то что в имени папки Program Files есть пробелы и желательно бы от них избавиться.
3. В третьем случае он тебе не дает ничего скачать потому что у тебя не указана папка где будет храниться скачанный SDK.
Я бы тебе посоветовал установить Android Studio и SDK.
1. Не в Program Files
2. Не в папку с русскими буквами
3. Не в папку с какими либо пробелами в имени.
Например отличным вариантом для студии будет F:AndroidStudio
А для SDK F:Androidsdk
А для NDK F:Androidndk
Источник
How to Fix “SDK location not found” in Android Studio?
Google developed Android SDK which is a Software Development Kit developed by Google for the Android platform. You can create Android apps using Android SDK, and you don’t need to be an expert to use it. Android SDK and Android Studio come bundled together, with Google’s official integrated development environment (IDE) for the Android operating system.
In this article, we see how to fix an error that is related to the main Android building component of Android Studio that is the Android SDK. The most common error related to Android SDK is “SDK location not found“. This message pops up stating that the location of Android SDK was not detected when the path of SDK is assigned incorrectly. There can also be other reasons for this error message as well and we will see ways to get rid of this error.
When switching from one IDE to another (Like from Eclipse to Android Studio)
Method 1
In this case, follow the below steps:
- Go to your project then go to the android directory and create a file with the following name – local.properties
- Open the file and paste your Android SDK path like below:
- For Windows user – sdk.dir=C:\users\Username\AppData\Local\Android\sdk
- For Mac user – sdk.dir = /users/Username/Library/Android/sdk (Replace Username with your PC name)
Method 2
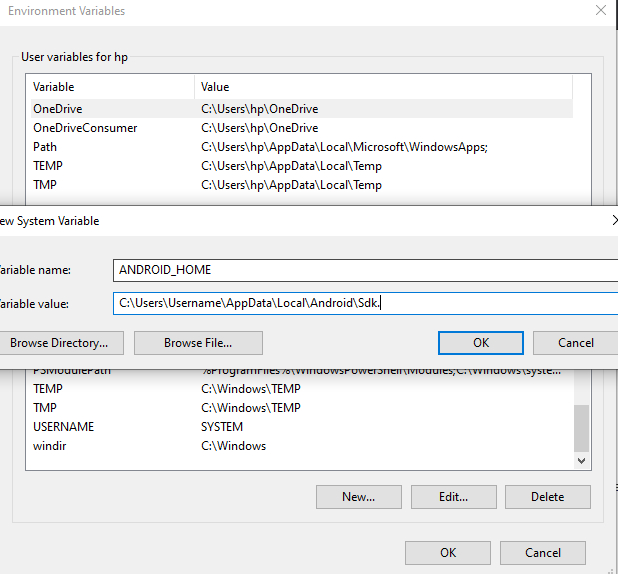
In case the above procedure doesn’t work then add the ANDROID_HOME variable in “Environment Variables” as C:UsersUsernameAppDataLocalAndroidSdk.
Method 3
In case it does not work even then, then you need to change the directory path on Project Structure as well.
- Close the current project and you’ll see a pop-up with a dialog which will then proceed to Configure option.
- Configure -> Project Defaults -> Project Structure -> SDKs on left column -> Android SDK Home Path -> give the exact path as you did on local.properties and select Valid Target.
Method 4
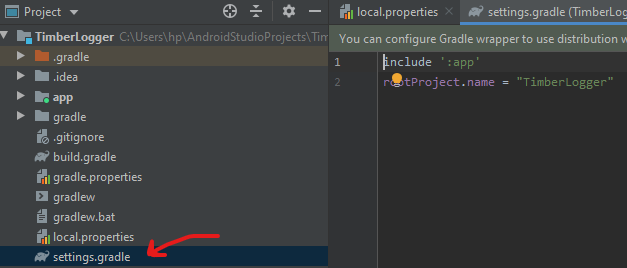
A settings.gradle file might be missing from the project. Make sure that the file exists from the project you are importing. If not add the settings.gradle file with the following:
Save the file and put it in the top-level folder in your project.
Источник
How to Fix “SDK location not found” in Android Studio?
Google developed Android SDK which is a Software Development Kit developed by Google for the Android platform. You can create Android apps using Android SDK, and you don’t need to be an expert to use it. Android SDK and Android Studio come bundled together, with Google’s official integrated development environment (IDE) for the Android operating system.
In this article, we see how to fix an error that is related to the main Android building component of Android Studio that is the Android SDK. The most common error related to Android SDK is “SDK location not found“. This message pops up stating that the location of Android SDK was not detected when the path of SDK is assigned incorrectly. There can also be other reasons for this error message as well and we will see ways to get rid of this error.
When switching from one IDE to another (Like from Eclipse to Android Studio)
Method 1
In this case, follow the below steps:
- Go to your project then go to the android directory and create a file with the following name – local.properties
- Open the file and paste your Android SDK path like below:
- For Windows user – sdk.dir=C:\users\Username\AppData\Local\Android\sdk
- For Mac user – sdk.dir = /users/Username/Library/Android/sdk (Replace Username with your PC name)
Method 2
In case the above procedure doesn’t work then add the ANDROID_HOME variable in “Environment Variables” as C:UsersUsernameAppDataLocalAndroidSdk.
Method 3
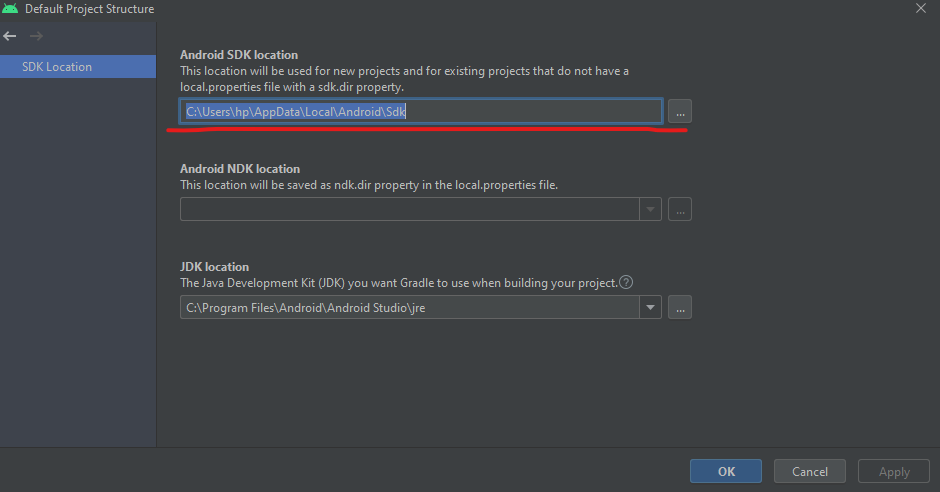
In case it does not work even then, then you need to change the directory path on Project Structure as well.
- Close the current project and you’ll see a pop-up with a dialog which will then proceed to Configure option.
- Configure -> Project Defaults -> Project Structure -> SDKs on left column -> Android SDK Home Path -> give the exact path as you did on local.properties and select Valid Target.
Method 4
A settings.gradle file might be missing from the project. Make sure that the file exists from the project you are importing. If not add the settings.gradle file with the following:
Save the file and put it in the top-level folder in your project.
Источник
Ошибка при установке android sdk
Android Studio — IDE для разработки приложений для Андроид от Google на основе IntelliJ IDEA.
Установка:
Страница загрузок на официальном сайте.
Windows:
Необходимо установить JDK и прописать системную переменную JAVA_HOME
Чтобы использовать Android Studio с эмулятором на Windows XP SP3 необходимо скачать и установить старую версию Intel Hardware Accelerated Execution Manager (extra_intel_haxm-windows_r02.zip) extra_intel_haxm-windows_r02.zip ( 1.66 МБ )
OS X:
Установка Andoid Studio на OS X намного проще — необходимо проинсталировать JDK, а затем Android Studio.
Не запускается эмулятор
Запускается эмулятор, но появляется ошибка «pixel launcher isn’t responding»
При запуске эмулятора лаунчер сообщает: Pixel launcher isn’t responding. Ни какой реакции на нажатия.
Произошло на машине с встроенной видеокартой Intel HD Graphics 3000 — в Windows 10 драйвер не поддерживает OpenGL (вероятно связанно с этим).
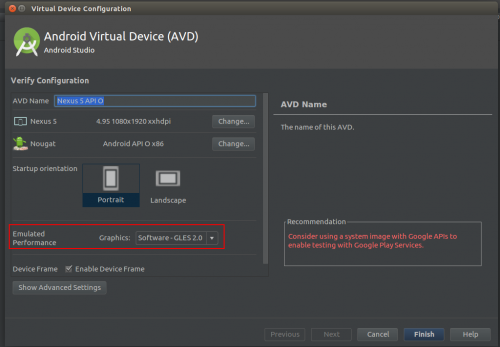
Решение: в наcтройках AVD установить значение Software-GLES 2.0 для Emulated performanceGraphics
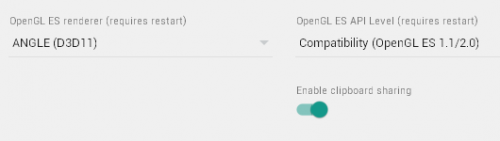
Решение: Изменить рендер на DirectX.
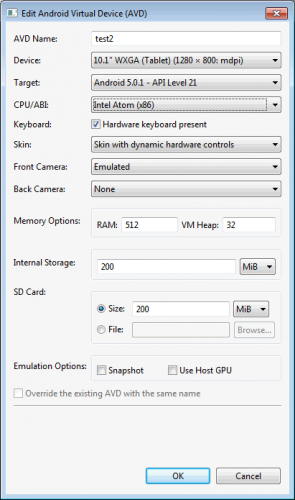
Создание быстрого x86 эмулятора Android (AVD) на примере Android 5.0.1 (API 21)
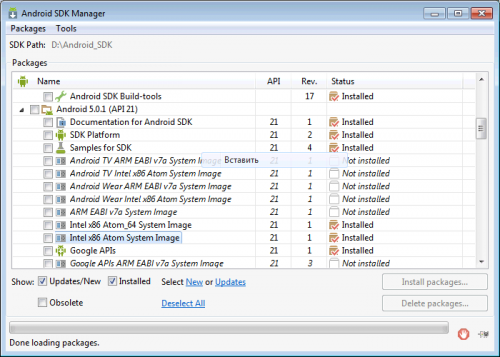
Запускаем Android SDK Manager. Загружаем Intel x86 Atom System Image (ознакомьтесь также с Using Hardware Acceleration, Как разогнать эмулятор Android )
Пользуемся 
Изменение места хранения AVD. Инструкция.
Проверено на Ubuntu 16.04, Android Studio 3.0, все компоненты обновлены до последней версии (на 19.11.2017)
- Если подчеркивает красным код, где используются ресурсы: R
- После внезапного выключения компьютера, после перезапуска может быть во всех проектах весь код красным
- Если Android Studio выдает приблизительно такую ошибку: Error:Execution failed for task ‘:app:dexDebug’
- В сообщении об ошибке упоминается heap — виртуальная память
- Android Studio пришет примерно такую ошибку: Plugin is too old, please update to a more recent version, or set ANDROID_DAILY_OVERRIDE environment variable to «83648b99316049d63656d7276cb19cc7e95d70a5»
- Иногда при подключении сторонних библиотек могут дублироваться некоторые файлы (обычно связанные с лицензированием). В сообщении будет что-то содержащее слова: duplicate files
- Если при запуске эмулятора сообщение Cannot set up guest memory ‘pc.ram’: Invalid argument — проверьте в настройках эмулятора объем памяти, например установите 512 Мб.
- Также быстро работает Android x86 в VirtualBox (Есть маркет в android-x86-4.2-20130228.iso)
- Используйте в названиях файлов и каталогов только символы латинского алфавита.
- Путь к файлу не должен превышать 256 символов.
- Не используйте заглавные буквы — «Error:Execution failed for task ‘:app:mergeDebugResources’. Unsupported node ‘item’ in file «powertoolappsrcmainresmenumenu.xml» — была из-за заглавной буквы в «Menu» «
Учебники по Android Studio:
Renamed Properties in BuildTypes
runProguard => minifyEnabled
zipAlign => zipAlignEnabled
jniDebugBuild => jniDebuggable
renderscriptDebug => renderscriptDebuggable
Renamed Properties in ProductFlavors
flavorGroups => flavorDimensions
packageName => applicationId
testPackageName => testApplicationId
renderscriptSupportMode => renderscriptSupportModeEnabled
ProductFlavor.renderscriptNdkMode => renderscriptNdkModeEnabled
Т.е. например в build.gradle вместо runProguard false необходимо написать minifyEnabled true
Просьба: если вы автор последнего сообщения — просто редактируйте его, а не добавляйте новое.
Добавляем систему контроля версий Mercurial
Разработчики используют систему Mercurial для администрирования исходного кода. У нее два основных назначения:
- Она хранит все предыдущие версии каждого файла
- Она может объединить разные версии вашего кода, то есть сотрудники могут независимо работать над кодом и затем объединять свои изменения
О инсталляции и работе с Mercurial хорошо написано здесь:
- Hg Init: Часть 2. Основы Mercurial
- Hg Init: Часть 3. Привыкаем работать в команде
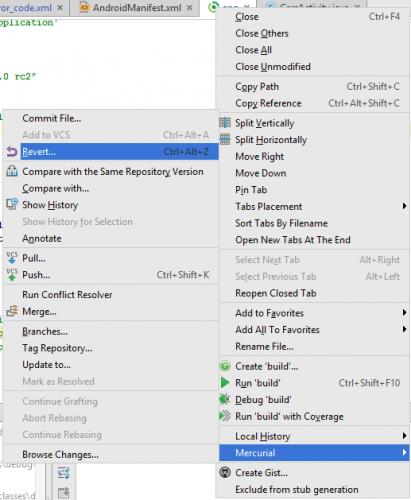
Устанавливаем Mercurial, если необходимо добавляем в %PATH% путь (в моем случае D:Program FilesTortoiseHg).
Запускаем в консоли из каталога проекта команду hg init — создает репозиторий.
Открываем проект в Android Studio — Studio обнаруживает Mercurial и предлагает добавить (add root).
Пользуемся — правая кнопка на вкладке открытого файла — Mercurial. Здесь те пункты, описанные в статье Hg Init: Часть 2. Основы Mercurial — Pull, Push, Commit и т.д.)
Создам информационную тему по Android Studio.
Android Studio — IDE для разработки приложений для Андроид от Google на основе IntelliJ IDEA.
Во время демонстрации Android Studio на Google IO пытался сразу найти и скачать, но видимо выложили в доступ позже.
Ошибка Abnormal build process termination после обновления до 0.2.1. — не обновляйте 0.2.0 до 0.2.1

избавится от проблемы удалось только вернувшись на 0.2.0 — удалить Android Studio через uninstal, затем удалить вручную каталог — там много остается.
Ошибки:
1. «You are using an old, unsupported version of
Gradle. Please use version 1.Х or greater.
2. Project is using an old version of the Android
Gradle plug-in. The minimum supported
version is 0.Х.X.
Решение О Android Studio
Ошибка Gradle project sync failed error — Решение
В теме нет куратора. По вопросам наполнения шапки обращайтесь к модераторам раздела через кнопку  под сообщениями, на которые необходимо добавить ссылки.
Сообщение отредактировал derak1129 — 26.09.20, 17:13
Источник
Adblock
detector
When installing Android studio, it is found that the SDK cannot continue to be installed, and the following error is reported:
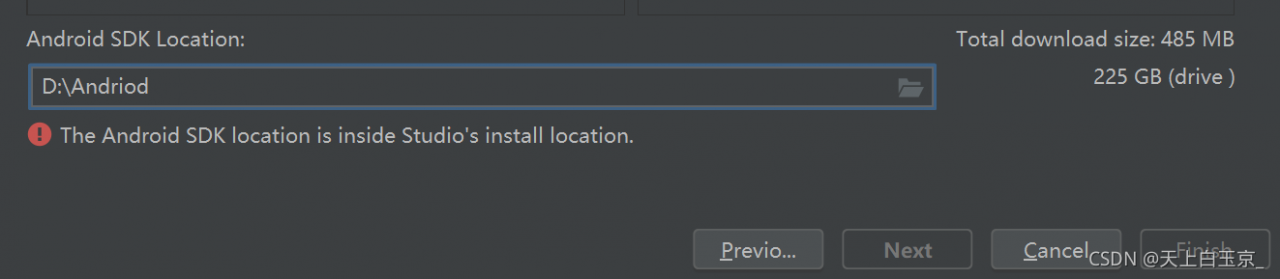
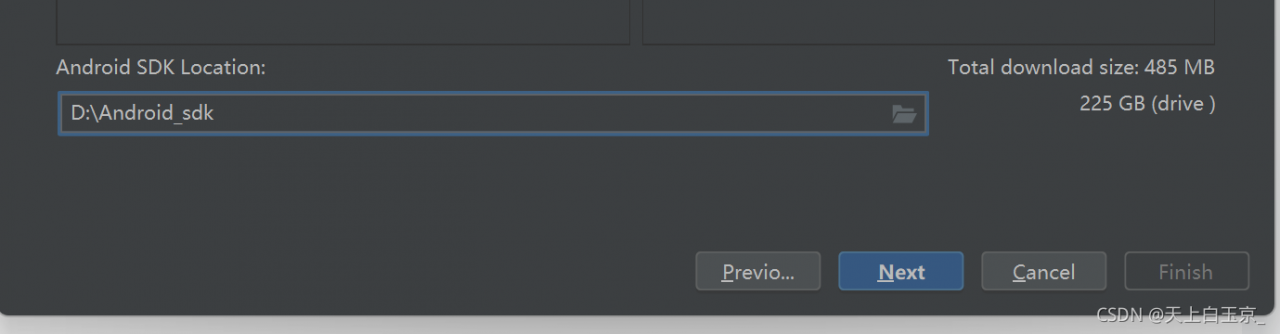
At this point, we will create a new installation address outside the installation path of Android studio, and then save the installation location to the new address:

The problems have been solved:
Read More:
Improve Article
Save Article
Like Article
Improve Article
Save Article
Like Article
Google developed Android SDK which is a Software Development Kit developed by Google for the Android platform. You can create Android apps using Android SDK, and you don’t need to be an expert to use it. Android SDK and Android Studio come bundled together, with Google’s official integrated development environment (IDE) for the Android operating system.
In this article, we see how to fix an error that is related to the main Android building component of Android Studio that is the Android SDK. The most common error related to Android SDK is “SDK location not found“. This message pops up stating that the location of Android SDK was not detected when the path of SDK is assigned incorrectly. There can also be other reasons for this error message as well and we will see ways to get rid of this error.
When switching from one IDE to another (Like from Eclipse to Android Studio)
Method 1
In this case, follow the below steps:
- Go to your project then go to the android directory and create a file with the following name – local.properties
- Open the file and paste your Android SDK path like below:
- For Windows user – sdk.dir=C:\users\Username\AppData\Local\Android\sdk
- For Mac user – sdk.dir = /users/Username/Library/Android/sdk (Replace Username with your PC name)

Method 2
In case the above procedure doesn’t work then add the ANDROID_HOME variable in “Environment Variables” as C:UsersUsernameAppDataLocalAndroidSdk.
Method 3
In case it does not work even then, then you need to change the directory path on Project Structure as well.
- Close the current project and you’ll see a pop-up with a dialog which will then proceed to Configure option.
- Configure -> Project Defaults -> Project Structure -> SDKs on left column -> Android SDK Home Path -> give the exact path as you did on local.properties and select Valid Target.
Method 4
A settings.gradle file might be missing from the project. Make sure that the file exists from the project you are importing. If not add the settings.gradle file with the following:
include ':app'
Save the file and put it in the top-level folder in your project.
Last Updated :
05 May, 2021
Like Article
Save Article
