-
Главная
-
Инструкции
-
Linux
-
Как исправить ошибку аутентификации SSH
Основные механизмы аутентификации пользователей при подключении через SSH — проверка пароля и сверка ключей. Их можно применять вместе или по отдельности, это настраивается в файле конфигурации SSH. Оба способа надежные, но иногда при их использовании можно столкнуться с ошибкой authentication failed. В этой статье разберемся, какие у этого сбоя могут быть причины и как их устранить.
В чем суть ошибки
У сообщения «authentication failed» перевод на русский предельно простой. Этот вывод в терминале говорит о том, что аутентификация пользователя не удалась.
Аутентификация — это проверка подлинности. Например, у вас есть сервер на cloud.timeweb.com. Вы настроили SSH для удаленного подключения. Чтобы система защиты вас пропустила, нужно пройти процедуру аутентификации – подтвердить, что это действительно вы.
Метод проверки подлинности закреплен в конфигурационном файле SSH. По умолчанию это аутентификация по паролю.
Другой вариант — использование пары SSH-ключей для проверки подлинности. В таком случае у пользователя на компьютере хранится закрытая часть ключа. На сервере располагается открытая часть. При попытке установить соединение эти части сравниваются. При совпадении доступ открывается. Если совпадения нет, появляется сообщение об ошибке — например, следующая ошибка SSH:
Permission denied (publickey)Но причины появления ошибки не ограничиваются только неправильным паролем или не теми ключами. Сбой может возникать также из-за повреждения системных файлов или неверно выставленных прав доступа.
Ниже разберемся с наиболее частыми ситуациями.
Ошибка при использовании пароля
Обычно проблемы возникают из-за неверного имени пользователя или пароля. Также стоит обратить внимание на конфигурацию сервера — может стоять запрет на аутентификацию через пароль. Как это проверить:
- Откройте файл конфигурации на сервере. Он находится по пути /etc/ssh/sshd_config.
- Найдите строку PasswordAuthentication. По умолчанию у неё значение `yes`. Это значит, что проверка по паролю разрешена.
- Если в вашем файле конфигурации параметр PasswordAuthentication имеет значение `no`, то подключиться по паролю не получится. Чтобы исправить ситуацию, измените значение на `yes`.
С паролем связано и появление ошибки su authentication failure. Вернее, с отсутствием парольной проверки у пользователя root. Если при такой конфигурации выполнить команду `su` без параметров, то вернется ошибка. Чтобы ее устранить, достаточно назначить пользователю root парольную защиту.
Ошибка при использовании ключей
Одна из самых распространенных проблем — использование не тех ключей при установке соединения. Часто это происходит, если с одного компьютера приходится подключаться к разным хостам. Самый простой способ не запутаться — давать понятные названия с указанием на то, для каких целей вы используете файлы аутентификации.
Использование большого количества ключей без явного указания нужного приводит еще к одной ошибке:
Too many authentication failures for userПричина сбоя — превышение числа попыток. Это случается из-за того, что SSH-клиент пытается подключиться к хосту, используя все доступные ключи. Исправить ситуацию можно с помощью опций IdentitiesOnly и IdentityFile. Пример запроса на подключение:
ssh -o IdentitiesOnly=yes
    -o IdentityFile=id1.key
    user@example.com
Чтобы каждый раз не прописывать это в командной строке при подключении, можно указать необходимую настройку в конфигурационном файле SSH ~/.ssh/config. Пример такой настройки:
Host 192.168.3.44
    IdentityFile ~/.ssh/id_rsa
Host *
    IdentitiesOnly=yes
В этом случае SSH будет использовать только идентификаторы, указанные в файлах ssh_config, плюс идентификатор, указанный в командной строке. Идентификаторы, предоставленные агентом, будут игнорироваться.
При использовании ssh-ключей может возникнуть еще одна ошибка:
Permission denied (publickey, password)Ее причиной может быть ввод неверной ключевой фразы.
Если вы потеряете ключевую фразу, восстановить ее будет невозможно. Вам нужно будет сгенерировать новую пару значений для Secure Shell.
Восстановление открытого ключа
Если у вас есть закрытый ключ, но вы потеряли открытую часть, то эту проблему можно решить стандартными средствами OpenSSH.
Самый просто способ — использовать утилиту ssh-keygen.
Запустите терминал и выполните команду:
ssh-keygen -y -f ~/.ssh/id_rsaЗдесь ~/.ssh/id_rsa — это путь к закрытому части, которая хранится на компьютере. В ответ вы получите последовательность символов. Это и есть открытая часть, которую необходимо добавить на сервер.
В среде Windows решить ту же задачу можно с помощью утилиты PuTTYgen, которая входит в набор PuTTY. В ней есть кнопка Load, через которую вы можете загрузить закрытый ключ. Для этого нужно лишь знать директорию, в которой он хранится на компьютере.
После импорта вы увидите окно с полем `Public key for…`. В нём отобразится открытая часть, которую можно скопировать и отправить на сервер.
Восстановить закрытую часть по открытой нельзя — это противоречит основам безопасности.
На что еще обратить внимание
У понятия «authentication failed» перевод дает весьма общее представление о причине сбоя. Проблема может крыться не только в пароле или ключах. Значение имеют также выставленные права доступа и алгоритмы шифрования.
Неправильная конфигурация клиента
Распространенная ошибка — использование клиента SSH/SFTP (SSH, PuTTY, Filezilla) без правильной настройки всех необходимых параметров, таких как хост, порт, имя пользователя или закрытый ключ.
Другая частая проблема возникает, когда вы используете неподдерживаемый сертификат. Например, пытаетесь добавить в PuTTY файл ключа *.pem вместо файла ключа *.ppk.
Противоречия в файле конфигурации
Убедитесь, что в файле /etc/ssh/sshd_config установлены параметры, которые не противоречат друг другу. Такое может быть, например, при отключении парольной проверки или запрете на подключение для пользователя root.
Распространенный пример конфликта: у параметра PasswordAuthentication установлено значение `yes`, а у параметра PermitRootLogin — значение `no` или `without-password`. Из-за этого сервер не понимает, как проверять пользователей, и не пускает никого.
Настройка прав доступа
У OpenSSH строгие правила к тому, кто должен быть владельцем файлов и какие на них должны быть выставлены права доступа.
Убедитесь, что на сервере выставлены следующие доступы:
- ~./ssh – 700.
- ~./ssh принадлежит текущему аккаунту.
- ~/.ssh/authorized_keys – 600.
- ~/.ssh/authorized_keys принадлежит текущему аккаунту.
На клиенте также проверьте разрешения следующих файлов:
- ~ / .ssh / config – 600.
- ~ / .ssh / id_ * – 600.
Почему важен владелец? Например, вы настраивали доступ через Secure Shell от имени одного пользователя, а затем пытаетесь подключиться под другим аккаунтом, у которого нет прав даже на чтение содержимого защищенных директорий с аутентификационными данными.
Использование устаревших алгоритмов
В OpenSSH начиная с седьмой версии не поддерживаются старые ключи, которые используют алгоритм цифровой подписи — DSA. Ключи ssh-dss считаются слишком слабыми для того, чтобы можно было доверять им защиту подключения к серверу.
Если у вас старые ключи, оптимальное решение — сгенерировать и добавить на хосты новые, которые основаны на более стойких алгоритмах.
Есть и альтернатива, но пользоваться ей придется на свой страх и риск. Речь идет об изменении файла конфигурации /etc/ssh/sshd_config. Если установить параметру PubkeyAcceptedKeyTypes значение `+ssh-dss`, то можно будет использовать ключи, сгенерированные с помощью устаревшего алгоритма цифровой подписи.
Дополнительные опции могут понадобиться и на SSH-клиенте. Например, при подключении к серверу с ПО, которое давно не обновлялось. В частности, такие проблемы возникают при подключении к хостам на CentOS 6, поддержка которой прекращена в конце 2020 года. Чтобы исправить эту ошибку, необходимо добавить опцию `-oHostKeyAlgorithms=+ssh-dss`:
ssh -oHostKeyAlgorithms=+ssh-dss user@legacyhost
Ошибки на сторонних сервисах
Проблемы аутентификации могут возникать и при использовании сторонних сервисов. Например, при подключении к VK API пользователи сталкиваются с сообщением user authorization failed invalid session. Устранить такой сбой самостоятельно не получится — нужно обращаться в поддержку.
Заключение
Причина ошибки аутентификации может быть как на стороне клиента, так и на стороне сервера. Начинайте диагностику с самого простого: проверьте правильность имени пользователя и пароля, если он используется, выбор SSH-ключа в агенте. Если это не помогает устранить сбой, проверьте конфигурацию подключения и права доступа к файлам, которые OpenSSH использует для проверки подлинности пользователей.
As @sufferer mentioned in another answer, some Linux distros include monitors to protect from brute force attacks on external visible services like SSH, for example DenyHosts or fail2ban. These monitors check the log files looking for failed attempts and add filters to block IP addresses that have too many failures (the number is configurable and independent from the sshd config).
If your distro includes fail2ban, which protect services adding rules to the iptables firewall, you could check which services or “jails” are supervised using the command:
sudo fail2ban-client status
The jail for the SSH service is sshd, so to check if there are banned IPs you can use:
sudo fail2ban-client status sshd
and to unban some IP a.b.c.d:
sudo fail2ban-client set sshd unbanip a.b.c.d
If you have DenyHosts, the banned list is in the file /etc/hosts.deny; you can edit this file directly as root. To grant some IP a.b.c.d permanent access, you could add the line sshd:a.b.c.d to the file /etc/hosts.allow.
As always, the man command is your friend:
man fail2ban
man hosts.deny
There should exist other similar utilities, but I only have used these.
Note that increasing the number of retries allowed in the sshd configuration does not free banned IPs, only permits more failures in the same connection. If the number allowed is exceeded, the user/attacker simply reconnects again to try n times more.
Other services had the ban list integrated (as shown in the answer of Rajnesh Thakur about restarting the VNC server).
Note: If you use fail2ban and use a jail.local file for configuring jails, add the following to the top of the file to stop your ip address being banned:
[DEFAULT]
ignoreip = 10.10.1.1 10.0.2.0/24
Restart fail2ban afterward, for example using systemctl restart fail2ban. The first IP allows a single address, the second allows all of subnet 10.0.2.x; adjust as required.
На чтение 2 мин Опубликовано 15.10.2018
Иногда, пытаясь подключиться к удаленным системам через SSH, вы можете столкнуться с ошибкой “Received disconnect from x.x.x.x port 22:2: Too many authentication failures”.
В этой короткой статье я объясню, как исправить эту ошибку за несколько простых шагов.
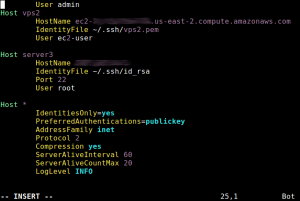
Ниже приведен снимок экрана об ошибке, с которой я столкнулся, при использовании ssh-клиента.

Я обнаружил, что это связано с наличием на моей машине многих идентификационных ключей ssh, и каждый раз, когда я запускаю ssh-клиент, он будет пытаться использовать все мои ssh-ключи, известные ssh-агенту и все остальные ключи при попытке подключиться к удаленному серверу (vps2, как показано на скриншоте выше).
Это поведение по умолчанию для службы ssh.
Поскольку ssh-сервер (sshd) на удаленном сервере ожидает определенного идентификационного ключа, сервер отклоняет соединение, а клиент ssh прерывает работу с указанной выше ошибкой.
Чтобы исправить эту ошибку, вам нужно добавить IdentitiesOnly со значением yes, которое инструктирует ssh использовать только файлы идентификации, указанные в командной строке, или настроенные в файлах ssh_config, даже если ssh-agent предлагает дополнительные данные.
Например:
$ ssh -o IdentitiesOnly=yes vps2

Кроме того, если вы хотите, чтобы это работало для всех подключений клиента ssh, вы можете настроить этот момент в файле ~/.ssh/config.
$ vim ~/.ssh/config
Добавьте следующую конфигурацию в файл в разделе Host *, как показано в скриншоте:
Host *
       	IdentitiesOnly=yes
Сохраните изменения в файле и выйдите из него.
Теперь вы можете запустить ssh без указания опции -o IdentitiesOnly = yes в командной строке, как показано далее
$ ssh vps2
![]()
Для получения дополнительной информации см. Справочную страницу ssh-config.
$ man ssh-config
См. также:
- Как создать туннелирование SSH или перенаправление портов в Linux
- ssh-auditor: сканируйте слабые пароли ssh
- Как установить Denyhost для предотвращения атак SSH на Ubuntu
Пожалуйста, не спамьте и никого не оскорбляйте.
Это поле для комментариев, а не спамбокс.
Рекламные ссылки не индексируются!
“Too many authentication failures” is an error message that can occur when trying to connect to an SSH server.
It indicates that the client has attempted to authenticate with the server using too many incorrect authentication methods or keys, exceeding the server’s configured maximum.
Let’s dive into this.
When connecting to an SSH server, the client sends its available authentication methods to the server, such as password-based authentication or public key-based authentication.
The server responds with a list of acceptable authentication methods, and the client then attempts to authenticate using the methods in the order specified by the server.
If the client has several keys or authentication methods configured and tries to use them all in a row, but none of them is accepted by the server, the server may respond with a “Too many authentication failures” error message, indicating that the maximum number of attempts has been exceeded.
This is a security feature to prevent brute-force attacks on the server.
To resolve this error, the user can try to connect again, making sure to provide the correct credentials or limit the number of keys or authentication methods being attempted by the client.
Alternatively, the server administrator can increase the maximum number of authentication attempts allowed on the server.
This article will cover how to fix Too many authentication failures for usernames in 3 ways.
Understanding Too many authentication failures
SSH servers are commonly set up to allow for a maximum number of attempted authentications before rejecting the attempt.
It will try all the available credentials (such as certificate, public key, and stored credentials).
This setting for ssh servers is called “MaxAuthTries”, and the default value is 6.
When attempting to connect to an SSH server, if we have not told our SSH client specifically which key to use with the server, it will attempt to use all of our keys (one at a time) until it finds one that works.
If the key we need to use for the server is attempted by our client after the MaxAuthTries as configured by the server, our client will never reach the correct key and will fail its authentication attempt.
Error example 1:
Received disconnect from 192.168.3.123 port 22:2: Too many authentication failures
Disconnected from 192.168.3.123 port 22
Error Example 2:
Too many authentication failures
Sep 19 16:21:24 ubuntu sshd[192635]: error: maximum authentication attempts exceeded for testfest from 192.168.6.124 port 54324 ssh2 []
Sep 19 16:21:24 ubuntu sshd[192635]: Disconnecting: Too many authentication failures []
Sep 19 16:21:48 ubuntu su[192609]: pam_unix(su:session): session closed for user testfest
Solution for Too many authentication failures
If you receive the error message “Too many authentication failures “, it means that you make too many failed login attempts to a server.
A failed login attempt could occur for a variety of reasons but the most common reason is incorrect credentials such as wrong password.
There are a few reasons why too many authentication failures might happen:
- The user’s username and password might not be correct.
- The user might be connecting to the wrong server.
- The key file is not correct.
- Add too many key files with ssh-add command
If you are still getting this error, check the following solutions.
- Use a Specific SSH Key for a Specific SSH Server
- Increase MaxAuthTries in SSH server
Understanding SSH known_hosts File with Examples
Use a Specific SSH Key for a Specific SSH Server in configuration file
To use a specific SSH key for a specific SSH server in the configuration file, you can follow these steps:
Open or create the SSH configuration file, located at ~/.ssh/config, using your preferred text editor.
Add a new section for the SSH server you want to connect to, using the following syntax:
Host <server_name>
  HostName <server_address>
  IdentityFile <path_to_private_key>
Replace <server_name> with the name you want to use for the SSH server, <server_address> with the IP address or domain name of the SSH server, and <path_to_private_key> with the path to the private key file you want to use.
Save the configuration file and close it.
You can now connect to the SSH server using the specific key you specified in the configuration file by running the ssh command
Use a Specific SSH Key in command line
The -i option in the SSH command is used to specify the identity (private key) file to be used for authentication.
By default, SSH looks for the private key in the user’s home directory with the filename id_rsa or id_dsa.
However, if the private key has a different filename or is located in a different directory, the -i option is used to specify the path to the private key file.
Example:
ssh -i ~/keyfile ip address
Increase MaxAuthTries in SSH
# vi /etc/ssh/sshd_config or (sudo vi /etc/ssh/sshd_config)
we will see the “MaxAuthTries 6” .
- Click “i” to enter the editing mode in the file.
- After modifying “MaxAuthTries” to 10, we can click on ”Esc” and type “:wq” to save and exit the file.
- Fire the command “service sshd restart” or “sudo service sshd restart” in order to apply changes made in the file.
More info about MaxAuthTries in SSH
The MaxAuthTries setting tells the ssh daemon how many different authentication attempts a user can try before it disconnects.
Each ssh key loaded into ssh-agent counts as one authentication attempt.
The default is 6 because many users have multiple ssh keys loaded into ssh-agent so that we can automatically log into different hosts that use different ssh keys.
After the ssh connection attempts all of our ssh keys and we haven’t run out of attempts and passwords are enabled we will eventually get a password prompt.
Understanding SSH Key with Examples
I have a hostgator account with ssh access enabled. When trying to upload the generated .pub key file with this command:
rsync -av -e "ssh -p2222" /home/user/.ssh/key.pub username@111.222.33.44:.ssh/authorized_keys
I keep getting:
Received disconnect from 111.222.33.44: 2: Too many authentication failures for username
rsync: connection unexpectedly closed (0 bytes received so far) [sender]
rsync error: unexplained error (code 255) at io.c(601) [sender=3.0.7]
I’ve been toying around previously with ssh until I got the auth failure. But now it seems that the auth failure counter does not reset (been waiting more than 12 hours now, tech support “supposes” it resets after 30 min to 1 hour, and another guy told me “it resets every time you try to login with the username”, jeesh).
This is driving me nuts. I even had this set up in a Slicehost custom server and had fewer issues than with these guys.
Any tips? Perhaps it’s something client side and not server side.
Randall
2371 silver badge12 bronze badges
asked Sep 12, 2010 at 17:14
1
This is usually caused by inadvertently offering multiple ssh keys to the server. The server will reject any key after too many keys have been offered.
You can see this for yourself by adding the -v flag to your ssh command to get verbose output. You will see that a bunch of keys are offered, until the server rejects the connection saying: “Too many authentication failures for [user]”. Without verbose mode, you will only see the ambiguous message “Connection reset by peer”.
To prevent irrelevant keys from being offered, you have to explicitly specify this in every host entry in the ~/.ssh/config (on the client machine) file by adding IdentitiesOnly like so:
Host www.somehost.com
  IdentityFile ~/.ssh/key_for_somehost_rsa
  IdentitiesOnly yes
  Port 22
If you use the ssh-agent, it helps to run ssh-add -D to clear the identities.
If you are not using any ssh hosts configuration, you have to explicitly specify the correct key in the ssh command like so:
ssh -i some_id_rsa -o 'IdentitiesOnly yes' them@there:/path/
Note: the ‘IdentitiesOnly yes’ parameter needed to be between quotes.
or
ssh -i some_id_rsa -o IdentitiesOnly=yes them@there:/path/
answered Sep 12, 2010 at 17:53
John TJohn T
162k27 gold badges338 silver badges347 bronze badges
13
I found an easier way to do this (if using password authentication):
ssh -o PubkeyAuthentication=no username@hostname.com
This forces non-key authentication. I was able to logon immediately.
Reference
![]()
answered Mar 25, 2012 at 0:14
Ben WestBen West
2,5361 gold badge13 silver badges7 bronze badges
3
I was getting this error too and found that it was happening b/c the server was configured to accept up to 6 tries:
/etc/ssh/sshd_config
...
...
#MaxAuthTries 6
In addition to setting the IdentitiesOnly yes in your ~/.ssh/config file you have a couple of other options.
- Increase the
MaxAuthTries(on the ssh server) - delete some of the key pairs you have present in your
~/.ssh/directory & runssh-add -D - explicitly link a key to a given host in your
~/.ssh/configfile
Like so:
host foo
hostname foo.example.com
IdentityFile /home/YOU/.ssh/foo
-
Is probably not a good way to go about it, given it weakens your ssh server a bit since it’ll now accept more keys in a given connection attempt. Think brute force attack vectors here.
-
Is a good way to go assuming you have keys that are not needed and can be permanently deleted.
-
And the approach of setting IdentitiesOnly are probably the preferred ways of dealing with this issue!
![]()
Giacomo1968
52.4k19 gold badges162 silver badges211 bronze badges
answered Jun 9, 2011 at 4:56
![]()
slmslm
9,79910 gold badges49 silver badges54 bronze badges
2
I added to ~/.ssh/config this:
Host *
IdentitiesOnly yes
It enables option IdentitiesOnly=yes by default. If you’ll need to connect with private key, you should specify it with option -i
answered Jul 23, 2014 at 17:29
If you get the following SSH Error:
$ Received disconnect from host: 2: Too many authentication failures for root
This can happen if you have (default on my system) five or more DSA/RSA identity files stored in your .ssh directory and if the ‘-i’ option isn’t specified at the command line.
The ssh client will first attempt to login using each identity (private key) and next prompt for password authentication. However, sshd drops the connection after five bad login attempts (again default may vary).
If you have a number of private keys in your .ssh directory you can disable “Public Key Authentication” at the command line using the ‘-o’ optional argument.
For example:
$ ssh -o PubkeyAuthentication=no root@host
![]()
David
9,0343 gold badges24 silver badges40 bronze badges
answered Sep 20, 2013 at 21:44
Will VernaWill Verna
711 silver badge1 bronze badge
3
If you have a password, and want to simply use the password to login, here is how you do it.
To use ONLY password authentication and NOT use Public-key, and NOT use the somewhat misleading “keyboard-interactive” (which is a superset including password), you can do this from the command line:
ssh -o PreferredAuthentications=password user@example.com
answered Jun 19, 2015 at 14:22
![]()
Going off @David saying, just add this
IdentitiesOnly yes
to your .ssh/config, it does the same thing as ssh -o PubkeyAuthentication=no.
After you logged in, remove .ssh/authorized_keys.
Now, go back to the local machine and type the following
cat ~/.ssh/id_rsa.pub | ssh -o PubkeyAuthentication=no user@IP_ADDR 'cat >> .ssh/authorized_keys'. This should re-enable your ssh with public key
answered Jan 25, 2014 at 5:48
![]()
Alan DongAlan Dong
1931 silver badge6 bronze badges
I know this is an old thread, but I just wanted to add in here that I ran into the same error message, but it was caused by the owner of the .ssh folder being root rather than the user that was using the key. I corrected the issue by running the following commands:
sudo chown -R user:user /home/user/.ssh
I also made sure the permissions were correct on the .ssh folder:
sudo chmod 700 /home/user/.ssh
The files within the .ssh directory should have the permission of 600:
sudo chmod 600 /home/user/.ssh/authorized_keys
answered Jun 13, 2014 at 17:37
1
In my case, the problem was directory permissions. This fixed it for me:
$ chmod 750 ~;chmod 700 ~/.ssh
answered Feb 20, 2016 at 22:57
tbc0tbc0
3093 silver badges13 bronze badges
Too many authentication failures
This message is caused by having too many failed authentication attempts given the permitted limits enforced on the remote SSH server. This potentially means that you’ve too many identities added in the SSH agent.
Here are few suggestions:
- Add
-vto see if that’s the case (you’ve using too many identities). - List added identities by
ssh-add -l. - Remove failing identity from the agent by:
ssh-add -d. - You may also deletes all identities by
ssh-add -Dand re-add only relevant one. -
If you’ve access to SSH server, check the
MaxAuthTriesoption (see:man sshd_config).Related post: What is a connection for
sshd_config‘s ‘MaxAuthTries’ limit? -
If none of this help, make sure whether you’re using the right credentials or file.
answered Apr 12, 2018 at 13:28
kenorbkenorb
24.2k26 gold badges126 silver badges191 bronze badges
This was a fun one for me. Turns out I changed my password locally while in a localization mode different from a keyboard I was using to login remotely. This effectively made my password different from what I thought it was probably because one of my special characters was different from what the keyboard said it was.
answered Nov 24, 2019 at 1:41
I had my public key in .ssh/authorized_keys2, but the server was configured to read only .ssh/authorized_keys:
# The default is to check both .ssh/authorized_keys and .ssh/authorized_keys2
# but this is overridden so installations will only check .ssh/authorized_keys
AuthorizedKeysFile .ssh/authorized_keys
After moving my file to .ssh/authorized_keys, I can log in successfully with my key.
answered May 5, 2017 at 7:57
Smart cards (aka PIV, CAC, PKCS #11, HSM, or Cryptoki) add an additional level of complexity to this.
As John T suggests, I added the -v verbose logging to my ssh command to find why my ssh was failing. Whether I put in -i ~/.ssh/myrsa.pem or -o 'IdentitiesOnly yes' or even -o 'CertificateFile ~/.ssh/myrsa.pem', I still got the “Too many authentication failures” error from the system because it was still insisting on using opensc-pkcs11.so to present the certificate from the smartcard, which is not recognized by my personal EC2 instance.
Removing the smartcard let it drop back to RSA authentication. But, as a better workaround, to keep the smartcard in the system and still have ssh work with my RSA key, I can pass
-o PKCS11Provider = PKCS_disabled
on the command lineto my ssh command, and it will override the global ssh default.
It’s still a workaround, since it will try to open a .so file for PKCS, and give you the error
dlopen PKCS_disabled failed: PKCS_disabled: cannot open shared object file: No such file or directory
but that creates an understandable error that forces it to fall back to RSA without having to pull my smartcard in and out.
answered Aug 25, 2022 at 15:16
RandallRandall
2371 silver badge12 bronze badges
This message can appear when the correct username and password is not entered.
First check that the user is listed:
vim /etc/passwd
![]()
Gaff
18.5k15 gold badges57 silver badges68 bronze badges
answered Sep 26, 2016 at 15:23
![]()
