FileZilla Server is a server that supports FTP and FTP over TLS which provides secure encrypted connections to the server. FileZilla supports TLS, the same level of encryption supported by your web browser, to protect your data. Kindly refer to this detailed guide on how to connect to a FileZilla Server: How to install and configure a FileZilla Server on Windows. FileZilla Clients are available for Windows, Linux, and macOS, but the servers are available only in Windows. Both server and client support FTP and FTPS, while the clients can also connect to SFTP servers. To reiterate further, FTP is a TCP-based service exclusively and there isn’t a UDP component to FTP. FTP is a service that utilizes two ports, a “data port” and a “command” port (also known as the control port). These are port 21 for the command port and port 20 for the data port. You may also want to see how to access FTP Server from your browser: How to create a shortcut and access Filezilla from Windows Explorer.
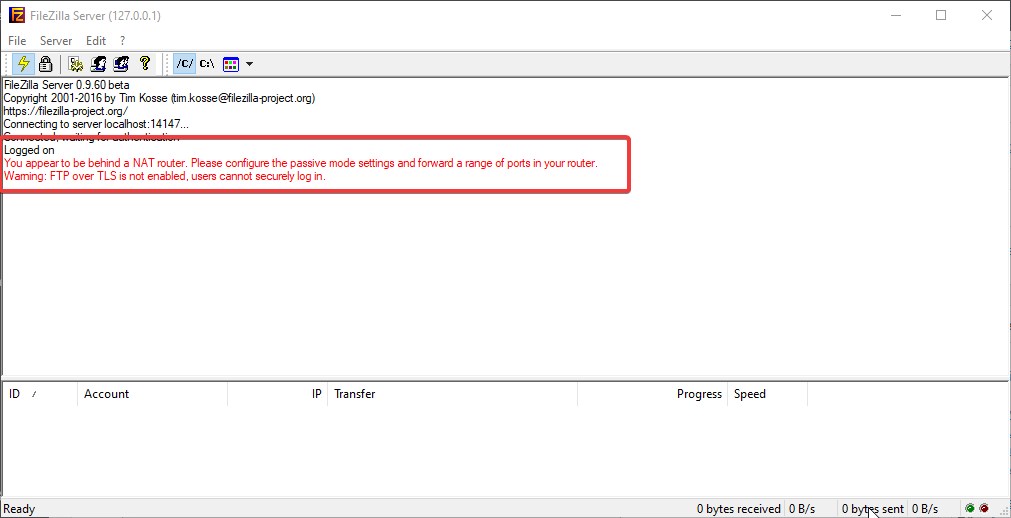
This is not an error but a warning giving you some basic information you need. Once connected to the server, you’ll get a screen like below. It’ll give you some basic info about the server and also auto-detect if you are behind a NAT router.

- If you do not want to allow connections to your FTP server from the Internet, and wish to use it only in your local network only, you can ignore these passive mode settings that is needed to fix this issue.
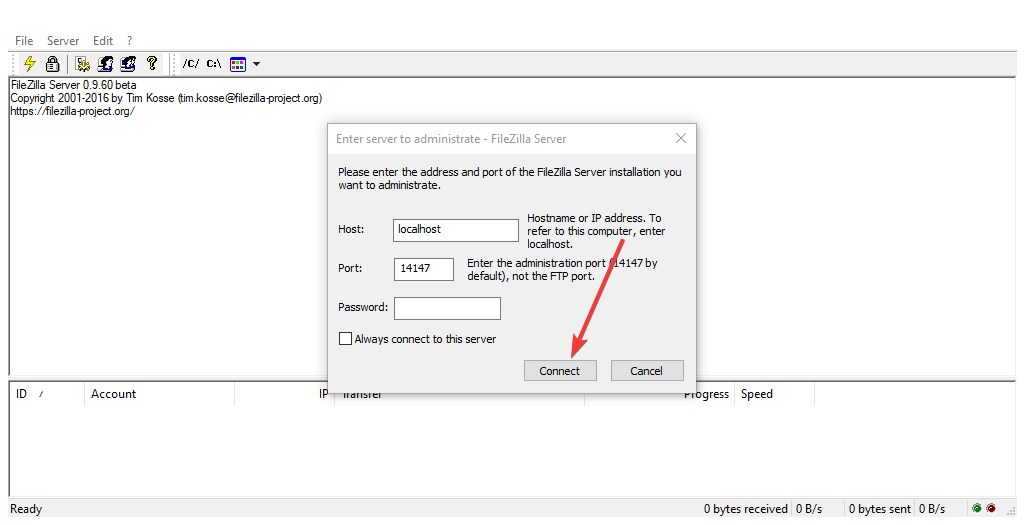
When launched for the first time, it will ask you to configure the FTP server. Leave the Host (127.0.0.1) and admin port (14147) as default. Type a new password (You will use this password for administering the FileZilla FTP server) and Press Connect.

You can also set this password at a later time under the Admin Interface Settings.

When you try to connect, you will be prompted with the following warning below. Note: By default Active Mode is the default mode for FTP. To learn more about Active and Passive Mode, kindly refer to this guide “How to install and configure a FileZilla Server on Windows“.

Solution: Click on the icon (settings) below to open the general preferences. Alternatively, you can also click on the Edit Menu and Settings
This will open the FileZilla options as shown below. Set the FTP connection port, this is the default port “21” anyways.
– Navigate to the Passive mode settings and check to use the custom port range.
If you do not want to allow incoming connections on all ports or if your FTP server is behind a NAT router, you need to configure FileZilla Server to use a specific range of ports for passive-mode connections say from 1000-2300 etc. These ports must then be opened on the firewall. If you have a NAT router, you need to forward these ports to the local machine where FileZilla Server is installed.Create user accounts and shared folders: Create a user by using the Add button as shown below.
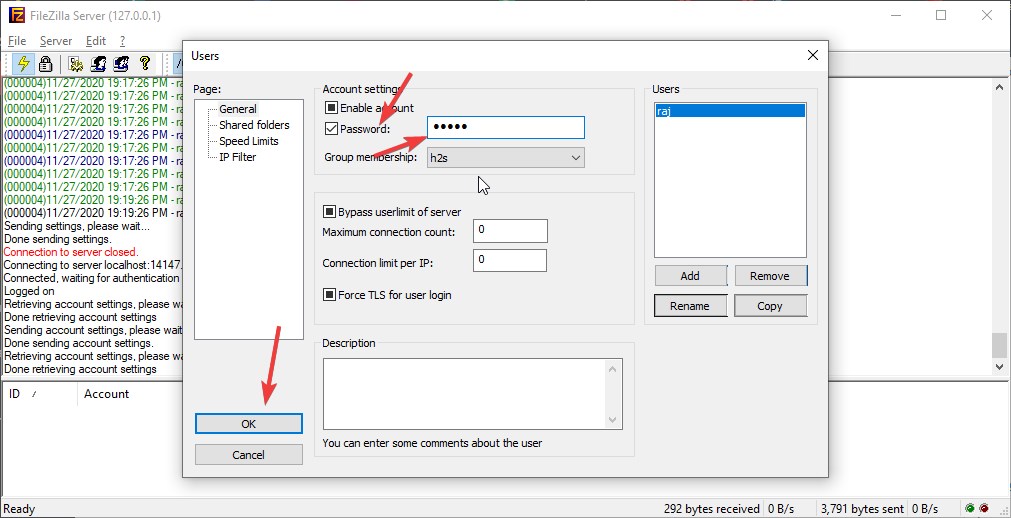
– Now that the account has been created, we will need to create a password. Select the user and create a password for it as shown below.

Click on the shared folders and click on Add, select the folder and assign the needed permissions.
– When you are done, click on Okay.
Configure the Windows Firewall: You will need to open the FTP port on the Windows firewall (or on other firewalls if necessary). Here we have chosen the default port, 21, but it can obviously be any other port. If you are working in a cloud environment, you will need to configure additional rules to permit external connection.
– Enter the program part and follow the needed steps. You may want to see this guide on how to create a Windows firewall rule on Windows or “how to resolve request timed out when pinging“.

Connect to a Filezilla Server from Windows: If you do not want to allow connections to your FTP server from the Internet, and therefore for use in the local network only, you can ignore these passive mode settings. To download the FileZilla client, you will need to download the FileZilla client installer from the Filezilla site.

Follow through the installation steps and on the “Choose Start Menu Folder” as shown below, click on Install.

When the installation is complete, launch the FileZilla client and connect as shown below. You should now be able to connect to your FTP server from a different device or on the same host as shown below.
– Kindly “login” with the username and passwords you have set. If you have configured FTP over TLS, you should be able to connect to the FTP server with FTPS to utilize encryption.- When prompted with the following notification below, click on Ok as we are already aware of this issue.

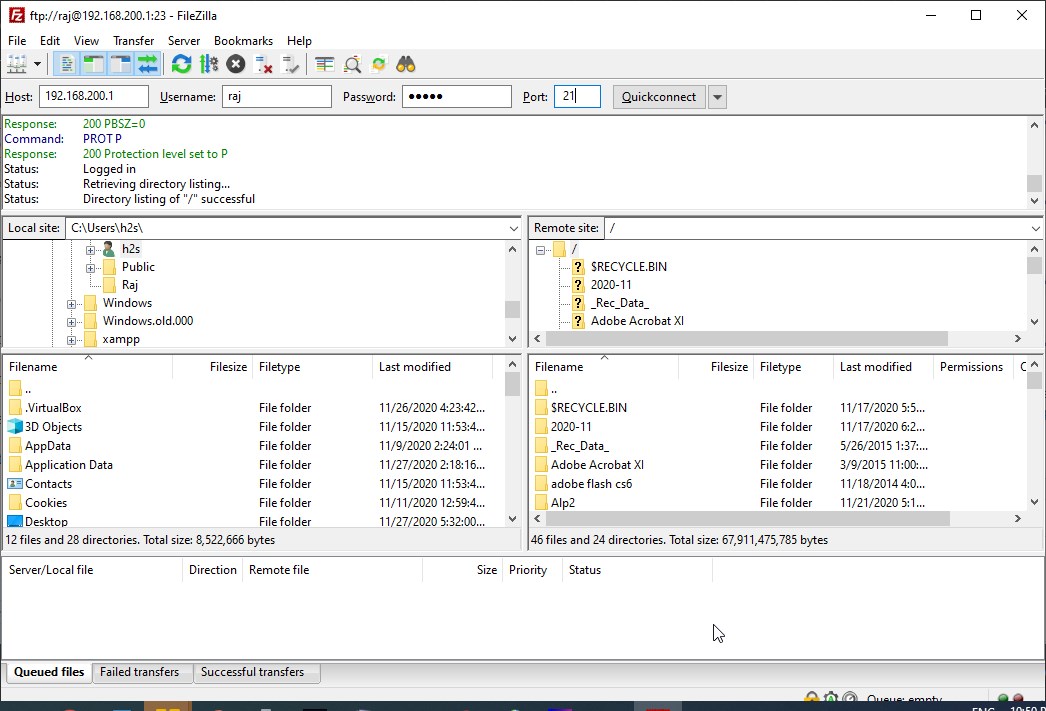
As you can see below, we have successfully connected to the FileZilla server via the FileZilla client.

Note: You can also connect to your FTP server via the Command Prompt as shown below. All you need to do is type “ftp <filezilla server IP>” and click on enter.

As you can see below, the connection to the FileZilla server was successful.

I hope you found this blog post helpful. If you have any questions, please let me know in the comment session.
Thanks for the reply, I enabled FTP over TLS it gave me an error soon as I tried to click the ok button.
After enabling it, you need to create or import a certificate and private key pair. Generating the cert with FileZilla Server will put both cert and key into the same file, so the path to “Private key file” and “Certificate file” is the same. For importing a certificate (e. g. from a CA) it must be in PEM format.
N00b guide:
1. Press “Generate new certificate…” button.
2. Pick a key size (the higher the better, 2048 or above recommended).
3. Fill in the information. For a self-created cert it doesn’t need to be authentic, just don’t have blank entries there (I had problems in the past with such certificates).
4. Pick a path to a location where you want the certificate/key saved. Use a path where you’ve got write access or there will be an error.
6. Press Generate.
7. Wait.
8. The paths should have been filled in for you. Password is blank.
9. Press OK to save the settings.
I followed your link to that page and read down to the “Malicious routers, firewalls and data sabotage” part I dont see how this applies to the error I am receiving can you narrow it down, give me a hint, I haven’t the slightest clue the answer could probably beat me over the head and I still would not realize its the answer, I need the ‘for dummies’ help lol.
You need to do what the “Configuring server for Passive mode” chapter tells you.
– Defining a port range for Passive data connections in the Passive settings for FZ Server. The listening port(s) alone don’t work.
– Open that port range in all firewalls you might have. Hopefully it’s just one. The range is TCP only.
– Forward that port range in your router, along with the listening ports.
Test the server using our https://ftptest.net Enrichment Cen… err, testing facility. Plain FTP is testing without TLS, and Explicit with TLS. There are often differences, with the bad routers you read about in the guide.
### BEGIN SIGNATURE BLOCK ###
No support requests per PM! You will NOT get any reply!!!
FTP connection problems? Please do yourself a favor and read Network Configuration.
FileZilla connection test: https://filezilla-project.org/conntest.php
### END SIGNATURE BLOCK ###
If you have problems connecting to your FTP account using FileZilla, check out the information below to help you solve the problem.
Response: 530 Login authentication failed
Response: 530 Login authentication failed
Error: Critical error
Error:  Could not connect to server
If you see this error message when trying to connect it means that you entered an incorrect username/password or host. If you don’t remember your login details, please follow the steps in this tutorial to reset it.
Your domain name must point to your hosting account. This happens by pointing your domain name’s DNS A record to your hosting account’s IP address.
Response: 421 Sorry, cleartext sessions are not accepted on this server
Response:    421 Sorry, cleartext sessions are not accepted on this server.
Error:    Could not connect to server
If you see this message, please check and make sure that FileZilla is set to use the following details:
Protocol: FTP protocol
Encryption: Require FTP over explicit TLS/SSL
LogonType : Normal
Filezilla timeout after 20 seconds of inactivity
- Open Site manager
- Click on “New site” button
- You need to change the Encryption to “Only use plain FTP (insecure)” and Logon type to Normal
- Enter host address, user name, and password and click “Connect”
Response: 500 unrecognized command
Response: 500 unrecognized command
Error:  Could not connect to server
This error can be caused by an incorrect port setting, please make sure you are using the correct port 21.
Response: 331 User savsuq2b1 OK. Password required
Error: Connetion timed out
Error: Could not connect to server
If you see this error you’ll first need to make sure that you’re using the correct login information. If they are all correct, you’ll need to check for Firewalls or Antivirus installed on your computer, try disabling them and test the connection again.
Response: Connection timed out (Failed to retrieve directory listing)
Error: Connection timed out after 10 seconds of inactivity
Error: Failed to retrieve directory listing
There could be a Firewalls or Antivirus problem, which might be blocking the transfer, try disabling them and test the connection again.
By default, FileZilla is defined to close the transfer of files if the file transfer takes more than a fixed amount of time, so if the disabling the Firewall doesn’t fix the problem you should try disabling the timeout settings.To disable the timeout select Edit -> Settings -> Connections -> Change Timeout to a higher value.
Connection attempt failed with “EAI_NONAME
Full error: Connection attempt failed with “EAI_NONAME – Neither nodename nor servname provided, or not known”.
If you see this error, this means that the issue is related to Name resolution error. The “Host” you are using is not correct, or your domain may not be pointed to our DNS. Check for spelling mistakes or try using the server’s IP address.
If you enjoyed this tutorial, then you’ll love our support! All ChemiCloud’s hosting plans include 24/7 support from our amazing support team. Check out our web hosting plans and have your website migrated today!
To set up a File Transfer Protocol (FTP) server on Windows 10, we don’t need to enable the inbuilt one, this can be done using the robust FileZilla Server application. It one of the easiest solutions to quickly up the FTP server on Windows 10, 8, 7 including the Windows server.
The main idea behind creating an FTP solution is to provide a quick way for uploading and downloading files remotely or locally using some FTP client software. For example, you want to upload files to your home machine using a smartphone, Desktop, or Laptop, and the same for downloading stuff such as documents, and other items when you need them. This gives you full control over your data, however, the backend maintains will be on your shoulders. Moreover, there would not any limitations on data transfer or on what type of file you want to upload.
Furthermore, we can add multiple users (friends & family) to access any common data with the help of user and password credentials to share things securely.
Here in this Windows 10 FTP server setup guide, we will install FileZilla server, create an FTP user & groups, and then let you know how to access the same via local network and remotely over the internet on a PC or Android smartphone.
If you still want to use the inbuilt FPT server option of WIndows 10 then here is the tutorial on that- How to enable an inbuilt FTP server of Windows 10 to access it locally and over the internet
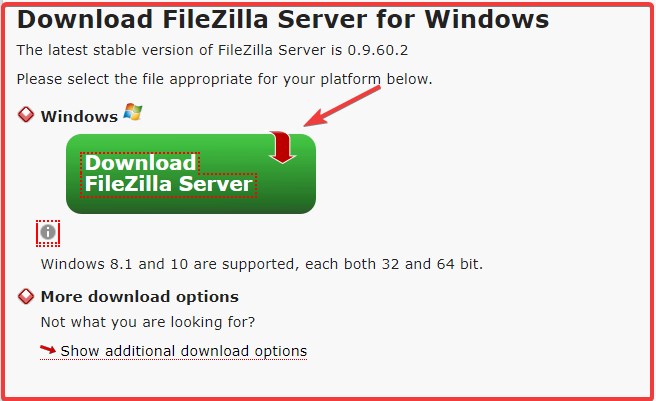
How to download FileZilla Server
- It is open-source software and available free to download.
- Therefore, go to the official website or use this link.
- Click on the green color button saying “Download FileZilla Server“.
- It supports both 32-bit and 64-bit versions.
- A pop-up window will open, click on the Download button.
- Save package on your Windows 10/8/7 system
Once the executable setup file is on your system follow the below steps to install it on your OS.
- Double click on the FileZilla_Server setup file.
- Click on the Yes button, when it will ask your permission to run the setup.
- Next, select the “I Agree” to accept the terms and conditions of the software.
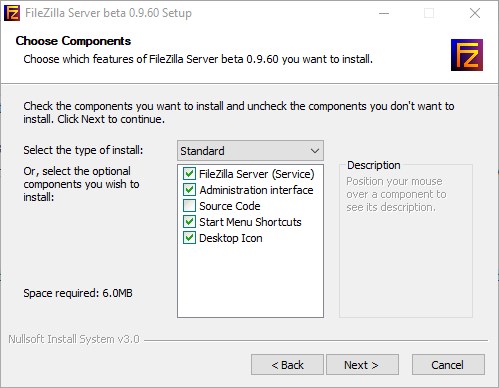
- By default, the Standard packages will be selected to install. The one item which will be unselected is “source code”, if you are a developer or want to go through the code of FileZilla you can select that one as well. However, normally we can leave that be unchecked.
- Select the Next button
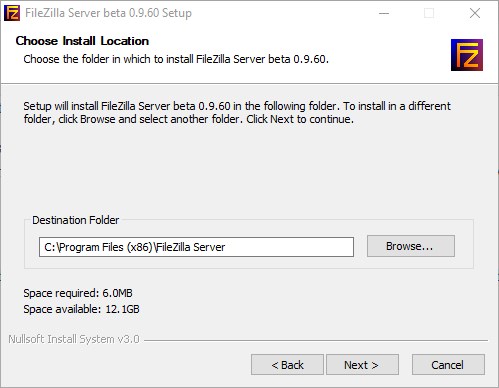
- The destination folder will set to use the C drive, in case you don’t want to install it there, you can change it. Otherwise, click Next.
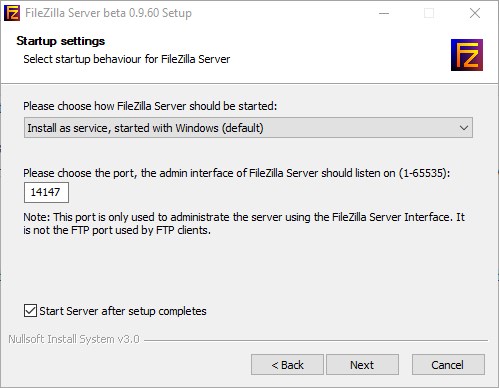
- To make the FileZilla server start automatically with Windows leave the default option “Install as a server, started with Windows“. If you want to start it manually then you can choose that one.
- Move forward, follow the wizard and wait for few seconds the FileZilla server will be on your Windows 10 system up and running.
Connect to localhost FTP server
When we open the FileZilla, it will ask us to connect to the local FTP server created by this program on Windows 10, 7, or server. Simply click on the Connect button.
Remove errors
After starting the server, in the log section it will give two errors:
- You appear to be behind a NAT router. Please configure the passive mode settings and forward a range of ports in your router.
- Warning: FTP over TLS is not enabled, users cannot securely log in.
FTP over TSL- Generate a new certificate
Passive Mode FileZilla FTP server
The error showing the server is behind the NAT and need to enable passive mode. To remove this error, in the Settings, select Passive Mode Settings.
Create FileZilla server Groups
We can create groups in the FileZilla to allow a particular group user to access some folder or file which other group users cannot.
Here we let you know the step to create a single group but you can use the same to create multiple as per the requirements.
Create FTP users
Now, let’s create and add some users to our FTP server group so that they can access the folders locally and remotely.
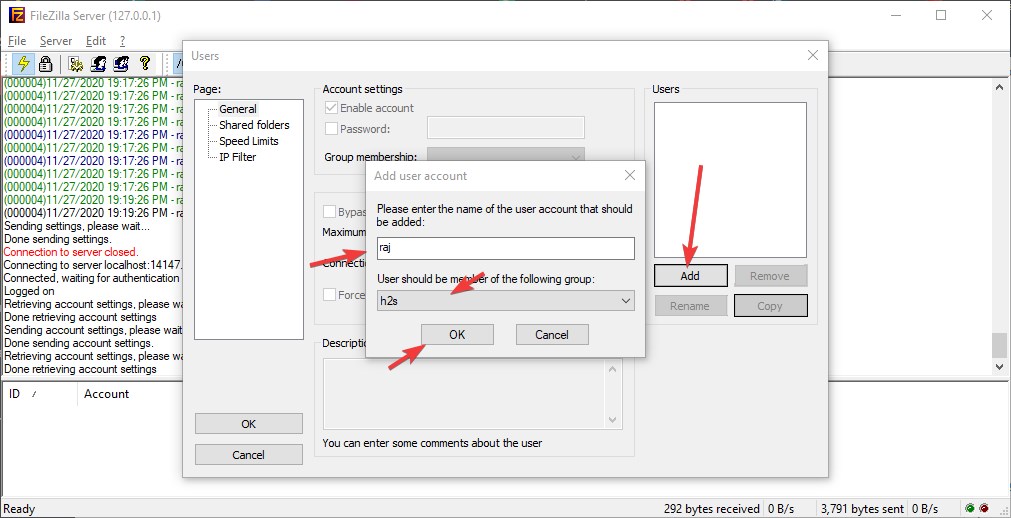
- Well, again go to the Edit menu of FileZilla.
- This time select Users.
- Click on the Add button
- Enter some user name and select the Groups you have created from the drop-down box.
- Hit the OK button.
- Now, check the password box and assign one to secure the user account. And again press the OK button.
Access FTP server Locally or Remotely
The key thing which we need to access the FTP server is the client application, you can either use FileZilla’s client app or simply add it as an FTP site via MY PC or Computer section of Windows 10 or 7.
- Well, to access it using FileZilla client, just open it.
- Enter the IP address of your PC where you have created or installed FileZilla’s FTP server.
- Enter the username and password we have created in this tutorial.
- 21 is the default port or use the custom one if you have assigned any and then click on Quick Connect.
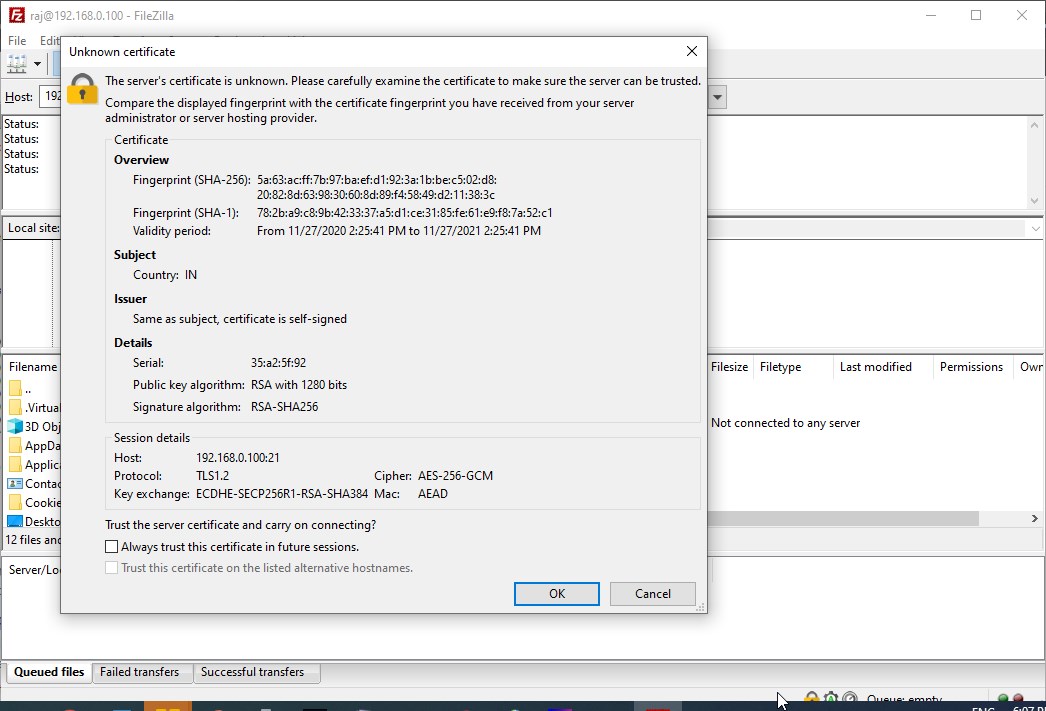
- Accept the Certificate
Note: To access the FTP server remotely, you have to open the router and forward the FTP port of your system IP address to the static IP address of your router. Once that is done, the remote user or you will need to use the public IP address of yours, to access the server.
On Android access the FTP server
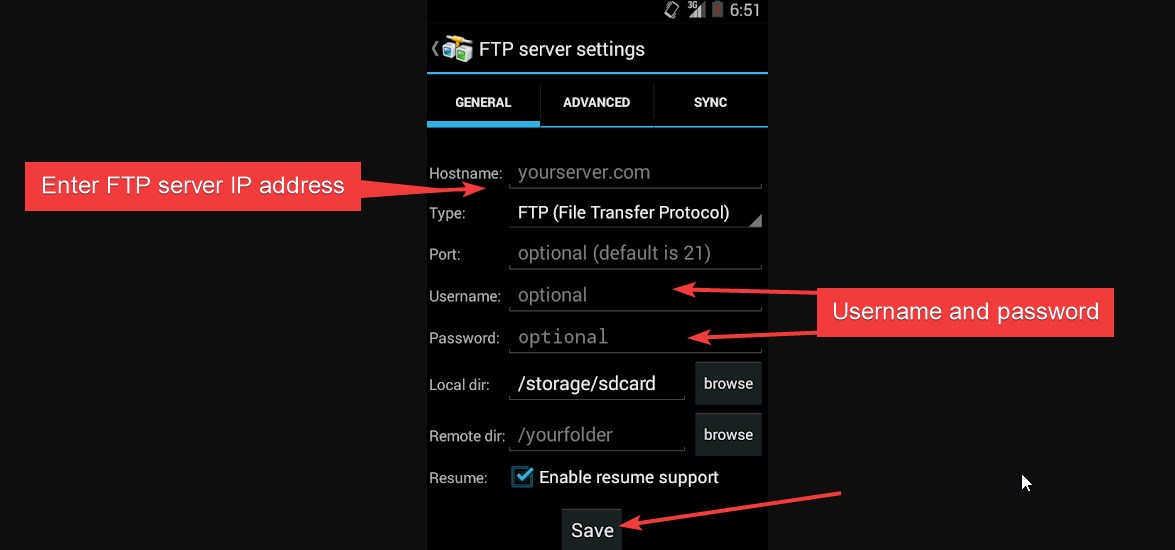
Go to the Play store and download some FTP client app. Here is the link to one such app which we are using.
- Open the FTP client App
- Enter the FTP server or your system IP address. If you are accessing remotely then your public IP.
- Furnish the Username and password of the FTP server user.
- Save it.
- Tap on the created server settings folder icon and it will automatically get connected if everything is fine.
Other released tutorials or articles
- How to install FileZilla on Ubuntu and CentOS via APT & YUM repository
- 3 Best FTP Server Apps For Android to Transfer Files
- How To Setup FTP Server in Android To Share files
- 5 Best Free FTP client Apps for Android
This article explained in detail the filezilla server configuration FTP server configuration and 425 can “t open data, you appear to be behind a nat router, ftp over tls is not enabled
Install and configure the server on the server:
The installation process is not repeated here,Keep going next,Select “always connect to this server” when popping out the pop-up window, and then click “connect” (password can be set by yourself or blank)
After the default installation, the following error message will be displayed:
Filezilla server warning:you appear to be behind a nat router. Please configure the passive mode settings and forward a range of ports in your router.
When running filezilla server:
warning:you appear to be behind a nat router. please configure the passive mode settings and forward a range of ports in your router.
Solution:
“Edit”-“setting” or directly click the setting button (gear);
Select the “passive mode settings” tab to enter the port range,Check “use the following ip:” and fill in the server’s IP address (note the external network address), and then click “ok” to save;
Second, filezilla server error 425 can “t open data connection for transfer of”/”
If “use custom port range” is not set in the above settings
Then when the client connects to the server and reads the directory, the following error will be reported:Response:425 can “t open data connection for transfer of”/”
This problem is mainly caused by the use of passive mode.
Solution:Check this option in the settings window above.Set the port range,And in the firewall settings below,Add the port range to the inbound port.
See details:Detailed filezilla_server:425 can “” t open data connection
Filezilla server warning:warning:ftp over tls is not enabled, users cannot securely log in.
Actually this warning can be ignored
Solution:enable tls transmission, the specific operation is as follows:
“Edit”-“setting” or directly click the setting button (gear);
Select the “ftp over tls settings” tab and click “generate new certificate …”;
Generate key size for verification “and choose according to your preference.Other information can be filled in according to your own situation,Then select the save address (preferably under the installation path) “;
The default name is “certificate.crt”.
The prompt “certificate generated successfully” indicates that there is no problem in generating,Click “OK” to close the popup window;
Click “ok” to save the settings;
Subsequent information prompts no more warnings.
Fourth, filezilla server configuration groups and users
Without elaborating,Just note:
Assign users to groups when adding users;
Assign permissions to folders for users,And specify the home folder (that is, “set as home dir”, “h” appears in front of the path), as shown below;
Five, filezilla server port settings
Default port:21
Encrypted port:990
Custom port range:10000-10200 (change according to your own situation) can be set by yourself,But note that no matter what port is used,Be sure to add it to the firewall’s inbound rules later.
Install the client locally,Just connect to the server through the client.


