Uninstall conflicting apps or run the SFC scan
by Milan Stanojevic
Milan has been enthusiastic about technology ever since his childhood days, and this led him to take interest in all PC-related technologies. He’s a PC enthusiast and he… read more
Updated on May 19, 2023
Reviewed by
Alex Serban

After moving away from the corporate work-style, Alex has found rewards in a lifestyle of constant analysis, team coordination and pestering his colleagues. Holding an MCSA Windows Server… read more
- Stop code Win32k power watchdog timeout is a BSOD error, and it’s caused by bad drivers.
- To fix this error, you’ll have to find and remove any problematic third-party apps.
- Some users managed to get things running by getting the hardware inspected and repaired.
XINSTALL BY CLICKING THE DOWNLOAD FILE
This software will repair common computer errors, protect you from file loss, malware, hardware failure and optimize your PC for maximum performance. Fix PC issues and remove viruses now in 3 easy steps:
- Download Restoro PC Repair Tool that comes with Patented Technologies (patent available here).
- Click Start Scan to find Windows issues that could be causing PC problems.
- Click Repair All to fix issues affecting your computer’s security and performance
- Restoro has been downloaded by 0 readers this month.
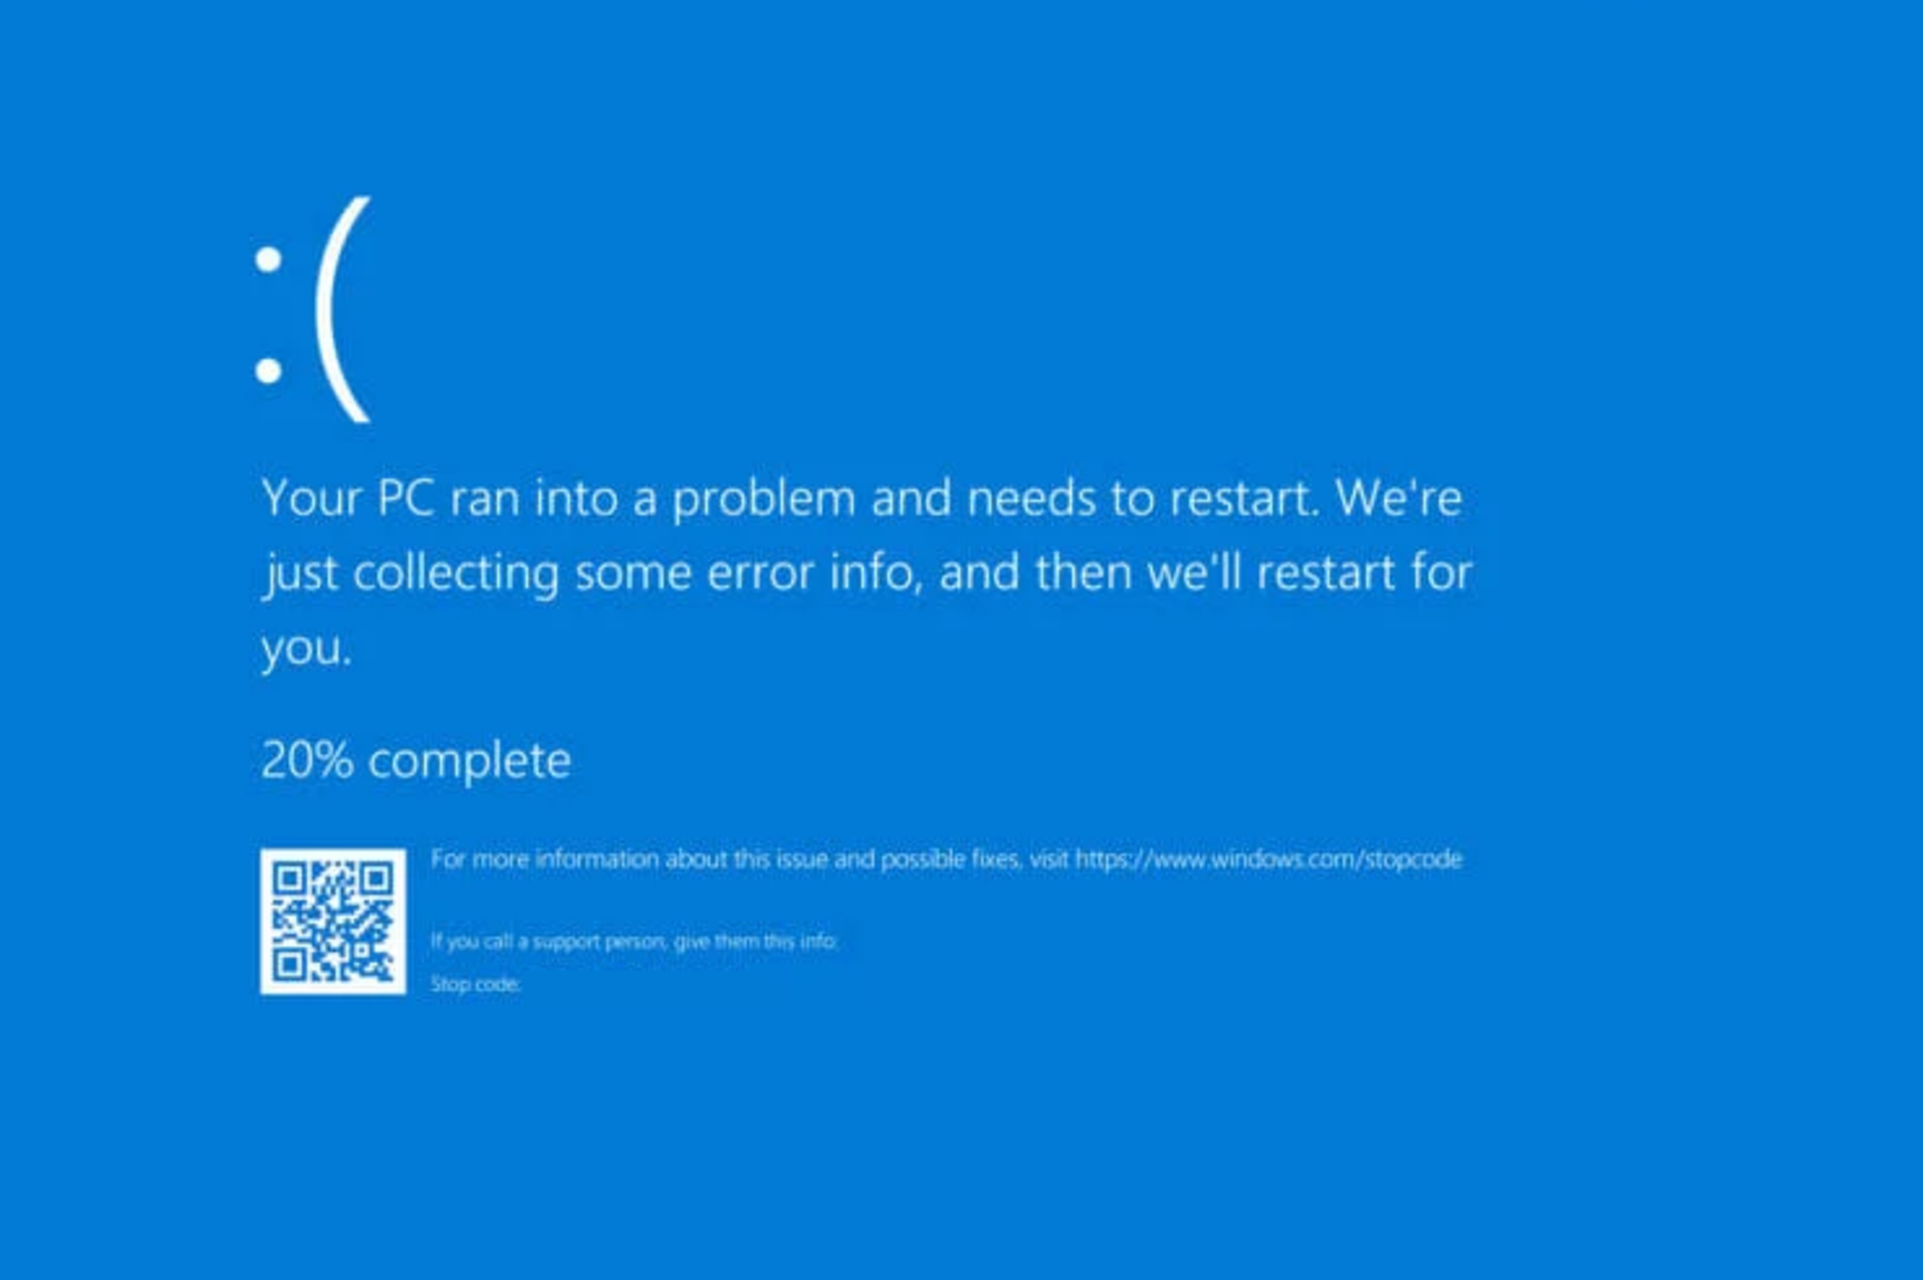
BSOD errors can be problematic, and many users reported WIN32K POWER WATCHDOG TIMEOUT on their PC. Just like any other BSOD error, this one will cause your system to crash, and you’ll lose any unsaved data.
Fixing this issue isn’t as complicated as you think, and in this guide, we’ll show you how to properly fix this problem and get your PC working again.
Before we start, it might be a good idea to check the BSOD log file location and find out more information about the error.
What is Win32k Power Watchdog Timeout?
The error is usually encountered after you turn on the computer while it’s in Hibernation or Sleep mode. This indicates that the problem lies with the power source or with the OS’s inability to ensure the supply of the required power.
In some cases, the computer may be unable to realize that it’s being turned on and subsequently, the external display remains turned off. Also, you may check the MSDN bugcheck for WIN32K_POWER_WATCHDOG_TIMEOUT to identify the underlying cause.
Some of the devices where you may encounter the error are:
- WIN32K POWER WATCHDOG TIMEOUT Dell (especially XPS), Lenovo (x1 Carbon in particular), Asus
- WIN32K POWER WATCHDOG TIMEOUT Windows 11, Windows 10
- WIN32K POWER WATCHDOG TIMEOUT blue screen – Watchdog did not stop, reboot starting system
- Error code WIN32K POWER WATCHDOG TIMEOUT – MSDN bugcheck WIN32K_POWER_WATCHDOG_TIMEOUT
- WIN32K did not turn the monitor on in a timely manner
What causes Win32k Power Watchdog Timeout?
There are several reasons behind the Watchdog Timeout error, including both hardware and software issues. Here’s a list of the common ones:
- Outdated drivers: When the installed drivers are outdated or incompatible, the error message may show up.
- Loose or incorrect connections: Improper connections are just as likely to trigger the error.
- Third-party app conflicts: Several applications, particularly security software or those that overclock the PC, have been found responsible for Win32k Power Watchdog Timeout on Surface laptops.
- Faulty RAM: Hardware issues with the RAM, say some damage or loose connections, may cause the error.
- Corrupt files: For many users, the corrupt system files were the underlying cause.
- Using an older version of the BIOS: The BIOS plays a vital role in the PC, and when it’s not updated for a long time, you may come across errors.
Now that you understand the basics, let’s find out how you can fix the WIN32K POWER WATCHDOG TIMEOUT error.
How do I fix Win32k Power Watchdog Timeout?
- What is Win32k Power Watchdog Timeout?
- What causes Win32k Power Watchdog Timeout?
- How do I fix Win32k Power Watchdog Timeout?
- 1. Use specialized BSOD repair software
- 2. Roll back updated device drivers
- 3. Check and remove third-party apps
- 4. Disconnect any new hardware device
- 5. Use the Windows Memory Diagnostics tool
- 6. Launch the System File Checker
- 7. Update your BIOS firmware
1. Use specialized BSOD repair software
The fastest way to fix Win32k power watchdog timeout is to use specialized software that can fix BSOD errors automatically.
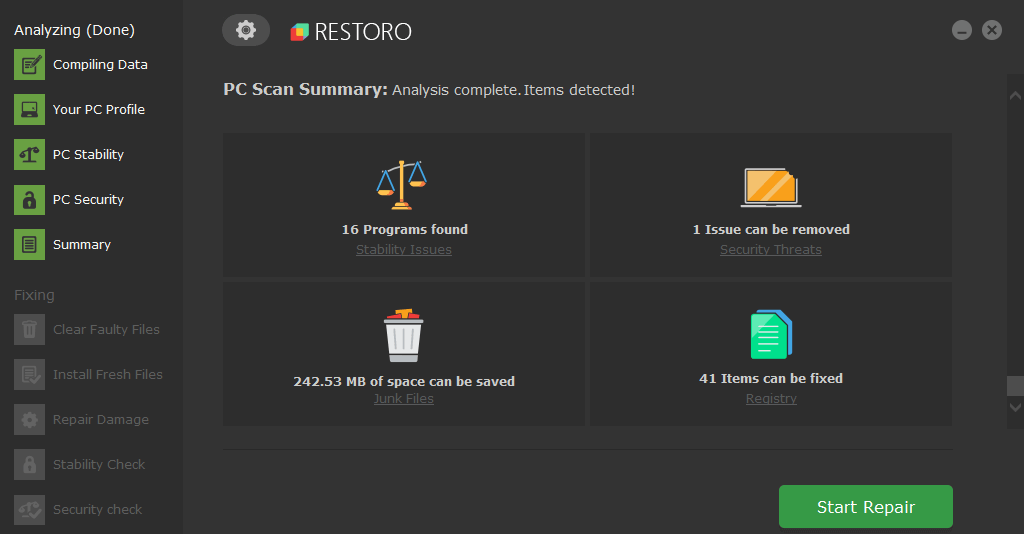
Restoro is powered by an online database that features the latest functional system files for Windows 10 PCs, allowing you to easily replace any elements that can cause a BSoD error.
This software can also help you by creating a restore point before starting the repairs, enabling you to easily restore the previous version of your system if something goes wrong.
This is how you can fix registry errors using Restoro:
- Download and install Restoro.
- Launch the application.
- Wait for the software to identify stability issues and possible corrupted files.
- Press Start Repair.
- Restart your PC for all the changes to take effect.
As soon as the fixing process is completed, your PC should work without problems, and you will not have to worry about BSoD errors or slow response times ever again.
⇒ Get Restoro
Disclaimer: This program needs to be upgraded from the free version in order to perform some specific actions.
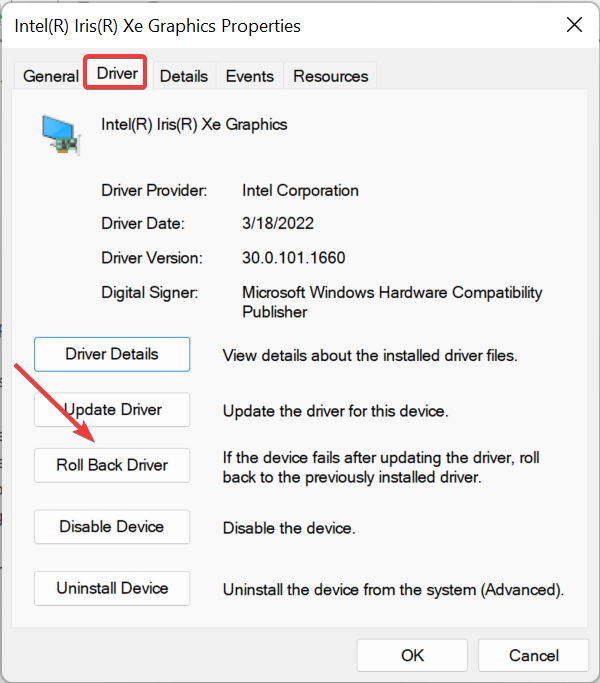
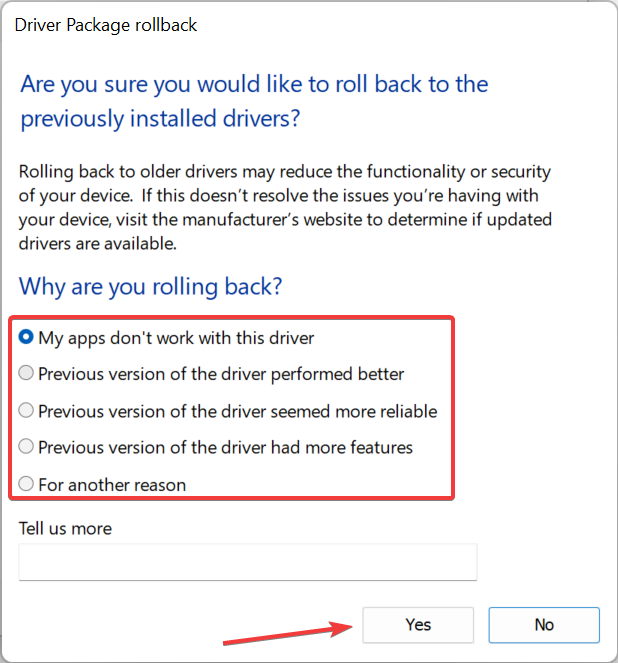
2. Roll back updated device drivers
After rolling back your drivers, check if the win32k power watchdog timeout error exists. In case the error persists, roll back all other drivers updated in the recent past and verify if the error is resolved.
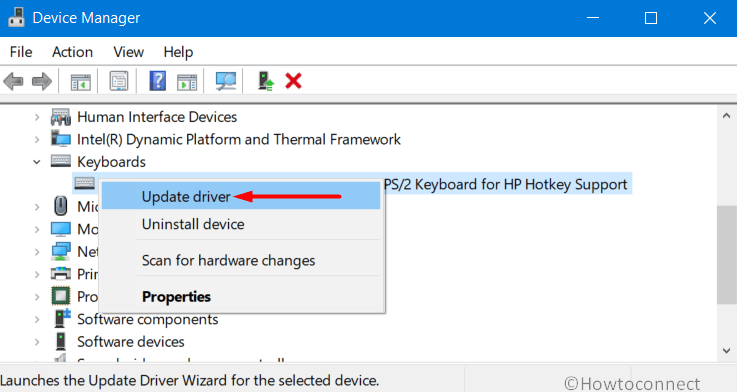
1. Right-click on Start and select Device Manager.

2. In the Device Manager, double-click on the relevant entry, right-click on the problematic device and then select Properties.
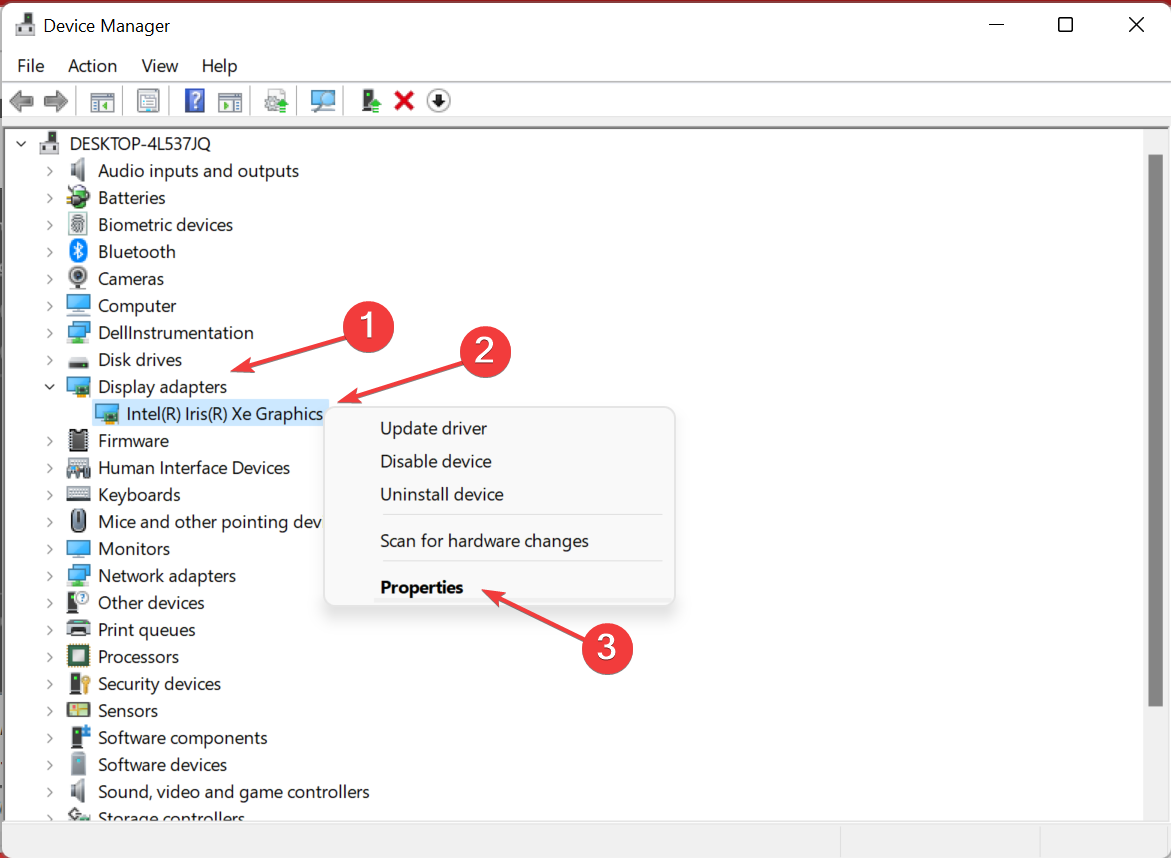
3. Now, navigate to the Driver tab, and then click on the Roll Back Driver button.
4. Choose a reason for it, and then click on Yes at the bottom.
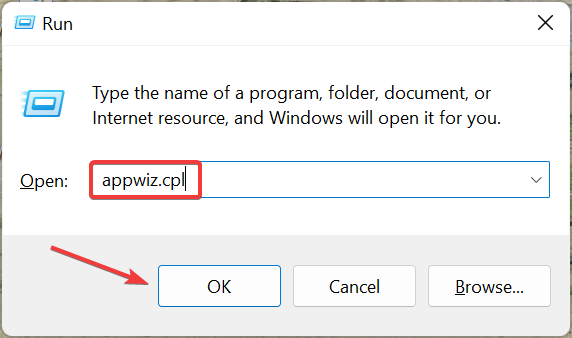
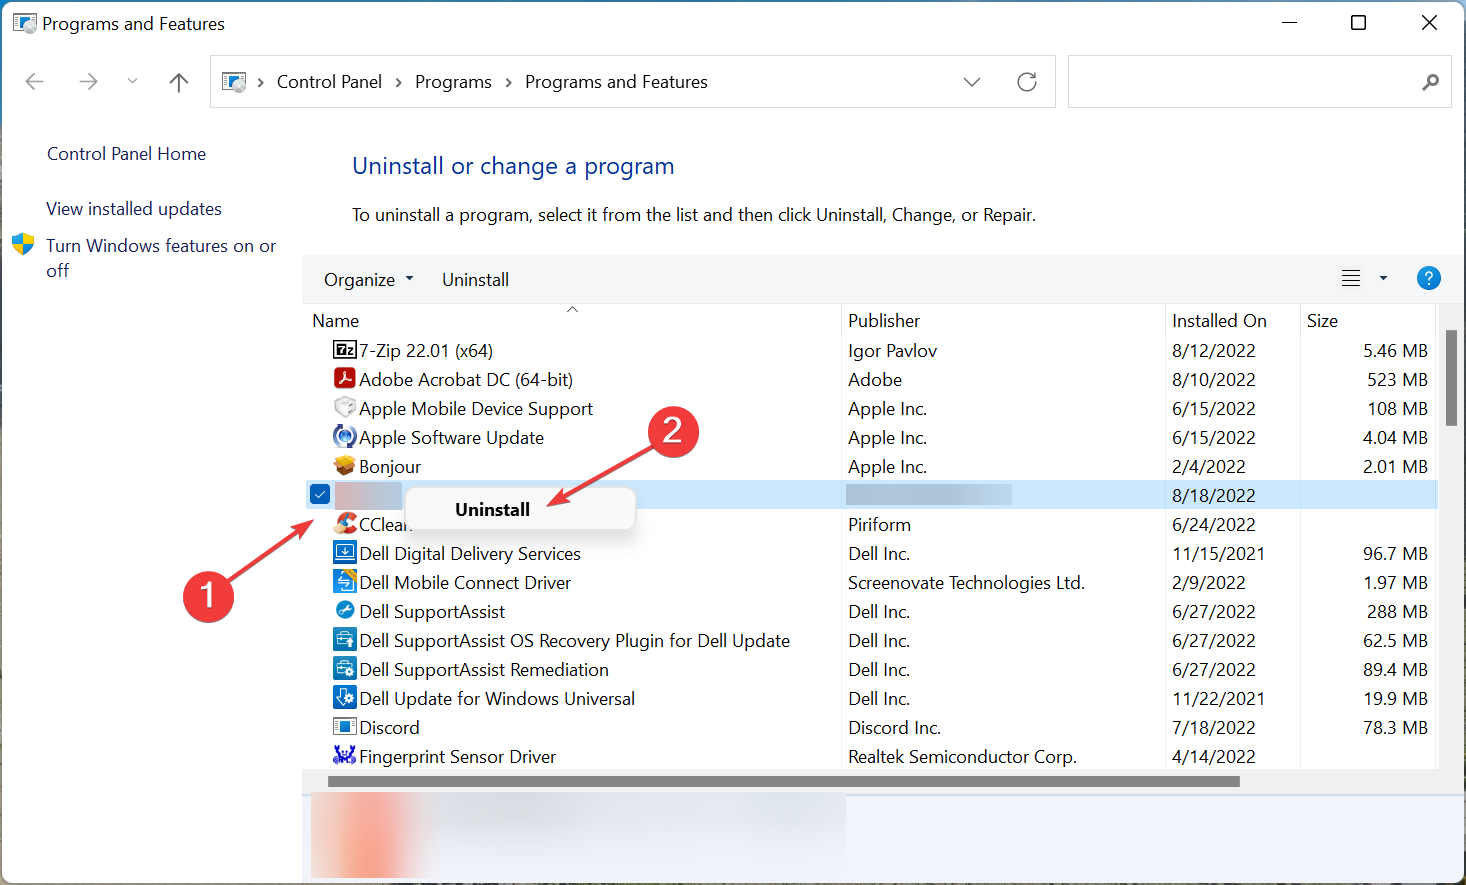
3. Check and remove third-party apps
- Press Windows +R to open Run, type appwiz.cpl, and then click OK.

- Right-click on the conflicting program and select Uninstall.

- Follow the required steps to remove that program.
Some PC issues are hard to tackle, especially when it comes to corrupted repositories or missing Windows files. If you are having troubles fixing an error, your system may be partially broken.
We recommend installing Restoro, a tool that will scan your machine and identify what the fault is.
Click here to download and start repairing.
In many cases, this BSOD Win32k power watchdog timeout screen error can be fixed by removing certain programs from your PC.
Windows users have reported that certain third-party apps can cause the Win32k Power Watchdog Timeout error. If you notice a program causing the issue, uninstall it and then restart your computer.
The software that generally causes the error is virtual image managers such as VirtualBox or Daemon Tools, for instance.
The best way to remove applications is to use a dedicated uninstaller software, such as CCleaner. With this type of software, you’ll remove the application and all of the files and registry entries associated with it.
Users reported WIN32K POWER WATCHDOG TIMEOUT timeout on Lenovo, Dell, HP, ASUS, and many other brands, so your PC can be affected regardless of the brand you’re using.
4. Disconnect any new hardware device
It is possible that your recently connected hardware can cause the WIN32K POWER WATCHDOG TIMEOUT error. That will occur if you have new hardware devices installed improperly.
This is why we recommend you disconnect any new hardware from your computer. If you don’t know which device caused this error, disconnect all external devices and peripherals except the mouse and keyboard.
Now, reconnect them one at a time, restart the computer after each to identify the problematic device, and remove it to fix the error.
5. Use the Windows Memory Diagnostics tool
- Press Windows + R to open the Run command, type mdsched in the text field, and then click OK or hit Enter.
- Select the Restart now and check for problems (recommended) option.

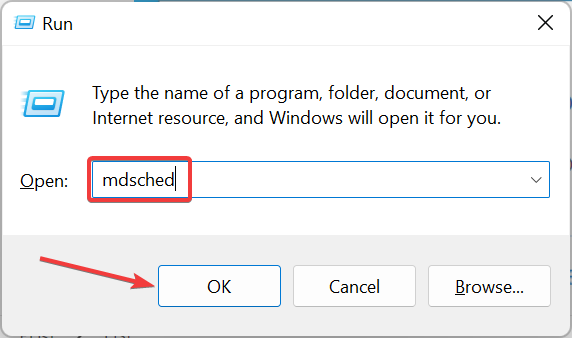
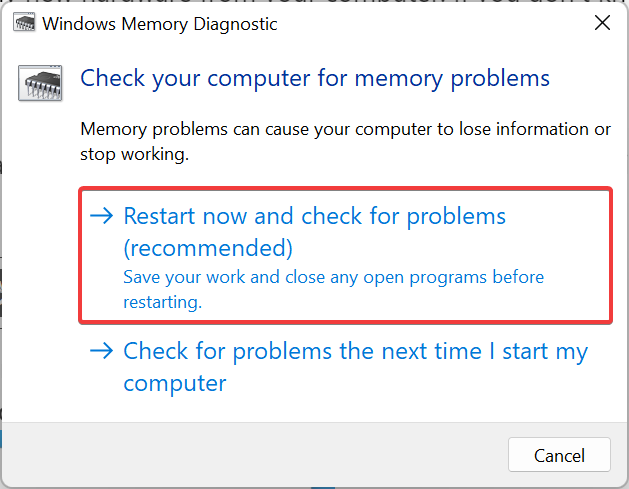
This solution will restart your computer and automatically fix any memory error. As an alternative, if the error is not solved, then you might need to change your memory modules or interchange the slots.
A faulty RAM module is one of the common causes of stop code WIN32K POWER WATCHDOG TIMEOUT in Windows 11 and other BSOD errors, so be sure to check your memory.
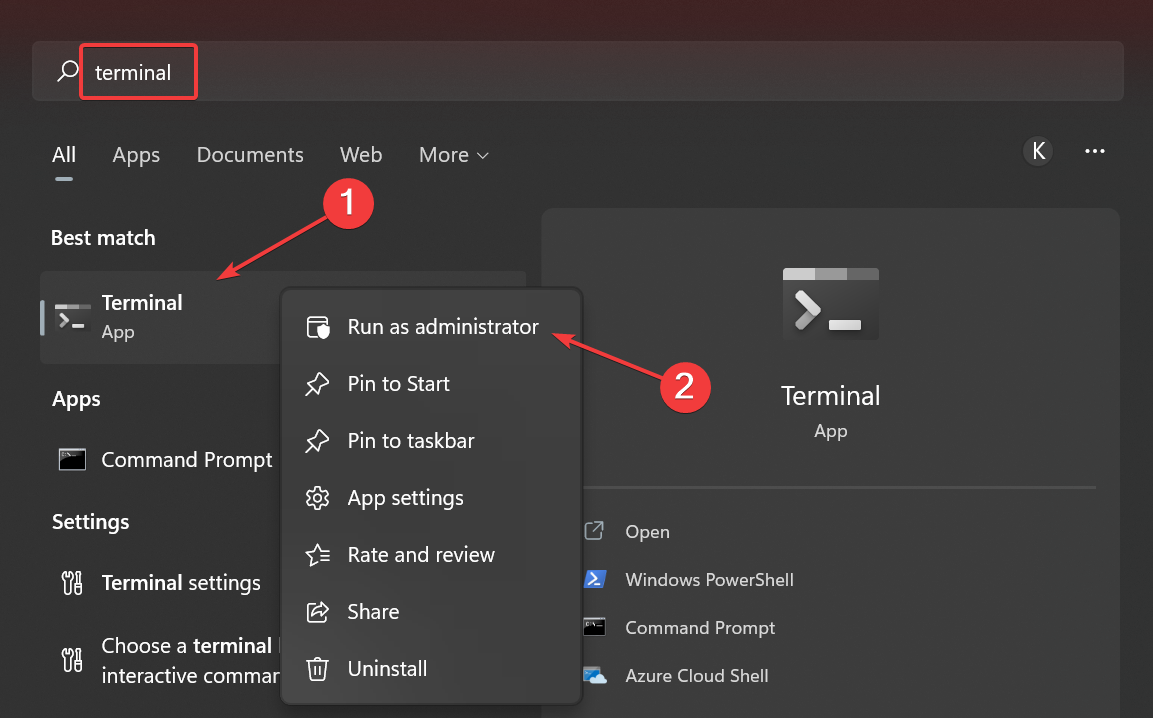
6. Launch the System File Checker
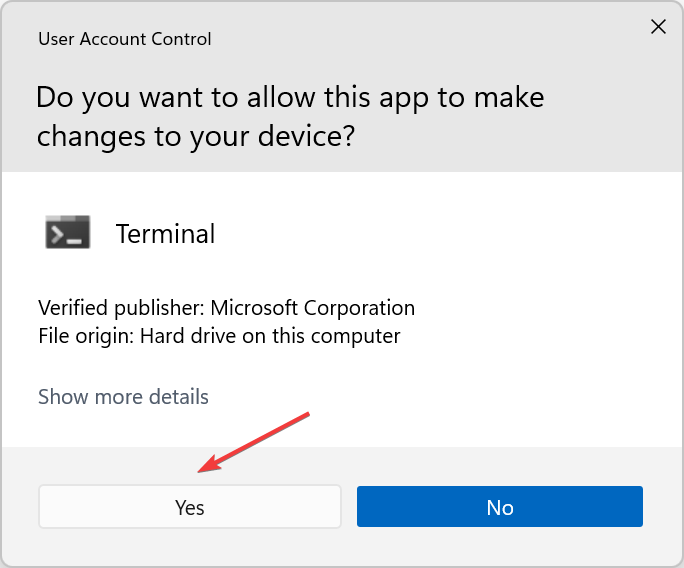
- Press Windows + S to open the Search menu, enter Terminal in the text field, right-click on the relevant search result, and then select Run as administrator.

- Click Yes in the UAC prompt.

- Press Ctrl + Shift + 2 to open the Command Prompt in a new tab.
- Type in the following command, and then press Enter:
sfc /scannow
- Wait for the scan to complete, and then restart the computer.
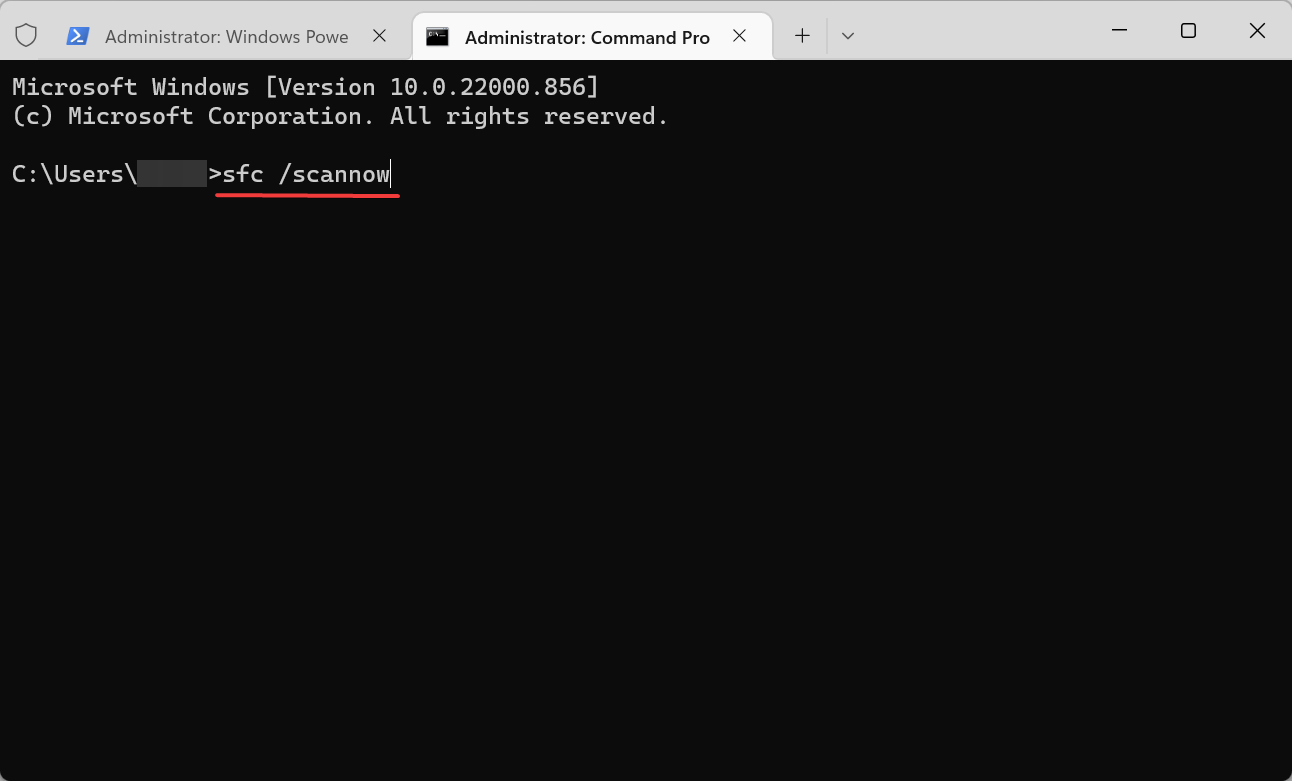
This variant of the Blue Screen of Death error will sometimes appear when your computer’s system files are corrupted. System File Checker will help you solve this issue.
After repairing your files, check if WIN32K_POWER_WATCHDOG_TIMEOUT in Windows 10 is still there. If that’s the case, head to the last method.
- Clock watchdog timeout error on Windows 10 [Full Guide]
- Fix: System Service Exception BSOD error on Windows 10
- Wpprecorder.sys BSoD: How to Fix It in 5 Steps
- 0xc000001d Error Code: How to Fix It on Windows 10 & 11
- Fix: An Error Occurred While Trying to Copy a File
7. Update your BIOS firmware
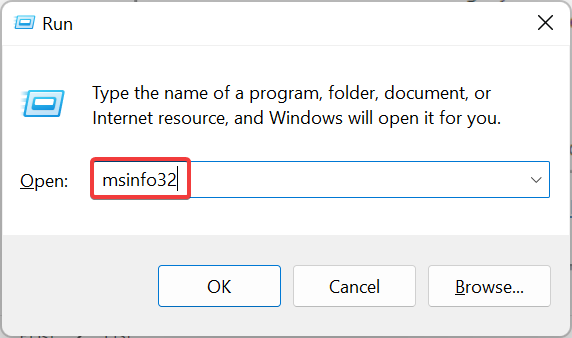
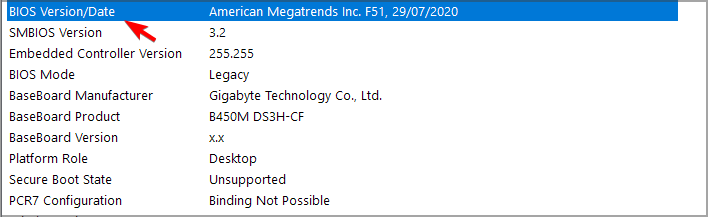
- Press Windows + R to open Run, type msinfo32, and then press Enter.
- Find BIOS Version/Date and then verify your firmware version.

- Go to the motherboard manufacturer’s website, select your motherboard and then navigate to Driver & Utility.

- Go to BIOS & Firmware section and then download the latest version.

- Unzip and extract the BIOS file to your computer.
- Examine the content of the readme file from the BIOS folder.
- Copy the BIOS update file to an empty USB drive or on your computer.
- Restart the computer, and enter BIOS by pressing F2 or the dedicated key on your device.
- Go to the BIOS update section, and select the file from your flash drive to start the update.

- Wait for the process to finish.


Back up your important files to an external device before performing a BIOS update. Before using this solution, verify the version of your BIOS firmware, and make sure to download a later version. Once done, the BSOD Power Watchdog Timeout error will be fixed.
The WIN32K POWER WATCHDOG TIMEOUT is an error that’s affecting many Windows users, but you should be able to fix it with our solutions.
Give us a comment below and let us know if they have proven helpful in solving this Windows error.
![]()
Newsletter
Seamlessly working in a smoothly running computer can often turn into a nightmare in a fraction of a second as WIN32K_POWER_WATCHDOG_TIMEOUT BSOD error is ruling out all over. The Blue Screen Error has a specific Bug check code of 0x0000019C which clearly indicates Win32k did not turn on the monitor in time it was supposed to do.
The issue has a firm root and that is mostly from an outdated or incompatible device driver. Along with the previous, Memory problems in Windows, junk making Hard Disk full, and missing system components play a great role as well.
Here is how to fix WIN32K_POWER_WATCHDOG_TIMEOUT BSOD Error in Windows 10 –
The issue will make the system unstable and unusable being hanging periodically and rebooting without notice. We have some effective fixes to resolve the snag but that might get tangled as of frequent rebooting. So to perfectly deploy the workarounds, let’s disable this Automatic Restarting of Windows 10 using the given instructions –
- First of all, take necessary actions for all the running processes to prevent unexpected data loss. You can preferably save and close them and then proceed with the following steps –
- Press Win+D at once and invoke the Desktop area immediately.
- Here on, make a right-click on This PC and select Properties.
- Once the System window pops out, select ‘Advanced system settings‘ from the left pane.
- From the forthcoming System Properties window, enter into the Advanced tab.
- Move on to the Settings located under Startup and Recovery section and click on the same.
- Hover to the new wizard that comes in the display and eventually to System failure area.
- Now, unmark the box before Automatically restart.
- Finally, click OK from the bottom to proceed ahead.
Once the changes are effective, Windows will not go for Automatic rebooting anymore, hence you can now go for the below workarounds one after another and resolve WIN32K_POWER_WATCHDOG_TIMEOUT Error in Windows 10. Let’s see the Method list in the below part –
1] Fix Existing Memory issues
Memory issues are always dangerous as the smooth running of the Operating System depends on them. The drawback includes any damage in the RAM stick as well which precisely happens once it falls on the ground accident. In most of such cases, you have to go for a complete replacement, unless you can fix them using some tweak.
To detect memory problems, Windows has a default utility called Memory Diagnostic tool. You can try resolving memory issues using this tool to fix WIN32K_POWER_WATCHDOG_TIMEOUT Error in Windows 10. The Guidelines are as follows –
- Open the Taskbar Search by pressing Windows and S keys combined.
- Type “memory” in the empty text space followed by hitting the Enter key.
- Shifting to the newly opened wizard, select “Restart now and check for problems (recommended)“.
- The machine will first reboot and when powers up next, you will see a blue screen detecting memory issues.
- Once this progress reaches 100 %, Windows will reboot again.
- After the desktop loads, you will find the result of the diagnosis in the System tray- notification area.
2] Rectify Hard Disk bad areas
Hard Disk is the most important organ of a system you might consider it the soul of the device you are using. It should be maintained healthy and obviously in good condition. Unfortunately, it may have bad areas formed inside after using for a long time or even due to your negligence to maintain good health. There are a good number of ways, with those you can keep it in perfect condition but once it has bad areas inside, the situation gets worse.
WIN32K_POWER_WATCHDOG_TIMEOUT Error in Windows 10 is an outcome of these bad areas and you can only fix them using Disk Checking tool. The Utility will be active in Elevated Command Prompt if you move through the below guidelines –
- Press the Windows and type cmd.exe in the open text field.
- When Command Prompt is visible in the result, do a right-click on the same.
- Select Run as Administrator from the appearing menu.
- After the UAC prompts for permission, choose Yes.
- When shifted to the dark window, insert the following command at the base of cursor –
chkdsk C: /f /r /x
- Now, press the Enter key and activate the Disk Checking Tool which would detect all the bad areas in Hard Disk and also make an attempt to bypass them all by itself.
- The process may seem lengthy and you have to wait until it is finished completely.
- After it ends, restart the device then return back and see if there is any BSOD error present in the system.
3] Clear Off Junk files
Junk file includes cache, temporary execution files, and similar stuff that Windows keep on producing every day. These files are created to serve specific purposes and get useless after a certain time. Yet, they occupy similar space in the disk making the storage low resulting in the slower operation of the device.
In addition, WIN32K_POWER_WATCHDOG_TIMEOUT Blue Screen error might show up as well. To eliminate these drawbacks, Clearing junk files are necessary and you can easily accomplish the task using Disk Cleanup tool. The instruction to avail this tool is as follows –
- Press Win+R hotkey together and invoke Run dialog on display.
- Type cleanmgr in the provided text area and eventually hit Enter.
- A small pop-up will rise up immediately and ask to choose the drive name.
- Select C: for this purpose, and also choose OK.
- The tool will now take minutes to calculate total memory space in Drive C: it can recover.
- Once a new wizard arrives, come down to its bottom left end to click on Clean up system files.
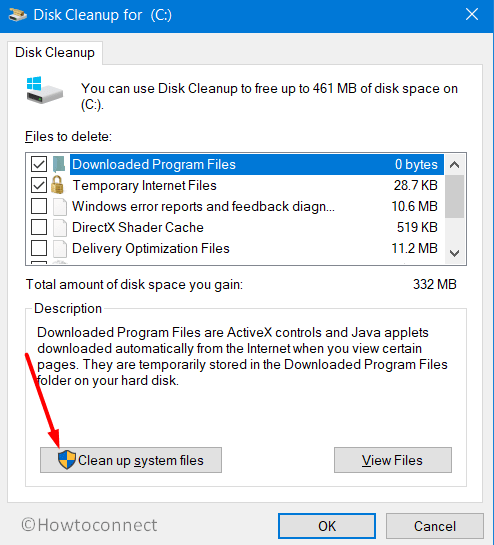
- From the forthcoming wizard, choose (C:) again and hit Enter key as well.
- Up next, there will be a new window opening, Disk Cleanup for (C:) appears. Here, check all the options sitting under Files to delete.
- Finally, click the OK button and let the tool initiate cleanup.
Note – Ensure the Downloads option and Recycle Bin are unchecked as important files may exist there or you can check them for any important files
4] Update Windows 10 to fix WIN32K_POWER_ WATCHDOG_TIMEOUT
Windows Operating System receives cumulative updates very frequently to maintain it in the best possible condition. These files carry the latest features and potential fixes for deadly bugs and issues. If you have not installed the updates yet, WIN32K_POWER_WATCHDOG_TIMEOUT Error may show up in the system. As to keep the OS healthy and resolve BSOD error, you must try installing the latest patches moving through the below guidelines –
Note – Since the Updating process is automatic, you may think this workaround unnecessary and it is quite true. Unfortunately, sometimes this automatic process disappoints you as it might entangle you in a loop of poor internet connection and gives birth to additional bugs and problems. Therefore, it’s preferable to move with the manual updating process as guided below –
- Open Windows Settings app by pressing “Win+I”.
- In the upcoming layout, click on Update & Security and move to the next page.
- On the left side panel of this page, choose Windows Update.
- Now, jump to the corresponding right and hit Check for updates button.
- Once the patches are available, hit Download located there.
- After downloading the files, installation starts automatically
- Follow the instructions further and complete the task.
5] Use Device Manager and update drivers
Drivers maintain a relationship between the specific Hardware and the Computer Bus as well as provide software interference. They play is a very important role in the device and when it needs to engage with any of the drawbacks. Most of these issues are inherited with an outdated driver which may happen when you do not maintain them in good condition. The negligence will definitely lead the device to have WIN32K_POWER_WATCHDOG_TIMEOUT Blue Screen error.
Microsoft made their updating process autonomous; hence you don’t need to work on it. Still, snags are coming as they often get stuck in the unexpected loop and create complicated issues. To avoid all these happenings, step up to update them manually using inbuilt Device Manager as shown in the below guidelines –
- Invoke Run dialog using “Win+R” keys
- When the wizard arrives, type devmgmt.msc in the empty text area.
- Select Ok located beneath the box.
- When Device Manager is upfront, expand the device having a mark of exclamation.
- Now, perform a right-click on driver having Yellow sign only.
- Once the menu shows up, select Update driver to begin the process.
- A separate wizard will show up, select – Search automatically for drivers.
6] Rollback dreadful drivers
As we have discussed before making driver updating automatic by Microsoft, you can clearly understand these items will get their latest version frequently. That’s quite an amazing step by Tech giants, but automatic processes are not always as helpful as we think. When connected to the internet, some of the buggy drivers may come in without bothering your permission whereas some incomplete downloads may also get installed.
This happens usually when the internet connection gets disturbed and you fall into big trouble such as WIN32K_POWER_WATCHDOG_TIMEOUT BSOD error in Windows 10. If such things happen quite regularly, you have to disable the dreadful driver or rollback that to the default state using the below guidelines –
- Open the Device Manager once more following the same instruction to the above resolution.
- Have a closer look at Device Manager console and locate the device whose driver you want to disable or roll back.
- Once reached the desired one, double-click on the same to unveil the driver list.
- Do a Right-click on the driver that was modified earlier, and then choose Properties.
- On the upcoming window, shift to its Driver tab and click either Disable or Roll Back Driver.
7] Disconnect Hardware Accessories temporarily
Recently a lot of forums are evidence that some people are becoming prey to Blue Screen error like WIN32K_POWER_WATCHDOG_TIMEOUT after using a Hardware item. They have mentioned a few names of accessories like a wired or USB mouse, keyboard, printer, or a speaker. If you look closely, you may have already understood how important these hardware items are in our day-to-day life. Getting sang when using them is truly unexpected and hard to keep working once things get out of your imagination. Well, the issue has got a simple fix as well.
When you will disconnect them, the issue takes leave and few users brought this news to daylight. You can perform the same i.e. disconnect these accessories for some time and restart Windows 10 later on. If the issue doesn’t appear in the further Startup, connect them to use for daily working on computer.
8] Perform Automatic Repair to Windows 10
Automatic Repair is an inbuilt Windows utility that runs eventually when a potential bug is detected and it is activated at the third boot. A good number of tests are carried out in the process to troubleshoot smoothly. Some of the diagnoses might be useless as well and consume lots of valuable time. The workaround is so helpful, you can perform it through your own moves according to the below instructions –
- Launch Settings by hitting the gear icon from Start menu.
- Select the Update & Security tile from the app UI and proceed to the next page.
- Here on, choose Recovery on the left pane and shift to the adjacent right side.
- Click Restart now button located under ‘Advanced startup’.
- When the Windows finishes rebooting, select Troubleshoot =>Advanced options => Startup Repair
- On the following Automatic Repair page, provide your Microsoft account credentials
- Lastly, choose Continue to start the repairing process.
9] Kill malware using Windows Security
Security on the internet is becoming a laughing stock day by day as malware is carrying powerful codes to sneak any defense strategy. Viruses are actually programs that can replicate themselves into other files and make the system elements corrupted. They get spread easily moving through spam emails or USB and when they get into the system, it deteriorates core components necessary for Windows. This will lead the system to get affected with WIN32K_POWER_WATCHDOG_TIMEOUT Blue Screen error.
To provide maximum security, Microsoft released the latest OS equipped with Windows Security which has a robust infrastructure. The utility can effectively scan and fix malware both Online and Offline. Eventually, you can get rid of BSOD issues as well as keep you invincible from these deadly bugs. The ways to deploy this tool are as follows –
- Hit the Windows key and write “security” in the blank text area.
- Select Windows Security app from the appearing result to launch the same.
- When in the visible app area, Select Virus & threat protection from the left pane.
- Jump to the adjacent right side and click Scan options.
- When all methods are available, hit the radio button before Full scan.
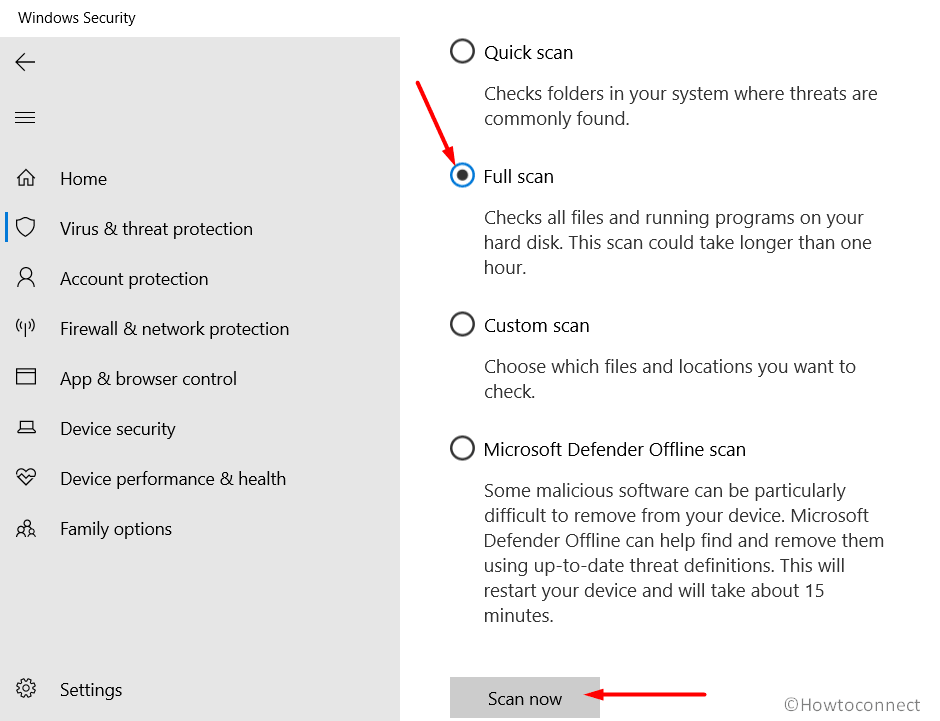
- Choose Scan now and let the process begin.
- If the method finds any of the malware, hit Clean threats.
- On the following window, select Remove first and followed by clicking Start actions.
- All threats will be dismissed once the process ends normally.
10] Defend Software conflict by uninstalling similar programs
Software programs provide aids to the day-to-day tasks and help to execute work in a very easy mean. We the people are also very much eager to get the job done easily by application and install them at a very good number. Sometimes, similar applications too which eventually possess the same core components. When such dual apps run in the same system, they might engage in conflict and resulting in the system losing necessary files. The act misleads to a WIN32K_POWER_WATCHDOG_TIMEOUT Blue Screen of Death Error.
As to prevent the issue and software collision, you have to uninstall similar programs as mentioned in the below instructions –
- Open the Run dialog and type “appwiz.cpl” in the blank text field.
- Hit the Enter key and immediately Programs and Features window will hit on display.
- Reach out to the desired program you opt to remove and also select Uninstall option located at the top ribbon.
- If UAC asks for permission, select Yes to proceed.
- Follow the guidelines on the screen until the task finishes completely.
- Later on, restart the device and upon returning to the desktop, check if WIN32K_POWER_ WATCHDOG_TIMEOUT BSOD error is dismissed.
11] Resolve System core components using sfc /scanow command
Due to malware infection or after a software conflict, the Windows system files get affected in a very nasty way. These dreadful files then lead to having Blue Screen error with abnormal bug check code 0x0000019C. To make these files up and running again, you have to rectify them as soon as possible. This is the place where you need the System File Checker tool that is powered up in the Elevated Command Prompt. The guidelines to avail the tool is as follows –
- Open the Taskbar Search and type cmd.exe in the typing area.
- When Command Prompt appears, do right-click on the same and also select Run as Administrator.
- When UAC prompts for permission, give consent by clicking on Yes.
- After moving to the black window, enter the following command
sfc /scannow
- Execute the utility by pressing Enter key.
- The tool will, therefore, detect and fix all corrupted Windows resources and DLL files automatically.
- Once it completes, perform a restart to Windows to save all the changes.
12] Disable Fast Boot to fix WIN32K_POWER_WATCHDOG_TIMEOUT Error in Windows 10
A joint feature of the usual shut down process and hibernate makes all together with the Fast Boot on a computer. This process usually performs a startup without hampering a single file in the system. Hence, even if you restart the machine after troubleshooting, the WIN32K_POWER_WATCHDOG_TIMEOUT Error will be carried over and you will not get the utmost result.
Therefore, to fix the Blue Screen error, you must disable this Fast Boot proceeding through the below guidelines –
- Right-click on the battery icon located at the rightmost corner of the Desktop.
- Now, from the visible menu, choose Power Options.
- Moving to the consequent page, “Choose what the power button does” from the left column.
- When shifted to the following page, perform click Change settings that are currently unavailable to unveil the hidden options.
- Roll down below and uncheck the box set for Turn on fast startup (recommended).
- Lastly, hit the Save Changes button from the bottom.
13] Perform System Restore and head back to the previous point
An affected system usually has a defectively modified registry which happens when you install a new program or remove an existing one. When WIN32K_POWER_WATCHDOG_TIMEOUT BSOD error occurs due to such changes, you can easily head back to the previous State performing System Restore only. The instructions to perform the task is as follows –
- Open the Run dialog by pressing Windows and R at once.
- Enter text ‘rstrui’ in the blank typing area.
- Hit Enter key and the command will put forward System Restore immediately.
- From the upcoming wizard, select Show more restore points.
- Choose the latest one and hit Next in the process.
- Once the succeeding page is displayed, choose Finish to start restoring process.
14] Deploy Blue Screen Troubleshooter
Blue Screen Error has suddenly gone past all previous records in terms of creating havoc and it has created trembling in the user’s mind. As to regain trust as well as to save the Operating System, Microsoft introduced Blue Screen Troubleshooter with Windows 10 Fall Creators Update edition.
In the past, the inbuilt utility was available in the Windows Settings app which recently shifted to Control panel coming to the latest version. You can deploy this utility to recover a device affected with WIN32K_POWER_ WATCHDOG_TIMEOUT BSOD moving with the below instructions –
- Press Widows+Q to activate the Taskbar search in Desktop.
- Now, write down bluescreen in the empty text bar.
- Choose Find and fix bluescreen problems from appearing results.
- Further, the Troubleshooting Wizard will be active.
- After the utility detects a BSOD issue, it will automatically suggest the steps on the screen.
- Follow those guidelines and fix WIN32K_POWER_WATCHDOG_TIMEOUT BSOD error eventually.
15] Go with a single Anti-virus program
Anti-virus programs provide sufficient shields to the machine to block the Malwares sneaking defense. There is a lot in the market and most of them have a good reputation as well as they are free. You can take up and continue with that obviously, but Windows 10 offers you Windows Security which is by far the best anti-virus program.
Whatever may be the application, you must not have both as they may cause a software collision and lead to WIN32K_POWER_WATCHDOG_TIMEOUT Blue Screen error. Therefore, if you have both, uninstall any using the below-mentioned guidelines –
- Call in Windows Settings app by pressing Windows+I.
- Select Apps from this layout and shift to the consequent page.
- Select Apps & Features from the left side pane and eventually jump to the right.
- Once the list of installed apps is available, hover over the Third-party antivirus tool.
- Click on the app and choose Uninstall from the expanded pane.
- If UAC asks your intention, choose Yes to continue.
- Follow the on-screen guidelines to uninstall it completely.
16] Use Safe Boot mode to resolve WIN32K_POWER_WATCHDOG_TIMEOUT Blue screen error
Windows Operating System usually gets affected by Bugs and this is truly nothing new. Right from the introduction, same thing happened and was resolved as well with the application of resolutions. One of the workarounds came up every time a critical drawback comes to the light, booting the OS in the Safe Mode.
This is a special type of Startup method where Windows powers up with basic programs and settings. You can deploy this resolution to fix WIN32K_POWER_WATCHDOG_TIMEOUT BSOD error. In case the issue becomes persistent again, you can at least be sure that, no default programs or settings s responsible for the snag and deploy further resolutions accordingly. Here is how you can Boot the OS in Safe Mode –
- First thing first, save and close all running programs and make your way to the desktop area by pressing ‘Win+D’ at once.
- Now, Press Alt+f4 together and click on Restart using the drop-down list located beneath What do you want the computer to do?
- After the OS completes the first cycle of reboot, you see a blue screen holding a few options, Choose Troubleshoot.
- From there, select Advanced options and consequently Startup Settings.
- Up next, press the Windows key and click on the Power icon.
- Choose Restart and let Windows 10 reboot for the second time.
- On the further Startup, you will have options to Boot in Safe Mode in the startup menu.
17] Go for Clean booting Windows 10
In the Clean boot mode, Operating System launches the basic applications only and tries to detect vulnerabilities accurately. The mode also improves the overall performance of the device as well as reduces the plausible software conflict risks.
Deploying this workaround might be helpful to fix Blue Screen error with bug check code 0x0000019C. Let’s try this workaround using the below guidelines –
- Press Windows and hover to Windows Administrative Tools from the appearing list.
- Make a double-click on the same to expand it.
- From the stretched-out list, reach to System Configuration and execute a right-click on it.
- Select Open and then choose the radio button before Selective startup.
- Proceeding ahead, uncheck the box against Load startup items.
- Next up is to transfer the self to the Services tab and put a tick mark on the box against Hide all Microsoft services.
- Select the Disable all button from the same wizard.
- Moving ahead, reach to Startup tab and click the labeled link Open Task Manager.
- When the Task Manager pops out, perform a right-click on each program listed in this console one after another and choose Disable for all.
- Lastly, Go back to the System Configuration wizard and click on Apply button first followed by OK.
18] Keep the BIOS up to date always
BIOS comes in the Operating System preinstalled and this one runs first when you start the machine for the first time. This is basically a Firmware that performs Hardware initiation at the time the device starts booting. It plays an important role such as offering Runtime services for Windows and other installed programs.
Outdated BIOS can be root to a lot of drawbacks including Blue Screen error with bug check code 0x0000019C. To prevent such happenings, updating this will be helpful –
- Press the Win+X hotkeys to launch the Power user menu.
- Choose Run from there and invoke the dialog.
- Type msinfo32 in the text box and eventually hit Enter key.
- Once the System Information page comes in, type BIOS version in its search bar.
- Hitting on the Find button will show up some information here.
- Keep them noted and then close the window.
- Now, open a web browser and visit the manufacturer’s website for your BIOS using the info you get a few moments ago.
- Finally, download compatible files for your system and install them as well.
19] Uninstall faulty Windows update files
As the Windows Update process is Autonomous, in the presence of a valid internet connection, update files will get installed anytime. Unless the process falls into any unexpected loop, this will be helpful to the Operating System as keeping OS up to date is a basic need.
Whenever the process abnormally terminates, a few incomplete files will be installed and the dreadful condition will lead to WIN32K_POWER_WATCHDOG_TIMEOUT BSOD error. In that case, you have to uninstall update files moving through the below instructions –
- Open the Settings app and head to Update & Security.
- Select it to load the additional settings page.
- On the consequent page, select Windows Update from the left pane.
- Jump to the corresponding right and hit click on View update history once you come across it.
- A new window will open up and from there click on Uninstall updates link available here.
- By default, you will be redirected to “Installed Updates”.
- Move out for the latest received patch in the appearing list and do a right-click on the same.
- Hit the Uninstall option showing in the top ribbon and keep following on-screen guidelines until these are deleted completely.
20] Rectify the Defective Windows image files
Windows Image files are the components of ISO that are released before any Windows Major update. Once these files get corrupted, Blue Screen error will show up in the system which is very hard to fix.
Well, you can step up to rectify those problematic files first in case having WIN32K_POWER_WATCHDOG_TIMEOUT error using the DISM tool. The default utility will activate only in the elevated Command Prompt when you proceed with the below guidelines –
- Open Command Prompt as Administrator.
- In the Dark window, appearing, type the following command –
DISM.exe /Online /Cleanup-image /Restorehealth
- Press Enter hey and immediately Deployment Image Servicing and Management (DISM) tool will arrive.
- This utility will rectify all the dreadful windows image files accordingly. The process may be a lengthy one.
- On completion of the process, restart the device and when signing back in, perform an inspection for BSOD error.
Methods:
1] Fix Existing Memory issues
2] Rectify Hard Disk bad areas
3] Clear Off Junk files
4] Update Windows 10
5] Use Device Manager and update drivers
6] Rollback drivers to default
7] Disconnect Hardware Accessories temporarily
8] Perform Automatic Repair
9] Kill malware using Windows Security
10] Defend Software conflict by uninstalling similar programs
11] Resolve System core components using sfc /scanow command
12] Disable Fast Boot
13] Perform System Restore
14] Deploy Online Blue Screen Troubleshooter
15] Go with a single Anti-virus program
16] Use the Safe Boot mode
17] Go for Clean boot
18] Keep BIOS up to date
19] Uninstall faulty Windows update files
20] Rectify Defective Windows image files
That’s all!!
Repair any Windows problems such as Blue/Black Screen, DLL, Exe, application, Regisrty error and quickly recover system from issues using Reimage.
Uninstall conflicting apps or run the SFC scan
by Milan Stanojevic
Milan has been enthusiastic about technology ever since his childhood days, and this led him to take interest in all PC-related technologies. He’s a PC enthusiast and he… read more
Updated on December 12, 2022
Reviewed by
Vlad Turiceanu

Passionate about technology, Windows, and everything that has a power button, he spent most of his time developing new skills and learning more about the tech world. Coming… read more
- Stop code Win32k power watchdog timeout is a BSOD error, and it’s caused by bad drivers.
- To fix this error, you’ll have to find and remove any problematic third-party apps.
- Read on to find out comprehensive solutions and the meaning of the Win32k power watchdog timeout error.
XINSTALL BY CLICKING THE DOWNLOAD FILE
This software will repair common computer errors, protect you from file loss, malware, hardware failure and optimize your PC for maximum performance. Fix PC issues and remove viruses now in 3 easy steps:
- Download Restoro PC Repair Tool that comes with Patented Technologies (patent available here).
- Click Start Scan to find Windows issues that could be causing PC problems.
- Click Repair All to fix issues affecting your computer’s security and performance
- Restoro has been downloaded by 0 readers this month.
BSOD errors can be problematic, and many users reported WIN32K POWER WATCHDOG TIMEOUT on their PC. Just like any other BSOD error, this one will cause your system to crash, and you’ll lose any unsaved data.
Fixing this issue isn’t as complicated as you think, and in this guide, we’ll show you how to properly fix this problem and get your PC working again.
Before we start, it might be a good idea to check the BSOD log file location and find out more information about the error.
The error is usually encountered after you turn on the computer while it’s in Hibernation or Sleep mode. This indicates that the problem lies with the power source or with the OS’s inability to ensure the supply of the required power.
In some cases, the computer may be unable to realize that it’s being turned on and subsequently, the external display remains turned off. Also, you may check the MSDN bugcheck for WIN32K_POWER_WATCHDOG_TIMEOUT to identify the underlying cause.
Some of the devices where you may encounter the error are:
- WIN32K POWER WATCHDOG TIMEOUT Dell (especially XPS), Lenovo (x1 Carbon in particular), Asus
- WIN32K POWER WATCHDOG TIMEOUT Windows 11, Windows 10
- WIN32K POWER WATCHDOG TIMEOUT blue screen – Watchdog did not stop, reboot starting system
- Error code WIN32K POWER WATCHDOG TIMEOUT – MSDN bugcheck WIN32K_POWER_WATCHDOG_TIMEOUT
- WIN32K did not turn the monitor on in a timely manner
What causes Win32k Power Watchdog Timeout?
There are several reasons behind the Watchdog Timeout error, including both hardware and software issues. Here’s a list of the common ones:
- Outdated drivers
- Loose or incorrect connections
- Third-party app conflicts
- Faulty RAM
- Corrupt files
- Using an older version of the BIOS
Now that you understand the basics let’s find out how you can fix the WIN32K POWER WATCHDOG TIMEOUT error.
How do I fix Win32k Power Watchdog Timeout?
- What is Win32k Power Watchdog Timeout?
- What causes Win32k Power Watchdog Timeout?
- How do I fix Win32k Power Watchdog Timeout?
- 1. Use specialized BSOD repair software
- 2. Roll back updated device drivers
- 3. Check and remove third-party apps
- 4. Disconnect any new hardware device
- 5. Use the Windows Memory Diagnostics tool
- 6. Launch the System File Checker
- 7. Update your BIOS firmware
1. Use specialized BSOD repair software
The fastest way to fix Win32k power watchdog timeout is to use specialized software that can fix BSOD errors automatically.
Restoro is powered by an online database that features the latest functional system files for Windows 10 PCs, allowing you to easily replace any elements that can cause a BSoD error.
This software can also help you by creating a restore point before starting the repairs, enabling you to easily restore the previous version of your system if something goes wrong.
This is how you can fix registry errors using Restoro:
- Download and install Restoro.
- Launch the application.
- Wait for the software to identify stability issues and possible corrupted files.
- Press Start Repair.
- Restart your PC for all the changes to take effect.
As soon as the fixing process is completed, your PC should work without problems, and you will not have to worry about BSoD errors or slow response times ever again.
⇒ Get Restoro
Disclaimer: This program needs to be upgraded from the free version in order to perform some specific actions.
2. Roll back updated device drivers
After rolling back your drivers, check if the win32k power watchdog timeout error exists. In case the error persists, roll back all other drivers updated in the recent past and verify if the error is resolved.
1. Right-click on Start and select Device Manager.
2. In the Device Manager, double-click on the relevant entry, right-click on the problematic device and then select Properties.
3. Now, navigate to the Driver tab, and then click on the Roll Back Driver button.
4. Choose a reason for it, and then click on Yes at the bottom.
3. Check and remove third-party apps
- Press Windows +R to open Run, type appwiz.cpl, and then click OK.
- Right-click on the conflicting program and select Uninstall.
- Follow the required steps to remove that program.
Some PC issues are hard to tackle, especially when it comes to corrupted repositories or missing Windows files. If you are having troubles fixing an error, your system may be partially broken.
We recommend installing Restoro, a tool that will scan your machine and identify what the fault is.
Click here to download and start repairing.
In many cases, this BSOD Win32k power watchdog timeout screen error can be fixed by removing certain programs from your PC.
Windows users have reported that certain third-party apps can cause the Win32k Power Watchdog Timeout error. If you notice a program causing the issue, uninstall it and then restart your computer.
The software that generally causes the error is virtual image managers such as VirtualBox or Daemon Tools, for instance.
The best way to remove applications is to use a dedicated uninstaller software, such as CCleaner. With this type of software, you’ll remove the application and all of the files and registry entries associated with it.
Users reported WIN32K POWER WATCHDOG TIMEOUT timeout on Lenovo, Dell, HP, ASUS, and many other brands, so your PC can be affected regardless of the brand you’re using.
4. Disconnect any new hardware device
It is possible that your recently connected hardware can cause the WIN32K POWER WATCHDOG TIMEOUT error. That will occur if you have new hardware devices installed improperly.
This is why we recommend you disconnect any new hardware from your computer. If you don’t know which device caused this error, disconnect all external devices and peripherals, except the mouse and keyboard.
Now, reconnect them one at a time, restart the computer after each to identify the problematic device, and remote it to fix the error.
5. Use the Windows Memory Diagnostics tool
- Press Windows + R to open the Run command, type mdsched in the text field, and then click OK or hit Enter.
- Select the Restart now and check for problems (recommended) option.
This solution will restart your computer and automatically fix any memory error. As an alternative, if the error is not solved, then you might need to change your memory modules or interchange the slots.
A faulty RAM module is one of the common causes of WIN32K POWER WATCHDOG TIMEOUT in Windows 11 and other BSOD errors, so be sure to check your memory.
6. Launch the System File Checker
- Press Windows + S to open the Search menu, enter Terminal in the text field, right-click on the relevant search result, and then select Run as administrator.
- Click Yes in the UAC prompt.
- Press Ctrl + Shift + 2 to open the Command Prompt in a new tab.
- Type in the following command, and then press Enter:
sfc /scannow - Wait for the scan to complete, and then restart the computer.
This variant of the Blue Screen of Death error will sometimes appear when your computer’s system files are corrupted. System File Checker will help you solve this issue.
After repairing your files, check if WIN32K_POWER_WATCHDOG_TIMEOUT in Windows 10 is still there. If that’s the case, head to the last method.
- Clock watchdog timeout error on Windows 10 [Full Guide]
- Fix: System Service Exception BSOD error on Windows 10
- Fix: Critical Error Start Menu Isn’t Working on a Windows PC
- Fix Wi-Fi Adapter Not Working/Not Available: 9 Easy Tips
- Windows Update Error 0x80070424: 7 Simple Solutions to Apply
7. Update your BIOS firmware
- Press Windows + R to open Run, type msinfo32, and then press Enter.
- Find BIOS Version/Date and then verify your firmware version.
- Go to the motherboard manufacturer’s website, select your motherboard and then navigate to Driver & Utility.
- Go to BIOS & Firmware section and then download the latest version.
- Unzip and extract the BIOS file to your computer.
- Examine the content of the readme file from the BIOS folder.
- Copy the BIOS update file to an empty USB drive or on your computer.
- Restart the computer, and enter BIOS by pressing F2 or the dedicated key on your device.
- Go to the BIOS update section, and select the file from your flash drive to start the update.
- Wait for the process to finish.
Back up your important files to an external device before performing a BIOS update. Before using this solution, verify the version of your BIOS firmware, and make sure to download a later version. Once done, the BSOD Power Watchdog Timeout error will be fixed.
The WIN32K POWER WATCHDOG TIMEOUT is an error that’s affecting many Windows users, but you should be able to fix it with our solutions.
Give us a comment below and let us know if they have proven helpful in solving this Windows error.
![]()
Newsletter
Uninstall conflicting apps or run the SFC scan
by Milan Stanojevic
Milan has been enthusiastic about technology ever since his childhood days, and this led him to take interest in all PC-related technologies. He’s a PC enthusiast and he… read more
Updated on December 12, 2022
Reviewed by
Vlad Turiceanu
Passionate about technology, Windows, and everything that has a power button, he spent most of his time developing new skills and learning more about the tech world. Coming… read more
- Stop code Win32k power watchdog timeout is a BSOD error, and it’s caused by bad drivers.
- To fix this error, you’ll have to find and remove any problematic third-party apps.
- Read on to find out comprehensive solutions and the meaning of the Win32k power watchdog timeout error.
XINSTALL BY CLICKING THE DOWNLOAD FILE
This software will repair common computer errors, protect you from file loss, malware, hardware failure and optimize your PC for maximum performance. Fix PC issues and remove viruses now in 3 easy steps:
- Download Restoro PC Repair Tool that comes with Patented Technologies (patent available here).
- Click Start Scan to find Windows issues that could be causing PC problems.
- Click Repair All to fix issues affecting your computer’s security and performance
- Restoro has been downloaded by 0 readers this month.
BSOD errors can be problematic, and many users reported WIN32K POWER WATCHDOG TIMEOUT on their PC. Just like any other BSOD error, this one will cause your system to crash, and you’ll lose any unsaved data.
Fixing this issue isn’t as complicated as you think, and in this guide, we’ll show you how to properly fix this problem and get your PC working again.
Before we start, it might be a good idea to check the BSOD log file location and find out more information about the error.
What is Win32k Power Watchdog Timeout?
The error is usually encountered after you turn on the computer while it’s in Hibernation or Sleep mode. This indicates that the problem lies with the power source or with the OS’s inability to ensure the supply of the required power.
In some cases, the computer may be unable to realize that it’s being turned on and subsequently, the external display remains turned off. Also, you may check the MSDN bugcheck for WIN32K_POWER_WATCHDOG_TIMEOUT to identify the underlying cause.
Some of the devices where you may encounter the error are:
- WIN32K POWER WATCHDOG TIMEOUT Dell (especially XPS), Lenovo (x1 Carbon in particular), Asus
- WIN32K POWER WATCHDOG TIMEOUT Windows 11, Windows 10
- WIN32K POWER WATCHDOG TIMEOUT blue screen – Watchdog did not stop, reboot starting system
- Error code WIN32K POWER WATCHDOG TIMEOUT – MSDN bugcheck WIN32K_POWER_WATCHDOG_TIMEOUT
- WIN32K did not turn the monitor on in a timely manner
What causes Win32k Power Watchdog Timeout?
There are several reasons behind the Watchdog Timeout error, including both hardware and software issues. Here’s a list of the common ones:
- Outdated drivers
- Loose or incorrect connections
- Third-party app conflicts
- Faulty RAM
- Corrupt files
- Using an older version of the BIOS
Now that you understand the basics let’s find out how you can fix the WIN32K POWER WATCHDOG TIMEOUT error.
How do I fix Win32k Power Watchdog Timeout?
- What is Win32k Power Watchdog Timeout?
- What causes Win32k Power Watchdog Timeout?
- How do I fix Win32k Power Watchdog Timeout?
- 1. Use specialized BSOD repair software
- 2. Roll back updated device drivers
- 3. Check and remove third-party apps
- 4. Disconnect any new hardware device
- 5. Use the Windows Memory Diagnostics tool
- 6. Launch the System File Checker
- 7. Update your BIOS firmware
1. Use specialized BSOD repair software
The fastest way to fix Win32k power watchdog timeout is to use specialized software that can fix BSOD errors automatically.
Restoro is powered by an online database that features the latest functional system files for Windows 10 PCs, allowing you to easily replace any elements that can cause a BSoD error.
This software can also help you by creating a restore point before starting the repairs, enabling you to easily restore the previous version of your system if something goes wrong.
This is how you can fix registry errors using Restoro:
- Download and install Restoro.
- Launch the application.
- Wait for the software to identify stability issues and possible corrupted files.
- Press Start Repair.
- Restart your PC for all the changes to take effect.
As soon as the fixing process is completed, your PC should work without problems, and you will not have to worry about BSoD errors or slow response times ever again.
⇒ Get Restoro
Disclaimer: This program needs to be upgraded from the free version in order to perform some specific actions.
2. Roll back updated device drivers
After rolling back your drivers, check if the win32k power watchdog timeout error exists. In case the error persists, roll back all other drivers updated in the recent past and verify if the error is resolved.
1. Right-click on Start and select Device Manager.
2. In the Device Manager, double-click on the relevant entry, right-click on the problematic device and then select Properties.
3. Now, navigate to the Driver tab, and then click on the Roll Back Driver button.
4. Choose a reason for it, and then click on Yes at the bottom.
3. Check and remove third-party apps
- Press Windows +R to open Run, type appwiz.cpl, and then click OK.
- Right-click on the conflicting program and select Uninstall.
- Follow the required steps to remove that program.
Some PC issues are hard to tackle, especially when it comes to corrupted repositories or missing Windows files. If you are having troubles fixing an error, your system may be partially broken.
We recommend installing Restoro, a tool that will scan your machine and identify what the fault is.
Click here to download and start repairing.
In many cases, this BSOD Win32k power watchdog timeout screen error can be fixed by removing certain programs from your PC.
Windows users have reported that certain third-party apps can cause the Win32k Power Watchdog Timeout error. If you notice a program causing the issue, uninstall it and then restart your computer.
The software that generally causes the error is virtual image managers such as VirtualBox or Daemon Tools, for instance.
The best way to remove applications is to use a dedicated uninstaller software, such as CCleaner. With this type of software, you’ll remove the application and all of the files and registry entries associated with it.
Users reported WIN32K POWER WATCHDOG TIMEOUT timeout on Lenovo, Dell, HP, ASUS, and many other brands, so your PC can be affected regardless of the brand you’re using.
4. Disconnect any new hardware device
It is possible that your recently connected hardware can cause the WIN32K POWER WATCHDOG TIMEOUT error. That will occur if you have new hardware devices installed improperly.
This is why we recommend you disconnect any new hardware from your computer. If you don’t know which device caused this error, disconnect all external devices and peripherals, except the mouse and keyboard.
Now, reconnect them one at a time, restart the computer after each to identify the problematic device, and remote it to fix the error.
5. Use the Windows Memory Diagnostics tool
- Press Windows + R to open the Run command, type mdsched in the text field, and then click OK or hit Enter.
- Select the Restart now and check for problems (recommended) option.
This solution will restart your computer and automatically fix any memory error. As an alternative, if the error is not solved, then you might need to change your memory modules or interchange the slots.
A faulty RAM module is one of the common causes of WIN32K POWER WATCHDOG TIMEOUT in Windows 11 and other BSOD errors, so be sure to check your memory.
6. Launch the System File Checker
- Press Windows + S to open the Search menu, enter Terminal in the text field, right-click on the relevant search result, and then select Run as administrator.
- Click Yes in the UAC prompt.
- Press Ctrl + Shift + 2 to open the Command Prompt in a new tab.
- Type in the following command, and then press Enter:
sfc /scannow - Wait for the scan to complete, and then restart the computer.
This variant of the Blue Screen of Death error will sometimes appear when your computer’s system files are corrupted. System File Checker will help you solve this issue.
After repairing your files, check if WIN32K_POWER_WATCHDOG_TIMEOUT in Windows 10 is still there. If that’s the case, head to the last method.
- Clock watchdog timeout error on Windows 10 [Full Guide]
- Fix: System Service Exception BSOD error on Windows 10
- Fix: Critical Error Start Menu Isn’t Working on a Windows PC
- Fix Wi-Fi Adapter Not Working/Not Available: 9 Easy Tips
- Windows Update Error 0x80070424: 7 Simple Solutions to Apply
- An Error Occurred Applying Attributes Access Is Denied: Fix
7. Update your BIOS firmware
- Press Windows + R to open Run, type msinfo32, and then press Enter.
- Find BIOS Version/Date and then verify your firmware version.
- Go to the motherboard manufacturer’s website, select your motherboard and then navigate to Driver & Utility.
- Go to BIOS & Firmware section and then download the latest version.
- Unzip and extract the BIOS file to your computer.
- Examine the content of the readme file from the BIOS folder.
- Copy the BIOS update file to an empty USB drive or on your computer.
- Restart the computer, and enter BIOS by pressing F2 or the dedicated key on your device.
- Go to the BIOS update section, and select the file from your flash drive to start the update.
- Wait for the process to finish.
Back up your important files to an external device before performing a BIOS update. Before using this solution, verify the version of your BIOS firmware, and make sure to download a later version. Once done, the BSOD Power Watchdog Timeout error will be fixed.
The WIN32K POWER WATCHDOG TIMEOUT is an error that’s affecting many Windows users, but you should be able to fix it with our solutions.
Give us a comment below and let us know if they have proven helpful in solving this Windows error.
![]()
Newsletter
Seamlessly working in a smoothly running computer can often turn into a nightmare in a fraction of a second as WIN32K_POWER_WATCHDOG_TIMEOUT BSOD error is ruling out all over. The Blue Screen Error has a specific Bug check code of 0x0000019C which clearly indicates Win32k did not turn on the monitor in time it was supposed to do.
The issue has a firm root and that is mostly from an outdated or incompatible device driver. Along with the previous, Memory problems in Windows, junk making Hard Disk full, and missing system components play a great role as well.
Here is how to fix WIN32K_POWER_WATCHDOG_TIMEOUT BSOD Error in Windows 10 –
The issue will make the system unstable and unusable being hanging periodically and rebooting without notice. We have some effective fixes to resolve the snag but that might get tangled as of frequent rebooting. So to perfectly deploy the workarounds, let’s disable this Automatic Restarting of Windows 10 using the given instructions –
- First of all, take necessary actions for all the running processes to prevent unexpected data loss. You can preferably save and close them and then proceed with the following steps –
- Press Win+D at once and invoke the Desktop area immediately.
- Here on, make a right-click on This PC and select Properties.
- Once the System window pops out, select ‘Advanced system settings‘ from the left pane.
- From the forthcoming System Properties window, enter into the Advanced tab.
- Move on to the Settings located under Startup and Recovery section and click on the same.
- Hover to the new wizard that comes in the display and eventually to System failure area.
- Now, unmark the box before Automatically restart.
- Finally, click OK from the bottom to proceed ahead.
Once the changes are effective, Windows will not go for Automatic rebooting anymore, hence you can now go for the below workarounds one after another and resolve WIN32K_POWER_WATCHDOG_TIMEOUT Error in Windows 10. Let’s see the Method list in the below part –
1] Fix Existing Memory issues
Memory issues are always dangerous as the smooth running of the Operating System depends on them. The drawback includes any damage in the RAM stick as well which precisely happens once it falls on the ground accident. In most of such cases, you have to go for a complete replacement, unless you can fix them using some tweak.
To detect memory problems, Windows has a default utility called Memory Diagnostic tool. You can try resolving memory issues using this tool to fix WIN32K_POWER_WATCHDOG_TIMEOUT Error in Windows 10. The Guidelines are as follows –
- Open the Taskbar Search by pressing Windows and S keys combined.
- Type “memory” in the empty text space followed by hitting the Enter key.
- Shifting to the newly opened wizard, select “Restart now and check for problems (recommended)“.
- The machine will first reboot and when powers up next, you will see a blue screen detecting memory issues.
- Once this progress reaches 100 %, Windows will reboot again.
- After the desktop loads, you will find the result of the diagnosis in the System tray- notification area.
2] Rectify Hard Disk bad areas
Hard Disk is the most important organ of a system you might consider it the soul of the device you are using. It should be maintained healthy and obviously in good condition. Unfortunately, it may have bad areas formed inside after using for a long time or even due to your negligence to maintain good health. There are a good number of ways, with those you can keep it in perfect condition but once it has bad areas inside, the situation gets worse.
WIN32K_POWER_WATCHDOG_TIMEOUT Error in Windows 10 is an outcome of these bad areas and you can only fix them using Disk Checking tool. The Utility will be active in Elevated Command Prompt if you move through the below guidelines –
- Press the Windows and type cmd.exe in the open text field.
- When Command Prompt is visible in the result, do a right-click on the same.
- Select Run as Administrator from the appearing menu.
- After the UAC prompts for permission, choose Yes.
- When shifted to the dark window, insert the following command at the base of cursor –
chkdsk C: /f /r /x
- Now, press the Enter key and activate the Disk Checking Tool which would detect all the bad areas in Hard Disk and also make an attempt to bypass them all by itself.
- The process may seem lengthy and you have to wait until it is finished completely.
- After it ends, restart the device then return back and see if there is any BSOD error present in the system.
3] Clear Off Junk files
Junk file includes cache, temporary execution files, and similar stuff that Windows keep on producing every day. These files are created to serve specific purposes and get useless after a certain time. Yet, they occupy similar space in the disk making the storage low resulting in the slower operation of the device.
In addition, WIN32K_POWER_WATCHDOG_TIMEOUT Blue Screen error might show up as well. To eliminate these drawbacks, Clearing junk files are necessary and you can easily accomplish the task using Disk Cleanup tool. The instruction to avail this tool is as follows –
- Press Win+R hotkey together and invoke Run dialog on display.
- Type cleanmgr in the provided text area and eventually hit Enter.
- A small pop-up will rise up immediately and ask to choose the drive name.
- Select C: for this purpose, and also choose OK.
- The tool will now take minutes to calculate total memory space in Drive C: it can recover.
- Once a new wizard arrives, come down to its bottom left end to click on Clean up system files.
- From the forthcoming wizard, choose (C:) again and hit Enter key as well.
- Up next, there will be a new window opening, Disk Cleanup for (C:) appears. Here, check all the options sitting under Files to delete.
- Finally, click the OK button and let the tool initiate cleanup.
Note – Ensure the Downloads option and Recycle Bin are unchecked as important files may exist there or you can check them for any important files
4] Update Windows 10 to fix WIN32K_POWER_ WATCHDOG_TIMEOUT
Windows Operating System receives cumulative updates very frequently to maintain it in the best possible condition. These files carry the latest features and potential fixes for deadly bugs and issues. If you have not installed the updates yet, WIN32K_POWER_WATCHDOG_TIMEOUT Error may show up in the system. As to keep the OS healthy and resolve BSOD error, you must try installing the latest patches moving through the below guidelines –
Note – Since the Updating process is automatic, you may think this workaround unnecessary and it is quite true. Unfortunately, sometimes this automatic process disappoints you as it might entangle you in a loop of poor internet connection and gives birth to additional bugs and problems. Therefore, it’s preferable to move with the manual updating process as guided below –
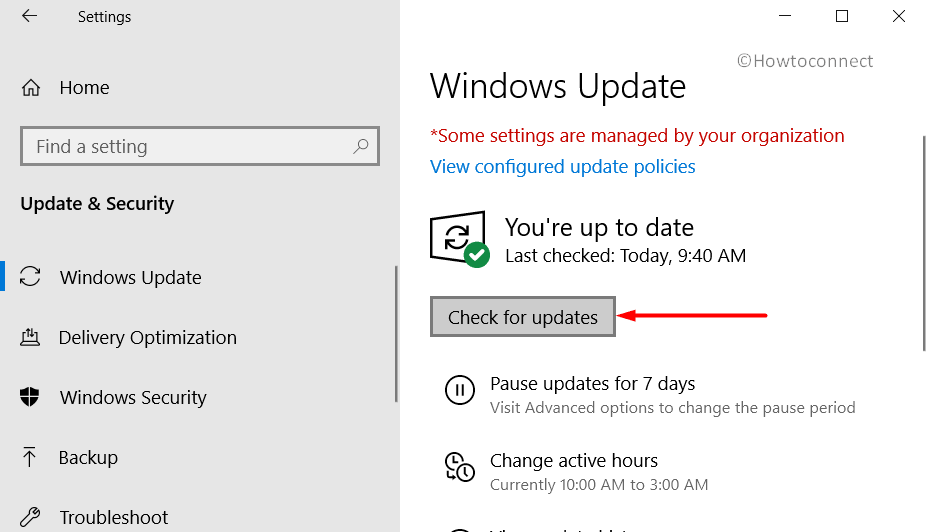
- Open Windows Settings app by pressing “Win+I”.
- In the upcoming layout, click on Update & Security and move to the next page.
- On the left side panel of this page, choose Windows Update.
- Now, jump to the corresponding right and hit Check for updates button.
- Once the patches are available, hit Download located there.
- After downloading the files, installation starts automatically
- Follow the instructions further and complete the task.
5] Use Device Manager and update drivers
Drivers maintain a relationship between the specific Hardware and the Computer Bus as well as provide software interference. They play is a very important role in the device and when it needs to engage with any of the drawbacks. Most of these issues are inherited with an outdated driver which may happen when you do not maintain them in good condition. The negligence will definitely lead the device to have WIN32K_POWER_WATCHDOG_TIMEOUT Blue Screen error.
Microsoft made their updating process autonomous; hence you don’t need to work on it. Still, snags are coming as they often get stuck in the unexpected loop and create complicated issues. To avoid all these happenings, step up to update them manually using inbuilt Device Manager as shown in the below guidelines –
- Invoke Run dialog using “Win+R” keys
- When the wizard arrives, type devmgmt.msc in the empty text area.
- Select Ok located beneath the box.
- When Device Manager is upfront, expand the device having a mark of exclamation.
- Now, perform a right-click on driver having Yellow sign only.
- Once the menu shows up, select Update driver to begin the process.
- A separate wizard will show up, select – Search automatically for drivers.
6] Rollback dreadful drivers
As we have discussed before making driver updating automatic by Microsoft, you can clearly understand these items will get their latest version frequently. That’s quite an amazing step by Tech giants, but automatic processes are not always as helpful as we think. When connected to the internet, some of the buggy drivers may come in without bothering your permission whereas some incomplete downloads may also get installed.
This happens usually when the internet connection gets disturbed and you fall into big trouble such as WIN32K_POWER_WATCHDOG_TIMEOUT BSOD error in Windows 10. If such things happen quite regularly, you have to disable the dreadful driver or rollback that to the default state using the below guidelines –
- Open the Device Manager once more following the same instruction to the above resolution.
- Have a closer look at Device Manager console and locate the device whose driver you want to disable or roll back.
- Once reached the desired one, double-click on the same to unveil the driver list.
- Do a Right-click on the driver that was modified earlier, and then choose Properties.
- On the upcoming window, shift to its Driver tab and click either Disable or Roll Back Driver.
7] Disconnect Hardware Accessories temporarily
Recently a lot of forums are evidence that some people are becoming prey to Blue Screen error like WIN32K_POWER_WATCHDOG_TIMEOUT after using a Hardware item. They have mentioned a few names of accessories like a wired or USB mouse, keyboard, printer, or a speaker. If you look closely, you may have already understood how important these hardware items are in our day-to-day life. Getting sang when using them is truly unexpected and hard to keep working once things get out of your imagination. Well, the issue has got a simple fix as well.
When you will disconnect them, the issue takes leave and few users brought this news to daylight. You can perform the same i.e. disconnect these accessories for some time and restart Windows 10 later on. If the issue doesn’t appear in the further Startup, connect them to use for daily working on computer.
8] Perform Automatic Repair to Windows 10
Automatic Repair is an inbuilt Windows utility that runs eventually when a potential bug is detected and it is activated at the third boot. A good number of tests are carried out in the process to troubleshoot smoothly. Some of the diagnoses might be useless as well and consume lots of valuable time. The workaround is so helpful, you can perform it through your own moves according to the below instructions –
- Launch Settings by hitting the gear icon from Start menu.
- Select the Update & Security tile from the app UI and proceed to the next page.
- Here on, choose Recovery on the left pane and shift to the adjacent right side.
- Click Restart now button located under ‘Advanced startup’.
- When the Windows finishes rebooting, select Troubleshoot =>Advanced options => Startup Repair
- On the following Automatic Repair page, provide your Microsoft account credentials
- Lastly, choose Continue to start the repairing process.
9] Kill malware using Windows Security
Security on the internet is becoming a laughing stock day by day as malware is carrying powerful codes to sneak any defense strategy. Viruses are actually programs that can replicate themselves into other files and make the system elements corrupted. They get spread easily moving through spam emails or USB and when they get into the system, it deteriorates core components necessary for Windows. This will lead the system to get affected with WIN32K_POWER_WATCHDOG_TIMEOUT Blue Screen error.
To provide maximum security, Microsoft released the latest OS equipped with Windows Security which has a robust infrastructure. The utility can effectively scan and fix malware both Online and Offline. Eventually, you can get rid of BSOD issues as well as keep you invincible from these deadly bugs. The ways to deploy this tool are as follows –
- Hit the Windows key and write “security” in the blank text area.
- Select Windows Security app from the appearing result to launch the same.
- When in the visible app area, Select Virus & threat protection from the left pane.
- Jump to the adjacent right side and click Scan options.
- When all methods are available, hit the radio button before Full scan.
- Choose Scan now and let the process begin.
- If the method finds any of the malware, hit Clean threats.
- On the following window, select Remove first and followed by clicking Start actions.
- All threats will be dismissed once the process ends normally.
10] Defend Software conflict by uninstalling similar programs
Software programs provide aids to the day-to-day tasks and help to execute work in a very easy mean. We the people are also very much eager to get the job done easily by application and install them at a very good number. Sometimes, similar applications too which eventually possess the same core components. When such dual apps run in the same system, they might engage in conflict and resulting in the system losing necessary files. The act misleads to a WIN32K_POWER_WATCHDOG_TIMEOUT Blue Screen of Death Error.
As to prevent the issue and software collision, you have to uninstall similar programs as mentioned in the below instructions –
- Open the Run dialog and type “appwiz.cpl” in the blank text field.
- Hit the Enter key and immediately Programs and Features window will hit on display.
- Reach out to the desired program you opt to remove and also select Uninstall option located at the top ribbon.
- If UAC asks for permission, select Yes to proceed.
- Follow the guidelines on the screen until the task finishes completely.
- Later on, restart the device and upon returning to the desktop, check if WIN32K_POWER_ WATCHDOG_TIMEOUT BSOD error is dismissed.
11] Resolve System core components using sfc /scanow command
Due to malware infection or after a software conflict, the Windows system files get affected in a very nasty way. These dreadful files then lead to having Blue Screen error with abnormal bug check code 0x0000019C. To make these files up and running again, you have to rectify them as soon as possible. This is the place where you need the System File Checker tool that is powered up in the Elevated Command Prompt. The guidelines to avail the tool is as follows –
- Open the Taskbar Search and type cmd.exe in the typing area.
- When Command Prompt appears, do right-click on the same and also select Run as Administrator.
- When UAC prompts for permission, give consent by clicking on Yes.
- After moving to the black window, enter the following command
sfc /scannow
- Execute the utility by pressing Enter key.
- The tool will, therefore, detect and fix all corrupted Windows resources and DLL files automatically.
- Once it completes, perform a restart to Windows to save all the changes.
12] Disable Fast Boot to fix WIN32K_POWER_WATCHDOG_TIMEOUT Error in Windows 10
A joint feature of the usual shut down process and hibernate makes all together with the Fast Boot on a computer. This process usually performs a startup without hampering a single file in the system. Hence, even if you restart the machine after troubleshooting, the WIN32K_POWER_WATCHDOG_TIMEOUT Error will be carried over and you will not get the utmost result.
Therefore, to fix the Blue Screen error, you must disable this Fast Boot proceeding through the below guidelines –
- Right-click on the battery icon located at the rightmost corner of the Desktop.
- Now, from the visible menu, choose Power Options.
- Moving to the consequent page, “Choose what the power button does” from the left column.
- When shifted to the following page, perform click Change settings that are currently unavailable to unveil the hidden options.
- Roll down below and uncheck the box set for Turn on fast startup (recommended).
- Lastly, hit the Save Changes button from the bottom.
13] Perform System Restore and head back to the previous point
An affected system usually has a defectively modified registry which happens when you install a new program or remove an existing one. When WIN32K_POWER_WATCHDOG_TIMEOUT BSOD error occurs due to such changes, you can easily head back to the previous State performing System Restore only. The instructions to perform the task is as follows –
- Open the Run dialog by pressing Windows and R at once.
- Enter text ‘rstrui’ in the blank typing area.
- Hit Enter key and the command will put forward System Restore immediately.
- From the upcoming wizard, select Show more restore points.
- Choose the latest one and hit Next in the process.
- Once the succeeding page is displayed, choose Finish to start restoring process.
14] Deploy Blue Screen Troubleshooter
Blue Screen Error has suddenly gone past all previous records in terms of creating havoc and it has created trembling in the user’s mind. As to regain trust as well as to save the Operating System, Microsoft introduced Blue Screen Troubleshooter with Windows 10 Fall Creators Update edition.
In the past, the inbuilt utility was available in the Windows Settings app which recently shifted to Control panel coming to the latest version. You can deploy this utility to recover a device affected with WIN32K_POWER_ WATCHDOG_TIMEOUT BSOD moving with the below instructions –
- Press Widows+Q to activate the Taskbar search in Desktop.
- Now, write down bluescreen in the empty text bar.
- Choose Find and fix bluescreen problems from appearing results.
- Further, the Troubleshooting Wizard will be active.
- After the utility detects a BSOD issue, it will automatically suggest the steps on the screen.
- Follow those guidelines and fix WIN32K_POWER_WATCHDOG_TIMEOUT BSOD error eventually.
15] Go with a single Anti-virus program
Anti-virus programs provide sufficient shields to the machine to block the Malwares sneaking defense. There is a lot in the market and most of them have a good reputation as well as they are free. You can take up and continue with that obviously, but Windows 10 offers you Windows Security which is by far the best anti-virus program.
Whatever may be the application, you must not have both as they may cause a software collision and lead to WIN32K_POWER_WATCHDOG_TIMEOUT Blue Screen error. Therefore, if you have both, uninstall any using the below-mentioned guidelines –
- Call in Windows Settings app by pressing Windows+I.
- Select Apps from this layout and shift to the consequent page.
- Select Apps & Features from the left side pane and eventually jump to the right.
- Once the list of installed apps is available, hover over the Third-party antivirus tool.
- Click on the app and choose Uninstall from the expanded pane.
- If UAC asks your intention, choose Yes to continue.
- Follow the on-screen guidelines to uninstall it completely.
16] Use Safe Boot mode to resolve WIN32K_POWER_WATCHDOG_TIMEOUT Blue screen error
Windows Operating System usually gets affected by Bugs and this is truly nothing new. Right from the introduction, same thing happened and was resolved as well with the application of resolutions. One of the workarounds came up every time a critical drawback comes to the light, booting the OS in the Safe Mode.
This is a special type of Startup method where Windows powers up with basic programs and settings. You can deploy this resolution to fix WIN32K_POWER_WATCHDOG_TIMEOUT BSOD error. In case the issue becomes persistent again, you can at least be sure that, no default programs or settings s responsible for the snag and deploy further resolutions accordingly. Here is how you can Boot the OS in Safe Mode –
- First thing first, save and close all running programs and make your way to the desktop area by pressing ‘Win+D’ at once.
- Now, Press Alt+f4 together and click on Restart using the drop-down list located beneath What do you want the computer to do?
- After the OS completes the first cycle of reboot, you see a blue screen holding a few options, Choose Troubleshoot.
- From there, select Advanced options and consequently Startup Settings.
- Up next, press the Windows key and click on the Power icon.
- Choose Restart and let Windows 10 reboot for the second time.
- On the further Startup, you will have options to Boot in Safe Mode in the startup menu.
17] Go for Clean booting Windows 10
In the Clean boot mode, Operating System launches the basic applications only and tries to detect vulnerabilities accurately. The mode also improves the overall performance of the device as well as reduces the plausible software conflict risks.
Deploying this workaround might be helpful to fix Blue Screen error with bug check code 0x0000019C. Let’s try this workaround using the below guidelines –
- Press Windows and hover to Windows Administrative Tools from the appearing list.
- Make a double-click on the same to expand it.
- From the stretched-out list, reach to System Configuration and execute a right-click on it.
- Select Open and then choose the radio button before Selective startup.
- Proceeding ahead, uncheck the box against Load startup items.
- Next up is to transfer the self to the Services tab and put a tick mark on the box against Hide all Microsoft services.
- Select the Disable all button from the same wizard.
- Moving ahead, reach to Startup tab and click the labeled link Open Task Manager.
- When the Task Manager pops out, perform a right-click on each program listed in this console one after another and choose Disable for all.
- Lastly, Go back to the System Configuration wizard and click on Apply button first followed by OK.
18] Keep the BIOS up to date always
BIOS comes in the Operating System preinstalled and this one runs first when you start the machine for the first time. This is basically a Firmware that performs Hardware initiation at the time the device starts booting. It plays an important role such as offering Runtime services for Windows and other installed programs.
Outdated BIOS can be root to a lot of drawbacks including Blue Screen error with bug check code 0x0000019C. To prevent such happenings, updating this will be helpful –
- Press the Win+X hotkeys to launch the Power user menu.
- Choose Run from there and invoke the dialog.
- Type msinfo32 in the text box and eventually hit Enter key.
- Once the System Information page comes in, type BIOS version in its search bar.
- Hitting on the Find button will show up some information here.
- Keep them noted and then close the window.
- Now, open a web browser and visit the manufacturer’s website for your BIOS using the info you get a few moments ago.
- Finally, download compatible files for your system and install them as well.
19] Uninstall faulty Windows update files
As the Windows Update process is Autonomous, in the presence of a valid internet connection, update files will get installed anytime. Unless the process falls into any unexpected loop, this will be helpful to the Operating System as keeping OS up to date is a basic need.
Whenever the process abnormally terminates, a few incomplete files will be installed and the dreadful condition will lead to WIN32K_POWER_WATCHDOG_TIMEOUT BSOD error. In that case, you have to uninstall update files moving through the below instructions –
- Open the Settings app and head to Update & Security.
- Select it to load the additional settings page.
- On the consequent page, select Windows Update from the left pane.
- Jump to the corresponding right and hit click on View update history once you come across it.
- A new window will open up and from there click on Uninstall updates link available here.
- By default, you will be redirected to “Installed Updates”.
- Move out for the latest received patch in the appearing list and do a right-click on the same.
- Hit the Uninstall option showing in the top ribbon and keep following on-screen guidelines until these are deleted completely.
20] Rectify the Defective Windows image files
Windows Image files are the components of ISO that are released before any Windows Major update. Once these files get corrupted, Blue Screen error will show up in the system which is very hard to fix.
Well, you can step up to rectify those problematic files first in case having WIN32K_POWER_WATCHDOG_TIMEOUT error using the DISM tool. The default utility will activate only in the elevated Command Prompt when you proceed with the below guidelines –
- Open Command Prompt as Administrator.
- In the Dark window, appearing, type the following command –
DISM.exe /Online /Cleanup-image /Restorehealth
- Press Enter hey and immediately Deployment Image Servicing and Management (DISM) tool will arrive.
- This utility will rectify all the dreadful windows image files accordingly. The process may be a lengthy one.
- On completion of the process, restart the device and when signing back in, perform an inspection for BSOD error.
Methods:
1] Fix Existing Memory issues
2] Rectify Hard Disk bad areas
3] Clear Off Junk files
4] Update Windows 10
5] Use Device Manager and update drivers
6] Rollback drivers to default
7] Disconnect Hardware Accessories temporarily
8] Perform Automatic Repair
9] Kill malware using Windows Security
10] Defend Software conflict by uninstalling similar programs
11] Resolve System core components using sfc /scanow command
12] Disable Fast Boot
13] Perform System Restore
14] Deploy Online Blue Screen Troubleshooter
15] Go with a single Anti-virus program
16] Use the Safe Boot mode
17] Go for Clean boot
18] Keep BIOS up to date
19] Uninstall faulty Windows update files
20] Rectify Defective Windows image files
That’s all!!
Repair any Windows problems such as Blue/Black Screen, DLL, Exe, application, Regisrty error and quickly recover system from issues using Reimage.
☑️ 7 простых трюков, чтобы исправить ошибку BSoD Win32k Power Watchdog Timeout
– Обзоры Новости
- Тайм-аут сторожевого таймера питания Win32k является ошибкой BSOD и вызван неисправными драйверами.
- Чтобы исправить эту ошибку, вам нужно будет найти и удалить проблемные сторонние приложения.
- Другой причиной этой проблемы может быть несовместимое оборудование, поэтому обязательно проверьте его.
XINSTALL, НАЖИМАЯ НА ЗАГРУЗОЧНЫЙ ФАЙЛ
Для устранения различных проблем с ПК мы рекомендуем Restoro PC Repair Tool:
Это программное обеспечение исправит распространенные компьютерные ошибки, защитит вас от потери файлов, вредоносного ПО, аппаратного сбоя и оптимизирует ваш компьютер для достижения максимальной производительности. Решите проблемы с ПК и удалите вирусы прямо сейчас, выполнив 3 простых шага:
- Скачать инструмент восстановления ПК Restoro который сопровождается запатентованными технологиями (патент доступен здесь).
-
Щелчок начать анализ чтобы найти проблемы Windows, которые могут вызывать проблемы на ПК.
-
Щелчок исправить все для устранения проблем, влияющих на безопасность и производительность вашего компьютера
- В этом месяце Restoro скачали 0 читателей.
Ошибки BSOD могут раздражать, и многие пользователи сообщают об этом. Тайм-аут сторожевого таймера Win32k на вашем ПК. Как и любая другая ошибка BSOD, эта приведет к сбою вашей системы, и вы потеряете все свои несохраненные данные.
Устранение этой проблемы не так сложно, как вы думаете, и в этом руководстве мы покажем вам, как правильно решить эту проблему и восстановить работоспособность вашего компьютера.
Прежде чем начать, было бы неплохо проверить расположение файла журнала BSOD и получить дополнительную информацию об ошибке.
Как исправить ошибку тайм-аута драйвера питания Win32k в Windows 10/11?
1. Используйте специализированное программное обеспечение для восстановления BSOD
Самый быстрый способ ремонта Тайм-аут сторожевого таймера Win32k заключается в использовании специализированного программного обеспечения, которое может автоматически исправлять ошибки BSOD.
ресторан работает с онлайн-базой данных, которая содержит последние рабочие системные файлы для ПК с Windows 10, что позволяет легко заменить все, что может вызвать ошибку BSoD.
Это программное обеспечение также может помочь вам, создав точку восстановления перед началом ремонта, что позволит вам легко восстановить предыдущую версию вашей системы, если что-то пойдет не так.
Вот как вы можете исправить ошибки реестра с помощью Restoro:
- Скачайте и установите Ресторо.
- Запустите приложение.
- Подождите, пока программа обнаружит проблемы со стабильностью и возможные поврежденные файлы.
- производство пресс оборудования начать ремонт.
- Перезагрузите компьютер, чтобы все изменения вступили в силу.
Как только процесс восстановления будет завершен, ваш компьютер должен работать нормально, и вам больше никогда не придется беспокоиться об ошибках BSoD или медленном времени отклика.
⇒ Восстановить
предупреждение: Эту программу необходимо обновить с бесплатной версии, чтобы выполнять некоторые специфические действия.
2. Откат обновленных драйверов устройств
- Щелкните правой кнопкой мыши на Démarrer и выберите Администратор устройства.
- В Администратор устройства раздел нажмите на устройство, чтобы вернуться.
- Выбирать Свойства а потом его проводник язык. Нажмите на пилот-помощник.
- Щелчок да.
- Перезагрузите компьютер.
После восстановления драйверов проверьте, Тайм-аут сторожевого таймера Win32k ошибка все еще там.
3. Проверьте и удалите сторонние приложения.
- Нажмите клавишу Windows + R, чтобы открыть Courirи писать appwiz.cpl. Нажмите Ввод.
- Найдите программу для удаления.
- Щелкните правой кнопкой мыши эту программу и выберите désinstaller.
- Выполните необходимые шаги, чтобы удалить эту программу.
Пользователи Windows сообщают, что некоторые сторонние приложения могут вызывать ошибку тайм-аута драйвера питания Win32k. Если вы заметили, что такая программа вызывает эту проблему, удалите ее и перезагрузите компьютер.
В категорию программного обеспечения, которое может вызвать эту ошибку, входят менеджеры виртуальных образов, такие как виртуальная коробка ли DAEMON Toolsнапример.
Лучший способ удалить приложения — использовать специальное программное обеспечение для удаления. С этим типом программного обеспечения он удалит приложение и все файлы и записи реестра, связанные с ним.
Пользователи сообщали об истечении времени ожидания драйвера питания Win32k на Lenovo, Dell, HP, ASUS и многих других брендах, поэтому ваш компьютер может быть затронут независимо от того, какую марку вы используете.
4. Отключите любое новое аппаратное устройство.
Возможно, ваше недавно подключенное оборудование вызывает ошибку тайм-аута контроллера питания Win32k. Это произойдет, если у вас есть новые аппаратные устройства, которые были установлены неправильно.
Вот почему мы рекомендуем вам отключать все новое оборудование от вашего компьютера. Если вы не уверены, какое устройство вызвало эту ошибку, отключите все внешние устройства и периферийные устройства, кроме мыши и клавиатуры.
Совет эксперта: Некоторые проблемы с ПК трудно исправить, особенно когда речь идет о поврежденных репозиториях или отсутствующих файлах Windows. Если у вас возникли трудности с исправлением ошибки, возможно, ваша система частично повреждена. Мы рекомендуем вам установить Restoro, инструмент, который проанализирует вашу машину и определит, что не так.
Нажмите здесь, чтобы скачать и начать ремонт.
Перезагрузите компьютер и проверьте, появляется ли по-прежнему ошибка Power Watchdog.
5. Используйте средство диагностики памяти Windows
- Одновременно нажмите клавишу Windows + R, чтобы войти Курир.
- запись mdsched в поле и нажмите Enter.
- Выберите Перезагрузите сейчас и проверьте наличие проблем (рекомендуется) опцию.
Это решение перезагрузит компьютер и автоматически исправит ошибки памяти. В качестве альтернативы, если ошибка не устранена, вам может потребоваться заменить модули памяти.
Неисправный модуль оперативной памяти является одной из частых причин Тайм-аут сторожевого таймера Win32k и другие ошибки BSOD, поэтому обязательно проверьте свою память.
6. Запустите средство проверки системных файлов.
- Тип порядок в поле поиска Windows для Системный символ. нажмите кнопку Запустить от имени администратора.
- Введите следующую команду и нажмите Enter: sfc /сканировать сейчас
- Проверьте, исчезла ли ошибка.
Этот вариант ошибки «синий экран смерти» иногда появляется, когда системные файлы вашего компьютера повреждены. Проверка системных файлов поможет вам решить эту проблему.
После исправления файлов проверьте, сохраняется ли BSOD Win32k Power Watchdog Timeout.
7. Обновите прошивку BIOS
- Нажмите клавишу Windows + R одновременно, чтобы открыть Courir.
- запись msinfo32 и нажмите Enter.
- Находить Версия/дата BIOS и проверьте версию прошивки.
- Перейдите на сайт производителя материнской платы, выберите свою материнскую плату и перейдите к драйвер и утилита.
- Гнев БИОС и прошивка раздел и загрузите последнюю версию.
- Разархивируйте и извлеките файл BIOS на свой компьютер.
- Изучите содержимое Прочти меня файл из папки BIOS.
- Скопируйте файл обновления BIOS на пустой USB-накопитель или на компьютер.
- Перезагрузите компьютер, войдите в BIOS, нажав F2 или любую специальную клавишу BIOS.
- Перейдите в раздел обновления BIOS и выберите файл на флешке, чтобы начать обновление.
- Подождите, пока процесс завершится.
Перед обновлением BIOS сделайте резервную копию важных файлов на внешнем устройстве. Прежде чем использовать это решение, проверьте версию прошивки BIOS.
Как исправить ошибку тайм-аута Win32k Power Watchdog в Windows 11?
Большинство версий Windows имеют много общего, и то же самое касается последних двух. Решения, упомянутые в этом руководстве, универсальны, поэтому они должны работать в любой операционной системе Windows.
Имейте в виду, что Windows 11 немного отличается, поэтому вам может потребоваться изменить некоторые шаги, но по большей части все решения в этом руководстве полностью совместимы с обеими версиями.
Le Тайм-аут сторожевого таймера Win32k Это ошибка, которая затрагивает многих пользователей Windows, но вы сможете исправить ее с помощью наших решений.
Чтобы узнать больше об этих ошибках, мы предлагаем прочитать руководство по причинам BSOD для получения дополнительной информации.
Пожалуйста, оставьте нам комментарий ниже и сообщите нам, помогли ли они решить эту ошибку Windows.
Все еще есть проблемы? Исправьте их с помощью этого инструмента:
- Загрузите этот инструмент для восстановления ПК рейтинг «Отлично» на TrustPilot.com (загрузка начинается на этой странице).
- Щелчок начать анализ чтобы найти проблемы Windows, которые могут вызывать проблемы на ПК.
- Щелчок исправить все решать проблемы с запатентованными технологиями (эксклюзивная скидка для наших читателей).
В этом месяце Restoro скачали 0 читателей.
ИСТОЧНИК: Отзывы Новости
Не забудьте поделиться нашей статьей в социальных сетях, чтобы дать нам солидный импульс. 🤓
- Remove From My Forums
-
Вопрос
-
Many users reported BSOD with w32k_power watchdog error. Can someone assist to check what could be the possible cause. We have updated new display drivers directly from lenovo website but the same error still happened. Attached the memory dump. Any
advise.https://1drv.ms/u/s!AmUCc9cQ9jjagn—lqaXYKTKTGma?e=QwaHhT
Все ответы
-
Hi Joo Kay.
The memory dump file recorded a 0x0000019C (WIN32K_POWER_WATCHDOG_TIMEOUT) bug check, which indicates that Win32k did not turn the monitor on in a timely manner.
The stack trace has revealed the igdkmd64.sys and the
Netwtw06.sys (part of the Intel PROSet/Wireless WiFi software)
modules: try updating the wireless driver too.Bye.
Luigi Bruno
MCP, MOS, MTA, MCTS, MCSA, MCSE- Изменено
14 июня 2019 г. 15:08
- Предложено в качестве ответа
yilia zhaoMicrosoft contingent staff
21 июня 2019 г. 7:27
- Изменено
-
To evaluate the BSOD please post logs for troubleshooting.
Using administrative command prompt copy and paste this whole command.
Make sure the default language is English so that the logs can be scanned and read.
https://www.tenforums.com/tutorials/3813-language-add-remove-change-windows-10-a.html
The command will automatically collect the computer files and place them on the desktop.
Then use 7zip to organize the files and one drive, drop box, or google drive to place share links into the thread for troubleshooting.
https://support.office.com/en-us/article/Share-OneDrive-files-and-folders-9fcc2f7d-de0c-4cec-93b0-a82024800c07
This command will automatically collect these files: msinfo32, mini dumps, drivers, hosts, install, uninstall, services, startup, event viewer files, etc.
Open administrative command prompt and copy and paste the whole command:
copy %SystemRoot%minidump*.dmp «%USERPROFILE%Desktop»&dxdiag /t %Temp%dxdiag.txt© %Temp%dxdiag.txt «%USERPROFILE%DesktopSFdebugFiles»&type %SystemRoot%System32driversetchosts >> «%USERPROFILE%Desktophosts.txt»&systeminfo
> «%USERPROFILE%Desktopsysteminfo.txt»&driverquery /v > «%USERPROFILE%Desktopdrivers.txt» &msinfo32 /nfo «%USERPROFILE%Desktopmsinfo32.nfo»&wevtutil qe System /f:text > «%USERPROFILE%Desktopeventlog.txt»®
export HKEY_LOCAL_MACHINESOFTWAREMicrosoftWindowsCurrentVersionUninstall «%USERPROFILE%Desktopuninstall.txt»® export «HKEY_LOCAL_MACHINESOFTWAREMicrosoftActive SetupInstalled Components» «%USERPROFILE%Desktopinstalled.txt»&net
start > «%USERPROFILE%Desktopservices.txt»&REM wmic startup list full /format:htable >»%USERPROFILE%Desktopstartup.html»&wmic STARTUP GET Caption, Command, User >»%USERPROFILE%Desktopstartup.txt»There are two files for you to find manually:
a) C:WindowsMEMORY.DMP
Use file explorer > this PC > local C: drive > right upper corner search enter the above to find results.
b) dxdiag:
In the left lower corner search type: dxdiag > When the DirectX Diagnostic Tool opens click on the next page button so that each tab is opened > click on save all information > save to desktop > post one drive or drop box share link into the
thread
.
.
.
.
.Please remember to vote and to mark the replies as answers if they help.
.
.
.
.
. -
Hi,
The bugcheck is WIN32K_POWER_WATCHDOG_TIMEOUT and the parameter is 0x50 : Calling monitor driver to power on.
The driver igdkmd64.sys is Intel HD Graphics Drivers for Windows, try to update
it and check the symptom.https://downloadcenter.intel.com/product/80939/Graphics-Drivers
Best regards,
Yilia
Please remember to mark the replies as answers if they help.
If you have feedback for TechNet Subscriber Support, contact
tnmff@microsoft.com. -
Hi,
Is there anything I can do for you?
If you have any problems or concerns, please feel free to post here.
Best regards,
Yilia
Please remember to mark the replies as answers if they help.
If you have feedback for TechNet Subscriber Support, contact
tnmff@microsoft.com. -
Already update and it doesnt work. I have also run vantage and update all drivers including display, wireless network adapter, fingerprint sensor, bios, thunderbolt driver and firmware. Please advise.
-
It doesn’t work for display driver. I see a similar pattern issue. If i plug in with lenovo thinkpad usbc dock with the laptop and resume from sleep or idle mode, the problem will likely to happen.
-
yes i have included memory dmp file. Please advise.
-
Hi Luigi,
i have updated latest driver display driver and wireless adapter driver, fingerprint, thunderbolt driver and firmware and BIOS including using lenovo vantage to update all but issue still happen to many machines. Didnt work. The only workaround solution
is to disable sleep mode or bypass usbc lenovo dock. -
Hi Luigi,
i have updated latest driver display driver and wireless adapter driver, fingerprint, thunderbolt driver and firmware and BIOS including using lenovo vantage to update all but issue still happen to many machines. Didnt work. The only workaround solution
is to disable sleep mode or bypass usbc lenovo dock.The problem could be related to Lenovo drivers: try contacting Lenovo Support and asking for assistance.
Bye.
Luigi Bruno
MCP, MOS, MTA, MCTS, MCSA, MCSE- Изменено
Luigi BrunoMVP
29 июня 2019 г. 13:32
- Изменено
-
No, the new driver already updated but the new memory dump was not uploaded. However, they show the same error code and details.
-
When available please post two share links using one drive, drop box, or google drive:
Share link #1: results of the administrative command prompt command with dxdiag
Share link #2: memory dump if file size is < 1.5 GB
Always post new logs into the newest post.
.
.
To evaluate the BSOD please post logs for troubleshooting.
Using administrative command prompt copy and paste this whole command.
Make sure the default language is English so that the logs can be scanned and read.
https://www.tenforums.com/tutorials/3813-language-add-remove-change-windows-10-a.html
The command will automatically collect the computer files and place them on the desktop.
Then use 7zip to organize the files and one drive, drop box, or google drive to place share links into the thread for troubleshooting.
https://support.office.com/en-us/article/Share-OneDrive-files-and-folders-9fcc2f7d-de0c-4cec-93b0-a82024800c07
This command will automatically collect these files: msinfo32, mini dumps, drivers, hosts, install, uninstall, services, startup, event
viewer files, etc.Open administrative command prompt and copy and paste the whole command:
copy %SystemRoot%minidump*.dmp «%USERPROFILE%Desktop»&dxdiag /t %Temp%dxdiag.txt© %Temp%dxdiag.txt «%USERPROFILE%DesktopSFdebugFiles»&type
%SystemRoot%System32driversetchosts >> «%USERPROFILE%Desktophosts.txt»&systeminfo > «%USERPROFILE%Desktopsysteminfo.txt»&driverquery /v > «%USERPROFILE%Desktopdrivers.txt» &msinfo32 /nfo «%USERPROFILE%Desktopmsinfo32.nfo»&wevtutil
qe System /f:text > «%USERPROFILE%Desktopeventlog.txt»® export HKEY_LOCAL_MACHINESOFTWAREMicrosoftWindowsCurrentVersionUninstall «%USERPROFILE%Desktopuninstall.txt»® export «HKEY_LOCAL_MACHINESOFTWAREMicrosoftActive
SetupInstalled Components» «%USERPROFILE%Desktopinstalled.txt»&net start > «%USERPROFILE%Desktopservices.txt»&REM wmic startup list full /format:htable >»%USERPROFILE%Desktopstartup.html»&wmic STARTUP
GET Caption, Command, User >»%USERPROFILE%Desktopstartup.txt»There are two files for you to find manually:
a) C:WindowsMEMORY.DMP
Use file explorer > this PC > local C: drive > right upper corner search enter the above to find results.
b) dxdiag:
In the left lower corner search type: dxdiag > When the DirectX Diagnostic Tool opens click on the next page button so that each
tab is opened > click on save all information > save to desktop > post one drive or drop box share link into the thread
.
.
.
.
.Please remember to vote and to mark the replies as answers if they help.
.
.
.
.
.- Изменено
questionsformicrosoftproducts
29 июня 2019 г. 16:43
- Изменено
 Одна из самых сложных в определении причин и исправлении ошибок в Windows 10 — синий экран «На вашем ПК возникла проблема и его необходимо перезагрузить» и код ошибки CLOCK_WATCHDOG_TIMEOUT, который может появляться как в произвольные моменты, так и при выполнении определенных действий (запуск конкретной программы, подключение устройства и т.п.). Сама по себе ошибка говорит о том, что ожидаемое системой прерывание не было получено с одного из ядер процессора за ожидаемое время, что, как правило, мало говорит о том, что делать дальше.
В этой инструкции — о наиболее распространенных причинах ошибки и способах исправить синий экран CLOCK_WATCHDOG_TIMEOUT в Windows 10, если это возможно (в некоторых случаях проблема может быть аппаратной).
Синий экран смерти (BSoD) CLOCK_WATCHDOG_TIMEOUT и процессоры AMD Ryzen

Решил вынести информацию об ошибке применительно к владельцам компьютеров на Ryzen в отдельный раздел, поскольку для них, помимо причин, описанных далее есть и свои специфичные.
Итак, если у вас на борту установлен CPU Ryzen, и вы столкнулись с ошибкой CLOCK_WATCHDOG_TIMEOUT в Windows 10, рекомендую учесть следующие моменты.
- Не устанавливайте ранние сборки Windows 10 (версии 1511, 1607), поскольку в них возможны конфликты при работе на указанных процессорах, что приводит к ошибкам. В дальнейшем были устранены.
- Обновите БИОС вашей материнской платы с официального сайта её производителя.
По второму пункту: на ряде форумов сообщают, что, наоборот, ошибка проявляется после обновления БИОС, в данном случае срабатывает откат на предыдущую версию.
Проблемы с БИОС (UEFI) и разгон
Если в последнее время вы меняли параметры БИОС или выполняли разгон процессора, это может служить причиной ошибки CLOCK_WATCHDOG_TIMEOUT. Попробуйте следующие шаги:
- Отключить разгон процессора (если выполнялся).
- Сбросить БИОС на настройки по умолчанию, можно — оптимизированные настройки (Load Optimized Defaults), подробнее — Как сбросить настройки БИОС.
- Если проблема появилась после сборки компьютера или замены материнской платы, проверьте, есть ли на официальном сайте производителя обновление БИОС для неё: возможно, проблема была решена в обновлении.
Проблемы с периферийным оборудованием и работой драйверов
Следующая по распространенности причина — неправильная работа оборудования или драйверов. Если вы недавно подключили новое оборудование или же только что переустановили (обновили версию) Windows 10, обратите внимание на следующие методы:
- Установите оригинальные драйверы устройств с официального сайта производителя вашего ноутбука или материнской платы (если это ПК), особенно драйверы чипсета, USB, управления электропитанием, сетевых адаптеров. Не используйте драйвер-паки (программы для автоматической установки драйверов), также не воспринимайте серьезно «Драйвер не нуждается в обновлении» в диспетчере устройств — это сообщение не говорит о том, что новых драйверов действительно нет (их нет лишь в центре обновлений Windows). Для ноутбука также следует установить вспомогательное системное ПО, также с официального сайта (именно системное, различные прикладные программы, которые также могут там присутствовать не обязательны).
- В случае, если в диспетчере устройств Windows есть устройства с ошибками, попробуйте отключить их (правый клик мышью — отключить), если это новые устройства, то можно отключить их и физически) и перезагрузить компьютер (именно перезагрузка, а не завершение работы с последующим включением, в Windows 10 это может быть важно), а затем понаблюдать — проявляется ли проблема снова.
Еще один момент, касающийся оборудования — в некоторых случаях (речь о ПК, не ноутбуках) проблема может проявляться при наличии двух видеокарт на компьютере (интегрированного чипа и дискретной видеокарты). В БИОС на ПК обычно присутствует пункт для отключения интегрированного видео (как правило, в разделе Integrated Peripherals), попробуйте выполнить отключение.
Программное обеспечение и вредоносные программы
Помимо прочего, BSoD CLOCK_WATCHDOG_TIMEOUT может быть вызвана недавно установленными программами, особенно теми из них, которые работают с Windows 10 на низком уровне или добавляют свои системные службы:
- Антивирусы.
- Программы, добавляющие виртуальные устройства (можно посмотреть в диспетчере устройств), например, Daemon Tools.
- Утилиты для работы с параметрами БИОС из системы, например, ASUS AI Suite, программы для разгона.
- В некоторых случаях — софт для работы с виртуальными машинами, например, VMWare или VirtualBox. Применительно к ним, иногда ошибка возникает в результате неправильной работы виртуальной сети или при использовании специфичных систем в виртуальных машинах.
Также к такому ПО можно отнести вирусы и другие вредоносные программы, рекомендую выполнить проверку компьютера на их наличие. См. Лучшие средства удаления вредоносных программ.
Ошибка CLOCK_WATCHDOG_TIMEOUT как следствие аппаратных проблем
И, наконец, причиной рассматриваемой ошибки могут быть аппаратные и сопутствующие проблемы. Некоторые из них достаточно просто исправляются, к ним можно отнести:
- Перегрев, пыль в системном блоке. Следует почистить компьютер от пыли (даже при отсутствии признаков перегрева это не будет лишним), при перегреве процессора, возможно, также поменять термопасту. См. как узнать температуру процессора.
- Неправильная работа блока питания, напряжения отличные от требуемых (можно отследить в БИОС некоторых материнских плат).
- Ошибки оперативной памяти. См. Как проверить оперативную память компьютера или ноутбука.
- Проблемы с работой жесткого диска, см. Как проверить жесткий диск на ошибки.
Более серьезные проблемы этого характера — неисправности материнской платы или процессора.
Дополнительная информация
Если ничто из описанного пока не помогло, возможно, могут оказаться полезными следующие пункты:
- Если проблема возникла недавно, а система не переустанавливалась, попробуйте использовать точки восстановления Windows 10.
- Выполните проверку целостности системных файлов Windows 10.
- Часто проблема бывает вызвана работой сетевых адаптеров или их драйверов. Иногда не удается точно определить, что дело в них (обновление драйверов не помогает и т.п.), но, при отключении компьютера от Интернета, выключении Wi-Fi адаптера или вынимании кабеля из сетевой карты проблема исчезает. Это не обязательно говорит о проблемах именно сетевой карты (также могут быть виноваты системные компоненты, неправильно работающие с сетью), но может помочь в диагностике проблемы.
- Если ошибка проявляется при запуске какой-то конкретной программы, возможно, проблема вызвана именно её некорректной работой (возможно, конкретно в этой программной среде и на этом оборудовании).
Надеюсь, один из способов поможет решить проблему и в вашем случае ошибка не вызвана аппаратными проблемами. Для ноутбуков или моноблоков с оригинальной ОС от производителя вы также можете попробовать выполнить сброс на заводские настройки.
Существует огромное количество различных ошибок в работе операционной системы Windows, которые входят в категорию «критических проблем», прерывающих штатную работу компьютера. «Синий экран смерти» (он же BSOD) уже давно стал некой визитной карточкой Windows, постоянно ставя в тупик пользователей, так как большинство из них просто не имеют конкретных причин возникновения, соответственно, и способов решения. Одним из самых сложных в решение является ошибка с текстом «CLOCK_WATCHDOG_TIMEOUT», возникающая на компьютерах с операционной системой Windows 10 на борту. А о том, в чём причины её возникновения и каким образом её можно решить, и пойдёт речь в настоящей статье.

Методика исправления ошибки CLOCK_WATCHDOG_TIMEOUT.
Причины и решение
Сложность рассматриваемой проблемы заключается в отсутствие привязки к конкретному действию. «CLOCK_WATCHDOG_TIMEOUT» может проявиться практически в любой момент использования возможностей операционной системы, например, во время простоя при открытии программного обеспечения или при подключении к компьютеру внешних устройств. Именно поэтому крайне сложно определить спектр возможных причин и предпринять какие-либо конкретные манипуляции, направленные на устранение ухода систему в аварийный режим. Исходя из существующей практики, можно выделить несколько возможных причин, на которые следует обратить внимание в первую очередь, а именно:
- «Разгон процессора». Постарайтесь хотя бы на время отказаться от оверклокинга и вернуть процессору корректные значения.
- «Конфликт между комплектующими». Например, на практике фиксировались случаи «несогласованности» работы дискретной и встроенной графической картой.
- «Оперативная память работает нестабильно».
- «Используемое драйверное обеспечение устарело, работает с ошибками или несовместимо с используемыми комплектующими и операционной системой в целом».
- «Вирусное программное обеспечение оказывает негативное воздействие на целостность операционной системы».
- «Некорректная работа жёсткого диска или твердотельного накопителя».
Как видно из данного перечня, причинно-следственная связь имеет стандартизированный вид для большинства представителей «BSOD». Но как уже было сказано в начале статьи, «CLOCK_WATCHDOG_TIMEOUT» проявляется хаотично, что не позволяет сразу определить порядок применения рекомендаций, которые будут описаны ниже.

Поэтому попробуйте применять всё в комплексе с постоянной перезагрузкой компьютера, для того чтобы постараться вынудить его снова вывести ошибку, так как не исключено, что она может «эволюционировать или деградировать» в более простой код, с понятным указанием на виновника. Итак, рекомендации носят следующий вид: в качестве совета, перед тем как приступать к конкретным действиям, озаботьтесь созданием загрузочного носителя с образом Windows или каким-либо LiveCD. Подобная страховка не будет лишней.
- Если осуществлялся разгон процессора, то верните его прежнее состояние.
- Сбросьте конфигурацию BIOS до значения по умолчанию, для этого:
- Перезагрузите компьютер и в момент загрузки нажмите кнопку, которая у вас отвечает за вход в BIOS. В большинстве случаев – это DEL, F2, F12, TAB, всё зависит от производителя вашей материнской платы и версии BIOS.
- Пролистайте имеющиеся вкладки (если они есть) и найдите «Exit».
- Последним пунктом будет параметр «Load Setup Defaults», нажмите на него и подтвердите выбор, нажав кнопку «ОК».
- Дождитесь перезагрузки компьютера, и проверьте работоспособность операционной системы.
В некоторых устаревших версиях BIOS, требуемый параметр может иметь название «Load Optimized Defaults» и находится во втором столбце, но смысл тот же. Альтернативный вариант – это замыкание перемычки или переустановка батарейки. Также необходимо учитывать, что в ряде случаев в решение рассматриваемой проблемы помогает обновление BIOS, но к этому процессу нужно подходить с определённой осторожностью, а без наличия нужных для этого навыков, браться за этот вариант не следует.
- Если у вас ноутбук с двумя графическими картами (встроенной и дискретной) попробуйте на время отключить встроенную и проверить сохранилась ли ошибка. Сделать это можно в BIOS или в специализированном программном обеспечение, которое поставляется от производителя, например, у Nvidia это можно осуществить с помощью утилиты «Nvidia Control Center» — «Управление параметрами 3D».

- Проведите комплексную проверку установленных версий драйверов программного обеспечения, особенно если появлению ошибки предшествовала установка новых компонентов или обновление операционной системы.
- Проведите полное сканирование операционной системы на наличие вирусной активности. Для проверки следует использовать проверенные утилиты, которые уже давно держат планку качества – это «Dr.Web CureIt», «Kaspersky Virus Removal Tool», «AdwCleaner», «Malwarebytes». Как вариант, можно потратить несколько больше времени и использовать их в связке.
- Проверьте целостность системных компонентов Windows. Для этого:
- Попробуйте на время удалить установленное антивирусное программное обеспечение. Возможно, оно блокирует или препятствует корректной работе какого-либо компонента.
- Попробуйте отключить брандмауэр Windows по той же причине.
- Удалите все приложения, которые для своей работы создают виртуальное устройства, например, всем известный «Daemon Tools» и извлеките созданные им образы.
- Проверьте состояние жёсткого диска или твердотельного накопителя утилитой «CHKDSK» и программой «Victoria».

- Протестируйте работу оперативной памяти. В качестве инструмента проверки можно воспользоваться стандартными средствами Windows – это утилита «Средстве проверки памяти» или можно использовать популярный вариант со специализированной утилитой «Memtest86».


Следует учитывать, что проверка оперативной памяти — это мероприятие, которые может растянуться на многие часы (обычно время тестов составляет от 4 до 8 часов). Поэтому вам потребуется обеспечить бесперебойной проверки/тестирования. Если положительного результата добиться не получилось, то определите дату, когда ошибка не начала себя проявлять и вами не были предприняты какие-либо манипуляции с Windows и, используя функционал «Восстановления системы», откате конфигурацию Windows.
Заключение
Приведённые выше одиннадцать пунктов – это наиболее явные причины появления «CLOCK_WATCHDOG_TIMEOUT», но, как уже неоднократно отмечалось, рассматриваемая ошибка иногда имеет совсем нетипичные причины. Принимая это во внимание, будьте готовы провести более детальное изучение работы вашего компьютера с проверкой компонентов на отсутствие перегрева, запыленности, корректности работы блока питания и совместимости подключаемого оборудования.
A Blue Screen of Death (BSoD) is an indication that your computer is facing a critical error and cannot run because it was pushed to a limit. There are more than 500 stop codes for BSoDs on Windows 10. We will be looking into the rare CLOCK_WATCHDOG_TIMEOUT error and try to get rid of it with the different methods in it.
What Is The CLOCK_WATCHDOG_TIMEOUT Blue Screen On Windows 10?
The stop code Clock Watchdog Timeout is a Windows 10 BSoD error indicator that could be caused when the system processor fails while processing interrupts on the system. This task stops only when the processor is not responsive or a processor thread is forced into a waiting state, as one thread waits for a response from another thread.
A system processor is pushed to this state when a processor isn’t able to handle its own cores and threads, simultaneously. The problem arises when one thread isn’t able to communicate with another or when there are no responses from the thread.

If the processor cannot process tasks further on a computer, because of full resources and no space to receive responses. This vegetative state of the processor is known as a deadlock.
This issue can occur even in a multi-processor system or for a processor with multiple threads. There is no specifications limit to what this issue can affect and stop everything abruptly. This issue takes different forms with different specifications. These are the various errors that the Clock Watchdog Timeout error can branch into.
Note: Threads are tasks that are managed by the cores in the processor. Higher the cores, more threads ran by the processor.
Variants Of The Windows 10 CLOCK_WATCHDOG_TIMEOUT Error
There are a number of variants for this error, which might sound like it is bad. But it’s quite the contrary as all these different branches of this issue can be fixed with the same steps.
CLOCK_WATCHDOG_TIMEOUT Error Ryzen
This type of the CLOCK_WATCHDOG_TIMEOUT error is caused after a Ryzen powered PC is updated. The solution to this issue is to roll it back to an older version.
CLOCK_WATCHDOG_TIMEOUT Error Intel
This variant occurs on computers with Intel processors. You’ll see this when there is a processor issue. It is recommended to look at the processor.
Clock Watchdog Timeout Windows Version
Corrupt system files can cause this type of CLOCK_WATCHDOG_TIMEOUT blue screen error on your computer. You can filter them out or repair them.
Clock Watchdog Timeout Overclock
Overclocking the CPU can also cause this issue, as mentioned earlier. You will have to make changes in the configurations to fix this.
Clock Watchdog Timeout GPU And CPU Memory
Insufficient RAM or Graphics card memory can be responsible for this issue. You might have to lower the output settings or upgrade these hardware components to fix this issue.
What Causes The Clock Watchdog Timeout Blue Screen Of Death Error?
- Driver issues
The first reason for a BSoD error to appear on your computer is one or more driver issues. These drivers can be outdated or corrupt, which will slow down the performance of any computer.
- Troublesome hardware
If your system has incompatible or dysfunctional hardware connected to it, there may be some issues regarding the functioning of the computer. You might have to check the hardware to see if it is damaged, if it is incompatibility is not the reason.
- CPU overclocking
Overclocking is not a good idea if your PC does not have the necessary requirements to push itself beyond the limit. Extended overclocking on a system with low specifications is highly risky.
- Corrupt or incompatible system files
System files are very important to a working computer and can bring the system to a standstill when they are corrupt or missing. You can repair them or replace them with system features like the SFC and DISM scans.
- Malicious files
There is no limit to what viruses and other malware can do to your computer. It is not a surprise if this is the cause for this Blue Screen of Death error. You will have to use an antivirus to remove them, carefully.
- Insufficient or Damaged RAM
A system needs the required amount of RAM to run applications and other processes. Lesser the capacity of RAM, the lower the number of processes that run on your computer. Without free memory, newer applications cannot be launched. Without adequate CPU memory, you’ll be able to see the Blue Screen of Death error often.
Solutions To Clock Watchdog Timeout Windows 10 Blue Screen Of Death Error
These are the different methods that can be used to remove the CLOCK_WATCHDOG_TIMEOUT error on Windows 10. If you want more details about this BSoD error, you will be able to find it in the Event Viewer (eventvwr).
- Detach USB Hardware Devices From Your Computer
- Troubleshoot The Blue Screen Error
- Troubleshoot The Blue Screen Error After A Clean Boot
- Install The Latest Bios Version
- Reset The Bios Menu
- Update Your SSD firmware
- Disable Overclocking
- Go Back To A System Restore Point
- Use The Windows Memory Diagnostics Tool (Memtest)
- Run The System File Checker (Sfc)
- Upgrade your RAM or replace the existing ones
Fixing The Clock Watchdog Timeout Blue Screen Error On Windows 10
Follow the below steps to fix the Clock Watchdog Timeout BSoD on a Windows 10 computer.
Detach USB Hardware Devices From Your Computer
Blue screen errors can be caused by USB devices that are connected to your computer. This is the reason that our first workaround for this issue is to clear all the USB ports on your computer. The list of USB devices comprises devices like mice, keyboards USB storage drives, cables, microphones, headphones, and other devices with a USB pin.
Remove these devices and restart your computer.

You should not be able to face this issue again. If you do see this blue screen on your display, it means that the workaround was not enough to fix it. Proceed with the below procedures to fix this issue.
Troubleshoot The Blue Screen Error
Windows 10 has exclusive troubleshooters to find out and fix issues for all aspects of your computer. Since a blue screen error is a big deal, Windows has a troubleshooter to find more information about this and take preventive measures.
These are the steps to troubleshoot the BSoD.
- Launch the Windows Settings tool through the Start menu or with the help of the keyboard shortcut (Windows + I).

- Go to the Update & Security tab and click on the Troubleshoot tab from the left panel.

- You will be able to see all the troubleshooters available on your system.
- If you can’t see any of them, click on the Additional troubleshooters link, which is located at the bottom of the window.

- Expand the Blue Screen option and click on the Run the Troubleshooter option from this section.
- You will have to give in a few details to the troubleshooter so that you can get the correct results.
After these steps are perfectly complete, the troubleshooting process runs and detects the source of the BSoD and fixes it. You just have to click on the Apply this fix option, when the process comes to an end. This solution will be implemented by the OS, automatically, and finally, you will have to restart your PC for these changes to take effect.
Troubleshoot The Blue Screen Error After A Clean Boot
If the usual troubleshooting does not work, we recommend doing a clean boot of your PC and then, running the Blue Screen troubleshooter. To run the BSoD troubleshooter, use the steps above and if you do not know how to launch your Windows 10 PC in clean boot, we have given the steps below.
The clean boot is a process that can help users narrow down and pinpoint the source of any issue on your Windows device. This is quite similar to the Safe Mode feature in Windows. Use these steps.
- Bring up the Run tool (Windows + R) and execute the msconfig command by pressing Enter or the Ok button.

This will open the System Configuration menu.
- In this window, click on the General tab and locate the Selective Startup radio button.
- Click on it to enable selecting the below options.

- Now, uncheck the Load startup items checkbox and move to the Services tab.

- Check the Hide all Microsoft services option and then, select the Disable all button to turn off all services when the system boots up.
- Go to the Startup tab and click on the Open Task Manager link. This will take you to the Startup tab in the Task Manager.

- Find all the enabled services, right-click on them and select Disable to deactivate these processes.

Reboot your system and the computer will be launched only with minimal and necessary files and features. After you boot your device up this way, you will have to troubleshoot the blue screen issue again.
Install The Latest BIOS Version
A BIOS is software that controls the motherboard of a computer. It is always recommended to have the latest version of the BIOS update to have better coordination with the hardware components of your computer. This can help to fix the CLOCK_WATCHDOG_TIMEOUT Windows 10 error on your device. This is a very risky process as making a mistake can cause a series of system crashes.
These are the steps to update the BIOS menu safely.
- Visit your motherboard or laptop manufacturer’s website through a browser and open the Support web page or the Downloads page.
- In the search bar on the page, enter the model name, serial number, and OS type. The search results will display the laptop or motherboard model that you are looking for BIOS updates. Some websites may also show you similar models, from which you have to choose the right one.
- Find the latest version of the BIOS update, with the help of the release date mentioned next to it, and download it onto your computer, by click on the Download button.
- Once the download finishes, go to the download location, right-click on it and click on the Run as Administrator option. It is easier when the update is an executable setup file.
- If this file was downloaded as a ZIP file, you might have to extract it to a USB storage drive and install it via the BIOS menu interface.
If your computer has a pre-installed application or interface, that helps you download and install drivers and BIOS updates, we recommend using it as a risk-free method to update the BIOS interface.
The BIOS settings play a key role in the CLOCK_WATCHDOG_TIMEOUT error there wouldn’t have been an issue when the computer was booted up for the first time with the default BIOS and Operating System (OS) configurations. Considering that this idea might work, you can try resetting the BIOS settings so that the settings are back to default.

Here’s how you can set the BIOS back to the original settings.
- Boot up your system and interrupt the booting by pressing the F10, F12, or Delete keys on your keyboard to stop the boot and launch the BIOS menu.
- Then, press the F2 key to bring up the BIOS settings menu. Here, you will be able to find the option to configure these settings back to the original settings, as of before.
- After resetting, hit the F10 key and confirm in the prompt window, that appears, for the changes to take effect and the computer will be rebooted again.
Update Your SSD firmware
You can try updating the SSD firmware to see if it can fix the Clock Watchdog Timeout error on your device. The SSD firmware can be updated with the help of interface applications, developed to provide updates and news about the Solid State Drives. These tools can be downloaded from the SSD manufacturer’s website. Once these tools are installed, it should be easy to download these updates.
Disable Overclocking
Overclocking is the process of pushing the output performance of a computer, more than the safety limit set to its components. The prospect of having the best output might sound great, but it comes with the cost of overheating and hardware life deterioration.
Users should never overclock their CPUs and GPUs unless they have sufficient cooling systems in their computers or the specifications are designed to withstand overclocking to push out outputs of high quality. Even if these conditions are met, it is not advisable to overclock the system for a long time.
Users can disable this feature by reducing the output quality in videos, games, or other renderable elements. You can also use applications that control the CPU to stop your system from overclocking.
Go Back To A System Restore Point
A system restore point is a save point for the OS, containing perfectly functioning configurations of the computer. If you have created one earlier, you can go back to it when your system has an issue.
- Enter system restore point into the taskbar search field and then click on the first search result.
- This will launch the System Properties dialog box onto your screen. In this window, press the System Restore button.

- When the System Restore window opens, click on the Next button on the main page. You’ll see a lot of restore points that you have made in the past, on your computer.
- Select the latest Restore Point and click on the Next button at the bottom-right part of the Window.
- In the final window, click on the Finish button to close this window and load a restore point.
Use The Windows Memory Diagnostics Tool (Memtest)
The Windows Memory Diagnostics test is a process that helps Windows users detect issues with the computer memory when initiated. It is quite easy to run this highly efficient test with the help of the following instructions.
- Open the Run tool on your system, by searching for it in the taskbar search menu or by pressing the Windows + R keys together, on your keyboard.
- In the Open text box, type in Mdsched and click on the Ok button or press Enter. This is the executable command for opening the MemTest tool.
- Users can also type in Memory in the search field and open this diagnostics tool from the search results.
- When the small Windows Memory Diagnostic tool window appears, choose Restart now and check for problems (Recommended).
 option in the Windows Memory Diagnostic tool window")
Run The System File Checker (SFC)
A System File Checker (SFC) is a Windows utility that is used to detect corrupt system files and replace them with a newer version of the same file so that the computer runs without crashing or slowly.
- Input cmd in the search bar placed in the taskbar, right-click on the Command Prompt app, and choose Run as Administrator from the context menu. This will bring up a Command prompt window with admin privileges.
- Type in the following command line in the command prompt window so that it can be launched:
sfc /scannow

- Then, press the Enter key on your keyboard to execute the System File Checker command.
Restart your PC to keep the last updated changes.
We recommend executing the SFC scan a minimum of two times so that your computer can be completely scanned.
Upgrade The RAM Or Replace The Existing Ones
Your final option is to attach new RAM sticks into the slots on your motherboard. This will increase the CPU memory and allows the system to run more processes and use many threads simultaneously.

You will need to purchase one or more RAM sticks that are compatible with the motherboard.
The above content contains the solutions to stop the CLOCK_WATCHDOG_TIMEOUT error from occurring on your computer, once again. If these solutions do not help, you have no option but to take your PC to an authorized service center. They’ll help you fix this issue so that you don’t face it for a considerable amount of time.
FAQs
How Do I Fix The Clock Watchdog Timeout Error In Windows 10?
If you wish to fix the Clock Watchdog Timeout error, you can troubleshoot the blue screen error, update BIOS software, run Windows Memory Diagnostic tool, stop CPU overclocking, install the latest SSD firmware software, run the SFC, and get a new RAM.
What Causes Clock Watchdog Timeout?
A Clock Watchdog Timeout error is caused by outdated or corrupt driver software, damaged system files, malicious files in the system, CPU and GPU overclocking, and even, update driver software.
What Causes Win32k Power Watchdog Timeout?
The Win32k Power Watchdog Timeout error is, usually, caused by incompatible driver software, updated drivers, troublesome third-party apps, and issues with your computer memory. This is similar to the stop code CLOCK_WATCHDOG_TIMEOUT error.
What Is Watch Dog Time Out?
Known as a blue screen of death, the Clock Watchdog Timeout error appears on your Windows 10 computer when a processor thread is waiting for a response from the cores of the processor hardware. This error can cause your computer to crash. It is possible that you will want additional RAM to resolve this issue.

- Remove From My Forums
-
Вопрос
-
Many users reported BSOD with w32k_power watchdog error. Can someone assist to check what could be the possible cause. We have updated new display drivers directly from lenovo website but the same error still happened. Attached the memory dump. Any
advise.https://1drv.ms/u/s!AmUCc9cQ9jjagn–lqaXYKTKTGma?e=QwaHhT
Все ответы
-
Hi Joo Kay.
The memory dump file recorded a 0x0000019C (WIN32K_POWER_WATCHDOG_TIMEOUT) bug check, which indicates that Win32k did not turn the monitor on in a timely manner.
The stack trace has revealed the igdkmd64.sys and the
Netwtw06.sys (part of the Intel PROSet/Wireless WiFi software)
modules: try updating the wireless driver too.Bye.
Luigi Bruno
MCP, MOS, MTA, MCTS, MCSA, MCSE-
Изменено
14 июня 2019 г. 15:08
-
Предложено в качестве ответа
yilia zhaoMicrosoft contingent staff
21 июня 2019 г. 7:27
-
Изменено
-
To evaluate the BSOD please post logs for troubleshooting.
Using administrative command prompt copy and paste this whole command.
Make sure the default language is English so that the logs can be scanned and read.
https://www.tenforums.com/tutorials/3813-language-add-remove-change-windows-10-a.html
The command will automatically collect the computer files and place them on the desktop.
Then use 7zip to organize the files and one drive, drop box, or google drive to place share links into the thread for troubleshooting.
https://support.office.com/en-us/article/Share-OneDrive-files-and-folders-9fcc2f7d-de0c-4cec-93b0-a82024800c07
This command will automatically collect these files: msinfo32, mini dumps, drivers, hosts, install, uninstall, services, startup, event viewer files, etc.
Open administrative command prompt and copy and paste the whole command:
copy %SystemRoot%minidump*.dmp “%USERPROFILE%Desktop”&dxdiag /t %Temp%dxdiag.txt© %Temp%dxdiag.txt “%USERPROFILE%DesktopSFdebugFiles”&type %SystemRoot%System32driversetchosts >> “%USERPROFILE%Desktophosts.txt”&systeminfo
> “%USERPROFILE%Desktopsysteminfo.txt”&driverquery /v > “%USERPROFILE%Desktopdrivers.txt” &msinfo32 /nfo “%USERPROFILE%Desktopmsinfo32.nfo”&wevtutil qe System /f:text > “%USERPROFILE%Desktopeventlog.txt”®
export HKEY_LOCAL_MACHINESOFTWAREMicrosoftWindowsCurrentVersionUninstall “%USERPROFILE%Desktopuninstall.txt”® export “HKEY_LOCAL_MACHINESOFTWAREMicrosoftActive SetupInstalled Components” “%USERPROFILE%Desktopinstalled.txt”&net
start > “%USERPROFILE%Desktopservices.txt”&REM wmic startup list full /format:htable >”%USERPROFILE%Desktopstartup.html”&wmic STARTUP GET Caption, Command, User >”%USERPROFILE%Desktopstartup.txt”There are two files for you to find manually:
a) C:WindowsMEMORY.DMP
Use file explorer > this PC > local C: drive > right upper corner search enter the above to find results.
b) dxdiag:
In the left lower corner search type: dxdiag > When the DirectX Diagnostic Tool opens click on the next page button so that each tab is opened > click on save all information > save to desktop > post one drive or drop box share link into the
thread
.
.
.
.
.Please remember to vote and to mark the replies as answers if they help.
.
.
.
.
. -
Hi,
The bugcheck is WIN32K_POWER_WATCHDOG_TIMEOUT and the parameter is 0x50 : Calling monitor driver to power on.
The driver igdkmd64.sys is Intel HD Graphics Drivers for Windows, try to update
it and check the symptom.https://downloadcenter.intel.com/product/80939/Graphics-Drivers
Best regards,
Yilia
Please remember to mark the replies as answers if they help.
If you have feedback for TechNet Subscriber Support, contact
tnmff@microsoft.com. -
Hi,
Is there anything I can do for you?
If you have any problems or concerns, please feel free to post here.
Best regards,
Yilia
Please remember to mark the replies as answers if they help.
If you have feedback for TechNet Subscriber Support, contact
tnmff@microsoft.com. -
Already update and it doesnt work. I have also run vantage and update all drivers including display, wireless network adapter, fingerprint sensor, bios, thunderbolt driver and firmware. Please advise.
-
It doesn’t work for display driver. I see a similar pattern issue. If i plug in with lenovo thinkpad usbc dock with the laptop and resume from sleep or idle mode, the problem will likely to happen.
-
yes i have included memory dmp file. Please advise.
-
Hi Luigi,
i have updated latest driver display driver and wireless adapter driver, fingerprint, thunderbolt driver and firmware and BIOS including using lenovo vantage to update all but issue still happen to many machines. Didnt work. The only workaround solution
is to disable sleep mode or bypass usbc lenovo dock. -
Hi Luigi,
i have updated latest driver display driver and wireless adapter driver, fingerprint, thunderbolt driver and firmware and BIOS including using lenovo vantage to update all but issue still happen to many machines. Didnt work. The only workaround solution
is to disable sleep mode or bypass usbc lenovo dock.The problem could be related to Lenovo drivers: try contacting Lenovo Support and asking for assistance.
Bye.
Luigi Bruno
MCP, MOS, MTA, MCTS, MCSA, MCSE-
Изменено
Luigi BrunoMVP
29 июня 2019 г. 13:32
-
Изменено
-
No, the new driver already updated but the new memory dump was not uploaded. However, they show the same error code and details.
-
When available please post two share links using one drive, drop box, or google drive:
Share link #1: results of the administrative command prompt command with dxdiag
Share link #2: memory dump if file size is < 1.5 GB
Always post new logs into the newest post.
.
.
To evaluate the BSOD please post logs for troubleshooting.
Using administrative command prompt copy and paste this whole command.
Make sure the default language is English so that the logs can be scanned and read.
https://www.tenforums.com/tutorials/3813-language-add-remove-change-windows-10-a.html
The command will automatically collect the computer files and place them on the desktop.
Then use 7zip to organize the files and one drive, drop box, or google drive to place share links into the thread for troubleshooting.
https://support.office.com/en-us/article/Share-OneDrive-files-and-folders-9fcc2f7d-de0c-4cec-93b0-a82024800c07
This command will automatically collect these files: msinfo32, mini dumps, drivers, hosts, install, uninstall, services, startup, event
viewer files, etc.Open administrative command prompt and copy and paste the whole command:
copy %SystemRoot%minidump*.dmp “%USERPROFILE%Desktop”&dxdiag /t %Temp%dxdiag.txt© %Temp%dxdiag.txt “%USERPROFILE%DesktopSFdebugFiles”&type
%SystemRoot%System32driversetchosts >> “%USERPROFILE%Desktophosts.txt”&systeminfo > “%USERPROFILE%Desktopsysteminfo.txt”&driverquery /v > “%USERPROFILE%Desktopdrivers.txt” &msinfo32 /nfo “%USERPROFILE%Desktopmsinfo32.nfo”&wevtutil
qe System /f:text > “%USERPROFILE%Desktopeventlog.txt”® export HKEY_LOCAL_MACHINESOFTWAREMicrosoftWindowsCurrentVersionUninstall “%USERPROFILE%Desktopuninstall.txt”® export “HKEY_LOCAL_MACHINESOFTWAREMicrosoftActive
SetupInstalled Components” “%USERPROFILE%Desktopinstalled.txt”&net start > “%USERPROFILE%Desktopservices.txt”&REM wmic startup list full /format:htable >”%USERPROFILE%Desktopstartup.html”&wmic STARTUP
GET Caption, Command, User >”%USERPROFILE%Desktopstartup.txt”There are two files for you to find manually:
a) C:WindowsMEMORY.DMP
Use file explorer > this PC > local C: drive > right upper corner search enter the above to find results.
b) dxdiag:
In the left lower corner search type: dxdiag > When the DirectX Diagnostic Tool opens click on the next page button so that each
tab is opened > click on save all information > save to desktop > post one drive or drop box share link into the thread
.
.
.
.
.Please remember to vote and to mark the replies as answers if they help.
.
.
.
.
.-
Изменено
questionsformicrosoftproducts
29 июня 2019 г. 16:43
-
Изменено
A Blue Screen of Death (BSoD) is an indication that your computer is facing a critical error and cannot run because it was pushed to a limit. There are more than 500 stop codes for BSoDs on Windows 10. We will be looking into the rare CLOCK_WATCHDOG_TIMEOUT error and try to get rid of it with the different methods in it.
What Is The CLOCK_WATCHDOG_TIMEOUT Blue Screen On Windows 10?
The stop code Clock Watchdog Timeout is a Windows 10 BSoD error indicator that could be caused when the system processor fails while processing interrupts on the system. This task stops only when the processor is not responsive or a processor thread is forced into a waiting state, as one thread waits for a response from another thread.
A system processor is pushed to this state when a processor isn’t able to handle its own cores and threads, simultaneously. The problem arises when one thread isn’t able to communicate with another or when there are no responses from the thread.
If the processor cannot process tasks further on a computer, because of full resources and no space to receive responses. This vegetative state of the processor is known as a deadlock.
This issue can occur even in a multi-processor system or for a processor with multiple threads. There is no specifications limit to what this issue can affect and stop everything abruptly. This issue takes different forms with different specifications. These are the various errors that the Clock Watchdog Timeout error can branch into.
Note: Threads are tasks that are managed by the cores in the processor. Higher the cores, more threads ran by the processor.
Variants Of The Windows 10 CLOCK_WATCHDOG_TIMEOUT Error
There are a number of variants for this error, which might sound like it is bad. But it’s quite the contrary as all these different branches of this issue can be fixed with the same steps.
CLOCK_WATCHDOG_TIMEOUT Error Ryzen
This type of the CLOCK_WATCHDOG_TIMEOUT error is caused after a Ryzen powered PC is updated. The solution to this issue is to roll it back to an older version.
CLOCK_WATCHDOG_TIMEOUT Error Intel
This variant occurs on computers with Intel processors. You’ll see this when there is a processor issue. It is recommended to look at the processor.
Clock Watchdog Timeout Windows Version
Corrupt system files can cause this type of CLOCK_WATCHDOG_TIMEOUT blue screen error on your computer. You can filter them out or repair them.
Clock Watchdog Timeout Overclock
Overclocking the CPU can also cause this issue, as mentioned earlier. You will have to make changes in the configurations to fix this.
Clock Watchdog Timeout GPU And CPU Memory
Insufficient RAM or Graphics card memory can be responsible for this issue. You might have to lower the output settings or upgrade these hardware components to fix this issue.
What Causes The Clock Watchdog Timeout Blue Screen Of Death Error?
- Driver issues
The first reason for a BSoD error to appear on your computer is one or more driver issues. These drivers can be outdated or corrupt, which will slow down the performance of any computer.
- Troublesome hardware
If your system has incompatible or dysfunctional hardware connected to it, there may be some issues regarding the functioning of the computer. You might have to check the hardware to see if it is damaged, if it is incompatibility is not the reason.
- CPU overclocking
Overclocking is not a good idea if your PC does not have the necessary requirements to push itself beyond the limit. Extended overclocking on a system with low specifications is highly risky.
- Corrupt or incompatible system files
System files are very important to a working computer and can bring the system to a standstill when they are corrupt or missing. You can repair them or replace them with system features like the SFC and DISM scans.
- Malicious files
There is no limit to what viruses and other malware can do to your computer. It is not a surprise if this is the cause for this Blue Screen of Death error. You will have to use an antivirus to remove them, carefully.
- Insufficient or Damaged RAM
A system needs the required amount of RAM to run applications and other processes. Lesser the capacity of RAM, the lower the number of processes that run on your computer. Without free memory, newer applications cannot be launched. Without adequate CPU memory, you’ll be able to see the Blue Screen of Death error often.
Solutions To Clock Watchdog Timeout Windows 10 Blue Screen Of Death Error
These are the different methods that can be used to remove the CLOCK_WATCHDOG_TIMEOUT error on Windows 10. If you want more details about this BSoD error, you will be able to find it in the Event Viewer (eventvwr).
- Detach USB Hardware Devices From Your Computer
- Troubleshoot The Blue Screen Error
- Troubleshoot The Blue Screen Error After A Clean Boot
- Install The Latest Bios Version
- Reset The Bios Menu
- Update Your SSD firmware
- Disable Overclocking
- Go Back To A System Restore Point
- Use The Windows Memory Diagnostics Tool (Memtest)
- Run The System File Checker (Sfc)
- Upgrade your RAM or replace the existing ones
Fixing The Clock Watchdog Timeout Blue Screen Error On Windows 10
Follow the below steps to fix the Clock Watchdog Timeout BSoD on a Windows 10 computer.
Detach USB Hardware Devices From Your Computer
Blue screen errors can be caused by USB devices that are connected to your computer. This is the reason that our first workaround for this issue is to clear all the USB ports on your computer. The list of USB devices comprises devices like mice, keyboards USB storage drives, cables, microphones, headphones, and other devices with a USB pin.
Remove these devices and restart your computer.
You should not be able to face this issue again. If you do see this blue screen on your display, it means that the workaround was not enough to fix it. Proceed with the below procedures to fix this issue.
Troubleshoot The Blue Screen Error
Windows 10 has exclusive troubleshooters to find out and fix issues for all aspects of your computer. Since a blue screen error is a big deal, Windows has a troubleshooter to find more information about this and take preventive measures.
These are the steps to troubleshoot the BSoD.
- Launch the Windows Settings tool through the Start menu or with the help of the keyboard shortcut (Windows + I).
- Go to the Update & Security tab and click on the Troubleshoot tab from the left panel.
- You will be able to see all the troubleshooters available on your system.
- If you can’t see any of them, click on the Additional troubleshooters link, which is located at the bottom of the window.
- Expand the Blue Screen option and click on the Run the Troubleshooter option from this section.
- You will have to give in a few details to the troubleshooter so that you can get the correct results.
After these steps are perfectly complete, the troubleshooting process runs and detects the source of the BSoD and fixes it. You just have to click on the Apply this fix option, when the process comes to an end. This solution will be implemented by the OS, automatically, and finally, you will have to restart your PC for these changes to take effect.
Troubleshoot The Blue Screen Error After A Clean Boot
If the usual troubleshooting does not work, we recommend doing a clean boot of your PC and then, running the Blue Screen troubleshooter. To run the BSoD troubleshooter, use the steps above and if you do not know how to launch your Windows 10 PC in clean boot, we have given the steps below.
The clean boot is a process that can help users narrow down and pinpoint the source of any issue on your Windows device. This is quite similar to the Safe Mode feature in Windows. Use these steps.
- Bring up the Run tool (Windows + R) and execute the msconfig command by pressing Enter or the Ok button.
This will open the System Configuration menu.
- In this window, click on the General tab and locate the Selective Startup radio button.
- Click on it to enable selecting the below options.
- Now, uncheck the Load startup items checkbox and move to the Services tab.
- Check the Hide all Microsoft services option and then, select the Disable all button to turn off all services when the system boots up.
- Go to the Startup tab and click on the Open Task Manager link. This will take you to the Startup tab in the Task Manager.
- Find all the enabled services, right-click on them and select Disable to deactivate these processes.
Reboot your system and the computer will be launched only with minimal and necessary files and features. After you boot your device up this way, you will have to troubleshoot the blue screen issue again.
Install The Latest BIOS Version
A BIOS is software that controls the motherboard of a computer. It is always recommended to have the latest version of the BIOS update to have better coordination with the hardware components of your computer. This can help to fix the CLOCK_WATCHDOG_TIMEOUT Windows 10 error on your device. This is a very risky process as making a mistake can cause a series of system crashes.
These are the steps to update the BIOS menu safely.
- Visit your motherboard or laptop manufacturer’s website through a browser and open the Support web page or the Downloads page.
- In the search bar on the page, enter the model name, serial number, and OS type. The search results will display the laptop or motherboard model that you are looking for BIOS updates. Some websites may also show you similar models, from which you have to choose the right one.
- Find the latest version of the BIOS update, with the help of the release date mentioned next to it, and download it onto your computer, by click on the Download button.
- Once the download finishes, go to the download location, right-click on it and click on the Run as Administrator option. It is easier when the update is an executable setup file.
- If this file was downloaded as a ZIP file, you might have to extract it to a USB storage drive and install it via the BIOS menu interface.
If your computer has a pre-installed application or interface, that helps you download and install drivers and BIOS updates, we recommend using it as a risk-free method to update the BIOS interface.
The BIOS settings play a key role in the CLOCK_WATCHDOG_TIMEOUT error there wouldn’t have been an issue when the computer was booted up for the first time with the default BIOS and Operating System (OS) configurations. Considering that this idea might work, you can try resetting the BIOS settings so that the settings are back to default.
Here’s how you can set the BIOS back to the original settings.
- Boot up your system and interrupt the booting by pressing the F10, F12, or Delete keys on your keyboard to stop the boot and launch the BIOS menu.
- Then, press the F2 key to bring up the BIOS settings menu. Here, you will be able to find the option to configure these settings back to the original settings, as of before.
- After resetting, hit the F10 key and confirm in the prompt window, that appears, for the changes to take effect and the computer will be rebooted again.
Update Your SSD firmware
You can try updating the SSD firmware to see if it can fix the Clock Watchdog Timeout error on your device. The SSD firmware can be updated with the help of interface applications, developed to provide updates and news about the Solid State Drives. These tools can be downloaded from the SSD manufacturer’s website. Once these tools are installed, it should be easy to download these updates.
Disable Overclocking
Overclocking is the process of pushing the output performance of a computer, more than the safety limit set to its components. The prospect of having the best output might sound great, but it comes with the cost of overheating and hardware life deterioration.
Users should never overclock their CPUs and GPUs unless they have sufficient cooling systems in their computers or the specifications are designed to withstand overclocking to push out outputs of high quality. Even if these conditions are met, it is not advisable to overclock the system for a long time.
Users can disable this feature by reducing the output quality in videos, games, or other renderable elements. You can also use applications that control the CPU to stop your system from overclocking.
Go Back To A System Restore Point
A system restore point is a save point for the OS, containing perfectly functioning configurations of the computer. If you have created one earlier, you can go back to it when your system has an issue.
- Enter system restore point into the taskbar search field and then click on the first search result.
- This will launch the System Properties dialog box onto your screen. In this window, press the System Restore button.
- When the System Restore window opens, click on the Next button on the main page. You’ll see a lot of restore points that you have made in the past, on your computer.
- Select the latest Restore Point and click on the Next button at the bottom-right part of the Window.
- In the final window, click on the Finish button to close this window and load a restore point.
Use The Windows Memory Diagnostics Tool (Memtest)
The Windows Memory Diagnostics test is a process that helps Windows users detect issues with the computer memory when initiated. It is quite easy to run this highly efficient test with the help of the following instructions.
- Open the Run tool on your system, by searching for it in the taskbar search menu or by pressing the Windows + R keys together, on your keyboard.
- In the Open text box, type in Mdsched and click on the Ok button or press Enter. This is the executable command for opening the MemTest tool.
- Users can also type in Memory in the search field and open this diagnostics tool from the search results.
- When the small Windows Memory Diagnostic tool window appears, choose Restart now and check for problems (Recommended).
Run The System File Checker (SFC)
A System File Checker (SFC) is a Windows utility that is used to detect corrupt system files and replace them with a newer version of the same file so that the computer runs without crashing or slowly.
- Input cmd in the search bar placed in the taskbar, right-click on the Command Prompt app, and choose Run as Administrator from the context menu. This will bring up a Command prompt window with admin privileges.
- Type in the following command line in the command prompt window so that it can be launched:
sfc /scannow
- Then, press the Enter key on your keyboard to execute the System File Checker command.
Restart your PC to keep the last updated changes.
We recommend executing the SFC scan a minimum of two times so that your computer can be completely scanned.
Upgrade The RAM Or Replace The Existing Ones
Your final option is to attach new RAM sticks into the slots on your motherboard. This will increase the CPU memory and allows the system to run more processes and use many threads simultaneously.
You will need to purchase one or more RAM sticks that are compatible with the motherboard.
The above content contains the solutions to stop the CLOCK_WATCHDOG_TIMEOUT error from occurring on your computer, once again. If these solutions do not help, you have no option but to take your PC to an authorized service center. They’ll help you fix this issue so that you don’t face it for a considerable amount of time.
FAQs
How Do I Fix The Clock Watchdog Timeout Error In Windows 10?
If you wish to fix the Clock Watchdog Timeout error, you can troubleshoot the blue screen error, update BIOS software, run Windows Memory Diagnostic tool, stop CPU overclocking, install the latest SSD firmware software, run the SFC, and get a new RAM.
What Causes Clock Watchdog Timeout?
A Clock Watchdog Timeout error is caused by outdated or corrupt driver software, damaged system files, malicious files in the system, CPU and GPU overclocking, and even, update driver software.
What Causes Win32k Power Watchdog Timeout?
The Win32k Power Watchdog Timeout error is, usually, caused by incompatible driver software, updated drivers, troublesome third-party apps, and issues with your computer memory. This is similar to the stop code CLOCK_WATCHDOG_TIMEOUT error.
What Is Watch Dog Time Out?
Known as a blue screen of death, the Clock Watchdog Timeout error appears on your Windows 10 computer when a processor thread is waiting for a response from the cores of the processor hardware. This error can cause your computer to crash. It is possible that you will want additional RAM to resolve this issue.
