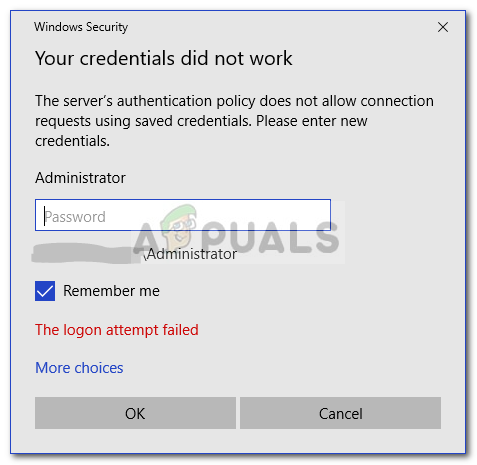
Сообщение об ошибке « Ваши учетные данные не работают » появляется, когда вам не удается подключиться к удаленной системе с помощью подключения к удаленному рабочему столу. Эта ошибка часто вызвана политиками Windows, которые предотвращают входящие соединения RDP, или просто именем пользователя вашей системы. Работа с этой конкретной ошибкой может приводить в ярость, поскольку ошибка не в учетных данных, а в другом месте. Такое сообщение об ошибке может появиться даже в том случае, если вы вводите правильные учетные данные, что делает это испытанием.
Если вы получаете сообщение об ошибке после установки новой копии Windows 10, значит, вы не единственная жертва. Многие пользователи зависят от подключения к удаленному рабочему столу, и такие ошибки обычно становятся для них кошмаром, однако не беспокойтесь, так как вы сможете решить эту проблему, следуя этому руководству.
Что вызывает сообщение об ошибке «Удаленный рабочий стол, ваши учетные данные не работают» в Windows 10?
Следующие факторы часто оказываются причиной указанного сообщения об ошибке:
- Изменение имени пользователя: иногда, когда вы недавно устанавливаете Windows или переименовываете текущую учетную запись пользователя, это может вызвать такую проблему. На самом деле, когда вы меняете свое имя пользователя, оно не меняется для подключения к удаленному рабочему столу, из-за чего создается сообщение об ошибке.
- Политика Windows: в некоторых случаях сообщение об ошибке возникает из-за политики безопасности Windows, которая не позволяет пользователям без прав администратора входить в систему.
Теперь, когда вы знаете причины появления сообщения об ошибке, вы можете следовать приведенным ниже решениям, чтобы решить вашу проблему. Убедитесь, что вы следуете данным решениям в том же порядке, что и предоставленные.
Решение 1. Восстановление имени пользователя
Как мы уже упоминали, сообщение об ошибке иногда возникает из-за того, что пользователь, от которого вы пытаетесь подключиться, не существует на сервере удаленного рабочего стола. Это происходит, когда вы пытаетесь изменить свое имя пользователя или установить новую копию Windows. Изменение вашего имени пользователя не обязательно приводит к его изменению для подключения к удаленному рабочему столу, поэтому ваши учетные данные будут неверными, поскольку пользователя нет на сервере. Таким образом, чтобы изолировать проблему, вам придется вернуться к имени пользователя, которое вы использовали до появления сообщения об ошибке.
Решение 2. Редактирование политики безопасности Windows
Существует политика безопасности Windows для подключения к удаленному рабочему столу, которая не позволяет пользователям без прав администратора входить в систему с помощью RDP. Таким образом, если вы хотите войти в систему, используя учетную запись пользователя без прав администратора, вам нужно будет предоставить доступ пользователям удаленного рабочего стола. Вот как это сделать:
- Нажмите Windows Key + R, чтобы открыть диалоговое окно « Выполнить ».
- Введите secpol.msc и нажмите Enter. Это откроет окно локальной политики безопасности.
- Разверните « Локальные политики» и выберите « Назначение прав пользователя» .
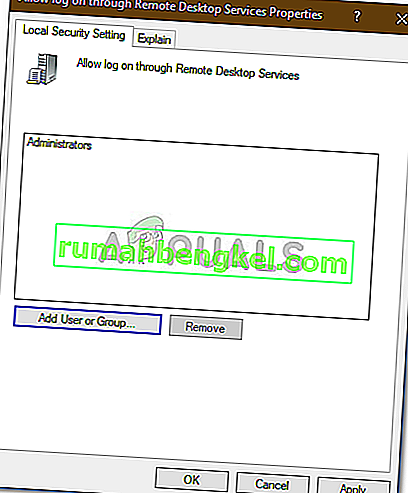
- С правой стороны найдите и дважды щелкните « Разрешить вход через службы удаленных рабочих столов » или « Разрешить вход через службы терминалов ».
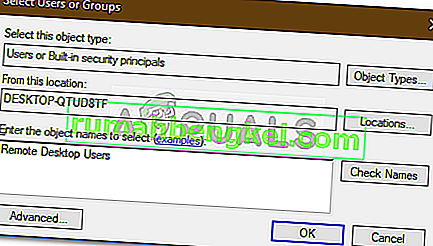
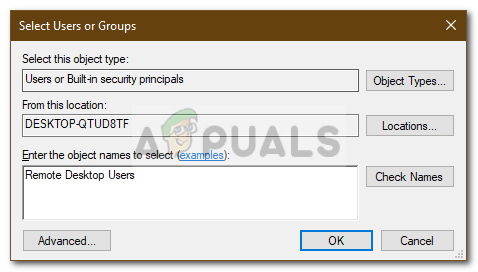
- Щелкните Добавить пользователя или группу, а затем введите Пользователи удаленного рабочего стола .
- Нажмите ОК , нажмите Применить, а затем еще раз нажмите ОК .
- Перезагрузите систему, чтобы изменения вступили в силу.
- Проверьте, устраняет ли это проблему.
Решение 3. Редактирование локальной групповой политики
Если вышеупомянутые решения не работают для вас, вы можете попытаться изолировать проблему, изменив несколько локальных групповых политик. По сути, вам нужно будет присвоить набору политик делегирования учетных данных конкретное значение, которое, скорее всего, решит вашу проблему. Вот как это сделать:
- Нажмите Windows Key + R, чтобы открыть Выполнить .
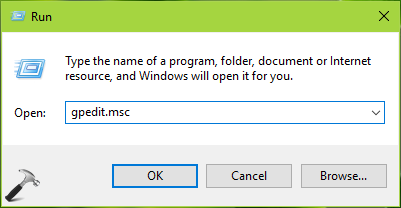
- Введите « gpedit.msc », чтобы открыть редактор локальной групповой политики.
- После этого перейдите по следующему пути:
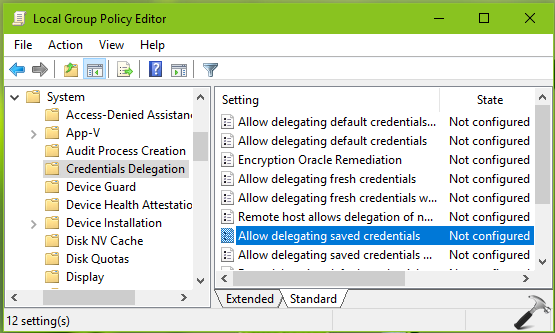
Конфигурация компьютера> Административные шаблоны> Система> Делегирование учетных данных
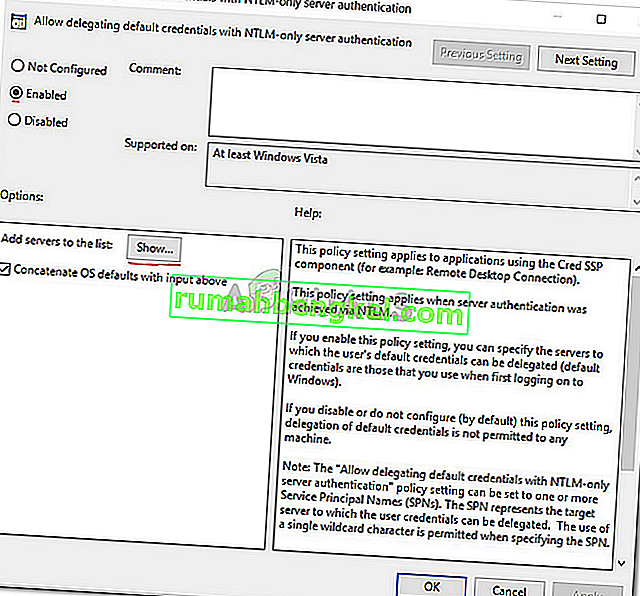
- Дважды щелкните политику « Разрешить делегирование учетных данных по умолчанию с проверкой подлинности сервера только NTLM », чтобы изменить ее.
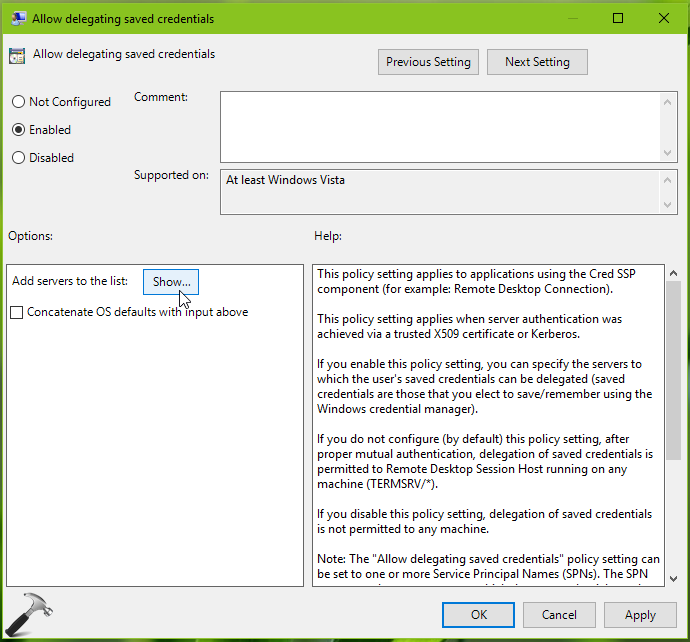
- Установите для него значение « Включено» и нажмите « Показать» .
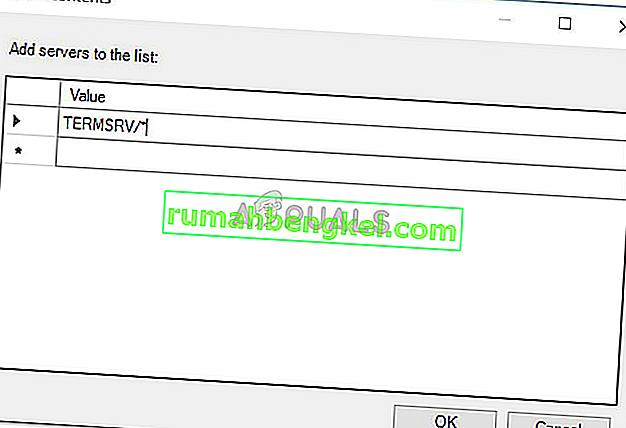
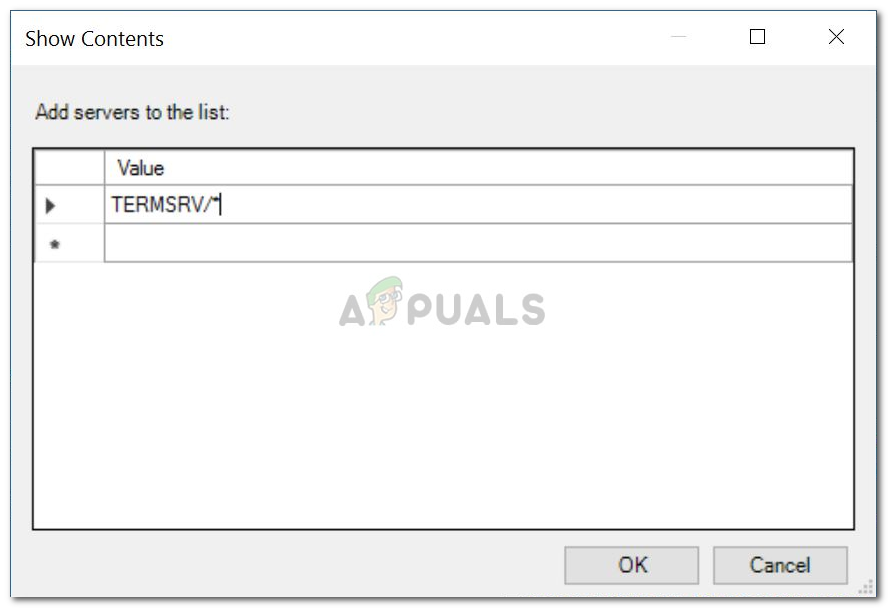
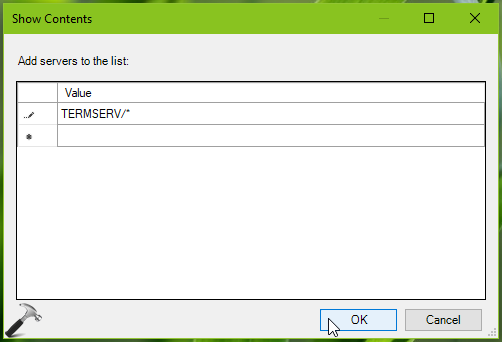
- Дважды щелкните в разделе « Значение» , введите TERMSRV / * и нажмите «ОК».
- Сделайте то же самое для следующих политик:
Разрешить делегирование учетных данных по умолчанию Разрешить делегирование сохраненных учетных данных Разрешить делегирование сохраненных учетных данных с проверкой подлинности сервера только NTLM
- Наконец, закройте редактор локальной групповой политики и перезапустите систему.
- Проверьте, сохраняется ли проблема.
Решение 4. Редактирование реестра
В некоторых случаях внесение некоторых изменений в реестр может избавить от ошибки. Поэтому на этом этапе мы изменим некоторые конфигурации в реестре. Для этого:
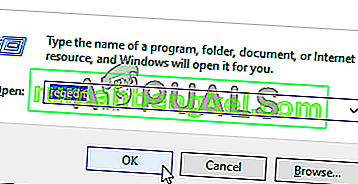
- Нажмите «Windows» + «R», чтобы открыть реестр.
- Введите «Regedit» и нажмите «Enter».
- Перейдите по следующему адресу.
Компьютер HKEY_LOCAL_MACHINE SYSTEM CurrentControlSet Control Lsa
- Щелкните на опции « LsaCompatiblityLeve l».
- Дважды щелкните параметр « REG_DWORD » и измените значение на «1».
- Проверьте, сохраняется ли проблема.
Примечание. Также убедитесь, что вы входите в систему локально, а не через подключение к удаленному рабочему столу, потому что это может не работать с включенной двухфакторной аутентификацией.
The error message ‘Your credentials did not work’ appears when you fail to connect to the remote system using Remote Desktop connection. This error is often caused by Windows policies that prevent incoming RDP connections, or simply your system’s username. Dealing with this particular error can be infuriating as the fault isn’t in the credentials but rather somewhere else. Such an error message might appear even if you are entering the correct credentials, thus, making it an ordeal.
If you are receiving the error message after installing a fresh copy of Windows 10, then you are not the only victim. Many users depend on Remote Desktop Connections and such errors are usually a nightmare to them, however, do not worry as you will be able to get over the issue after following this guide.
What causes the ‘Remote Desktop Your Credentials Did not Work’ Error Message on Windows 10?
The following factors are often found to be the cause of the said error message —
- Username Change: Sometimes, when you freshly install Windows or rename your current user account, it can cause such an issue. Actually, when you change your username, it doesn’t get changed for the Remote Desktop Connection due to which the error message is generated.
- Windows Policy: In some cases, the error message is because of a Windows Security Policy which prevents non-admin users from signing in.
Now that you know the causes of the error message, you can follow the solutions provided down below to resolve your issue. Please make sure you follow the given solutions in the same order as provided.
Solution 1: Reverting Username
As we have mentioned, the error message is sometimes caused because the user you are trying to connect from does not exist on the Remote Desktop server. This happens when you try to change your username or install a fresh copy of Windows. Changing your username does not necessarily change it for Remote Desktop Connection and thus, your credentials will be incorrect as the user is not on the server. Thus, to isolate the issue, you will have to revert to the username that you had been using prior to the appearance of the error message.
Solution 2: Editing Windows Security Policy
There is a Windows Security Policy for Remote Desktop Connection that does not allow non-Admin users to log in using RDP. Thus, if you want to login using a non-admin user account, you will have to grant the remote desktop users access. Here is how to do it:
- Press Windows Key + R to open the Run dialog box.
- Type in ‘secpol.msc’ and press Enter. This will open up the Local Security Policy window.
- Expand Local Policies and then select User Rights Assignment.
- On the right-hand side, locate and double-click either ‘Allow log on through Remote Desktop Services’ or ‘Allow log on through Terminal Services’.
- Click Add User or Group and then type in Remote Desktop Users.
Adding User to Grant Access - Click OK, hit Apply and then click OK again.
Allowing Remote Desktop Users Access - Restart your system for the change to take effect.
- Check if it isolates the issue.
Solution 3: Editing Local Group Policy
If the above-mentioned solutions do not work out for you, you can try to isolate the issue by modifying a few Local Group Policies. Basically what you will have to do is give a set of Credential Delegation policies a specific value which will most likely fix your issue. Here’s how to do it:
- Press Windows Key + R to open Run.
- Type in ‘gpedit.msc’ to open the Local Group Policy Editor.
- Afterward, navigate to the following path:
Computer Configuration > Administrative Templates > System > Credentials Delegation
- Double-click the ‘Allow delegating default credentials with NTLM-only server authentication’ policy to edit it.
- Set it to Enabled and then click Show.
Editing Local Group Policy - Double-click under Value, type in TERMSRV/* and then click OK.
Adding Server to the List - Do the same for the following policies as well:
Allow delegating default credentials
Allow delegating saved credentials
Allow delegating saved credentials with NTLM-only server authentication
- Finally, close the Local Group Policy Editor and restart your system.
- Check if the issue persists.
Solution 4: Editing Registry
In some cases, making some changes in the registry might get rid of the error. Therefore, in this step, we will be changing some configurations in the registry. For that:
- Press “Windows” + “R” to open the registry.
- Type in “Regedit” and press “Enter”.
Opening the Registry Editor - Navigate to the following address.
ComputerHKEY_LOCAL_MACHINESYSTEMCurrentControlSetControlLsa
- Click on the “LsaCompatiblityLevel” option.
- Double-click on the “REG_DWORD” option and change the Value to “1”.
- Check to see if the issue persists.
Note: Also make sure that you are logging in locally and not through a Remote Desktop Connection because it might not work with Two factor Authentication enabled.
Solution 5: Disabling Windows Hello sign-in (If applicable)
Sometimes the Windows Hello sign-in can be problematic. Therefore, in this step, we will be replacing the Windows Hello sign-in with the normal Password. Try this:
-
- Press and hold the “Windows” + “I” keys together to open the Settings app.
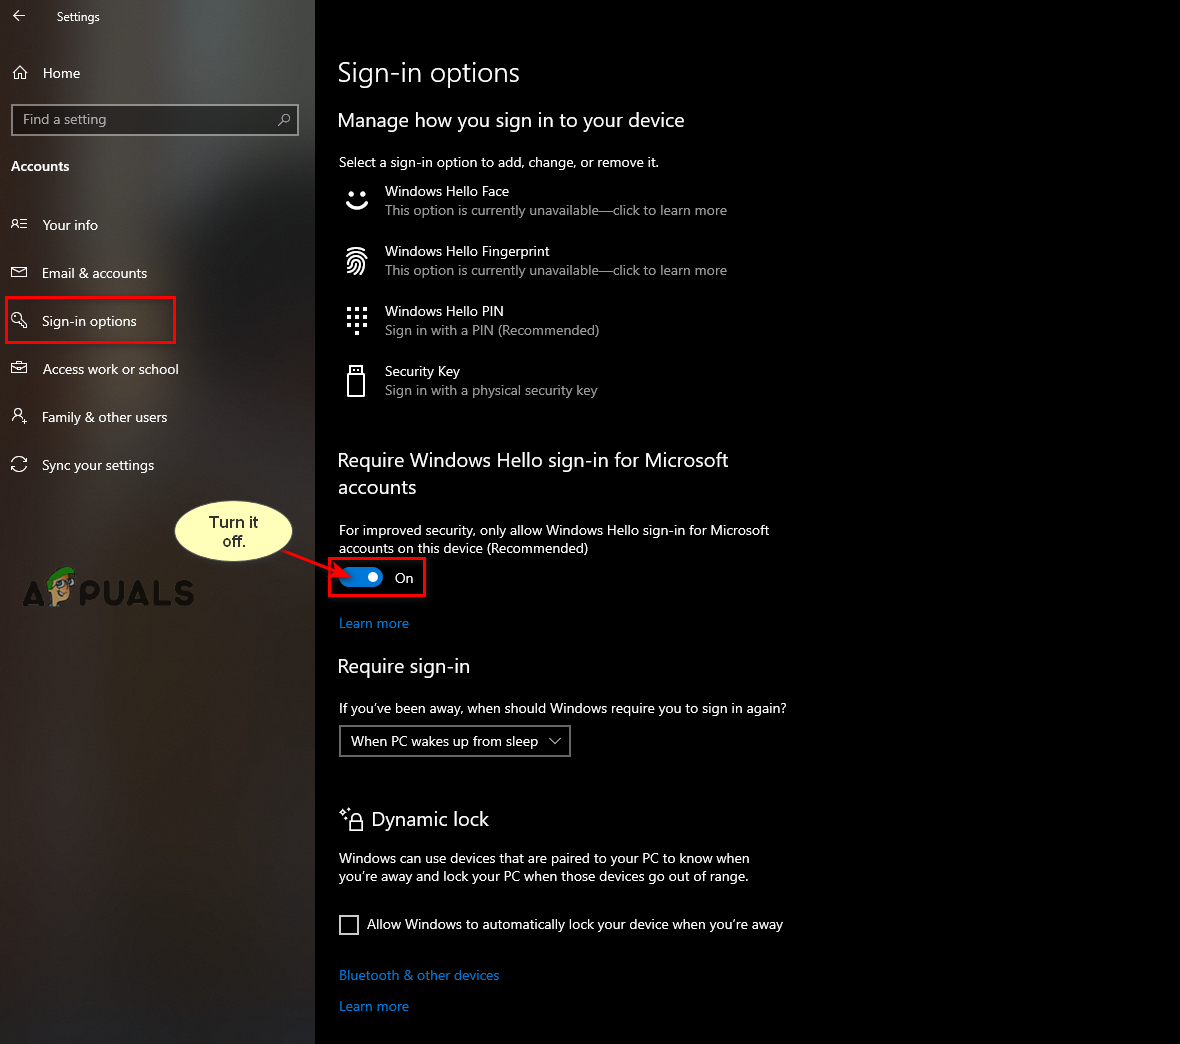
- Once the Settings app is opened, Navigate to “Accounts > Sign-in options“. Now Disable Windows Hello sign-in.
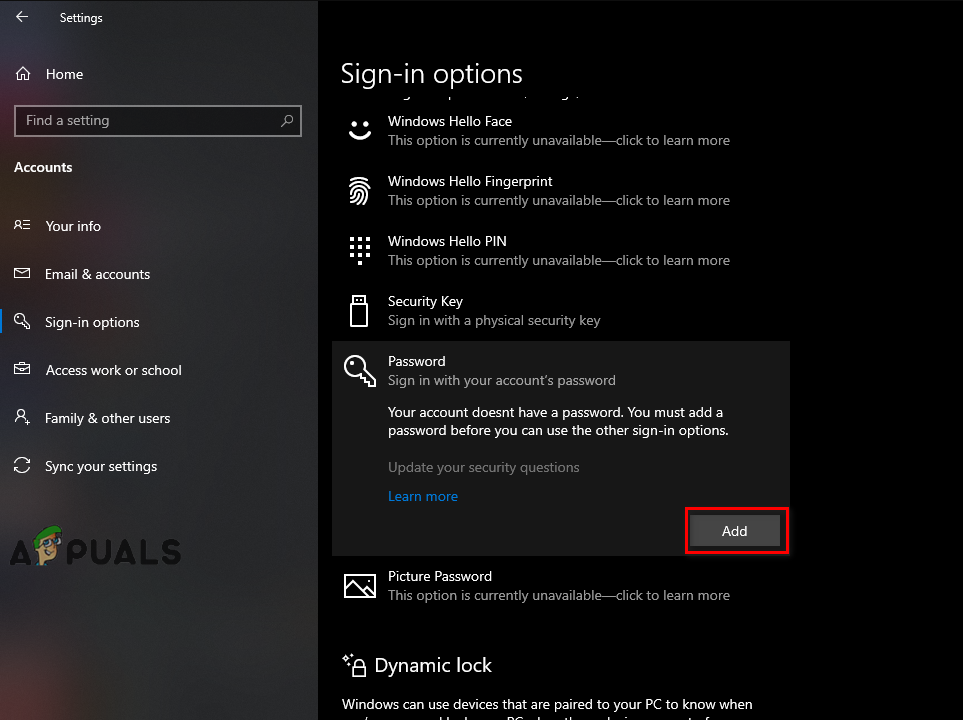
Turning off Windows Hello sign-in - Now we will set a normal password, for doing that click on the “Password” option then click on “Add”.
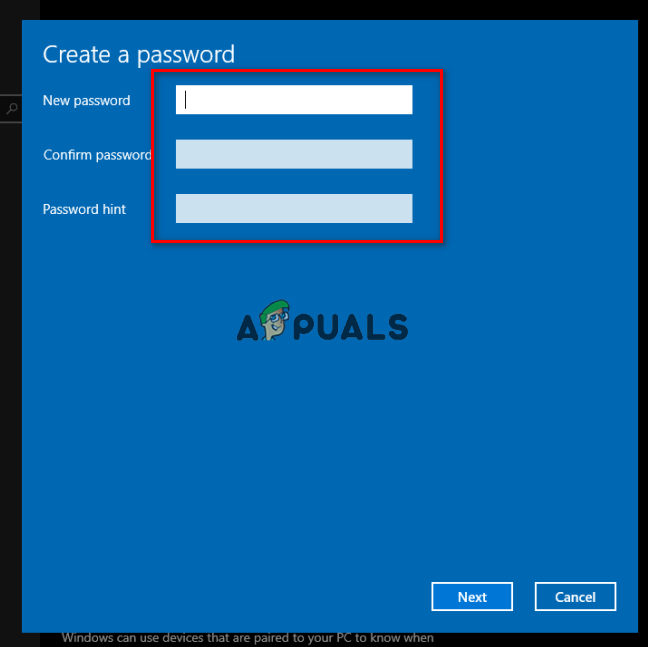
Settings a normal Password - Once you press the “Add” button you will get a pop-up asking for your new “Password” and a Hint for that password. It should look like this.
Creating a new password - Now simply put the new password and the hint for it and you should be good to go.
- Check to see if the issue persists.
Kevin Arrows
Kevin Arrows is a highly experienced and knowledgeable technology specialist with over a decade of industry experience. He holds a Microsoft Certified Technology Specialist (MCTS) certification and has a deep passion for staying up-to-date on the latest tech developments. Kevin has written extensively on a wide range of tech-related topics, showcasing his expertise and knowledge in areas such as software development, cybersecurity, and cloud computing. His contributions to the tech field have been widely recognized and respected by his peers, and he is highly regarded for his ability to explain complex technical concepts in a clear and concise manner.
In Windows 10, you can use Remote Desktop feature to connect systems remotely. This article talks about an issue which is related to credentials used in Remote Desktop connectivity.
Actually, while connecting systems remotely, recently I received following error:
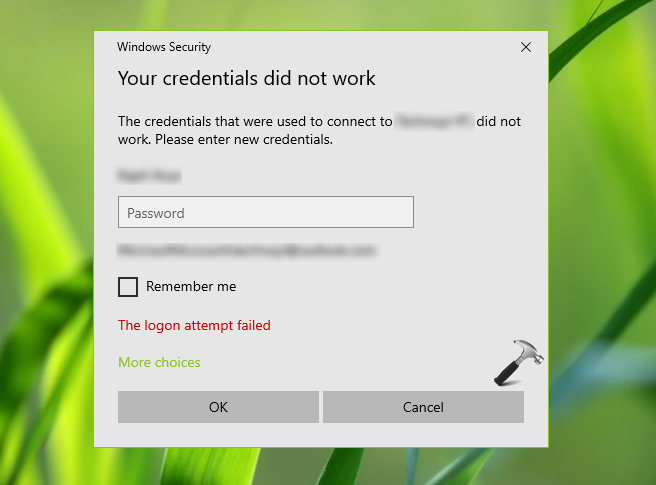
Your credentials did not work
The credential that were used to connect to <server> did not work. Please enter new credentials.
The logon attempt failed.
In this case, I was pretty sure that the credentials were correct. Even they worked fine with other machines but one of my machines start throwing this error.
If you’re also facing same issue, here’s how to fix it.
FIX: ‘Your Credentials Did Not Work’ For Remote Desktop Connection In Windows 10/8/7
FYI: Security Policy and Group Policy snap-ins are not available in Windows 10 Home edition. If you’re on Windows 10 Home and want to use these snap-ins, go here and upgrade to Pro edition. This fix will only work on Windows 10 Pro, Enterprise, Education editions.
FIX 1 – Via Security Policy Snap-in
1. Press 
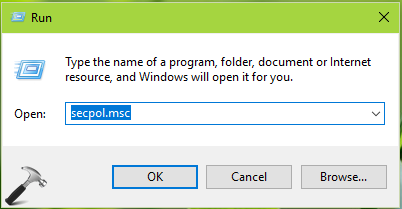
secpol.msc in Run dialog box. Click OK to open Security Policy snap-in.
2. Then in Security Policy snap-in window, navigate here:
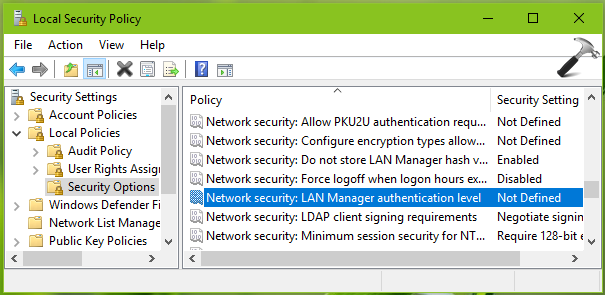
Security Settings > Local Policies > Security Options
3. In the right pane of Security Options, look for policy setting named Network Security: LAN Manager authentication level which is set to Not Defined, by default. Double click on the policy to modify its status.
4. Finally set the policy setting to Send LM & NTLM – use NTLMv2 session security if negotiated. Click Apply followed by OK. Close Security Policy snap-in.
If this doesn’t works for you, try FIX 2 mentioned below.
FIX 2 – Via Group Policy Snap-in
1. Press 
gpedit.msc in Run dialog box to open GPO snap-in. Click OK.
2. Next, in the GPO snap-in window, navigate here:
Computer Configuration > Administrative Templates > System > Credentials Delegation
3. In the right pane of Credentials Delegation, look for the policy setting named Allow delegating saved credentials. The policy is Not Configured by default. Double click on it to modify its status:
4. On the policy configuration window, set it to Enabled. Under Options, click Show button. In Show Contents window, type TERMSERV/* and click OK. Click Apply followed by OK.
5. Repeat step 4 for following GPO settings as well at same path mentioned in step 2:
- Allow delegating saved credentials with NTLM-only server authentication
- Allow delegating default credentials with NTLM-only server authentication
- Allow delegating default credentials
6. Make sure Deny delegating saved credentials GPO setting at same path mentioned in step 2 is set to Not Configured.
Close GPO snap-in and you can then run gpupdate /force command or reboot your system to make changes effective.
Then check if your Remote Desktop Connection is working. You’ll find that issue is resolved now and you can connect systems remotely without any issue.
Hope this helps!
READ THESE ARTICLES NEXT
- Fix: Remote Desktop not working with Microsoft Account in Windows 11
- Fix: Remote Desktop not working in Windows 11/10
- Fix: Remote Desktop Gateway server’s certificate has expired
- Fix: The system administrator has limited the computers you can log on with
- Fix: An internal error has occurred for Remote Desktop Connection
- Fix: Windows could not start the Remote Desktop Services
- Fix: RDP not working after Windows 11 22H2 update
- Fix: An Authentication Error has Occurred in Windows 11/10
- How to enable Remote Assistance in Windows 11
- Solved: Remote Desktop does not work in Windows 11/10
Встроенный RDP клиент Windows (mstsc.exe) позволяет сохранить на компьютере имя и пароль пользователя для подключения к удаленному рабочему столу. Благодаря этому пользователю не нужно каждый раз вводить пароль для подключения к удаленному RDP компьютеру/серверу. В этой статье мы рассмотрим, как разрешить сохранять учетные данные для RDP подключений в Windows, и что делать, если несмотря на все настройки, у пользователей не сохраняются пароли для RDP подключения (пароль запрашивается каждый раз)
Содержание:
- Как сохранить пароль для RDP подключения в Windows?
- Что делать, если в Windows не сохраняется пароль для RDP подключения?
- Политика проверки подлинности сервере не допускает подключение сохраненными учетными данными
- Credential Guard в Защитнике Windows не разрешает использовать сохраненные учетные данные
Как сохранить пароль для RDP подключения в Windows?
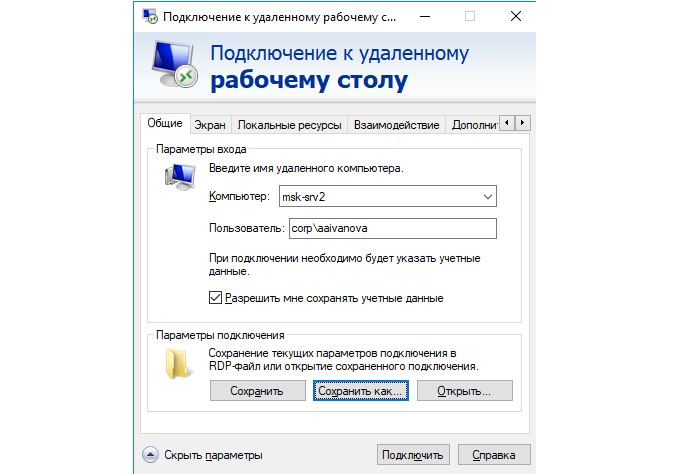
По умолчанию Windows разрешает пользователям сохранять пароли для RDP подключений. Для этого в окне клиента Remote Desktop Connection (mstsc.exe) пользователь должен ввести имя удаленного RDP компьютера, учетную запись и поставить галку “Разрешить мне сохранять учетные данные” (Allow me to save credential). После того, как пользователь нажимает кнопку “Подключить”, RDP сервер запрашивает пароль и компьютер сохраняет его в Windows Credential Manager (не в .RDP файл).
При следующем подключении к удаленному RDP серверу под этим же пользователем, клиент автоматически получит сохраненный пароль из менеджера паролей Windows и использует его для RDP-аутентификации.
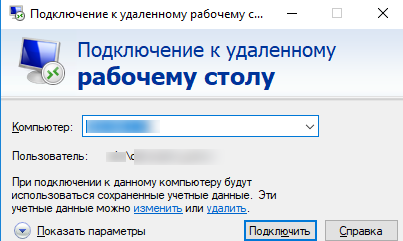
Если для данного компьютера имеется сохраненный пароль, в окне RDP клиента будет указано:
При подключении к данному компьютеру будут использоваться сохранённые учетные данные. Эти учетные данные можно изменить или удалить.
Saved credentials will be used to connect to this computer. You can edit or delete these credentials.
В большинстве случаев администраторы не рекомендуют пользователям сохранять пароли подключений в Windows. Например, в домене Active Directory лучше настроить SSO (Single Sign-On) для прозрачной RDP аутентификации.
По умолчанию Windows не разрешает пользователю использовать сохраненный пароль RDP подключения с компьютера, добавленного в домен Active Directory, к компьютеру/серверу, который находится в другом домене или рабочей группе. Несмотря на то, что пароль для подключения сохранен в Credentials Manager, Windows не позволяет его использовать, и требует от пользователя каждый раз вводить пароль. Также Windows не разрешает использовать сохраненный пароль для RDP, если вы подключаетесь не под доменной, а под локальной учетной записью.
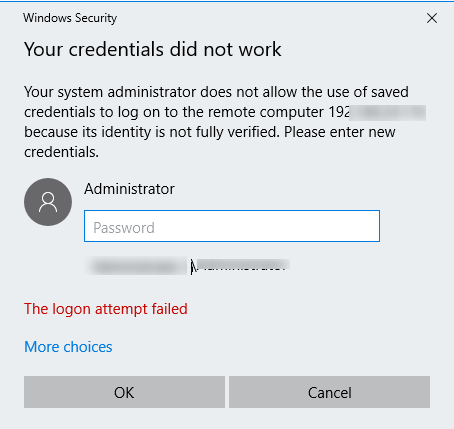
При попытке RDP подключения с сохраненным паролем в этой ситуации появляется окно с ошибкой:
Your Credentials did not work
Your system administrator does not allow the use of saved credentials to log on to the remote computer CompName because its identity is not fully verified. Please enter new credentials.
Или (в русской редакции Windows 10):
Недопустимые учетные данные
Системный администратор запретил использовать сохраненные учетные данные для входа в систему удаленного компьютера CompName, так как его подлинность проверена не полностью. Введите новые учетные данные.
Windows считает такое подключение небезопасным, т.к. отсутствуют доверительные отношения между этим компьютером и удаленным компьютером/сервером в другом домене (или рабочей группе).
Вы можете изменить эти настройки на компьютере, с которого выполняется RDP подключение:
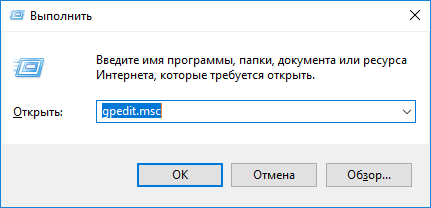
- Откройте редактор локальной GPO, нажав Win + R -> gpedit.msc ;
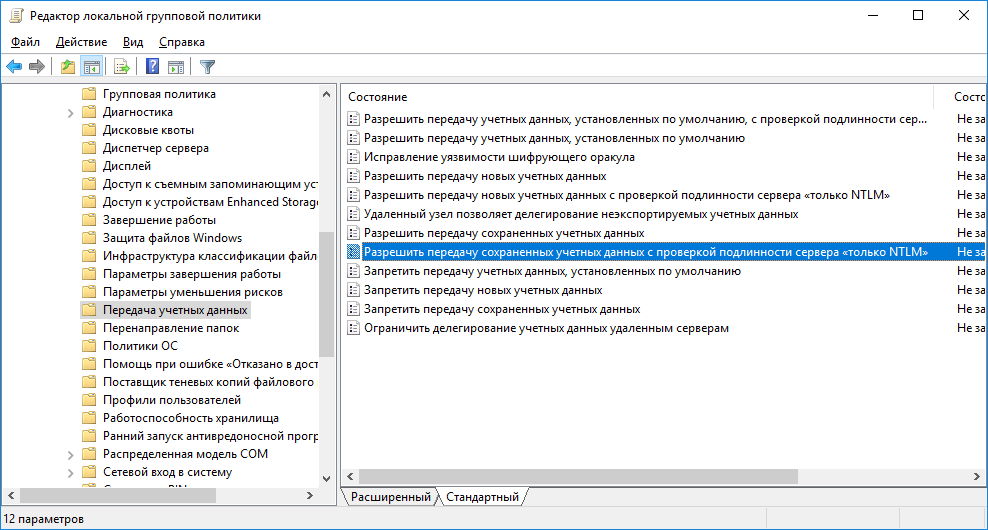
- В редакторе GPO перейдите в раздел Computer Configuration –> Administrative Templates –> System –> Credentials Delegation (Конфигурация компьютера -> Административные шаблоны -> Система -> Передача учетных данных). Найдите политику с именем Allow delegating saved credentials with NTLM-only server authentication (Разрешить передачу сохраненных учетных данных с проверкой подлинности сервера только NTLM);
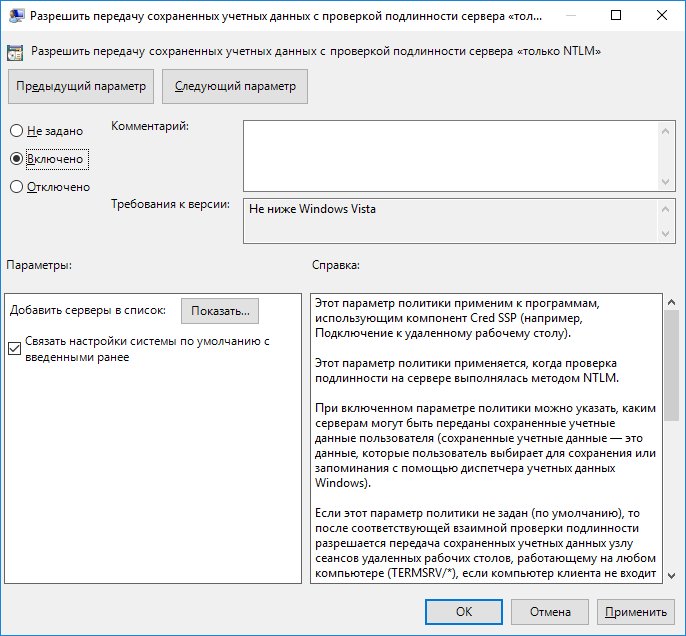
- Дважды щелкните по политике. Включите политику (Enable) и нажмите на кнопку Показать (Show);
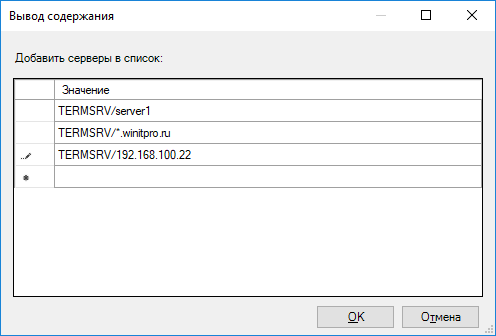
- В открывшемся окне нужно будет указать список удаленных компьютеров (серверов), для которых будет разрешено использовать сохранные пароли для RDP подключения. Список удаленных компьютеров нужно указать в следующих форматах:
-
TERMSRV/server1
— разрешить использование сохранённых паролей для RDP подключения к одному конкретному компьютеру/серверу; -
TERMSRV/*.winitpro.ru
— разрешить RDP подключение ко всем компьютерам в домене winitpro.ru; -
TERMSRV/*
— разрешить использование сохранённого пароля для подключения к любым компьютерам.
Примечание. TERMSRV нужно обязательно писать в верхнем регистре, а имя компьютера должно полностью соответствовать тому, которое вы указываете в поле подключения RDP клиента.
-
- Аналогичным образом включите и добавьте ваши значения TERMSRV/ в параметр Allow Delegating Saved Credentials (“Разрешить передачу сохранённых учетных данных”);
Этим настройкам GPO соответствуют следующие параметры реестра:
Windows Registry Editor Version 5.00
[HKEY_LOCAL_MACHINESOFTWAREPoliciesMicrosoftWindowsCredentialsDelegation]
"AllowSavedCredentialsWhenNTLMOnly"=dword:00000001
“AllowSavedCredentials”=dword:00000001
[HKEY_LOCAL_MACHINESOFTWAREPoliciesMicrosoftWindowsCredentialsDelegationAllowSavedCredentialsWhenNTLMOnly]
"1"="TERMSRV/*"
[HKEY_LOCAL_MACHINESOFTWAREPoliciesMicrosoftWindowsCredentialsDelegationAllowSavedCredentials]
"1"="TERMSRV/*"
[HKEY_LOCAL_MACHINESOFTWAREWOW6432NodePoliciesMicrosoftWindowsCredentialsDelegation]
“AllowSavedCredentialsWhenNTLMOnly”=dword:00000001
“AllowSavedCredentials”=dword:00000001
[HKEY_LOCAL_MACHINESOFTWAREWOW6432NodePoliciesMicrosoftWindowsCredentialsDelegationAllowSavedCredentialsWhenNTLMOnly]
"1"="TERMSRV/*"
[HKEY_LOCAL_MACHINESOFTWAREWOW6432NodePoliciesMicrosoftWindowsCredentialsDelegationAllowSavedCredentials]
"1"="TERMSRV/*"
- Проверьте, что политика Deny delegating saved credentials / Запретить передачу сохраненных учетных данных отключена (или не настроена). Запретительные политики GPO имеют более высокий приоритет, чем разрешающие;
- Также должен быть отключен параметр Network access: Do not allow storage of passwords and credentials for network authentication (Computer Configuration -> Windows Settings -> Security Settings -> Local Policies -> Security Options); Если этот параметр включен, то при попытке сохранить пароль в хранилище пользователь получит ошибку:
Credential Manager ErrorUnable to save credentials.
 To save credentials in this vault, check your computer configuration.Error code: 0x80070520
Error Message: A specified logon session does not exist. It may already have been terminated.
- Сохраните изменения и обновите групповые политики командой
gpupdate /force
Теперь при выполнении RDP подключения клиент mstsc сможет использовать сохранённый пароль.
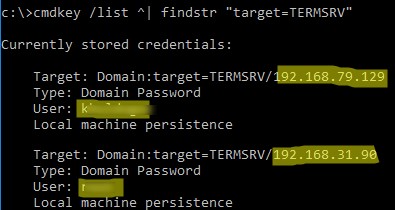
Вы можете вывести список сохранённых паролей для RDP подключений с помощью команды:
cmdkey /list ^| findstr "target=TERMSRV"
Чтобы очистить сохраненные пароли подключений, выполните команду:
For /F "tokens=1,2 delims= " %G in ('cmdkey /list ^| findstr "target=TERMSRV"') do cmdkey /delete %H
С помощью локального редактора групповых политик вы сможете переопределить политику только на локальном компьютере. Если вы хотите чтобы политика разрешения использования сохранённых паролей для RDP подключения действовала на множество компьютеров домена, используете доменные политики, которые настраиваются с помощью консоли gpmc.msc.
Что делать, если в Windows не сохраняется пароль для RDP подключения?
Если вы настроили Windows по инструкции выше, но клиент все равно при каждом повторном RDP подключении требует ввести пароль следует проверить следующее:
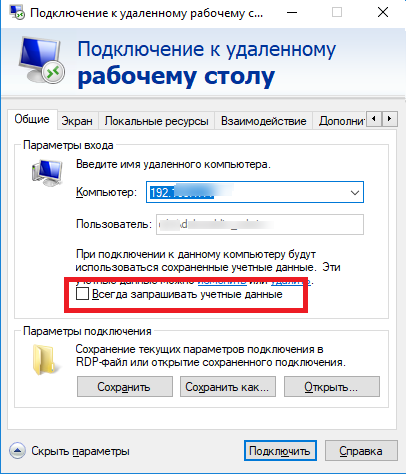
- В окне RDP подключения нажмите на кнопку “Показать параметры” и убедитесь, что опция “Всегда запрашивать учетные данные” (Always ask for credentials) не выбрана;
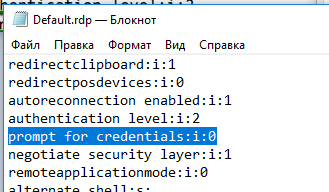
- Если вы используете для подключения сохранённый RDP файл, проверьте, что параметр “prompt for credentials” равен 0 (
prompt for credentials:i:0
); - Запустите редактор локальной групповой политики
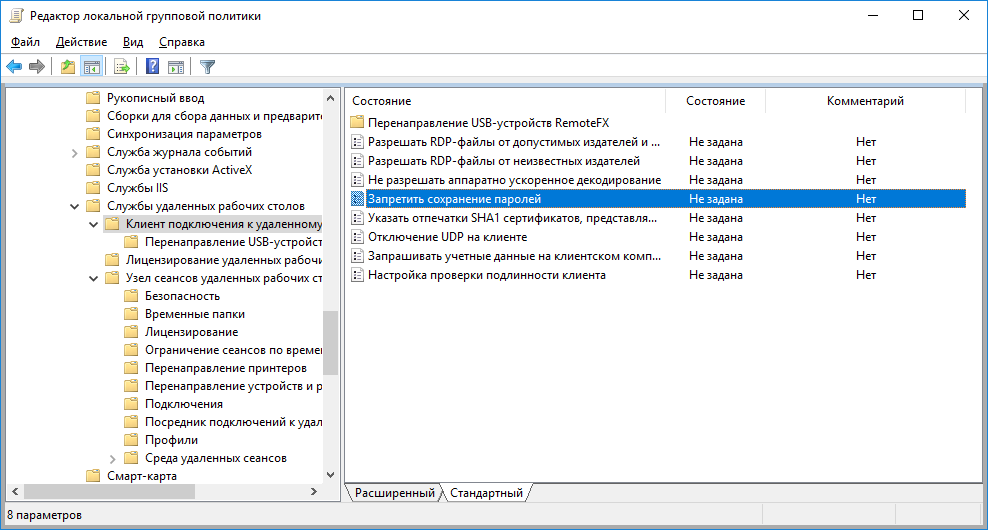
gpedit.msc
, перейдите в раздел Конфигурация компьютера -> Компоненты Windows -> Службы удаленных рабочих столов -> Клиент подключения к удаленному рабочему столу (Computer Configuration -> Administrative Templates -> Windows Components -> Remote Desktop Services -> Remote Desktop Connection Client). Параметры “Запретить сохранение паролей” (Do not allow passwords to be saved) и Prompt for credentials on the client computer должны быть не заданы или отключены. Также убедитесь, что он отключен в результирующей политике на вашем компьютере (html отчет с применёнными настройками доменных политик можно сформировать с помощью gpresult); - Удалите все сохраненные пароли в менеджере паролей Windows (Credential Manager). Наберите
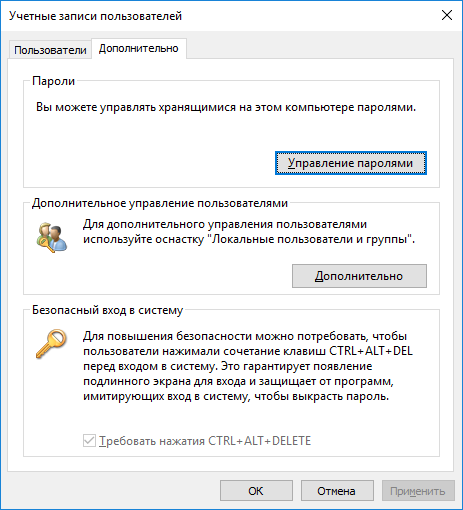
control userpasswords2
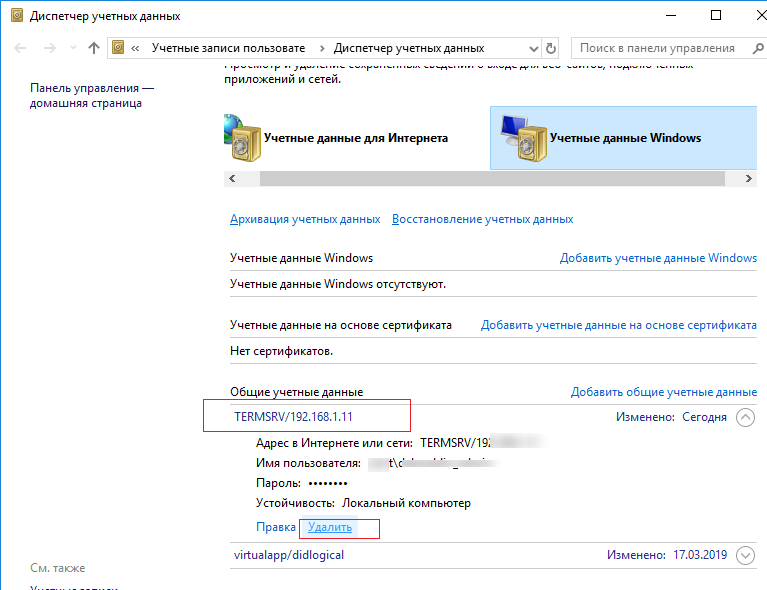
и в окне “Учетные записи пользователей” перейдите на вкладку “Дополнительно” и нажмите на кнопку “Управление паролями”;В открывшемся окне выберите “Учетные данные Windows”. Найдите и удалите все сохраненные RDP пароли (начинаются с TERMSRV/…).
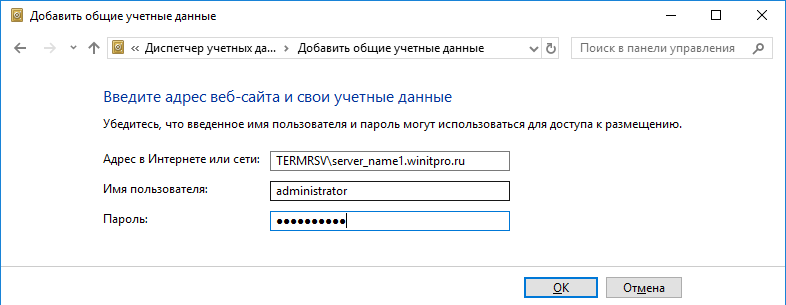
Из этого окна вы можете самостоятельно добавить учетных данные для RDP подключений. Обратите внимание, что имя удаленного RDP сервера (компьютера) нужно указывать в формате TERMSRVserver_name1. При очистке истории RDP подключений на компьютере, не забывайте удалять сохраненные пароли.
- Вход с сохраненным паролем также не будет работать, если удаленный RDP сервер давно не обновлялся и при подключении к нему появляется ошибка CredSSP encryption oracle remediation.
После этого, пользователи смогут использовать свои сохраненные пароли для rdp подключений.
Политика проверки подлинности сервере не допускает подключение сохраненными учетными данными
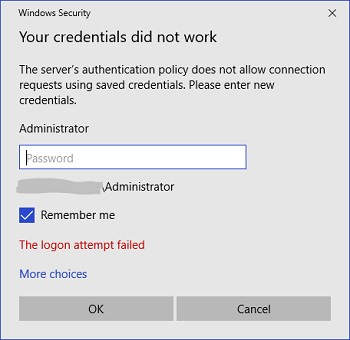
При подключении к RDP хосту или ферме RDS с помощью сохраненного пароля может появится ошибка:
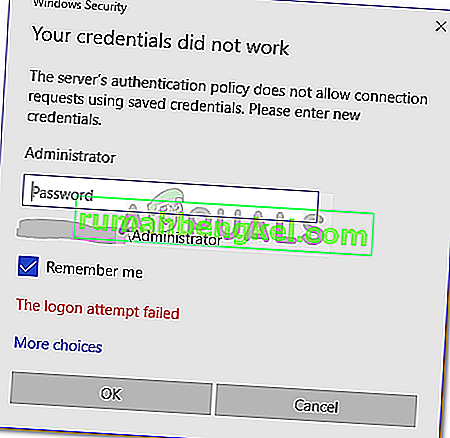
Windows Security
Your credentials did not work
The server’s authentication policy does not allow connection requests using saved credentials. Please enter new credentials.
Политика проверки подлинности на сервере не допускает запросы на подключение с использованием сохраненных учетных данных.
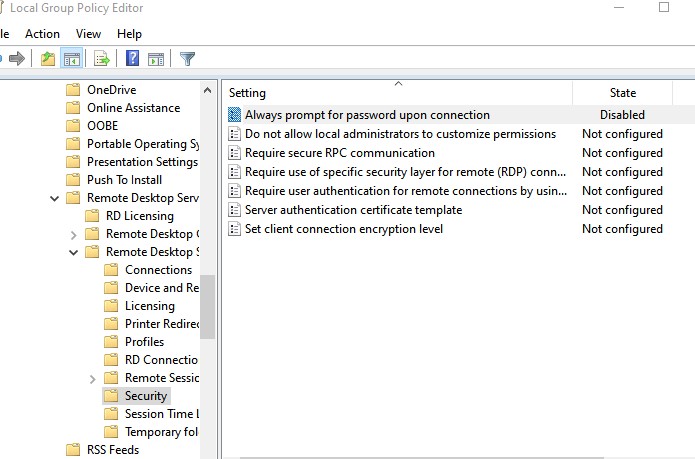
В этом случае на удаленном сервере нужно отключить параметр “Always prompt for password upon connection” в разделе Computer Configuration -> Administrative Templates -> Windows Components -> Remote Desktop Services -> Remote Desktop Session Host -> Security.
Если эта политика включена, RDP хост всегда запрашивает у клиента пароль для подключения.
Можно включить этот параметр через реестр:
REG add "HKLMSOFTWAREPoliciesMicrosoftWindows NTTerminal Services" /v fPromptForPassword /t REG_DWORD /d 0 /f
Credential Guard в Защитнике Windows не разрешает использовать сохраненные учетные данные
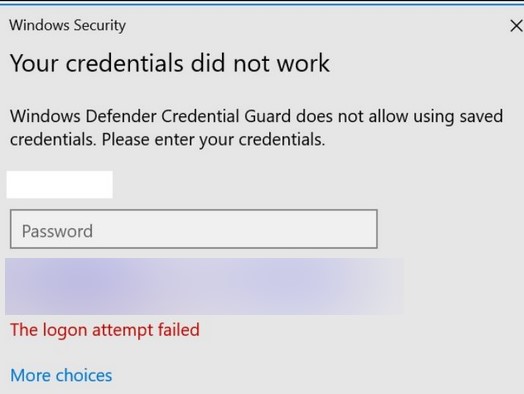
После обновления до Windows 11 22H2 пользователи стали жаловаться, что теперь они не могут использовать сохраненные пароли для RDP подключений:
Windows Security: Your credentials did not work
Windows Defender Credential Guard does not allow using saved credentials. Please enter your credentials.
Credential Guard в Защитнике Windows не разрешает использовать сохраненные учетные данные.
Представленные еще в Windows 10 1607 компонент Windows Defender Remote Credential Guard должен защищать ваши учетные данные для RDP подключений. В обновлении 22H2 по умолчанию он разрешает использовать сохраненные учетные данные только при использовании Kerberos аутентификации на RDP хосте. Если нельзя использовать Kerberos (контроллер домена не доступен, или вы подключаетесь к хосту в рабочей группе), Remote Credential Guard блокирует аутентификацию с помощью NTLM.
Для решения этой проблемы придется отключить Credential Guard через реестр:
New-ItemProperty -Path "HKLM:SystemCurrentControlSetControlLSA" -Name "LsaCfgFlags" -PropertyType "DWORD" -Value 0 -Force
Problems with Remote Desktop connections are common. While attempting to connect to the Remote Desktop network, many users have reported the error – Your credentials did not work, The login attempt failed. If you face this issue, obviously, the first step should be verifying the credentials. However, a significant number of users have noted that the credentials were correct and in many cases worked fine earlier. Users have reported this problem on newly installed versions of the operating system and immediately after reinstalling Windows.
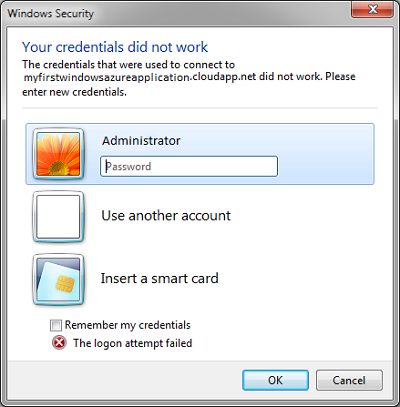
The issue is probably caused due to the Windows security policies or the username might have been changed recently. The latter is especially true when you reinstall Windows and enter a new username. The credentials for the Windows Remote Desktop connection do not change automatically.
Fix Remote Desktop incorrect or wrong password
To troubleshoot the problem, we will follow the following approach sequentially:
- Run the Network Adapter Troubleshooter
- Change the network profile from public to private
- Change account username
- Edit Windows Security Policy
- Using the Group Policy editor
Let’s check out these steps in detail.
1] Run the Network Adapter Troubleshooter
The Network Adapter Troubleshooter will help check the flaws with the network (if any) and correct the same.
Go to Start > Settings > Updates & Security > Troubleshoot. Select the Network Adapter Troubleshooter from the list.
Read: Remote Desktop Printer redirection not working
2] Change the network profile from public to private
It has been reported that this issue occurred on systems where the network profile was set the public. Changing it to private helped in resolving the issue.
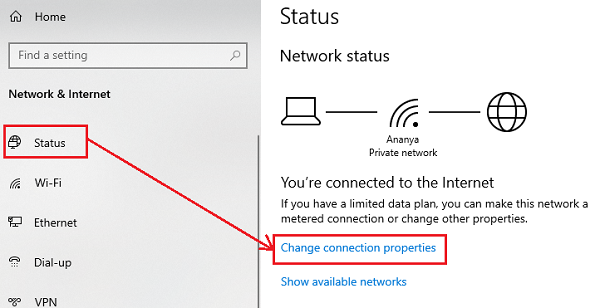
Go to Start > Settings > Network & Internet > Status. Click on Change connection properties.
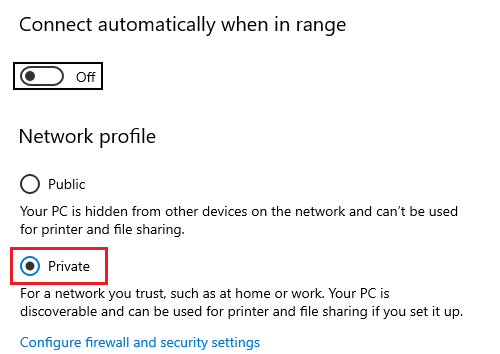
Shift the radio button for Network profile to Private.
Wait for a few seconds for the system to modify the settings.
3] Change account username
One of the causes behind this issue is when users reinstall their copy of Windows 10, they change the username for the system – but it doesn’t change for the Remote Desktop connection. In this case, you could change the username back to what it was before the reinstallation and see if that helps.
4] Edit Windows Security Policy
There’s a Windows security policy, which when enabled, doesn’t allow non-admin users to logon to Remote Desktop connection. If you need to allow non-admin users to use the Remote Desktop connection, you would have to edit this policy. This is obviously possible if you are the administrator of the system yourself.
Press Win + R to open the Run window and type the command secpol.msc. Press Enter to open the Local Security Policy. In the Local Security Policy window, on the left pane, select Local Policies > User Rights Agreement.
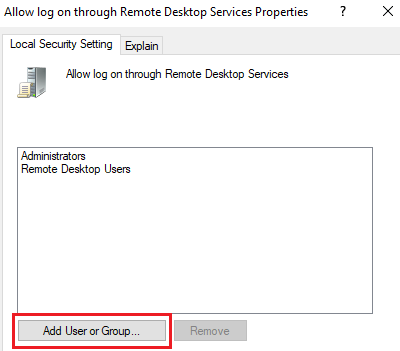
In the right-pane, double-click on “Allow log on through Remote Desktop Services.”
In the next window, select Add user or group.
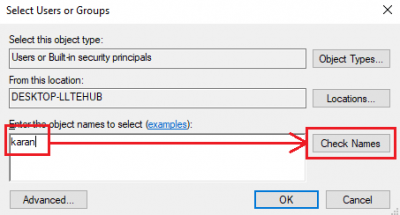
Under “Enter the object names to select column,” enter the username of the intended non-admin user. Click on Check names to resolve the username.
Select Ok to save the settings and restart the system.
Read: Remote Desktop connection very slow in Windows 11
5] Using the Group Policy editor
In case you need to set this policy across a series of systems, the same could be done through the Group Policy Editor. The procedure for the same is as follows:
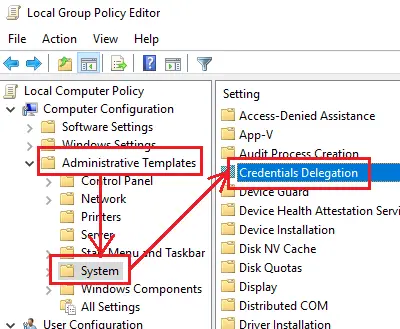
Press Win + R to open the Run window and type the command gpedit.msc. Hit Enter to open the Group Policy Editor. Navigate to the following path:
Computer Configuration > Administrative Templates > System > Credentials Delegation.
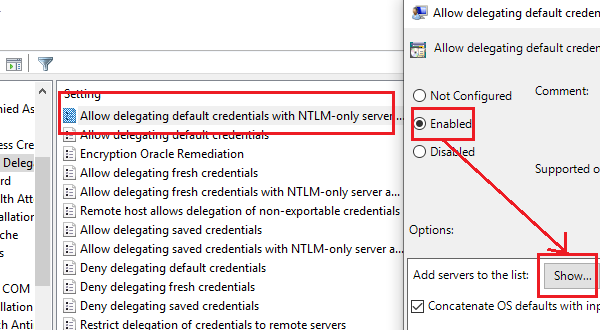
On the right-pane, double-click on the policy, “Allow delegating default credentials with NTLM-only server authentication” to open its editing window.
Shift the radio button to Enabled and click on Show.
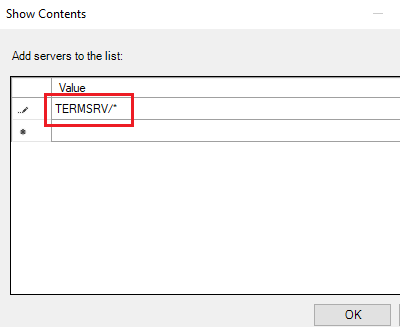
In the Value box, type TERMSRV/* and click on Ok.
Repeat the same for the following policies:
- Allow delegating default credentials
- Allow delegating saved credentials
- Allow delegating saved credentials with NTLM-only server authentication
Check if helps in resolving the problem.
How do I fix the username or password is incorrect for Remote Desktop?
If you get Your credentials did not work or your username or password is incorrect for Remote Desktop error, you need to run the Network Adapter Troubleshooter, change your username, etc. Other than these, you can add Remove Desktop Users in the Allow log on through Remote Desktop Services menu as well.
How do I fix Remote Desktop credentials?
If you get any Remote Desktop credentials error, you might have to change the network profile type from Public to Private, use the Network Adapter Troubleshooter, change your account username, etc. Although this error doesn’t occur frequently, a certain change in your computer might cause this problem.
Hope something helps!
Related read: The logon attempt failed error while connecting Remote Desktop.





 В открывшемся окне выберите “Учетные данные Windows”. Найдите и удалите все сохраненные RDP пароли (начинаются с TERMSRV/…).